HIT-OSLab3
实验目标:
掌握 Linux 下的多进程编程技术
通过对进程运行轨迹的跟踪来形象化进程的概念
在进程运行轨迹跟踪的基础上进行相应的数据统计,从而能对进程调度算法进行实际的量化评价,更进一步加深对调度和调度算法的理解,获得能在实际操作系统上对调度算法进行实验数据对比的直接经验
基于模板 process.c 编写多进程的样本程序,实现如下功能:
所有子进程都并行运行,每个子进程的实际运行时间一般不超过30秒
父进程向标准输出打印所有子进程的 id,并在所有子进程都退出后才退出
在 Linux-0.11 上实现进程运行轨迹的跟踪,基本任务是在内核中维护一个日志文件 /var/process.log,把从操作系统启动到系统关机过程中所有进程的运行轨迹都记录在这一 log 文件中
在修改过的 Linux-0.11 上运行样本程序,通过分析 log 文件,统计该程序建立的所有进程的等待时间、完成时间(周转时间)和运行时间,然后计算平均等待时间,平均完成时间和吞吐量
可以自己编写统计程序,也可以使用 python 脚本程序 stat_log.py(在 /home/teacher/ 目录下)进行统计
修改 Linux-0.11 进程调度的时间片,然后再运行同样的样本程序,统计同样的时间数据,和原有的情况对比,体会不同时间片带来的差异
实验过程
文件 ./files/process.c 的信息如下:
1 2 3 4 5 6 7 8 9 10 11 12 13 14 15 16 17 18 19 20 21 22 23 24 25 26 27 28 29 30 31 32 33 34 35 36 37 38 39 40 41 42 43 44 45 46 47 48 49 50 51 52 53 54 55 #include <stdio.h> #include <unistd.h> #include <time.h> #include <sys/times.h> #define HZ 100 void cpuio_bound (int last, int cpu_time, int io_time) int main (int argc, char * argv[]) return 0 ; } void cpuio_bound (int last, int cpu_time, int io_time) struct tms start_time , current_time ; clock_t utime, stime; int sleep_time; while (last > 0 ) { times(&start_time); do { times(¤t_time); utime = current_time.tms_utime - start_time.tms_utime; stime = current_time.tms_stime - start_time.tms_stime; } while ( ( (utime + stime) / HZ ) < cpu_time ); last -= cpu_time; if (last <= 0 ) break ; sleep_time=0 ; while (sleep_time < io_time) { sleep(1 ); sleep_time++; } last -= sleep_time; } }
这个文件主要实现了 cpuio_bound 函数
程序会先用 times 系统调用来获取系统的时间信息,源码如下:
1
2
3
4
5
6
7
8
9
10
11
12
13
14
15
16
17
18
19
struct tms { time_t tms_utime; time_t tms_stime; time_t tms_cutime; time_t tms_cstime; }; int sys_times (struct tms * tbuf) if (tbuf) { verify_area(tbuf,sizeof *tbuf); put_fs_long(current->utime,(unsigned long *)&tbuf->tms_utime); put_fs_long(current->stime,(unsigned long *)&tbuf->tms_stime); put_fs_long(current->cutime,(unsigned long *)&tbuf->tms_cutime); put_fs_long(current->cstime,(unsigned long *)&tbuf->tms_cstime); } return jiffies; }
接着程序会分别模拟占用一次 CPU 资源和等待1秒 IO 资源这两个操作
实验的第一个要求是进程并发,此时我们需要 fork 系统调用,该系统调用会将父进程拷贝一份作为子进程
在 linux-0.11 中 sys_fork 的实现如下:
1
2
3
4
5
6
7
8
9
10
11
12
13
.align 2 sys_fork: call find_empty_process # 查找是否存在一个空闲的进程ID testl %eax,%eax js 1f push %gs # gs:主要用于保存全局符号表的基址 pushl %esi pushl %edi pushl %ebp pushl %eax call copy_process # 复制指定进程的内存空间 addl $20,%esp 1: ret
1 2 3 4 5 6 7 8 9 10 11 12 13 14 15 16 17 18 19 20 21 22 23 24 25 26 27 28 29 30 31 32 33 34 35 36 37 38 39 40 41 42 43 44 45 46 47 48 49 50 51 52 53 54 55 56 57 58 59 60 61 62 63 64 65 66 67 68 69 #define NR_TASKS 64 struct task_struct * task [NR_TASKS ] =int copy_process (int nr,long ebp,long edi,long esi,long gs,long none, long ebx,long ecx,long edx, long fs,long es,long ds, long eip,long cs,long eflags,long esp,long ss) struct task_struct *p ; int i; struct file *f ; p = (struct task_struct *) get_free_page(); if (!p) return -EAGAIN; task[nr] = p; *p = *current; p->state = TASK_UNINTERRUPTIBLE; p->pid = last_pid; p->father = current->pid; p->counter = p->priority; p->signal = 0 ; p->alarm = 0 ; p->leader = 0 ; p->utime = p->stime = 0 ; p->cutime = p->cstime = 0 ; p->start_time = jiffies; p->tss.back_link = 0 ; p->tss.esp0 = PAGE_SIZE + (long ) p; p->tss.ss0 = 0x10 ; p->tss.eip = eip; p->tss.eflags = eflags; p->tss.eax = 0 ; p->tss.ecx = ecx; p->tss.edx = edx; p->tss.ebx = ebx; p->tss.esp = esp; p->tss.ebp = ebp; p->tss.esi = esi; p->tss.edi = edi; p->tss.es = es & 0xffff ; p->tss.cs = cs & 0xffff ; p->tss.ss = ss & 0xffff ; p->tss.ds = ds & 0xffff ; p->tss.fs = fs & 0xffff ; p->tss.gs = gs & 0xffff ; p->tss.ldt = _LDT(nr); p->tss.trace_bitmap = 0x80000000 ; if (last_task_used_math == current) __asm__("clts ; fnsave %0" ::"m" (p->tss.i387)); if (copy_mem(nr,p)) { task[nr] = NULL ; free_page((long ) p); return -EAGAIN; } for (i=0 ; i<NR_OPEN;i++) if ((f=p->filp[i])) f->f_count++; if (current->pwd) current->pwd->i_count++; if (current->root) current->root->i_count++; if (current->executable) current->executable->i_count++; set_tss_desc(gdt+(nr<<1 )+FIRST_TSS_ENTRY,&(p->tss)); set_ldt_desc(gdt+(nr<<1 )+FIRST_LDT_ENTRY,&(p->ldt)); p->state = TASK_RUNNING; return last_pid; }
在 linux-0.11 中,进程是由 task[NR_TASKS] 数组进行管理的(其中第一个进程为 init 进程)
新建进程的过程本质上就是往 task[NR_TASKS] 中添加一个 task_struct 结构体
实验要求父进程必须在所有子进程结束后才能返回,此时需要 wait 系统调用,其作用是等待子进程结束并返回子进程的退出状态码,对应源码如下:
1
2
3
4
pid_t wait (int * wait_stat) return waitpid(-1 ,wait_stat,0 ); }
1 2 3 4 5 6 7 8 9 10 11 12 13 14 15 16 17 18 19 20 21 22 23 24 25 26 27 28 29 30 31 32 33 34 35 36 37 38 39 40 41 42 43 44 45 46 47 48 49 50 51 52 53 54 55 56 57 #define FIRST_TASK task[0] #define LAST_TASK task[NR_TASKS-1] int sys_waitpid (pid_t pid,unsigned long * stat_addr, int options) int flag, code; struct task_struct ** p ; verify_area(stat_addr,4 ); repeat: flag=0 ; for (p = &LAST_TASK ; p > &FIRST_TASK ; --p) { if (!*p || *p == current) continue ; if ((*p)->father != current->pid) continue ; if (pid>0 ) { if ((*p)->pid != pid) continue ; } else if (!pid) { if ((*p)->pgrp != current->pgrp) continue ; } else if (pid != -1 ) { if ((*p)->pgrp != -pid) continue ; } switch ((*p)->state) { case TASK_STOPPED: if (!(options & WUNTRACED)) continue ; put_fs_long(0x7f ,stat_addr); return (*p)->pid; case TASK_ZOMBIE: current->cutime += (*p)->utime; current->cstime += (*p)->stime; flag = (*p)->pid; code = (*p)->exit_code; release(*p); put_fs_long(code,stat_addr); return flag; default : flag=1 ; continue ; } } if (flag) { if (options & WNOHANG) return 0 ; current->state=TASK_INTERRUPTIBLE; schedule(); if (!(current->signal &= ~(1 <<(SIGCHLD-1 )))) goto repeat; else return -EINTR; } return -ECHILD; }
注意:只要 wait(&stat) 检测到一个子进程处于 TASK_STOPPED 或者 TASK_ZOMBIE 状态时就会返回
当 wait(&stat) 遍历完所有进程都找不到当前进程的子进程时,就会返回 -ECHILD
根据实验要求,我们编写的实验代码如下:
1 2 3 4 5 6 7 8 9 10 11 12 13 14 15 16 17 18 19 20 21 22 23 24 25 26 27 28 29 30 #include <stdio.h> #include <unistd.h> #include <stdlib.h> #include <time.h> #include <sys/times.h> #include <sys/wait.h> int main (int argc, char * argv[]) int pid[8 ]; int i; int stat; for (i = 0 ; i < 8 ; i++) { pid[i] = fork(); if (!pid[i]){ cpuio_bound(20 ,18 ,2 ); return 0 ; } else if (pid[i] < 0 ) { printf ("Failed to fork child process %d!\n" ,i+1 ); return -1 ; } } for (i = 0 ; i < 8 ; i++) printf ("Child PID: %d\n" , pid[i]); while ((wait(&stat)) > 0 ); return 0 ; }
由于实验要求记录从操作系统启动到系统关机过程中所有进程的运行轨迹,因此我们需要先了解一下系统启动的过程:
BIOS 在完成硬件检测和资源分配后,将硬盘中的引导程序 bootloader 读到系统内存中然后将控制权交给 bootloader
bootloader(引导加载器)负责从硬盘或软盘加载 Linux 内核和根文件系统(root filesystem),当计算机开机时,bootloader 会读取硬盘或软盘上的配置信息(grub、lilo …),然后将内核和根文件系统加载到内存中
内核启动后,会首先读取根文件系统,将其挂载到根目录下,然后调用 swapper 进程(最开始处于内核态,然后通过 move_to_user_mode 切换到用户态),该进程会执行一些初始化任务,如设置内存分配、网络初始化等
init 进程是 Linux 系统的第一个用户空间程序,它负责启动其他进程和服务,在 init 进程启动后,它会加载其他所需的进程和服务,如:网络服务(sshd、httpd …)、系统服务(crond、syslog …)等
init 进程加载的其他进程和服务也会像 init 进程一样,通过系统调用与内核交互,它们可以访问内核提供的功能,它们也可以创建、删除和监控其他进程
在 init 进程加载其他进程和服务后,用户空间程序就可以正常运行了,用户可以通过终端或其他界面与系统交互,如:输入输出、文件操作、网络访问 …
下面是 swapper 进程(pid=0)执行的代码:
1
2
3
4
5
6
7
8
9
10
11
12
13
14
15
16
17
18
19
20
21
22
23
24
25
26
27
28
29
30
31
32
33
34
35
36
37
38
39
40
41
42
43
44
45
46
void main (void ) ROOT_DEV = ORIG_ROOT_DEV; drive_info = DRIVE_INFO; memory_end = (1 <<20 ) + (EXT_MEM_K<<10 ); memory_end &= 0xfffff000 ; if (memory_end > 16 *1024 *1024 ) memory_end = 16 *1024 *1024 ; if (memory_end > 12 *1024 *1024 ) buffer_memory_end = 4 *1024 *1024 ; else if (memory_end > 6 *1024 *1024 ) buffer_memory_end = 2 *1024 *1024 ; else buffer_memory_end = 1 *1024 *1024 ; main_memory_start = buffer_memory_end; #ifdef RAMDISK main_memory_start += rd_init(main_memory_start, RAMDISK*1024 ); #endif mem_init(main_memory_start,memory_end); trap_init(); blk_dev_init(); chr_dev_init(); tty_init(); time_init(); sched_init(); buffer_init(buffer_memory_end); hd_init(); floppy_init(); sti(); move_to_user_mode(); if (!fork()) { init(); } for (;;) pause(); }
前半部分都是一系列的初始化操作
系统调用 fork 创建的 init 进程会执行核心函数 init,源码如下:
1
2
3
4
5
6
7
8
9
10
11
12
13
14
15
16
17
18
19
20
21
22
23
24
25
26
27
28
29
30
31
32
33
34
35
36
37
38
39
40
41
42
43
44
45
46
47
48
49
50
51
static char *argv_rc[] = {"/bin/sh" , NULL };static char *envp_rc[] = {"HOME=/" , NULL };static char *argv[] = {"-/bin/sh" , NULL };static char *envp[] = {"HOME=/usr/root" , NULL };void init (void ) int pid,i; setup((void *) &drive_info); (void ) open("/dev/tty0" ,O_RDWR,0 ); (void ) dup(0 ); (void ) dup(0 ); printf ("%d buffers = %d bytes buffer space\n\r" ,NR_BUFFERS, NR_BUFFERS*BLOCK_SIZE); printf ("Free mem: %d bytes\n\r" ,memory_end-main_memory_start); if (!(pid=fork())) { close(0 ); if (open("/etc/rc" ,O_RDONLY,0 )) _exit(1 ); execve("/bin/sh" ,argv_rc,envp_rc); _exit(2 ); } if (pid>0 ) while (pid != wait(&i)) ; while (1 ) { if ((pid=fork())<0 ) { printf ("Fork failed in init\r\n" ); continue ; } if (!pid) { close(0 );close(1 );close(2 ); setsid(); (void ) open("/dev/tty0" ,O_RDWR,0 ); (void ) dup(0 ); (void ) dup(0 ); _exit(execve("/bin/sh" ,argv,envp)); } while (1 ) if (pid == wait(&i)) break ; printf ("\n\rchild %d died with code %04x\n\r" ,pid,i); sync(); } _exit(0 ); }
在创建日志文件 /var/process.log 前,需要以下操作先执行:
等待 setup((void *) &drive_info) 完成文件系统的加载(否则会导致系统错误)
等待 stdin/stdout/stderr 生成完毕(否则会导致文件描述符混乱)
为了监控 init 进程,我们需要将 init 进程中如下的代码迁移到 swapper 进程中,但这样会触发一个 task[0] trying to sleep 的报错,网上搜索后发现是配置的问题
所以我这里选择不监控 swapper 进程(包括它的非 init 子进程),将 open("/var/process.log") 写到 init 进程中:
1 2 3 4 5 setup((void *) &drive_info); (void ) open("/dev/tty0" ,O_RDWR,0 ); (void ) dup(0 ); (void ) dup(0 ); (void )open("/var/process.log" , O_CREAT | O_TRUNC | O_WRONLY, 0666 );
由于用户态的其他进程都是 init 进程的子进程,因此 /var/process.log 会作为 “文件描述符-3” 被传递给后续的用户态进程
注意:swapper 不止有 init 一个子进程,而其他子进程没有 “文件描述符-3”,也就不会被监控
接下来我们需要使用 “文件描述符-3” 来往 /var/process.log 中写入数据,不过在此之前我们需要先搞清楚 printk 函数的底层逻辑:
1
2
3
4
5
6
7
8
9
10
11
12
13
14
15
16
17
18
19
20
21
22
static char buf[1024 ];int printk (const char *fmt, ...) va_list args; int i; va_start(args, fmt); i = vsprintf (buf, fmt, args); va_end(args); __asm__("push %%fs\n\t" "push %%ds\n\t" "pop %%fs\n\t" "pushl %0\n\t" "pushl $buf\n\t" "pushl $0\n\t" "call tty_write\n\t" "addl $8,%%esp\n\t" "popl %0\n\t" "pop %%fs" ::"r" (i) : "ax" , "cx" , "dx" ); return i; }
我们可以参考 printk 函数的代码,仿照写一个格式化的写入函数:
1 2 3 4 5 6 7 8 9 10 11 12 13 14 15 16 17 18 19 20 21 22 23 24 25 26 27 28 29 30 #include <linux/sched.h> #include <sys/stat.h> static char logbuf[1024 ];int writelogf (const char *fmt, ...) va_list args; int i; va_start(args, fmt); i = vsprintf (logbuf, fmt, args); va_end(args); if (!(file = task[1 ]->filp[3 ])) return 0 ; inode = file->f_inode; __asm__("push %%fs\n\t" "push %%ds\n\t" "pop %%fs\n\t" "pushl %0\n\t" "pushl $logbuf\n\t" "pushl %1\n\t" "pushl %2\n\t" "call file_write\n\t" "addl $12,%%esp\n\t" "popl %0\n\t" "pop %%fs" ::"r" (i),"r" (file),"r" (inode) : "ax" , "cx" , "dx" ); return i; }
PS:这里不能直接调用 write,因为 write 使用 file=current->filp[fd] 来获取文件描述符,此时 swapper 创建的非 init 进程就会因为缺少对应的文件描述符而发生错误
接下来我们需要分析进程的运行轨迹,在 linux-0.11 中,进程有5个状态:
1 2 3 4 5 #define TASK_RUNNING 0 #define TASK_INTERRUPTIBLE 1 #define TASK_UNINTERRUPTIBLE 2 #define TASK_ZOMBIE 3 #define TASK_STOPPED 4
就绪状态:表示该进程可以获取 CPU 资源(似乎 linux-0.11 没有区分就绪状态和运行状态)
可打断的等待状态:等待资源有效时唤醒,可以被其他进程或中断信号所打断
不可打断的等待状态:等待资源有效时唤醒,不能被其他进程或中断信号所打断
僵死状态:进程资源用户空间被释放,但内核中的进程PCB并没有释放
挂起状态:进程被外部程序暂停
linux-0.11 的进程状态转化图如下:
TASK_UNINTERRUPTIBLE 只能被 wake_up 唤醒
TASK_INTERRUPTIBLE 可以被 wake_up 与 schedule 唤醒
先分析一下 linux-0.11 与进程调度相关的几个函数:
1
2
3
4
5
6
7
8
9
10
11
12
13
14
15
16
17
18
19
20
21
22
23
24
25
26
27
28
29
30
31
32
33
34
35
36
37
38
39
40
41
42
43
44
void schedule (void ) int i,next,c; struct task_struct ** p ; for (p = &LAST_TASK ; p > &FIRST_TASK ; --p) if (*p) { if ((*p)->alarm && (*p)->alarm < jiffies) { (*p)->signal |= (1 <<(SIGALRM-1 )); (*p)->alarm = 0 ; } if (((*p)->signal & ~(_BLOCKABLE & (*p)->blocked)) && (*p)->state==TASK_INTERRUPTIBLE){ (*p)->state=TASK_RUNNING; writelogf("%d\tJ\t%d\n" ,(*p)->pid,jiffies); } } while (1 ) { c = -1 ; next = 0 ; i = NR_TASKS; p = &task[NR_TASKS]; while (--i) { if (!*--p) continue ; if ((*p)->state == TASK_RUNNING && (*p)->counter > c) c = (*p)->counter, next = i; } if (c) break ; for (p = &LAST_TASK ; p > &FIRST_TASK ; --p) if (*p) (*p)->counter = ((*p)->counter >> 1 ) + (*p)->priority; } switch_to(next); }
函数 schedule 每次开始调度前,都会先检查是否有满足 TASK_RUNNING 条件的进程,然后使其带上 TASK_RUNNING 标记
接下来 schedule 会在带有 TASK_RUNNING 的进程中,选择 counter 最大的进程为目标
然后 schedule 会更新所有进程的时间片(算法为:counter=2*counter+priority)
最后使用 switch_to(next) 切换到目标进程
1
2
3
4
5
6
7
8
9
10
11
12
13
14
15
16
17
18
19
20
21
22
23
24
25
26
27
28
29
30
31
32
void do_timer (long cpl) extern int beepcount; extern void sysbeepstop (void ) if (beepcount) if (!--beepcount) sysbeepstop(); if (cpl) current->utime++; else current->stime++; if (next_timer) { next_timer->jiffies--; while (next_timer && next_timer->jiffies <= 0 ) { void (*fn)(void ); fn = next_timer->fn; next_timer->fn = NULL ; next_timer = next_timer->next; (fn)(); } } if (current_DOR & 0xf0 ) do_floppy_timer(); if ((--current->counter)>0 ) return ; current->counter=0 ; if (!cpl) return ; schedule(); }
函数 do_timer 是内核中的一个内核线程函数,负责处理系统定时器,并在定时器触发时执行相应的操作
函数 do_timer 的执行周期是由内核调度器设置的,代表了内核调度器处理进程调度的速度
在 do_timer 中,当前正在运行的进程的时间片会逐渐减少,意味着该进程的 “优先程度” 会逐步下降
上述两个函数体现了 linux-0.11 调度的核心思想:基于动态优先级的时间片轮转调度
占用 CPU 资源会导致 “时间片” 下降,等待调度会导致 “时间片” 上升
调度程序优先调用 “时间片” 大的进程
新进入 task[NR_TASKS] 的进程优先级比较低,因此没有抢占机制
回到实验,为了记录进程的运行轨迹,我们只需要在内核修改 p->state 的代码后调用 writelogf 即可
有一点需要注意,在 sleep_on 函数中需要特殊处理:
1
2
3
4
5
6
7
8
9
void sleep_on (struct task_struct **p) struct task_struct *tmp ; ...... if (current->pid != 1 ) writelogf("%d\tW\t%d\n" ,current->pid,jiffies); schedule(); ...... }
之前我们没有选择在 swapper 进程中创建 /var/process.log,并且 init 进程在调用 setup((void *) &drive_info) 时就会执行到 sleep_on 函数
由于在 init 进程调用 sleep_on 时,文件 /var/process.log 并没有创建完毕,所以此时调用 writelogf 就会导致系统错误
另外在 schedule 函数中有一点需要注意:
1
2
3
4
5
6
if (current->pid != task[next]->pid){ if (current->state == TASK_RUNNING) writelogf("%d\tJ\t%d\n" ,current->pid,jiffies); writelogf("%d\tR\t%d\n" ,task[next]->pid,jiffies); }
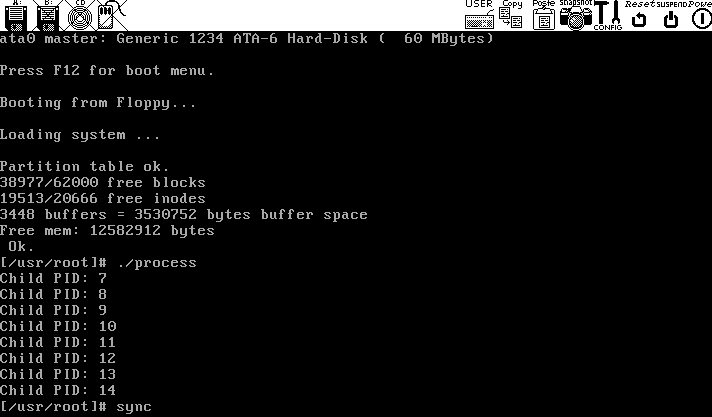
到了实验的最后一步,需要先编译并执行之前写的 process.c:
1
2
3
gcc -o process process.c ./process sync # 刷新cache,确保文件确实写入了磁盘
效果如如下:
接着就可以用 mount-hdc 挂载文件,并把 /oslab/hdc/var/process.log 拿出,然后使用 stat_log.py 脚本进行测试:(由于我没有记录完整的 init 进程,因此我这里只测试 process 以及它生成的子进程)
1
2
3
4
5
6
7
8
9
10
11
12
13
14
15
16
(Unit: tick) Process Turnaround Waiting CPU Burst I/O Burst 0 23207 0 0 0 6 14617 7 2 14607 7 14614 12606 1801 206 8 14612 12606 1801 205 9 14610 12605 1800 205 10 14610 12604 1801 204 11 14608 12604 1800 204 12 14606 12603 1800 203 13 14606 12602 1801 202 14 14604 12602 1800 202 15 3 0 3 0 16 3 0 1 1 Average: 12891.67 8403.25 Throughout: 0.03 /s
在运行测试脚本之前,要先手动将不需要的 pid 给去除
否则就会因为缺少 swapper 线程(包括它的非 init 子进程)的部分信息而引发报错