0%

HIT-OSLab7

HIT-OSLab7

实验目的:

  • 加深对操作系统设备管理基本原理的认识,了解键盘中断、扫描码等概念
  • 通过实践掌握 Linux-0.11 对键盘终端和显示器终端的处理过程

实验内容:

  • 本实验的基本内容是修改 Linux-0.11 的终端设备处理代码,对键盘输入和字符显示进行非常规的控制
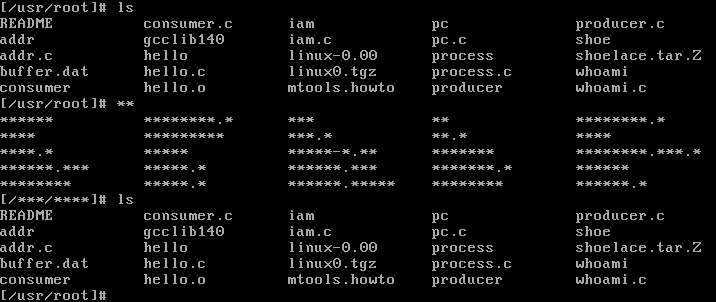
  • 在初始状态,一切如常,用户按一次 F12 后,把应用程序向终端输出所有字母都替换为 *
  • 再按一次 F12,又恢复正常
  • 第三次按 F12,再进行输出替换,依此类推

实验过程

终端设备是计算机系统中与用户交互的硬件设备,通常使用键盘和显示器来接收用户的输入和输出操作

在 Linux 系统中,每个终端设备都对应一个 tty_struct 结构体实例,用于存储该终端设备的状态、配置信息以及与终端相关的数据结构

1
2
3
4
5
6
7
8
9
10
struct tty_struct
{
struct termios termios; /* 存储终端设备的属性 */
int pgrp; /* 存储该终端设备所属的进程组 */
int stopped; /* 表示该终端设备是否处于停止状态 */
void (*write)(struct tty_struct *tty); /* 处理终端设备的写操作 */
struct tty_queue read_q; /* 存储终端设备的输入缓冲区(来自键盘输入的数据) */
struct tty_queue write_q; /* 存储终端设备的输出缓冲区(屏幕将会输出的数据) */
struct tty_queue secondary; /* 存储终端设备的次要缓冲区(来自网络或其他设备的输入数据) */
};
1
2
3
4
5
6
7
8
struct tty_queue
{
unsigned long data;
unsigned long head; /* 存储队列中的头指针 */
unsigned long tail; /* 存储队列中的尾指针 */
struct task_struct *proc_list; /* 指向一个任务结构体列表 */
char buf[TTY_BUF_SIZE]; /* 存储队列中的数据缓冲区 */
};

扫描码是指计算机在接收用户的输入时,将用户的输入转换为计算机能够理解的形式,在键盘上,每个键都对应一个唯一的扫描码,这个扫描码可以用来识别用户按下的是哪个键

在操作系统中,键盘中断通常是通过中断处理程序(Interrupt Handler)来实现的

  • 当用户按下键盘上的键时,计算机系统会向操作系统发送一个中断信号,操作系统接收到这个信号后,会调用相应的中断处理程序来处理这个中断事件

下面是键盘中断的处理程序代码:

1
2
3
4
5
6
7
8
9
10
11
12
13
14
15
16
17
18
19
20
21
22
23
24
25
26
27
28
29
30
31
32
33
34
35
36
37
38
39
40
41
42
43
44
45
keyboard_interrupt:
pushl %eax
pushl %ebx
pushl %ecx
pushl %edx
push %ds
push %es
movl $0x10,%eax /* eax中是扫描码 */
mov %ax,%ds
mov %ax,%es
xor %al,%al
inb $0x60,%al
cmpb $0xe0,%al
je set_e0
cmpb $0xe1,%al
je set_e1
call key_table(,%eax,4) /* 调用键处理程序"ker_table+eax*4" */
movb $0,e0
e0_e1: inb $0x61,%al
jmp 1f
1: jmp 1f
1: orb $0x80,%al
jmp 1f
1: jmp 1f
1: outb %al,$0x61
jmp 1f
1: jmp 1f
1: andb $0x7F,%al
outb %al,$0x61
movb $0x20,%al
outb %al,$0x20
pushl $0
call do_tty_interrupt /* 将收到的数据复制成规范模式数据并存放在规范字符缓冲队列中 */
addl $4,%esp
pop %es
pop %ds
popl %edx
popl %ecx
popl %ebx
popl %eax
iret
set_e0: movb $1,e0
jmp e0_e1
set_e1: movb $2,e0
jmp e0_e1

其中 key_table 存储有各个扫描码的处理程序:

1
2
3
4
5
6
7
8
9
10
11
12
13
14
15
key_table:
.long none,do_self,do_self,do_self /* 00-03 s0 esc 1 2 */
.long do_self,do_self,do_self,do_self /* 04-07 3 4 5 6 */
.long do_self,do_self,do_self,do_self /* 08-0B 7 8 9 0 */
.long do_self,do_self,do_self,do_self /* 0C-0F + ' bs tab */
......
.long func,func,func,func /* 3C-3F f2 f3 f4 f5 */
.long func,func,func,func /* 40-43 f6 f7 f8 f9 */
.long func,num,scroll,cursor /* 44-47 f10 num scr home */
.long cursor,cursor,do_self,cursor /* 48-4B up pgup - left */
.long cursor,cursor,do_self,cursor /* 4C-4F n5 right + end */
.long cursor,cursor,cursor,cursor /* 50-53 dn pgdn ins del */
.long none,none,do_self,func /* 54-57 sysreq ? < f11 */
.long func,none,none,none /* 58-5B f12 ? ? ? */
......
  • 我们可以发现 F12 会调用 func 函数

核心思路就是添加一个 F12 标记位,我们可以选择将 func 替换为我们需要的函数,其目的是修改该标记位以记录用户是否输入了 F12

1
2
3
4
5
int f12_key = 0;
void change_f12_key(void)
{
f12_key ^= 1;
}
1
.long change_f12_key,none,none,none		/* 58-5B f12 ? ? ? */

函数 con_write 用于将字符串写入终端设备:

1
2
3
4
5
6
7
8
9
10
11
12
13
14
15
16
17
18
19
20
21
22
23
24
void con_write(struct tty_struct * tty)
{
int nr;
char c;

nr = CHARS(tty->write_q);
while (nr--) {
GETCH(tty->write_q,c);
switch(state) {
case 0:
if (c>31 && c<127) {
if (x>=video_num_columns) {
x -= video_num_columns;
pos -= video_size_row;
lf();
}
/* 将write_q的字符放入显存的汇编代码 */
__asm__("movb attr,%%ah\n\t"
"movw %%ax,%1\n\t"
::"a" (c),"m" (*(short *)pos)
);
pos += 2;
x++;
} else if (c==27)
  • case 0 用于处理 asicc 在 (31,127) 范围的字符
  • 我们需要在这段代码前检查 f12_key 并将字符设置为 *
1
2
3
4
5
6
7
8
9
10
11
12
13
14
15
16
17
18
19
20
21
22
23
24
25
26
void con_write(struct tty_struct * tty)
{
int nr;
char c;

nr = CHARS(tty->write_q);
while (nr--) {
GETCH(tty->write_q,c);
switch(state) {
case 0:
if (c>31 && c<127) {
if (x>=video_num_columns) {
x -= video_num_columns;
pos -= video_size_row;
lf();
}
if(f12_key == 1 && ( (c >= 48 && c<= 57) || (c>=65 && c<=90) || (c>=97 && c<=122) ) )
c = '*';

__asm__("movb attr,%%ah\n\t"
"movw %%ax,%1\n\t"
::"a" (c),"m" (*(short *)pos)
);
pos += 2;
x++;
} else if (c==27)

最终效果如下: