0%

HIT-OSLab1

HIT-OSLab1

实验目标:

  • 改写 bootsect.s 的代码,使得屏幕上可以输出 YHellowOS is loading...
  • 使 bootsect.s 能够完成 setup.s 的载入,并跳转到 setup.s 开始执行处,并输出 Now we are in SETUP
  • 将 setup.s 获取到的硬件参数输出到屏幕上
  • 完成了输出硬件参数的步骤后,不再继续加载 linux 内核,保持上述信息

实验过程

先简单解释分析一下 bootsect.s 的作用:

  • bootsect.s 是一个汇编程序,是引导扇区的源代码(该扇区被称为引导扇区,是一个计算机启动时第一个读取的扇区,通常是硬盘或软盘的第一个扇区)
  • 引导扇区通常包含一个引导扇区表(Boot Sector Table,BST),该表指向计算机的引导Loader(通常是BIOS)和操作系统

其核心代码如下:

1
2
3
4
5
6
7
8
9
10
11
12
13
14
15
16
17
18
19
SETUPLEN = 4				! nr of setup-sectors # setup程序代码占用扇区数
BOOTSEG = 0x07c0 ! original address of boot-sector # bootsect起始地址
INITSEG = 0x9000 ! we move boot here - out of the way
SETUPSEG = 0x9020 ! setup starts here # setup起始地址
SYSSEG = 0x1000 ! system loaded at 0x10000 (65536). # system起始地址
ENDSEG = SYSSEG + SYSSIZE ! where to stop loading

entry _start
_start:
mov ax,#BOOTSEG
mov ds,ax # ds:数据段基地址
mov ax,#INITSEG
mov es,ax # es:附加段基地址
mov cx,#256 # cx:计数器(用于指示rep循环的次数)
sub si,si # si:数据段偏移
sub di,di # di:附加段偏移
rep # 用于重复执行一段汇编代码(默认计数器为cx)
movw # movw默认的源寄存器是ds:si,目标寄存器是es:di
jmpi go,INITSEG
  • 这一段指令使位于 0x07c00 的 bootsect 代码,被全部拷贝到了 0x90000
  • 最后跳转到 0x90000 从 go 标号处开始执行
1
2
3
4
5
6
7
8
9
10
11
12
13
14
15
16
17
18
19
20
21
go:	mov	ax,cs			# cs:代码段基地址
mov ds,ax
mov es,ax
! put stack at 0x9ff00.
mov ss,ax # ss:栈段基地址
mov sp,#0xFF00 ! arbitrary value >>512

! load the setup-sectors directly after the bootblock.
! Note that 'es' is already set up.

load_setup:
mov dx,#0x0000 ! drive 0, head 0 # 驱动器编号'0'和磁头编号'0'
mov cx,#0x0002 ! sector 2, track 0 # 扇区号'2'和磁道号'0'
mov bx,#0x0200 ! address = 512, in INITSEG # 读取数据的起始地址为512
mov ax,#0x0200+SETUPLEN ! service 2, nr of sectors # 读取的数据长度为0x200+4
int 0x13 ! read it
jnc ok_load_setup ! ok - continue
mov dx,#0x0000
mov ax,#0x0000 ! reset the diskette
int 0x13
j load_setup
  • 指令 int 0x13 的中断服务程序实质上就是磁盘服务程序,用于读取 setup 的代码并将其加载到程序的内存 0x90200 中
  • 如果 ax 寄存器的值大于0,则 jnc 会使程序跳转至 ok_load_setup,否则会尝试再次加载 setup
1
2
3
4
5
6
7
8
9
10
11
12
13
14
15
16
17
18
19
20
21
22
23
24
25
26
27
28
29
30
31
32
33
34
35
36
37
38
39
40
41
42
43
44
45
46
47
48
49
50
51
52
53
54
55
56
57
58
59
60
61
62
ok_load_setup:

! Get disk drive parameters, specifically nr of sectors/track

mov dl,#0x00
mov ax,#0x0800 ! AH=8 is get drive parameters
int 0x13
mov ch,#0x00
seg cs # 将cs的值加载到数据段(seg [ds:] address)
mov sectors,cx
mov ax,#INITSEG
mov es,ax

! Print some inane message

mov ah,#0x03 ! read cursor pos
xor bh,bh
int 0x10

mov cx,#24
mov bx,#0x0007 ! page 0, attribute 7 (normal)
mov bp,#msg1
mov ax,#0x1301 ! write string, move cursor
int 0x10

! ok, we've written the message, now
! we want to load the system (at 0x10000)

mov ax,#SYSSEG
mov es,ax ! segment of 0x010000
call read_it # 读取磁盘上的system
call kill_motor # 关闭驱动器马达,这样就可以知道驱动器的状态了

! After that we check which root-device to use. If the device is
! defined (!= 0), nothing is done and the given device is used.
! Otherwise, either /dev/PS0 (2,28) or /dev/at0 (2,8), depending
! on the number of sectors that the BIOS reports currently.
# 检查要使用哪个根文件系统设备

seg cs
mov ax,root_dev
cmp ax,#0
jne root_defined
seg cs
mov bx,sectors
mov ax,#0x0208 ! /dev/ps0 - 1.2Mb
cmp bx,#15
je root_defined
mov ax,#0x021c ! /dev/PS0 - 1.44Mb
cmp bx,#18
je root_defined
undef_root:
jmp undef_root
root_defined:
seg cs
mov root_dev,ax

! after that (everyting loaded), we jump to
! the setup-routine loaded directly after
! the bootblock:

jmpi 0,SETUPSEG
  • 指令 int 0x10 的中断服务程序可以将字符串输出到屏幕上
  • 输出信息并进行初始化后,程序会调用 read_it 来读取磁盘上的 system 模块,并将其加载到 0x10000
  • 最后跳转到 0x90200 执行 setup 的代码

计算机上电后,ROM BIOS 会在物理内存 0 处初始化中断向量表,其中有256个中断向量,每个中断向量占用4字节,共1KB,在物理内存地址 0x000-0x3ff 处,这些中断向量供 BIOS 中断使用

BIOS 初始化中断向量表后,启动设备的第一个扇区(即引导扇区)读入内存地址 0x7c00 处,并跳转到此处开始执行:

  • 此时操作系统处于实模式,寻址方式为:16位段寄存器 * 0x10 + 16位目标寄存器
  • 为了方便加载主模块,引导程序首先会将自己拷贝到内存相对靠后的位置(如 linux0.11 的 bootsect 程序先将自己移动到 0x90000 处),然后跳转过去执行
  • 在接下来的步骤中,程序会依次加载 setup 和 system 的代码,并跳转执行 setup 的代码

setup.s 是一个汇编语言源代码文件,通常位于操作系统内核的源代码目录中,它的作用是设置操作系统的初始状态,为操作系统其他模块的运行做准备:

  • 操作系统的主模块为了让其中代码地址等于实际的物理地址,需要将其加载到内存 0x0000 处,但此时会覆盖在 0x000-0x3ff 处的 BIOS 中断向量表
  • 所以操作系统在加载时需要先将主模块加载到内存中不与 BIOS 中断向量表冲突的地址处,之后在可以覆盖中断向量表时才将其移动到 0x0000
  • 例如在 Linux0.11 的 system 模块就是先在 bootsect 程序中被加载到了 0x10000,之后在 setup 程序中移到 0x0000 处

接下来的工作就是利用 int 0x10 来将我们需要的字符串打印到屏幕上,为此我们需要先把字符串构造好:

1
2
3
msgmy:
.ascii "YHellowOS is loading..."
.byte 13,10,13,10
1
2
3
msgmy:
.ascii "Now we are in setup..."
.byte 13,10,13,10
  • 13,10 代表换行符

接下来就可以编写打印函数了:

1
2
3
4
5
6
7
8
9
10
11
12
13
read_cur:
mov ah,#0x03
xor bh,bh
int 0x10
ret

print_string:
mov cx,bx
mov bx,#0x0007
mov bp,ax
mov ax,#0x1301
int 0x10
ret
  • read_cur 用于获取光标位置(如果没有这一步,打印数据很可能会被后续数据覆盖),寄存器 cx 中的值就是该字符串的长度,寄存器 bx 中的值代表了输出字符的颜色
  • print_string 用于打印字符串,需要传入两个参数(ax:字符串地址,bx:字符串长度)

这里有一点需要注意:

1
2
3
4
5
6
7
8
9
mov ax,#INITSEG
mov ds,ax
mov ax,#SETUPSEG
mov es,ax

call read_cur
mov ax,#msgmy
mov bx,#26
call print_string
  • 在 setup.s 中使用 read_cur 获取光标位置前,需要先重置 ds/es(主要是重置 es 格外数据段)

在输出硬件参数前我们需要知道 setup.s 读取了哪些硬件参数,找到其核心代码:

1
2
3
4
5
6
7
8
9
10
11
12
13
14
15
16
17
18
19
20
21
22
23
24
25
26
27
28
29
30
31
32
33
34
35
36
37
38
39
40
41
42
43
44
45
46
47
48
49
50
51
52
53
54
55
56
57
58
entry start
start:

! ok, the read went well so we get current cursor position and save it for
! posterity.
# 获取光标位置(0x9000:0x0)
mov ax,#INITSEG ! this is done in bootsect already, but...
mov ds,ax
mov ah,#0x03 ! read cursor pos
xor bh,bh
int 0x10 ! save it in known place, con_init fetches
mov [0],dx ! it from 0x90000.
! Get memory size (extended mem, kB)
# 获取拓展内存大小(0x9000:0x2)
mov ah,#0x88
int 0x15
mov [2],ax

! Get video-card data:
# 获取显卡video-card参数(0x9000:0x6)
mov ah,#0x0f
int 0x10
mov [4],bx ! bh = display page
mov [6],ax ! al = video mode, ah = window width

! check for EGA/VGA and some config parameters
mov ah,#0x12
mov bl,#0x10
int 0x10
mov [8],ax
mov [10],bx
mov [12],cx

! Get hd0 data
# 获取硬盘hd0参数(0x9000:0x80)
mov ax,#0x0000
mov ds,ax
lds si,[4*0x41]
mov ax,#INITSEG
mov es,ax
mov di,#0x0080
mov cx,#0x10
rep
movsb # ds:si(4*0x41)->es:di(0x90000+0x80)

! Get hd1 data
# 获取硬盘hd1参数(0x9000:0x90)
mov ax,#0x0000
mov ds,ax
lds si,[4*0x46]
mov ax,#INITSEG
mov es,ax
mov di,#0x0090
mov cx,#0x10
rep
movsb # ds:si(4*0x41)->es:di(0x90000+0x90)

......
  • 我们需要打印的设备有 HD0,HD1,VC(地址偏移记录在注释中)

为了方便读取地址中的数据,我们需要写一个打印函数:

1
2
3
4
5
6
7
8
9
10
11
12
13
14
15
16
17
18
19
20
print_hex_4:
mov cx,#4
j print_hex
print_hex_2:
mov cx,#2
j print_hex
print_hex:
mov dx,ax
print_digit:
rol dx,#4 # 向左循环移动4位
mov ax,#0xe0f
and al,dl
add al,#0x30 # 将数据转化为ascii字符
cmp al,#0x3a
jl outp
add al,#0x07
outp:
int 0x10
loop print_digit
ret

最后我们可以按照数据的格式写出代码:

1
2
3
4
5
6
7
8
9
10
11
12
13
14
15
16
17
18
19
20
21
22
23
24
25
26
27
28
29
30
31
32
33
34
35
36
37
38
39
40
41
42
43
44
45
46
47
48
49
50
51
52
53
54
55
56
57
58
59
60
61
62
63
64
65
66
67
68
69
70
71
72
73
74
75
76
77
78
79
80
81
82
83
84
85
86
87
88
89
90
91
92
93
94
95
96
97
98
99
100
101
102
103
104
105
106
107
108
109
110
111
112
113
114
115
116
117
118
119
120
121
122
123
! Show HD Information:
mov ax,#INITSEG # 由于之前修改了ds/es,这里要先将它们改回
mov ds,ax
mov ax,#SETUPSEG
mov es,ax

call read_cur # 打印Cursor POS
mov ax,#cur
mov bx,#13
call print_string

mov ax,[0]
call print_hex_4
call print_nl

call read_cur # 打印Memory SIZE
mov ax,#mem
mov bx,#12
call print_string

mov ax,[2]
call print_hex_4

call read_cur
mov ax,#kb
mov bx,#4
call print_string

call read_cur # 打印video-card设备的数据
mov ax,#vc
mov bx,#11
call print_string

call read_cur
mov ax,#display
mov bx,#13
call print_string

mov ax,[4]
call print_hex_4
call print_nl

call read_cur
mov ax,#mode
mov bx,#11
call print_string

mov ax,[6]
call print_hex_2
call print_nl

call read_cur
mov ax,#width
mov bx,#13
call print_string

mov ax,[8]
call print_hex_2
call print_nl

call read_cur # 打印hd0设备的数据
mov ax,#hd1
mov bx,#12
call print_string

call read_cur
mov ax,#cyl
mov bx,#10
call print_string

mov ax,[0x80]
call print_hex_4
call print_nl

call read_cur
mov ax,#head
mov bx,#8
call print_string

mov ax,[0x80+0x2]
call print_hex_4
call print_nl

call read_cur
mov ax,#sect
mov bx,#8
call print_string

mov ax,[0x80+0xe]
call print_hex_4
call print_nl

call read_cur # 打印hd1设备的数据
mov ax,#hd2
mov bx,#12
call print_string

call read_cur
mov ax,#cyl
mov bx,#10
call print_string

mov ax,[0x90]
call print_hex_4
call print_nl

call read_cur
mov ax,#head
mov bx,#8
call print_string

mov ax,[0x90+0x2]
call print_hex_4
call print_nl

call read_cur
mov ax,#sect
mov bx,#8
call print_string

mov ax,[0x90+0xe]
call print_hex_4
call print_nl

至于最后一个要求,我们只需要写一个死循环即可:

1
l:  jmp l

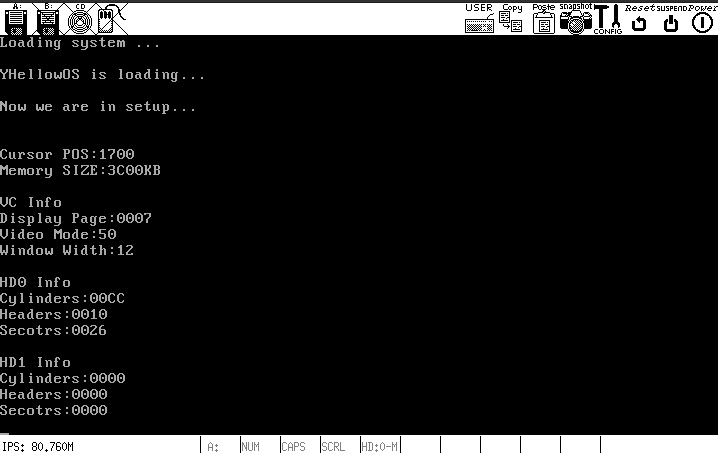
最终效果如下: