进程状态 进程的生命周期通常有6种情况:进程创建、进程执行、进程等待、进程抢占、进程唤醒、进程结束
对应了一下几种进程状态:
创建状态:
这是一个进程刚刚建立,但还未将它送人就绪队列时的状态
指的是为程序分配合适的pcb格式,然后放入内存
如果由于内存不足,暂未放入主存,创建工作并未完成,进程不能被调用,则被成为创建状态
就绪状态:
指进程得到了除CPU以外所有必要资源就等CPU开始发动了
通常把处于就绪状态的进程排成一个或多个队列,称其为就绪队列
执行状态:
指进程已获得处理机,其程序正在执行
得到调度被分配到CPU,就会从就绪状态转换为执行状态,单CPU只能执行单进程,多CPU可以进行多进程
阻塞状态:
进程因等待某事件(如:等待I/O操作结束、等待通信信息、等待申请缓存空间)而暂停执行时的状态
指执行状态受到I/O的影响变为阻塞状态,等I/O完成后又变为就绪状态
通常将处于阻塞状态的进程排成一个队列,称为阻塞队列,在有的系统中,按阻塞原因的不同而将处于阻塞状态的进程排成多个队列
唤醒状态:
唤醒进程的原因:
被阻塞进程需要的资源可被满足
被阻塞进程等待的事件到达
将该进程的PCB插入到就绪队列
终止状态(僵尸状态):
当一个进程已经正常结束或异常结束,OS已将它从就绪队列中移出,但尚未将它撤消时的状态(父进程尚未使用 wait 函数族等来收尸,即等待父进程销毁它)
自然或非正常结束进程,将进入终止状态,先等待os处理,然后将其pcb清零,将pcb空间返还系统
进程创建 在Unix中,进程通过系统调用 fork 和 exec 来创建一个进程
fork:把一个进程复制成两个除PID以外完全相同的进程
fork 函数创建一个继承的子进程:
该子进程复制父进程的所有变量和内存,以及父进程的所有CPU寄存器(除了某个特殊寄存器,以区分是子进程还是父进程)
fork 函数一次调用,返回两个值:
fork 函数的开销十分昂贵,其实现开销来源于:
对子进程分配内存
复制父进程的内存和寄存器到子进程中
在大多数情况下,调用 fork 函数后就紧接着调用 exec ,此时 fork 中的内存复制操作是无用的,因此,fork 函数中使用 写时复制技术 (Copy on Write, COW)
exec:用新进程来重写当前进程,PID没有改变
空闲进程的创建
空闲进程主要工作是完成内核中各个子系统的初始化,并最后用于调度其他进程,该进程最终会一直在 cpu_idle 函数中判断当前是否可调度(循环语句)
简单来说,虽然这叫做“系统空闲进程”,但这其实并不是一个真正的进程
由于该进程是为了调度进程而创建的,所以其 need_resched 成员初始时为1(需要被调度)
空闲进程在 proc_init 函数中被创建
1
2
3
4
5
6
7
8
9
10
11
12
13
14
15
16
17
18
19
20
21
22
23
24
25
26
27
28
29
30
31
32
33
34
35
void proc_init (void ) int i; list_init(&proc_list); for (i = 0 ; i < HASH_LIST_SIZE; i ++) { list_init(hash_list + i); } if ((idleproc = alloc_proc()) == NULL ) { panic("cannot alloc idleproc.\n" ); } idleproc->pid = 0 ; idleproc->state = PROC_RUNNABLE; idleproc->kstack = (uintptr_t )bootstack; idleproc->need_resched = 1 ; set_proc_name(idleproc, "idle" ); nr_process ++; current = idleproc; int pid = kernel_thread(init_main, "Hello world!!" , 0 ); if (pid <= 0 ) { panic("create init_main failed.\n" ); } initproc = find_proc(pid); set_proc_name(initproc, "init" ); assert(idleproc != NULL && idleproc->pid == 0 ); assert(initproc != NULL && initproc->pid == 1 ); }
第一个内核进程的创建
第一个内核进程是未来所有新进程的父进程或祖先进程
1 2 3 4 5 6 7 8 9 10 11 int pid = kernel_thread(init_main, "Hello world!!" , 0 );if (pid <= 0 ) { panic("create init_main failed.\n" ); } initproc = find_proc(pid); set_proc_name(initproc, "init" ); assert(idleproc != NULL && idleproc->pid == 0 ); assert(initproc != NULL && initproc->pid == 1 );
在kernel_thread中
程序先设置 trapframe 结构,最后调用 do_fork 函数
注意:该 trapframe 部分寄存器 ebx、edx、eip 被分别设置为“目标函数地址”、“参数地址”以及“kernel_thread_entry地址”
1
2
3
4
5
6
7
8
9
10
11
12
13
14
15
16
17
18
19
20
21
22
23
static int init_main (void *arg) cprintf("this initproc, pid = %d, name = \"%s\"\n" , current->pid, get_proc_name(current)); cprintf("To U: \"%s\".\n" , (const char *)arg); cprintf("To U: \"en.., Bye, Bye. :)\"\n" ); return 0 ; } int kernel_thread (int (*fn)(void *), void *arg, uint32_t clone_flags) struct trapframe tf ; memset (&tf, 0 , sizeof (struct trapframe)); tf.tf_cs = KERNEL_CS; tf.tf_ds = tf.tf_es = tf.tf_ss = KERNEL_DS; tf.tf_regs.reg_ebx = (uint32_t )fn; tf.tf_regs.reg_edx = (uint32_t )arg; tf.tf_eip = (uint32_t )kernel_thread_entry; return do_fork(clone_flags | CLONE_VM, 0 , &tf); }
进程挂起 将处于挂起状态的进程映像在磁盘上,目的是减少进程占用的内存
挂起状态,它既可以是我们客户主动使得进程挂起,也可以是操作系统因为某些原因使得进程挂起,总而言之引入挂起状态的原因有以下几种:
用户的请求:可能是在程序运行期间发现了可疑的问题,需要暂停进程
父进程的请求:考察,协调,或修改子进程
操作系统的需要:对运行中资源的使用情况进行检查和记账
负载调节的需要:有一些实时的任务非常重要,需要得到充足的内存空间,这个时候我们需
把非实时的任务进行挂起,优先使得实时任务执行
定时任务:一个进程可能会周期性的执行某个任务,那么在一次执行完毕后挂起而不是阻塞,这样可以节省内存
安全:系统有时可能会出现故障或者某些功能受到破坏,这是就需要将系统中正在进行的进程进行挂起,当系统故障消除以后,对进程的状态进行恢复
挂起(Suspend):把一个进程从内存转到外存
等待到等待挂起:没有进程处于就绪状态或就绪进程要求更多内存资源
就绪到就绪挂起:当有高优先级进程处于等待状态(系统认为很快会就绪的),低优先级就绪进程会挂起,为高优先级进程提供更大的内存空间
运行到就绪挂起:当有高优先级等待进程因事件出现而进入就绪挂起
等待挂起到就绪挂起:当有等待挂起进程因相关事件出现而转换状
激活(Activate):把一个进程从外存转到内存
就绪挂起到就绪:没有就绪进程或挂起就绪进程优先级高于就绪进程
等待挂起到等待:当一个进程释放足够内存,并有高优先级等待挂起进程
进程切换 过程简述
暂停当前进程,保存上下文,并从运行状态变成其他状态
调度另一个进程,恢复其上下文并从就绪状态转为运行状态
进程控制块 (Process Control Block,PCB)
进程控制块是 操作系统管理控制进程运行所用的信息集合 ,操作系统用PCB来描述 进程的基本情况以及运行变化的过程
PCB是进程存在的唯一标志 ,每个进程都在操作系统中有一个对应的PCB(内核为每个进程维护了对应的进程控制块PCB)进程控制块可以通过某个数据结构组织起来(例如链表),同一状态进程的 PCB 连接成一个链表,多个状态对应多个不同的链表,各状态的进程形成不同的链表:就绪联链表,阻塞链表等等
1
2
3
4
5
6
7
8
9
10
11
12
13
14
15
16
17
18
19
20
21
22
23
enum proc_state { PROC_UNINIT = 0 , PROC_SLEEPING, PROC_RUNNABLE, PROC_ZOMBIE, }; struct proc_struct { enum proc_state state ; int pid; int runs; uintptr_t kstack; volatile bool need_resched; struct proc_struct *parent ; struct mm_struct *mm ; struct context context ; struct trapframe *tf ; uintptr_t cr3; uint32_t flags; char name[PROC_NAME_LEN + 1 ]; list_entry_t list_link; list_entry_t hash_link; };
struct context context:
需要注意的是,与 trapframe 所保存的用户态上下文不同,context 保存的是线程的 当前 上下文
这个上下文可能是执行用户代码时的上下文,也可能是执行内核代码时的上下文
struct trapframe* tf:
无论是用户程序在用户态通过系统调用进入内核态,还是线程在内核态中被创建,内核态中的线程返回用户态所加载的上下文就是 struct trapframe* tf
所以当一个线程在内核态中建立,则该新线程就必须“伪造”一个 trapframe 来返回用户态
两者关系:
以 kernel_thread 函数为例,尽管该函数设置了 proc->trapframe ,但在 fork 函数中的 copy_thread 函数里,程序还会设置 proc->context
“两个上下文”看上去好像冗余,但实际上两者所分的工是不一样的
进程之间通过进程调度来切换控制权,当某个 fork 出的新进程获取到了控制流后,首当其中执行的代码是 current->context->eip 所指向的代码,此时新进程仍处于内核态,但实际上我们想在用户态中执行代码,所以我们需要从内核态切换回用户态,也就是中断返回,此时会遇上两个问题:
新进程如何执行中断返回?:这就是 proc->context.eip = (uintptr_t)forkret 的用处, forkret 会使新进程正确的从中断处理例程中返回
新进程中断返回至用户代码时的上下文为?:这就是 proc_struct->tf 的用处,中断返回时,新进程会恢复保存的 trapframe 信息至各个寄存器中,然后开始执行用户代码
由于进程数量可能较大,倘若从头向后遍历查找符合某个状态的PCB,则效率会十分低下,因此使用了哈希表作为遍历所用的数据结构
详细流程
uCore中,内核的第一个进程 idleproc(空闲进程)会执行 cpu_idle 函数,并从中调用 schedule 函数,准备开始调度进程:
1
2
3
4
5
6
7
8
9
10
struct proc_struct *current =NULL ; void cpu_idle (void ) while (1 ) { if (current->need_resched) { schedule(); } } }
schedule 函数会先清除调度标志,并从当前进程在链表中的位置开始,遍历进程控制块,直到找出处于 就绪状态 的进程:
1
2
3
4
5
6
7
8
9
10
11
12
13
14
15
16
17
18
19
20
21
22
23
24
25
26
27
28
29
30
31
32
33
34
35
36
37
38
39
40
41
42
list_entry_t proc_list; struct proc_struct *idleproc =NULL ; #define le2proc(le, member) \ to_struct((le), struct proc_struct, member) #define to_struct(ptr, type, member) \ ((type *)((char *)(ptr) - offsetof(type, member))) void schedule (void ) bool intr_flag; list_entry_t *le, *last; struct proc_struct *next =NULL ; local_intr_save(intr_flag); { current->need_resched = 0 ; last = (current == idleproc) ? &proc_list : &(current->list_link); le = last; do { if ((le = list_next(le)) != &proc_list) { next = le2proc(le, list_link); if (next->state == PROC_RUNNABLE) { break ; } } } while (le != last); if (next == NULL || next->state != PROC_RUNNABLE) { next = idleproc; } next->runs ++; if (next != current) { proc_run(next); } } local_intr_restore(intr_flag); }
proc_run 函数会设置TSS中ring0的内核栈地址,同时还会加载页目录表的地址,等到这些前置操作完成后,最后执行上下文切换
1
2
3
4
5
6
7
8
9
10
11
12
13
14
15
void proc_run (struct proc_struct *proc) if (proc != current) { bool intr_flag; struct proc_struct *prev = local_intr_save(intr_flag); { current = proc; load_esp0(next->kstack + KSTACKSIZE); lcr3(next->cr3); switch_to(&(prev->context), &(next->context)); } local_intr_restore(intr_flag); } }
PS:线程控制块 (Thread Control Block,TCB)
线程控制块(TCB)是与进程的控制块(PCB)相似的子控制块,只是TCB中所保存的线程状态比PCB中保存少而已
进程终止 有序终止 :进程结束时调用 exit(),完成进程资源回收
exit 函数调用的功能:
将调用参数作为进程的“结果”
关闭所有打开的文件等占用资源
释放内存
释放大部分进程相关的内核数据结构
检查父进程是否存活
如果存活,则保留结果的值,直到父进程使用,同时当前进程进入僵尸状态
如果没有,它将释放所有的数据结构,进程结束
清理所有等待的僵尸进程(僵尸状态,终止状态)
进程机制 这里我将简述一下 ucore 的进程是什么实现的:(涉及多进程原理)
内核的第一个进程 idleproc(空闲进程)会执行 cpu_idle函数,在这个函数中循环执行 schedule 用于空闲进程的调度,这个函数是永远不会停止的
其他的进程都会因为schedule 而被调度,又会因为各种原因被中断,然后再次调度
CPU 会把自己的资源依靠某种算法给分配到这些进程上,每次对于一个进程只执行一小会儿(用定时器timer实现),然后去执行其他的进程
从用户的视角来看,就好像这些进程是“同步运行”的一样,这就是操作系统提供的“抽象”
中断帧 中断发生时:内核将进程的所有寄存器的值放到了进程的 trapframe 结构中
trapframe 保存的都是一些系统关键的寄存器,这里我们只需要特别关注4个寄存器(涉及到程序执行的控制流问题):
EFLAGS:状态寄存器(本实验暂时用不到)
EIP:Instruction Pointer,当前执行的汇编指令的地址
ESP:当前的栈顶
EBP:当前的栈底,当前过程的帧在栈中的开始地址(高地址)
1
2
3
4
5
6
7
8
9
10
11
12
13
14
15
16
17
18
19
20
21
22
struct trapframe { struct pushregs tf_regs ; uint16_t tf_gs; uint16_t tf_padding0; uint16_t tf_fs; uint16_t tf_padding1; uint16_t tf_es; uint16_t tf_padding2; uint16_t tf_ds; uint16_t tf_padding3; uint32_t tf_trapno; uint32_t tf_err; uintptr_t tf_eip; uint16_t tf_cs; uint16_t tf_padding4; uint32_t tf_eflags; uintptr_t tf_esp; uint16_t tf_ss; uint16_t tf_padding5; } __attribute__((packed));
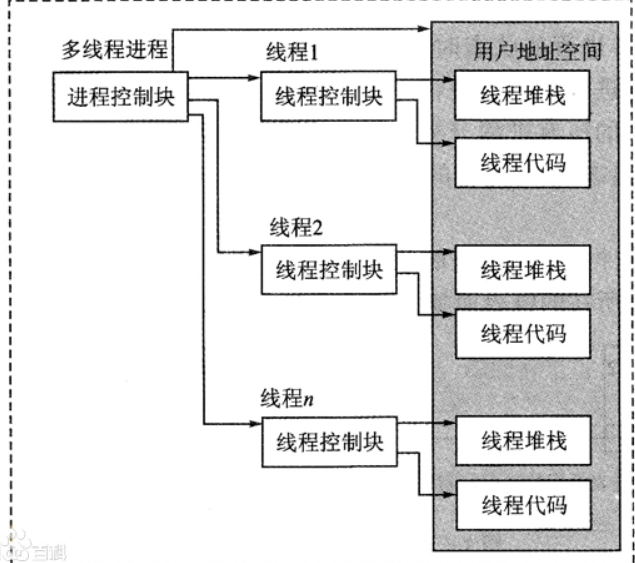
用户线程与内核线程 线程有三种实现方式
用户线程:在用户空间实现(POSIX Pthread)
用户线程的定义:
用户线程是由一组用户级的线程库函数来完成线程的管理,包括线程的创建、终止、同步和调度等
用户线程的特征:
不依赖于操作系统内核,在用户空间实现线程机制
可用于不支持线程的多进程操作系统
线程控制模块(TCB)由线程库函数内部维护
同一个进程内的用户线程切换速度块,无需用户态/核心态切换
允许每个进程拥有自己的线程调度算法
用户进程的缺点:
线程发起系统调用而阻塞时,整个进程都会进入等待状态
不支持基于线程的处理机抢占
只能按进程分配CPU时间
内核线程:在内核中实现(Windows,Linux)
内核线程的定义:
内核线程是由内核通过系统调用实现的线程机制,由内核完成线程的创建、终止和管理
内核线程的特征:
由内核自己维护PCB和TCB
线程执行系统调用而被阻塞不影响其他线程
线程的创建、终止和切换消耗相对较大
以线程为单位进行CPU时间分配,其中多线程进程可以获得更多的CPU时间
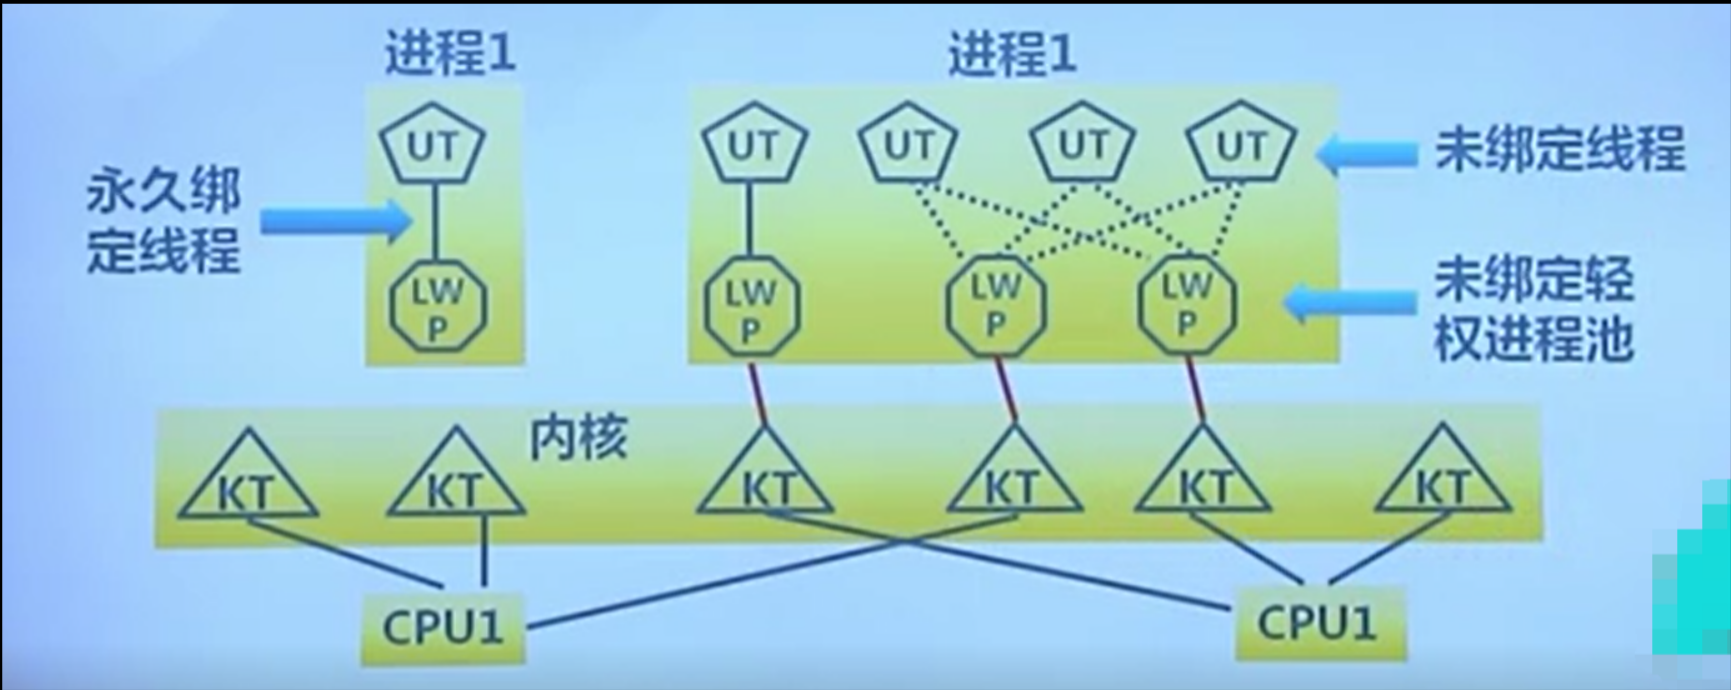
轻权进程:轻权进程是操作系统内核支持的用户线程
轻权进程的特点:
用户线程可以自定义调度算法,但存在部分缺点
而内核线程不存在用户线程的各种缺点
所以轻权进程是用户线程与内核线程的结合产物
轻权进程的模型图:
练习0-把 lab3 的内容复制粘贴到 lab4 练习1-分配并初始化一个进程控制块 alloc_proc 函数负责分配并返回一个新的 struct proc_struct 结构,用于存储新建立的内核线程的管理信息,ucore 需要对这个结构进行最基本的初始化,你需要完成这个初始化过程
1
2
3
4
5
6
7
8
9
10
11
12
13
14
15
16
17
18
19
20
21
22
23
static struct proc_struct *alloc_proc (void ) struct proc_struct *proc =sizeof (struct proc_struct)); if (proc != NULL ) { } return proc; }
这个函数的关键就是初始化一个 proc_struct 结构体:
首先需要知道 proc_struct 结构体的内容
然后需要明白它的各个条目该初始化为什么
下面是实现的过程:
1
2
3
4
5
6
7
8
9
10
11
12
13
14
15
16
17
18
19
static struct proc_struct *alloc_proc (void ) struct proc_struct *proc =sizeof (struct proc_struct)); if (proc != NULL ) { proc->state = PROC_UNINIT; proc->pid = -1 ; proc->runs = 0 ; proc->kstack = 0 ; proc->need_resched = 0 ; proc->parent = NULL ; proc->mm = NULL ; memset (&(proc->context), 0 , sizeof (struct context)); proc->tf = NULL ; proc->cr3 = boot_cr3; proc->flags = 0 ; memset (proc->name, 0 , PROC_NAME_LEN); } return proc; }
其实,具体的操作流程需要看后续的代码是怎么安排的,我为了省事就直接抄答案了
context是进程的上下文:用于进程的上下文切换*tf 是中断帧指针:总是指向内核栈的某个位置
当进程从用户空间跳到内核空间时,中断帧记录了进程在被中断前的状态
当内核需要跳回用户空间时,需要调整中断帧以恢复让进程继续执行的各寄存器值
trapframe 包含了 context 的信息
练习2-为新创建的内核线程分配资源 do_fork 的作用是,创建当前内核线程的一个副本,它们的执行上下文、代码、数据都一样,但是存储位置不同,在这个过程中,需要给新内核线程分配资源,并且复制原进程的状态
1
2
3
4
5
6
7
8
9
10
11
12
13
14
15
16
17
18
19
20
int do_fork (uint32_t clone_flags, uintptr_t stack , struct trapframe *tf) int ret = -E_NO_FREE_PROC; struct proc_struct *proc ; if (nr_process >= MAX_PROCESS) { goto fork_out; } ret = -E_NO_MEM; fork_out: return ret; bad_fork_cleanup_kstack: put_kstack(proc); bad_fork_cleanup_proc: kfree(proc); goto fork_out; }
要求:
调用 alloc_proc 来分配一个 proc_struct
调用 setup_kstack 为子进程分配内核堆栈
根据 clone_flag 调用 copy_mm 或 share mm
调用 copy_thread 在 proc_struct 中设置中断帧指针和上下文
将 proc_struct 插入 hash_list和proc_list
调用 wakeup_proc 使新的子进程可以运行
使用子进程的 pid 设置 ret vaule
我们可用的函数:
1
2
3
4
5
6
7
8
9
10
11
12
13
14
15
16
17
18
19
20
static struct proc_struct *alloc_proc (void ) struct proc_struct *proc =sizeof (struct proc_struct)); if (proc != NULL ) { proc->state = PROC_UNINIT; proc->pid = -1 ; proc->runs = 0 ; proc->kstack = 0 ; proc->need_resched = 0 ; proc->parent = NULL ; proc->mm = NULL ; memset (&(proc->context), 0 , sizeof (struct context)); proc->tf = NULL ; proc->cr3 = boot_cr3; proc->flags = 0 ; memset (proc->name, 0 , PROC_NAME_LEN); } return proc; }
setup_kstack:将大小为 KSTACKPAGE 的页面作为进程内核堆栈
1 2 3 4 5 6 7 8 9 10 11 #define KSTACKPAGE 2 static int setup_kstack (struct proc_struct *proc) struct Page *page = if (page != NULL ) { proc->kstack = (uintptr_t )(page); return 0 ; } return -E_NO_MEM; }
copy_mm:把所有的虚拟页数据复制到新的进程(本实验中没有任何作用)
1
2
3
4
5
6
static int copy_mm (uint32_t clone_flags, struct proc_struct *proc) assert(current->mm == NULL ); return 0 ; }
copy_thread:在进程的内核堆栈顶部设置 trapframe,并设置进程的内核入口点和堆栈
1
2
3
4
5
6
7
8
9
10
11
static void copy_thread (struct proc_struct *proc, uintptr_t esp, struct trapframe *tf) proc->tf = (struct trapframe *)(proc->kstack + KSTACKSIZE) - 1 ; *(proc->tf) = *tf; proc->tf->tf_regs.reg_eax = 0 ; proc->tf->tf_esp = esp; proc->tf->tf_eflags |= FL_IF; proc->context.eip = (uintptr_t )forkret; proc->context.esp = (uintptr_t )(proc->tf); }
hash_proc:将 proc 添加到进程哈希链表中
1 2 3 4 5 6 7 8 #define HASH_SHIFT 10 #define pid_hashfn(x) (hash32(x, HASH_SHIFT)) static list_entry_t hash_list[HASH_LIST_SIZE]; static void hash_proc (struct proc_struct *proc) list_add(hash_list + pid_hashfn(proc->pid), &(proc->hash_link)); }
1 2 3 4 5 6 7 8 9 10 11 12 13 14 15 16 17 18 19 20 21 22 23 24 25 26 27 28 29 30 31 32 33 34 35 36 #define MAX_PROCESS 4096 #define MAX_PID (MAX_PROCESS * 2) static int get_pid (void ) static_assert (MAX_PID > MAX_PROCESS); struct proc_struct *proc ; list_entry_t *list = &proc_list, *le; static int next_safe = MAX_PID, last_pid = MAX_PID; if (++ last_pid >= MAX_PID) { last_pid = 1 ; goto inside; } if (last_pid >= next_safe) { inside: next_safe = MAX_PID; repeat: le = list ; while ((le = list_next(le)) != list ) { proc = le2proc(le, list_link); if (proc->pid == last_pid) { if (++ last_pid >= next_safe) { if (last_pid >= MAX_PID) { last_pid = 1 ; } next_safe = MAX_PID; goto repeat; } } else if (proc->pid > last_pid && next_safe > proc->pid) { next_safe = proc->pid; } } } return last_pid; }
wakeup_proc:设置 proc->state = PROC_RUNNABLE(程序可运行)
1
2
3
4
5
void wakeup_proc (struct proc_struct *proc) assert(proc->state != PROC_ZOMBIE && proc->state != PROC_RUNNABLE); proc->state = PROC_RUNNABLE; }
实现过程:
1 2 3 4 5 6 7 8 9 10 11 12 13 14 15 16 17 18 19 20 21 22 23 24 25 26 27 28 29 30 31 32 33 34 35 36 37 38 39 40 41 42 43 44 45 46 47 48 49 #define E_NO_FREE_PROC 5 #define KSTACKPAGE 2 int do_fork (uint32_t clone_flags, uintptr_t stack , struct trapframe *tf) int ret = -E_NO_FREE_PROC; struct proc_struct *proc ; if (nr_process >= MAX_PROCESS) { goto fork_out; } ret = -E_NO_MEM; if ((proc = alloc_proc()) == NULL ) { goto fork_out; } proc->parent = current; if (setup_kstack(proc) != 0 ) { goto bad_fork_cleanup_proc; } if (copy_mm(clone_flags, proc) != 0 ) { goto bad_fork_cleanup_kstack; } copy_thread(proc, stack , tf); bool intr_flag; local_intr_save(intr_flag); { proc->pid = get_pid(); hash_proc(proc); list_add(&proc_list, &(proc->list_link)); nr_process ++; } local_intr_restore(intr_flag); wakeup_proc(proc); ret = proc->pid; fork_out: return ret; bad_fork_cleanup_kstack: put_kstack(proc); bad_fork_cleanup_proc: kfree(proc); goto fork_out; }
练习3-理解proc_run函数和它调用的函数如何完成进程切换的 1 2 3 4 5 6 7 8 9 10 11 12 13 14 15 void proc_run (struct proc_struct *proc) if (proc != current) { bool intr_flag; struct proc_struct *prev = local_intr_save(intr_flag); { current = proc; load_esp0(next->kstack + KSTACKSIZE); lcr3(next->cr3); switch_to(&(prev->context), &(next->context)); } local_intr_restore(intr_flag); } }
其实这个在前面已经提过了
PS:“local_intr_save”和“local_intr_restore”用于实现“原子操作”,使得某些关键的代码不会被打断,从而避免引起一些未预料到的错误,避免条件竞争

